
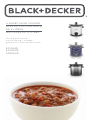
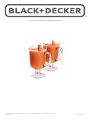
4 QUART SLOW COOKER
OLLA DE COCCIÓN LENTA
DE 4 LITROS
MIJOTEUSE DE 4 LITRES
use and care manual
manual de uso y cuidado
guide d’utilisation ed d’entretien
SC1004D
SC2004D
SC5004D

2
3
Should you have any questions or concerns with your new product,
please call our Customer Service Line at 1-800-465-6070 (US and
Canada). Please do not return to the store.
Si usted tiene alguna inquietud o pregunta con su producto, por
favor llame a nuestra línea de servicio al cliente una atención
inmediata 1-800-465-6070 (EE.UU/Canadá) 01-800-714-2503
(México). No devuela a la tienda.
Si vous avez des questions ou des préoccupations à propos de
votre nouveau produit, veuillez communiquer avec notre Service à
la clientèle au 1 800 465-6070 (États-Unis et Canada). Veuillez ne
pas rapporter le produit au magasin.
Thank you for your purchase!
Gracias por su compra!
Merci de votre achat!
www.prodprotect.com/blackanddecker
www.BlackAndDeckerAppliances.com

2
3
CONTENTS
Important Safeguards ............................................... 4
Getting to Know Your Slow Cooker .................................... 6
Getting Started .................................................... 7
Important Information about your BLACK+DECKER Slow Cooker ........... 7
Operating Your BLACK+DECKER Slow Cooker ........................... 7
Care and Cleaning .................................................. 8
Helpful Hints and Tips............................................... 8
Troubleshooting....................................................11
Recipes...........................................................12
Warranty and Customer Service Information ............................14
WELCOME!
Congratulations on your purchase of the BLACK+DECKER 4 Quart Slow Cooker.
We have developed this use and care guide to ensure optimal performance and
your satisfaction. Save this use and care book and register your appliance online
at www.prodprotect.com/blackanddecker.

4
5
Please Read and Save this Use and Care Book.
IMPORTANT SAFEGUARDS.
When using electrical appliances, basic safety precautions should always be fol-
lowed to reduce the risk of fire, electric shock, and/or injury, including the following:
SAVE THESE INSTRUCTIONS.
This product is for household use only.
• READ ALL INSTRUCTIONS.
• To protect against electrical shock, do
not immerse cord, plug, or cooking
base in water or other liquid.
• Do not touch hot surfaces. Use handles
or knobs.
• Close supervision is necessary when any
appliance is used by or near children.
• Unplug from outlet when not in use and
before cleaning. Allow time to cool before
putting on, taking off, or cleaning parts.
• It is recommended to regularly
inspect the appliance. Do not operate
any appliance with a damaged
cord or plug, or after the appliance
malfunctions or has been damaged
in any manner. Contact consumer
support at the toll-free number listed
in the warranty section.
• The use of accessory attachments
not recommended by the appliance
manufacturer may cause injuries.
• Do not use outdoors.
• Do not let cord hang over edge of table
or counter, or touch hot surfaces.
• Do not place on or near a hot gas or
electric burner, or in a heated oven.
• Extreme caution must be used when
moving an appliance containing hot
food, water or other hot liquids.
• To disconnect, turn the control knob
to “Off”; then remove plug from wall
outlet.
• Do not use appliance for other than
intended use.
• Intended for countertop use only.
• WARNING: Spilled food can cause
serious burns. Keep appliance and
cord away from children. Never
drape cord over edge of counter,
never use outlet below counter, and
never use with an extension cord.
• This appliance is not intended for use
by persons (including children) with
reduced physical, sensory or mental
capabilities, or lack of experience and
knowledge, unless they have been
given supervision or instructions
concerning use of the appliance by a
person responsible for their safety.
• Children should be supervised to
ensure that they do not play with
the appliance.
• When using the appliance, provide
adequate air space above and on all
sides for circulation. Do not operate
while it is covered or touching
flammable materials, including curtains,
draperies, walls and the like, when in
operation. Do not store any item on top
of the appliance while in operation.
• Do not store any materials, other than
the manufacturer’s recommended
accessories, in this appliance when
not in use.
• Do not place any of the following materials
in the appliance: paper, cardboard, plastic
and other flammable materials.
• The appliance is not intended to be
operated by means of an external timer
or separate remote control system.
• Do not use this appliance on an
unstable surface.
• Do not attempt to heat or cook non-
food items in this appliance.
Additional Safeguards:
• To prevent damage or shock hazard,
do not cook directly in cooking base.
Cook only in stoneware pot provided.
• Avoid sudden temperature changes,
such as adding frozen foods into a
heated stoneware pot.
• This appliance generates heat and
escaping steam during use. Lift off
glass lid carefully to avoid scalding and
allow water to drip into stoneware pot.
• Never use the stoneware pot on a
gas or electric cooktop or on an open
flame.
• Do not cut foods directly in the
stoneware pot to avoid scratching.

4
5
POLARIZED PLUG
This appliance has a polarized plug (one blade is wider than the other). To reduce
the risk of electric shock, this plug is intended to fit into a polarized outlet only one
way. If the plug does not fit fully into the outlet, reverse the plug. If it still does not fit,
contact a qualified electrician. Do not attempt to modify the plug in any way.
TAMPER-RESISTANT SCREW
Warning: This appliance is equipped with a tamper-resistant screw to prevent
removal of the outer cover. To reduce the risk of fire or electric shock, do not attempt
to remove the outer cover. There are no user-serviceable parts inside. Repair should
be done only by authorized service personnel.
ELECTRICAL CORD
A short power-supply cord is provided to reduce the risk resulting from becoming
entangled in or tripping over a longer cord.
Note: If the power cord is damaged, please contact the warranty department listed
in these instructions.

6
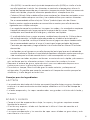
7
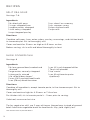
Product may vary slightly
from what is illustrated.
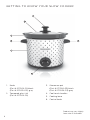
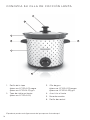
GETTING TO KNOW YOUR SLOW COOKER
1
2
3
4 4
5
6
1. K n o b
(Part # SC1004-01) black
(Part # SC2004-01) gray
2. Tempered glass Lid
(Part # SC1004-02)
3. Stoneware pot
(Part # SC1004-03) black
(Part # SC2004-03) gray
4. Cool touch handles
5. Cooking base
6. Control knob

6
7
GETTING STARTED
This appliance is intended for household use only.
• Remove all packing material, any stickers, and the plastic band around the power plug.
• Go to www.prodprotect.com/blackanddecker to register your product.
• Wash all removable parts as instructed in CARE AND CLEANING. Place the clean,
dry stoneware pot in the cooking base
• Select a location where the slow cooker is to be used. Place the unit on a stable,
heat resistant surface, free from cloth, liquids and any other flammable materials.
Place the unit with ample space all the way around it, and far enough away from
the wall, to allow heat to flow without damage to cabinets and walls.
IMPORTANT INFORMATION ABOUT YOUR
BLACK+DECKER SLOW COOKER
• The stoneware pot gets hot. When in use, always use oven mitts or potholders
when touching any outer or inner surface of the appliance
• If there is a power outage, the slow cooker will turn off. If this is discovered
quickly, continue cooking when the power is restored. If you are not sure how
long the slow cooker has been off, discard the food.
• During first few minutes of use you may notice smoke and a slight odor. This is
caused by oil that may have been used during manufacturing of the unit and will
not impact the performance.
• Do not add cold food if the stoneware pot is hot, and vice versa.
The stoneware material is not meant to handle sudden changes in temperature.
OPERATING YOUR BLACK+DECKER
SLOW COOKER
1. Add ingredients to the stoneware pot and cover with glass lid.
2. Plug in the appliance and turn the control knob to the desired heat setting.
NOTE:
Do not use the “Warm” setting to cook.
3. Set a kitchen timer for cook time if desired.
4. When cooking time is done, either turn the control knob to “Warm” or switch
the appliance off. Do not keep foods on the “Warm” setting for more than 4
hours.
5. When ready to serve, switch the control knob to “Off”.
6. Unplug the appliance when not in use and always allow the slow cooker to
completely cool before cleaning.

8
9
CARE AND CLEANING
This product contains no user serviceable parts. Refer service to qualified
service personnel.
Cleaning
IMPORTANT: Never Immerse cooking base in water or other liquids.
1. Always unplug and allow to completely cool before cleaning.
Wash stoneware pot and glass lid in warm, soapy water. If food sticks to the
stoneware pot, fill with warm, soapy water and allow it to soak before cleaning
with a nonabrasive scouring pad.
NOTE:
Do not use abrasive cleaners on the stoneware pot.
NOTE:
Both the stoneware pot and glass lid are dishwasher safe.
2. Rinse and dry thoroughly.
3. Wipe interior and exterior of the cooking base with a soft, slightly damp cloth
or sponge. Never use abrasive cleansers or scouring pads to clean the cooking
base, as they may damage the surfaces.
4. Allow to dry thoroughly before storing.
Storing
Make sure that the appliance is thoroughly dry. Never wrap the cord tightly
around the appliance; keep it loosely coiled. Placing the lid on upside-down
for storage can help save space.
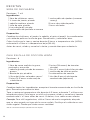
HELPFUL HINTS AND TIPS
General Tips:
• The stoneware pot should always be filled from ½ to 3⁄4 full, to avoid over and
under cooking.
- When only half full, check for doneness 1 to 2 hours before recommended
cooking time.
-To avoid spillovers, do not fill slow cooker more than 3⁄4 full.
• Always slow cook with the lid on.
- Do not open lid during first 2 hours of cooking; this allows heat to rise efficiently.
- Open the lid as little as possible to assure even cooking. Every time the lid is
removed, the cooking time increases by 15–20 minutes.
• Most recipes can be cooked on either HIGH or LOW. Many recipes will give the
time for both.
- Low: Often used for longer cooking times, 8–10 hours, or less tender cuts
of meat.

8
9
- High: Cooking on high setting is similar to a covered pot on the stovetop.
Foods will cook on high in about half the time required for low cooking.
Additional liquid may be required as foods can boil on high.
- Warm: Only use to keep cooked foods at a food-safe serving temperature and
should not be used to cook foods. It is not recommended to use “Warm” for
more than 4 hours.
• Many standard recipes can be converted to slow cooker recipes with a few simple tips:
- Vegetables such as carrots, potatoes, turnips, and beats require longer cooking
times than most meats. Always place them on the bottom of the stoneware pot
and cover them with liquids.
- If adding fresh milk, yogurt, or cheese it should be done during the last 2 hours
of cooking. Evaporated milk may be added at the start of cooking. If possible,
substitute condensed soups for fresh milk or yogurt.
- Rice and pasta are not recommended for long cooking periods. Cook them
separately and then add to the slow cooker during the last 30 minutes.
- Liquids do not boil away in a slow cooker like they do in conventional cooking.
Reduce the amount of liquid in any recipe not designed for a slow cooker. The
only exception would be soups.
• Foods cut into uniform pieces will cook faster and more evenly than foods left
whole such as roast or poultry
• Removed excess fat before serving with a slice of bread, or a spoon to skim it off
the top.
• To save time, fill the stoneware pot the night before and refrigerate. You may need
to add some extra cooking time because the food and stoneware pot are cold.
Ingredient Tips:
DAIRY
• Milk products, especially those low in fat, tend to curdle if cooked too long;
add them toward the end of the cooking time.
• Evaporated milk and condensed soups are great substitutes for milk
and cream.
SOUPS AND STEWS
• Because there is little evaporation, soups and stews require less liquid
than usual.
• If too thick, add additional liquid in last
½
hour of cooking or at serving time.
• Condensed soups and dry soup mixes add great flavor and body to sauces
and gravies.

10
11
MEATS
• The higher the fat content, the less liquid needed. Also, place thickly sliced
onions under fattier meat to keep it above the drippings.
• Browning before cooking in the slow cooker is not necessary; however,
browning meats, lightly coated in flour gives more body and flavor to
sauces. This works for ground meat as well.
• Make sure top of meat does not touch the lid.
• Cooking times will vary depending upon the size of the meat, the bones and
the cut. Meat with bone-in will take longer to cook. Lean meats and poultry
will cook faster.
• Meats slow cooked in liquids develop great flavor with a minimum of effort.
• Use HIGH for more tender cuts of meat; use LOW for tougher cuts.
• Always thoroughly thaw meats before cooking them in the slow cooker.
VEGETABLES
• Place vegetables such as carrots, potatoes, turnips, and beet at the very
bottom of the stoneware pot and always cover them with liquids. They
usually take longer to cook than most meat.
• Vegetables cook well; they develop better flavor and don’t break down as
they would in your oven.
FISH
• Fish cooks quickly; add it for the last 15 minutes.
SEASONINGS
• Fresh herbs should be added at the end of the cooking cycle. If cooked too
long they lose their color and flavor.
• Dried herbs work well in the slow cooker and can be added at the
beginning. They can become stronger on longer cooking; begin with less
and add at end, if needed.
• Some spices and dried herbs, such as cinnamon sticks, bay leaves and whole
peppercorns can become quite intense with long cooking, so use sparingly.
• If using bay leaves, remember to remove before serving.
• Whole herbs and spices flavor better in slow cooking than crushed or ground.

10
11
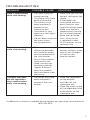
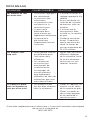
TROUBLESHOOTING
PROBLEM POSSIBLE CAUSE SOLUTION
Food is undercooked
while slow cooking
• May have used the
wrong setting.
• The power may have
been interrupted.
• The lid may have
been improperly
placed on the
stoneware pot.
• The power in your
home may be slightly
different.
• Lid has been removed
too many times
during operation.
• Make sure you use the
correct setting for the
recipe.
• If the power was
interrupted and you
don’t know for how
long; discard the food.
• Make sure the lid is
placed evenly on top
of the stoneware pot.
• Keep the lid closed.
Every time the lid
is removed it adds
15–20 minutes to the
cooking time.
Food is overcooked
while slow cooking
• There may be a
difference between
your favorite recipe
and the operation of
the slow cooker.
• Not all slow cookers
cook exactly the
same; the settings
could be cooking
slightly different
than slow cookers
that have been used
previously.
• As you use the slow
cooker settings, make
note of any changes
in time on your
favorite recipes.
The meat was done
but the vegetables
were under-cooked
while slow cooking
• The foods may have
been improperly
placed in the slow
cooker.
• Place the vegetables
on the bottom
and sides of the
stoneware pot.
• Place the meat on top
of the vegetables and
in the center of the
stoneware pot.
If additional assistance is needed, please contact our consumer service team at
1-800-465-6070.

12
13
RECIPES
SPLIT PEA SOUP
Servings: 7–8
Ingredients:
1 lb. dried split peas
1 ½ cups chopped ham
1 medium onion, chopped
1 stalk celery, chopped
¼ cup chopped parsley
1 tsp. chervil or rosemary
1 tsp. summer savory
9 cups chicken broth
2 cups milk
Directions:
Combine split peas, ham, onion, celery, parsley, seasonings, and chicken broth
in stoneware pot. Stir to thoroughly mix.
Cover and cook for 5 hours on high or 8–9 hours on low.
Before serving, stir in milk and blend thoroughly to heat.
SLOW COOKER CHILI
Servings: 8
Ingredients:
1 lb. lean ground beef, cooked and
drained
1 large onion, coarsely chopped
1 clove garlic, minced
½ lb. dried kidney beans*
2 cans (14.5 oz each) beef broth
1 can (28 oz) diced tomatoes
1 can (4 ½ oz) chopped chilies
1 Tbsp. chili powder
2 tsp. cumin
1 can (6 oz) tomato paste
(optional)
Directions:
Combine all ingredients, except tomato paste, in the stoneware pot. Stir to
thoroughly mix.
Cover and cook on high for 4.5 hours or 7–8 on low.
For thicker chili, stir in tomato paste ½ – 1 hour prior to serving.
If desired, serve over hot rice.
Tip: for vegetarian chili, use 2 cups of frozen, thawed corn instead of ground
beef. Substitute vegetable broth for beef broth. May yield slightly less.
*No need to soak or precook beans.

12
13
JERK CHICKEN
Servings: 4
Ingredients:
5 green onions, cut in 1-inch pieces
3 jalapeño peppers, seeded and
cut into 4 pieces
1 large onion, quartered
1 Tbsp. allspice
1 Tbsp. dry mustard
2 tsp. cinnamon
2 tsp. nutmeg
½ tsp. ground pepper
2 Tbsp. Balasmic Vinegar
2 Tbsp. soy sauce
1 chicken ( 3–3.5 lbs), cut up with
the skin removed
1 can (14.5 oz) chicken broth
Directions:
Using a food processor or blender, combine green onions, jalapeño peppers,
onion, allspice, dry mustard, cinnamon, nutmeg, pepper, Balsamic vinegar and
soy sauce. Process to chop and blend well. Coat chicken pieces with mixture
(it will be thick).
Cover and marinate overnight in the refrigerator.
Place chicken in stoneware pot with marinade. Add chicken broth.
Cover; cook on high for 3 hours.
If desired, serve with rice and cooking sauce.
Tip: for thicker sauce, mix 1–2 Tbsp. of all-purpose flour with a little water, then
add it to the sauce. Stir until the sauce thickens.
MULLED ORANGE CIDER
Servings: 16
Ingredients:
8 cups apple cider
3 cups orange juice
2 sticks cinnamon
½ tsp. allspice
¼ cup packed brown sugar
1 orange, sliced and halved
Directions:
Combine all ingredients in stoneware pot. Stir to mix thoroughly.
Cover and cook on high for 3 hours.
Garnish with orange slices.

14
15
For service, repair or any questions regarding your appliance, call the
appropriate 800 number listed within this section. Please DO NOT return the
product to the place of purchase. Also, please DO NOT mail product back to
manufacturer, nor bring it to a service center. You may also want to consult
the website listed on the cover of this manual.
Two-Year Limited Warranty
(Applies only in the United States and Canada)
What does it cover?
• Any defect in material or workmanship provided; however, Spectrum Brands,
Inc.’s liability will not exceed the purchase price of product.
For how long?
• Two years from the date of original purchase with proof of purchase.
What will we do to help you?
• Provide you with a reasonably similar replacement product that is either new or
factory refurbished.
How do you get service?
• Save your receipt as proof of date of sale.
• Visit the online service website at www.prodprotect.com/blackanddecker, or call
toll-free 1-800-465-6070, for general warranty service.
• If you need parts or accessories, please call 1-800-738-0245.
What does your warranty not cover?
• Damage from commercial use
• Damage from misuse, abuse or neglect
• Products that have been modified in any way
• Products used or serviced outside the country of purchase
• Glass parts and other accessory items that are packed with the unit
• Shipping and handling costs associated with the replacement of the unit
• Consequential or incidental damages (Please note, however, that some states do
not allow the exclusion or limitation of consequential or incidental damages, so
this limitation may not apply to you.)
How does state law relate to this warranty?
• This warranty gives you specific legal rights. You may also have other rights that
vary from state to state or province to province.
WARRANTY INFORMATION

14
15
ÍNDICE
Medidas Importantes de Seguridad ....................................16
Conozca su Olla de Cocción Lenta .....................................18
Preparación para Utilizar su Olla de Cocción Lenta .......................19
Información Importante acerca de su Olla de Cocción Lenta BLACK+DECKER .19
Uso de su Olla de Cocción Lenta BLACK+DECKER ........................19
Cuidado y Limpieza................................................ 20
Pistas y Consejos Útilies ............................................20
Resolución de Problemas ........................................... 23
Recetas.......................................................... 24
Información de Garantía y Servicio para el Cliente....................... 26
¡BIENVENIDO!
Felicitaciones por su compra de la olla de cocción lenta de 4 litros de
BLACK+DECKER. Hemos diseñado esta guía para asegurar un rendimiento
óptimo del producto y garantizar su satisfacción completa. Conserve este
manual de uso y cuidado y asegúrese de registrar su producto en línea,
visitando www.prodprotect.com/blackanddecker.

16
17
• LEA TODAS LAS INSTRUCCIONES.
• Para protegerse contra descargas eléctricas, no
sumerja el cable, enchufe o aparato en agua u otro
líquido.
• No toque las superficies calientes. Utilice las asas o
las perillas.
• Todo aparato eléctrico utilizado en la presencia de
los niños o por ellos mismos requiere la supervisión
de un adulto.
• Desenchufe el aparato del tomacorriente cuando
no esté en uso y antes de limpiarlo. Permita que se
enfrie antes de colocarle o retirarle las piezas.
• Se recomienda inspeccionar el aparato
regularmente. No opere ningún aparato con un
cable o enchufe dañado o después de haber
fallado o que haya sido dañado de cualquier otra
manera. Comuníquese con el departamento de
Servicio para el Cliente, llamando gratis al número
que aparece en la sección de Garantía.
• El uso de accesorios no recomendados por el
fabricante del aparato puede causar lesiones
personales.
• No utilice el aparato a la intemperie.
• No permita que el cable cuelgue del borde de la
mesa o del mostrador ni que entre en contacto con
superficies calientes.
• No lo coloque sobre o cerca de una hornilla de gas
o eléctrica, ni en un horno caliente.
• Se requiere proceder con extrema precaución
cuando se mueve un aparato que contiene
alimentos calientes, agua u otros líquidos calientes.
• Para desconectar el aparato, gire la perilla de
control a la posición de apagado (OFF); luego
desenchúfelo del tomacorriente.
• No utilice el aparato para otro fin que no sea para el
que fué diseñado.
• Diseñado solamente para uso en el mostrador.
• ADVERTENCIA: Los alimentos derramados
pueden ocasionar quemaduras graves. Mantenga
el aparato y el cable alejados de los niños. Nunca
acomode el cable de manera que cuelgue sobre el
borde del mostrador, nunca utilice el tomacorriente
debajo del mostrador y nunca utilice con un cable
de extensión.
• Este aparato no está diseñado para ser utilizado por
personas (incluyendo los niños) con su capacidad
física, sensorial o mental reducida, o con falta
de experiencia o sabiduria, a menos que sean
supervisadas o instruidas acerca del uso del aparato
por una persona responsable de su seguridad.
• Los niños deben ser supervisados para asegurar
que no jueguen con el aparato.
• Cuando vaya a utilizar el aparato, asegúrese de
dejar suficiente espacio en la parte superior y en
todos los costados para permitir que el aire circule.
No opere el aparato mientras esté cubierto o si ha
entrado en contacto con materiales inflamables,
incluyendo las cortinas, las paredes u otros
materiales similares. Asegúrese de no colocar nada
encima del aparato mientras esté en uso.
• Cuando este aparato no esté en funcionamiento, no
se debe almacenar nada que no sea los accesorios
recomendados por el fabricante.
• No introduzca ninguno de los siguientes materiales
en el horno: papel, cartón, plástico ni otros
materiales inflamables.
• El aparato no está diseñado para funcionar a través
de un reloj automático externo o con un sistema de
control remoto separado.
• No utilice este aparato sobre una superficie
inestable.
• No trate de calentar o cocinar nada que no sea
alimento en este aparato.
Medidas de Seguridad Adicionales:
• Para prevenir daños o riesgos de descarga
eléctrica, no cocine sobre la base de cocción.
Cocine solamente en la olla de gres provista.
• Evite los cambios de temperatura repentinos,
tales como añadir alimentos congelados dentro
de una olla de gres caliente.
• Este aparato genera calor y escape de vapor
durante su uso. Levante la tapa de vidrio
cuidadosamete para evitar quemaduras y permitir
que el agua escurra dentro de la olla de gres.
• Nunca use la olla de gres en una estufa de gas o
eléctrica, o sobre una llama expuesta.
• No corte los alimentos directamente en la olla de
gres para evitar rayones.
Por favor lea este instructivo antes de usar el producto.
INSTRUCCIONES IMPORTANTES
DE SEGURIDAD
Cuando se utilizan aparatos eléctricos, siempre se debe respetar ciertas medidas de seguridad a fin de redu-
cir el riesgo de un incendio, un choque eléctrico y (o) lesiones a las personas, incluyendo las siguientes:
CONSERVE ESTAS INSTRUCCIONES.
Este aparato eléctrico es para uso doméstico solamente.

16
17
ENCHUFE POLARIZADO
Este aparato cuenta con un enchufe polarizado (un contacto es más ancho que el otro). A fin de
reducir el riesgo de un choque eléctrico, este enchufe encaja en un tomacorriente polarizada en un
solo sentido. Si el enchufe no entra en le tomacorriente, inviértalo y si aun así no encaja, consulte con
un electricista. Por favor no trate de alterar esta medida de seguridad.
TORNILLO DE SEGURIDAD
Advertencia: Este aparato cuenta con un tornillo de seguridad para evitar la remoción de la cubierta
exterior del mismo. A fin de reducir el riesgo de incendio o de choque eléctrico, por favor no trate de
remover la cubierta exterior. Este producto no contiene piezas reparables por el consumidor. Toda
reparación se debe llevar a cabo únicamente por personal de servicio autorizado
CABLE ELÉCTRICO
El producto debe proporcionarse con un cable de alimentación corto para reducir el riesgo de
enredarse o de tropezar con un cable más largo.
Nota: Si el cable de alimentación está dañado, por favor llame al número del departamento de
garantía que aparece en estar instrucciones.

18
19
CONOZCA SU OLLA DE COCCIÓN LENTA
El producto puede variar ligeramente del que aparece ilustrado aquí.
2
3
4
5
6
1. Perilla de la tapa
(pieza no. SC1004-01) negro
(pieza no. SC2004-01) gris
2. Tapa de vidrio resistente
(pieza no. SC1004-02)
3. Olla de gres
(pieza no. SC1004-03) negro
(pieza no. SC2004-03) gris
4. Asas frías al tacto
5. Base de cocción
6. Perilla de control
4
1

18
19
PREPARACIÓN PARA UTILIZAR SU OLLA
DE COCCIÓN LENTA
Este aparato es para uso doméstico solamente.
• Retire todo material de empaque, cualquier etiqueta y la tira plástica alrededor
del enchufe.
• Por favor, visite www.prodprotect.com/blackanddecker para registrar su garantía.
• Lave todas las piezas removibles según las instrucciones en la sección de CUIDADO
Y LIMPIEZA. Coloque la olla de gres limpia y seca en la base de cocción.
• Escoja un lugar apropiado para utilizar la olla de cocción lenta. Seleccione una
superficie estable, resistente al calor, que no contenga paños, líquidos ni nungún
otro material inflamable. Coloque la unidad en un área que tenga suficiente
espacio alrededor y lejos de la pared para permitir que el calor fluya sin causar
daño alguno a los gabinetes y las paredes.
INFORMACIÓN IMPORTANTE ACERCA DE SU
OLLA DE COCCIÓN LENTA BLACK+DECKER
• La olla de gres se calienta. Cuando la esté utilizando, siempre use guantes de cocina
o agarraderas de ollas al tocar cualquier superficie interior o exterior de la olla.
• En caso de que ocurra una interrupción de electricidad, la olla de cocción lenta
se apagará. Si esto se detecta rápidamente, continue cocinando cuando la
electricidad sea restaurada. Si no sabe cuánto tiempo ha estado sin funcionar la
olla, deseche los alimentos.
• Durante los primeros minutos de uso, podría notar un humo y un ligero olor.
Esto es ocasionado por el aceite utilizado durante el proceso de fabricación y no
afectará el rendimiento de la unidad.
• No añada alimentos fríos en la olla de gres si está caliente y viceversa. El material de
la olla de gres no está diseñado para sostener cambios repentinos de temperatura.
USO DE SU OLLA DE COCCIÓN LENTA
BLACK+DECKER
1. Añada los ingredientes que va a cocinar en la olla de gres y coloque la tapa de
vidrio sobre la olla.
2. Enchufe el aparato y gire la perilla de control al ajuste de temperatura deseado.
NOTA:
No utilice el ajuste “Warm” (calentar) para cocinar.
3. Ajuste un reloj automático de cocina al tiempo de cocción deseado.
4. Cuando el tiempo de cocción termine, gire la perilla de control al ajuste
“Warm” (calentar) o apague la olla. No mantenga los alimentos en el ajuste
“Warm” por más de 4 horas.
5. Cuando esté listo para servir, gire la perilla de control a la posicion “Off”
(apagado).
6. Desenchufe el aparato cuando no esté en uso y siempre permita que la olla de
cocción lenta se enfríe completamente antes de limpiarla.

20
21
CUIDADO Y LIMPIEZA
Este producto no contiene piezas que se puedan reparar por el usuario. Consulte al
personal de servicio calificado.
Limpieza
Importante: Nunca sumerja la base de cocción en agua ni otros líquidos.
1. Siempre desenchufe y deje enfriar el aparato antes de limpiarlo.
2. Lave la olla de gres y la tapa de vidrio en agua caliente jabonosa. Si los alimentos
se pegan a la olla de gres, llénela con agua caliente jabonosa y deje en remojo
antes de limpiarla con una almohadilla de fregar que no sea abrasiva.
NOTA:
Retire todo material de empaque, cualquier etiqueta y la tira plástica
alrededor del enchufe.
NOTA:
La olla de gres así como la tapa de vidrio pueden lavarse en la máquina
lavaplatos.
3. Enjuague y seque bien.
4. Pase un paño o esponja suave, ligeramente humedecido por la superficie interior y
exterior de la base de cocción. Nunca utilice limpiadores o almohadillas de fregar
abrasivos para limpiar la base de cocción, ya que pueden dañar las superficies.
5. Permita que el aparato se seque bien antes de almacenarlo.
Almacenamiento
Asegúrese de que el aparato esté seco completamente. Nunca enrolle el cable
apretado alrededor del aparato; manténganlo enrollado holgadamente. Invierta la tapa
para almacenarla, esto puede ayudar a ahorrar espacio.
PISTAS Y CONSEJOS ÚTILIES
Consejos generales:
• La olla de gres siempre debe estar llena de ½ a 3⁄4 de su capacidad, para evitar la
cocción excesiva o insuficiente.
- Cuando esté medio llena, verifique el progreso de la cocción 1 a 2 horas antes
del tiempo de cocción recomendado.
- Para evitar derrames, no llene la olla de cocción lenta más de 3⁄4 de su capacidad.
• Siempre cocine con la tapa colocada sobre la olla.
- No abra la tapa durante las primeras 2 horas de cocción; esto permite que el
calor se eleve de manera eficiente.
- Abra la tapa lo menos posible para asegurar que la cocción sea uniforme.
Cada vez que la tapa se retira, el tiempo de cocción aumenta 15 a 20 minutos.
• La mayoría de las recetas pueden ser cocinadas a temperatura alta (HIGH) o baja
(LOW). Muchas recetas indicarán el tiempo de cocción para ambas temperaturas.
- Baja (LOW): Utilizada con frecuencia para tiempos de cocción más largos, 8 a
10 horas o para cortes de carnes menos tiernos.
La page charge ...
La page charge ...
La page charge ...
La page charge ...
La page charge ...
La page charge ...
La page charge ...
La page charge ...
La page charge ...
La page charge ...
La page charge ...
La page charge ...
La page charge ...
La page charge ...
La page charge ...
La page charge ...
La page charge ...
La page charge ...
La page charge ...
La page charge ...
La page charge ...
La page charge ...
La page charge ...
La page charge ...
-
 1
1
-
 2
2
-
 3
3
-
 4
4
-
 5
5
-
 6
6
-
 7
7
-
 8
8
-
 9
9
-
 10
10
-
 11
11
-
 12
12
-
 13
13
-
 14
14
-
 15
15
-
 16
16
-
 17
17
-
 18
18
-
 19
19
-
 20
20
-
 21
21
-
 22
22
-
 23
23
-
 24
24
-
 25
25
-
 26
26
-
 27
27
-
 28
28
-
 29
29
-
 30
30
-
 31
31
-
 32
32
-
 33
33
-
 34
34
-
 35
35
-
 36
36
-
 37
37
-
 38
38
-
 39
39
-
 40
40
-
 41
41
-
 42
42
-
 43
43
-
 44
44


Black and Decker Appliances SC1004D Mode d'emploi
- Catégorie
- Mijoteuses
- Taper
- Mode d'emploi
dans d''autres langues
Documents connexes
-
 Black and Decker Appliances SC1005SSD Mode d'emploi
-
Black & Decker SC1004D Mode d'emploi
-
 Black and Decker Appliances SCD4007C Mode d'emploi
-
 Black and Decker Appliances SC4004D Mode d'emploi
-
Black & Decker SC1007D Mode d'emploi
-
Black & Decker SL5385C Manuel utilisateur
-
 Black and Decker Appliances SL5470C Mode d'emploi
-
 Black and Decker Appliances EC650B Mode d'emploi
-
Black and Decker Appliances EC500W Mode d'emploi


