Unify Circuit Meeting Room - Quick Solution Guide d'installation
- Taper
- Guide d'installation

© Unify Software and Solutions GmbH & Co. KG
All rights reserved. 04/2019
Reference No.: A31003-A4015-J100-01-7631
unify.com
Circuit
Circuit Meeting Room
Quick Solution Installation Guide
Schnelleinstieg
Guide d’installation rapide
Snelle installatiegids
Guida rapida all’installazione della soluzione
Guía de instalación rápida de la solución
Manual de Instalação Rápida da Solução


3
EnglishDeutschFrançaisNederlandsItalianoEspañolPortuguês
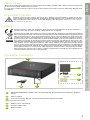
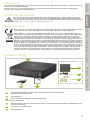
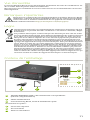
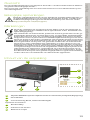
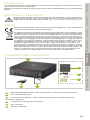
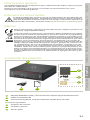
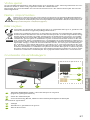
Overview
The Circuit Meeting Room is a device for providing audio and video conferencing ex-
perience in small conference rooms.
It requires connectivity to the Circuit Cloud Service and a Circuit Meeting Room sub-
scription.
Important Notes
Please observe the safety notes in the “Safety / Regulations” manual, in the
operating manual and in the following paragraphs. You will find the operat-
ing manual for this device as a PDF file on the Internet at http://www.fujit-
su.com/fts/support/.
Marks
Package Contents
Optional Accessories
A
B C
D
E
F
Please observe the CE marking directives & regulations that the product
conforms with in the “Safety / Regulations” manual.
All electrical and electronic products should be disposed of separately from
the municipal waste stream via designated collection facilities appointed by
the government or the local authorities. The correct disposal and separate
collection of your old appliance will help prevent potential negative conse-
quences for the environment and human health. It is a precondition for re-
use and recycling of used electrical and electronic equipment. For more de-
tailed information about disposal of your old appliance, please contact your
city office, waste disposal service, the shop where you purchased the prod-
uct or your sales representative. The statements quoted above are only fully
valid for equipment which is installed and sold in the countries of the Euro-
pean Union and is covered by the directive 2012/19/EU. Countries outside
the European Union may have other regulations regarding the disposal of
electrical and electronic equipment.
FUJITSU ESPRIMO Q958 and accompanying documentation (Safety/ Regula-
tions)
Power cable
Circuit Meeting Room, Quick Solution Installation Guide
Optional Accessories:
Label cover assembly
Screws and bolts
Rubber feet
A
B
C
D
E
F

4
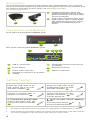
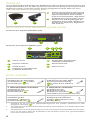
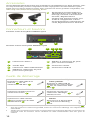
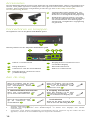
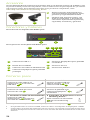
Accessories
Circuit Meeting Room requires a web camera and a speakerphone. Only compatible
products, such as Jabra Speak 410 speakerphone and Logitech C925e webcam, should be used.
For additional compatible products please visit wiki.unify.com/wiki/
Circuit_Meeting_Room.
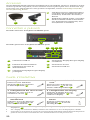
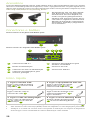
Connectors and Buttons
Front panel of the FUJITSU ESPRIMO Q958
Rear panel of the FUJITSU ESPRIMO Q958
Getting Started
4a
Speakerphone Jabra Speak 410,
packaged together with its Getting
Started, Warranty and Safety/ Regu-
lations documents
Web camera Logitech C925e, pack-
aged together with its Setup Guide,
and Important Information, Safety,
Regulatory and Warranty docu-
ments
USB 3.1 connectors DisplayPort connector for second-
ary display
Power button Network connector
Power cable connector USB 2.0 connectors
DisplayPort connector for primary
display
1 Connect the web camera
Plugin the USB cable of the
web camera to an avail-
able USB connector .
2 Connect the speakerphone
Plugin the USB cable of the
speakerphone to an avail-
able USB connector .
3 Connect the network cable
Connect a network cable to
the network connector .
4 Connect the display
1
Connect the display to a Dis-
playPort connector
2
and
turn the display on.
1 For a dual display configuration, connect the primary display to DisplayPort connector .
2 For displays with HDMI connector(s), please use a DisplayPort to HDMI adapter or cable.
5 Connect the power cable
Connect the power cable
3
to the power cable connector
.
3 Check whether the local mains voltage corresponds with the indications on the label of the de-
vice, before plugging the other end of the power cable into a power outlet.
6 Turn on your Circuit Meeting
Room
Press the power button of
the Circuit Meeting Room.
G H
G
H
1
2
4 15 63
4b
4a
1
4b
2
5
3
6
4a
H
6
G
6
5
4
B
3
2

5
EnglishDeutschFrançaisNederlandsItalianoEspañolPortuguês
Setting up the Circuit Meeting Room Software
A setup wizard will guide you through the initial configuration process of the Circuit
Meeting Room.
Circuit Meeting Room is configured using web pages (“Dashboard”). You can access
the Dashboard either by:
•Reading the Network IP address from the display and enter it in a web browser on
your computer in the same network:
https://<ip-address>
or by
• Connecting a USB keyboard and mouse to a USB connector .
Your browser (and the display) shows the Dashboard landing page. After first login,
the setup wizard will start automatically.
NOTE: The setup requires connection to the network and access to the Internet.
Please check the network configuration before (DHCP available, proxy configuration).
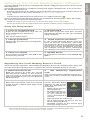
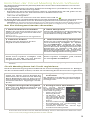
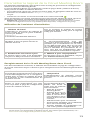
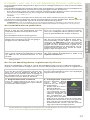
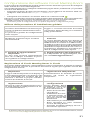
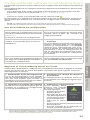
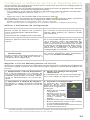
Using the Setup Wizard
Registering the Circuit Meeting Room to Circuit
Once the setup completes, the Dashboard displays the Circuit configuration page. Fol-
low the steps described below to register the Circuit Meeting Room to Circuit.
1 Login to the Dashboard
Login to the Dashboard using the de-
fault administrator password:
Admin%123
The setup wizard starts.
2 Review EULA
Read and accept the End User License
Agreement (EULA) for the pre-installed
Unify software.
3 Change password
Change the password for accessing the
Dashboard.
4 Check internet connection
If the Circuit Meeting Room does not
have an internet connection, click Can-
cel while the check is in progress or OK
afterwards to get to the Network configu-
ration page of the Dashboard and edit
the network settings. After submitting
the changes, the setup wizard resumes.
5 Check for update
If no update is available, click OK to fin-
ish the setup wizard.
6 Update device
If an update is available, click Install up-
date
1
.
1 Depending on your available network bandwidth, this may take a few moments.
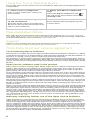
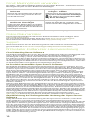
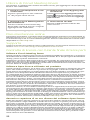
1 Determine Device ID
Read the Device ID from the Circuit
Meeting Room display or the browser
you are using to access the Dashboard
and provide this to your Circuit Domain
Administrator.
2 Get temporary registration
code
The Circuit Domain Administration pro-
vides you with a temporary registration
code
1
.
1 The registration code is automatically generated by Circuit once the Circuit Domain Admini-
strator adds your device to your Circuit domain. For more information please visit:
www.circuit.com/unifyportalfaqdetail?articleId=120430.
3 Enter the registration code
Enter the registration code you received
in the Circuit configuration page of the
Dashboard.
4 Completing configuration
Circuit Meeting Room
displays its idle screen
with the following in-
formation:
•Name of the Circuit
Meeting Room
• IP address of the Cir-
cuit Meeting Room,
in case remote ac-
cess to Dashboard is
needed
• PIN required for activation
• Short instructions on how to use the
Circuit Meeting Room
• Installed version of the Circuit App
and operating system.
1

6
Using the Circuit Meeting Room
You or any other Circuit client user are now able to add your Circuit Meeting Room to
a conference.
Documentation Online
This and other documentation can be found on the Internet at: www.unify.com/sup-
port. Visit, also, www.circuit.com/support for Circuit Meeting Room FAQs. Additional
technical information can be found at: wiki.unify.com.
Support
Ifthereareanyproblemswiththesetupandtechnicalassistanceisrequired,pleasevisit
www.circuit.com/unifyportalfaqdetail?articleId=36665.
Third-Party End User License Agreement
Circuit Meeting Room Software
This product contains the Circuit App and the Dashboard Software (“Software”), which
is intellectual property of Unify Software and Solutions GmbH & Co. KG (hereinafter re-
ferred to as “Unify”), except where explicitly indicated otherwise.
The Software is protected by German copyright law, international copyrights, interna-
tional treaties and all other applicable laws, and, save where contractually agreed oth-
erwise, licensed to You under the terms of the Unify end user license agreement (“Unify
EULA”).
Open Source software used in the product
This product contains, among other things, Open Source software developed by third
parties. This Open Source software is protected by copyright. Your right to use the
Open Source software in this product beyond the mere execution of the program is
governed by the terms of the relevant Open Source license.
Your compliance with the Open Source license will entitle you to use the Open Source
software as provided for in the relevant Open Source license. In the event of a conflict
between the Unify EULA and a contractual arrangement between You and Unify, the
Open Source license terms shall prevail with respect to the Open Source software por-
tions of the Software.
The Open Source software in this product is licensed to You royalty-free, i.e. no fees are
charged for granting and exercising the licensed rights, whereas Unify may charge You
for the reimbursement of costs incurred by Unify when providing the Open Source
software to You.
Where required under the applicable Open Source licenses, you may obtain a physical
copy of the relevant Open Source software components contained in this product and
the applicable Open Source licenses, also including, where required, downloadable
source code, documentation and other supplementary information on media. Please
contact the Unify headquarters to find out about how to obtain the media and about
the applicable handling fees. Unify may also elect to provide the relevant information
via a dedicated section of its website. Please select or search for the applicable prod-
uct(s) at wiki.unify.com.
Warranty regarding further use of the Open Source Software
Unify provides no warranty for the Open Source software if it is used in any manner
other than execution of the program as intended by Unify. Subject to any explicit con-
tractual arrangement with Unify, the Open Source licenses applicable to the Open
Source software define the warranty, if any, from the authors or licensors of the Open
Source software. Unify specifically disclaims any warranties for defects caused by alter-
ing any of the Open Source software or the product configuration. You have no warran-
ty claims against Unify in the event that the Open Source software infringes the intel-
lectual property rights of a third party. Technical support, if any, will be provided only
for products which contain unmodified software.
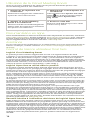
1 Start or join a conference
Start or join a conference
1
from your
Circuit client.
1 You cannot add a Circuit Meeting Room into a one-to-one call
2 Select the Add to conference
icon
Select the Add to conference icon on
the call action bar and then select Add
meeting room.
3 Add the Circuit Meeting Room
to the conference
Enter the name of the Circuit Meeting
Room into the search box and choose to
add it to the conference.
4 Enter the PIN
Enter the PIN when prompted by your
Circuit client.

7
EnglishDeutschFrançaisNederlandsItalianoEspañolPortuguês
Übersicht
Circuit Meeting Room versorgt kleine bis mittlere Räume mit Audio / Video und Col-
laboration-Funktionalität.
Hierbei ist eine Verbindung zum Circuit Cloud-Service und ein Circuit Meeting
Room-Abonnement erforderlich.
Wichtige Hinweise
Beachten Sie die Sicherheitshinweise im Handbuch “Sicherheit/ Regulari-
en”, in der Betriebsanleitung und die nachfolgenden Sicherheitshinweise.
Die Betriebsanleitung zu diesem Gerät finden Sie als PDF-Datei im Internet
unter http://www.fujitsu.com/fts/support/.
Kennzeichen
Lieferumfang
Optionales Zubehör
A
B C
D
E
F
Bitte beachten Sie die CE Kennzeichnungsrichtlinie und Regularien. Dieses
Produkt ist mit dem Handbuch “Sicherheit / Regularien” konform.
Alle Elektro- und Elektronikgeräte sind getrennt vom allgemeinen Haus-
müll über staatlich vorgesehene Stellen zu entsorgen. Die sachgemäße Ent-
sorgung und die getrennte Sammlung von Altgeräten dient der Vorbeu-
gung von potenziellen Umwelt- und Gesundheitsschäden. Sie sind eine
Voraussetzung für die Wiederverwendung und das Recycling gebrauchter
Elektro- und Elektronikgeräte. Ausführliche Informationen zur Entsorgung
Ihrer Altgeräte erhalten Sie bei Ihrer Kommune, Ihrem Müllentsorgungs-
dienst, dem Fachhändler bei dem Sie das Produkt erworben haben oder Ih-
rem Vertriebsansprechpartner. Diese Aussagen sind nur gültig für Geräte,
die in den Ländern der Europäischen Union installiert und verkauft werden
und die der Europäischen Richtlinie 2012/19/EU unterliegen. In Ländern
außerhalb der Europäischen Union können davon abweichende Bestim-
mungen für die Entsorgung von Elektro- und Elektronikgeräten gelten.
FUJITSU ESPRIMO Q958 und begleitende Dokumentation
(Sicherheit/ Regularien)
Stromkabel
Circuit Meeting Room, Schnelleinstieg
Optionales Zubehör:
Abdeckplatte (für die Geräteunterseite, wenn keine Schrauben und Bolzen ver-
wendet werden)
Schrauben und Bolzen
Gummifüße
A
B
C
D
E
F

8
Zubehör
Circuit Meeting Room benötigt eine Webkamera und eine Freisprecheinrichtung. Nur
kompatible Produkte (wie die Jabra Speak 410 Freisprecheinrichtung und die Logitech C925e
Webkamera) sollten verwendet werden. Weitere kompatible Produkte finden Sie unter
wiki.unify.com/wiki/Circuit_Meeting_Room.
Anschlüsse und Bedienungselemente
Frontseite des FUJITSU ESPRIMO Q958
Rückseite des FUJITSU ESPRIMO Q958
Erste Schritte
4a
Freisprecheinrichtung Jabra Speak
410, im Lieferpaket mit den zugehö-
rigen Dokumenten Erste Schritte,
Garantie und Sicherheit / Regularien
Webkamera Logitech C925e, im Lie-
ferpaket mit den zugehörigen Do-
kumenten Setup Guide, Wichtige In-
formationen, Sicherheit, Regularien
und Garantie
USB 3.1-Ports DisplayPort-Anschluss für
sekundären Bildschirm
Ein/Aus-Schalter Netzwerkbuchse
Gerätestecker USB 2.0-Ports
DisplayPort-Anschluss für
primären Bildschirm
1 Webkamera verbinden
Schließen Sie das USB-Kabel
der Webkamera an einen
freien USB-Port an.
2 Freisprecheinrichtung verbinden
Schließen Sie das USB-Kabel
der Freisprecheinrichtung
an einen freien USB-Port
an.
3 Netzwerkkabel verbinden
Verbinden Sie das
Netzwerkkabel mit der
Netzwerkbuchse .
4 Bildschirm verbinden
1
Verbinden Sie den
Bildschirm mit dem
DisplayPort
2
-Anschluss
und schalten Sie den Bildschirm ein.
1 Verbinden Sie für eine duale Bildschirmkonfiguration den primären Bildschirm mit dem
DisplayPort-Anschluss .
2 Verwenden Sie bei Monitoren mit HDMI-Anschluss einen DisplayPort-zu-HDMI-Adapter bzw.
ein HDMI-Kabel.
5 Stromkabel anschließen
Verbinden Sie das
Stromkabel
3
mit der
Gerätesteckerbuchse .
3 Überprüfen Sie, ob die Netzspannung mit den Werten auf dem Gerätetypschild übereinstimmt,
bevor Sie das andere Ende des Stromkabels in die Steckdose stecken. Das Typschild befindet
sich auf der Geräteunterseite.
6 Circuit Meeting Room hochfahren
Betätigen Sie den Ein/Aus-
Schalter an Ihrem Circuit
Meeting Room.
G H
G
H
1
2
4 15 63
4b
4a
1
4b
2
5
3
6
4a
H
6
G
6
5
4
B
3
2

9
EnglishDeutschFrançaisNederlandsItalianoEspañolPortuguês
Einrichten der Circuit Meeting Room-Software
Ein Einrichtungsassistent (Wizard) führt Sie durch die Erstinstallation von Circuit
Meeting Room.
Circuit Meeting Room wird über Webseiten konfiguriert (“Dashboard”). Sie können
wie folgt auf das Dashboard zugreifen:
• Entweder Sie lesen die Netzwerk-IP-Adresse vom Bildschirm ab und geben sie im
selben Netzwerk in der Adressleiste Ihres Webbrowsers ein:
https://<IP-Adresse>
oder tun Sie Folgendes:
• Sie schließen eine Tastatur und eine Maus über USB an .
In Ihrem Browser (auf dem Bildschirm) wird die Dashboard-Startseite angezeigt. Nach
erstmaligem Anmelden wird der Einrichtungsassistent automatisch gestartet.
HINWEIS: Für die Einrichtung benötigen Sie eine Netzwerkverbindung und Zugriff auf das Inter-
net. Bitte überprüfen Sie die Netzwerkkonfiguration (DHCP verfügbar, Proxy-Konfiguration).
Den Einrichtungsassistenten verwenden
Circuit Meeting Room bei Circuit registrieren
Nach der Einrichtung zeigt das Dashboard die
Circuit-
Konfigurationsseite an
.
Befolgen
Sie die nachstehenden Schritte, um den Circuit Meeting Room bei Circuit zu registrieren
.
1 Beim Dashboard anmelden
Melden Sie sich beim Dashboard an und
geben Sie dabei das Standard-Administ-
ratorpasswort ein:
Admin%123
Der Einrichtungsassistent wird gestartet.
2 EULA überprüfen
Lesen und akzeptieren Sie die Endbenut-
zer-Lizenzvereinbarung (EULA) für die
vorinstallierte Unify-Software.
3 Passwort ändern
Ändern Sie das Passwort für den
Zugriff auf das Dashboard.
4 Internetverbindung überprüfen
Wenn im Circuit Meeting Room keine In-
ternetverbindung verfügbar ist, klicken
Sie auf Abbrechen, während die Über-
prüfung läuft, oder anschließend auf OK,
um zur Netzwerk-Konfigurationsseite des
Dashboards zu gelangen und dort die
Netzwerkeinstellungen zu bearbeiten.
Nach Fertigstellung der Änderungen wird
der Einrichtungsassistent fortgesetzt.
5 Nach Updates suchen
Wenn keine Updates verfügbar sind,
klicken Sie auf OK, um den Einrich-
tungsassistenten abzuschließen.
6 Gerät aktualisieren
Wenn Updates verfügbar sind, klicken
Sie auf Update installieren
1
.
1 Je nach verfügbarer Netzwerkbandbreite kann dieser Vorgang einige Zeit in Anspruch
nehmen.
1 Geräte-ID ermitteln
Teilen Sie Ihrem Circuit-Domain-Ad-
ministrator die auf dem Circuit Meeting
Room-Bildschirm oder in dem von Ih-
nen zum Zugriff auf das Dashboard ver-
wendeten Browser angezeigte Geräte-
ID mit.
2 Temporären Registrierungscode
anfordern
Sie erhalten von Ihrem Circuit-Domain-
Administrator einen temporären Regist-
rierungscode
1
.
1 Circuit generiert den Registrierungscode automatisch, sobald der Circuit-Domain-Admini-
strator Ihr Gerät zu Ihrer Circuit-Domain hinzufügt. Weitere Informationen finden Sie unter:
www.circuit.com/unifyportalfaqdetail?articleId=120430.
3 Registrierungscode eingeben
Geben Sie den Registrierungscode auf
der Circuit-Konfigurationsseite des
Dashboards ein.
4 Konfiguration abschließen
Der Circuit Meeting
Room-Ruhebildschirm
mit folgenden Informati-
onen wird angezeigt:
•Name des Circuit
Meeting Rooms
• IP-Adresse des Cir-
cuit Meeting Rooms
für etwaigen Remote-
zugriff auf das Dash-
board
• PIN zur Aktivierung erforderlich
• Kurzanleitung zur Verwendung von
Circuit Meeting Room
• Installierte Version der Circuit App
und des Betriebssystems.
1

10
Circuit Meeting Room verwenden
Sie selbst – oder jeder beliebige andere Circuit-Client-Benutzer – kann Ihren Circuit
Meeting Room jetzt zu einer Konferenz hinzufügen.
Online-Dokumentation
Das vorliegende Handbuch und weitere Dokumentationen sind verfügbar unter
www.unify.com/support.
Die Circuit Meeting Room FAQs finden Sie unter www.circuit.com/support.
Weiterführende technische Informationen: http://wiki.unify.com.
Support
Wenn Sie Probleme mit der Einrichtung haben und technische Unterstützung benöti-
gen, besuchen Sie www.circuit.com/unifyportalfaqdetail?articleId=36665.
Drittanbieter-Endbenutzer-Lizenzvereinbarung
Circuit Meeting Room-Software
Das Produkt beinhaltet die Circuit-App und die Dashboard-Software (nachfolgend "Soft-
ware"). Diese ist Eigentum der Unify Software and Solutions GmbH & Co. KG
(nachfolgend "Unify"), sofern nicht ausdrücklich anderslautend angegeben.
Die Software ist durch das deutsche Urheberrechtsgesetz, internationale Urheberrech-
te, internationale Verträge und alle weiteren anwendbaren Rechte geschützt. Sie wird zu
den Bedingungen der Endbenutzer-Lizenzvereinbarung von Unify lizenziert, sofern kei-
ne anderslautenden vertraglichen Vereinbarungen bestehen.
Im Produkt verwendete Open-Source-Software
Das Produkt beinhaltet neben anderen Komponenten Open-Source-Software, die von
Drittanbietern entwickelt wurde und urheberrechtlich geschützt ist. Ihre Nutzungsrechte
an dieser Open-Source-Software, die über die reine Programmausführung hinausgehen,
sind durch die Bedingungen der entsprechenden Open-Source-Lizenz geregelt.
Unter Einhaltung dieser Lizenzbedingungen wird Ihnen – gemäß der entsprechenden
Open-Source-Lizenz – das Nutzungsrecht für die Open-Source-Software gewährt. Bei
Konflikten mit der Unify-Endbenutzer-Lizenzvereinbarung oder mit einer zwischen
Ihnen und Unify geschlossenen vertraglichen Vereinbarung haben die Bedingungen der
Open-Source-Lizenz Vorrang in Bezug auf die Open-Source-Komponente der Software.
Die Open-Source-Software ist lizenzgebührenfrei, d. h. für die Erteilung und Ausübung
der lizenzierten Rechte werden keine Gebühren erhoben; allerdings darf Unify von
Ihnen die Erstattung von Kosten fordern, die für die Bereitstellung der Open-Source-
Software anfallen.
Sofern in den Bedingungen der maßgeblichen Open-Source-Lizenzen gefordert, haben
Sie die Möglichkeit, eine physische Kopie der in diesem Produkt enthaltenen Open-Sour-
ce-Komponenten und der maßgeblichen Open-Source-Lizenzen anzufordern. Sofern er-
forderlich, können auch herunterladbarer Quellcode, Dokumentation und weitere er-
gänzende Informationen auf Medien bereitgestellt werden. Wenden Sie sich bitte an die
Unify-Zentrale, um sich über die Bereitstellung solcher Medien und die anfallenden Be-
arbeitungsgebühren zu informieren. Optional kann Unify die erforderlichen Informatio-
nen auch in einem bestimmten Bereich seiner Website bereitstellen. Unter
wiki.unify.com können Sie gewünschte Produkte auswählen oder danach suchen.
Gewährleistung bei weitergehender Nutzung der Open-Source-
Software
Unify übernimmt keine Gewährleistung für die Open-Source-Software, wenn diese
nicht gemäß der von Unify vorgesehenen Programmausführung genutzt wird.
Vorbehaltlich ausdrücklicher vertraglicher Vereinbarungen mit Unify legen die für die
Open-Source-Software geltenden Open-Source-Lizenzen die etwaige Gewährleistung
fest, die von den Autoren oder Lizenzgebern der Open-Source-Software übernommen
wird. Insbesondere übernimmt Unify keinerlei Gewährleistung für Fehler oder Schäden,
die durch die Modifikation der Open-Source-Software oder der Produktkonfiguration
hervorgerufen wurden. Es entstehen auch keinerlei Gewährleistungsansprüche gegen
Unify, falls die Open-Source-Software gegen geistige Eigentumsrechte von Dritten ver-
stößt. Technischer Support wird, sofern grundsätzlich verfügbar, nur für Produkte mit
unveränderter Software geleistet.
1 Konferenz starten oder
beitreten
Starten Sie eine Konferenz auf Ihrem
Circuit-Client oder treten Sie dort ei-
ner Konferenz bei.
1
1 Ein Circuit Meeting Room kann nicht zu einem 1:1-Gespräch hinzugefügt werden.
2 Das Symbol „Zur Konferenz hin-
zufügen“ wählen
Wählen Sie in der Anruf-Aktionsleiste
das Symbol Zur Konferenz hinzufügen
und wählen Sie anschließend Mee-
ting Room hinzufügen.
3 Den Circuit Meeting Room zur
Konferenz hinzufügen
Geben Sie den Namen des Circuit Mee-
ting Room in das Suchfeld ein und be-
stätigen Sie, dass Sie ihn der Konferenz
hinzufügen möchten.
4 PIN eingeben
Geben Sie den PIN ein, wenn Sie vom
Circuit-Client dazu aufgefordert werden.

11
EnglishDeutschFrançaisNederlandsItalianoEspañolPortuguês
Vue d’ensemble
La Circuit Meeting Room est un équipement permettant de tenir des conférences au-
dio et vidéo dans de petites salles de conférence.
Elle nécessite une connexion au service cloud Circuit et un abonnement à la Circuit
Meeting Room.
Remarques importantes
Respecter les consignes de sécurité figurant dans le manuel “Sécurité / Régle-
mentation” et dans le manuel d‘utilisation ainsi que les remarques suivantes.
Vous trouverez le manuel d‘utilisation de cet appareil sous forme de fichier
PDF à l’adresse Internet http://www.fujitsu.com/fts/support/.
Logos
Contenu de l’emballage
Accessoires en option
A
B C
D
E
F
Respectez les Directives et réglementations relatives au marquage CE qui
précisent que le produit doit être conforme à du manuel “Sécurité / Régle-
mentation”.
Les produits électriques et électroniques ne doivent pas être mis au rebut
avec les déchets municipaux, mais dans les installations de collecte prévues
à cet effet par le gouvernement ou les autorités locales. La mise au rebut
adéquate et la collecte séparée de votre ancien équipement permettront
d’éviter d’éventuelles conséquences négatives sur l’environnement et la
santé des personnes. C’est une condition préalable à la réutilisation et au re-
cyclage des appareils électriques et électroniques. Pour plus d’informations
sur la mise au rebut de vos vieux appareils, contactez les services munici-
paux, le service responsable de l’élimination des déchets, le magasin dans
lequel vous avez acheté le produit ou bien votre représentant commercial.
Les éléments énoncés ci-dessus ne sont totalement valables que pour les
appareils installés et vendus dans les pays de l’Union européenne et pour
lesquels la Directive 2012/19/EU s’applique. Il est possible que les pays si-
tués en dehors de l’Union européenne appliquent d’autres règles en ce qui
concerne la mise au rebut des appareils électriques et électroniques.
FUJITSU ESPRIMO Q958 et documentation correspondante
(Sécurité / Réglementation)
Câble d’alimentation
Circuit Meeting Room, Guide d’installation rapide
Accessoires en option :
Couvercle étiquette
Vis et boulons
Pieds en caoutchouc
A
B
C
D
E
F

12
Accessoires
Circuit Meeting Room nécessite une webcam et un téléphone avec haut-parleur. Utili-
ser uniquement des produits compatibles comme l’équipement d’audioconférence Jabra
Speak 410 et la caméra Logitech C925e. Pour connaître les autres produits compatibles, voir
wiki.unify.com/wiki/Circuit_Meeting_Room.
Connecteurs et boutons
Panneau avant du FUJITSU ESPRIMO Q958
Panneau arrière du FUJITSU ESPRIMO Q958
Guide de démarrage
4a
Equipement d’audioconférence
Jabra Speak 410, avec Guide de dé-
marrage, Garantie et documents
Sécurité / Réglementation
Caméra web Logitech C925e, avec
Guide de configuration et docu-
ments Informations importantes, Sé-
curité, Réglementation et Garantie
Connecteurs USB 3.1 Afficher le connecteur de ports
pour l’écran secondaire
Touche M/A Connecteur réseau
Connecteur câble d’alimentation Connecteurs USB 2.0
Afficher le connecteur de ports
pour l’écran principal
1 Connecter la webcam
Brancher le câble USB de la
webcam sur un
connecteur USB libre .
2 Connecter le téléphone avec
haut-parleur
Brancher le câble USB du
téléphone avec haut-parleur
sur un connecteur USB
libre .
3 Connecter le câble réseau
Connecter un câble réseau au
connecteur réseau .
4 Connecter l’écran
1
Connecter l’écran à un
connecteur affichage
2
et
allumer l’écran.
1 Pour une configuration à double écran, connecter l’écran principal au connecteur affichage .
2 Pour les écrans avec connecteur(s) HDMI, utiliser un connecteur affichage vers adaptateur ou
câble HDMI.
5 Connecter le câble réseau
Connecter le câble réseau
3
vers connecteur du câble
d’alimentation .
3 Vérifier que la tension secteur locale correspond bien aux indications figurant sur l’étiquette de
l’appareil avant de brancher l’autre extrémité du câble d’alimentation dans une prise de
courant.
6 Activer votre Circuit Meeting
Room
Appuyer sur le bouton M/A
de la Circuit Meeting
Room.
G H
G
H
1
2
4 15 63
4b
4a
1
4b
2
5
3
6
4a
H
6
G
6
5
4
B
3
2

13
EnglishDeutschFrançaisNederlandsItalianoEspañolPortuguês
Paramétrer le logiciel de la Circuit Meeting Room
Un assistant d'installation vous guidera tout au long du processus de configuration
initial de la Circuit Meeting Room.
La Circuit Meeting Room est configurée à l’aide de pages Web (“tableau de bord”).
Vous pouvez accéder au tableau de bord :
•Lire l’adresse IP réseau sur l’écran et l’entrer dans un navigateur Web de votre or-
dinateur sur le même réseau :
https://<adresse IP>
ou par
• Connecter un clavier et une souris USB à un connecteur USB .
Votre navigateur (et l’écran) présente la page d’accueil du tableau de bord. Après la
première connexion, l'assistant d'installation démarrera automatiquement.
REMARQUE : l'installation nécessite une connexion au réseau et un accès à Internet. Veuillez
vérifier la configuration réseau au préalable (DHCP disponible, configuration du proxy).
Utilisation de l'assistant d'installation
Enregistrement de la Circuit Meeting Room dans Circuit
Une fois l'installation terminée, le Tableau de bord affiche la page de configuration
de Circuit. Suivez les étapes ci-dessous pour enregistrer la Circuit Meeting Room dans
Circuit.
1 Se connecter et ouvrir le
tableau de bord
Connexion et ouverture du tableau de
bord à l’aide du mot de passe adminis-
trateur par défaut :
Admin%123
L’assistant d’installation démarre.
2 Vérifier le CLUF
Lire et accepter le Contrat de licence
d’utilisateur final (CLUF) pour le logiciel
Unify pré-installé.
3 Modifier le mot de passe
Modifier le mot de passe d’accès au
tableau de bord.
4 Contrôler la connexion Internet
Si Circuit Meeting Room n'est pas
connecté à Internet, cliquer sur Annuler
pendant que la vérification est en cours
ou sur OK ensuite pour aller sur la page
de configuration Réseau du tableau de
bord et modifier les paramètres du ré-
seau. Une fois les modifications effec-
tuées, l’assistant d’installation reprend.
5 Rechercher les mises à jour
Si aucune mise à jour n’est disponible,
cliquer sur OK pour fermer l’assistant.
6 Mettre à jour l’équipement
Si une mise à jour est disponible, cliquer
sur Installer la mise à jour
1
.
1 Selon la bande passante réseau disponible, cela peut prendre quelques instants.
1 Déterminer l’ID de l’équipement
Lire l’ID de l’équipement sur l’écran de la
Circuit Meeting Room ou le navigateur
utilisé pour accéder au tableau de bord
et le fournir à votre administrateur de
domaine Circuit.
2 Obtenir le code d’inscription
temporaire
L’administration du domaine Circuit
vous fournit un code d’inscription tem-
poraire
1
.
1
Le code d’inscription est automatiquement généré par Circuit dès que l’administrateur de domaine
Circuit ajoute votre équipement au domaine Circuit. Pour obtenir plus d’informations, voir :
www.circuit.com/unifyportalfaqdetail?articleId=120430.
3 Entrer le code d’inscription
Entrer le code d’inscription que vous
avez reçu dans la page de configuration
Circuit du tableau de bord.
4 Terminer la configuration
Circuit Meeting Room
affiche son écran de
veille avec les informa-
tions suivantes:
• Nom de la Circuit
Meeting Room
• Adresse IP de la Cir-
cuit Meeting Room
dans le cas où un ac-
cès à distance du ta-
bleau de bord est né-
cessaire.
• PIN nécessaire pour l’activation
• Instructions abrégées sur l’utilisation
de la Circuit Meeting Room
• Version installée de l’applicationCir-
cuit et du système d’exploitation.
1

14
Utilisation de la Circuit Meeting Room
Vous ou un autre utilisateur du client Circuit pouvez désormais ajouter votre
Circuit Meeting Room à une conférence.
Documentation en ligne
Cette documentation et d'autres documents sont disponibles sur Internet, à l'adresse :
www.unify.com/support. Visitez également www.circuit.com/support pour consulter
les FAQ relatives à la Circuit Meeting Room. Vous trouverez des informations tech-
niques supplémentaires à l'adresse suivante : wiki.unify.com.
Assistance
Si vous rencontrez des problèmes avec la configuration et si vous avez besoin d’une as-
sistance technique, veuillez consulter www.circuit.com/unifyportalfaqdetail?article-
Id=36665.
Contrat de licence utilisateur final tiers
Logiciel Circuit Meeting Room
Le présent produit contient l'application Circuit et le logiciel Tableau de bord
(« logiciel »), qui constitue la propriété intellectuelle de Unify Software and Solutions
GmbH & Co. KG (dénommée ci-après « Unify »), sauf indication contraire explicite.
Le logiciel est protégé par la loi allemande sur le copyright, les copyrights internatio-
naux, les traités internationaux et toutes les autres lois applicables et, sauf convention
contractuelle contraire, vous est fourni sous licence conformément aux termes du
contrat de licence utilisateur final Unify (« CLUF Unify »).
Logiciel Open Source utilisé dans le produit
Ce produit contient notamment des logiciels Open Source développés par des tiers.
Ce logiciel Open Source est protégé par copyright. Votre droit d'utilisation du logiciel
Open Source dans ce produit au-delà de la simple exécution du programme est régi par
les termes de la licence Open Source correspondante.
Votre conformité à la licence Open Source vous autorisera à utiliser le logiciel Open
Source comme le prévoit la licence Open Source correspondante. En cas de conflit
entre le CLUF Unify et une convention contractuelle entre vous et Unify, les termes
de la licence Open Source primeront sur tout ce qui concerne les parties Open Source
du Logiciel.
Le logiciel Open Source contenu dans ce projet vous est accordé sous licence libre de
droits. Autrement dit, aucun frais n'est imputé pour l'octroi et l'exercice des droits de
licence, tandis que Unify peut vous facturer le remboursement des frais imputés par
Unify lorsque le logiciel Open Source vous est fourni.
Si les licences Open Source applicables l'exigent, vous pouvez obtenir une copie
physique des composantes logicielles Open Source correspondantes contenues dans
ce produit et des licences Open Source applicables, ce qui inclut notamment le code
source téléchargeable, la documentation ou toute autre information ou tout autre sup-
port supplémentaire, si nécessaire. Veuillez contacter le siège de Unify pour découvrir
comment obtenir les supports et en apprendre plus sur les frais de traitement appli-
cables. Unify peut également décider de fournir les informations correspondantes
via une section dédiée de son site Web. Veuillez sélectionner ou rechercher le ou les
produits applicables sur wiki.unify.com.
Garantie relative à l'utilisation ultérieure du logiciel Open Source
Unify n'offre aucune garantie relative au logiciel Open Source s'il est utilisé d'une
manière différente de l'exécution du programme prévue par Unify. Sous réserve d'un
arrangement contractuel explicite avec Unify, les licences Open Source applicables au
logiciel Open Source définissent l'éventuelle garantie octroyée par les auteurs ou les
concédants de licence du logiciel Open Source. Unify décline notamment toute garan-
tie relative à des défauts causés en modifiant le logiciel Open Source ou la configuration
du produit. Vous ne disposez d'aucun droit à la garantie si le logiciel Open Source
enfreint les droits de propriété intellectuelle d'un tiers. Le cas échéant, l'assistance
technique sera uniquement fournie pour les produits contenant un logiciel non
modifié.
1 Démarrer ou rejoindre une
conférence
Démarrez ou rejoignez une conférence
1
à partir de votre client Circuit.
1 Vous ne pouvez pas ajouter une Circuit Meeting Room à un appel privé
2 Sélectionnez l’icône Ajouter à la
conférence
Sélectionnez l’icône Ajouter à la confé-
rence sur la barre d’action d’appel,
puis sélectionnez Ajouter Mee-
tingRoom.
3 Ajouter la Circuit Meeting
Room à la conférence
Entrez le nom de Circuit Meeting Room
dans la zone de recherche et choisissez
de l’ajouter à la conférence.
4 Entrer le code PIN
Entrez le code PIN lorsque votre client
Circuit vous y invite.

15
EnglishDeutschFrançaisNederlandsItalianoEspañolPortuguês
Overzicht
De Circuit Meeting Room is een apparaat dat audio- en videoconferenties in kleinere
vergaderruimtes mogelijk maakt.
Het vereist een verbinding met de Circuit Cloud Service en een abonnement op Cir-
cuit Meeting Room.
Belangrijke opmerkingen
Neem de veiligheidsinstructies in het handboek “Veiligheid/Regelgeving” in
de gebruiksaanwijzing en in de volgende paragrafen in acht. U vindt de ge-
bruiksaanwijzing bij dit apparaat als PDF-bestand op het internet onder
http://www.fujitsu.com/fts/support/.
Markeringen
Inhoud van de verpakking
Optionele accessoires
A
B C
D
E
F
Neem de richtlijnen en regelgeving in het kader van de CE-markering in
acht, zodat het product voldoet aan de specificaties in het handboek “Vei-
ligheid/Regelgeving”.
Alle elektrische en elektronische producten moeten gescheiden van de ge-
meentelijke afvalstroom worden afgevoerd, via specifieke inzamelingsfaci-
liteiten die hiervoor door de overheid of plaatselijke autoriteiten worden
aangewezen. Door de juiste afvoer en afzonderlijke inzameling van uw oude
apparaat draagt u bij aan het voorkomen van mogelijke negatieve gevolgen
voor het milieu en de gezondheid van de mens. Dit is een voorwaarde voor
het hergebruiken en recyclen van gebruikte elektrische en elektronische
apparatuur. Voor gedetailleerdere informatie over het afvoeren van uw
oude apparaat kunt u contact opnemen met het gemeentehuis, de afvalop-
haaldienst, de winkel waar u het product hebt aangeschaft of uw verkoop-
vertegenwoordiger. De hierboven aangehaalde verklaringen zijn alleen vol-
ledig geldig voor apparatuur, geïnstalleerd en verkocht in landen van de
Europese Unie en waarvoor richtlijn 2012/19/EU van toepassing is. In lan-
den buiten de Europese Unie gelden mogelijk andere regels met betrekking
tot het afvoeren van elektrische en elektronische apparatuur.
FUJITSU ESPRIMO Q958 en bijbehorende documentatie (Veiligheid/Regelgeving)
Stroomkabel
Circuit Meeting Room, Snelle installatiegids
Optionele accessoires:
Beschermkap
Schroeven en bouten
Rubberen voetjes
A
B
C
D
E
F

16
Accessoires
Circuit Meeting Room vereist een webcam en een luidspreker. Alleen compatibele pro-
ducten, zoals Jabra Speak 410 luidspreker en Logitech C925e webcam dienen gebruiken te
worden. Voor additionele compatibele producten, ga naar wiki.unify.com/wiki/
Circuit_Meeting_Room.
Connectoren en knoppen
Voorpaneel van de FUJITSU ESPRIMO Q958
Achterpaneel van de FUJITSU ESPRIMO Q958
Aan de slag
4a
Luidspreker Jabra Speak 410, ver-
pakt met de documentatie Starten,
Garantie en Veiligheid/ Regelgeving
Webcam Logitech C925e, verpakt
met de documentatie Gids Instelling
en documentatie met belangrijke
informatie, veiligheid en regelgeving
en garantie
USB 3.1-connectoren Display/Poort-connector voor
secundair display
Knop Aan/Uit Netwerkconnector
Connector van de stroomkabel USB 2.0-connectoren
Display/Poort-connector voor
primair display
1 Webcam aansluiten
Sluit de stekker van de USB-
kabel van de webcam op
een beschikbare USB-con-
nector aan .
2 Luidspreker aansluiten
Sluit de stekker van de USB-
kabel van de luidspreker op
een beschikbare USB-
connector aan .
3 Netwerkkabel aansluiten
Sluit een netwerkkabel aan
op de netwerkconnector .
4 Display aansluiten
1
Sluit het display op de Dis-
play/Poort-connector aan
2
en schakel het display in.
1 Sluit het primaire display aan op de Display/Poort-connector voor een dubbele
displayconfiguratie .
2 Gebruik een Display/Poort naar HDMI-adapter of -kabel voor displays met HDMI-
connector(en).
5 Stroomkabel aansluiten
Sluit de stroomkabel aan
3
op de connector van de
stroomkabel .
3 Controleer of de lokale netspanning overeenkomt met de gegevens op het etiket van het
apparaat, voordat u de stroomkabel op het stopcontact aansluit.
6 Uw Circuit Meeting Room
inschakelen
Druk op de knop Aan/Uit
van de Circuit Meeting Room.
G H
G
H
1
2
4 15 63
4b
4a
1
4b
2
5
3
6
4a
H
6
G
6
5
4
B
3
2

17
EnglishDeutschFrançaisNederlandsItalianoEspañolPortuguês
Instellen van de Circuit Meeting Room-software
Een installatiewizard begeleidt u bij het eerste configuratieproces van de Circuit Mee-
ting Room.
Circuit Meeting Room wordt op basis van webpagina’s geconfigureerd (“Dashboard”).
U kunt op verschillende manieren toegang krijgen tot het Dasboard:
• door het lezen van het IP-adres van het netwerk op het display en het invoeren hier-
van in een webbrowser op uw computer in hetzelfde netwerk:
https://<ip-address>
of door
• door een USB-toetsenbord en muis op een USB-connector aan te sluiten .
Uw browser (en het display) tonen de startpagina van het Dashboard. Nadat voor de
eerste keer is aangemeld, wordt de wizard automatisch gestart.
OPMERKING: voor de installatie is een netwerkverbinding en toegang tot het internet vereist.
Controleer eerst de netwerkconfiguratie (beschikbaarheid DHCP, configuratie van de proxy).
De installatiewizard gebruiken
De Circuit Meeting Room registreren bij Circuit
Zodra de installatie voltooid is, toont het Dashboard de Circuit-configuratiepagina.
Volg de onderstaande stappen om de Circuit Meeting Room bij Circuit te registreren.
1 Aanmelden bij het Dashboard
Meld u aan bij het Dashboard met het
standaard beheerderswachtwoord:
Admin%123
De installatiewizard wordt gestart.
2 EULA accepteren
Lees en accepteer de licentievoorwaar-
den voor eindgebruikers (EULA) voor de
vooraf geïnstallleerde Unify-software.
3 Wachtwoord wijzigen
Wijzig het wachtwoord om toegang te
krijgen tot het Dashboard.
4 Internetverbinding controleren
Als de Circuit Meeting Room geen inter-
netverbinding heeft, klikt u tijdens de
controle op Afbreken of na de controle
op OK om naar de Netwerk-configuratie-
pagina van het Dashboard te gaan en de
netwerkinstellingen te bewerken. De in-
stallatiewizard gaat door nadat de wijzi-
gingen zijn doorgevoerd.
5 Controleren op updates
Als er geen update beschikbaar is, klikt u
op OK om de installatiewizard te vol-
tooien.
6 Apparaat bijwerken
Als een update beschikbaar is, klikt u op
Update installeren
1
.
1 Afhankelijk van de bij u beschikbare bandbreedte van het netwerk kan dit enige minuten in
beslag nemen.
1 ID van het apparaat bepalen
Lees de ID van het apparaat van het dis-
play van Circuit Meeting Room of de
browser die u gebruikt voor toegang tot
het Dashboard, en geef dit door aan uw
beheerder van het Circuit-domein.
2 Tijdelijke registratiecode
Circuit-domeinbeheer zal u een tijdelijke
registratiecode geven
1
.
1 De registratiecode wordt automatisch door Circuit gegenereerd wanneer de beheerder van het
Circuit-domein uw apparaat toevoegt aan uw Circuit-domein. Ga voor meer informatie naar:
www.circuit.com/unifyportalfaqdetail?articleId=120430.
3 Registratiecode invoeren
Voer de registratiecode in die u via de
Circuit- configuratiepagina op het Dash-
board hebt ontvangen.
4 Configuratie voltooien
Circuit Meeting Room
toont een inactief
scherm met de volgen-
de informatie:
• Naam van de Circuit
Meeting Room
• IP-adres van de Cir-
cuit Meeting Room,
voor het geval dat op
afstand toegang tot
het Dashboard ge-
kregen moet worden
• PIN-code is vereist voor de activering
• Beknopte instructies over het gebrui-
ken van de Circuit Meeting Room
• Geïnstalleerde versie van de Circuit-
app en het besturingssysteem.
1

18
Gebruik van de Circuit Meeting Room
U of elke andere Circuit-gebruiker heeft nu de mogelijkheid om uw Circuit Meeting
Room aan een conferentie toe te voegen.
Documentatie op het internet
U kunt deze en andere documentatie op het internet vinden op www.unify.com/support.
Ga ook naar www.circuit.com/support voor veelgestelde vragen over Circuit Meeting
Room. Aanvullende technische informatie kunt u vinden op: wiki.unify.com.
Ondersteuning
Als u problemen ondervindt met de installatie en technische ondersteuning nodig heeft,
gaat u naar www.circuit.com/unifyportalfaqdetail?articleId=36665.
Licentievoorwaarden van derden voor eindge-
bruikers
Circuit Meeting Room-software
Dit product bevat de Circuit-app en de Dashboard-software (“software”) die intellectueel
eigendom is van Unify Software and Solutions GmbH & Co. KG (hierna te noemen
“Unify”), behalve indien expliciet anders vermeld.
De software valt onder het Duitse auteursrecht, internationale auteursrechten, interna-
tionale verdragen en alle overige van toepassing zijnde wetten, en wordt, behalve indien
contractueel anders overeengekomen, aan u in licentie gegeven onder de voorwaarden
van de licentieovereenkomst voor eindgebruikers van Unify (“Unify EULA”).
Opensourcesoftware die in het product wordt gebruikt
Dit product bevat onder andere opensourcesoftware die is ontwikkeld door derden.
Deze opensourcesoftware is auteursrechtelijk beschermd. Uw rechten met betrekking
tot het gebruik van de opensourcesoftware die in dit product is ingebouwd en die uit-
gaan boven het uitvoeren van het programma, zijn onderhevig aan de voorwaarden van
de betreffende opensourcelicentie.
Als u zich houdt aan de voorwaarden van de opensourcelicentie, bent u gerechtigd de
opensourcesoftware te gebruiken zoals vastgelegd in de betreffende opensourcelicentie.
Mocht er sprake zijn van een conflict tussen de Unify EULA of een contractuele overeen-
komst tussen u en Unify, hebben de voorwaarden van de opensourcelicentie voorrang
ten opzichte van delen van de betreffende software.
Voor de licentie van de opensourcesoftware in dit product bent u geen vergoeding ver-
schuldigd (d.w.z. er wordt geen betaling gevraagd voor het toekennen en uitoefenen van
de licentierechten), maar Unify kan u wel een vergoeding vragen voor de kosten die
Unify heeft gemaakt voor het aan u ter beschikking stellen van de opensourcesoftware.
Indien vereist krachtens de van toepassing zijnde opensourcelicenties, kunt u een fysie-
ke kopie krijgen van de betreffende delen van de opensourcesoftware die in dit product
zijn opgenomen en de betreffende opensourcelicenties, waaronder, indien nodig, ook
downloadbare broncode, documentatie en andere aanvullende informatie op media.
Neem contact op met het hoofdkantoor van Unify om te vragen hoe u de media kunt
krijgen en wat de van toepassing zijnde verwerkingskosten zijn. Unify kan er ook voor
kiezen de relevante informatie beschikbaar te stellen op een speciaal daarvoor ingericht
gedeelte van haar website. Selecteer of zoek naar de betreffende producten op wi-
ki.unify.com.
Garantie met betrekking tot verder gebruik van de opensource
software
Unify verleent geen garantie voor de opensourcesoftware indien deze op een andere
manier wordt gebruikt dan voor uitvoering van het programma zoals bedoeld door
Unify. Afhankelijk van een eventuele contractuele overeenkomst met Unify, bepalen
de opensourcelicenties die gelden voor de opensourcesoftware wat, indien van toepas-
sing, de garantie is die door de auteurs of licentiehouders van de opensourcesoftware
wordt geboden. Unify wijst expliciet alle garanties van de hand voor defecten die veroor-
zaakt worden door het wijzigen van de opensourcesoftware of de productconfiguratie.
U kunt geen garantieclaims indienen tegen Unify indien de opensourcesoftware inbreuk
maakt op de intellectuele eigendomsrechten van derden. Technische ondersteuning, in-
dien gegeven, wordt uitsluitend gegeven voor producten die ongewijzigde software be-
vatten.
1 Deelnemen aan een conferen-
tie of er een starten
Neem deel aan een conferentie of start
er een
1
vanuit uw Circuit-client.
1 U kunt geen Circuit Meeting Room toevoegen aan een gesprek tussen slechts twee personen
2 Selecteer het pictogram Aan
conferentie toevoegen
Selecteer het pictogram Aan conferen-
tie toevoegen op de gespreksactie-
balk en selecteer vervolgens Meeting
Room toevoegen.
3 Circuit Meeting Room aan
de conferentie toevoegen
Voer de naam van de Circuit Meeting
Room in het zoekvak in en voeg deze
toe aan de conferentie.
4 PIN-code invoeren
Voer de PIN-code in als u hierom door
uw Circuit-client wordt gevraagd.

19
EnglishDeutschFrançaisNederlandsItalianoEspañolPortuguês
Panoramica
Circuit Meeting Room è un dispositivo che consente di eseguire conferenze audio e vi-
deo nelle piccole sale conferenza.
Richiede la connettività al servizio cloud di Circuit e l'abbonamento a Circuit Meeting
Room.
Informazioni importanti
Attenersi alle norme di sicurezza riportate nel manuale „Sicurezza/Norme“
e nelle istruzioni per l’uso. Le istruzioni per l’uso di questo dispositivo sono
disponibili come file PDF nel sito Web http://www.fujitsu.com/fts/support/.
Marchi
Contenuto della confezione
Accessori opzionali
A
B C
D
E
F
Attenersi alle direttive e alle norme sul contrassegno CE a cui è conforme il
prodotto nel manuale “Sicurezza/Norme”.
Le apparecchiature elettriche ed elettroniche devono essere smaltite sepa-
ratamente dai normali rifiuti domestici affidandole ad organizzazioni auto-
rizzate al loro trattamento. La raccolta differenziata e il corretto smaltimen-
to delle apparecchiature dimesse contribuiscono a tutelare l’ambiente e la
salute da potenziali danni e costituiscono la premessa per il loro recupero e
riciclaggio. Per maggiori informazioni sullo smaltimento di apparecchiatu-
re dimesse rivolgersi all’ufficio competente del proprio comune, alle orga-
nizzazioni specializzate nel recupero e nello smaltimento dei rifiuti, al ri-
venditore specializzato presso il quale è stato acquistato il prodotto o al
proprio centro di distribuzione. Quanto esposto si applica soltanto per ap-
parecchiature installate e vendute nei paesi dell’Unione Europea e contem-
plate dalla direttiva 2012/19/EU. Nei paesi non facenti parte dell’Unione Eu-
ropea, lo smaltimento di apparecchiature elettriche ed elettroniche può
essere regolato da disposizioni diverse dalla direttiva menzionata.
FUJITSU ESPRIMO Q958 e documentazione a corredo (Sicurezza/Norme)
Cavo di alimentazione
Circuit Meeting Room - Guida rapida all’installazione della soluzione
Accessori opzionali:
Gruppo di protezione dell’etichetta
Viti e bulloni
Piedini in gomma
A
B
C
D
E
F

20
Accessori
Circuit Meeting Room richiede una Webcam e un telefono vivavoce. Utilizzare esclusi-
vamente prodotti compatibili, come il telefono vivavoce Jabra Speak 410 e la Webcam Logi-
tech C925e. Per informazioni su altri prodotti compatibili, visitare wiki.unify.com/wiki/
Circuit_Meeting_Room.
Connettori e pulsanti
Pannello anteriore di FUJITSU ESPRIMO Q958
Pannello posteriore di FUJITSU ESPRIMO Q958
Guida introduttiva
4a
Telefono vivavoce Jabra Speak 410,
corredato dai documenti Guida in-
troduttiva, Garanzia e Sicurezza/
Norme
Webcam Logitech C925e, corredata
dai documenti Guida di installazio-
ne e Informazioni importanti, Sicu-
rezza/Norme e Garanzia
Connettori USB 3.1 Connettore DisplayPort per display
secondario
Pulsante di alimentazione Connettore di rete
Connettore del cavo di
alimentazione
Connettori USB 2.0
Connettore DisplayPort per display
principale
1 Collegamento della Webcam
Inserire il cavo USB della
Webcam in un connetto-
re USB disponibile .
2 Collegamento del telefono viva-
voce
Inserire il cavo USB del tele-
fono vivavoce in un con-
nettore USB disponibile .
3 Collegamento del cavo di rete
Collegare un cavo di rete al
connettore di rete .
4 Collegamento del display
1
Collegare il display a un con-
nettore DisplayPort
2
e ac-
cendere il display.
1 Per una configurazione a doppio display, collegare il display principale al connettore
DisplayPort .
2 Per i display con connettori HDMI, utilizzare un adattatore o cavo da DisplayPort a HDMI.
5 Collegamento del cavo di ali-
mentazione
Collegare il cavo di alimenta-
zione
3
al connettore del
cavo di alimentazione .
3 Controllare se la tensione di rete locale corrisponde alle indicazioni sull'etichetta del dispositivo
prima di inserire l'altra estremità del cavo di alimentazione in una presa di rete.
6 Attivazione di Circuit Meeting
Room
Premere il pulsante di ali-
mentazione di Circuit
Meeting Room.
G H
G
H
1
2
4 15 63
4b
4a
1
4b
2
5
3
6
4a
H
6
G
6
5
4
B
3
2
La page charge ...
La page charge ...
La page charge ...
La page charge ...
La page charge ...
La page charge ...
La page charge ...
La page charge ...
La page charge ...
La page charge ...
La page charge ...
La page charge ...
-
 1
1
-
 2
2
-
 3
3
-
 4
4
-
 5
5
-
 6
6
-
 7
7
-
 8
8
-
 9
9
-
 10
10
-
 11
11
-
 12
12
-
 13
13
-
 14
14
-
 15
15
-
 16
16
-
 17
17
-
 18
18
-
 19
19
-
 20
20
-
 21
21
-
 22
22
-
 23
23
-
 24
24
-
 25
25
-
 26
26
-
 27
27
-
 28
28
-
 29
29
-
 30
30
-
 31
31
-
 32
32


Unify Circuit Meeting Room - Quick Solution Guide d'installation
- Taper
- Guide d'installation
dans d''autres langues
- italiano: Unify Circuit Meeting Room - Quick Solution Guida d'installazione
- español: Unify Circuit Meeting Room - Quick Solution Guía de instalación
- Deutsch: Unify Circuit Meeting Room - Quick Solution Installationsanleitung
- Nederlands: Unify Circuit Meeting Room - Quick Solution Installatie gids
- português: Unify Circuit Meeting Room - Quick Solution Guia de instalação
Documents connexes
-
Unify OpenScape Desk Phone CP410 Mode d'emploi
-
-
-
-
-
-
-
Autres documents
-
Fujitsu REN-12-BRZE-4340C Fiche technique
-
Bose Lifestyle SoundTouch 235 entertainment system Guide de démarrage rapide
-
Bose Lifestyle 535 Series II home entertainment system Guide de démarrage rapide
-
Bose MediaMate® computer speakers Le manuel du propriétaire
-
Bose SOUNDTOUCH 520 Guide de démarrage rapide