Whirlpool WRT108FZDM Le manuel du propriétaire
- Catégorie
- Frigos
- Taper
- Le manuel du propriétaire

INSTALLATION INSTRUCTIONS
AND OWNER’S MANUAL
Top Mount Refrigerator
Do Not Throw Away — Additional important safety information included.
Para las instrucciones en español, visite nuestro sitio de internet.
INSTRUCTIONS D’INSTALLATION
ET MANUEL D’UTILISATION
Réfrigérateur superposé
Ne pas jeter — Autres consignes de sécurité importantes ci-jointes.
Table of Contents / Table des matières
REFRIGERATOR SAFETY........................................................ 2
INSTALLATION INSTRUCTIONS............................................. 3
Unpack the Refrigerator ......................................................... 3
Location Requirements .......................................................... 4
Electrical Requirements..........................................................4
Water Supply Requirements................................................... 5
Connect the Water Supply .....................................................5
Refrigerator Doors .................................................................. 6
Reversibility Kit Instructions .................................................12
Adjust the Doors...................................................................12
REFRIGERATOR FEATURES................................................. 13
Refrigerator Shelves ............................................................. 13
Deli Drawer............................................................................ 13
Crisper...................................................................................13
FREEZER FEATURES.............................................................14
Freezer Shelf.........................................................................14
DOOR FEATURES................................................................... 15
Door Rails .............................................................................15
Door Bins .............................................................................. 15
Utility Compartment.............................................................. 15
BRAND BADGE PLACEMENT TEMPLATE ......BACK COVER
SÉCURITÉ DU RÉFRIGÉRATEUR.........................................16
INSTRUCTIONS D'INSTALLATION.......................................17
Déballage du réfrigérateur ....................................................17
Exigences d'emplacement ...................................................18
Spécifications électriques.....................................................18
Spécifications de l’alimentation en eau................................19
Raccordement de la canalisation d'eau...............................19
Portes du réfrigérateur..........................................................20
Instructions pour l'ensemble d’inversion
du sens d’ouverture..............................................................26
Ajustement des portes..........................................................26
CARACTÉRISTIQUES DU RÉFRIGÉRATEUR......................27
Tablettes du réfrigérateur .....................................................27
Tiroir pour spécialités alimentaires.......................................27
Bac à légumes ......................................................................28
CARACTÉRISTIQUES DU CONGÉLATEUR .........................28
Tablette du congélateur........................................................28
CARACTÉRISTIQUES DE LA PORTE ...................................29
Tringles de porte...................................................................29
Balconnets de porte .............................................................29
Compartiment utilitaire .........................................................29
GABARIT DE POSITIONNEMENT DE L’INSIGNE
DE LA MARQUE...............................COUVERTURE ARRIÈRE
W10728576A

2
REFRIGERATOR SAFETY
You can be killed or seriously injured if you don't immediately
You
can be killed or seriously injured if you don't
follow
All safety messages will tell you what the potential hazard is, tell you how to reduce the chance of injury, and tell you what can
happen if the instructions are not followed.
Your safety and the safety of others are very important.
We have provided many important safety messages in this manual and on your appliance. Always read and obey all safety
messages.
This is the safety alert symbol.
This symbol alerts you to potential hazards that can kill or hurt you and others.
All safety messages will follow the safety alert symbol and either the word “DANGER” or “WARNING.”
These words mean:
follow instructions.
instructions.
DANGER
WARNING
IMPORTANT SAFETY INSTRUCTIONS
To reduce the risk of fire, electric shock, or injury to persons when using the refrigerator, follow basic precautions,
including the following:
WARNING:
SAVE THESE INSTRUCTIONS
■ Plug into a grounded 3 prong outlet.
■ Do not remove ground prong.
■ Do not use an adapter.
■ Do not use an extension cord.
■ Disconnect power before servicing.
■ Replace all parts and panels before operating.
■ Remove doors from your old refrigerator.
■ Use nonflammable cleaner.
■ Keep flammable materials and vapors, such as gasoline,
away from refrigerator.
■ Use two or more people to move and install refrigerator.
■ Disconnect power before installing ice maker (on ice maker
kit ready models only).
State of California Proposition 65 Warnings:
WARNING: This product contains one or more chemicals known to the State of California to cause cancer.
WARNING: This product contains one or more chemicals known to the State of California to cause birth defects or other
reproductive harm.

3
INSTALLATION INSTRUCTIONS
Unpack the Refrigerator
Remove the Packaging
IMPORTANT: Do not remove the white foam air return insert from
behind the control panel on the ceiling of the refrigerator. If the
insert is removed, ice may migrate down from the freezer and
cause icicles to form.
■ Remove tape and glue residue from surfaces before turning
on the refrigerator. Rub a small amount of liquid dish soap
over the adhesive with your fingers. Rinse with warm water
and dry with a soft cloth.
■ Do not use sharp instruments, rubbing alcohol, flammable
fluids, or abrasive cleaners to remove tape or glue. These
products can damage the surface of your refrigerator. For
more information see “Refrigerator Safety.”
Clean Before Using
After you remove all of the package materials, clean the inside of
your refrigerator before using it. See the cleaning instructions in
“Refrigerator Care.”
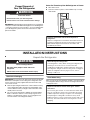
Proper Disposal of
Your Old Refrigerator
IMPORTANT: Child entrapment and suffocation are not problems
of the past. Junked or abandoned refrigerators are still dangerous
– even if they will sit for “just a few days.” If you are getting rid of
your old refrigerator, please follow these instructions to help
prevent accidents.
Before You Throw Away Your Old Refrigerator or Freezer:
■ Take off the doors.
■ Leave the shelves in place so that children may not easily
climb inside.
WARNING
Suffocation Hazard
Remove doors from your old refrigerator.
Failure to do so can result in death or brain damage.
Important information to know about disposal of
refrigerants:
Dispose of refrigerator in accordance with Federal and Local
regulations. Refrigerants must be evacuated by a licensed,
EPA certified refrigerant technician in accordance with
established procedures.
WARNING
Excessive Weight Hazard
Use two or more people to move and install
refrigerator.
Failure to do so can result in back or other injury.
When Moving Your Refrigerator:
Your refrigerator is heavy. When moving the refrigerator for
cleaning or service, be sure to cover the floor with
cardboard or hardboard to avoid floor damage. Always pull
the refrigerator straight out when moving it. Do not wiggle or
“walk” the refrigerator when trying to move it, as floor
damage could occur.
Important information to know about glass shelves
and covers:
Do not clean glass shelves or covers with warm water when
they are cold. Shelves and covers may break if exposed to
sudden temperature changes or impact, such as bumping.
Tempered glass is designed to shatter into many small,
pebble-size pieces. This is normal. Glass shelves and covers
are heavy. Use both hands when removing them to avoid
dropping.

4
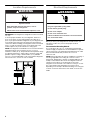
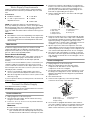
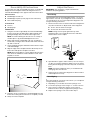
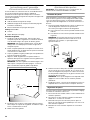
Location Requirements
IMPORTANT: This refrigerator is designed for indoor household
use only.
To ensure proper ventilation for your refrigerator, allow for ½"
(1.25 cm) of space on each side and at the top. Allow for 1"
(2.54 cm) of space behind the refrigerator. If your refrigerator has
an ice maker, allow extra space at the back for the water line
connections. When installing your refrigerator next to a fixed wall,
leave a 2" (5.08 cm) minimum space on the hinge side (some
models require more) to allow the door to swing open.
NOTE: This refrigerator is intended for use in a location where the
temperature ranges from a minimum of 55°F (13°C) to a
maximum of 110°F (43°C). The preferred room temperature range
for optimum performance, which reduces electricity usage and
provides superior cooling, is between 60°F (15°C) and 90°F
(32°C). It is recommended that you do not install the refrigerator
near a heat source, such as an oven or radiator.
Electrical Requirements
Before you move your refrigerator into its final location, it is
important to make sure you have the proper electrical
connection.
Recommended Grounding Method
A 115 volt, 60 Hz, AC only, 15- or 20-amp fused, grounded
electrical supply is required. It is recommended that a separate
circuit serving only your refrigerator be provided. Use an outlet
that cannot be turned off by a switch. Do not use an
extension cord.
NOTE: Before performing any type of installation or cleaning, or
removing a light bulb, turn cooling off or turn the control
(Thermostat, Refrigerator or Freezer Control depending on the
model) to OFF, and then disconnect the refrigerator from the
electrical source. When you are finished, reconnect the
refrigerator to the electrical source and turn cooling on or reset
the control (Thermostat, Refrigerator or Freezer Control
depending on the model) to the desired setting. See “Using the
Controls” in the User Instructions, User Guide, or Use & Care
Guide.
WARNING
Explosion Hazard
Keep flammable materials and vapors, such as
gasoline, away from refrigerator.
Failure to do so can result in death, explosion, or fire.
1
/
2" (1.25 cm)
2" (5.08 cm)
Electrical Shock Hazard
Plug into a grounded 3 prong outlet.
Do not remove ground prong.
Do not use an adapter.
Do not use an extension cord.
Failure to follow these instructions can result in death,
fire, or electrical shock.
WARNING

5
Water Supply Requirements
Gather the required tools and parts before starting installation.
Read and follow the instructions provided with any tools listed
here.
Tools Needed:
NOTE: Your refrigerator dealer has a kit available with a ¹⁄₄"
(6.35 mm) saddle-type shutoff valve, a union, and copper tubing.
Before purchasing, make sure a saddle-type valve complies with
your local plumbing codes. Do not use a piercing-type or ³⁄₁₆"
(4.76 mm) saddle valve which reduces water flow and clogs more
easily.
IMPORTANT:
■ All installations must meet local plumbing code requirements.
■ Use copper tubing and check for leaks. Install copper tubing
only in areas where the household temperatures will remain
above freezing.
Water Pressure
A cold water supply with water pressure of between 30 and
120 psi (207 and 827 kPa) is required to operate the water
dispenser and ice maker. If you have questions about your water
pressure, call a licensed, qualified plumber.
Reverse Osmosis Water Supply
IMPORTANT: The pressure of the water supply coming out of a
reverse osmosis system going to the water inlet valve of the
refrigerator needs to be between 30 and 120 psi (207 and
827 kPa).
If a reverse osmosis water filtration system is connected to your
cold water supply, the water pressure to the reverse osmosis
system needs to be a minimum of 40 to 60 psi (276 to 414 kPa).
If the water pressure to the reverse osmosis system is less than
40 to 60 psi (276 to 414 kPa):
■ Check to see whether the sediment filter in the reverse
osmosis system is blocked. Replace the filter if necessary.
■ Allow the storage tank on the reverse osmosis system to refill
after heavy usage.
If you have questions about your water pressure, call a licensed,
qualified plumber.
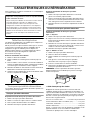
Connect the Water Supply
Read all directions before you begin.
IMPORTANT: If you turn ON the refrigerator before the water line
is connected, turn OFF the ice maker.
Connect to Water Line
1. Unplug refrigerator or disconnect power.
2. Turn OFF main water supply. Turn ON nearest faucet long
enough to clear line of water.
3. Locate a ½" to 1¹⁄₄" (1.25 cm to 3.18 cm) vertical cold water
pipe near the refrigerator.
IMPORTANT:
■ Make sure it is a cold water pipe.
■ Horizontal pipe will work, but drill on the top side of the
pipe, not the bottom. This will help keep water away from
the drill and normal sediment from collecting in the valve.
4. Determine the length of copper tubing you need. Measure
from the connection on the lower left rear of refrigerator to the
water pipe. Add 7 ft (2.1 m) to allow for cleaning. Use ¹⁄₄"
(6.35 mm) O.D. (outside diameter) copper tubing. Be sure
both ends of copper tubing are cut square.
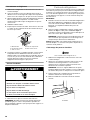
5. Using a cordless drill, drill a ¹⁄₄" hole in the cold water pipe
you have selected.
6. Fasten the shutoff valve to the cold water pipe with the pipe
clamp. Be sure the outlet end is solidly in the ¹⁄₄" drilled hole
in the water pipe and that the washer is under the pipe clamp.
Tighten the packing nut. Tighten the pipe clamp screws
slowly and evenly so washer makes a watertight seal. Do not
overtighten or you may crush the copper tubing.
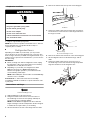
7. Slip the compression sleeve and compression nut on the
copper tubing as shown. Insert the end of the tubing into the
outlet end squarely as far as it will go. Screw compression nut
onto outlet end with adjustable wrench. Do not overtighten.
8. Place the free end of the tubing in a container or sink, and
turn ON the main water supply. Flush the tubing until water is
clear. Turn OFF the shutoff valve on the water pipe. Coil the
copper tubing.
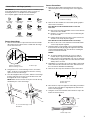
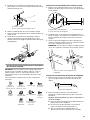
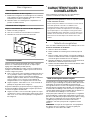
Connect to Refrigerator
1. Unplug refrigerator or disconnect power.
2. Attach the copper tubing to the valve inlet using a
compression nut and sleeve as shown. Tighten the
compression nut. Do not overtighten.
3. Use the tube clamp on the back of the refrigerator to secure
the tubing to the refrigerator as shown. This will help avoid
damage to the tubing when the refrigerator is pushed back
against the wall.
4. Turn shutoff valve ON.
5. Check for leaks. Tighten any connections (including
connections at the valve) or nuts that leak.
6. The ice maker is equipped with a built-in water strainer. If
your water conditions require a second water strainer, install
it in the ¹⁄₄" (6.35 mm) water line at either tube connection.
Obtain a water strainer from your nearest appliance dealer.
■ Flat-blade screwdriver
■ ⁷⁄₁₆" and ¹⁄₂" Open-end or two
adjustable wrenches
■ ¹⁄₄" Nut driver
■ ¹⁄₄" Drill bit
■ Cordless drill
A. Cold water pipe
B. Pipe clamp
C. Copper tubing
D. Compression nut
E. Compression sleeve
F. Shutoff valve
G. Packing nut
A. Tube clamp
B. Tube clamp screw
C. Copper tubing
D. Compression nut
E. Valve inlet
A
B
C
DEF
G
A
C
B
D
E

6
Complete the Installation
1. Plug into a grounded 3 prong outlet.
NOTE: Allow 24 hours to produce the first batch of ice. Discard
the first three batches of ice produced. Allow 3 days to
completely fill ice container.
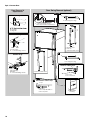
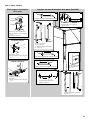
Refrigerator Doors
Depending on the width of your doorway, you may need to
remove the doors to move the refrigerator into your home. Also,
the door hinges are factory installed on the right-hand side. If you
want the door to open from the other direction, you must reverse
the door swing.
IMPORTANT:
■ Before you begin, turn OFF the refrigerator control, unplug
the refrigerator or disconnect power. Remove food and any
adjustable door or utility bins from doors.
■ Depending on your model, your refrigerator has either
Style 1–Contour Doors or Style 2–Standard Doors.
Reference the graphic specific to your model later in this
section following “Final Steps.”
NOTE: A Reversibility Kit, which includes a new Brand Badge
and hole covers, is available.
Tools Needed: ⁵⁄₁₆" Hex-head socket wrench, #2 Phillips
screwdriver, Flat-blade screwdriver, ⁵⁄₁₆" Open-end wrench, Flat
2" putty knife.
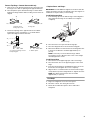
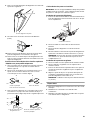
Remove Doors and Hinges
⁵⁄₁₆
" Hex-Head Hinge Screw
1. Unplug refrigerator or disconnect power.
2. Using a hex-head socket wrench, remove the three ⁵⁄₁₆"
hex-head hinge screws from the top hinge and lift up to
remove the hinge. See top hinge graphic.
NOTE: Provide additional support for the doors while the
hinges are being moved. Do not depend on the door magnets
to hold the doors in place while you are working.
3. Lift the freezer door off of the center hinge and set it aside.
4. Remove the washer from the top of the center hinge pin.
5. Using a hex-head socket wrench and an open-end wrench,
remove the three screws from the center hinge and remove
the hinge. Set aside.
6. Remove the washer from the bottom of the center hinge pin.
7. Lift the refrigerator door from the bottom hinge, and set
aside.
8. Using a hex-head socket wrench, remove the four ⁵⁄₁₆"
hex-head hinge screws from the bottom hinge and pull the
hinge from the bottom of the refrigerator door.
Electrical Shock Hazard
Plug into a grounded 3 prong outlet.
Do not remove ground prong.
Do not use an adapter.
Do not use an extension cord.
Failure to follow these instructions can result in death,
fire, or electrical shock.
WARNING
A. Washer
A. Center hinge
B.
⁵⁄₁₆
" Hex-head hinge screws
A
A
B

7
Reverse Doors and Hinges (optional)
IMPORTANT: If you want to reverse your doors so that they open
in the opposite direction, follow these steps. If you are not
reversing the doors, see “Replace Doors and Hinges.”
See complete graphics later in these instructions.
Reverse Center Hinge
1. Remove the three dome caps and screws from the handle
side and use them to fill the holes created when the hinge
screws were removed.
2. Using the three ⁵⁄₁₆" hex-head hinge screws, removed in
Step 1, insert two screws halfway into the holes, leaving
space to insert the center hinge.
3. Once the refrigerator door is in place, slide the center hinge
from the right onto the screws, insert the third screw, and
then tighten all screws completely.
NOTE: Make sure the washers are in place on both the top
and bottom pins of the center hinge.
Reverse Freezer Door
1. Remove the three cabinet hole plugs from the top of the
cabinet and place them in the hinge holes on the opposite
side.
2. Remove the door handles. See the model specific graphics
later in these instructions.
Door Handles Installed with Flat-head Screws and
Setscrews
■ Remove the two flat-head handle screws from the bottom
of the freezer door handle.
■ Using the ¹⁄₈" hex key, loosen the setscrew attaching the
top of the handle.
■ Pull the handle away from the door to release it from the
shoulder screw. Keep all parts together.
Door Handles Installed with Flat-head Screws Only
■ Remove the screw cover and the three flat-head handle
screws. Keep all parts together.
3. Using the plastic tool (provided), remove the brand badge
from the freezer door by prying up the right-hand side and
slowly peeling the badge away from the door, revealing the
hole to mount the door handle.
NOTES:
■ To avoid scratching the finish, do not use a sharp or
metallic object to pry the brand badge from the door.
■ Rub a small amount of liquid dish soap over any adhesive
residue with your fingers. Rinse the door with warm water
and dry with a soft cloth.
4. Depending on your model, remove the shoulder screw and its
washer from the left-hand side of the door and fasten it into
the hole that was behind the brand badge.
5. Remove the door stop from the bottom of the freezer door.
6. Move the door stop to the opposite side making sure that the
hole in the door stop plate is aligned perfectly with the hole
for the center hinge pin.
7. Using the screw removed earlier, fasten the door stop to the
bottom of the freezer door.
A. Dome cap washers
B. Hex-head hinge screws
C. Dome caps
A.
⁵⁄₁₆
" Hex-head hinge screws
B. Washers
Door Hinge
Hole Plug
Cabinet Hinge
Hole Plug
Dome Cap
Dome Cap
Washer
Setscrew
Shoulder
Screw
Shoulder
Screw Washer
Door Stop
Screw
Flat-Head
Handle
Screw
Door Handle
Hole Plug
A
B
C
A
A
B
A. Cabinet hole plugs
A. Door stop screw
B. Door stop
A. Door stop screw
A
AB
A

8
8. Depending on your model, place the handle on the shoulder
screw and push the handle toward the door until the
mounting base is flush against the door.
9. Fasten the bottom of the handle to the bottom of the freezer
door.
10. Tighten all screws. Set aside the freezer door until the hinges
and refrigerator door are in place.
Reverse Refrigerator Door
1. Remove the door stop from the bottom of the refrigerator
door.
2. Replace the door stop on the opposite side of the refrigerator
door, making sure that the hole in the door stop plate is
aligned perfectly with the hole for the bottom hinge pin.
3. Fasten the door stop to the door.
4. Remove the door handles. See the model specific graphics
later in these instructions.
Door Handles Installed with Flat-head Screws and
Setscrews
■ Remove the screws from the top of the refrigerator door
handle.
■ Remove the setscrew from the lower part of the handle.
■ Pull the handle away from the door to release it from the
shoulder screw. Keep all parts together.
Door Handles Installed with Flat-head Screws Only
■ Remove the screw cover, and the three flat-head handle
screws. Keep all parts together.
5. Remove the plug covering the hole on the opposite side of
the door, where the refrigerator door handle will be installed,
and discard the hole plug.
6. Depending on your model, remove the shoulder screw and its
washer from the left-hand side of the door and fasten it into
the hole that was behind the cap.
7. Depending on your model, place the handle on the shoulder
screw and push the handle toward the door until the
mounting base is flush against the door.
8. Fasten the top of the refrigerator handle to the top of the
refrigerator door.
9. Cover the remaining hole with the hole plug (provided).
10. Remove door hinge hole plug from the refrigerator door.
Move to opposite side.
11. Tighten all screws. Set aside refrigerator door until bottom
hinge is installed on the opposite side of the refrigerator.
A. Setscrew
A. Door stop screw
B. Door stop
A
AB
A. Flat-head handle screws
A

9
Reverse Top Hinge - Contour Door models only
1. Remove the screw attaching the hinge pin to the hinge. Turn
the hinge over so that it is pointing in the opposite direction.
2. Place the plastic spacer beneath the hinge so that it will be
between the hinge and the cabinet, making sure the holes are
aligned.
3. Fasten the top hinge to the opposite side of the cabinet,
inserting the screws only halfway, so you will be able to
replace and align the freezer door later.
Replace Doors and Hinges
IMPORTANT: Provide additional support for the doors while the
hinges are being moved. Do not depend on the door magnets to
hold the doors in place while you are working.
Install Refrigerator Door
1. Insert the hinge pin into the bottom hinge of the refrigerator
door and fasten the hinge to the cabinet. Do not tighten
completely.
2. Place the washer on top of the bottom hinge pin.
3. Place the refrigerator door onto the bottom hinge pin.
4. Measure the distance from the bottom of the refrigerator door
to the floor. The distance should be approximately 1⁴⁄₅"
(4.6 cm).
NOTE: If necessary, loosen the bottom hinge, without
removing the screws, adjust the door to the correct height
and fully tighten the screws.
Install Freezer Door
1. Place washer on the upper hinge pin of the center hinge.
2. Place the freezer door on the upper hinge pin of the center
hinge.
3. Insert the top hinge pin into the drilled hole in the top of the
freezer door. Do not tighten the screws completely
4. Align the doors so that the bottom of the freezer door aligns
evenly with the top of the refrigerator door. Tighten all screws.
NOTE: The distance between the doors should be
approximately ³⁄₄" (19 mm).
Final Steps
1. Plug in the refrigerator or reconnect the power.
2. Reset the controls. See “Using the Controls.”
3. Return all removable door parts to doors and food to
refrigerator.
A. Plastic spacer
B. Hinge pin screw
C. Hinge pin
A.
⁵⁄₁₆
" Hex-head hinge screws
B. Top hinge pin
C. Plastic spacer
ACC
A
BB
C
B
A
A. Bottom hinge

10
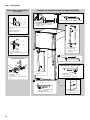
Style 1–Contour Door
Door Swing Reversal (optional)
4
1-2
A. Door Hinge Hole Plug
3
A
A. Door Stop
B. Door Stop Screw
A
Removal of Door Stops
B
A. Cabinet Hinge Hole Plugs
A
Door Removal &
Replacement
5
A. Door Stop
B. Door Stop Screw
B
A
Reinstallation of Door Stops
A. Shoulder Screw
B. Setscrew
C. Flat-Head Handle Screw
2
C
Center Hinge
Top Hinge
1-1
A.
5
/16" Hex-Head Hinge
Screws,
Dome Caps and Dome Cap Washers
A
B.
5
/
16
" Hex-Head Hinge Screws
A. Center Hinge
A
B
A. Flat-Head Handle Screw
6
A
B. Top Hinge
C. Hinge Pin
A
B
C
B
A
A. Door Handle
Hole Plug
7
A. Bottom Hinge
Bottom Hinge
B. Washer
C.
5
/
16
" Hex-Head Hinge Screws
A
B
C

11
Style 2–Standard Doors
Door Removal &
Replacement
Door Swing Reversal (optional)
A. Door Hinge Hole Plug
A. Door Handle Sealing Screws
3
4
A
A
A. Cabinet Hinge Hole Plugs
1-2
A
Top Hinge
B.
5
/
16
" Hex-Head Hinge Screws
C. Top Hinge
B
C
A. Top Hinge Cover
A
A. Door Handle
Hole Plug
7
1-1
A.
5
/
16
" Hex-Head Hinge
Screws,
Dome Caps and Dome Cap Washers
A
Center Hinge
B.
5
/
16
" Hex-Head Hinge Screws
A. Center Hinge
A
B
A. Bottom Hinge
Bottom Hinge
B. Washer
C.
5
/
16
" Hex-Head Hinge Screws
A
B
C
A. Door Stop Screw
B. Door Stop
BA
5
Side View
Front View
A. Shoulder Screw
B. Setscrew
C. Flat-Head Handle Screw
2
C
6
A
B
A
A. Flat-Head Handle Screw
B. Screw Cover
A
A
B
D. Screw Cover
C
C
D

12
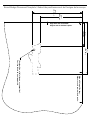
Reversibility Kit Instructions
If your model came with a Reversibility kit, please use the Brand
Badge Placement template and the following instructions to
install the Brand Badge on the opposite side of the freezer door.
Parts Included:
■ Brand badge removal tool
■ Brand badge template (on last page of User Instructions)
■ Door handle hole plug
Tools Needed:
■ Scissors
■ Masking tape
Freezer Door
1. Using the removal tool (provided), remove the brand badge
from the freezer door by lifting up the right-hand side and
peeling the badge away from the door from right to left.
NOTE: To avoid scratching the door, do not use a sharp or
metallic object to pry the brand badge from the door.
2. Rub a small amount of liquid dish soap over any adhesive
residue with your fingers. Rinse the door with warm water and
dry with a soft cloth.
3. Cut the template along the dotted lines that match the shape
of the brand badge.
4. Align the edges of the template with the side and top of the
freezer door and tape the template to the door.
NOTE: When the template is correctly aligned, the hole in the
door, where the handle was, will be within the cutout of the
template, as shown.
5. Using the cutout as a guide, press the brand badge onto the
freezer door making sure that the hole is completely covered.
6. Slowly remove the template.
Adjust the Doors
IMPORTANT: Your refrigerator complies with American
Disabilities Act (ADA) guidelines.
Door Closing
Your refrigerator has two front adjustable levelers - one on the
right and one on the left. If your refrigerator seems unsteady or
you want the doors to close easier, adjust the refrigerator's tilt
using the following instructions:
1. Turn the leveler to lower or raise that side of the refrigerator. It
may take several turns to adjust the tilt of the refrigerator.
■ To raise, turn the leveler to the right.
■ To lower, turn the leveler to the left.
NOTE: Having someone push against the top of the
refrigerator takes some weight off the levelers and rollers
which makes it easier to adjust.
2. Open both doors again to make sure they close as easily as
you like. If not, tilt the refrigerator slightly more to the rear by
turning both leveling legs to the left; it may take several more
turns.
NOTE: To keep the refrigerator level, you should turn both
leveling legs the same amount.
3. Using a level, be sure that the refrigerator is still level side to
side. Readjust if necessary.
Door Aligning
If the space between your doors looks uneven, you can adjust it
using the following instructions:
1. Depending on your model, remove the top hinge cover.
2. Loosen the top hinge screws using a ⁵⁄₁₆" socket or wrench.
3. Have someone hold the door in place or put a spacer
between the doors while you tighten the top hinge screws.
4. Replace the top hinge cover, if removed in Step 1.

13
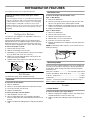
REFRIGERATOR FEATURES
Your model may have some or all of these features.
Refrigerator Shelves
The shelves in your refrigerator are adjustable to match your
individual storage needs.
Storing similar food items together in your refrigerator and
adjusting the shelves to fit different heights of items will make
finding the exact item you want easier. It will also reduce the
amount of time the refrigerator door is open, and save energy.
To remove and replace a shelf:
1. Remove items from the shelf.
2. Slide the shelf straight out to the stop.
3. Depending on your model, lift back or front of the shelf past
the stop. Slide shelf out the rest of the way.
4. Replace the shelf by sliding the back of the shelf into the
track in the wall of the cabinet.
5. Guide the front of the shelf into the shelf track. Be sure to
slide the shelf in all the way.
Deli Drawer
The deli drawer design allows flexible positioning.
Deli Drawer
To reposition the deli drawer:
1. Remove deli drawer.
2. Release cover and place it between the desired crossbars.
3. Secure the rear clips onto the shelf.
4. Replace the deli drawer.
To remove and replace the deli drawer:
1. Slide deli drawer out to the stop.
2. Lift front of deli drawer with one hand while supporting
bottom of drawer with other hand. Slide drawer out the rest of
the way.
3. Replace the drawer by sliding it back in fully past the drawer
stop.
Deli Drawer Cover
To remove and replace the deli drawer cover:
Style 1 - Wire Shelves
1. Remove the deli drawer.
2. Push the cover back to release the rear clips from the shelf.
Tilt the cover up at the front, and then pull it forward.
3. Replace the deli drawer cover by fitting the notches and clips
on the cover over the rear and center crossbars on the shelf.
4. Replace the deli drawer.
Style 2 - Glass Shelves
1. Remove the deli drawer.
2. Remove items from the shelf.
3. Slide the shelf straight out to the stop.
4. Slide the deli cover to one side until free.
5. Insert the cover into the shelf tracks.
6. Slide the shelf back into the refrigerator, and then replace the
deli drawer.
NOTE: The deli drawer slides sideways on the shelf to allow for
flexible positioning.
Meat Storage Guide
Store most meat in original wrapping as long as it is airtight and
moisture-proof. Rewrap if necessary. See the following chart for
storage times. When storing meat longer than the times given,
freeze the meat.
Fresh fish or shellfish.........................use same day as purchased
Chicken, ground beef, variety meats (liver)......................1-2 days
Cold cuts, steaks/roasts ..................................................3-5 days
Cured meats...................................................................7-10 days
Leftovers - Cover leftovers with plastic wrap, aluminum foil, or
plastic containers with tight lids.
Crisper
Crisper Drawers
To remove and replace the crisper drawer:
1. Slide the crisper drawer straight out to the stop. Lift the front
and slide the drawer out the rest of the way.
2. Replace the drawer by sliding the drawer in fully past the
stop.
Important information to know about glass shelves
and covers:
Do not clean glass shelves or covers with warm water when
they are cold. Shelves and covers may break if exposed to
sudden temperature changes or impact, such as bumping.
Tempered glass is designed to shatter into many small,
pebble-size pieces. This is normal. Glass shelves and covers
are heavy. Use both hands when removing them to avoid
dropping.

14
Crisper Cover
To remove and replace the crisper cover:
1. Remove the crisper(s).
2. Pull the glass straight out.
3. Replace the glass by pushing it straight in.
Crisper Humidity Control
You can control the amount of humidity in the moisture-sealed
crisper. Adjust the control to any setting between LOW and
HIGH.
LOW (open) lets moist air out of the crisper for best storage of
fruits and vegetables with skins.
■ Fruit: Wash, let dry and store in refrigerator in plastic bag or
crisper. Do not wash or hull berries until they are ready to use.
Sort and keep berries in original container in crisper, or store
in a loosely closed paper bag on a refrigerator shelf.
■ Vegetables with skins: Place in plastic bag or plastic
container and store in crisper.
HIGH (closed) keeps moist air in the crisper for best storage of
fresh, leafy vegetables.
■ Leafy vegetables: Wash in cold water, drain and trim or tear
off bruised and discolored areas. Place in plastic bag or
plastic container and store in crisper.
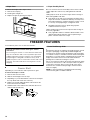
FREEZER FEATURES
Your model may have some or all of these features.
Freezer Shelf
Depending on your model, the shelf may be wire or glass.
To remove and replace a shelf:
1. Remove items from the shelf.
2. Slide the shelf straight out to the stop.
3. Depending on your model, lift back or front of the shelf past
the stop. Slide shelf out the rest of the way.
4. Replace the shelf by sliding the back of the shelf into the
track in the wall of the cabinet.
5. Guide the front of the shelf into the shelf track. Be sure to
slide the shelf in all the way.
Frozen Food Storage Guide
Storage times will vary according to the quality and type of food,
the type of packaging or wrap used (should be airtight and
moisture-proof), and the storage temperature. Seal the package
or container securely to avoid taste and odor transfer throughout
the product. Ice crystals inside a sealed package are normal. This
simply means that moisture in the food and air inside the
package have condensed, creating ice crystals.
Put no more unfrozen food into the freezer than will freeze within
24 hours (no more than 2 to 3 lbs of food per cubic foot [907 to
1,350 g per L] of freezer space). Leave enough space in the
freezer for air to circulate around packages. The freezer door
must close tightly.
NOTE: For more information on preparing food for freezing,
check a freezer guide or reliable cookbook.
Important information to know about glass shelves
and covers:
Do not clean glass shelves or covers with warm water when
they are cold. Shelves and covers may break if exposed to
sudden temperature changes or impact, such as bumping.
Tempered glass is designed to shatter into many small,
pebble-size pieces. This is normal. Glass shelves and covers
are heavy. Use both hands when removing them to avoid
dropping.

15
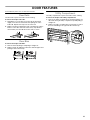
DOOR FEATURES
Your model may have some or all of these features.
Door Rails
The door rails may be removed for easier cleaning.
To remove and replace the rails:
1. Depending on your model, remove the rails by pushing in
slightly on the front of the bracket while pulling out on the
inside tab. Repeat these steps for the other end.
2. Replace the rails by aligning the ends of the brackets with the
buttons on the sides of the door liner. Firmly snap bracket
and assembly onto the tabs above the shelf as shown.
Door Bins
To remove and replace the bins:
1. Remove the bin by lifting it and pulling it straight out.
2. Replace the bin by sliding it in above the desired support and
pushing it down until it stops.
Utility Compartment
The utility compartment may be removed for easier cleaning.
To remove and replace the utility compartment:
1. Remove the utility compartment by squeezing against one
side while raising the utility compartment up and pulling it
straight out.
2. Replace the utility compartment by positioning one side in
the lock and sliding in the opposite side until it stops.

16
INSTRUCTIONS D’INSTALLATION
ET MANUEL D’UTILISATION
Réfrigérateur superposé
SÉCURITÉ DU RÉFRIGÉRATEUR
Risque possible de décès ou de blessure grave si vous ne
suivez pas immédiatement les instructions.
Risque possible de décès ou de blessure grave si vous
ne suivez pas les instructions.
Tous les messages de sécurité vous diront quel est le danger potentiel et vous disent comment réduire le risque de blessure et
ce qui peut se produire en cas de non-respect des instructions.
Votre sécurité et celle des autres est très importante.
Nous donnons de nombreux messages de sécurité importants dans ce manuel et sur votre appareil ménager. Assurez-vous de
toujours lire tous les messages de sécurité et de vous y conformer.
AVERTISSEMENT
DANGER
Voici le symbole d’alerte de sécurité.
Ce symbole d’alerte de sécurité vous signale les dangers potentiels de décès et de blessures graves à vous
et à d’autres.
Tous les messages de sécurité suivront le symbole d’alerte de sécurité et le mot “DANGER” ou
“AVERTISSEMENT”. Ces mots signifient :
AVERTISSEMENT :
réfrigérateur, prendre quelques précautions fondamentales, y compris les suivantes :
Pour réduire les risques d'incendie, de choc électrique ou des blessures lors de l'utilisation du
IMPORTANTES INSTRUCTIONS DE SÉCURITÉ
CONSERVEZ CES INSTRUCTIONS
■ Brancher l'appareil sur une prise à 3 alvéoles reliée à la
terre.
■ Ne pas enlever la broche de liaison à la terre.
■ Ne pas utiliser un adaptateur.
■ Ne pas utiliser un câble de rallonge.
■ Débrancher la source de courant électrique avant
l'entretien.
■ Replacer pièces et panneaux avant de faire la remise en
marche.
■ Enlever les portes de votre vieux réfrigérateur.
■ Utiliser un produit de nettoyage ininflammable.
■ Garder les matériaux et les vapeurs inflammables, telle que
l'essence, loin du réfrigérateur.
■ Utiliser deux ou plus de personnes pour déplacer et
installer le réfrigérateur.
■ Débrancher le réfrigérateur avant l'installation de la
machine à glaçons (seulement pour modèles prêts à
recevoir une machine à glaçons).
Avertissements de la proposition 65 de l'État de Californie :
AVERTISSEMENT : Ce produit contient au moins un produit chimique connu par l’État de Californie pour être à l’origine de
cancers.
AVERTISSEMENT : Ce produit contient au moins un produit chimique connu par l’État de Californie pour être à l’origine de
malformations et autres déficiences de naissance.

17
Mise au rebut appropriée
de votre vieux réfrigérateur
IMPORTANT : L'emprisonnement et l'étouffement des enfants ne
sont pas un problème du passé. Les réfrigérateurs jetés ou
abandonnés sont encore dangereux, même s'ils sont laissés
abandonnés pendant “quelques jours seulement”. Si vous vous
débarrassez de votre vieux réfrigérateur, veuillez suivre les
instructions suivantes pour aider à éviter les accidents.
Avant de jeter votre vieux réfrigérateur ou congélateur :
■ Enlever les portes.
■ Laisser les tablettes en place de sorte que les enfants ne
puissent pas y pénétrer facilement.
INSTRUCTIONS D'INSTALLATION
Déballage du réfrigérateur
Retirer les matériaux d’emballage
IMPORTANT : Ne pas enlever le dispositif de refoulement de l’air
en mousse blanche de derrière le tableau de commande sur le
plafond du réfrigérateur. Si le dispositif est enlevé, de la glace peut
se former en provenance du congélateur et causer la formation de
glaçons.
■ Enlever le ruban adhésif et tout résidu de colle des surfaces
du réfrigérateur avant de le mettre en marche. Frotter une
petite quantité de savon liquide à vaisselle sur l’adhésif avec
les doigts. Rincer à l’eau tiède et essuyer avec un chiffon
doux.
■ Ne pas utiliser d’instruments coupants, d’alcool à friction, de
liquides inflammables ou de nettoyants abrasifs pour enlever
le ruban adhésif ou la colle. Ces produits peuvent
endommager la surface de votre réfrigérateur. Pour plus de
renseignements, voir “Sécurité du réfrigérateur”.
Nettoyage avant l’utilisation
Après avoir enlevé tous les matériaux d’emballage, nettoyer
l’intérieur du réfrigérateur avant de l’utiliser. Voir les instructions
de nettoyage dans la section “Entretien du réfrigérateur”.
AVERTISSEMENT
Risque de suffoquer
Enlever les portes de votre vieux réfrigérateur.
Le non-respect de cette instruction peut causer
un décès ou des lésions cérébrales.
Renseignements importants à propos de la mise au
rebut des fluides réfrigérants :
Mettre le réfrigérateur au rebut conformément à la
réglementation fédérale et locale. Les fluides réfrigérants
doivent être évacués par un technicien certifié et agréé par
l’EPA conformément aux procédures établies.
AVERTISSEMENT
Risque du poids excessif
Utiliser deux ou plus de personnes pour déplacer et
installer le réfrigérateur.
Le non-respect de cette instruction peut causer
une blessure au dos ou d'autre blessure.
Déplacement de votre réfrigérateur :
Votre réfrigérateur est lourd. Lors du déplacement de votre
réfrigérateur pour le nettoyage ou un entretien ou réparation,
veiller à recouvrir le plancher avec du carton ou un panneau
de fibres dures pour éviter qu'il ne subisse tout dommage.
Toujours tirer le réfrigérateur tout droit lors de son
déplacement. Ne pas incliner le réfrigérateur d’un côté ou de
l’autre ni le “faire marcher” en essayant de le déplacer car le
plancher pourrait être endommagé.
Importants renseignements à savoir au sujet des tablettes
et des couvercles en verre :
Ne pas nettoyer les tablettes ou couvercles en verre avec de
l’eau tiède quand ils sont froids. Les tablettes et les
couvercles peuvent se briser s'ils sont exposés à des
changements soudains de température ou à un impact tel
que coup brusque. Le verre trempé est conçu pour éclater
en d’innombrables pièces minuscules. Ceci est normal. Les
tablettes et les couvercles en verre sont lourds. Les saisir à
deux mains lors de leur dépose afin d'éviter de les faire
tomber.

18
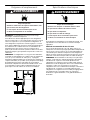
Exigences d'emplacement
IMPORTANT : Ce réfrigérateur est conçu pour un usage
domestique, à l’intérieur uniquement.
Pour obtenir une aération appropriée pour votre réfrigérateur,
laisser un espace de ½" (1,25 cm) de chaque côté et au sommet.
Laisser un espace de 1" (2,54 cm) derrière le réfrigérateur. Si
votre réfrigérateur comporte une machine à glaçons, s’assurer
qu’un espace additionnel est prévu à l’arrière pour permettre les
raccordements des conduits d’eau. En cas d’installation du
réfrigérateur près d’un mur fixe, laisser un minimum de 2"
(5,08 cm) du côté de la charnière (certains modèles nécessitent
davantage d’espace) pour permettre à la porte de s’ouvrir sans
obstruction.
REMARQUE : Ce réfrigérateur est conçu pour être utilisé dans
un endroit où la température est comprise entre un minimum de
55°F (13°C) et un maximum de 110°F (43°C). La plage de
température ambiante idéale pour une performance optimale est
comprise entre 60°F (15°C) et 90°F (32°C). Respecter cette plage
de température permet aussi de réduire la consommation
d'électricité et d'optimiser l'efficacité du refroidissement. Il est
recommandé de ne pas installer le réfrigérateur près d'une
quelconque source de chaleur, tel un four ou un radiateur.
Spécifications électriques
Avant de placer le réfrigérateur à son emplacement final, il est
important de vous assurer d'avoir la connexion électrique
appropriée.
Méthode recommandée de mise à la terre
Une source d'alimentation de 115 volts, 60 Hz, type 15 ou
20 ampères CA seulement, protégée par fusible et adéquatement
mise à la terre, est nécessaire. Il est recommandé d'utiliser un
circuit distinct pour alimenter uniquement votre réfrigérateur.
Utiliser une prise murale qui ne peut pas être mise hors circuit à
l'aide d'un commutateur. Ne pas utiliser un câble de rallonge.
REMARQUE : Avant d’installer ou de nettoyer un quelconque
élément, ou de retirer une ampoule d’éclairage, désactiver le
refroidissement ou placer la commande (du thermostat,
réfrigérateur ou congélateur selon le modèle) à OFF (arrêt) et
débrancher ensuite le réfrigérateur de la source d’alimentation
électrique. Lorsque vous avez terminé, reconnecter le
réfrigérateur à la source d’alimentation électrique et réactiver le
refroidissement ou replacer la commande (du thermostat,
réfrigérateur ou congélateur selon le modèle) au réglage désiré.
Voir “Utilisation des commandes” dans les instructions
d’utilisation, le guide d’utilisation, ou le guide d’utilisation et
d’entretien.
Risque d'explosion
Garder les matériaux et les vapeurs inflammables, telle
que l'essence, loin du réfrigérateur.
Le non-respect de cette instruction peut causer
un décès, une explosion ou un incendie.
AVERTISSEMENT
1
/
2" (1,25 cm)
2" (5,08 cm)
AVERTISSEMENT
Risque de choc électrique
Brancher sur une prise à 3 alvéoles reliée à la terre.
Ne pas enlever la broche de liaison à la terre.
Ne pas utiliser un adaptateur.
Ne pas utiliser un câble de rallonge.
Le non-respect de ces instructions peut causer
un décès, un incendie ou un choc électrique.

19
Spécifications de l’alimentation en eau
Rassembler les outils et pièces nécessaires avant de commencer
l'installation. Lire et suivre les instructions fournies avec les outils
indiqués ici.
Outillage Requis :
REMARQUE : Votre marchand de réfrigérateurs dispose d'une
trousse disponible avec un robinet d’arrêt à étrier de ¹⁄₄"
(6,35 mm), un raccord et un tube en cuivre. Avant l’achat,
s’assurer que le robinet d’arrêt à étrier est conforme à vos codes
locaux de plomberie. Ne pas employer de robinet d’arrêt à étrier
de ³⁄₁₆" (4,76 mm) ou de type à percer, ce qui réduit le débit d’eau
et cause une obstruction plus facilement.
IMPORTANT :
■ Toutes les installations doivent être conformes aux exigences
des codes locaux de plomberie.
■ Utiliser un tube en cuivre et vérifier s’il y a des fuites. Installer
les tubes en cuivre seulement à des endroits où la
température se maintient au-dessus du point de congélation.
Pression de l'eau
Une alimentation en eau froide avec une pression comprise entre
30 et 120 lb/po
2
(207 et 827 kPa) est nécessaire pour faire
fonctionner le distributeur d'eau et la machine à glaçons. Si vous
avez des questions au sujet de la pression de votre eau, appeler
un plombier qualifié agréé.
Alimentation en eau par osmose inverse
IMPORTANT : La pression de l'alimentation en eau entre le
système d'osmose inverse et la valve d'arrivée d'eau du
réfrigérateur doit être entre 30 et 120 lb/po² (207 et 827 kPa).
Si un système de purification de l'eau par osmose inverse est
raccordé à votre alimentation en eau froide, la pression de l'eau
au système doit être d'un minimum de 40 à 60 lb/po² (276 à
414 kPa).
Si la pression de l'eau au système d'osmose inverse est
inférieure à 40 à 60 lb/po
2
(276 à 414 kPa) :
■ Vérifier si le filtre à sédiments du système d'osmose inverse
est bloqué et le remplacer si nécessaire.
■ Laisser le réservoir du système d'osmose inverse se remplir
après une utilisation intense.
Si vous avez des questions au sujet de la pression de votre eau,
appeler un plombier qualifié agréé.
Raccordement de la canalisation d'eau
Lire toutes les instructions avant de commencer.
IMPORTANT : Si on doit mettre le réfrigérateur sous tension
avant qu’il soit raccordé à la canalisation d’eau, placer la
commande de la machine à glaçons à la position OFF (arrêt).
Raccordement à une canalisation d’eau
1. Débrancher le réfrigérateur ou déconnecter la source de
courant électrique.
2. FERMER le robinet principal d’arrivée d’eau. OUVRIR le
robinet de puisage le plus proche pendant une période
suffisante pour que la canalisation d’eau se vide.
3. Trouver une canalisation d’eau froide verticale de
¹⁄₂" à 1¹⁄₄" (1,25 cm à 3,18 cm) près du réfrigérateur.
IMPORTANT :
■ Assurez-vous qu'il s'agit d'un conduit d'eau froide.
■ Un conduit horizontal fonctionnera, mais percer par le
dessus de la canalisation et non pas par le dessous.
Ainsi, l’eau ne risquera pas d’arroser la perceuse. Ceci
empêche également les sédiments qu’on trouve
normalement dans l’eau de s’accumuler dans le robinet.
4. Pour déterminer la longueur du tube en cuivre, il faut mesurer
la distance entre le point de connexion inférieur gauche à
l’arrière du réfrigérateur et la canalisation d'eau. Ajouter une
longueur de 7 pi (2,1 m) pour permettre le déplacement du
réfrigérateur pour le nettoyage. Utiliser un tube en cuivre de
¹⁄₄" (6,35 mm) de diamètre extérieur. Veiller à ce que le tube
soit coupé d’équerre aux deux extrémités.
5. À l’aide d’une perceuse sans fil, percer un trou de ¹⁄₄" dans le
tuyau de canalisation d’eau froide choisi.
6. Fixer le robinet d’arrêt sur la canalisation d’eau froide avec la
bride de tuyau. Vérifier que le raccord de sortie du robinet est
bien engagé dans le trou de ¹⁄₄" percé dans la canalisation et
que la rondelle d’étanchéité est placée sous la bride de
tuyau. Serrer l’écrou de serrage. Serrer lentement et
uniformément les vis de la bride de tuyau afin que la rondelle
forme une jonction étanche. Ne pas serrer excessivement car
ceci pourrait provoquer l’écrasement du tube en cuivre.
7. Enfiler l’écrou et la bague de compression du raccord sur le
tube en cuivre comme on le voit sur l’illustration. Insérer
l’extrémité du tube tout droit et aussi loin que possible dans
l’ouverture de sortie du robinet. Visser l’écrou de
compression sur l'ouverture de sortie avec une clé à molette.
Ne pas serrer excessivement.
8. Placer le bout libre du tube dans un contenant ou évier et
OUVRIR le robinet principal d’arrivée d’eau; laisser l’eau
s’écouler par le tube jusqu’à ce que l’eau soit limpide.
FERMER le robinet principal d’arrivée d’eau. Enrouler le tube
en cuivre en spirale.
■ Tournevis à lame plate
■ Clés plates de ⁷⁄₁₆" et ¹⁄₂" ou
deux clés à molette
■ Tourne-écrou de ¹⁄₄"
■ Foret de ¹⁄₄"
■ Perceuse sans fil
A. Canalisation d’eau froide
B. Bride de tuyau
C. Tube en cuivre
D. Écrou de compression
E. Bague de compression
F. Robinet d’arrêt
G. Écrou de serrage
A
B
C
DEF
G

20
Raccordement au réfrigérateur
1. Débrancher le réfrigérateur ou déconnecter la source de
courant électrique.
2. Connecter le tube en cuivre au robinet d'arrivée d’eau en
utilisant un écrou et une bague de compression tel qu’illustré.
Serrer l’écrou de compression. Ne pas serrer excessivement.
3. Utiliser la bride du tube à l'arrière du réfrigérateur pour fixer le
tube au réfrigérateur tel qu'illustré. Ceci aide à éviter
d'endommager le tube lorsque le réfrigérateur est poussé
contre le mur.
4. OUVRIR le robinet d’arrêt.
5. Inspecter pour rechercher les fuites. Serrer tous les raccords
(y compris les raccordements de la valve d’entrée d’eau) ou
les écrous qui coulent.
6. La machine à glaçons est équipée d’un filtre à eau incorporé.
Si la qualité de l’eau distribuée localement nécessite un
deuxième filtre à eau, l'installer dans la canalisation d'eau de
¹⁄₄" (6,35 mm) à l'une ou l'autre extrémité de la canalisation.
On peut obtenir un tel filtre à eau chez le marchand
d’appareils électroménagers le plus proche.
Achever l’installation
1. Brancher sur une prise à 3 alvéoles reliée à la terre.
REMARQUE : Attendre 24 heures pour produire la première
quantité de glaçons. Jeter les trois premières quantités de
glaçons produites. Attendre 3 jours pour que le bac à glaçons se
remplisse entièrement.
Portes du réfrigérateur
En fonction de la largeur de l’ouverture de la porte, il faudra peut-
être retirer les portes pour pouvoir introduire le réfrigérateur dans
le domicile. Les charnières de portes ont été installées à l'usine
sur le côté droit de l'appareil. Si l'on souhaite que la porte puisse
s'ouvrir depuis le côté opposé, le sens d'ouverture de la porte
doit être inversé.
IMPORTANT :
■ Avant de commencer, tourner la commande du réfrigérateur à
OFF (arrêt), débrancher le réfrigérateur ou déconnecter la
source de courant électrique. Retirer les aliments et tout
balconnet ou compartiment utilitaire des portes du
réfrigérateur.
■ Selon le modèle, le réfrigérateur comporte soit des portes
profilées de Style 1 ou des portes standard de Style 2.
Consulter le schéma correspondant à votre modèle plus loin
dans cette section après “Étapes finales”.
REMARQUE : On peut acheter un ensemble d’inversion du
sens d’ouverture qui comprend une nouvelle insigne de la
marque ainsi que des bouchons d’obturation.
Outillage nécessaire : Clé à douille à tête hexagonale de ⁵⁄₁₆",
tournevis Phillips n° 2, tournevis à lame plate, clé plate de ⁵⁄₁₆",
couteau à mastic plat de 2".
Démontage des portes et charnières
Vis de charnière à tête hexagonale de
⁵⁄₁₆
"
1. Débrancher le réfrigérateur ou déconnecter la source de
courant électrique.
2. Utiliser une clé à douille hexagonale, retirer les trois vis de
charnière à tête-hexagonale de ⁵⁄₁₆" de la charnière
supérieure et les soulever pour retirer la charnière. Voir
l'illustration de la charnière supérieure.
REMARQUE : Prévoir un support additionnel des portes
pendant le déplacement des charnières. La force d’attraction
des aimants des portes ne suffit pas à les maintenir en place.
3. Soulever la porte du congélateur pour la séparer de la
charnière centrale et la conserver à part.
4. Retirer la rondelle du sommet de l'axe de la charnière
centrale.
A. Bride de tube
B. Vis de bride de tube
C. Tube en cuivre
D. Écrou de compression
E. Valve d'entrée d'eau
A
C
B
D
E
AVERTISSEMENT
Risque de choc électrique
Brancher sur une prise à 3 alvéoles reliée à la terre.
Ne pas enlever la broche de liaison à la terre.
Ne pas utiliser un adaptateur.
Ne pas utiliser un câble de rallonge.
Le non-respect de ces instructions peut causer
un décès, un incendie ou un choc électrique.
A. Rondelle
A
La page charge ...
La page charge ...
La page charge ...
La page charge ...
La page charge ...
La page charge ...
La page charge ...
La page charge ...
La page charge ...
La page charge ...
La page charge ...
La page charge ...
-
 1
1
-
 2
2
-
 3
3
-
 4
4
-
 5
5
-
 6
6
-
 7
7
-
 8
8
-
 9
9
-
 10
10
-
 11
11
-
 12
12
-
 13
13
-
 14
14
-
 15
15
-
 16
16
-
 17
17
-
 18
18
-
 19
19
-
 20
20
-
 21
21
-
 22
22
-
 23
23
-
 24
24
-
 25
25
-
 26
26
-
 27
27
-
 28
28
-
 29
29
-
 30
30
-
 31
31
-
 32
32


Whirlpool WRT108FZDM Le manuel du propriétaire
- Catégorie
- Frigos
- Taper
- Le manuel du propriétaire
dans d''autres langues
- English: Whirlpool WRT108FZDM Owner's manual
Documents connexes
-
Whirlpool WRT311FZDB Manuel utilisateur
-
Whirlpool WRT519SZDM00 Le manuel du propriétaire
-
Whirlpool WRT518SZFM Guide d'installation
-
Whirlpool EB9FVBXWQ01 Mode d'emploi
-
-
-
Whirlpool WRT312CZJB Mode d'emploi
-
-
-
Whirlpool WRB533CZJB Le manuel du propriétaire
Autres documents
-
KitchenAid KRFF300ESS Manuel utilisateur
-
KitchenAid KFFS20EYMS Manuel utilisateur
-
IKEA IX5BBEXDS00 Le manuel du propriétaire
-
-
Maytag 501963702076/D Manuel utilisateur
-
IKEA IK8FXNGFDM01 Le manuel du propriétaire
-
Danby DFF501WDD Manuel utilisateur
-
White-Westinghouse FRTX18N5BW0 Le manuel du propriétaire
-
Shimano BL-7402 Service Instructions