KitchenAid KRMF706ESS Guide d'installation
- Catégorie
- Frigos
- Taper
- Guide d'installation

333333
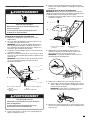
Proper Disposal of Your Old Refrigerator
IMPORTANT: Child entrapment and suffocation are not problems
of the past. Junked or abandoned refrigerators are still dangerous
– even if they will sit for “just a few days.” If you are getting rid of
your old refrigerator, please follow these instructions to help
prevent accidents.
Before You Throw Away Your Old Refrigerator or Freezer:
■ Take off the doors.
■ Leave the shelves in place so that children may not easily
climb inside.
INSTALLATION INSTRUCTIONS
Unpack the Refrigerator
Remove the Packaging
■ Remove tape and glue residue from surfaces before turning
on the refrigerator. Rub a small amount of liquid dish soap
over the adhesive with your fingers. Wipe with warm water
and dry.
■ Do not use sharp instruments, rubbing alcohol, flammable
fluids, or abrasive cleaners to remove tape or glue. These
products can damage the surface of your refrigerator. For
more information, see “Refrigerator Safety.”
■ Dispose of/recycle all packaging materials.
Clean Before Using
After you remove all of the packaging materials, clean the inside of
your refrigerator before using it. See the cleaning instructions in
“Refrigerator Care.”
WARNING
Suffocation Hazard
Remove doors from your old refrigerator.
Failure to do so can result in death or brain damage.
Important information to know about disposal of
refrigerants:
Dispose of refrigerator in accordance with Federal and Local
regulations. Refrigerants must be evacuated by a licensed,
EPA certified refrigerant technician in accordance with
established procedures.
WARNING
Excessive Weight Hazard
Use two or more people to move and install
refrigerator.
Failure to do so can result in back or other injury.
When Moving Your Refrigerator:
Your refrigerator is heavy. When moving the refrigerator for
cleaning or service, be sure to cover the floor with
cardboard or hardboard to avoid floor damage. Always pull
the refrigerator straight out when moving it. Do not wiggle or
“walk” the refrigerator when trying to move it, as floor
damage could occur.
Important information to know about glass shelves
and covers:
Do not clean glass shelves or covers with warm water when
they are cold. Shelves and covers may break if exposed to
sudden temperature changes or impact, such as bumping.
Tempered glass is designed to shatter into many small,
pebble-size pieces. This is normal. Glass shelves and covers
are heavy. Use both hands when removing them to avoid
dropping.

444444
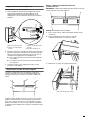
Remove and Replace Refrigerator Doors
NOTE: Measure the width of your door opening to see whether or not you need to remove the refrigerator doors to move the refrigerator
into your home. If door removal is necessary, see the following instructions.
IMPORTANT: If the refrigerator was previously installed and you are moving it out of the home, before you begin, turn the refrigerator
control OFF. Unplug the refrigerator or disconnect power. Remove food and adjustable door or utility bins from doors.
Gather the required tools and read all instructions before removing doors.
TOOLS NEEDED: ³⁄₁₆" hex key and a #2 Phillips screwdriver
WARNING
Electrical Shock Hazard
Disconnect power before removing doors.
Failure to do so can result in death or electrical shock.
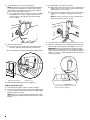
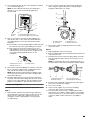
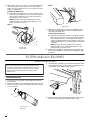
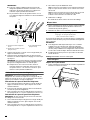
Door Removal and Replacement
Wiring Plug
Top Left Hinge
BA
C
A. ³⁄₁₆" Internal Hex-Head Screws
B. Ground Wire (Do Not Remove)
C. Do Not Remove Screws
Water Dispenser
Tubing Connection
A
A. Outer Ring
Top Right Hinge
A. ³⁄₁₆"
Internal Hex-Head Screws
B. Hinge Cover Screw
C. Top Hinge Cover
D. Top Hinge
C
B
A
D
90˚
Door at 90˚ Angle
to Cabinet

555555
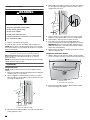
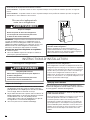
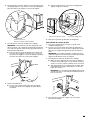
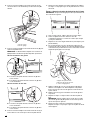
Bottom Door Hinge
For your convenience, the refrigerator doors have bottom hinges
with door closers. These closers allow the doors to swing fully
closed with just a gentle push.
IMPORTANT: So that the closers feature will operate properly, the
doors must be removed only when open to a 90° angle to the front
of the cabinet. If one or both doors were not at a 90° angle when
removed, the bottom door hinge must be reset.
Reset the Door Hinge
1. Lift the door from the bottom hinge pin and place it on a
flat surface.
2. Using a driver with a #2 square bit, remove the bottom
hinge with the bushing from the cabinet.
3. Insert the bottom hinge and bushing into the corresponding
slot in the bottom of the door.
NOTE: Make sure that the base of the hinge is parallel to the
bottom of the door.
4. Turn the hinge until the hinge base is at a 90° angle to the
bottom edge of the door.
5. Remove the hinge from the door. Using a driver with a
#2 square bit, reattach the bottom hinge to the refrigerator
cabinet.
6. The hinge is now reset and prepared for the door to be
replaced. See “Replace Refrigerator Doors” later in this
section.
A. Bushing
B. Hinge base
90˚
A
B
A. Hinge base parallel to the bottom edge of the door
A. Hinge base turned to a 90° angle with the
bottom edge of the door
A
90°
A

666666
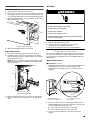
Remove Refrigerator Doors
Remove Right-Hand Refrigerator Door
1. Unplug refrigerator or disconnect power.
2. Keep the refrigerator doors closed until you are ready to lift
them free from the cabinet.
NOTE: Provide additional support for the refrigerator door
while the hinges are being removed. Do not depend on the
door gasket magnets to hold the door in place while you are
working.
3. Using a Phillips screwdriver, remove the cover from the top
hinge.
4. Using the ³⁄₁₆" hex key, remove the two internal hex-head
screws from the top hinge and set aside.
NOTE: Do not remove the two locator screws. These screws
will help you align the hinge when you replace the door.
5. Open the door until it is at a 90° angle to the front of the
cabinet.
6. Lift the refrigerator door from the bottom hinge pin. The top
hinge will come away with the door.
Remove Left-Hand Refrigerator Door
IMPORTANT: The tubing and wiring for the water dispenser run
through the left-hand door hinge, so they must be disconnected
before removing the door.
1. Using a Phillips screwdriver, remove the cover from the top
hinge.
2. Disconnect the water dispenser tubing located on top of the
door hinge by firmly pulling up on the clasp. Then, pull the
tubing out of the fitting.
NOTE: The water dispenser tubing remains attached to the
left-hand refrigerator door.
3. Disconnect the wiring plug located on top of the door hinge.
■ Grasp each side of the wiring plug. With your left thumb,
press down to release the catch and pull the sections of
the plug apart.
NOTE: Do not remove the green, ground wire. It should
remain attached to the door hinge.
4. Using the ³⁄₁₆" hex key wrench, remove the two internal
hex-head screws from the top hinge and set aside.
A. Top hinge cover screw
B. Top hinge cover
C.
³⁄₁₆
" Internal hex-head screws
D. Top hinge
WARNING
Electrical Shock Hazard
Disconnect power before removing doors.
Failure to do so can result in death or electrical shock.
A
B
C
D
WARNING
Excessive Weight Hazard
Use two or more people to lift the refrigerator door.
Failure to do so can result in back or other injury.
A. Top hinge cover screwB.Top hinge cover
A
B

777777
NOTES:
■ Provide additional support for the refrigerator door while
the hinges are being removed. Do not depend on the door
gasket magnets to hold the door in place while you are
working.
■ Do not remove the two locator screws. These screws will
help you align the hinge when you replace the door.
5. Open the door until it is at a 90° angle to the front of the
cabinet.
6. Lift the refrigerator door from the bottom hinge pin. The top
hinge will come away with the door.
NOTE: It may not be necessary to remove the bottom hinges
and brake feet assemblies to move the refrigerator through a
doorway.
■ Only if necessary, use a driver with a #2 square bit tip to
remove the bottom hinges and a ³⁄₈" nut driver to remove
the brake feet screws.
Replace Refrigerator Doors
IMPORTANT: To avoid damage to the refrigerator doors, they
must be replaced at a 90° angle to the front of the cabinet. You
should not have to force the door onto the hinge if it is at the
correct angle.
Replace Right-Hand Refrigerator Door
1. Holding the right-hand door at a 90° angle to the front of the
cabinet, set the door onto the bottom hinge pin.
2. Insert the top hinge pin into the open hole in the top of the
refrigerator door.
3. Using the two ³⁄₁₆" internal hex-head screws, fasten the hinge
to the cabinet. Do not tighten the screws completely.
Replace Left-Hand Refrigerator Door
IMPORTANT: Do not intertwine the water tubing and wiring
bundles when reconnecting them.
1. Holding the left-hand door at a 90° angle to the front of the
cabinet, set the door onto the bottom hinge pin.
2. Using the two ³⁄₁₆" internal hex-head screws, fasten the hinge
to the cabinet. Do not tighten the screws completely.
3. Reconnect the water dispenser tubing.
Style 1 - Insert the tubing into the fitting until it stops and the
outer ring is touching the face of fitting.
Style 2 - Insert the tubing firmly into the fitting until it stops.
Close the clasp around the tubing. The clasp snaps into place
between the fitting and the collar.
4. Reconnect the electrical wiring.
■ Push together the two sections of the wiring plug.
Final Steps
1. Completely tighten the four internal hex-head screws (two
on the right-hand door hinge and two on the left-hand door
hinge).
2. Replace both top hinge covers.
Remove and Replace Drawer Fronts
Depending on the width of your door opening, it may be
necessary to remove the drawer fronts to move the refrigerator
into your home.
IMPORTANT:
■ If the refrigerator was previously installed and you are moving
it out of the home, before you begin, turn the refrigerator
control OFF, and unplug the refrigerator or disconnect power.
Remove food from the drawers.
■ Two people may be required to remove and replace the
drawer fronts.
Tools Needed: Flat-blade screwdriver
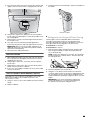
Refrigerated Drawers
Remove the Drawer Fronts
1. Open the drawer to its full extension. Grasp the sides of the
interior bin, and then lift up and out to remove.
2. Left-hand drawer only: Remove the wiring connection cover.
Press in on the side of the cover to release the tab from the
slot, and then pull the cover away from the bracket.
A.
³⁄₁₆
" Internal hex-head screws
B. Ground wire (Do not remove)
C. Locator screws (Do not
remove)
A B
C
A. Cover tab
B. Wiring connection cover
A
B

888888
3. Left-hand drawer only: Disconnect the wiring.
NOTE: The drawer front of the left-hand refrigerated drawer
is connected to the temperature control by wires running
underneath the drawer glide. Before removing the drawer
front, the wires must be disconnected.
■ On one side of the wiring connector, insert the screwdriver
blade between the connector tab and the connector to
release. Repeat for the opposite side. Pull the wiring
connector apart.
4. Remove the drawer front.
■ Push up on the lever at the bottom of the drawer glide
bracket to release the drawer front from the bracket.
■ Lift the drawer front up and off the drawer glide brackets.
5. Slide the drawer glides back into the refrigerator.
Replace the Drawer Fronts
1. Pull out the drawer glides until they are fully extended.
2. Push up on the lever at the bottom of the drawer glide bracket
to open. Insert the drawer front bracket into the drawer glide
bracket and release the lever.
NOTE: It helps if one person holds the drawer glides steady
while another person aligns the drawer front and connects the
brackets.
3. Left-hand drawer only: Reconnect wiring.
■ Align the two ends of the wiring connector and push them
together until you hear a “click” sound and feel the tabs
snap into place on the connector.
■ Gently pull on the wiring connection to ensure the wiring
connection is completely seated. Replace the wiring
cover.
NOTE: The wiring connection must be complete for the
drawer temperature control to operate.
4. Left-hand drawer only: Replace the wiring connection cover.
5. Replace the drawer bins onto the drawer glides with the rear
side of the bin facing the back of the refrigerator as shown.
IMPORTANT: The Door Ajar alarm will sound if the interior
drawer bins are not replaced correctly. The bins are designed
with a specific front and rear. They must be placed into the
drawers, as shown, so that the refrigerated drawers will close
and operate properly.
A. Drawer glide bracket B. Release lever
A
B
A. Faces back of refrigerator (insert first)
B. Faces front of refrigerator
A
B

999999
Freezer Drawer
Remove Drawer Front
1. Open the freezer drawer to its full extension.
2. Loosen the two top screws that fasten the drawer front to the
drawer glides. The two screws (one on the left-hand side and
one on the right-hand side) are located inside the drawer front.
3. Lift up on the drawer front to release the plastic studs from the
drawer glide bracket slots.
4. Slide the drawer glides back into the freezer.
Replace Drawer Front
1. Pull out the freezer drawer glides to their full extension.
2. Holding the drawer front by its sides, align the two plastic
studs, located at the bottom, inside the drawer front, with the
drawer glide bracket slots.
NOTE: It helps if one person holds the drawer glides steady
while another person aligns the drawer front and inserts the
studs into the slots.
3. Replace and tighten the two screws at the top of the drawer
front (one on the left-hand side and one on the right-hand
side).
Final Steps
1. Plug into a grounded 3 prong outlet.
2. Reset the controls. See “Using the Control(s)” and
“Temperature Controlled Exterior Drawer.”
3. Return all removable parts and the food to the drawers.
Align Doors and Drawers
Once the doors and drawer fronts are replaced on the refrigerator,
you may notice that the doors appear angled or that they are no
longer level. Both the refrigerator doors and refrigerated drawers
are adjustable.
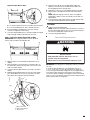
Align Refrigerator Door
Tools Provided: ¹⁄₈" hex key
1. Keeping both refrigerator doors closed, pull out the right-hand
refrigerated drawer. Locate the bottom hinge pin of the
refrigerator door. The alignment screw is inside the bottom
hinge pin.
2. Insert the short end of the ¹⁄₈" hex key (packed with the Door
Handle Installation Instructions) into the bottom hinge pin until
it is fully engaged in the alignment screw.
■ To raise the door, turn the hex key to the right.
■ To lower the door, turn the hex key to the left.
3. Continue to turn the alignment screw until the doors are
aligned.
A. Drawer glide bracket slots
A. Drawer front screw
B. Drawer front plastic stud
A
A
B
A. Bottom hinge pin
B. Turn to the right to raise.
C. Turn to the left to lower.
D.
¹⁄₈
" Hex key
Electrical Shock Hazard
Plug into a grounded 3 prong outlet.
Do not remove ground prong.
Do not use an adapter.
Do not use an extension cord.
Failure to follow these instructions can result in death,
fire, or electrical shock.
WARNING
A
B
C
D

101010101010
Align Refrigerated Drawer Fronts
When the drawer fronts are aligned, the width of the vertical space
(A) between the refrigerator doors (B) and the drawer fronts (C) is
the same thickness, and the drawers appear level.
Aligning the drawer fronts is a two-step process. The first step is
to adjust the drawer fronts up and down. The second step shifts
the drawer fronts from side to side. Visually inspect the
refrigerator for alignment and adjust the drawer fronts as needed.
Step 1 - Adjust the Drawer Fronts Up/Down
IMPORTANT: Each refrigerated drawer can be adjusted up and
down on both the left and the right sides.
Tools Needed: Phillips screwdriver
1. With the drawers closed, identify the drawer front that needs
to be raised or lowered.
2. Open the drawer to its full extension. Grasp the sides of the
interior bin, and then lift it up and out to remove.
3. Locate the drawer glide brackets (A).
4. Insert the Phillips screwdriver into screw (A) and turn
counterclockwise to loosen the drawer front.
5. Insert the Phillips screwdriver into screw (B) to adjust the
drawer front.
IMPORTANT: The direction you turn screw (B) depends
on which side of the drawer you are adjusting.
Left-Hand Side Drawer Glide
■ To raise the drawer front, turn screw (B) clockwise.
■ To lower the drawer front, turn screw (B)
counterclockwise.
A
B
C
B
C
A. Drawer glide brackets
A. Tightening screw
B. Adjusting screw
A
A
B

111111111111
Right-Hand Side Drawer Glide
■ To raise the drawer front, turn screw (B) counterclockwise.
■ To lower the drawer front, turn screw (B) clockwise.
6. Insert the Phillips screwdriver into screw (A), and turn
clockwise to tighten the drawer front.
7. Close the refrigerated drawer to check the alignment. Repeat
steps 2 through 6 until the drawer fronts are level.
Step 2 - Adjust the Drawer Fronts Side-to-Side
IMPORTANT: Each refrigerated drawer can be adjusted
side-to-side on both the left and right side.
1. With the drawers closed, identify the drawer that is not
aligned.
2. Open the drawer to its full extension. Grasp the sides of
the interior bin, and then lift it up and out to remove. (See
step 1 for further details.)
3. Locate the drawer glide brackets. (See step 1 for further
details.)
4. Starting with the glide bracket closest to the vertical gap,
press and hold the release lever (C) up. With your other
hand, lift the door clip (A) from the bracket (B).
5. Reposition the clip (A) onto the glide bracket (B) in the
direction you want to move the drawer front. Make sure
that the glide bracket is vertically level.
6. Release the lever (C) to lock the glide bracket into position.
7. Repeat steps 3 through 6 for the other side of the drawer
front.
NOTE: Adjust the clip (A) on the top of the second glide
bracket (B) so that it is in the same position as the side you
adjusted first.
8. Close the drawer and visually inspect the gap. Repeat steps
2 though 7 until the drawer fronts are aligned.
Final Steps
1. Replace the interior drawer bins.
NOTE: The bins must be placed into the drawers correctly so
that the refrigerated drawers will close and operate properly.
See “Remove and Replace Drawer Fronts.”
2. Close the refrigerated drawers.
Location Requirements
IMPORTANT: This refrigerator is designed for indoor, household
use only.
To ensure proper ventilation for your refrigerator, allow for a
¹⁄₂" (1.25 cm) of space on each side and at the top. Allow for a
1" (2.54 cm) space behind the refrigerator. If your refrigerator has
an ice maker, allow extra space at the back for the water line
connections. When installing your refrigerator next to a fixed wall,
leave a 3³⁄₄" (9.5 cm) minimum space between the refrigerator and
wall to allow the door to swing open.
A. Drawer front clip
B. Drawer glide bracket
C. Release lever
A
B
C
B
A
WARNING
Explosion Hazard
Keep flammable materials and vapors, such as
gasoline, away from refrigerator.
Failure to do so can result in death, explosion, or fire.

121212121212
NOTE: This refrigerator is intended for use in a location where the
temperature ranges from a minimum of 55°F (13°C) to a maximum
of 110°F (43°C). The preferred room temperature range for
optimum performance, which reduces electricity usage and
provides superior cooling, is between 60°F (15°C) and 90°F
(32°C). It is recommended that you do not install the refrigerator
near a heat source, such as an oven or radiator.
Electrical Requirements
Before you move your refrigerator into its final location, it is
important to make sure you have the proper electrical connection.
Recommended Grounding Method
A 115-volt, 60 Hz, AC-only 15- or 20-amp fused, grounded
electrical supply is required. It is recommended that a separate
circuit serving only your refrigerator and approved accessories be
provided. Use an outlet that cannot be turned off by a switch. Do
not use an extension cord.
NOTE: Before performing any type of installation, cleaning, or
removing a light bulb, turn off Cooling, and then disconnect the
refrigerator from the electrical source. When you have finished,
reconnect the refrigerator to the electrical source and turn on
Cooling. See “Using the Control(s).”
Water Supply Requirements
A cold water supply with water pressure between 35 and 120 psi
(241 and 827 kPa) is required to operate the water dispenser and
ice maker. If you have questions about your water pressure, call a
licensed, qualified plumber.
NOTE: If the water pressure is less than what is required, the flow
of water from the water dispenser could decrease or ice cubes
could be hollow or irregular shaped.
Reverse Osmosis Water Supply
IMPORTANT: The pressure of the water supply coming out of
a reverse osmosis system going to the water inlet valve of the
refrigerator needs to be between 35 and 120 psi (241 and
827 kPa).
If a reverse osmosis water filtration system is connected to your
cold water supply, the water pressure to the reverse osmosis
system needs to be a minimum of 40 to 60 psi (276 to 414 kPa).
■ Check to see whether the sediment filter in the reverse
osmosis system is blocked. Replace the filter if necessary.
■ Allow the storage tank on the reverse osmosis system to refill
after heavy use. The tank capacity could be too small to keep
up with the requirements of the refrigerator.
NOTE: Faucet-mounted reverse osmosis systems are not
recommended.
■ If your refrigerator has a water filter, it may further reduce the
water pressure when used in conjunction with a reverse
osmosis system. Remove the water filter. See “Water Filtration
System.”
If you have questions about your water pressure, call a licensed,
qualified plumber.
Connect the Water Supply
Read all directions before you begin.
IMPORTANT:
■ Plumbing shall be installed in accordance with the
International Plumbing Code and any local codes and
ordinances.
■ The gray water tubing on the back of the refrigerator (which
is used to connect to the household water line) is a PEX
(cross-linked polyethylene) tube. Copper and PEX tubing
connections from the household water line to the refrigerator
are acceptable and will help avoid off-taste or odor in your ice
or water. Check for leaks.
If PEX tubing is used instead of copper, we recommend the
following Part Numbers:
W10505928RP (7 ft [2.14 m] jacketed PEX),
8212547RP (5 ft [1.52 m] PEX), or
W10267701RP (25 ft [7.62 m] PEX).
■ Install tubing only in areas where temperatures will remain
above freezing.
Tools Needed:
Gather the required tools and parts before starting installation.
■ Flat-blade screwdriver
■ ⁷⁄₁₆" and ¹⁄₂" open-end wrenches or two adjustable wrenches
■ ¹⁄₄" nut driver
NOTE: Do not use a piercing-type or ³⁄₁₆" (4.76 mm) saddle valve
which reduces water flow and clogs easier.
Connect to Water Line
IMPORTANT: If you turn the refrigerator on before the water is
connected, turn off the ice maker.
1. Unplug refrigerator or disconnect power.
2. Turn off main water supply. Turn on nearest faucet long
enough to clear line of water.
3³⁄₄
" (9.5 cm)
¹⁄₂
" (1.25 cm)
Electrical Shock Hazard
Plug into a grounded 3 prong outlet.
Do not remove ground prong.
Do not use an adapter.
Do not use an extension cord.
Failure to follow these instructions can result in death,
fire, or electrical shock.
WARNING

131313131313
3. Use a quarter-turn shut-off valve or the equivalent, served by
a ¹⁄₂" household supply line.
NOTE: To allow sufficient water flow to the refrigerator, a
minimum ¹⁄₂" (12.7 mm) size household supply line is
recommended.
4. Now you are ready to connect the copper tubing to the
shut-off valve. Use ¹⁄₄" (6.35 mm) O.D. (outside diameter)
soft copper tubing to connect the shut-off valve and the
refrigerator.
■ Ensure that you have the proper length needed for the job.
Be sure both ends of the copper tubing are cut square.
■ Slip compression sleeve and compression nut onto
copper tubing as shown. Insert end of tubing into outlet
end squarely as far as it will go. Screw compression nut
onto outlet end with adjustable wrench. Do not
overtighten.
5. Place the free end of the tubing into a container or sink and
turn on main water supply to flush out tubing until water is
clear. Turn off shut-off valve on the water pipe.
NOTE: Always drain the water line before making the final
connection to the inlet of the water valve to avoid possible
water valve malfunction.
6. Bend the copper tubing to meet the water line inlet which
is located on the back of the refrigerator cabinet as shown.
Leave a coil of copper tubing to allow the refrigerator to be
pulled out of the cabinet or away from the wall for service.
Connect to Refrigerator
Follow the connection instructions specific to your model.
Style 1
1. Remove plastic cap from water valve inlet port. Attach the
copper tube to the valve inlet using a compression nut and
sleeve as shown. Tighten the compression nut. Do not
overtighten. Confirm copper tubing is secure by pulling
on copper tubing.
2. Create a service loop with the copper tubing. Avoid kinks
when coiling the copper tubing. Secure copper tubing to
refrigerator cabinet with a “P” clamp.
3. Turn on water supply to refrigerator and check for leaks.
Correct any leaks.
Style 2
1. Unplug refrigerator or disconnect power.
2. Remove and discard the short, black plastic part from the end
of the water line inlet.
3. Thread the nut onto the end of the tubing. Tighten the nut by
hand. Then tighten it with a wrench two more turns. Do not
overtighten.
NOTE: To avoid rattling, be sure the copper tubing does not
touch the cabinet’s side wall or other parts inside the cabinet.
4. Install the water supply tube clamp around the water supply
line to reduce strain on the coupling.
5. Turn on shut-off valve.
6. Check for leaks. Tighten any connections (including
connections at the valve) or nuts that leak.
7. On some models, the ice maker is equipped with a built-in
water strainer. If your water conditions require a second water
strainer, install it in the ¹⁄₄" (6.35 mm) water line at either tube
connection. Obtain a water strainer from your appliance
dealer.
A. Sleeve
B. Nut
C. Copper tubing (to refrigerator)
D. Household supply line (½" minimum)
A. Compression sleeve
B. Compression nut
C. Copper tubing
A
B
D
C
B CA
A. Copper tubing
B. “P” clamp
C. Compression nut
D. Compression sleeve
A. Household water line
B. Nut (purchased)
C. Ferrule (purchased)
D. Refrigerator water tubing
B
A
C
D
D
A B C

141414141414
Complete the Installation
1. Plug into a grounded 3 prong outlet.
2. Flush the water system. See “Water and Ice Dispensers.”
NOTE: Allow 24 hours to produce the first batch of ice. Discard
the first three batches of ice produced. Allow 3 days to completely
fill the ice storage bin.
Handle Installation and Removal
Parts Included: Refrigerator door handles (2), refrigerated
drawer handles (2), freezer drawer handle (1), ³⁄₃₂" hex key,
spare setscrew(s)
NOTE: The freezer drawer handle is longer than the door handles.
Handle style may vary by model.
Install Handles
Refrigerator Doors
NOTE: Handle mounting setscrews are preinstalled inside the
handle.
1. Remove the handles from the packaging inside the refrigerator
and place them on a soft surface.
2. Open a refrigerator compartment door. On the closed door,
place a handle onto the shoulder screws so that the setscrews
are facing the adjacent door.
3. Firmly push the handle toward the door until the handle base
is flush against the door.
4. While holding the handle, insert the short end of the hex key
into the upper hole and slightly rotate the hex key until it is
engaged in the setscrew.
5. Using a clockwise motion, tighten the setscrew just until it
begins to contact the shoulder screw. Do not fully tighten.
6. Repeat steps 4 and 5 to fasten the lower setscrew.
7. Once both setscrews have been partially tightened as
instructed in the previous steps, fully tighten both setscrews.
IMPORTANT: When the screws feel tight, tighten them an
additional quarter-turn. The handle is not properly installed
without this extra tightening.
8. Repeat steps 2 through 7 to install the other handle onto the
adjacent refrigerator door.
Refrigerator and Freezer Drawers
1. With the drawer closed, place the handle onto the shoulder
screws so that the setscrews are facing down toward the floor.
2. Firmly push the handle toward the drawer until the handle
base is flush against the drawer.
A. Shoulder screws
B. Setscrews inside the handle
Electrical Shock Hazard
Plug into a grounded 3 prong outlet.
Do not remove ground prong.
Do not use an adapter.
Do not use an extension cord.
Failure to follow these instructions can result in death,
fire, or electrical shock.
WARNING
A
B
A. Shoulder screw
B. Setscrews inside the handle
A
B

151515151515
3. Insert the short end of the hex key into the left-hand hole and
slightly rotate the hex key until it is engaged in the setscrew.
4. Using a left-to-right motion, tighten the setscrew a quarter-
turn at a time just until it begins to contact the shoulder screw.
Do not fully tighten.
5. Repeat steps 11 and 12 to fasten the right-hand setscrew to
the shoulder screw.
6. Once both setscrews have been partially tightened as
instructed in the previous steps, fully tighten both setscrews.
IMPORTANT: When the screws feel tight, tighten them an
additional quarter-turn. The handle is not properly installed
without this extra tightening.
7. Save the hex key and all instructions.
Remove the Handles
1. While holding the handle, insert the short end of the hex key
into a setscrew hole and slightly rotate the hex key until it is
engaged in the setscrew.
2. Using a right-to-left motion, loosen the setscrew a quarter-
turn at a time.
3. Repeat steps 1 and 2 for the other setscrew. Slowly pull the
handle away from the door or drawer.
4. If necessary, use a Phillips screwdriver to remove the shoulder
screws from the door.
Remove and Replace Handle Medallions (optional)
The handles for your model have red medallions on the ends.
Replacement medallions are available for purchase. See
“Accessories” to order.
1. Using a ¹⁄₈" hex key, remove the medallion from the end of the
handle.
2. Replace medallion.
3. Using the fastener removed in Step 1, attach the medallion to
the handle.
Refrigerator Leveling and Door Closing
The base grille covers the adjustable brake feet and roller
assemblies located at the bottom of the refrigerator below
the freezer drawer. Before making any adjustments, remove the
base grille and move the refrigerator to its final location.
Tools Needed: ¹⁄₄" hex driver
Tools Provided: ¹⁄₈" hex key
1. Remove the base grille. Using both hands, grasp the grille
firmly and pull it toward you. Open the freezer drawer to
access the brake feet.
NOTE: To allow the refrigerator to roll easier, raise the brake
feet by turning them counterclockwise. The front rollers will
be touching the floor.
2. Move the refrigerator to its final location.
3. Using the ¹⁄₄" hex driver, lower the brake feet. Turn them
clockwise until the rollers are off the floor and both brake feet
are snug against the floor. This keeps the refrigerator from
rolling forward when opening the refrigerator doors or freezer
drawer.
IMPORTANT: If you need to make further adjustments
involving the brake feet, you must turn both brake feet
the same amount to keep the refrigerator level.
A. Handle medallion
A

161616161616
4. Make sure the doors close easily. If you are satisfied with the
door opening and closing, skip the next section and go to
Step 5. If, however, the doors do not close easily or the doors
pop open, adjust the tilt.
To Adjust the Cabinet Tilt:
■ Open the freezer drawer. Use a ¹⁄₄" hex nut driver to turn
both brake feet clockwise the same amount. This will raise
the front of the refrigerator. It may take several turns to
allow the doors to close easier.
NOTE: Having someone push against the top of the
refrigerator takes some weight off the brake feet. This
makes it easier to turn them.
Style 1
Style 2
5. Make sure the refrigerator is steady. If the refrigerator seems
unsteady or rolls forward when a door or drawer is pulled
open, adjust the brake feet.
To Steady the Refrigerator:
■ Open the freezer drawer. Using a ¹⁄₄" hex driver, turn both
brake feet clockwise the same amount until the brake feet
are snug against the floor. Check again. If not satisfied,
continue to adjust the brake feet by half turns of the screw
until the refrigerator does not roll forward when the drawer
is opened.
NOTE: Having someone push against the top of the
refrigerator takes some weight off the brake feet. This
makes it easier to turn the screws.
6. Replace the base grille by aligning the ends of the grille with
the leveling assemblies on each side and snapping the grille
into place.
FILTERS AND ACCESSORIES
Water Filtration System
Install the Water Filter
1. Locate the accessory packet in the refrigerator and remove
the water filter.
2. Take the water filter out of its packaging and remove the cover
from the O-rings. Be sure the O-rings are still in place after the
cover is removed.
3. The water filter compartment is located in the right-hand side
of the refrigerator ceiling. Push up on the compartment door
to release the catch, and then lower the door.
4. Align the arrow on the water filter label with the cutout notch in
the filter housing and insert the filter into the housing.
A. Brake foot
B. Front roller
A
¹⁄₄"
B
A. Brake foot
¹⁄₄"
A
A. O-ring cover
B. O-rings
Do not use with water that is microbiologically unsafe or
of unknown quality without adequate disinfection before
or after the system. Systems certified for cyst reduction
may be used on disinfected waters that may contain
filterable cysts.
B
A

767676767676
Mise au rebut adéquate de
votre vieux réfrigérateur
IMPORTANT : L’emprisonnement et l’étouffement des enfants ne
sont pas un problème du passé. Les réfrigérateurs jetés ou
abandonnés sont encore dangereux, même s’ils sont laissés
abandonnés pendant “quelques jours seulement”. Si vous vous
débarrassez de votre vieux réfrigérateur, veuillez suivre les
instructions suivantes pour aider à éviter les accidents.
Avant de jeter votre vieux réfrigérateur ou congélateur :
■ Enlever les portes.
■ Laisser les tablettes en place de sorte que les enfants ne
puissent pas y pénétrer facilement.
INSTRUCTIONS D’INSTALLATION
Déballage du réfrigérateur
Dépose de l’emballage
■ Enlever tout résidu de ruban adhésif et de colle des surfaces
du réfrigérateur avant de le mettre en marche. Frotter une
petite quantité de savon liquide pour la vaisselle sur l’adhésif
avec les doigts. Rincer à l’eau tiède et essuyer.
■ Ne pas utiliser d’instruments coupants, d’alcool à friction, de
liquides inflammables ou de nettoyants abrasifs pour enlever
le ruban adhésif ou la colle. Ces produits peuvent
endommager la surface de votre réfrigérateur. Pour plus de
renseignements, voir “Sécurité du réfrigérateur”.
■ Jeter ou recycler tous les matériaux d’emballage.
Nettoyage avant l’utilisation
Après avoir enlevé tous les matériaux d’emballage, nettoyer
l’intérieur du réfrigérateur avant de l’utiliser. Voir les instructions
de nettoyage dans “Entretien du réfrigérateur”.
Avertissements de la proposition 65 de l'État de Californie :
AVERTISSEMENT : Ce produit contient au moins un produit chimique connu par l’État de Californie pour être à l’origine de
cancers.
AVERTISSEMENT : Ce produit contient au moins un produit chimique connu par l’État de Californie pour être à l’origine de
malformations et autres déficiences de naissance.
AVERTISSEMENT
Risque de suffoquer
Enlever les portes de votre vieux réfrigérateur.
Le non-respect de cette instruction peut causer
un décès ou des lésions cérébrales.
Renseignements importants à propos de la mise au
rebut des fluides réfrigérants :
Mettre le réfrigérateur au rebut conformément à la
réglementation fédérale et locale. Les fluides réfrigérants
doivent être évacués par un technicien certifié et agréé par
l’EPA conformément aux procédures établies.
AVERTISSEMENT
Risque du poids excessif
Utiliser deux ou plus de personnes pour déplacer et
installer le réfrigérateur.
Le non-respect de cette instruction peut causer
une blessure au dos ou d'autre blessure.
Déplacement de votre réfrigérateur :
Votre réfrigérateur est lourd. Lors du déplacement de votre
réfrigérateur pour le nettoyage ou un entretien ou réparation,
veiller à recouvrir le plancher avec du carton ou un panneau
de fibres dures pour éviter qu'il ne subisse tout dommage.
Toujours tirer le réfrigérateur tout droit lors de son
déplacement. Ne pas incliner le réfrigérateur d’un côté ou de
l’autre ni le “faire marcher” en essayant de le déplacer car le
plancher pourrait être endommagé.
Importants renseignements à savoir au sujet des tablettes
et des couvercles en verre :
Ne pas nettoyer les tablettes ou couvercles en verre avec de
l’eau tiède quand ils sont froids. Les tablettes et les
couvercles peuvent se briser s'ils sont exposés à des
changements soudains de température ou à un impact tel
que coup brusque. Le verre trempé est conçu pour éclater
en d’innombrables pièces minuscules. Ceci est normal. Les
tablettes et les couvercles en verre sont lourds. Les saisir à
deux mains lors de leur dépose afin d'éviter de les faire
tomber.

777777777777
Retrait et réinstallation des portes du réfrigérateur
REMARQUE : En fonction de la largeur de l’ouverture de la porte, il faudra peut-être retirer les portes du réfrigérateur pour pouvoir
introduire le réfrigérateur dans le domicile. Si les portes doivent être retirées, voir les instructions suivantes.
IMPORTANT : Si le réfrigérateur était déjà installé et que vous souhaitez le déplacer hors de votre domicile, effectuez d'abord les
opérations suivantes : tourner la commande du réfrigérateur sur OFF (arrêt). Débrancher le réfrigérateur ou déconnecter la source
de courant électrique. Retirer les aliments et tout balconnet de la porte du réfrigérateur.
Rassembler les outils nécessaires et lire toutes les instructions avant de retirer les portes.
OUTILLAGE REQUIS : Clé à tête hexagonale de ³⁄₁₆" et un tournevis Phillips n° 2
AVERTISSEMENT
Risque de choc électrique
Déconnecter la source de courant électrique avant d'enlever les portes.
Le non-respect de cette instruction peut causer un décès ou un choc électrique.
Dépose et réinstallation des portes
Fiche de câblage
Charnière supérieure gauche
B
A
C
Distributeur d'eau
Raccordement du tuyau
A
A. Bague externe
Charnière supérieure droite
C
B
A
D
90°
Porte formant un angle de
90° par rapport à la caisse
A. Vis à tête hexagonale internes
de ³⁄₁₆
B. Vis du couvre-charnière
C. Couvercle de charnière supérieur
D. Charnière supérieure
A. Vis à tête hexagonale internes de ³⁄₁₆
B. Conducteur de liaison à la terre
(ne pas retirer)
C. Ne pas retirer les vis

787878787878
Charnière inférieure de la porte
Pour plus de commodité, les portes du réfrigérateur comportent
des charnières inférieures avec ferme-porte. Ces ferme-portes
permettent aux portes de se fermer complètement d'un simple
toucher.
IMPORTANT : Pour que la fonction de ferme-porte fonctionne
correctement, les portes doivent être retirées uniquement
lorsqu'elles sont ouvertes à un angle de 90° par rapport à la partie
avant du placard. Si l'une ou l'autre des portes n'était pas à un
angle de 90° lors de la dépose, la charnière de porte inférieure
doit être réinitialisée.
Réinitialisation de la charnière de porte
1. Soulever la porte hors de la charnière inférieure et la placer sur
une surface de niveau.
2. À l'aide d'un tourne-écrou avec une pointe carrée n° 2, retirer
la charnière inférieure avec le coussinet hors de la caisse du
réfrigérateur.
3. Insérer la charnière inférieure et le coussinet dans la fente
correspondante dans le bas de la porte.
REMARQUE : S’assurer que la base de la charnière est
parallèle au bas de la porte.
4. Tourner la charnière jusqu'à ce que la base de cette dernière
soit à un angle de 90° par rapport au rebord inférieur de la
porte.
5. Retirer la charnière de la porte. À l'aide d'un tourne-écrou
avec une pointe carrée n° 2, retirer la charnière inférieure avec
le coussinet hors de la caisse du réfrigérateur.
6. La charnière est maintenant réinitialisée et prête pour la
réinstallation de la porte. Voir “Réinstallation des portes du
réfrigérateur” plus loin dans cette section.
A. Bague
B. Base de la charnière
90˚
A
B
A. Base de la charnière parallèle au rebord inférieur de la porte
A. Base de la charnière tournée à un angle de 90°
par rapport au rebord inférieur de la porte
A
90°
A

797979797979
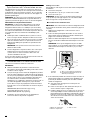
Retrait des portes du réfrigérateur
Retrait de la porte de droite du réfrigérateur
1. Débrancher le réfrigérateur ou déconnecter la source
d'alimentation.
2. Laisser les portes du réfrigérateur fermées jusqu’à ce vous
soyez prêt à les détacher de la caisse.
REMARQUE : Prévoir un support supplémentaire pour la
porte du réfrigérateur pendant le retrait des charnières. La
force d’attraction des aimants de la porte ne suffit pas à la
maintenir en place pendant la manutention.
3. À l’aide d’un tournevis Phillips, retirer le couvre-charnière de
la charnière supérieure.
4. Utiliser la clé à tête hexagonale de ³⁄₁₆" pour enlever les deux
vis internes à tête hexagonale de la charnière supérieure et les
mettre de côté.
REMARQUE : Ne pas retirer les deux vis de positionnement.
Ces vis vous aideront à aligner la charnière lors de la
réinstallation de la porte.
5. Ouvrir la porte jusqu'à ce qu'elle soit à un angle de 90° par
rapport à l'avant de la caisse.
6. Soulever la porte du réfrigérateur de l'axe de la charnière
inférieure. La charnière supérieure se dégage en même temps
que la porte.
Retrait de la porte de gauche du réfrigérateur
IMPORTANT : Étant donné que le raccordement de l'eau et le
câblage électrique passent par la charnière de la porte de gauche,
ils doivent être déconnectés avant de retirer la porte.
1. À l’aide d’un tournevis Phillips, retirer le couvre-charnière de
la charnière supérieure.
2. Débrancher le tuyau du distributeur d'eau situé sur la
charnière de la porte en tirant fermement l'attache vers
le haut. Tirer ensuite le tuyau hors du raccord.
REMARQUE : Le tuyau du distributeur d'eau reste fixé à
la porte de gauche du réfrigérateur.
3. Débrancher le câblage situé sur la charnière de la porte.
■ Saisir chaque côté de la fiche de câblage. Avec le pouce
gauche, appuyer sur le loquet pour le dégager et écarter
les deux sections de la fiche.
REMARQUE : Ne pas retirer le conducteur vert relié à
la terre. Il doit rester fixé à la charnière de porte.
4. Utiliser la clé à tête hexagonale de ³⁄₁₆" pour enlever les deux
vis internes à tête hexagonale de la charnière supérieure et les
mettre de côté.
A. Vis du couvre-charnière
supérieur
B. Couvre-charnière
supérieur
C.Vis internes à tête hexagonale
de
³⁄₁₆
"
D. Charnière supérieure
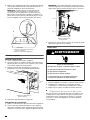
AVERTISSEMENT
Risque de choc électrique
Déconnecter la source de courant électrique avant
d'enlever les portes.
Le non-respect de cette instruction peut causer
un décès ou un choc électrique.
A
B
C
D
AVERTISSEMENT
Risque du poids excessif
Utiliser deux ou plus de personnes pour soulever la
porte du réfrigérateur.
Le non-respect de cette instruction peut causer
une blessure au dos ou d'autre blessure.
A. Vis du couvre-charnière
supérieur
B. Couvre-charnière
supérieur
A
B

808080808080
REMARQUES :
■ Prévoir un support supplémentaire pour la porte du
réfrigérateur pendant le retrait des charnières. La force
d’attraction des aimants de la porte ne suffit pas à la
maintenir en place pendant la manutention.
■ Ne pas retirer les deux vis de positionnement. Ces vis
vous aideront à aligner la charnière lors de la réinstallation
de la porte.
5. Ouvrir la porte jusqu'à ce qu'elle soit à un angle de 90° par
rapport à l'avant de la caisse.
6. Soulever la porte du réfrigérateur de l'axe de la charnière
inférieure. La charnière supérieure se dégage en même temps
que la porte.
REMARQUE : Il ne sera peut-être pas nécessaire d’enlever
les charnières inférieures et les pieds de stabilisation pour
faire passer le réfrigérateur dans un cadre de porte.
■ Uniquement si cela s'avère nécessaire, retirer les
charnières inférieures à l'aide d'un tourne-écrou avec
une pointe carrée n° 2 et un tourne-écrou de ³⁄₈" pour
retirer les vis des pieds de stabilisation.
Réinstallation des portes du réfrigérateur
IMPORTANT : Pour ne pas endommager les portes du
réfrigérateur, elles doivent être replacées à un angle de 90° par
rapport à l'avant de la caisse. Vous ne devriez pas avoir à forcer
la porte sur la charnière si l'angle est approprié.
Réinstallation de la porte de droite du réfrigérateur
1. Tout en maintenant la porte de droite à un angle de 90° par
rapport à l'avant de la caisse, placer la porte sur l'axe de
charnière inférieure.
2. Insérer l'axe de charnière supérieure dans le trou béant du
sommet de la porte du réfrigérateur.
3. Fixer la charnière à la caisse à l'aide des deux vis internes à
tête hexagonale de ³⁄₁₆". Ne pas complètement serrer les vis.
Réinstallation de la porte de gauche du réfrigérateur
IMPORTANT : Ne pas emmêler le tuyau d’eau et les faisceaux
de câblage en les reconnectant.
1. Tout en maintenant la porte de gauche à un angle de 90° par
rapport à l'avant de la caisse, placer la porte sur l'axe de
charnière inférieure.
2. Fixer la charnière à la caisse à l'aide des deux vis internes à
tête hexagonale de ³⁄₁₆". Ne pas complètement serrer les vis.
3. Raccorder le tuyau du distributeur d'eau.
Style 1 - Enfoncer le tuyau dans le raccord jusqu'à la butée et
jusqu'à ce que l'anneau externe soit en contact avec l'avant
du raccord.
Style 2 - Enfoncer fermement le tuyau d’eau dans le raccord
jusqu’à ce qu’il s’arrête. Fixer l’attache autour du tube.
L’attache se fixe autour du raccord et du collier.
4. Rebrancher le câblage.
■ Remboîter les deux sections de la fiche de câblage.
Étapes finales
1. Serrer complètement les quatre vis internes à tête hexagonale
(deux sur la charnière de la porte de droite et deux sur la
charnière de la porte de gauche).
2. Réinstaller les deux couvre-charnières supérieurs.
Retrait et réinstallation
de l’avant des tiroirs
En fonction de la largeur de l’ouverture de la porte, il faudra peut-
être retirer l'avant des tiroirs pour pouvoir introduire le réfrigérateur
dans le domicile.
IMPORTANT :
■ Si le réfrigérateur était déjà installé et que vous souhaitez
le déplacer hors de votre domicile, effectuez d'abord les
opérations suivantes : tourner la commande du réfrigérateur
sur OFF (arrêt) et débrancher le réfrigérateur ou déconnecter
la source de courant électrique. Retirer les aliments des tiroirs.
■ Il faudra peut-être deux personnes pour retirer et réinstaller
l'avant des tiroirs.
Outillage nécessaire : Tournevis à lame plate
Tiroirs réfrigérés
Dépose des façades de tiroir
1. Ouvrir complètement le tiroir. Saisir les côtés du compartiment
intérieur, le soulever et le retirer.
C. Vis internes à tête hexagonale
de
³⁄₁₆
"
B. Conducteur de liaison à la terre
.(Ne pas retirer.)
C. Vis de positionnement.
(Ne pas retirer.)
A B
C

818181818181
2. Tiroir de gauche seulement : Retirer le couvercle de protection
du câblage. Appuyer sur le côté du couvercle pour dégager la
patte de la fente, puis éloigner le couvercle du support.
3. Tiroir de gauche seulement : Débrancher le câblage.
REMARQUE : La façade du tiroir du tiroir réfrigéré du côté
gauche est reliée à la commande de température par des fils
sous la glissière du tiroir. Avant de retirer la façade du tiroir, les
fils doivent être débranchés.
■ D'un côté du connecteur du câblage, insérer la lame du
tournevis entre l'onglet du connecteur et le connecteur
lui-même pour dégager le connecteur. Répéter l'opération
de l'autre côté. Retirer le connecteur de câblage.
4. Retirer la façade du tiroir.
■ Pousser vers le haut le levier dans le bas du support
de la glissière du tiroir pour dégager la façade du tiroir
du support.
■ Soulever l’avant du tiroir vers le haut et le dégager des
supports de glissières de tiroir.
5. Réinsérer les glissières de tiroir dans le réfrigérateur.
Réinstallation des façades de tiroir
1. Tirer sur les glissières de tiroir jusqu'à ce qu'elle soient
complètement déployées.
2. Pousser vers le haut le levier dans le bas du support de la
glissière du tiroir pour l'ouvrir. Insérer le support de la façade
du tiroir ans le support de la glissière du tiroir et relâcher le
levier.
REMARQUE : Pour faciliter l'opération, une personne peut
maintenir les glissières de tiroir en place pendant qu'une autre
aligne la façade du tiroir et relie les supports.
3. Tiroir de gauche seulement : Rebrancher le câblage.
■ Aligner les deux extrémités du connecteur de câblage et
les enfoncer ensemble jusqu'à ce qu'un déclic retentisse
et que l'on sente les onglets s'emboîter sur le connecteur.
■ Tirer délicatement sur les conducteurs pour vérifier qu'ils
sont parfaitement engagés. Réinstaller le couvercle du
boîtier de connexion.
REMARQUE : Le raccordement du câblage doit avoir été
exécuté pour que la commande de température du tiroir
puisse fonctionner.
4. Tiroir de gauche seulement : Replacer le couvercle de
protection du câblage.
A. Patte du couvercle
B. Couvercle de protection du câblage
A
B
A. Encoche de glissière de tiroir B. Levier de dégagement
A
B
La page est en cours de chargement...
La page est en cours de chargement...
La page est en cours de chargement...
La page est en cours de chargement...
La page est en cours de chargement...
La page est en cours de chargement...
La page est en cours de chargement...
La page est en cours de chargement...
La page est en cours de chargement...
La page est en cours de chargement...
-
 1
1
-
 2
2
-
 3
3
-
 4
4
-
 5
5
-
 6
6
-
 7
7
-
 8
8
-
 9
9
-
 10
10
-
 11
11
-
 12
12
-
 13
13
-
 14
14
-
 15
15
-
 16
16
-
 17
17
-
 18
18
-
 19
19
-
 20
20
-
 21
21
-
 22
22
-
 23
23
-
 24
24
-
 25
25
-
 26
26
-
 27
27
-
 28
28
-
 29
29
-
 30
30


KitchenAid KRMF706ESS Guide d'installation
- Catégorie
- Frigos
- Taper
- Guide d'installation
dans d''autres langues
Documents connexes
-
KitchenAid KFIS29PBMS Manuel utilisateur
-
KitchenAid KRFC302EWH Manuel utilisateur
-
KitchenAid KRFC302EPA Mode d'emploi
-
KitchenAid KRFC400EBL Mode d'emploi
-
-
KitchenAid KRMF706ESS Mode d'emploi
-
KitchenAid KRFC300EBS Le manuel du propriétaire
-
-
KitchenAid KRFF302EBL00 Le manuel du propriétaire
-
KitchenAid KRFF305EWH Manuel utilisateur
Autres documents
-
Whirlpool WRV986FDEM Guide d'installation
-
-
Maytag WRX735SDHV Le manuel du propriétaire
-
Kenmore 596.7238 Le manuel du propriétaire
-
-
Whirlpool WRX986SIHV Mode d'emploi
-
Dometic Kits 293275011 Right To Left, Black 293275012 Left To Right, Black Guide d'installation
-