Middle Atlantic Products FlexView FVS IFP Series Guide d'installation
- Catégorie
- Haut-parleurs de la barre de son
- Taper
- Guide d'installation

I-00876 Rev A
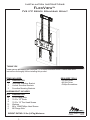
Installation Instructions
FlexView
™
FVS IFP Series Soundbar Mount
HARDWARE KIT INCLUDES
Thank you for purchasing the FlexView™ IFP series soundbar mount. Please read these
instructions thoroughly before installing this product.
QTY
DESCRIPTION
REQUIRED TOOLS
10-32 Flange Nuts
10-32 x 1/2” Studs
10-32 x 1/2” Pan Head Screws
Washers
M4 x 12MM Phillips Head Screws
M4 Flange Nuts
• 3/8 Nut Driver
• M4 Nut Driver
• Phillips Screwdriver
24
4
8
12
6
6
ITEMS INCLUDED
Horizontal Soundbar Bracket
Vertical Soundbar Brackets
Soundbar Mounting Brackets
1
2
2
QTY
DESCRIPTION
THANK YOU
WEIGHT RATING: 20 lbs (9.07kg) Maximum

Page 2
INSTRUCTIONS IMPORTANTES SUR LA SÉCURITÉ
Lorsque vous utilisez des mobiliers électriques, toujours respecter les précautions de base, notamment :
• Lisez et suivez toutes les instructions avant d'utiliser (cet ameublement).
• DANGER - Pour réduire le risque de choc électrique :
1. Toujours débrancher le meuble de la prise électrique avant de le nettoyer.
• AVERTISSEMENT - Pour réduire les risques de brûlures, d'incendie, de choc électrique ou de blessures :
1. Débrancher de la prise électrique avant d'installer ou de retirer des pièces.
2. N'utiliser ce meuble que pour l'usage auquel il est destiné, tel que décrit dans la présente fiche d'instructions. Ne pas
utiliser d'accessoires non recommandés par le fabricant.
3. Ne jamais utiliser ce meuble si le cordon ou la prise est endommagé, s'il ne fonctionne pas correctement, s'il est
tombé ou est endommagé, ou s'il est tombé dans l'eau. Renvoyer le meuble à un centre de service après-vente pour
qu'il soit examiné et réparé.
4. Ne jamais faire tomber ou introduire un objet dans une ouverture.
5. Ne pas utiliser en extérieur.
6. Pour débrancher, placer tous les boutons en position off, puis retirer la fiche de la prise électrique.
7. AVERTISSEMENT : Risque de choc électrique - Brancher le meuble uniquement à une prise correctement mise
à la terre.
8. Les objets les plus lourds doivent toujours être placés dans la partie inférieure du meuble, et non pas dans la partie
supérieure, afin d'éviter tout risque de basculement du meuble.
• Avertissement: Risque de blessures pour les personnes - n'utilisez pas cet équipement pour prendre en charge des
équipements vidéo tels que des téléviseurs ou des moniteurs d'ordinateur.
CONSERVER CES INSTRUCTIONS
IMPORTANT SAFETY INSTRUCTIONS
When using an electrical furnishing, basic precautions should always be followed, including the following:
• Read and follow all instructions before using (this furnishing).
• DANGER – To reduce the risk of electrical shock:
1. Always unplug this furnishing from the electrical outlet before cleaning.
• WARNING – To reduce the risk of burns, fire, electric shock, or injury to persons:
1. Unplug from outlet before putting on or taking off parts.
2. Use this furnishing only for its intended use as described in these instructions. Do not use attachments not
recommended by the manufacturer.
3. Never operate the furnishing if it has a damaged cord or plug, if it is not working properly, if it has been dropped or
damaged, or dropped into water. Return the furnishing to a service center for examination and repair.
4. Never drop or insert any object into any opening.
5. Do not use outdoors.
6. To disconnect, turn all controls to the off position, then remove plug from outlet.
7. WARNING: Risk of Electric Shock – Connect the furnishing to a properly grounded outlet only.
8. For loading always put heavier items at the bottom and not near the top in order to help prevent the possibility of the
furnishing tipping over.
• Warning: Risk of Injury to Persons - do not use this furnishing to support video equipment such as televisions or
computer monitors.
SAVE ALL INSTRUCTIONS

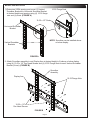
1) Determine VESA spacing and mount (2) Vertical
Soundbar Brackets to Horizontal Soundbar Bracket
at desired height and spacing using (4) 10-32 flange
nuts and (4) studs. (FIGURE A)
MOUNT INSTALLATION
FIGURE A
10-32 x 1/2” Studs
10-32 Flange Nuts
NOTE: Soundbar can be installed above
or below display.
Vertical Soundbar
Brackets
Horizontal Soundbar
Bracket
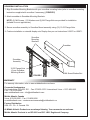
2. Attach Soundbar assembly to cart Display Arm at desired height to fit above or below display
using (4) 10-32 x 1/2” Pan Head Screws and (4) 10-32 Flange Nuts for each Vertical Soundbar
Bracket (8 total). (FIGURE B)
FIGURE B
Page 3
Soundbar
Assembly
Display Arm
10-32 Flange Nuts
10-32 x 1/2”
Pan Head Screws

For warranty information, refer to www.middleatlantic.com/terms.
Corporate Headquarters
Corporate Voice: 973-839-1011 - Fax: 973-839-1976 / International Voice: +1 973-839-8821
Fax: +1 973-839-4982
www.middleatlantic.com - [email protected]
Middle Atlantic Canada
Voice: 613-836-2501 - Fax: 613-836-2690
ca.middleatlantic.com - [email protected]
Factory Distribution
USA: NJ - CA - IL Canada: ON
At Middle Atlantic Products we are always listening. Your comments are welcome.
Middle Atlantic Products is an ISO 9001 and ISO 14001 Registered Company.
WARRANTY
SOUNDBAR INSTALLATION
1. Align Soundbar Mounting Brackets with your soundbar mounting holes (refer to soundbar mounting
instructions supplied with soundbar if necessary). (FIGURE C)
2. Attach soundbar to Soundbar Mounting Brackets.
NOTE: (6) M4 Screws, (12) Washers and (6) M4 Flange Nuts are provided for installation
(suitable for most applications).
3. Secure soundbar assembly to Soundbar Mount assembly using (12) 10-32 Flange Nuts.
4. Continue installation or reinstall display onto Display Arm per cart instructions I-00870 or I-00871.
Soundbar
Assembly
Soundbar
Mounting
Brackets
M4 Screw/Washer/Nut
Soundbar
10-32 Flange Nuts
(6) per Soundbar
Mounting Bracket
FIGURE C
-
 1
1
-
 2
2
-
 3
3
-
 4
4


Middle Atlantic Products FlexView FVS IFP Series Guide d'installation
- Catégorie
- Haut-parleurs de la barre de son
- Taper
- Guide d'installation