
JENNAIR
®
SMALL BUILT-IN STEAM OVEN
PETIT FOUR ENCASTRÉ AVEC INJECTION
DE VAPEUR JENNAIR
®
Use & Care Guide
For questions about features, operation/performance, parts, accessories, or service in the U.S.A., call:
1-800-JENNAIR (1-800-536-6247) or visit our website at www.jennair.com.
In Canada, call: 1-800-JENNAIR (1-800-536-6247) or visit our website at www.jennair.ca.
Guide d’utilisation et d’entretien
Pour des questions à propos des caractéristiques, du fonctionnement/rendement, des pièces, accessoires ou dépannage,
composerle: 1800JENNAIR (1800536-6247) ou visiter notre site Web au www.jennair.com.
Au Canada, composer le: 1800JENNAIR (1800536-6247) ou visiter notre site Web au www.jennair.ca.
Table of Contents/Table des matières .....................................2
W11323318B

2
TABLE OF CONTENTS TABLE DES MATIÈRES
SÉCURITÉ DU FOUR ...................................................................23
PIÈCES ET CARACTÉRISTIQUES ..............................................24
AVANT D’UTILISER LE FOUR .....................................................25
COMMANDE ÉLECTRONIQUE DU FOUR .................................25
Tableau de commande ............................................................... 25
Afchage du menu .....................................................................25
Éclairage .....................................................................................25
Afchage ....................................................................................25
Settings (Réglages) ....................................................................26
Favorites (Favoris) ......................................................................27
UTILISATION DU FOUR ...............................................................28
Papier d’aluminium ....................................................................28
Grille métallique et autres accessoires, guides de grille,
glissières .....................................................................................28
Réservoir d’eau ..........................................................................28
Sonde de cuisson ......................................................................29
Degré de cuisson .......................................................................30
Évent du four ..............................................................................30
Assisted Cooking (Cuisson assistée) .........................................30
Modes de cuisson – Steam (vapeur) .........................................31
Modes de cuisson – True Convect (convection) .......................32
Modes de cuisson – True Convect + Steam
(convection + vapeur) .................................................................33
Fonctions spéciales – Steam Defrost
(décongélation à la vapeur) ........................................................34
Fonctions spéciales – Steam Reheat
(réchauffage à la vapeur) ............................................................35
Specialty Functions (Fonctions spéciales).................................36
ENTRETIEN DU FOUR .................................................................38
Fonctions d’entretien .................................................................38
Nettoyage général ......................................................................39
Supports de grille .......................................................................40
Lampe du four ............................................................................40
DÉPANNAGE ................................................................................. 41
ASSISTANCE OU DÉPANNAGE ..................................................42
Aux É.-U. ....................................................................................42
Au Canada ..................................................................................42
Accessoires ................................................................................42
OVEN SAFETY ................................................................................3
PARTS AND FEATURES ................................................................4
BEFORE USING THE OVEN ..........................................................5
ELECTRONIC OVEN CONTROL ...................................................5
Control Panel ................................................................................5
Display Navigation .......................................................................5
Light .............................................................................................. 5
Display ..........................................................................................5
Settings ........................................................................................6
Favorites .......................................................................................7
OVEN USE ....................................................................................... 8
Aluminum Foil ............................................................................... 8
Wire Shelf and Other Accessories, Shelf Guides,
Sliding Runners ............................................................................8
Water Tank .................................................................................... 8
Temperature Probe ....................................................................... 9
Doneness ...................................................................................10
Oven Vent ...................................................................................10
Assisted Cooking .......................................................................10
Cooking Modes - Steam ............................................................11
Cooking Modes - True Convect ................................................. 12
Cooking Modes - True Convect+Steam ....................................13
Specialty Functions - Steam Defrost .........................................14
Specialty Functions - Steam Reheat .........................................15
Specialty Functions ....................................................................16
OVEN CARE ..................................................................................18
Maintenance Functions ..............................................................18
General Cleaning ........................................................................19
Shelf Supports............................................................................20
Oven Light ..................................................................................20
TROUBLESHOOTING ..................................................................21
ASSISTANCE OR SERVICE .........................................................22
In the U.S.A. ...............................................................................22
Accessories ................................................................................22
In Canada ...................................................................................22

3
You can be killed or seriously injured if you don't immediately
You
can be killed or seriously injured if you don't
follow
All safety messages will tell you what the potential hazard is, tell you how to reduce the chance of injury, and tell you what can
happen if the instructions are not followed.
Your safety and the safety of others are very important.
We have provided many important safety messages in this manual and on your appliance. Always read and obey all safety
messages.
This is the safety alert symbol.
This symbol alerts you to potential hazards that can kill or hurt you and others.
All safety messages will follow the safety alert symbol and either the word “DANGER” or “WARNING.”
These words mean:
follow instructions.
instructions.
DANGER
WARNING
SAVE THESE INSTRUCTIONS
IMPORTANT SAFETY INSTRUCTIONS
WARNING: To reduce the risk of fire, electrical shock,
injury to persons, or damage when using the oven, follow
basic precautions, including the following:
■
Proper Installation – Be sure the oven is properly installed
and grounded by a qualified technician.
■ Never Use the Oven for Warming or Heating the Room.
■
Do Not Leave Children Alone – Children should not be left
alone or unattended in area where oven is in use. They
should never be allowed to sit or stand on any part of the
oven.
■
Wear Proper Apparel – Loose-fitting or hanging garments
should never be worn while using the oven.
■
User Servicing – Do not repair or replace any part of the
oven unless specifically recommended in the manual. All
other servicing should be referred to a qualified technician.
■
Storage in Oven – Flammable materials should not be
stored in an oven.
■ Do Not Use Water on Grease Fires – Smother fire or flame
or use dry chemical or foam-type extinguisher.
■
Use Only Dry Potholders – Moist or damp potholders on
hot surfaces may result in burns from steam. Do not let
potholder touch hot heating elements. Do not use a towel
or other bulky cloth.
■ Use Care When Opening Door – Let hot air or steam
escape before removing or replacing food.
■ Do Not Heat Unopened Food Containers – Build-up of
pressure may cause container to burst and result in injury.
■
Keep Oven Vent Ducts Unobstructed.
■
Placement of Oven Racks – Always place oven racks in
desired location while oven is cool. If rack must be moved
while oven is hot, do not let potholder contact hot heating
element in oven.
■
DO NOT TOUCH HEATING ELEMENTS OR INTERIOR
SURFACES OF OVEN – Heating elements may be hot
even though they are dark in color. Interior surfaces of an
oven become hot enough to cause burns. During and after
use, do not touch, or let clothing or other flammable
materials contact heating elements or interior surfaces of
oven until they have had sufficient time to cool. Other
surfaces of the oven may become hot enough to cause
burns – among these surfaces are oven vent openings and
surfaces near these
openings, oven doors, and windows of
oven doors.
For self-cleaning ovens:
■ Do Not Clean Gasket – The gasket is essential for a good
seal. Care should be taken not to rub, damage, or move
the gasket.
■ Do Not Use Oven Cleaners – No commercial oven cleaner
or oven liner protective coating of any kind should be used
in or around any part of the oven.
■ Clean Only Parts Listed in Manual.
■ Before Self-Cleaning the Oven – Remove broiler pan and
other utensils.
OVEN SAFETY

4
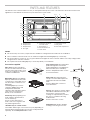
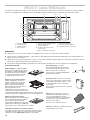
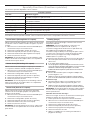
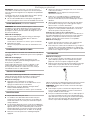
PARTS AND FEATURES
This manual covers several models. The oven you have purchased may have some or all of the items listed. The locations and
appearances of the features shown here may not match those of your model.
NOTES:
■ Be sure that any accessories you purchase are suitable for cooking with steam and hot air in combination.
■ Place cookware on the wire shelf, as it can hold more weight than the baking/drip tray or steam tray.
■ Be sure that there is at least 1¼" (3.2 cm) space between the upper rim of the cookware and the oven cavity ceiling to allow
enough steam to enter the cookware.
■ Do not place wire shelf, baking/drip tray or steam tray directly on oven bottom.
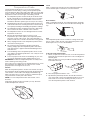
Accessories supplied
Wire shelf: The wire shelf allows
hot air to circulate around the food.
The wire shelf can be used to cook
food or as a support for ovenproof
cookware and bakeware.
Baking/drip tray: Use the baking/
drip tray underneath the wire shelf
or steam tray to catch drips. It may
also be used as cookware or as a
baking tray.
The baking/drip tray is used to
collect the dripping juices and
food particles that would
otherwise stain and soil the interior
of the oven. Do not place tray
directly on the oven bottom.
Steam tray: When preparing most
foods using the Steam function,
use the steam tray.
Do not use the steam tray for
foods, such as rice or grains, that
may fall through the holes.
*Available only on certain models.
The number and the type of accessories may vary depending on
which model is purchased. Other accessories can be purchased
separately. Go to www.jennair.com to order.
Temperature probe: The temperature
probe is designed to measure the
internal temperature of food between
90°F and 210°F (30°C and 100°C).
See the “Temperature Probe” section
for more information.
Water tank: All cooking functions
except Convection Bake require the
water tank to be full to the “MAX”
mark.
See the “Water Tank” section for
more information.
Sponge: The sponge is used for wiping
off residual condensation that may be
present in the cooled oven after
cooking. It is important that you allow
the oven to cool before removing
residual water.
See the “Oven Care” section
Sliding Runners: Used to facilitate
inserting or removing accessories.
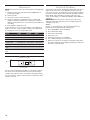
A
B
C
D
E
F
G H I J K
A. Rack position 1
B. Rack position 2
C. Rack position 3
D. Oven light
E. Temperature probe lid/
oven wall socket
F. Rack position 4
G. Convection bake fan
H. Steam outlet
I. Temperature sensor
J. Door gasket
K. Water tank compartment
Point de lecture

5
BEFORE USING THE OVEN
IMPORTANT: Complete the following steps before oven is used
for the rst time.
1. Open the oven door, remove the accessories and make sure
that the oven is empty.
2. Rinse the water tank with tap water (no detergents) and then
ll it to the “MAX” mark with fresh tap water. Slide the water
tank into its compartment until it is rmly seated in place.
ELECTRONIC OVEN CONTROL
Control Panel
The control panel houses the control menu and function
controls.
The control keypads are very sensitive and require only a light
touch to activate.
For more information about the individual controls, see their
respective sections in this manual.
The functions described in this section will work only if the oven
is On. To turn the oven On, press POWER.
Display Navigation
If the oven is off, touch the Oven Power to activate the menu.
From this screen, all automatic cooking programs can be
activated, all manual cooking programs can be set, options
can be adjusted, and instructions, preparation, and tips can be
accessed.
Light
Press the Light keypad to turn the light on and off. When the
oven door is opened, the oven light will automatically turn on.
Display
The display is for both the menu and oven function controls.
The touch panel allows you to scroll through the oven menus.
The display is very sensitive and requires only a light touch to
activate and control.
When an oven is in use, the display will show the clock, mode,
oven temperature, kitchen timer, and oven timer, if set. If the
oven timer is not set, you can set it from this screen.
After approximately 2 minutes of inactivity, the display will go
into sleep mode and the display will dim. When the oven is in
operation, the display will remain bright.
During use, the display will show menus and the appropriate
selections for the options being chosen.
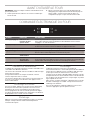
KEYPAD FEATURE INSTRUCTIONS
Settings Microwave Oven Use
Functions
Enables you to personalize the audible tones and microwave oven and oven
operation to suit your needs. See the “Settings” and “More Modes” sections.
Home Home Screen If pressed once, it enables the user to return to the “Cooking Methods” and
“Assisted Cooking” screen. If pressed twice, the time of day is displayed.
Favorites Favorites Allows you to save the cycles that you use on a frequent basis.
Light Oven Light Press the Light keypad to turn the light on and off. When the oven door is opened,
the oven light will automatically turn on.
Power Oven Function Power The Power keypad turns the oven on and wakes it from Sleep mode.
Cancel Oven Function
Cancel
The Cancel keypad turns the microwave oven on and wakes it from Sleep mode. If
the microwave oven is already on, the Cancel keypad stops any microwave oven
function except the Clock, Timer, and Control Lock.
CANCEL
Light
Settings
Home
Favorites

6
Settings
You can control several settings through the Settings Menu:
Temperature Units, Language, Time, Display Brightness, Signal
Volume and Eco Mode.
To access the Settings Menu, press the up or down buttons until
“Settings” is selected on the display, then press OK to conrm.
Language
The language must be set on the display after power is supplied
to the oven.
To Set the Language:
1. Press POWER.
2. Press the up or down buttons until “Settings” is selected on
the display, then press OK to conrm.
3. Press the up or down buttons until “Language” is selected
on the display, then press OK to conrm.
4. Press the up or down buttons until the desired language is
selected on the display, then press OK to conrm.
5. Press BACK to exit the settings function when you are done.
Time
The time must be set on the display after power is supplied to
the oven or after a power failure.
To Set the Time:
1. Press POWER.
2. Press the up or down buttons until “Settings” is selected on
the display, then press OK to conrm.
3. Press the up or down buttons until “Time” is selected on the
display, then press OK to conrm.
The digits on the display will icker.
4. Press the up or down buttons until the correct time is
displayed, then press OK to conrm.
5. Press BACK to exit the settings function when you are done.
Brightness
To Set the Brightness of the Display:
1. Press POWER.
2. Press the up or down buttons until “Settings” is selected on
the display, then press OK to conrm.
3. Press the up or down buttons until “Brightness” is selected
on the display, then press OK to conrm.
4. Press the up or down buttons until the desired brightness is
selected on the display, then press OK to conrm.
5. Press BACK to exit the settings function when you are done.
Volume
To Set the Signal Volume:
1. Press POWER.
2. Press the up or down buttons until “Settings” is selected on
the display, then press OK to conrm.
3. Press the up or down buttons until “Volume” is selected on
the display, then press OK to conrm.
4. Press the up or down buttons until the desired volume is
selected on the display, then press OK to conrm.
5. Press BACK to exit the settings function when you are done.
The Settings keypad allows you access to functions and
customization options for your oven. These settings allow you to
set the clock, turn the audible signals and prompts on and off,
adjust the oven calibration, change the language, and more.
Select the Settings keypad to view the Settings features:
■ Kitchen Timer
■ Light
■ Steam Clean
■ Mute
■ Control Lock
See the “More Modes” section for more information.
TOOL NOTES
Kitchen Timer Set a kitchen timer by manually entering
the desired time into the keypad.
1. Select KITCHEN TIMER.
2. Manually input the time to the desired
timer length.
3. Select START.
4. Select the Cancel keypad to end the
Kitchen Timer.
Light Select the Light keypad to turn the light on
and off. When the oven door is opened,
the oven light will automatically turn on.
Steam Clean See the “Steam Cleaning” section.
Mute Select MUTE to mute or unmute the oven
sounds.
Control Lock The Control Lock shuts down the control
panel keypads to avoid unintended use of
the oven(s). The Control Lock will remain
set after a power failure, if set before the
power failure occurs. When the control is
locked, only the Oven Power and Settings
keypads will function.
The Control Lock is preset unlocked, but
can be locked.
To Lock or Unlock Control:
1. Check that the oven is off.
2. Select CONTROL LOCK.
3. “Control Lock” will display.
4. Scroll up to unlock. No keypads will
function.

7
Preferences
Times and Dates
Set time and date preferences.
■ Your Meal Times: Adjust when breakfast/lunch/dinner is
shown
■ Time
■ Date
■ Time Format (AM/PM vs 24 hour [Military Time])
Sound Volume
Set sound volume preferences.
■ Timers and Alerts
■ Buttons and Effects
Display Settings
Set the screen brightness.
■ Display Brightness
Regional
Set regional preferences.
■ Language: English or French
Info
■ Service and Support: Displays model number, Customer
Support contact info, and Diagnostics.
■ Store Demo Mode: Select Store Demo Mode to toggle
Demo Mode off and on.
Start Demo Mode
1. Select the Settings keypad.
2. Scroll and select INFO.
3. Select STORE DEMO MODE and select ON.
NOTE: The display screen will show the time (default screen/
standby mode).
4. Select the Settings keypad.
5. Select TRY THE PRODUCT.
If the unit is in Demo Mode after power up, follow these
steps to exit Demo Mode:
To Exit Demo Mode:
1. Select TRY THE PRODUCT.
2. Select the Settings keypad.
3. Scroll and select INFO.
4. Select STORE DEMO MODE and select OFF.
5. Select YES on the conrmation screen.
■ Restore Factory: This will restore your product to the
original factory default settings.
Favorites
The Favorites feature stores the oven mode and temperature
for your favorite recipe. As you continue to utilize your Favorites
tool, your product will rene and tailor suggestions towards your
cooking cravings/needs.
NOTE: A select set of Favorites and suggestions may be
automatically shown on the Home screen based on your meal
times.
To save a recipe, select the Favorites keypad and follow the
prompts on the screen to customize your favorites.
Add an image or name to the favorite to customize it to your
preferences.

8
OVEN USE
Odors and smoke are normal when the oven is used the rst few
times, or when it is heavily soiled.
During oven use, the heating elements will not remain on, but will
cycle on and off throughout oven operation.
IMPORTANT: The health of some birds is extremely sensitive to
the fumes given off. Exposure to the fumes may result in death
to certain birds. Always move birds to another closed and well
ventilated room.
Aluminum Foil
IMPORTANT: To avoid permanent damage to the oven bottom
nish, do not line the oven bottom with any type of foil or liner.
■ For best cooking results, do not cover entire wire shelf with
foil because air must be able to move freely.
■ To catch spills, use the baking/drip tray provided with your
oven.
Wire Shelf and Other Accessories,
Shelf Guides, Sliding Runners
IMPORTANT: To avoid permanent damage to the stainless steel
nish, do not place food or bakeware directly on the oven door
or bottom.
WIRE SHELF AND TRAYS
■ Position wire shelf and trays before turning on the oven.
■ Do not change rack positions of wire shelf and trays with
bakeware on them.
■ Make sure wire shelf and trays are level.
BAKEWARE
To cook food evenly, hot air must be able to circulate. Allow
2" (5 cm) of space around bakeware and oven walls.
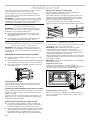
Inserting the Wire Shelf and other Accessories
Insert the wire shelf horizontally by sliding it across the shelf
guides, making sure that the side with the raised edge is facing
upwards.
Other accessories, such as the drip tray and the baking tray, are
inserted horizontally in the same way as the wire shelf.
Removing and Refitting the Shelf Guides
■ To remove the shelf guides, lift the guides up and then gently
pull the lower part out of its seating. The shelf guides can
now be removed.
■ To ret the shelf guides, rst t them back into their upper
seating. Keeping them held up, slide them into the cooking
compartment, then lower them into position in the lower
seating.
Fitting the Sliding Runners (if present)
Remove the shelf guides from the oven and remove the
protective plastic from the sliding runners.
Fasten the upper clip of the runner to the shelf guide and slide
it along as far as it will go. Lower the other clip into position.
To secure the guide, press the lower portion of the clip rmly
against the shelf guide.
Make sure that the runners can move freely. Repeat these steps
on the other shelf guide on the same level.
NOTE: The sliding runners can be tted on any level.
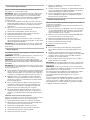
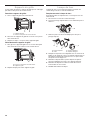
Water Tank
The water tank is located behind the oven door and is accessible
once the oven door is opened.
IMPORTANT: Empty and replace the water tank after each use
to keep condensation from building up inside the oven. See
“Accessories” in the “General Cleaning” section for information
on cleaning the water tank.
Use only fresh tap water or still bottled water. Fill water tank with
tap water to the “MAX” mark.
IMPORTANT: Do not use distilled water, or other liquids, in the
water tank.
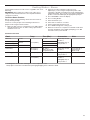
To Remove the Water Tank:
Slowly lift and pull the water tank out of its compartment toward
you, keeping it horizontal to allow the remaining water to drain
out of the valve seat.
To Replace the Water Tank:
With the water tank lled, position it in the water tank
compartment, then push toward the back of the oven until it
engages the contact point and is rmly seated in place.
1
2
3
4

9
Temperature Probe
The temperature probe allows you to measure the internal
temperature of meat during cooking. The temperature probe
measures between 90°F (30°C) and 210°F (100°C) to ensure that
food is cooked to the desired temperature. The required internal
temperature can be set for the type of food being cooked.
■ The temperature probe should normally be inserted so that
the tip of the probe is in the thickest part of the food, which
takes the longest time to heat. Read this section for more
information about the specic type of food you are cooking.
■ Avoid placing the tip of the temperature probe in fatty areas
of the food or where it is touching bone; these areas heat up
more quickly and will give misleading temperature readings.
■ The temperature probe should be positioned so that the tip
does not touch the sides or bottom of the cookware.
■ The temperature that is set must be higher than the current
temperature of the food.
■ Because the temperature probe can only be set to
temperatures up to 210°F (100°C), the temperature probe
cannot be used to make sweets, jams and marmalade, or
food that needs to be cooked or simmered for a long period.
■ Always unplug and remove the temperature probe from the
oven before removing food.
■ Do not immerse the temperature probe in water when
cleaning. Simply wipe the temperature probe clean with a
clean, damp cloth or paper towel with mild detergent and
water after use.
■ To avoid damage to the temperature probe, do not use the
oven with the temperature probe in the oven cavity if it is not
plugged into the oven.
■ To ensure proper results and to avoid damage to your oven,
use only the temperature probe supplied with the oven.
IMPORTANT: Position the temperature probe accurately in the
meat to obtain good cooking results.
If the meat you are cooking has very irregular thicknesses, check
the temperature in multiple areas to make sure it is cooked
properly before removing it from the oven.
Chicken
When the temperature probe is used to roast chicken, the tip of
the temperature probe should be positioned in the eshiest part
of the chicken, on the inside of the thigh just behind the leg.
Make sure that it does not touch any bones, and that the tip is
not positioned in a hollow part of the chicken.
NOTE: To use the Temperature Probe with chicken, select
Assisted.
Temperature probe in chicken assisted cycle only allowed a
restricted temperature selection.
Lamb
When cooking a leg of lamb, insert the temperature probe tip
into the thickest part so that it does not touch the bone.
Beef and Pork
When cooking beef and pork, the temperature probe should be
inserted into the end or side of the meat rather than through the
top.
Fish
The temperature probe can be used when cooking whole, large
pieces of sh. Position the top of the temperature probe in the
thickest part, not too close to the backbone.
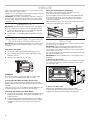
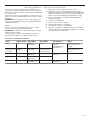
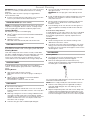
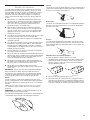
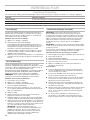
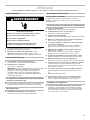
To Use the Temperature Probe:
1. Before you place the food in the oven, insert the temperature
probe fully into the eshiest part of the meat, avoiding bones
and fatty parts.
Make sure that as much as possible of the probe length is
inserted into the food.
2. Place the prepared food in the oven.
3. Flip back the probe lid (located on the left side wall of the
oven cavity) and connect the temperature probe to the oven
wall socket. Close the door, making sure that you do not
close the temperature probe cord in the door.
Correct Incorrect

10
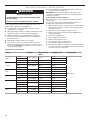
Doneness
NOTE: This function can only be selected when the food probe is
in use.
1. Switch the oven on by selecting the ON/HOME button or
touching the display.
2. Select Food list.
3. Choose the food to cook from the list.
4. Doneness selection is required. Doneness selection will
modify the default temperature/or cooking time in order to
adjust the internal doneness of your food to the desired level
of cooking.
5. Press START to begin the cycle.
To select doneness, you can use the slider to select Normal or
Light. You can also select the option to type in the temperature
by selecting the icon in the upper right corner.
Food Light Normal Extra
Roast Beef 122ºF (50ºC) 140ºF (60ºC) 158ºF (70ºC)
Roast Veal 149ºF (65ºC) 158ºF (70ºC) 167ºF (75ºC)
Roast Pork 140ºF (60ºC) 158ºF (70ºC) 176ºF (80ºC)
Roast Lamb 149ºF (65ºC) 158ºF (70ºC) 167ºF (75ºC)
Roast Duck 158ºF (70ºC) 167ºF (75ºC) 176ºF (80ºC)
Baked Whole
Fish
140ºF (60ºC) 149ºF (65ºC) 158ºF (70ºC)
Steamed Whole
Fish
140ºF (60ºC) 149ºF (65ºC) 158ºF (70ºC)
Oven Vent
The oven vent should not be blocked or covered since it allows
the release of hot air and moisture from the oven. Blocking or
covering vents will cause poor air circulation, affecting cooking.
Do not set plastics, paper or other items that could melt or burn
near the oven vent.
Assisted Cooking
The Preset Foods function will display prompts and allow you to
make selections to assist you in preparing a variety of foods.
You can choose from 11 categories of food: Casserole & Baked
Pasta, Rice & Grain, Meat, Fish & Seafood, Vegetables, Quiche,
Pizza, Bread, Cakes & Pastries, Desserts, Eggs. Once you
select a food category, you will be prompted to make additional
selections.
IMPORTANT: At the end of the cooking cycle, make sure to
empty the water tank and return it to its compartment before
closing the oven door.
To Use:
Use the on-screen prompts or the following instructions to
prepare foods using the assisted cooking cycle.
1. Press ON/HOME or touch the display.
2. Press Assisted Cooking.
3. Select the food category.
4. Select the cycle.
5. Follow the instructions on the display.
6. Press START to begin the cooking cycle.
7. When the Cook Time is complete, an alert will sound and a
message will appear on the display prompting you add more
time to the cycle if desired.
A
A. Oven Vent

11
Cooking Modes - Steam
Use the Steam function for foods such as vegetables, sh, or for
blanching.
IMPORTANT: At the end of the cooking cycle, make sure to
empty the water tank and return it to its compartment before
closing the oven door.
To Use the Steam Function:
Before cooking, see the following “Steam Function Chart” for
rack positioning and tips.
Use the on-screen prompts or the following instructions to
prepare foods using the Steam function.
1. Make sure that oven has cooled below 212°F (100°C) before
using the Steam function. To aid in cooling, open the door
and let the oven cool.
2. Open the oven door and place food in the oven.
(Optional): If you are using the temperature probe, make
sure that it is properly inserted into the food, and plug in the
temperature probe. The oven will sense that the temperature
probe is connected and display the appropriate prompts.
3. Press ON/HOME or touch the display.
4. Press Cooking Modes.
5. Select the Steam cycle.
6. Select Set Cook Time to set a time.
7. Set the temperature and press next.
8. Press START to begin the cooking cycle.
9. When the Cook Time is complete, an alert will sound and a
message will appear on the display prompting you to add
more time to the cycle if desired.
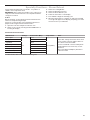
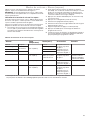
Steam Function Chart
Food Temp Time (Min.)* Accessories Hints
Broccoli Florets
212°F (100°C)
17 - 22 Steam tray on rack
position 3
Baking/drip tray on
rack position 1
Red Cabbage
Sliced
30 - 35
White Cabbage 25 - 30
Corn on the cob 20 - 30
Fish Terrine 165°F (75°C) -
175°F (80°C)
60 - 90 or
160°F (72°C) with
temperature probe
Steam tray on rack
position 3
Cover with lid or
heat-resistant
plastic wrap
Baked Eggs 195°F (90°C) 20 - 25 Baking/drip tray on
rack position 3
Gnocchi 195°F (90°C) -
212°F (100°C)
10 - 15 Steam tray on rack
position 3
Baking/drip tray on
rack position 1
*Cooking times are based on starting from a room temperature oven.
Always place food in the oven without the packaging/wrapping unless otherwise stated.

12
Cooking Modes - True Convect
Use the True Convect function to cook foods such as pies,
dinner rolls, pizza or mufns using the convection function.
During True Convect, the convection ring element cycles on and
off in intervals to maintain the oven temperature, while the fan
constantly circulates the hot air.
Reduce recipe temperature by adjusting the temperature down
approximately 25°F (15°C). The cook time may need to be
reduced also.
Preheat the oven rst unless specied in the recipe.
To Use:
Before cooking, see the following “True Convect Function Chart”
for rack positioning and tips.
For best results, rotate food from front to back halfway through
cooking.
Use the on-screen prompts or the following instructions to
prepare foods using the True Convect function.
1. (Optional) If you are using the temperature probe, make
sure that it is properly inserted into the food, and plug in the
temperature probe. The oven will sense that the temperature
probe is connected and display the appropriate prompts.
2. Switch on the oven by selecting the ON/HOME button or
touching the display.
3. Select the Cooking Modes.
4. Select the True Convect cycle.
5. Follow the instructions on the display.
6. (Optional) If you are not using the temperature probe, the
display will show a preheat option. Press the icon to select
the preheating function.
7. Press START to begin the preheat cycle.
8. (Optional) Open the oven door and place food in the oven
once the preheat cycle is complete.
9. When the Cook Time is complete, an alert will sound and a
message will appear on the display prompting to you to add
more time to the cycle if desired.
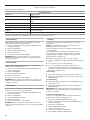
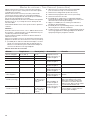
True Convect Function Chart
Food Temperature Time (Min.)* Accessories Hints
Biscuits, refrigerated 325°F (160°C) 13-15
Baking/drip tray on
rack position 2
Cookies 330-345°F (165-175°C) 10-15
Pizza, frozen 365°F (185°C) 20-25
Scones 365°F (185°C) 12-15 Wire shelf on rack
position 2
Quiche 365-375°F (185-190°C) 35-40 Wire shelf on rack
position 2
Puff pastry 355-375°F (180-190°C) 15-20 Baking/drip tray on
rack position 2
Frozen cooked
chicken wings
375-390°F (190-200°C) 15-20 Baking/drip tray on
rack position 2
Cover the tray with baking paper.
Whole chicken
3-4.5 lb (1.5-2.5 kg)
375°F (190°C) 60-80
or 165°F (74°C)
with temperature
probe
Wire shelf on rack
position 2
Baking/drip tray on
rack position 1
Season and place chicken in
oven with breast side up. Make
sure that the meat is well done
by pricking with a tooth pick in
the thickest parts. The meat juice
should be clear.
Roast beef
3-4.5 lb (1.5-2.5 kg)
315°F (155°C) 70-95
or 145°F (63°C)
with temperature
probe
Season the roast and insert
temperature probe, if desired.
Place roast on wire shelf.
*Cooking times are based on a preheated oven.

13
Cooking Modes - True Convect+Steam
True Convect + Steam cooking builds on the benets of
convection cooking by helping to retain moisture, texture and
avor in food. Steam or moisture is automatically added during
the cooking cycles.
Use the True Convect + Steam function to cook food such as
poultry, roast meats and baked sh using convection cooking
and steam.
IMPORTANT: At the end of the cooking cycle, make sure to
empty the water tank and return it to its compartment before
closing the oven door.
To Use:
Before cooking, see the following “True Convect + Steam
Function Chart” for rack positioning and tips.
IMPORTANT: For best results, rotate food from front to back
halfway through cooking.
Use the on-screen prompts or the following instructions to
prepare foods using the True Convect + Steam function.
1. Open the oven door and place food in the oven.
2. (Optional) If you are using the temperature probe, make
sure that it is properly inserted into the food, and plug in the
temperature probe. The oven will sense that the temperature
probe is connected and display the appropriate prompts.
3. Switch on the oven by selecting the ON/HOME button or
touching the display.
4. Select the Cooking Modes.
5. Select the True Convect + Steam.
6. Follow the instructions on the display.
7. Press START to begin the cooking cycle.
8. When the Cook Time is complete, an alert will sound and a
message will appear on the display prompting to you to add
more time to the cycle if desired.
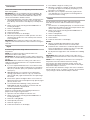
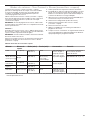
True Convect + Steam Function Chart
Food Steam Level Time (Min.)* Time (Min.)* Accessories Hints
Ribs Low 325-350°F
(160-175°C)
80-90 Wire shelf on rack
position 2
Baking/drip tray on
rack position 1
Start with bone side
up and turn after 30
minutes
Turkey breast,
boneless (2-3 lb
[1-1.5 kg])
Medium
400-425°F
(205-220°C)
50-60 or
165°F (74°C) with
temperature probe
Center temperature
should reach 165°F
(75°C)
Baked potatoes
Low
375-400°F
(190-205°C)
45-55 Wire shelf on rack
position 2
Vegetable gratin Medium to High 400-425°F
(205-220°C)
20-30
Italian bread Low to Medium 350-375°F
(175-190°C)
30-40 Baking/drip tray on
rack position 2
*Cooking times are based on a preheated oven. Use the Convection Bake function when preheating.

14
Specialty Functions - Steam Defrost
Use the Steam Defrost function for defrosting food such as
meat, poultry, vegetables, bread and fruit.
■ Food should be cooked immediately after the defrost/
standing time is completed.
■ When defrosting, it is better to slightly underthaw the food
and allow the process to nish during standing time.
■ Adding standing time after defrosting always improves
the results, as the temperature will be evenly distributed
throughout the food.
■ Wrap bread to keep it from becoming soggy.
■ Place foods, such as meat and sh, in the oven without
packaging or wrapping on the steam tray on rack position
3. Place the baking/drip tray beneath it on rack position 1 to
collect the thawing water.
■ Turn food halfway through defrosting, and rearrange and
separate already thawed pieces.
IMPORTANT: At the end of the defrost cycle, make sure to
empty the water tank and return it to its compartment before
closing the oven door.
To Use the Steam Defrost Function:
Before defrosting, see the following “Steam Defrost Function
Chart” for tips.
Use the on-screen prompts or the following instructions to
prepare foods using the Steam Defrost function.
1. Make sure that oven has cooled below 212°F (100°C) before
using the Steam function. To aid in cooling, open the door
and let the oven cool.
2. Open the oven door and place food in the oven.
3. Switch on the oven by selecting the ON/HOME button or
touching the display.
4. Select the Cooking Modes.
5. Select the Specialty Functions.
6. Select the Steam Defrost cycle.
7. Follow the instructions on the display.
8. Press START to begin the defrost cycle.
9. When the Defrost Time is complete, an alert will sound and
a message will appear on the display prompting you to add
more time to the cycle if desired.
Steam Defrost Function Chart
Food Weight Defrost Time
(Min.)
Standing Time Temperature
Meat
Minced
17.6 oz (500 g) 25-30
30-35
150°F (65°C)
Sliced 20-25
Bratwurst 15.9 oz (450 g) 60-70 10-15
Poultry
Whole 35.3 oz (1000 g) 25-30 40-50
Fillets 17.6 oz (500 g) 30-35 20-25
Legs 30-40 25-30
Fish
Whole 21.2 oz (600 g) 10-15 25-30
Fillets 10.6 oz (300 g) 20-25 10-15
Block 14.1 oz (400 g) 25-30 20-25
Vegetables Block 10.6 oz (300 g) 10-15 20-25
Pieces 14.1 oz (400 g) 15-20 5-10
Bread Loaf 17.6 oz (500 g) 8-12 25-30
Slices 8.8 oz (250 g) 10-12 5-10
Rolls and Buns 8-10 5-10
Cake 14.1 oz (400 g) 10-15 15-20
Fruit Mixed 14.1 oz (400 g) 5-8 5-10
Berries 8.8 oz (250 g) 5-8 3-5
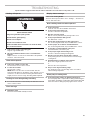
WARNING
Food Poisoning Hazard
Do not let food sit in oven more than one hour before
or after cooking.
Doing so can result in food poisoning or sickness.

15
Specialty Functions - Steam Reheat
Use the Steam Reheat function to reheat 1 or 2 portions of
chilled or room temperature food.
IMPORTANT: At the end of the reheating cycle, make sure to
empty the water tank and return it to its compartment before
closing the oven door.
To Use:
Before reheating, see the following “Steam Reheat Function
Chart” for rack positioning and tips.
Use the on-screen prompts or the following instructions to
prepare foods using the Steam Reheat function.
1. Open the oven door and place food in the oven.
2. Switch on the oven by selecting the ON/HOME button or
touching the display.
3. Select the Cooking Modes.
4. Select the Specialty Functions.
5. Select the Steam Reheat Cycle.
6. Follow the instructions on the display.
7. Press START to begin the reheating cycle.
8. When the Reheat Time is complete, an alert will sound and
a message will appear on the display prompting you to add
more time to the cycle if desired.
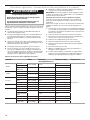
Steam Reheat Function Chart
Chilled Food Servings Reheat Time (Min.)* Temperature Hints
Dinner plate
1-2
18-25
212°F (100°C)
If possible, arrange the thicker, denser food
to the outside of the tray and the thinner or
less dense food in the middle.
Cover food with lid or heat-resistant plastic
wrap and place in the steam tray on rack
position 3.
Place the baking and drip tray beneath to
collect the water.
Soup 20-25
Vegetables 20-25
Rice and pasta 15-20
Potatoes 20-25
Meat (sliced) 15-20
Meat (in sauce) 25-30
Fish llets 10-15
*For best results, allow some additional standing time.

16
Specialty Functions
Specialty functions available are:
Special Functions
Function Suggested Use
Steam Defrost Use the Steam Defrost function for defrosting food such as meat, poultry, vegetables,
bread and fruit.
Steam Reheat Use the Steam Reheat function to reheat 1 or 2 portions of chilled or room temperature
food.
Steam Cook Use to reheat and nish cooking gently with steam.
Proong Use to proof the dough inside the oven at a constant temperature of 105°F (40°C).
Preservation Use to make canned fruits and vegetables.
Yogurt Use to make yogurt.
Sanitize Use to sanitize dishes and other items such as jars for preservation.
Follow the instructions in the appropriate section to use the desired special function.
Steam Defrost
Use the Steam Defrost function for defrosting food such as
meat, poultry, vegetables, bread and fruit.
1. Switch on the oven by selecting the ON/HOME button or
touching the display.
2. Select Cooking Modes.
3. Select the Specialty Functions.
4. Select Steam Defrost.
5. Follow the instructions on the display.
IMPORTANT: At the end of the defrost cycle, make sure to
empty the water tank and return it to its compartment before
closing the oven door.
Steam Reheat
Use the Steam Reheat function to reheat 1 or 2 portions of
chilled or room temperature food.
1. Switch on the oven by selecting the ON/HOME button or
touching the display.
2. Select Cooking Modes.
3. Select the Specialty Functions.
4. Select Steam Reheat.
5. Follow the instructions on the display.
IMPORTANT: At the end of the reheating cycle, make sure to
empty the water tank and return it to its compartment before
closing the oven door.
Steam Cook
Use the Steam Cook function to reheat and nish cooking ready
made meals, such as roasts, sh and gratins.
1. Switch on the oven by selecting the ON/HOME button or
touching the display.
2. Select Cooking Modes.
3. Select the Specialty Functions.
4. Select Steam Cook.
5. Follow the instructions on the display.
IMPORTANT: At the end of the cooking cycle, make sure to
empty the water tank and return it to the oven before closing the
oven door.
Proofing
To use the Proong function, begin with the oven at room
temperature.
NOTE: The Proong function will not activate if the oven
temperature is above 105°F (40°C).
Use the Proong function to proof dough much faster than at
room temperature.
The Proong function is optimal for the rising of sweet or
savory dough. Proong time with this function is reduced
by approximately one-third compared to proong at room
temperature (68-77°F [20-25°C]).
During the Proong function, the oven is 105°F (40°C).
■ Cover the dough with a baking cloth before placing it in the
oven.
■ The oven does not have to be preheated.
■ It is recommended to shorten the proong times as
compared to traditional recipes to keep the dough from
proong too much during the Preset Foods baking function
(Bread/Cakes) preheat cycle.
First Proong
■ Place bowl with dough on wire shelf in rack position 1 or 2.
■ Shorten the proong time by up to one-half compared to a
traditional recipe.
Second Proong
■ Roll out the dough, then place onto a baking/drip tray. Use
rack position 2 or 3.
■ Short the proong time by up to one-half compared to a
traditional recipe.
IMPORTANT: At the end of the proong cycle, make sure to
empty the water tank and return it to its compartment before
closing the oven door.
To Use the Proong Function:
Use the on-screen prompts or the following instructions to
prepare foods using the Proong function.
1. Open the oven door and place food in the oven.
2. Switch on the oven by selecting the ON/HOME button or
touching the display.
3. Select the Cooking Modes.
4. Select the Specialty Functions.
5. Select the Proong cycle.
6. Follow the instructions on the display.
7. Press START to begin the proong cycle.

17
Preservation
Use the Preservation function for preparing homemade canned
fruits and vegetables.
IMPORTANT: Use only good quality fruits and vegetables. All
utensils and dishes used to make canned fruit and vegetables
must be very clean to avoid unwanted bacteria cultures. Jars
can be cleaned with the Sanitize Function.
1. Place the prepared jars on the wire shelf in shelf position two
and the drip tray beneath it. If the jars are too high, place
them directly on the bottom of the drip tray on shelf position
one.
2. Switch on the oven by selecting the ON/HOME button or
touching the display.
3. Select Cooking Modes.
4. Select the Specialty Functions.
5. Select Preservation.
6. Follow the instructions on the display.
7. When the preserving time has ended, open the oven door
and let the jars remain in the oven until they have reached
room temperature.
IMPORTANT: At the end of the cooking cycle, make sure to
empty the water tank and return it to the oven before closing the
oven door.
Yogurt
To use the Yogurt function, begin with the oven at room
temperature.
NOTE: The Yogurt function will not activate if the oven
temperature is above 120°F (50°C).
IMPORTANT: All utensils and dishes used to make yogurt must
be very clean to avoid introducing unwanted bacteria cultures by
mistake.
IMPORTANT: At the end of the cooking cycle, make sure to
empty the water tank and return it to its compartment before
closing the oven door.
■ If you use unpasteurized milk, for it to set, it will have to be
heated to above 195°F (90°C) and then left to cool between
90°F (32°C) and 120°F (49°C). The optimum temperature is
110°F (43°C).
■ Add approximately 3.5 oz (110 g) of room temperature
existing yogurt with live culture, to 1 qt (1 L) of full cream
milk. The milk and yogurt should have the same percentage
fat content.
■ Put the mix in portion-sized glass dishes. Cover each one
tightly with a lid or heat-resistant plastic wrap. Special yogurt
jars may also be used.
■ Cover with aluminum foil during cooking. Position the
baking/drip tray with the containers on the rst shelf. The
oven does not have to be preheated.
To Use the Yogurt Function:
Use the on-screen prompts or the following instructions to
prepare foods using the Yogurt function.
1. Open the oven door and place food in the oven.
2. Switch on the oven by selecting the ON/HOME button or
touching the display.
3. Select the Cooking Modes.
4. Select Specialty Functions.
5. Select the Yogurt cycle.
6. Follow the instructions on the display.
7. Press START to begin the cooking cycle.
8. When the Cook Time is complete, an alert will sound and
a message will appear on the display prompting to you to
prolong the cycle if desired.
9. When the cycle is complete, remove the yogurt from the
oven and allow it to cool, then place in the refrigerator for
several hours before serving.
Sanitize
Use the Sanitize Function for dishes and preservation jars.
Wash all items and rinse with fresh water before using this
function.
1. Place the items on a baking & drip tray or on the wire shelf in
shelf position two. Make sure they are well spaced from each
other to allow steam to reach all parts.
2. Switch on the oven by selecting the ON/HOME button or
touching the display.
3. Select Cooking Modes.
4. Select the Specialty Functions.
5. Select Sanitize.
6. Follow the instructions on the display.
NOTES:
■ All items should be dismantled down to the smallest
individual parts to allow the steam to reach all sides.
■ A minimum time of 20 minutes is needed for proper results.
This is the default factory setting. Less time is not possible,
and the maximum time is an hour and a half.
■ Dry all parts thoroughly with a clean cloth before assembling
them.
IMPORTANT: At the end of the cooking cycle, make sure to
empty the water tank and return it to the oven before closing the
oven door.
NOTE: Not all cooking functions allow the user to change the
temperature or the time while the function is running.
If the function does allow temperature change, click on the
target temperature shown on the screen. Select the new target
temperature and press "Resume".
If the function does allow time change, click on the countdown
time (if a timed cycle) or on "Set the Cook Time" (if an un-timed
cycle). Change to the time desired and press Resume.

18
OVEN CARE
Maintenance Functions
The Drain, Descale, and Steam Clean functions are under "Settings".
Function Suggested Use
Drain Use to manually drain the boiler.
Descale Use to descale the boiler.
Steam Clean Use to rinse the oven.
Follow the instructions in the appropriate function section to use the special functions.
Drain
To ensure that no residual water is left behind, the Drain function
can manually drain the boiler. Empty the water tank and return it
to its compartment before using the Drain function.
To Use the Drain Function:
1. Press Settings.
2. Select Drain function.
If the temperature in the boiler is above 140°F (60°C), the
oven will not start the Drain function. Once the temperature
has dropped below 140°F (60°C), it will begin to drain
automatically.
3. The display will show the status of the cycle. “Please remove
and empty container” will appear at the end of the cycle.
4. Empty the water tank and return it to its compartment before
closing the oven door. Press OK when done.
Descale
When oven descale is necessary, "Descale requested" will
appear on the display. When this message appears, descale
must be completed before another oven cycle can be run.
Before beginning the descale function, be sure that you have
enough descaling liquid available. Use a descaler that is suitable
for coffee and espresso machines and kettles.
NOTE: Once the descale cycle has begun, the descaling
procedure must be completed.
To Use the Descale Function:
1. Make sure the oven is empty.
2. Press Settings.
3. Select Descale function.
The oven will prepare for descale.
4. In the water tank, mix 34 oz (1 L) of water with 8.5 oz
(250mL) of descaler and replace the water tank into its
compartment.
5. Press OK.
6. Follow the on-screen instructions. Do not interrupt the cycle
until it has nished.
7. The display will show a message (“Please remove and empty
container”) at the end of the cycle.
8. Empty the water tank and return it to its compartment before
closing the oven door. Press OK when done. No residue
should be present in the system. The oven is properly
descaled and ready to use.
NOTE: When oven descale is recommended, "Descale
requested" will appear on the display. If this appears you
can continue to use the oven without running descale but
after roughly 10 hours of more usage, descaling will be
required.
Steam Clean
IMPORTANT: Do not use oven cleaners or any other additives
with the Steam Cleaning function.
The Steam Cleaning function is used to soften hard soiled
particles and make cleaning easier. Use the Steam Cleaning
function as soon as possible after spills occur. The longer a spill
sits and dries in the oven, the more difcult it may be to remove.
IMPORTANT: Since the water in the oven bottom is hot, do not
open the oven door during the Steam Cleaning function.
Press CANCEL at any time to end the cycle. The display will
return to the time of day.
To Use the Steam Cleaning Function:
1. Remove wire shelf and trays from the oven cavity.
2. Close the oven door.
3. Select Settings.
4. Select the Steam Clean function.
5. Follow the on-screen instructions.
6. Press START to begin the cleaning cycle.
Helpful Hints
■ Once the Steam Cleaning function is complete, remove all
remaining water and debris in the bottom of the oven with a
sponge or cloth.
■ Wipe any remaining moisture from the oven door interior and
oven cavity interior sides.
■ Use a soft brush or nylon scrubber to wipe the oven interior.
This may help with more stubborn stains.
■ If any soil remains, run a second Steam Cleaning cycle to
help loosen debris for easier removal.
■ Use the Steam Cleaning on small spills such as cheese or
sauce from pizza or snacks, or drips from casseroles.
■ Food spills containing sugar, proteins or starches may
require vigorous scrubbing to remove most of the debris.

19
General Cleaning
IMPORTANT: Before cleaning, make sure all controls are off and
the oven is cool. Always follow label instructions on cleaning
products.
Soap, water and a soft cloth or sponge are suggested rst
unless otherwise noted.
■ If there is moisture left in the cavity after a cycle, run the True
Convect cycle and the moisture will be taken out.
STAINLESS STEEL (on some models)
NOTE: To avoid damage to stainless steel surfaces, do not use
soap-lled scouring pads, abrasive cleaners, Cooktop Cleaner,
steel-wool pads, gritty washcloths or abrasive paper towels.
Cleaning Method:
Rub in direction of grain to avoid damaging.
■ Affresh
®
Stainless Steel Cleaner Part Number W10355016B
(not included):
See “Assistance or Service” section to order.
■ All-purpose cleaner:
Rinse with clean water and dry with soft, lint-free cloth.
OVEN DOOR EXTERIOR
Slight differences in color on the front of the oven are determined
by the different materials used, such as glass, plastic and metal.
Cleaning Method:
Clean with a damp cloth. If the exterior is heavily soiled, add a
few drops of liquid detergent to the water. Wipe with a dry cloth.
Do not use corrosive or abrasive cleaners, which dull the
surface. In the event that one of these products comes into
contact with the oven, immediately clean it using a damp cloth.
CONTROL PANEL
To avoid damage to the control panel, do not use abrasive
cleaners, steel-wool pads, gritty washcloths or abrasive paper
towels.
Cleaning Method:
■ Glass cleaner and soft cloth or sponge:
Apply glass cleaner to soft cloth or sponge, not directly on
panel.
■ Affresh
®
Kitchen and Appliance Cleaner Part Number
W10355010B (not included):
See “Assistance or Service” section to order.
OVEN CAVITY
■ Do not use oven cleaners.
■ Food spills should be cleaned when oven cools. To avoid
buildup of baked-on food residue, clean the oven cavity after
every use.
■ With long cooking times or when cooking on different levels,
especially food with a high water content (pizzas, stuffed
vegetables, etc.) moisture may form on the inside of the door
and the seal. When the oven is cool, dry the inside of the
door with a cloth or sponge.
■ Clean the door glass with a suitable liquid detergent.
■ Use a sponge with a mild detergent or a paper towel with
spray glass cleaner.
IMPORTANT: Do not spray glass cleaner directly into the
oven.
■ If salts are deposited in the cooking compartment, rust could
develop. It is a good idea to clean the cooled down oven
cavity after each use.
■ Run the Steam Cleaning function regularly to aid and ease
the cleaning. See “ Steam clean” in the “Maintenance
Functions” section.
■ To avoid damage to the oven door, do not allow grease or
other food particles to build up around the door and door
seal.
To clean oven cavity surfaces:
To avoid damage to oven cavity surfaces, do not use soap-lled
scouring pads or abrasive cleaners. The oven cavity should
be cleaned at regular intervals, especially if spillovers have
occurred.
Cleaning Method:
■ Steam Cleaning Function: See “Steam Cleaning” in the
“Maintenance Functions” section.
■ To clean the oven cavity surfaces (including the oven cavity
ceiling), remove the wire shelf and shelf supports and wipe
the interior of the oven and the shelf supports clean. See the
“Shelf Supports” section.
ACCESSORIES
Cleaning Method:
■ The following accessories are dishwasher safe: wire shelf,
baking/drip tray, steam tray and shelf supports.
■ Remove the water pipe from the water tank for easy
cleaning. Soak the water pipe in water with liquid detergent.
The water pipe is not dishwasher safe.
Use a sponge with a mild detergent to clean the water tank. The
water tank is not dishwasher safe.
NOTE: Remove, empty and dry the water tank after each use.
■ Soak the seals and rings from the light bulb assembly in
water with liquid detergent. The seals and rings are not
dishwasher safe.
■ Wipe the temperature probe clean with a clean, damp cloth
or paper towel with mild detergent and water after use. Do
not immerse the temperature probe in water when cleaning.
To avoid scratching the surface, do not use steel-wool pads.

20
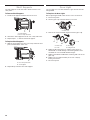
Shelf Supports
The shelf supports can be removed to better clean the oven
cavity walls.
To Remove Shelf Supports
1. Pull the shelf support toward the front of the oven.
2. Unhook the shelf supports from the oven cavity wall hooks.
3. Repeat steps 1 - 2 with the other shelf support.
To Replace Shelf Supports
1. Slide the shelf support onto the oven cavity wall hooks and
push toward the back of the oven.
2. Repeat Step 1 with the other shelf support.
Oven Light
The oven light is a 12 V, 10 W maximum, type G4 heat resistant
halogen bulb.
To Replace the Oven Light:
Before replacing the bulb, make sure the oven is off and cool.
1. Disconnect power.
2. Turn the glass cap counterclockwise to unscrew.
3. Remove the seals and metal ring and clean the glass cap.
4. Replace bulb using a tissue or wearing cotton gloves to
handle bulb. To avoid damage or decreasing the life of the
new bulb, do not touch bulb with bare ngers.
5. Replace the bulb into bulb holder, metal ring and seals to the
glass cap.
6. Replace the oven light assembly to the oven cavity by
turning it clockwise.
7. Reconnect power.
B
A
A. Shelf support
B. Oven cavity wall hook
A
B
A. Oven cavity wall hook
B. Shelf support
A
A. Glass cap
A
B
C
D
A. Glass cap
B. Seals
C. Metal ring
D. Halogen bulb
La page est en cours de chargement...
La page est en cours de chargement...
La page est en cours de chargement...
La page est en cours de chargement...
La page est en cours de chargement...
La page est en cours de chargement...
La page est en cours de chargement...
La page est en cours de chargement...
La page est en cours de chargement...
La page est en cours de chargement...
La page est en cours de chargement...
La page est en cours de chargement...
La page est en cours de chargement...
La page est en cours de chargement...
La page est en cours de chargement...
La page est en cours de chargement...
La page est en cours de chargement...
La page est en cours de chargement...
La page est en cours de chargement...
La page est en cours de chargement...
La page est en cours de chargement...
La page est en cours de chargement...
La page est en cours de chargement...
La page est en cours de chargement...
-
 1
1
-
 2
2
-
 3
3
-
 4
4
-
 5
5
-
 6
6
-
 7
7
-
 8
8
-
 9
9
-
 10
10
-
 11
11
-
 12
12
-
 13
13
-
 14
14
-
 15
15
-
 16
16
-
 17
17
-
 18
18
-
 19
19
-
 20
20
-
 21
21
-
 22
22
-
 23
23
-
 24
24
-
 25
25
-
 26
26
-
 27
27
-
 28
28
-
 29
29
-
 30
30
-
 31
31
-
 32
32
-
 33
33
-
 34
34
-
 35
35
-
 36
36
-
 37
37
-
 38
38
-
 39
39
-
 40
40
-
 41
41
-
 42
42
-
 43
43
-
 44
44


JennAir JJW6024HL Le manuel du propriétaire
- Taper
- Le manuel du propriétaire
- Ce manuel convient également à
dans d''autres langues
- English: JennAir JJW6024HL Owner's manual