Kichler Lighting 15495CBR Manuel utilisateur
- Taper
- Manuel utilisateur
La page est en cours de chargement...

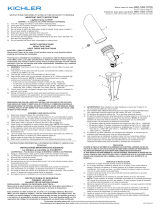
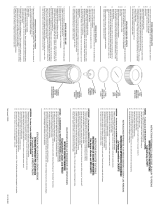
SOCKET SCREW
VIS À TETE CREUSE
For warranty information please visit: kichler.com/warranty
Pour de plus amples informations sur la garantie, cliquez sur le lien ci-dessous : kichler.com/warranty
INSTRUCTIONS PERTAINING TO A RISK OF FIRE,OR INJURY TO PERSONS
IMPORTANT SAFETY INSTRUCTIONS
Lighted lamp is HOT!
WARNING — To reduce the risk of FIRE OR INJURY TO PERSONS.
1) Turn off / unplug and allow to cool before replacing lamp.
2) Lamp gets HOT quickly! Contact only switch / plug when turning on.
3) Do not touch hot lens or cowl.
4) Donottouchlamporxtureifwarm
5) Do not look directly at lamp when on.
6) Keep lamp away from combustible materials.
7) Useonlywithwattageandlampmarkedonxture.
8) Do not touch the inner glass envelope of the lamp at any time. Use a soft cloth. Oil from skin may damage lamp.
9) Donotoperatethexturewithadamagedormissinglens.
SAFETY INSTRUCTIONS READ THIS FIRST
KEEP THESE INSTRUCTIONS
CAUTION – RISK OF SHOCK –
Disconnect Power at the main circuit breaker panel or main fusebox before starting and during
the installation.
This xture is intended for installation in accordance with the National Electric Code (NEC) and
Local code specications. Failure to adhere to these codes and instructions may result in serious
injury and/or property damage and will void the warranty. If you are not familiar with code require-
ments, installation by a certied electrician is recommended.
1) WARNING:Thisxtureisnottobeinstalledwithin10feet(3M)ofapool,spaorfountain.
2) Thisxtureistobeusedonlywithalistedpowerunit(transformer)ratedamaximumof300W(25
AMPS)15volts.
3) The#18ga.xturewireisnotintendedfordirectburialorconnectedtoatransformer.
4) Directburialratedwireistobeburiedaminimumof6”(152mm)beneaththesurfaceoftheground.
NOTE: IfadditionalDirectBurialwireisneeded,contactyourlocalKichler
®
landscape distributor.
• 8GAwirecanbepurchasedinlengthof250’(76M),15503-BK.
• 10GAwirecanbepurchasedinlengthof250’(76M),15504-BK.
• 12GAwirecanbepurchasedinlengthsof100’(30M),15501-BK;250’(76M),15502-BK;
500’(152M),15505-BK;and1000’(304M),15506-BK.
5) Fixtureshallnotuseatungstenhalogenlampunlessthextureismarkedforusewithsuchlamps.
6) Wiringconnectionsmustbemadewithapproved/listedwireconnectiondevice(s)suitableforthe
application.Donotexceedmanufacturers’wiringcombinationspecicationsforsizeandquantityof
conductors.
CAUTION
WHEN INSTALLING KICHLER LANDSCAPE LIGHTING (LINE VOLTAGE OR LOW VOLTAGE),
CARE SHOULD BE TAKEN TO KEEP CLEAR OF POTENTIALLY COMBUSTIBLE MATERIALS.
WHEN MAINTAINING THE FIXTURES, BE SURE TO REMOVE LEAVES, PINE NEEDLES, GRASS
CLIPPINGS, MULCH, OR ANY DEBRIS THAT HAS ACCUMULATED ON THE LIGHT BULB, LENS,
OR BODY OF THE FIXTURE.
ASSEMBLY AND INSTALLATION
1) TURN OFF POWER.
2) Determinedesiredlocationforinstallation.Checkareaforobstructionssuchassprinklers,plant
material,etc.Assesssoilconditions.
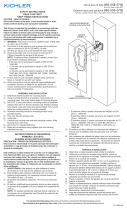
3) Digaholeapproximately12”deepby3”widerthanthewelllight.Thisallowsapproximately3”of
peagravelorsandtosurroundABShousing(Forconcreteapplications,usea51/4”coredrill,
12” deep).
4) Withascrewdriver,loosencoverscrewsandinstalllampintosocket.
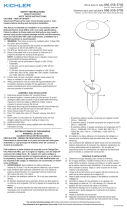
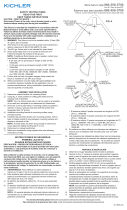
5) Returnthecoverbackon,aligntheholesandtightenscrewsaccordingtothestarpattern
shown in Fig. 1.
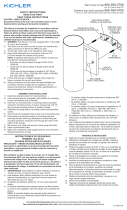
6) Stripthetwoleadwiresfromxturepigtailwire.Usingwireconnectors(notincluded),connectthe
leadsfromtheluminairetothemainsupplycableleads.Allow12-18”ofextrawire(coiledinside
the bottom of the well light) to allow for lamp removal / replacement.
7) Placextureatnalheightleaving1-2”ofthextureabovegradetominimizedebriscollection(in
lawnareastheyshouldbeushwithgrade).
8) Installluminaireinholeandllholeafterinstallationwithpeagravelorsand.Backllandcompact
thesoilaroundthexturethussecuringitintheground.
9) Restorepowertoxturetocheckforproperoperation.
Call Factory for additional installation options.
INSTRUCTIONS POUR EVITER TOUT RISQUE D’INCENDIE OU DE BLESSURE
INSTRUCTIONS DE SECURITE IMPORTANTES
Une lampe allumée est BRULANTE!
AVERTISSEMENT — Pour éviter tout risque d’INCENDIE OU DE BLESSURE
1) Éteindreoudébrancherl’appareiletattendrequelalamperefroidisseavantdelaremplacer.
2) Lalampechaufferapidement!Netoucherquel’interrupteur/lapriselorsquevousl’allumez.
3) Nepastoucherlalentilleoulecapotlorsqu’ilssontchauds.
4) Nepastoucherlalampenileluminaires’ilssontchauds.
5) Nejamaisregarderdirectementlalumièred’unelampeallumée.
6) Teniràl’écartdesmatièrescombustibles.
7) N’utiliserlapuissanceetlalampequeselonlesvaleursindiquéessurl’appareil.
8) Nejamaistoucherl’enveloppeenverreàl’intérieurdelalampe.Utiliserunchiffondoux.L’huilede
lapeaurisqued’endommagerlalampe.
9) Nepasutiliserl’appareilsanslentilleousicettedernièreestendommagée.
CONSIGNES DE SÉCURITÉ À LIRE EN PREMIER
CONSERVER CES CONSIGNES
ATTENTION – RISQUE DE DÉCHARGES ÉLECTRIQUES –
Couper le courant au niveau du panneau du disjoncteur du circuit principal ou de la boîte à
fusibles principale avant de procéder à l’installation.
Cet appareil est prévu pour l’installation conformément au Code électrique National (NEC) et les
spécications du code Local. Ne pas respecter ces codes et instructions peut entraîner des
blessures graves et/ou des dommages matériels et annulera la garantie. Si vous ne connaissez
pas les exigences de ces codes, il est recommandé de coner l’installation à un électricien certié.
1) AVERTISSEMENT :Nepasinstallerleluminairedansles3m(10pi)d’unepiscine,d’unspaou
d’unefontaine.
2) Cetappareildoitêtreutiliséuniquementavecunblocd’alimentation
homologuée(transformateur)évaluéàunmaximumde300W(25ampères)15volts.
3) 18GAln’estpasprévupourl’enfouissementdirectniàuneconnexionàtransformateur.
4) Enfouissementdirectlévaluéestd’êtreenterréunminimumde6”(152mm)souslasurfacedusol.
IS-15495-15496-15497-15498-15499-CB
OUTDOOR USE ONLY
DOM ETRE INSTALLE A L’EXTERIEUR
INSTRUCTIONS
For Assembling and Installing Fixtures in Canada
Pour L’assemblage et L’installation Au Canada
REMARQUE :Sileld’enfouissementDirectsupplémentaireestnécessaire,contactezvotre
distributeur local du paysage Kichler®.
• 8ldeGApeutêtreachetéenlongueurde250pieds(76M),15503-BK.
• 10ldeGApeutêtreachetéenlongueurde250pieds(76M),15504-BK.
• 12ldeGApeutêtreachetédansdeslongueursde100pi(30M),15501-BK;250PIEDS
(76M),15502-BK;500PIEDS(152M),15505-BK;et1000pieds(304M),15506-BK).
5) Leluminairenedoitpasutiliserdelampehalogènetungstèneàmoinsd’unementionindiquéesur
le luminaire.
6) Câblageconnexionsdoiventêtrefaitesaveclapprouvé/répertoriésconnexionoulesdispositifs
adaptésàl’application.Nepasdépasserlesspécicationsdufabricantducâblagecombinaison
pour la taille et la quantité des conducteurs.
ATTENTION
LORS DE L’INSTALLATION D’ECLAIRAGE DE JARDIN KICHLER (TENSION DU SECTEUR OU
BASSE TENSION), PRENEZ SOIN DE LE MAINTENIR DEGAGE DE TOUT MATERIAU
COMBUSTIBLE.
LORS DE L’ENTRETIEN DE LA LAMPE, ASSUREZ - VOUS DE RETIRER LES FEULLES, LES
AIGUILLES DE PIN, LES BRINS D’HERBE, L’HUMUS, ET TOUT DEBRIS QUI S’EST ACCUMULE
SUR L’AMPOULE DE LA LAMPE, LE DIFFUSEUR OU LE CORP DE LA LAMPE.
MONTAGE ET INSTALLATION
1) COUPER LE COURANT.
2) Déterminezl’emplacementdel’installation.Inspectezlazoneanderepérertouteobstructiontelle
quedesgicleurs,dumatérielvégétal,etc.etévaluezlesconditionsdusol.
3) Creusezuntroud’environ30cmdeprofondeuret7,50cmpluslargequelalumièredupuits.Ce
troupermetd’entourerleboîtierABSd’environ7,50cmdegraviernoudesable(pourles
applicationsenbéton,utilisezunforetde51/4po,profondeurde30cm).
4) Àl’aided’untournevis,desserrezlesvisducouvercleetinstallezlalampedansladouille.
5) Remettezlecouvercleenplace,alignezlestrousetserrezlesvisselonunmotifenétoile
(voirlaFig.1).
6) Dénudezlesdeuxlsconducteursdulcourtduluminaire.Àl’aidedesconnecteursdels(non
fournis),raccordezleslsduluminaireauxlsducâbled’alimentationprincipale.Laissezentre30
et45cmdel(enrouléàl’intérieurdufonddelalumièredupuits)pourpermettreleretrait/
remplacement de la lampe.
7) Placezleluminaireàlahauteurnaleenlaissant2,5à5cmduluminaireau-dessusdusolpour
minimiserlacollectedesdébris(dansleszonesdepelouse,ilsdoiventafeurerlesol).
8) Installezleluminairedansletrouetaprèsl’installation,remplissezletroudegravieroudesable.
Remblayezetcompactezlesolautourduluminairepourlexersolidementdanslesol.
9) Rétablissezl’alimentationauluminairepourgarantirquel’installationestcorrecte.
Pourtouteautreoptiond’installation,veuillezcontacterl’usine.
We’re here to help 844-542-4537
Hrs: M-F 8am to 6:30pm EST
Nous sommes là pour vous aider 844-542-4537
Heures : du lundi au vendredi, de 8h à 6:30h (heure de l’Est)
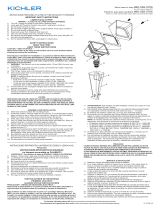
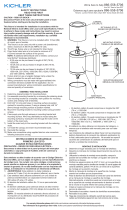
COVER SCREW
VIS DU COUVERCLE
COVER
COUVERCLE
GLASS
VERRE
GASKET
JOINT
LAMP(soldseparately)
LAMPE(venduséparément)
BRACKET SCREW
VISDESUPPORT
SOCKETCLIP
CLIPDEDOUILLE
BRACKET
SUPPORT
HOUSING
BOÎTIER
CORDGRIP
ATTACHE CORDON
Fig. 1
1
2
3
4
5
WIRE
FIL
SOCKET
DOUILLE
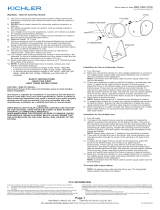
15495
Flat Glass Cover
CouvercleenVerrePlat
15497
Rockguard Cover
Couvercle Rockguard
15498
Indicator Cover
Couvercle Indicateur
15496
Cowl Cover
Couvercle Capot
15499
Side-FireCover
Couvercle Latéral
-
 1
1
-
 2
2


Kichler Lighting 15495CBR Manuel utilisateur
- Taper
- Manuel utilisateur
dans d''autres langues
Documents connexes
-
Kichler Lighting 15788CBR Manuel utilisateur
-
 Kichler Lighting 15786CBR Manuel utilisateur
-
 Kichler Lighting 15785CO Manuel utilisateur
-
 Kichler Lighting 15310AZT Manuel utilisateur
-
 Kichler Lighting 15079AZT Manuel utilisateur
-
 Kichler Lighting 15066AZT Manuel utilisateur
-
 Kichler Lighting 15065AZT Manuel utilisateur
-
 Kichler Lighting 15783CBR Manuel utilisateur
-
 Kichler Lighting 16027SS27 Manuel utilisateur
-
 Kichler Lighting 15190BK Manuel utilisateur


