Lifetime 60139 Le manuel du propriétaire
- Taper
- Le manuel du propriétaire

CSH (x2)
8 mm x 10 mm
(Included)
CTP (x1)
(Included)
Icon Legend...............................4
Warnings & Notices.....................5
Parts Identifi er............................6
Bench Seat Assembly..................7
Bench Back Assembly...............11
Bench Adjustment....................18
Cleaning & Care........................19
Registration............................20
Warranty.............................21
TOOLS REQUIRED TABLE OF CONTENTS
CONTACT LIFETIME CUSTOMER SERVICE:
Call: 1-800-225-3865
7:00 am–5:00 pm (Monday–Friday) MST
and 9:00 am–1:00 pm Saturday MST
Live Chat: www.lifetime.com
(click on “Ask An Expert” tab)
Video Instructions: www.youtube.com/lifetimeproducts
QUESTIONS?
MODEL# AND PRODUCT ID (you will need both when contacting us)
Model Number: 60139
Product ID:
BEFORE ASSEMBLY:
• Assemble on a level surface
• 2 adults recommended for setup
• Videos and help guides available
Scan the code below to see how it all comes
together.
http://go.lifetime.com/fwconvertible
Pour le français, voir la page 2. Para el español, ver la página 3.
ASSEMBLY INSTRUCTIONS
MODEL #60091
CONVERTIBLE
BENCH
MODEL 60139
ITM./ART. 853270
FOR DOMESTIC USE ONLY!
IMPORTANT: SAVE FOR FUTURE REFERENCE. READ CAREFULLY!
Importado por:
Importadora Primex S.A. de C.V.
Blvd. Magnocentro No. 4
San Fernando La Herradura
Huixquilucan, Estado de México
C.P. 52765
RFC: IPR-930907-S70
Tel: 5-5246-5500
Ninguna garantía ofrecida por el fabricante es válida en México.
For Customer Service in mainland Europe:
E-mail: [email protected]
Copy

POUR L’USAGE DOMESTIQUE SEULEMENT !
IMPORTANT, CONSERVER POUR RÉFÉRENCE : LIRE AVEC PRUDENCE !
CSH (x2)
8 mm x 10 mm
(Incluses)
CTP (x1)
(Incluse)
Légende des icônes.....................4
Avertissements et avis.................5
Identifi cateur de pièces................6
Assemblage du siège...................7
Assemblage du dossier..............11
Ajustement du dossier...............18
Nettoyage et entretien...............19
Enregistrement......................20
Garantie.................................22
OUTILS REQUIS SOMMAIRE
CONTACTER LES SERVICES À LA CLIENTÈLE LIFETIME
®
:
Composer le 1-800-225-3865
Du lundi au vendredi 7:00 hr – 17:00 hr (HNR)
et samedi 9:00 hr – 13:00 hr (HNR)
t’Chat en direct: www.lifetime.com
(cliquer sur la languette « Ask An Expert »)
Videos educatifs: www.youtube.com/lifetimeproducts
QUESTIONS ?
N° DE MODÈLE ET RÉFÉRENCE DU PRODUIT (vous aurez besoin des deux lorsque vous nous contactez)
N° de modèle : 60139
Référence du produit :
For English, see page 1. Para el español, ver la página 3.
INSTRUCTIONS D’ASSEMBLAGE
MODEL #60091
BANC
CONVERTIBLE
MODÈLE n° 60139
AVANT L’ASSEMBLAGE :
• Assembler sur une surface de niveau
• Nous recommendons seulement 1 adulte pour l’assemblage
• Vídeos et guides d’aide sont disponibles
Scanner le code ci-dessous pour voir l’assemblage.
http://go.lifetime.com/fwconvertible
Pour les services à la clientèle du continent européen :
É-mail: [email protected]
Copy

¡SÓLO PARA EL USO DOMÉSTICO!
¡IMPORTANTE: GUARDAR PARA FUTURA REFERENCIA. LEER CUIDADOSAMENTE!
ITM./ART. 853270
Importado por:
Importadora Primex S.A. de C.V.
Blvd. Magnocentro No. 4
San Fernando La Herradura
Huixquilucan, Estado de México
C.P. 52765
RFC: IPR-930907-S70
Tel: 5-5246-5500
Ninguna garantía ofrecida por el fabricante es válida en México.
Leyenda de íconos......................4
Advertencias y avisos...................5
Identifi cador de piezas.................6
Ensamble del asiento..................7
Ensamble del respaldo..............11
Ajusto del respaldo....................18
Limpieza y cuidado..................19
Registro.............................20
Garantía................................23
INSTRUMENTAL REQUERIDO ÍNDICE
PONERSE EN CONTACTO CON LOS SERVICIOS DE CLIENTES LIFETIME
®
:
Llamar : 1-800-225-3865
De lunes hasta viernes 7:00 hr–17:00 hr (MST)
y sábado 9:00 hr–13:00 hr (MST)
Chat en vivo: www.lifetime.com
(cliquee en la lengüeta «Ask An Expert»)
Instrucciones en vídeo: www.youtube.com/lifetimeproducts
¿PREGUNTAS?
MODEL E ID DEL PRODUCTO (necesitará los dos al contactarnos)
Número de modelo: 60139
ID del producto:
ANTES DEL ENSAMBLE:
• Ensamblar sobre una superfi cie nivelada
• Recomendamos sólo 1 adulto para el ensamble
• Videos y guías de ayuda son disponibles
Escanear el código debajo para ver el ensamble.
http://go.lifetime.com/fwconvertible
For English, see page 1. Pour le français, voir la page 2.
INSTRUCCIONES DE ENSAMBLE
MODEL #60091
MODELO n° 60139
BANCO
CONVERTIBLE
CSH (x2)
8 mm x 10 mm
(Incluidas)
CTP (x1)
(Incluida)
Para el servicio a clientes en el continente europeo:
Correo electrónico: [email protected]
Copy

44
• Indicates the parts to be used for a section.
• Indique les pièces à utiliser pour une section.
• Indica las piezas que se usarán en una sección.
• Indicates special heed should be taken when reading.
• Indique qu’une attention spéciale doit être prise lors de la lecture.
• Indica que uno debe prestar atención al leer.
• Indicates the hardware to be used for a section.
• Indique la quincaillerie à utiliser pour une section.
• Indica el herraje que se usará en una sección.
• Indicates the tools to be used for a section.
• Indique les outils à utiliser pour une section.
• Indica el instrumental que se usará en una sección.
• Indicates no hardware required for a specifi c page.
• Indique qu’aucun matériel n’est requis pour une page précise.
• Indica que no se necesita herraje en una página específi ca.
• Indicates no parts required for a specifi c section.
• Indique qu’aucune pièce n’est requise pour une section précise.
• Indica que no se necesitan partes en una sección específi ca.
• Indicates to use/not to use an electric drill for a specifi c step.
• Indique quand utiliser ou ne pas utiliser une perceuse électrique pour une étape précise.
• Indica usar o no usar un taladro eléctrico en un paso específi co.
ICON LEGEND / LÉGENDE DES ICÔNES / LEYENDA DE ÍCONOS
1159277 G 5/30/2017
Copy

55
English:
• Failure to follow these warnings may result in serious injury or property damage and will void warranty.
• To ensure safety, do not attempt to assemble this product without following the instructions carefully.
• Assemble on a level surface.
• Be aware that plastic pieces can be damaged by overtightening the screws. To avoid damage, we strongly recommend
the use of a drill with a low torque setting. A #2 Phillips screwdriver may also be used.
• Two capable adults are required for assembly.
• All who participate in the assembly process should wear safety glasses throughout the assembly.
• Do not use or store hot objects near the product.
• Proper and complete assembly are essential to reduce the risk of accident or injury.
• Most injuries are caused by misuse and/or not following instructions.
Le français :
• Le non-respect de ces avertissements peut entraîner en conséquence des blessures sérieuses ou dommages à la propriété et annulera la
garantie.
• Pour assurer votre sécurité, ne tentez pas d’assembler ce produit sans suivre attentivement les instructions.
• Assemblez ce produit sur une surface niveléé.
• Il est possible d’endommager les pièces en plastique en serrant les vis excessivement. Pour éviter d’endommager le
plastique, nous recommandons vivement l’usage d’une perceuse électrique de faible puissance. Vous pouvez aussi
utiliser un tournevis cruciforme #2.
• Deux adultes sont requis pour assembler ce produit.
• Toutes les personnes qui participent à l’assemblage doivent porter des lunettes de sécurité tout le long de l’assemblage.
• N’utilisez pas ni conservez pas les objets chauds sur ce produit.
• L’assemblage correct et complet est essentiel pour réduire le risque des dangers ou des blessures.
• La plupart des blessures sont causées par l’abus et/ou par le non-respect des instructions.
El español:
• El incumplimiento de seguir estas advertencias puede resultar en lesiones graves o daño a la propiedad y anulará la garantía.
• Para mantener la seguridad, no intente armar este producto sin seguir detenidamente las instrucciones.
• Ensamble este producto sobre una superfi cie nivelada.
• Es posible dañar las piezas de plástico por apretar demasiado los tornillos. Para evitar dañar el plástico, recomendamos que
use un taladro eléctrico de baja potencia. Se puede usar también un destornillador de punta Phillips #2.
• Se requiere de 2 adultos para ensamblar este producto.
• Todos los que participan en el ensamble del producto deben llevar gafas de seguridad a lo largo del ensamble.
• No use ni almacene objetos calientes en el banco.
• El ensamble apropiado y completo son esenciales para reducir el riesgo de accidentes y lesiones.
• La mayoría de las lesiones son causadas por el uso erróneo y/o el incumplimiento de seguir las instrucciones.
WARNINGS & NOTICES / AVERTISSEMENTS ET AVIS / ADVERTENCIAS Y AVISOS

66
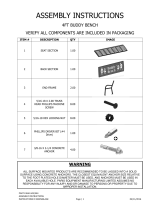
PARTS IDENTIFIER / IDENTIFICATEUR DE PIÈCES / IDENTIFICADOR DE PIEZAS
HARDWARE / QUINCAILLERIE / HERRAJE
LARGE PARTS / PIÈCES GRANDES / PIEZAS GRANDES
CRK (x1)
CTK (x1)
CRL (x1)
CRI (x1)
CRJ (x1)
CTR (x1)
CTW CTX
CTT (x4)
CTQ (x2)
Hole / Trou / Agujero

77
AON (x8)
CSI (x4) CTV (x4)
47 mm
52 mm
CRI (x1) CRJ (x1)
CRK (x1)
CRL (x1)
CSH (x2)
CTW
Large Parts / Pièces grandes / Piezas grandes
Hardware / Quincaillerie / Herraje
PARTS REQUIRED / PIÈCES REQUISES / PIEZAS REQUERIDAS
HARDWARE REQUIRED / QUINCAILLERIE REQUISE / HERRAJE REQUERIDO
SEAT ASSEMBLY / ASSEMBLAGE DU SIÈGE / ENSAMBLE DEL ASIENTO
1
TOOLS REQUIRED / OUTILS REQUIS / INSTRUMENTAL REQUERIDO
CSH (x2)
8 mm x 10 mm
Hole / Trou / Agujero

8
SECTION 1 (CONTINUED) / SECTION 1 (SUITE) / SECCIÓN 1 (CONTINUACIÓN)
TOOLS AND HARDWARE REQUIRED / OUTILS ET QUINCAILLERIE REQUIS / INSTRUMENTAL Y HERRAJE REQUERIDOS
AON (x2)
CSI (x2)
47 mm
10 mm (x2)
CRJ
CSI
CSI
AON
AON
CRL
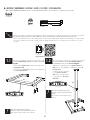
1.1
1.2
• Insert two Bolts (CSI) through the holes in the Left
Leg (CRJ).
• Insérer deux boulons (CSI) à travers les trous dans
le pied gauche (CRJ).
• Insertar deux pernos (CSI) a través de los agujeros
en la pata izquierda (CRJ).
• Set the two holes in the Cross Support (CRL) over
the two Bolts, and secure. Do not overtighten.
• Mettre les deux trous sur le support transversal
(CRL) sur les deux boulons, et attacher-le bien. Ne
pas trop serrer.
• Colocar los dos agujeros
en el soporte transversal
(CRL) sobre los dos pernos,
y sujetarlo bien. No apretar
demasiado.
Note: Orient the Lifetime logo as shown.
Remarque : Orienter le logo Lifetime comme
illustré.
Nota: Orientar el logotipo Lifetime como se
muestra.
Note: Orient the Lifetime logo as shown.
Remarque : Orienter le logo Lifetime comme illustré.
Nota: Orientar el logotipo Lifetime como se muestra.
!
!
LIFETIME
©
• If you have trouble with this section, follow the code below to view a video on how to assemble the Seat.
• En cas de problèmes avec cette section, suivre le code en bas pour voir un vidéo sur l’assemblage de cette section.
• En caso de problemas con esta sección, seguir el código debajo para ver un video sobre el ensamble de en esta
sección.
http://go.lifetime.com/cbseatassembly

9
SECTION 1 (CONTINUED) / SECTION 1 (SUITE) / SECCIÓN 1 (CONTINUACIÓN)
TOOLS AND HARDWARE REQUIRED / OUTILS ET QUINCAILLERIE REQUIS / INSTRUMENTAL Y HERRAJE REQUERIDOS
CSI
CRI
CRK
AON
AON
CSI
AON (x2)
CSI (x2)
47 mm
10 mm (x2)
1.3
1.4
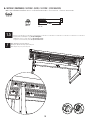
• Secure the Cross Support to the Right Leg (CRI). Do not overtighten.
• Attacher bien le support transversal au pied droit (CRI). Ne pas trop serrer.
• Sujetar el soporte transversal a la pata derecha (CRI). No apretar demasiado.
Holes / Trous / Agujeros
• Set the Seat (CRK) down onto the Legs as shown, and align the holes.
• Mettre le siège (CRK) sur les pieds comme illustré, et aligner le trous.
• Colocar el asiento (CRK) en las patas como se muestra, y alinear los agujeros.
!

10
SECTION 1 (CONTINUED) / SECTION 1 (SUITE) / SECCIÓN 1 (CONTINUACIÓN)
TOOLS AND HARDWARE REQUIRED / OUTILS ET QUINCAILLERIE REQUIS / INSTRUMENTAL Y HERRAJE REQUERIDOS
10 mm (x2)
AON (x4)
CTV (x4)
52 mm
1.5
• Secure the Seat to the Leg. Do not overtighten.
• Attacher bien le siège au pied. Ne pas trop serrer.
• Sujetar el asiento a la pata. No apretar demasiado.
Note: Repeat this step for the other Leg.
Remarque : Répéter cette étape pour l’autre pied.
Nota: Repetir este paso para la otra pata.
!
AON
AON
CTV
CTV

1111
BACK ASSEMBLY / ASSEMBLAGE DU DOSSIER / ENSAMBLE DEL RESPALDO
2
CTK (x1)
AON (x8)
CSJ (x4)
CTV (x4)
CTL (x4)
54 mm
52 mm
CTM (x4)
CTN (x8)
CTO (x2)
CTU (x2)
CTT (x4)
CTS (x2)
CTQ (x2)
CTP (x1)
CTR (x1)
CTP (x1)
2.5 mm
CUK (x2)
CTX
Large Parts / Pièces grandes / Piezas grandes
Hardware / Quincaillerie / Herraje
PARTS REQUIRED / PIÈCES REQUISES / PIEZAS REQUERIDAS
HARDWARE REQUIRED / QUINCAILLERIE REQUISE / HERRAJE REQUERIDO
TOOLS REQUIRED / OUTILS REQUIS / INSTRUMENTAL REQUERIDO
CSH (x2)
8 mm x 10 mm
No Hole / Aucun trou /
Ninguún agujero

12
TOOLS AND HARDWARE REQUIRED / OUTILS ET QUINCAILLERIE REQUIS / INSTRUMENTAL Y HERRAJE REQUERIDOS
SECTION 2 (CONTINUED) / SECTION 2 (SUITE) / SECCIÓN 2 (CONTINUACIÓN)
CUK (x2)
CUK
CUK
CTU
CTR
CTR
2.1 2.2
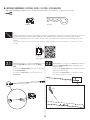
• Insert a Cap (CUK) into both ends of the Hinge
(CTR).
• Insérer un capuchon (CUK) dans chaque extrémité
de la charnière (CTR).
• Insertar un tapón (CUK) en cada extremo de la
bisagra (CTR).
LIFETIME
©
• If you have trouble with this section, follow the code below to view a video on the assembly in this section.
• En cas de problèmes avec cette section, suivre le code en bas pour voir un vidéo sur l’assemblage dans cette
section.
• En caso de problemas con esta sección, seguir el código debajo para ver un video sobre el ensamble en esta
sección.
http://go.lifetime.com/cbbackassembly
CTU (x2)
• Insert a Cotter Key (CTU) into the small hole in the
Hinge as shown.
• Insérer une goupille (CTU) dans le petit trou dans la
charnière comme illustré.
• Insertar una chaveta (CTU) en el agujero pequeño
en la bisagra como se muestra.

13
TOOLS AND HARDWARE REQUIRED / OUTILS ET QUINCAILLERIE REQUIS / INSTRUMENTAL Y HERRAJE REQUERIDOS
SECTION 2 (CONTINUED) / SECTION 2 (SUITE) / SECCIÓN 2 (CONTINUACIÓN)
2.3
2.4
CTS (x2)
CTS
CTT
• Insert an Adjustement Fork (CTS) into the two larger
holes in the Hinge Tube.
• Insérer un fourche d’ajustement (CTS) dans les deux
grands trous dans le tube de charnière.
• Insertar un tenedor de ajuste (CTS) en los dos agujeros
más grandes en el tubo de bisagra.
• Slide an Adjustment Plate (CTT) over the end of the Hinge and up to the Cotter Key as shown.
• Faire glisser une plaque d’ajustement (CTT) sur l’extrémité de la charnière comme illustré.
• Deslizar una placa de ajuste (CTT) sobre el extremo de la bisagra como se muestra.

14
TOOLS AND HARDWARE REQUIRED / OUTILS ET QUINCAILLERIE REQUIS / INSTRUMENTAL Y HERRAJE REQUERIDOS
SECTION 2 (CONTINUED) / SECTION 2 (SUITE) / SECCIÓN 2 (CONTINUACIÓN)
CTL (x4)
CTM (x4)
CTM
CTM
CTQ
CTL
CTL
CTP
2.5
2.6
• Slide a Handle (CTQ) onto the Hinge as shown. Secure with the hardware
included.
• Faire glisser un levier d’ajustement (CTQ) sur la charnièer comme illustré.
Attacher-le à la charnière à l’aide de la quincaillerie incluse.
• Deslizar una palanca de ajuste (CTQ) sobre la bisagra como se muestra.
Sujetarla a la bisagra usando el herraje incluido.
Note: The Nuts (CTL) fi t into these nut-shaped
indentations.
Remarque : Les écrous (CTL) se fi xent dans
ces dépressions hexagonales.
Nota: Las tuercas (CTL) se encajan en estas
indentaciones hexagonales.
Note: Repeat steps 2.1–2.6 for the other side.
Remarque : Répéter les étapes 2.1 – 2.6 pour l’autre côté.
Nota: Repetir los pasos 2.1–2.6 para el otro lado.
!
!
• Slide another Adjustment Plate over the end of the Hinge Tube and Hinge Fork as shown.
• Faire glisser une autre plaque d’ajustement sur l’extrémité du tube de charnière et du fourche d’ajustement comme
illustré.
• Deslizar otra placa de ajuste sobre el extremo del tubo de bisagra y del tenedor de ajuste como se muestra.

15
TOOLS AND HARDWARE REQUIRED / OUTILS ET QUINCAILLERIE REQUIS / INSTRUMENTAL Y HERRAJE REQUERIDOS
SECTION 2 (CONTINUED) / SECTION 2 (SUITE) / SECCIÓN 2 (CONTINUACIÓN)
Align these holes
Aligner ces trous
Alinear estos agujeros
• Set the Hinge Assembly onto the back of the Legs, and align the holes as shown.
• Mettre l’assemblage de la charnière sur la partie arrière des pieds, et aligner les trous comme illustré
• Colocar el ensamble de la bisagra en la parte trasera de las patas, y alinear los agujeros como se muestra.
CTN (x8)
AON (x4)
CSJ (x4)
54 mm
10 mm (x2)
CSJ
CTN
CTN
AON
2.7
2.8
• Attach a Hinge Assembly to the Leg using the hardware included.
• Attacher bien un assemblage de la charnière aux pieds à l’aide de la quincaillerie incluse.
• Sujetar un ensamble de la bisagra a las patas usando el herraje incluido.
Note: Repeat step 2.8 for the other side.
Remarque : Répéter l’étape 2.8 pour l’autre côté.
Nota: Repetir el paso 2.8 para el otro lado.
!

16
TOOLS AND HARDWARE REQUIRED / OUTILS ET QUINCAILLERIE REQUIS / INSTRUMENTAL Y HERRAJE REQUERIDOS
SECTION 2 (CONTINUED) / SECTION 2 (SUITE) / SECCIÓN 2 (CONTINUACIÓN)
CTK
AON (x4)
CTV (x4)
52 mm
2.9
2.10
• Attach a Hinge Assembly to the Top using the hardware included.
• Attacher bien un assemblage de la charnière au dessus de la table à l’aide de la quincaillerie incluse.
• Sujetar un ensamble de la bisagra al tablero usando el herraje incluido.
Note the position of the two holes.
Noter l’orientation de ces deux trous.
Notar la orientación de los dos agujeros.
!
CTO (x2)
• Attach a Spring (CTO) to the Fork and Bolt as shown.
• Attacher un ressort (CTO) au fourche y au boulon comme illustré.
• Sujetar un resorte (CTO) al tenedor y el perno como se muestra.
Note: Repeat step 2.9 for the other side.
Remarque : Répéter l’étape 2.9 pour l’autre côté.
Nota: Repetir el paso 2.9 para el otro lado.
!
CTO
CTO

17
TOOLS AND HARDWARE REQUIRED / OUTILS ET QUINCAILLERIE REQUIS / INSTRUMENTAL Y HERRAJE REQUERIDOS
SECTION 2 (CONTINUED) / SECTION 2 (SUITE) / SECCIÓN 2 (CONTINUACIÓN)
• Adjust the Top until it’s level. Tighten the hardware from the previous step.
• Ajuster le dessus de la table jusqu’à ce qu’il soit horizontal. Serrer bien la quincaillerie de l’étape précédente.
• Ajustar el tablero hasta que esté horizontal. Apretar bien el herraje del paso anterior.
2.11
2.12
10 mm (x2)
CTV
CTV
AON
AON
• Loosen the Nuts (AON) just enough to allow you to rotate the Lever. Tighten only by hand at this point.
• Desserrer les écrous (AON) suffi samment pour vous permettre tourner le levier. Serrer à la main seulement en ce moment.
• Afl ojar las tuercas (AON) sufi cientemente para poder rotar la palanca. Apretar sólo a mano en este momento.
Note: Repeat steps 2.11 for the other side.
Remarque : Répétez les étapes 2.11 pour l’autre côté.
Nota: Repita los pasos 2.11 para el otro lado.
!

1818
BACK ADJUSTMENT / AJUSTEMENT DU DOSSIER / AJUSTO DEL RESPALDO
3
3.1
• To switch from bench to table, simply pull up on the Handles and rotate the Back downward and vice versa.
• Pour changer d’un banc à une table, soulever les leviers et pivoter le dossier vers le bas et vice versa.
• Para cambiar de un banco a una mesa, tirar de las palancas y rotar el respaldo hacia abajo y vice versa.

1919
Congratulations on your Lifetime
®
product purchase. By following the instructions below, your new Lifetime product should provide you with years
of service and enjoyment.
The polyethylene panels are stain- and solvent-resistant. Most stains can be removed using a mild soap and a soft-bristled
brush. Abrasive cleaning materials may scratch the plastic and are not recommended. Repair scratches or rust spots on the
metal by sanding the affected area lightly; using a rust preventative spray primer; and fi nally, spraying with a high-gloss spray
enamel paint. Avoid placing a direct heat source on or near surfaces unless using a heat barrier.
Nous vous félicitons d’avoir acheté ce produit Lifetime
®
. En suivant les instructions ci-dessous, votre nouveau produit Lifetime devrait vous
fournir des années de service et de plaisir.
Les murs et les étagères en polyéthylène sont résistants aux taches et solvants de nettoyage. Pour les nettoyer, servez-vous
d’un savon doux et d’une brosse douce. Les produits abrasifs de nettoyage risquent d’égratigner le plastique et ne sont pas
recommandés. Pour réparer les égratignures ou taches de rouille sur le métal, frottez légèrement l’endroit affecté au papier
de verre, puis passez un couche de produit vaporisant préventif et enfi n vaporisez une peinture émail ultrabrillante. Évitez de
placer une source de chaleur directe sur ou près des surfaces, ou protégez-les à l’aide d’une protection contre la chaleur.
CLEANING & CARE
NETTOYAGE ET ENTRETIEN
Felicidades por la compra de su producto Lifetime
®
. Al seguir las siguientes instrucciones, su nuevo producto Lifetime le brindará años de servicio
y satisfacción.
Los paneles de polietileno son resistentes a las manchas y solventes. La mayoría de las manchas puede removerse usando un
jabón suave y un cepillo de cerdas suaves. Los materiales abrasivos para limpieza pueden rayar el plástico y no se recomien-
dan. Repare rayones o manchas de óxido en el metal, lijando suavemente la parte afectada; usando un aerosol preventivo de
óxido y fi nalmente, rociando con una pintura de esmalte brillante. Evite poner una fuente de calor directa en o cerca de las
superfi cies a menos que utilice una barrera de calor.
LIMPIEZA Y CUIDADO

2020
LIFETIME’S PROMISE TO YOU:
We invite you to read our privacy policy at www.lifetime.com
REGISTER today!
At Lifetime
®
, we are committed to providing innovative and quality products. While registering, you will have the opportunity to give us your feedback. Your input is
valuable to us.
• You can also opt in to receive new product notifi cations or promotions.
• In the unlikely event of a product recall or safety modifi cation, your registration provides the information we need to notify you directly.
• Registration is fast, easy, and completely voluntary.
Maintaining your privacy is our long-standing policy at Lifetime
®
. And you can rest assured that Lifetime
®
will not sell or provide your
personal data to other third parties, or allow them to use your personal data for their own purposes.
REGISTER YOUR PRODUCT ONLINE AT WWW.LIFETIME.COM
LA PROMESA DE LIFETIME
®
PARA USTED:
Lo invitamos a leer nuestra política de privacidad en www.lifetime.com
¡REGÍSTRESE hoy mismo!
En Lifetime
®
, estamos comprometidos a ofrecer productos innovadores y de calidad. Al registrarse, usted tendrá la oportunidad de darnos su retroalimentación.
Su información es valiosa para nosotros.
• También puede optar por recibir nuestras notifi caciones o promociones.
• En el caso improbable de que el producto tenga que salir del mercado o que sufra alguna modifi cación, su registro provee la
información que necesitamos para notifi carle directamente.
• El registro es rápido, fácil y completamente voluntario.
Mantener su privacidad es nuestra política permanente en Lifetime
®
. Y puede estar seguro que Lifetime
®
no venderá ni dará sus datos
personales a terceros, ni les permitirá usar sus datos personales para fi nes propios.
REGISTRE SU PRODUCTO EN LÍNEA EN WWW.LIFETIME.COM
LA PROMESSE DE LIFETIME :
Nous vous invitons à lire notre politique de confi dentialité à www.lifetime.com
ENREGISTREZ VOTRE PRODUIT aujourd’hui!
Chez Lifetime®, nous nous engageons à fournir des produits innovateurs de qualité. Lors de votre inscription, vous aurez l’occasion de nous faire parvenir vos
commentaires. Votre opinion est importante pour nous.
• Vous pouvez également choisir de recevoir des avis ou des promotions dans le cadre de nouveaux produits.
• Dans l’éventualité improbable d’un rappel ou d’un avis de sécurité, votre inscription fournit les renseignements nécessaires nous
permettant de communiquer avec vous.
• L’inscription est rapide, facile et complètement volontaire.
Conserver votre confi dentialité est notre politique de longue date chez Lifetime®. Vous pouvez donc être rassuré par le fait que Lifetime®
ne vendra pas ou ne fournira pas vos données personnelles à des tiers, et ne leur permettra pas d’utiliser vos données personnelles à leurs
propres fi ns.
ENREGISTREZ VOTRE PRODUIT EN LIGNE À WWW.LIFETIME.COM
La page est en cours de chargement...
La page est en cours de chargement...
La page est en cours de chargement...
La page est en cours de chargement...
-
 1
1
-
 2
2
-
 3
3
-
 4
4
-
 5
5
-
 6
6
-
 7
7
-
 8
8
-
 9
9
-
 10
10
-
 11
11
-
 12
12
-
 13
13
-
 14
14
-
 15
15
-
 16
16
-
 17
17
-
 18
18
-
 19
19
-
 20
20
-
 21
21
-
 22
22
-
 23
23
-
 24
24


Lifetime 60139 Le manuel du propriétaire
- Taper
- Le manuel du propriétaire
dans d''autres langues
- English: Lifetime 60139 Owner's manual
- español: Lifetime 60139 El manual del propietario
Documents connexes
-
Lifetime 60139 Le manuel du propriétaire
-
-
-
-
-
-
-
-
-