Polk DBRX1 Mode d'emploi
- Catégorie
- Équipement musical supplémentaire
- Taper
- Mode d'emploi

DBRX1
SOUND BAR
Quick Start Guide

2
Thank you for your Polk sound bar purchase! If you have a question or comment, please feel free to
call or email us.
Technical Assistance
www.polkaudio.com
Visit our support page and FAQs at https://polk.custhelp.com/ for assistance.
Call Polk Customer Service at 800-377-POLK(7655)
Polk Audio is a DEI Holdings, Inc. company. Polk Audio and Polk are registered trademarks of Polk
Audio, LLC. All other trademarks, product names, logos, and brands referenced herein are the
property of their respective owners.

3
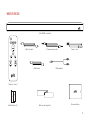
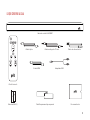
What’s in the Box
Polk DBRX1 sound bar
Documentation
HDMI cable
Remote control
AAA batteries (2)
Optical cable
RCA adapter
Wall mount template
Power cord3.5 mm analog cable
AAA
AAA

4
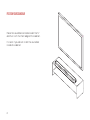
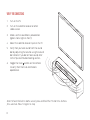
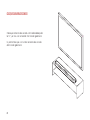
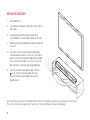
Position your sound bar
Place the sound bar centered under the TV
and flush with the front edge of the cabinet.
It is best if you do not install the sound bar
inside of a cabinet.

5
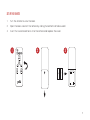
Connect the TV
Optical
1. Insert one end of the optical cable into the
OPTICAL port on the sound bar.
2. Insert the other end of the cable into the
optical port on the TV.
HDMI ARC (Recommended)
1. Insert one end of the HDMI cable into the
HDMI ARC port on the sound bar.
2. Insert the other end of the HDMI cable into
the HDMI port labeled “HDMI ARC” on the TV.
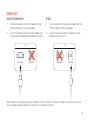
Note: HDMI is the preferred input; however, if the TV does not have an HDMI or Optical output, use
the included analog cable to connect the sound bar to the TV.
TVTV
HDMI ARCHDMI ARC OPTICALOPTICAL

6
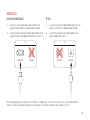
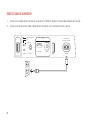
Connect the power
1. Connect the power cord to the POWER port on the back of the sound bar.
2. Connect the other end of the power cord into an AC power outlet.
WIRELESS ADAPTER
SUB
SURROUND
HDMI ARC OPTICAL
UPDATE POWER
TV AC INPUT 65W
100–240V - 50/60Hz
CONNECT ANALOG

7
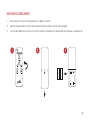
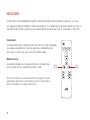
set up the remote
1. Turn the remote to view the back.
2. Open the back cover of the remote by sliding the bottom half downward.
3. Insert the two AAA batteries into the remote and replace the cover.
AAA
AAA
123

8
verify the connections
1. Turn on the TV.
2. Turn on the satellite receiver or other
video source.
3. Make sure the sound bar is powered on
(green status light on front).
4. Select the satellite receiver input on the TV.
5. Verify that you hear sound from the sound
bar by adjusting the volume using the sound
bar remote. If you do not hear sound, refer
to the Tips and Troubleshooting section.
6. Toggle the mute button on the remote
to verify that the mute command is
operational.
Note: To hear the built-in demo sound, press and hold the TV and VOL+ buttons
for 4 seconds. Press TV again to stop.

9
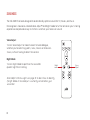
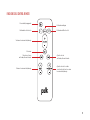
remote control features
Power
TV input
Volume up/down
Mute
Night mode
on/off
Bass up/down
Analog input
Bluetooth input
Voice adjust
on/off
Surround
speaker level
adjustment
up/down

10
sound modes
The Polk DBRX1 has been designed to automatically optimize sound for TV, movies, and music.
Polk engineers have also created Voice Adjust® and Night Mode to further enhance your listening
experience and provide a way to further customize your television sound.
Voice Adjust
Turn on Voice Adjust to make it easier to hear dialogue,
whether you’re watching sports, news, movies or television
shows, without having to blast the volume.
Night Mode
Turn on Night Mode to optimize the sound for
quieter nighttime listening.
Note: Refer to Status Lights on page 13 to learn how to identify
if Night Mode or Voice Adjust is currently activated on your
sound bar.
Night
mode
Voice
Adjust

11
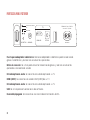
top panel controls
Power: Turns the sound bar on/off.
TV input: Selects the TV input connection (HDMI or optical)
Analog input: Selects the analog input connection.
Bluetooth input: Selects the Bluetooth input.
Voice Adjust: Activates the Voice Adjust feature for clear dialogue.
Volume up and down buttons: Control the volume of the sound bar.
Power Analog
input Voice
Adjust
Volume
up
TV input Bluetooth
input
Volume
down
ANALOG
TV VOICE +
–

12
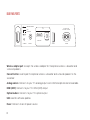
Back panel ports
Wireless adapter port: Accepts the wireless adapter for the optional wireless subwoofer and
surround speakers.
Connect button: Used to pair the optional wireless subwoofer and surround speakers to the
sound bar.
Analog audio in: Connects to your TV’s analog output when HDMI and optical are not available.
HDMI (ARC): Connects to your TV’s HDMI (ARC) output.
Optical audio in: Connects to your TV’s optical output.
USB: Used for software updates.
Power: Connects to an AC power source.
WIRELESS ADAPTER
SUB
SURROUND
HDMI ARC OPTICAL
UPDATE POWER
TV AC INPUT 65W
100–240V - 50/60Hz
CONNECT ANALOG

13
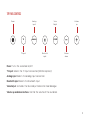
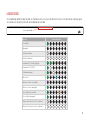
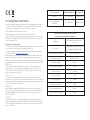
Status lights
The status of the sound bar is provided by an array of seven multicolored LEDs located on the top
front of the sound bar.
Function Light Pattern
Power On
Power Off
Volume Min
Volume Max
TV Input (Dolby Digital)
TV Input (PCM)
Analog Input
Bluetooth
Night Mode On
Night Mode Off
Voice Adjust On
Voice Adjust Off
Bass/Surround Level 0 (min)
Bass/Surround Level 6 (max)
Status lights

14
Listening to music using bluetooth
To pair your mobile device using Bluetooth, press the Bluetooth button on the sound bar or remote control.
The blue status light located in front of the Bluetooth button will slowly pulse as the sound bar
enters pairing mode and waits to connect to your Bluetooth device.
Go to the Bluetooth settings on your mobile device and select “Polk Sound Bar”. The status light will
turn solid blue when your mobile device is connected to the sound bar.
Open your favorite music app on your mobile device, and when you tap the Play button sound will
play from the sound bar.

15
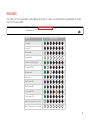
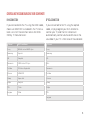
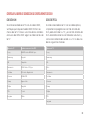
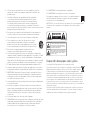
controlling the sound bar using your dish remote
HDMI connection
If you connected to the TV using the HDMI cable,
make sure HDMI CEC is enabled in the TV menus.
Here is a list of the common names for HDMI-
CEC by TV manufacturers:
Optical connection
If you connected to the TV using the optical
cable, simply program your Dish remote to
control your TV, and the Dish remote will
automatically control volume and mute on the
sound bar if your TV is from one of these brands:
TV Brand CEC Trade Name
Sony BRAVIA Link or BRAVIA Sync
Samsung Anynet+
LG SimpLink
Panasonic VIERA Link or EZ-Sync
Toshiba CE-Link or Regza Link
Hisense HDMI-CEC
Sharp Aquos Link
Philips EasyLink
TCL T-Link
Insignia INlink
TV Brand
Sony
Samsung
LG
Vizio
Panasonic
Toshiba
Hisense
Sharp
Philips
TCL
Insignia

16
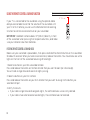
using the remote control learning function
If your TV is connected to the sound bar using the optical cable
and you are not able to control the volume of the sound bar with
your TV or Dish remote, you can use the Remote Control Learning
function to control volume and mute on your sound bar.
IMPORTANT: Hold both remotes about 12” (30 cm) directly in front
of the sound bar when pressing their respective buttons, and make
sure your remotes have fresh batteries.
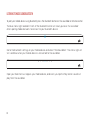
Entering remote control learning Mode
Make sure your sound bar is powered on, then press and hold the ANALOG button on the sound bar
for about 5 seconds. When you hear a two-note tone, release the button. You should now see white
lights on the front of the sound bar bouncing left and right.
1. Select a button on your Polk sound bar remote.
Press and release the button on the Polk remote that you want to learn (ex: Volume Up).
You will hear a single tone and see white lights pulsing.
2. Select a button on your Dish remote.
Press and release the button on your Dish remote that you want to assign to the button you
selected in Step 1.
3. Verify the results.
• If you hear a single tone and see green lights, the command was successfully learned.
• If you hear a two-note tone and see red lights, the command was not learned.
12” (30 cm)

17
4. Learn another code.
When you see the white lights on the front of the sound bar bouncing left and right again, you are
ready to select your next function to learn by repeating steps 1–3.
Exiting remote control learning Mode
Press and hold the ANALOG button on the sound bar again for about 5 seconds. When you hear a
two-note tone, release the button.
Note: The sound bar will automatically exit IR learn mode if it has not received any IR commands for
60 seconds. All learned IR commands will automatically be saved.
Clearing learned remote control Codes
Press and hold the ANALOG button on the sound bar for about 10 seconds. You will hear a two-note
tone. Continue holding the button and release the button after you hear a three-note tone.

18
Tips and troubleshooting
I don’t have an HDMI port labeled “ARC” on my TV.
• Connect an optical audio cable between the TV and sound bar.
• Refer to your TV’s manual for instructions on how to turn off the TV’s internal speakers.
I don’t hear any sound.
• Use only one audio cable connected to the TV (HDMI, optical or analog).
• Make sure your cables are properly connected to the correct ports.
• If using HDMI, make sure you are connected to the HDMI port marked “ARC”, and refer to your
TV’s manual to make sure the HDMI ARC function is enabled.
• Select the corresponding input on the sound bar.
My sound bar is not turning on when I turn on my TV.
• Make sure your sound bar is connected to your TV using an HDMI cable.
• Refer to your TV’s manual to make sure that HDMI CEC and ARC are both enabled.
I hear an echo or I hear sound coming from both the TV and the sound bar.
• Refer to your TV’s manual to disable the internal TV speakers.
How do I perform a factory reset?
• Press and hold the TV and Voice buttons at the same time until all status lights turn orange
(about 7 seconds), then release the buttons.
• All status lights will turn off indicating the reset sequence has started.

19
this page intentionally left blank

20
¡Gracias por su compra de la barra de sonido de Polk! Si tiene preguntas o comentarios, llámenos o
envíenos un correo electrónico.
Asistencia técnica
www.polkaudio.com
Visite nuestra página de ayuda y preguntas frecuentes en https://polk.custhelp.com para mayor
asistencia.
Llame a Servicio al cliente de Polk al 800-377-POLK(7655)
Polk Audio es una empresa de DEI Holdings, Inc. Polk Audio y Polk son marcas registradas de Polk
Audio, LLC. Todas las demás marcas comerciales, nombres de productos, logotipos y marcas a las
que se hace referencia en el presente documento son propiedad de sus respectivos propietarios.
La page est en cours de chargement...
La page est en cours de chargement...
La page est en cours de chargement...
La page est en cours de chargement...
La page est en cours de chargement...
La page est en cours de chargement...
La page est en cours de chargement...
La page est en cours de chargement...
La page est en cours de chargement...
La page est en cours de chargement...
La page est en cours de chargement...
La page est en cours de chargement...
La page est en cours de chargement...
La page est en cours de chargement...
La page est en cours de chargement...
La page est en cours de chargement...
La page est en cours de chargement...
La page est en cours de chargement...
La page est en cours de chargement...
La page est en cours de chargement...
La page est en cours de chargement...
La page est en cours de chargement...
La page est en cours de chargement...
La page est en cours de chargement...
La page est en cours de chargement...
La page est en cours de chargement...
La page est en cours de chargement...
-
 1
1
-
 2
2
-
 3
3
-
 4
4
-
 5
5
-
 6
6
-
 7
7
-
 8
8
-
 9
9
-
 10
10
-
 11
11
-
 12
12
-
 13
13
-
 14
14
-
 15
15
-
 16
16
-
 17
17
-
 18
18
-
 19
19
-
 20
20
-
 21
21
-
 22
22
-
 23
23
-
 24
24
-
 25
25
-
 26
26
-
 27
27
-
 28
28
-
 29
29
-
 30
30
-
 31
31
-
 32
32
-
 33
33
-
 34
34
-
 35
35
-
 36
36
-
 37
37
-
 38
38
-
 39
39
-
 40
40
-
 41
41
-
 42
42
-
 43
43
-
 44
44
-
 45
45
-
 46
46
-
 47
47


Polk DBRX1 Mode d'emploi
- Catégorie
- Équipement musical supplémentaire
- Taper
- Mode d'emploi
dans d''autres langues
- English: Polk DBRX1 User guide
- español: Polk DBRX1 Guía del usuario
