
EN, English
(2-12)
ES, Español
(13-23)
FR, Français
(24-34)
Operator's manual
Manual de usuario
Manuel d'utilisation
EPOS Reference station
Read the operator's manual carefully and make sure that you
understand the instructions before you use the product.
Lea detenidamente el manual de usuario y asegúrese de
entender su contenido antes de utilizar el producto.
Lisez attentivement le manuel d'utilisation et assurez-vous que
vous en comprenez le contenu avant d’utiliser la machine.

Contents
1 Operator's manual............................................ 2
2 Safety............................................................... 4
3 Installation........................................................ 5
4 Maintenance.....................................................9
5 Troubleshooting................................................9
6 Storage and disposal........................................9
7 Technical data................................................ 10
8 Warranty.........................................................11
9 Applicable to US/CA market...........................11
1 Operator's manual
1.1 Introduction
Serial number:
The serial number is on the product rating plate and on the product carton. Use the serial number to register your
product on www.husqvarna.com.
1.1.1 Support
For support about the product, speak to your Husqvarna
servicing dealer.
1.1.2 System description
The EPOS system contains a robotic lawn mower, a
charging station and a reference station. The robotic
lawn mower and the reference station receives satellite
signals for positioning. The reference station is
stationary and sends correction data to the robotic lawn
mower to get an accurate position for the mower. The
work area is made virtually in an app by operating the
product and adding waypoints to make a map in an app.
1.1.3 Product description
Note: Husqvarna regularly updates the appearance
and function of the products. Refer to
Support on page
2
.
The product is a reference station that receives satellite
signals and sends correction data to the mower. One
reference station can be used for several robotic lawn
mowers.
2 - Operator's manual 1512 - 002 - 08.11.2021

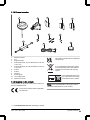
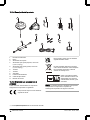
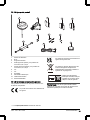
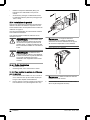
1.1.4 Product overview
123
9
678
10
11
45
1. Reference station
2. Arm
3. Support bracket
4. Post bracket small, for post dimensions 32-44 mm/
1.26-1.73 in.
5. Post bracket large, for post dimensions 44-55 mm/
1.73-2.16 in.
6. Screws
7. Screws
8. Washers
9. Power supply1
10. Low-voltage cable
11. Operator's manual
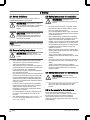
1.1.5 Symbols on the product
These symbols can be found on the product. Make sure
that you understand them.
This product complies with the applicable
EU Directives.
This product complies with the applicable
UK Directives.
It is not permitted to dispose the product
as usual domestic waste. Obey national
regulations and use the local recycling
system.
Use a detachable power sup-
ply as specified on the rating
plate adjacent to the symbol.
Note: Other symbols/decals on the product refer to
certification requirements for some markets.
1The appearance may differ depending on market
1512 - 002 - 08.11.2021 Operator's manual - 3

2 Safety
2.1 Safety definitions
Warnings, cautions and notes are used to point out
specially important parts of the manual.
WARNING: Used if there is a risk of
injury or death for the operator or bystanders
if the instructions in the manual are not
obeyed.
CAUTION: Used if there is a risk of
damage to the product, other materials or
the adjacent area if the instructions in the
manual are not obeyed.
Note: Used to give more information that is necessary
in a given situation.
2.2 General safety instructions
WARNING: Read the warning
instructions that follow before you use the
product.
• Obey national regulations about electrical safety.
• The product is only to be used with the power
supply unit supplied by Husqvarna.
• The product may only be used with the equipment
recommended by the manufacturer. All other types
of use are incorrect. The manufacturer’s
instructions with regard to operation/maintenance
must be followed precisely.
• The product may only be operated, maintained and
repaired by persons that are fully conversant with
its special characteristics and safety regulations.
Please read the Operator’s Manual carefully and
make sure you understand the instructions before
using the product.
• Husqvarna does not guarantee full compatibility
between the product and other types of wireless
systems such as remote controls, radio
transmitters, hearing loops, underground electric
animal fencing or similar.
• It is not permitted to modify the original design of
the product. All modifications are made at your
own risk.
• The operating temperature is -20°C to 45°C / -4°F
to 113°F. The storage temperature is -20°C to
70°C / -4°F to 158°F.
2.3 Safety instructions for installation
WARNING: Read the warning
instructions that follow before you use the
product.
• Do not put the power supply at a position where
there is a risk that it can become wet. Do not put
the power supply on the ground.
• Do not encapsulate the power supply. Condensed
water can harm the power supply and increase the
risk of electrical shock.
• Risk of Electric Shock. Install only to an residual-
current device (RCD) when connecting the power
supply to the wall socket. Applicable to USA/
Canada. If power supply is installed outdoors: Risk
of Electric Shock. Install only to a covered Class A
GFCI receptacle (RCD) that has an enclosure that
is weatherproof with the attachment plug cap
inserted or removed.
• Make sure that the plugs of the low-voltage cable
and the power supply unit are clean and dry before
you connect them.
• There is a risk of falling objects during the
installation of the reference station. This can result
in injury.
• The power supply cable and extension cable must
be outside the work area to avoid damage to the
cables.
• There is a risk of falling when you install the
reference station in a high position. Make sure that
you have a stable position when you install the
reference station.
2.4 Safety instructions for maintenance
WARNING: Read the warning
instructions that follow before you use the
product.
• Disconnect the product from the power supply
before you clean or do maintenance on the
product.
2.5 In the event of a thunderstorm
To decrease the risk of damage to electrical
components in the reference station, we recommend
that the power supply to the reference station is
disconnected if there is a risk of a thunderstorm.
Connect the power supply again when there is no a risk
of thunderstorm.
4 - Safety 1512 - 002 - 08.11.2021

3 Installation
3.1 Introduction - Installation
WARNING: Read and understand the
safety chapter before you install the product.
CAUTION: Use original spare parts and
installation material.
Note: Refer to www.husqvarna.com for more
information about installation.
3.2 To examine where to put the
reference station
CAUTION: If there is a lightning rod
near by, do not install the reference station
higher than the lightning rod.
CAUTION: Do not install the reference
station on a flagpole. Movements of the
reference station will affect the correction
data sent to the product with the accurate
position.
• Install the reference station on a fixed object that
cannot move or rotate.
• Install the reference station on a post or a wall.
The post must be 32-55 mm / 1.26-2.16 in. in
diameter to fit the attachments on the reference
station.
Note: If the reference station is installed on a
wall the top of the reference station must be above
the wall. There must be no metal in the wall.
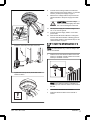
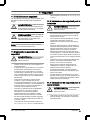
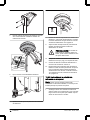
• The reference station needs to have full view of the
sky. The sky must be visible without obscuration in
all directions above 10° elevation angle.
160°
10°10°
• Install the reference station at minimum 2.5 m / 8
ft. height.
• The maximum distance between the reference
station and the product is 500 m / 1640 ft. when
free line of view. Objects between the reference
station and product decreases the distance.
• Install the reference station where the radio signal
reaches all parts of the work area. Large objects
can block the radio signals.
• It is recommended to have free line of sight
between product and reference station for optimal
performance.
• Special settings are necessary if the site has more
than one robotic lawn mower and reference
station. Speak to your local Husqvarna
representative for more information.
3.3 To examine where to put the power
supply
WARNING: Do not cut the low-voltage
cable. There is a risk of electrical shock.
CAUTION: Make sure that the blades
on the robotic lawn mower do not cut the
power cables.
• Put the power supply in an area with a roof and
protection from the sun and rain.
• Put the power supply in an area with good airflow.
• Use a residual-current device (RCD) when you
connect the power supply to the power outlet.
• Extend the low-voltage cable if necessary. The
low-voltage cable can be extended up to 100 m /
328 ft.
1512 - 002 - 08.11.2021 Installation - 5

3.4 Installation of the product
Read and understand the instructions about the
reference station. Refer to
To examine where to put the
reference station on page 5
.
Read the Operator's manual for the robotic lawn mower
to be used together with the reference station.
You can install the reference station on a post or a wall.
CAUTION: Movements of the reference
station will affect the correction data sent to
the product with the accurate position. The
reference station must be installed tightly on
the post or wall.
CAUTION: The items on the map will
change position if you move the reference
station. Adjust the items on the map or do
the installation again in the Automower®
Connect app.
3.4.1 Installation tools
• Screwdriver, Torx 20.
• Hex key, 4 mm. Included in the carton.
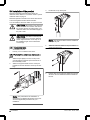
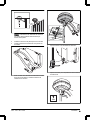
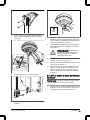
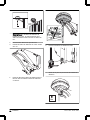
3.4.2 To install the reference station on a
post
1. Attach the post tightly to a wall, roof top or the
ground. Make sure that the post cannot move or
be accidentally moved.
2. Attach the support bracket and one of the post
brackets to the arm with the 4 screws (4 mm hex
key).
Note: The post brackets are available in 2
dimensions to fit different dimensions of the post.
Select the applicable post bracket for your
installation.
3. Put the arm on top of the post.
Note: The reference station must be installed at
the top of the post.
4. Attach the reference station to the post with the 2
screws (4mm hex key).
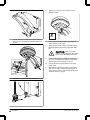
5. Pull the cable on the reference station through the
slot in the arm and install the reference station on
the arm.
6 - Installation 1512 - 002 - 08.11.2021

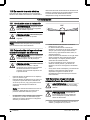
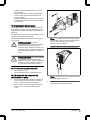
6. Attach the connector to the clips on the arm.
7. Tighten the screw (Torx 20) on the arm of the
reference station.
T20
8. Connect the low-voltage cable to the reference
station and the power supply. Refer to
To examine
where to put the power supply on page 5
.
9. Attach the low-voltage cable to the post from the
reference station to the power supply with cable
ties.
CAUTION: If the low-voltage
cable is not attached tightly with cable
ties it can be damaged in hard wind.
10. Put the power supply at a minimum height of 30
cm / 12 in. from the ground.
11. Connect the power supply cable to a 100-240V
power outlet.
12. Wait until the LED status indicator is solid green.
First the LED status indicator is flashing green for
some minutes. Refer to
LED indicator lamp on the
reference station on page 9
.
3.4.3 To install the reference station on a
wall
Note: As wall materials vary, screws for fixing to the
wall are not included.
1. Hold the arm for the reference station on the wall
where you will attach it. Make 4 marks on the wall
where you will attach 4 screws.
Note: If the reference station is installed on a
wall the top of the reference station must be above
the wall.
2. Drill 4 holes in the wall for the 4 screws.
3. Install the reference station on the wall with 4
screws.
1512 - 002 - 08.11.2021 Installation - 7

4. Put the cable of the reference station through the
slot in the arm and install the reference station on
the arm.
5. Attach the connector to the clips on the arm.
6. Tighten the screw (Torx 20) on the arm of the
reference station.
T20
7. Connect the low-voltage cable to the reference
station and the power supply.
8. Attach the low-voltage cable to the wall from the
reference station to the power supply with cable
ties.
CAUTION: If the low-voltage
cable is not attached tightly with cable
ties it can be damaged in hard wind.
9. Put the power supply at a minimum height of 30
cm / 12 in. from the ground. Refer to
To examine
where to put the power supply on page 5
.
10. Connect the power supply cable to a 100-240V
power outlet.
11. Wait until the LED status indicator is solid green.
First the LED status indicator is flashing green for
some minutes. Refer to
LED indicator lamp on the
reference station on page 9
.
8 - Installation 1512 - 002 - 08.11.2021

4 Maintenance
4.1 Introduction - maintenance
Do a check of the installation each year.
1. Make sure that the post is tightly attached.
2. Do a check of the tightening torques for all screws.
Screw Tool Tightening torque (Nm)
Upper to lower chassis Torx 20 1.8
Reference station to arm Torx 20 1.8
Arm to post Hex key, 4 mm 5-6
Arm, support bracket and post bracket Hex key, 4 mm 5-6
4.2 Clean the product
WARNING: Disconnect the product
from the power supply before any
maintenance or cleaning.
CAUTION: Do not use a high-pressure
washer to clean the product. Do not use
solvents for cleaning.
If necessary, clean the product with a moist cloth.
5 Troubleshooting
5.1 LED indicator lamp on the reference station
Light Status
Green flashing light Startup of the reference station. This can take some minutes.
Green constant light In operation.
Red flashing light The reference station is not working due to an error. Restart the product. If the prob-
lem stays, speak to your approved servicing dealer.
White flashing light Firmware update is necessary. Speak to your local Husqvarna representative.
6 Storage and disposal
6.1 Storage
If you store the reference station indoors, keep the arm
installed at the post or wall to be able to install the
reference station on its original position again.
If you keep the reference station outdoors during the
winter, we recommend you to keep the power supply
connected.
6.2 Disposal
Obey the local recycling requirements and applicable
regulations.
1512 - 002 - 08.11.2021 Maintenance - 9

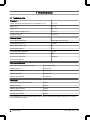
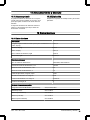
7 Technical data
7.1 Technical data
Dimensions
Length, max length including plate for post installation cm / in. 36 / 13.8
Width, cm / in. 19 / 7.5
Height, cm / in. 36 / 13.8
Weight, reference station kg / lb 0.88 / 1.9
Weight, arm kg / lb 0.33 / 0.73
Reference station
Type of Power Supply Unit ADP-40BR, ADP-40EW XX
Power supply input, V AC 100-240
Power supply output, V DC 28
Power supply output, A 1.3
Low-voltage cable, length m/ft 20 / 66
IP-code reference station IPX5
IP-code power supply unit IPX4/IP44
Power consumption, W 2
Frequency Band Support
Bluetooth® Frequency range (for service) 2400.0-2483.5 MHz
SRD868 (Europe) 863-870 MHz
SRD915 (North America) 902-928 MHz
SRD915 (Australia) 915-928 MHz
SRD915 (New Zealand) 915-928 MHz
Power Class
Bluetooth® Output power (for service) 8 dBm
SRD868 (Europe) 13 dBm
SRD915 (North America) 13 dBm
SRD915 (Australia) 13 dBm
SRD915 (New Zealand) 13 dBm
Full compatibility cannot be guaranteed between the product and other types of wireless systems such as remote
controls and radio transmitters.
10 - Technical data 1512 - 002 - 08.11.2021

7.2 Registered trademarks
The
Bluetooth®
word mark and logos are registered trademarks owned by
Bluetooth SIG, inc.
and any use of such
marks by Husqvarna is under license.
8 Warranty
8.1 Warranty terms
Husqvarna® warranty covers this product's functionality
for a period of 2 years from date of purchase. The
warranty covers serious faults relating to materials or
manufacturing faults. Within the warranty period, we will
replace the product or repair it at no charge if the
following terms are met:
• The product may only be used in compliance with
the instructions in this Operator’s Manual. This
manufacturer's warranty does not affect warranty
entitlements against the dealer/retailer.
• End-users or non-authorized third parties must not
attempt to repair the product.
Examples of faults which are not included in the
warranty:
• Damage caused by water seepage from using a
high-pressure washer.
• Damage caused by lightning.
• Damage caused by not using Husqvarna original
spare parts and accessories.
• Damage caused by non-authorized changing or
tampering with the product or its power supply.
If an error occurs with your Husqvarna product, please
contact Husqvarna local representative for further
instructions. Please have the receipt and the product’s
serial number at hand when contacting Husqvarna local
representative.
9 Applicable to US/CA market
9.1 Supplier's Declaration of
Conformity
Issuer: Husqvarna AB, Drottninggatan 2, S-561 82
Huskvarna, Sweden www.husqvarnagroup.com.
Responsible party: Husqvarna Professional Products,
Inc. 9335 Harris Corners Parkway Suite 500 Charlotte,
NC 28269 United States U.S. Contact information:
Michael Campbell, Sr Director Quality, test compliance,
Telephone: +1 704 597 5000.
9.2 Compliance requirements
FCC ID: MCQ-XBSX (Reference station).
FCC ID ZASHQ-BLE-1D (Bluetooth® module).
The Bluetooth module and radio module are located
inside the reference station. They must only be
accessed by an authorized service technician.
WARNING: To comply with RF
exposure requirements, please maintain a
separation distance of at least 20 cm/7
inches from any part of the product.
Note: Changes or modifications made to this
equipment not expressly approved by Husqvarna may
void the FCC authorization to operate this equipment.
Note: This device complies with Part 15 of the FCC
Rules [and with Industry Canada licence-exempt RSS
standard(s)]. Operation is subject to the following two
conditions: this device may not cause harmful
interference, and this device must accept any
interference received, including interference that may
cause undesired operation.
1512 - 002 - 08.11.2021 Warranty - 11

Note: This equipment has been tested and found to
comply with the limits for a Class B digital device,
pursuant to part 15 of the FCC Rules. These limits are
designed to provide reasonable protection against
harmful interference in a residential installation. This
equipment generates, uses and can radiate radio
frequency energy and, if not installed and used in
accordance with the instructions, may cause harmful
interference to radio communications. However, there is
no guarantee that interference will not occur in a
particular installation. If this equipment does cause
harmful interference to radio or television reception,
which can be determined by turning the equipment off
and on, the user is encouraged to try to correct the
interference by one or more of the following measures:
• Reorient or relocate the receiving antenna.
• Increase the separation between the equipment
and receiver.
• Connect the equipment into an outlet on a circuit
different from that to which the receiver is
connected.
• Consult the dealer or an experienced radio/TV
technician for help.
WARNING: Cancer and Reproductive
Harm - www.P65Warnings.ca.gov.
12 - Applicable to US/CA market 1512 - 002 - 08.11.2021

Contenido
10 Manual de usuario........................................13
11 Seguridad..................................................... 15
12 Instalación.................................................... 16
13 Mantenimiento..............................................20
14 Resolución de problemas.............................20
15 Almacenamiento y desecho......................... 21
16 Datos técnicos..............................................21
17 Garantía........................................................22
18 Aplicable al mercado de EE. UU./CA........... 22
10 Manual de usuario
10.1 Introducción
Nº de serie:
El número de serie se encuentra en la placa de características y en el embalaje del producto. Utilice el número de
serie para registrar su producto en www.husqvarna.com.
10.1.1 Asistencia
Para obtener asistencia sobre el producto, póngase en
contacto con su distribuidor Husqvarna.
10.1.2 Descripción del sistema
El sistema EPOS incluye un robot cortacésped, una
estación de carga y una estación de referencia. El robot
cortacésped y la estación de referencia reciben señales
de posicionamiento por satélite. La estación de
referencia es estática y envía datos de corrección al
robot cortacésped para obtener una posición precisa de
este último. El área de trabajo se crea virtualmente
mediante una aplicación; para ello, se hace funcionar el
producto y se añaden puntos de referencia a fin de
trazar un mapa en la aplicación.
10.1.3 Descripción del producto
Nota: Husqvarna actualiza periódicamente el aspecto
y la función de los productos. Consulte la sección
Asistencia en la página 13
.
El producto es una estación de referencia que recibe
señales por satélite y envía datos de corrección al robot
cortacésped. Es posible utilizar la misma estación de
referencia con varios robots cortacésped.
1512 - 002 - 08.11.2021 Manual de usuario - 13

10.1.4 Descripción del producto
123
9
678
10
11
45
1. Estación de referencia
2. Brazo
3. Abrazadera de soporte
4. Abrazadera para poste pequeño, 32-44 mm
(1,26-1,73 pulg.)
5. Abrazadera para poste grande, 44-55 mm
(1,73-2,16 pulg.)
6. Tornillos
7. Tornillos
8. Arandelas
9. Fuente de alimentación2
10. Cable de baja tensión
11. Manual de usuario
10.1.5 Símbolos que aparecen en el
producto
Puede encontrar estos símbolos en el producto.
Asegúrese de comprender su significado.
Este producto cumple con las directivas
vigentes de la UE.
Este producto cumple con las directivas
vigentes del Reino Unido.
No está permitido desechar el producto
como residuo doméstico normal. Respete
las normativas nacionales y utilice el
sistema de reciclaje local.
Utilice una fuente de alimen-
tación extraíble conforme a lo
especificado en la placa de
características técnicas, junto
al símbolo.
Nota: Los demás símbolos y etiquetas que aparecen
en el producto corresponden a requisitos de
homologación específicos en algunos mercados.
2La apariencia puede variar en función del mercado
14 - Manual de usuario 1512 - 002 - 08.11.2021

11 Seguridad
11.1 Definiciones de seguridad
Las advertencias, precauciones y notas se utilizan para
destacar información especialmente importante del
manual.
ADVERTENCIA: Indica un riesgo de
lesiones o incluso de muerte del usuario o
de las personas cercanas si no se respetan
las instrucciones del manual.
PRECAUCIÓN: Indica un riesgo de
daños en el producto, otros materiales o el
área adyacente si no se respetan las
instrucciones del manual.
Nota: Se usa para proporcionar más información
necesaria en una situación determinada.
11.2 Instrucciones generales de
seguridad
ADVERTENCIA: Lea las siguientes
instrucciones de advertencia antes de
utilizar el producto.
• Cumpla con las normas de su país relativas a la
seguridad eléctrica.
• El producto solo se puede utilizar con una unidad
de alimentación suministrada por Husqvarna.
• El producto solo se puede utilizar con el equipo
recomendado por el fabricante. Todos los demás
usos son inadecuados. Se deben seguir al pie de
la letra las instrucciones de uso y mantenimiento
del fabricante.
• Este producto solamente lo podrán manejar,
mantener y reparar aquellas personas que
conozcan perfectamente sus normas de seguridad
y características especiales. Lea detenidamente el
manual de usuario y asegúrese de entender su
contenido antes de utilizar el producto.
• Husqvarna no garantiza la total compatibilidad
entre el producto y otro tipo de sistemas
inalámbricos, como mandos a distancia,
radiotransmisores, bucles magnéticos, vallas
eléctricas enterradas para animales o similares.
• No está permitido modificar el diseño original del
producto. Todas las modificaciones se harán por
su cuenta y riesgo.
• La temperatura de funcionamiento oscila entre –
20 °C y 45 °C (–4 °F y 113 °F). La temperatura de
almacenamiento oscila entre –20 °C y 70 °C (–4 °F
y 158 °F).
11.3 Instrucciones de seguridad para la
instalación
ADVERTENCIA: Lea las siguientes
instrucciones de advertencia antes de
utilizar el producto.
• No coloque la fuente de alimentación en un lugar
donde se pueda mojar. No coloque la fuente de
alimentación en el suelo.
• No encapsule la fuente de alimentación. El agua
condensada puede dañar la fuente de
alimentación y aumentar el riesgo de descarga
eléctrica.
• Riesgo de descarga eléctrica. Instale siempre un
interruptor diferencial (RCD) antes de conectar la
fuente de alimentación a la toma de corriente.
Aplicable a EE. UU./Canadá. Si la fuente de
alimentación se instala en el exterior: Riesgo de
descarga eléctrica. Conecte el dispositivo siempre
a una toma de Clase A GFCI (RCD) con tapa cuya
carcasa sea estanca tanto con la clavija enchufada
o no.
• Asegúrese de que los enchufes del cable de baja
tensión y de la fuente de alimentación están
limpios y secos antes de conectarlos.
• Existe riesgo de caída de objetos durante la
instalación de la estación de referencia. Esta
situación podría ocasionar lesiones.
• El cable de alimentación y el cable alargador
deben estar fuera del área de trabajo para evitar
daños en los cables.
• Si instala la estación de referencia en un punto
elevado, existe el riesgo de caídas. Sitúese de tal
manera que no pueda perder el equilibrio cuando
instale la estación de referencia.
11.4 Instrucciones de seguridad para el
mantenimiento
ADVERTENCIA: Lea las siguientes
instrucciones de advertencia antes de
utilizar el producto.
• Desconecte el producto de la toma de corriente
antes de limpiarlo o de someterlo a operaciones
de mantenimiento.
1512 - 002 - 08.11.2021 Seguridad - 15

11.5 En caso de tormenta eléctrica
Para reducir el riesgo de daños en los componentes
eléctricos de la estación de referencia, recomendamos
desconectar la fuente de alimentación de la estación de
referencia si existe riesgo de tormenta eléctrica. Vuelva
a conectar la fuente de alimentación cuando
desaparezca el riesgo de tormenta eléctrica.
12 Instalación
12.1 Introducción sobre la instalación
ADVERTENCIA: Asegúrese de leer
y comprender el capítulo sobre seguridad
antes de instalar el producto.
PRECAUCIÓN: Utilice material para
la instalación y piezas de repuesto
originales.
Nota: Consulte www.husqvarna.com para obtener
más información acerca de la instalación.
12.2 Determinación del lugar donde se
colocará la estación de referencia
PRECAUCIÓN: Si hay un pararrayos
cerca, no instale la estación de referencia a
una altura superior a la del pararrayos.
PRECAUCIÓN: No instale la estación
de referencia en un mástil. Cualquier
movimiento que se produzca en la estación
de referencia influirá en los datos de
corrección que se enviarán al producto con
la posición exacta.
• Instale la estación de referencia en un objeto fijo
que no se mueva ni gire.
• Instale la estación de referencia en un poste o en
una pared. El poste debe tener un diámetro de
32-55 mm (1.26-2.16 pulg.) para poder usar los
accesorios de montaje de la estación de
referencia.
Nota: Si la estación de referencia se monta en
una pared, deberá situarse por encima de la
pared. No debe haber metal en la pared.
• No debe haber ningún obstáculo entre la estación
de referencia y el cielo. No debe haber ningún
obstáculo en ninguna dirección en un ángulo de
elevación por encima de 10°.
160°
10°10°
• Instale la estación de referencia a una altura
mínima de 2.5 m (8 pies).
• La distancia máxima entre la estación de
referencia y el producto es de 500 m (1640 pies)
siempre que no exista ningún obstáculo entre
ambos. Si hay algún obstáculo entre ambos, la
distancia disminuye.
• Instale la estación de referencia en un lugar desde
donde la señal de radio pueda alcanzar toda el
área de trabajo. Los objetos grandes pueden
obstaculizar las señales de radio.
• Lo más aconsejable es que no exista ningún
obstáculo entre el producto y la estación de
referencia; solo así se conseguirá un rendimiento
óptimo.
• Si hay varios robots cortacésped y una estación de
referencia, será necesario realizar ajustes
especiales. Póngase en contacto con su
representante local de Husqvarna para obtener
más información.
12.3 Determinar el lugar donde se
colocará la fuente de alimentación
ADVERTENCIA: No corte el cable
de baja tensión. Puede sufrir una descarga
eléctrica.
PRECAUCIÓN: Tome todas las
precauciones para que las cuchillas del
robot cortacésped no puedan cortar los
cables de alimentación.
• Coloque la fuente de alimentación en una zona a
cubierto y protegida del sol y la lluvia.
16 - Instalación 1512 - 002 - 08.11.2021

• Coloque la fuente de alimentación en una zona
bien ventilada.
• Utilice un dispositivo de corriente residual (RCD)
cuando conecte la fuente de alimentación a la
toma de corriente.
• Extienda el cable de baja tensión si es necesario.
El cable de baja tensión se puede extender hasta
100 m (328 ft).
12.4 Instalación del producto
Lea detenidamente las instrucciones sobre la estación
de referencia. Consulte la sección
Determinación del
lugar donde se colocará la estación de referencia en la
página 16
.
Lea el manual de usuario del robot cortacésped que va
a utilizar con la estación de referencia.
Puede instalar la estación de referencia en un poste o
en una pared.
PRECAUCIÓN: Cualquier
movimiento que se produzca en la estación
de referencia influirá en los datos de
corrección que se enviarán al producto con
la posición exacta. La estación de referencia
debe instalarse firmemente en el poste o la
pared.
PRECAUCIÓN: Si mueve la estación
de referencia, los elementos del mapa
cambiarán de posición. Ajuste los elementos
del mapa o vuelva a realizar la instalación
en la aplicación Automower® Connect.
12.4.1 Herramientas de instalación
• Destornillador Torx 20.
• Llave hexagonal de 4 mm. Incluida en la caja.
12.4.2 Instalación de la estación de
referencia en un poste
1. Fije el poste firmemente a la pared, al tejado o al
suelo. Cerciórese de que el poste no se pueda
mover, ni siquiera de manera accidental.
2. Fije el soporte y uno de los soportes de poste al
brazo con los 4 tornillos (llave hexagonal de
4 mm).
Nota: Los soportes de poste están disponibles
en 2 tamaños, cada uno para un tamaño de poste
diferente. Seleccione el soporte de poste
adecuado para su instalación.
3. Coloque el brazo en la parte superior del poste.
Nota: La estación de referencia debe instalarse
en la parte superior del poste.
4. Fije la estación de referencia al poste con los
2 tornillos (llave hexagonal de 4 mm).
1512 - 002 - 08.11.2021 Instalación - 17

5. Pase el cable de la estación de referencia a través
de la ranura del brazo e instale la estación de
referencia en el brazo.
6. Fije el conector a las abrazaderas del brazo.
7. Apriete el tornillo (Torx 20) del brazo de la estación
de referencia.
T20
8. Conecte el cable de baja tensión a la estación de
referencia y a la fuente de alimentación. Consulte
la sección
Determinar el lugar donde se colocará
la fuente de alimentación en la página 16
.
9. Sujete el cable de baja tensión al poste desde la
estación de referencia hasta la fuente de
alimentación con bridas.
PRECAUCIÓN: Si el cable de
baja tensión no está bien sujeto con
bridas, puede resultar dañado en caso
de soplar viento fuerte.
10. Coloque la fuente de alimentación a una altura
mínima de 30 cm (12 pulg.) con respecto al suelo.
11. Conecte el cable de la fuente de alimentación a
una toma de corriente de 100-240 V.
12. Espere hasta que el indicador LED de estado se
ilumine en verde de forma permanente. En primer
lugar, el indicador LED de estado parpadea en
verde durante unos minutos. Consulte la sección
Luz indicadora LED de la estación de referencia
en la página 20
.
12.4.3 Instalación de la estación de
referencia en una pared
Nota: Puesto que las paredes pueden estar
construidas con diversos materiales, no se incluyen los
tornillos para fijar el producto a la pared.
1. Sostenga el brazo de la estación de referencia
sobre la pared en el punto donde lo vaya a montar.
Haga 4 marcas en la pared para señalar el punto
donde se colocarán los 4 tornillos.
18 - Instalación 1512 - 002 - 08.11.2021

Nota: Si la estación de referencia se monta en
una pared, dicha estación debe situarse por
encima de la pared.
2. Taladre 4 orificios en la pared para los 4 tornillos.
3. Instale la estación de referencia en la pared con
4 tornillos.
4. Pase el cable de la estación de referencia a través
de la ranura del brazo e instale la estación de
referencia en el brazo.
5. Fije el conector a las abrazaderas del brazo.
6. Apriete el tornillo (Torx 20) del brazo de la estación
de referencia.
T20
1512 - 002 - 08.11.2021 Instalación - 19

7. Conecte el cable de baja tensión a la estación de
referencia y a la fuente de alimentación.
8. Sujete el cable de baja tensión a la pared desde la
estación de referencia hasta la fuente de
alimentación con bridas.
PRECAUCIÓN: Si el cable de
baja tensión no está bien sujeto con
bridas, puede resultar dañado en caso
de soplar viento fuerte.
9. Coloque la fuente de alimentación a una altura
mínima de 30 cm (12 pulg.) con respecto al suelo.
Consulte la sección
Determinar el lugar donde se
colocará la fuente de alimentación en la página 16
.
10. Conecte el cable de la fuente de alimentación a
una toma de corriente de 100-240 V.
11. Espere hasta que el indicador LED de estado se
ilumine en verde de forma permanente. En primer
lugar, el indicador LED de estado parpadea en
verde durante unos minutos. Consulte la sección
Luz indicadora LED de la estación de referencia
en la página 20
.
13 Mantenimiento
13.1 Introducción - Mantenimiento
Revise la instalación todos los años.
1. Asegúrese de que el poste esté bien montado.
2. Revise los pares de apriete de todos los tornillos.
Tornillo Herramienta Par de apriete de (Nm)
Entre las partes superior e inferior del chasis Torx 20 1,8
Entre la estación de referencia y el brazo Torx 20 1,8
Entre el brazo y el poste Llave Allen, 4 mm 5-6
Brazo, abrazadera de soporte y abrazadera pa-
ra poste
Llave Allen, 4 mm 5-6
13.2 Limpie el producto
ADVERTENCIA: Desconecte el
producto de la fuente de alimentación antes
de proceder con las labores de
mantenimiento o limpieza.
PRECAUCIÓN: No utilice un equipo
de limpieza de alta presión para limpiar el
producto. No utilice productos disolventes
para la limpieza.
Si es necesario, limpie el producto con un paño
húmedo.
14 Resolución de problemas
14.1 Luz indicadora LED de la estación de referencia
Luz Estado
Luz verde intermitente Puesta en marcha de la estación de referencia. Puede tardar unos minutos.
Luz verde fija En funcionamiento.
Luz roja intermitente La estación de referencia no funciona debido a un error. Reinicie el producto. Si el
problema persiste, póngase en contacto con un taller de servicio autorizado.
Luz blanca intermitente Hay que actualizar el firmware. Hable con su representante local de Husqvarna.
20 - Mantenimiento 1512 - 002 - 08.11.2021
La page est en cours de chargement...
La page est en cours de chargement...
La page est en cours de chargement...
La page est en cours de chargement...
La page est en cours de chargement...
La page est en cours de chargement...
La page est en cours de chargement...
La page est en cours de chargement...
La page est en cours de chargement...
La page est en cours de chargement...
La page est en cours de chargement...
La page est en cours de chargement...
La page est en cours de chargement...
La page est en cours de chargement...
La page est en cours de chargement...
La page est en cours de chargement...
-
 1
1
-
 2
2
-
 3
3
-
 4
4
-
 5
5
-
 6
6
-
 7
7
-
 8
8
-
 9
9
-
 10
10
-
 11
11
-
 12
12
-
 13
13
-
 14
14
-
 15
15
-
 16
16
-
 17
17
-
 18
18
-
 19
19
-
 20
20
-
 21
21
-
 22
22
-
 23
23
-
 24
24
-
 25
25
-
 26
26
-
 27
27
-
 28
28
-
 29
29
-
 30
30
-
 31
31
-
 32
32
-
 33
33
-
 34
34
-
 35
35
-
 36
36


dans d''autres langues
- English: Husqvarna HUSO2022 User manual
- español: Husqvarna HUSO2022 Manual de usuario
Documents connexes
-
Husqvarna Automower 550 EPOS Professional Robotic Lawn Mowers Mode d'emploi
-
-
Husqvarna 440 e-series Manuel utilisateur
-
-
Husqvarna 9676731-21 Mode d'emploi
-
-
-
-
-