BLACK DECKER AP3560-B5 Air Purifier Manuel utilisateur
- Taper
- Manuel utilisateur

www.blackanddecker.ae
AR FR EN
AP3560-B5

2
ENGLISH (Original instructions)
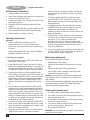
1
2
3
7
4
5
6
8
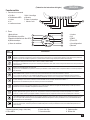
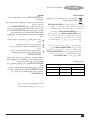
DISPLAY (2)
CONTROL PANEL (1)
For Control panel & Display refer page number 5 for detailed explanation

Intended use
Your BLACK+DECKERTM AP3560-B5 Purifier has been
designed to improve indoor air quality by removing harmful
particles for clean air and comfortable living experience.
This appliance is intended for indoor household use only.
Thank you for choosing BLACK+DECKER. We hope that
you will enjoy using this product for many years.
For indoor domestic household use only.
This appliance is not to be used in:
• Staff kitchen areas in shops, offices and other working
environments;
• Farm Houses;
• By clients in hotels, motels and other residential type
environments;
• Bed and breakfast type environments or any other non
household type environments.
Safety instructions
Warning!
Read all safety warnings and all instructions.
Failure to follow the warnings and instructions
listed below may result in electric shock, fire
and/or serious injury.
• Always route the power supply cord carefully to avoid a
tripping hazard.
• The intended use is described in this manual. The use of
any accessory or attachment or the performance of any
operation with this appliance other than those
recommended in this instruction manual may present a
risk of personal injury.
Warning! UV radiation is dangerous for the eyes and skin.
Do not operate the UV-C emitter outside the appliance.
Read the manual before replacing UV-C emitter.
The appliance must be disconnected from the supply before
replacing the UV-C emitter
• Precautions to be taken when replacing UV-C emitters
and starters, if applicable
• Unintended use of the appliance or damage to the
housing may result in the escape of dangerous UV-C
radiation. UV-C radiation may, even in little doses, cause
harm to the eyes and skin.
Warning! When using mains-powered appliances, basic
safety precautions, including the following, should always be
followed to reduce the risk of fire, electric shock and
personal injury and material damage.
Caution: In order to avoid a hazard due to inadvertent
resetting of the thermal cutout, this appliance must not be
supplied through an external switching device, such as a
timer, or connected to a circuit that is regularly switched on
and off by the utility.
3
ENGLISH
(Original instructions)
• Retain this manual for future reference.
Electrical safety
Before use, check that the mains voltage corresponds to the
voltage on the rating plate.
This appliance is double insulated therefore no
earth wire is required.
• To avoid the risk of electric shock, do not immerse the
cord, plug or appliance in water or other liquid.
• Check that the supply voltage shown on the rating plate
of the appliance matches that of your electrical system.
Any connection error will invalidate the guarantee.
Using your appliance
• The temperature of accessible surfaces may be high
when the appliance is operating and for some time
afterwards.
• Read all of this manual carefully before using the
appliance.
• Always take care when using the appliance.
• Never pull the power supply cord to disconnect the plug
from the socket.
• Please don't put any objects on top of purifier. It will
cause obstruction to outlet fresh air and may lead to
decreased performance.
• Keep the power supply cord away from heat, oil and
sharp edges.
• Do not put small objects on top of purifier. It may get
dropped into the unit through top vents and may cause
damage to the internal part when unit is running.
• Do not place the appliance on or near heat sources or in
a heated oven.
• Do not use the appliance outdoors.
• If the power supply cord is damaged during use,
disconnect the appliance from the power supply
immediately. Do not touch the power supply cord before
disconnecting from the power supply.
• Disconnect the appliance from the power supply when
not in use, before fitting or removing parts and before
cleaning.
• Never let the appliance operate unattended.
• Unit must be attended in use.
• Do not let the cord hang over the edge of a table,
counter, or touch hot surfaces.
• Fully uncoil then guide the power supply cord neatly so it
cannot be caught accidentally or tripped over.
• The purifier must not be located immediately below a
socket-outlet.

4
ENGLISH (Original instructions)
• To prevent overload and blown fuses, do not plug other
appliance into same outlet (receptacle)
• Do not place the purifier on carpets, don’t place the
cable under carpets. Arrange cord away from track
areas so that it will not be tripped over.
• Do not use this appliance under direct sunlight or near
any heating object.
• DO NOT place the purifier under an electrical socket
outlet or other product that maybe affected by humidity.
• NEVER use this purifier where it may come into contact
with water i.e. bathroom, shower room, kitchen. Do not
use this purifier in the immediate surroundings of a bath,
a shower or a swimming pool.
Warning! In order to avoid overheating, do not cover the
purifier.
• Always ensure that hands are dry before operating or
adjusting any switch on the product or touching the plug
and mains supply connections.
• To prevent a possible fire, do not block air intakes or
exhaust in any manner. Do not use on soft surfaces, like
a bed, where openings may become blocked.
• Don’ t use extension cable.
• Always operate on a flat horizontal surface.
• Do not insert or allow foreign objects to enter any
ventilation or exhaust opening, as this may cause an
electric shock, fire or damage to the appliance.
• Do not operate in areas where gasoline, paint or other
flammable liquids are used or stored.
• The most common cause of overheating is deposits of
dust or fluff in the appliance. Ensure these deposits are
removed regularly by unplugging the appliance and
vacuum cleaning air vents and grilles.
• Always use the purifier in an upright position.
• To disconnect the appliance, switch it “OFF” then
remove.
Safety of others
• Some parts of the product are small in size and may
cause a choking hazards if swallowed by children or any
individuals who have a tendency to place inedible
objects in their mouths.
• This appliance is not intended for use by persons
(including children) with reduced physical, sensory or
mental capabilities, or lack of experience and
knowledge, unless they have been given supervision or
instruction concerning use of the appliance by a person
responsible for their safety.
• Children should be supervised to ensure that they do not
play with the appliance.
• Do not allow children or any person unfamiliar with these
instructions to use the appliance.
• Do not allow children or animals to come near the work
area or to touch the appliance or power supply cord.
• Close supervision is necessary when the appliance is
used near children.
• Children of less than 3 years should be kept away unless
continuously supervised.
• Children aged from 3 years and less than 8 years shall
only switch on/off the appliance provided that it has been
placed or installed in its intended normal operating
position and they have been given supervision or
instruction concerning use of the appliance in a safe way
and understand the hazards involved
• Children aged from 3 years and less than 8 years shall
not plug in, regulate and clean the appliance or perform
user maintenance
After use
• Remove the plug from the socket before leaving the
appliance unattended and before changing, cleaning or
inspecting any parts of the appliance.
• When not in use, the appliance should be stored in a dry
place. Children should not have access to stored
appliances.
Inspection and repairs
• Switch off the appliance before cleaning, changing
accessories or approaching parts which move in use.
• Before use, check the appliance for damaged or
defective parts. Check for breakage of parts, damage to
switches and any other conditions that may affect its
operation.
• Do not use the appliance if any part is damaged or
defective.
• Have any damaged or defective parts repaired or
replaced by an authorised repair agent.
• Before use, check the power supply cord for signs of
damage, ageing and wear.
• Do not use the appliance if the power supply cord or
mains plug is damaged or defective.
• If the supply cord is damaged, it must be replaced by the
manufacturer or its service agent or a similarly qualified
person in order to avoid a hazard. Do not attempt to
repair it yourself.
• Never attempt to remove or replace any parts other than
those specified in this manual.

5
ENGLISH
(Original instructions)
ai
h
g
f
b
c
d
e
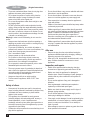
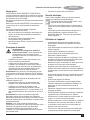
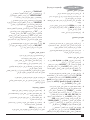
Features
1. Control panel
a. Pre-Filter
b. HEPA reset
c. Ionizer
d. UV
e. Night light
f. Sleep / Lock
g. Timer
h. Speed / Auto
i. On / Off
j
k
n
l
m
o
p
r
q
t
s
2. Display
j) Night light mode
k) Pre-filter reset
l) HEPA Filter reset reminder
m) Auto mode
n) Fan speed
o) Ionizer
p) UV
q) PM2.5
r) LCD Screen
s) Child lock
t) Timer
3. Light ring ( Red, Purple, Blue) 4. Filtered air outlet 5. Rear Sensor
6. HEPA filter 7. Rear Cover 8. Air Inlet
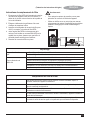
Display/ Operation
Control
There are five speed settings Speed 1, Speed 2, Speed 3, Speed 4 and AUTO for selection.
Press the “SPEED/AUTO” button on the control panel to select desired speed and the corresponding icon will be illuminated on the dial to indicate selected speed.
There are four time settings of 2H, 4H, 6H and 8H for selection.
Press the “TIMER” button on the control panel to to select desired time and the corresponding icon will be illuminated on the dial to indicate selected time.
The display dial and the light ring will turn off if the "NIGHT LIGHT" mode is activated, and the middle part of the display will show “-”.
Press the "NIGHT LIGHT" button on the control panel to activate "NIGHT LIGHT" mode.
This appliance has an independent ionizer feature which, when turned on, release negative ions into outgoing filtered air to help the air purification process, and the
corresponding "IONIZER" icon will be illuminated on the dial.
This appliance is equipped with a UV lamp (UV-C emitter), so that it has a strong bactericidal effect and the structure of microorganisms can be destroyed by the high
energy of the ultraviolet spectrum. Press the “UV” button on the control panel to turn on the UV lamp and the corresponding icon of “UV” will illuminate.
The “UV” icon will display solid blue color to remind the user to replace the UV lamp, if the appliance has been cumulatively operated for 7300 hours.
The “FILTER RESET” icon will illuminate in red to remind the user to replace the HEPA filter if the appliance has been cumulatively operated for 2160 hours.
After replacing the filter, hold and press the “FILTER RESET” button for 3 seconds to reset and then, “FILTER RESET” icon will disappear from the display dial.
The “PRE-FILTER” icon will illuminate in red to remind the user to replace the nylon filter if the appliance has been cumulatively operated for 360 hours.
After replacing the filter, hold and press the “PRE-FILTER” button for 3 seconds to reset and then, “PRE-FILTER” icon will disappear from the display dial.
The appliance will run under “SLEEP” mode if the “SLEEP” mode is activated so that the user can have a quite sleeping environment.
Press the “SLEEP/LOCK” button on the control panel to activate “SLEEP” mode and the corresponding "SLEEP" mode icon will be illuminated on the dial.
All the controls are invalid if the "CHILD LOCK" function is activated. Hold and press the “SLEEP/LOCK” button on the control panel for 3 seconds to activate “CHILD LOCK”
condition and the corresponding "CHILD LOCK" mode icon will be illuminated on the dial.
There is an illuminated light ring around the display to indicate the current air quality. When the value of PM2.5 is less than 35, the light ring is illuminated in blue, indicating
that the air quality is very good. When the value of PM2.5 ranges between 36 and 115, the light ring is illuminated in purple, indicating that the air quality is good. When the
value of PM2.5 is more than 115, the light ring is illuminated in red, indicating that the air quality is bad.
PM2.5
INDICATOR
UV LAMP
SPEED/AUTO
TIMER
SLEEP/LOCK
NIGHT LIGHT
IONIZER
FILTER RESET
REMINDER
PRE-FILTER

6
ENGLISH (Original instructions)
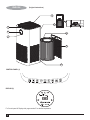
Pre-Operating instructions
1. Carefully unpack your air purifier.
2. Select a firm level place where there are no obstructions
to the air inlet or filtered air outlet.
3. Press the tab of filter cover, and then pull the filter cover
backwards to remove it.
4. Detach the HEPA filter and then unpack the PE bag
carefully.
5. Replace the HEPA filter back in position, make sure that
the primarily-efficient filter shall be pointed outwards.
6. Replace the filter cover back in position.
Operating instructions
Important:
• Remove all PE bags from filters before use.
• Always place the unit in an area such that there is
enough clear space around the unit to avoid blocking of
air suction .
• Avoid blocking filtered area outlet (top grill) to facilitate
purified air circulation in the room.
To operate your air purifier:
1. Plug into a electrical outlet of 220V~240/50~60Hz, two
beeps “Bi-Bi” can be heard.
2. Press down the ON/OFF button, one beep “Bi” can be
heard and its corresponding LED turns on, the light ring
will illuminate in different color according to the current
air quality and the display will show the value of PM2.5.
3. The air purifier starts to run under the default speed
(AUTO setting). If you want to select other settings, you
can press “ SPEED/AUTO” button to select your desired
speed setting. There are five speed settings including
Speed 1, Speed 2, Speed 3, Speed 4 and AUTO for
selection. After select, its corresponding LED will turn
on.
4. You can activate the timer after turn on the air purifier
and select your required speed setting by following the
operation as below: press down “TIMER” button on the
control panel, one beep “Bi” can be heard. There are 4
settings including 2H, 4H, 6H and 8H for selection. After
select your required timing, its corresponding LED turns
on. When the timer expires, the air purifier will power off
automatically and the LED will extinguish.
5. To activate the “Sleep” mode, press the “SLEEP/LOCK”
button once to make the appliance enter into the “Sleep”
mode, and then the corresponding icon of “Sleep” mode
shown in the display illuminates.
6. To activate the “Child lock” function, hold and press the
“SLEEP/LOCK” button for 3 seconds to make the
appliance enter into the locking condition, and then the
corresponding icon of “Child lock” shown in the display
illuminates.
7. To make the appliance enter into “Night light” mode,
press the “NIGHT LIGHT” button once , and then the
display and the light ring turn off and the middle part of
the display shows “-”.
8. To release negative ions into the filtered air, press the
“IONIZER” button once, then the negative ions will be
released into outgoing filtered air to help the air
purification process, and the icon of ionizer shown in the
display will illuminate.
9. To activate the “UV lamp” function to sterilize, press the
“UV” button on the control panel to turn on the UV lamp
and the icon of “UV” shown in the display will
illuminate.The icon of “UV” shown in the display will
illuminate in blue solidly to remind the user to eplace the
UV lamp if the appliance has been operated for up to
7300 hours cumulatively.
10. If you want to make the air purifier stop running, just need
to press “ ON/OFF” button once. And the air purifier will
stop working after hearing one beep “Bi”.
Mains plug replacement
If a new mains plug needs to be fitted:
• Safely dispose of the old plug.
• Connect the brown lead to the live terminal of the new
plug.
• Connect the blue lead to the neutral terminal.
• If the product is class l (earthed), connect the green /
yellow lead to the earth terminal.
Warning! If your product is class ll double insulated (only 2
wires in the cord set), no connection is to be made to the
earth terminal.
Follow the fitting instructions supplied with good quality plugs.
Any replacement fuse must be of the same rating as the
original fuse supplied with the product.
Cleaning and maintenance
1. Turn the air purifier off and unplug it before cleaning.
2. The outside of the air purifier can be cleaned with a soft,
clean and dampened cloth.
3. The filtered air outlet and the filter cover can be cleaned
of dust with a small, soft brush.
4. If you wish to clean the inside of the air purifier, please
only use a dry, soft cloth to wipe it down.
5. Do not wash the HEPA filter.
WARNING: Do not allow moisture to come in contact with the
main body of the air purifier.

7
ENGLISH
(Original instructions)
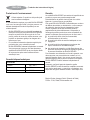
Error code interpretation
E11
E1
E5
E0
E2
This appliance is out of speed or under over heating protection. After 10mins, re-plug in
the appliance and turn on it again.
The motor is faulty, please contact the authorized service center or partner for checking
and repairs.
The filter cover is not assembled properly, please re-assemble, then the appliance will
return to operation mode.
The filter is not assembled properly, please re-assemble, then the appliance will return to
operation mode.
The dust sensor or related circuit may be damaged, please contact the authorized service
center or partner for checking and repairs.
Troubleshooting
Device does not work.
No or decreased air flow
Check if the device is plugged to the power supply.
Check if the device is turned on.
Check if filter is properly installed and the filter cover is firmly closed.
Check the filter status and clean or replace if necessary (too dirty).
Check to ensure nothing is blocking the air inlet and filtered air outlet.
Replace the HEPA filter if it has not been replaced periodically.
Ensure the plastic bag has been removed from the filter.
Filter replacement instructions
1. On average, HEPA filter needs to be cleaned every 360
hours and replaced every 2160 hours. Filter life will vary
depending on air quality and usage.
2. Turn off and unplug the air purifier before attempting to
replace the filter.
3. Press the tab of filter cover to open the cover and then
remove the HEPA filter.
4. Discard the old HEPA filter and do not attempt to clean.
And then install a new HEPA filter well in position, make
sure that the primarily efficient filter shall be pointed
outwards.
5. Replace the filter cover back in position.
WARNING:
• To clean the dust sensor carefully open the cover on the
rear side of the unit.
• Use dry cloth or cotton swab to carefully wipe the sensor.
Do not apply pressure while cleaning to avoid damage to
the sensor.

8
ENGLISH (Original instructions)
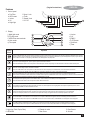
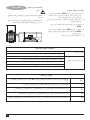
AP3560-B5
Input voltage 220 - 240 V
Power input 55 W
Frequency 50-60 Hz
Technical Data
Protecting the environment
Separate collection. This product must not be
disposed of with normal household waste.
Should you find one day that your BLACK+DECKER product
needs replacement, or if it is of no further use to you, do not
dispose of it with other household waste. Make this product
available for separate collection.
• BLACK+DECKER provides a facility for recycling
BLACK+DECKER products once they have reached the
end of their working life. This service is provided free of
charge. To take advantage of this service please return
your product to any authorised repair agent who will
collect them on our behalf.
• You can check the location of your nearest authorised
repair agent by contacting your local BLACK+DECKER
office at the address indicated in this manual.
Alternatively, a list of authorized BLACK+DECKER repair
agents and full details of our after-sales service and
contact are available on: www.2helpU.com.
Warranty
BLACK+DECKER is confident of the quality of its products
and offers an outstanding warranty.
This warranty statement is in addition to and in no way
prejudices your statutory rights.
If a BLACK+DECKER product becomes defective due to
faulty materials, workmanship or lack of conformity, within 24
months from the date of purchase, BLACK+DECKER
warranty to replace defective parts, repair products subjected
to fair wear and tear or replace such products to ensure
minimum inconvenience to the customer unless:
The product has been used for trade, professional or hire
purposes;
The product has been subjected to misuse or neglect;
The product has sustained damage through foreign
objects, substances or accidents;
Repairs have been attempted by persons other than
authorised repair agents or BLACK+DECKER service
staff.
To claim on the warranty, you will need to submit proof of
purchase to the seller or an authorised repair agent. You can
check the location of your nearest authorised repair agent by
contacting your local BLACK+DECKER office at the address
indicated in this manual.
Alternatively, a list of authorised BLACK+DECKER repair
agents and full details of our after-sales service and contacts
are available on the Internet at: www.2helpU.com.
BLACK AND DECKER (OVERSEAS) GMBH (DUBAI BRANCH)
PO Box 17164, Dubai, United Arab Emirates

9
FRANÇAIS
(Traduction des instructions d'origine)
Usage prévu
Votre purificateur BLACK DECKER™ AP3560-B5 a été
conçu pour améliorer la qualité de l’air intérieur en éliminant
les particules nocives afin de produire un air pur et apporter
une expérience de vie confortable.
Cet appareil est destiné à une utilisation domestique interne
uniquement.
Merci d’avoir choisi BLACK+DECKER. Nous espérons que
vous profiterez de ce produit pendant de nombreuses
années.
Pour usage domestique en intérieur uniquement.
Cet appareil ne doit pas être utilisé :
• dans les cuisines pour les employés de boutiques, de
bureaux et d’autres environnements professionnels ;
• dans les fermes ;
• par les clients d’hôtels, de motels et autres
environnements de type résidentiel ;
• dans les chambres d’hôtes ou tout autre environnement
non résidentiel.
Consignes de sécurité
Avertissement !
Lisez toutes les consignes de sécurité et
toutes les instructions. Le non-respect de ces
avertissements et de ces instructions peut
provoquer un incendie, une électrocution ou de
graves blessures.
• Acheminez toujours le cordon avec précaution pour
éviter tout risque de trébuchement.
• L’usage prévu est décrit dans le présent manuel.
L’utilisation d’un accessoire ou d’une pièce jointe ou
l’exécution de toute opération avec cet appareil autre
que celles qui sont recommandées dans ce mode
d’emploi peut présenter un risque de blessure.
Avertissement ! Les rayons UV sont dangereux pour les
yeux et la peau. N’utilisez pas l’émetteur UV-C à l’extérieur
de l’appareil. Lisez le manuel avant de remplacer l’émetteur
UV-C.
L’appareil doit être déconnecté de l’alimentation afin de
remplacer l’émetteur UV-C.
• Précautions à prendre lors du remplacement des
émetteurs UV-C et des démarreurs, le cas échéant
• L’utilisation non conforme de l’appareil ou des
dommages au boîtier peuvent entraîner la fuite de
dangereux rayonnements UV-C. Le rayonnement UV-C
peut, même à faible dose, être nocif pour les yeux et la
peau.
Avertissement ! Lorsque vous utilisez des appareils
électriques, veuillez toujours respecter les précautions
élémentaires de sécurité, entre autres, pour réduire le risque
d’incendie, d’électrocution et de blessures corporelles et des
dommages matériels.
Attention : Pour éviter tout danger résultant de la
réinitialisation involontaire du coupe-circuit thermique, évitez
d’alimenter cet appareil au moyen d’un dispositif de
commutation externe tel qu’une minuterie, ou de le
connecter à un circuit régulièrement mis sous/hors tension
par le réseau public.
• Conservez ce manuel à titre de référence.
Sécurité électrique
Avant d’utiliser l’appareil, vérifiez que la tension secteur
correspond à celle de la plaque signalétique.
Cet appareil dispose d’une double isolation ; ainsi,
aucun fil de terre n’est nécessaire.
• Pour éviter le risque d’électrocution, ne plongez pas le
cordon, la fiche ou l’appareil dans de l’eau ou tout autre
liquide.
• Vérifiez que la tension d’alimentation indiquée sur la
plaque signalétique correspond à celle de votre
alimentation électrique. Toute erreur de branchement
annule la garantie.
Utilisation de l’appareil
• La température des surfaces accessibles peut être
élevée pendant l'utilisation de l’appareil et un certain
temps après.
• Lisez attentivement ce manuel dans son intégralité avant
d’utiliser l’appareil.
• Utilisez toujours l’appareil avec précaution.
• Ne tirez jamais sur le cordon d’alimentation pour
débrancher la fiche du secteur.
• Veuillez ne pas placer d’objets sur le purificateur. Cela
entraînera une obstruction de la sortie d’air frais et peut
entraîner une diminution des performances.
• Maintenez le cordon d’alimentation à l’écart des sources
de chaleur, de l’huile et des bords tranchants.
• Ne placez pas de petits objets sur le purificateur. Ils
peuvent tomber dans l’appareil par les évents supérieurs
et endommager la partie interne lorsque l’appareil est en
marche.
• Ne posez pas l’appareil sur ou à proximité de sources de
chaleur ou directement à l’intérieur d’une cuisinière en
marche.
• N’utilisez pas l’appareil à l’extérieur.
• Si le cordon d’alimentation est endommagé pendant
l’utilisation, débranchez immédiatement l’appareil. Ne
touchez pas le cordon d’alimentation avant de le
débrancher.
• Débranchez l’appareil avant le montage/démontage et le
nettoyage des pièces.
• Ne laissez jamais l’appareil en marche sans surveillance.
• L’appareil doit être surveillé durant son utilisation.
• Ne laissez pas le cordon pendre au bord de la table, du
comptoir, ou toucher les surfaces chaudes.
• Déroulez entièrement le cordon d’alimentation et guidez-le
de manière à éviter tout risque d’accident ou de chute.
• Le purificateur ne doit pas se trouver directement en
dessous d’une prise de courant.
• Pour éviter tout risque de surcharge et de fusible grillé,
ne branchez pas d’autre appareil sur la même prise.

10
FRANÇAIS (Traduction des instructions d'origine)
• Ne placez pas le purificateur sur des tapis et ne placez
pas le cordon sous des tapis. Ne positionnez pas le
cordon dans le passage de sorte à éviter tout risque de
trébuchement.
• N’utilisez pas cet appareil sous la lumière directe du
soleil ou près d’un objet chauffant.
• NE PLACEZ PAS le purificateur sous une prise
électrique ou tout autre produit qui peut être affecté par
l’humidité.
• N’UTILISEZ JAMAIS le purificateur dans des endroits où
il est susceptible d’entrer en contact avec de l’eau
(toilettes, salle de bain, cuisine). N’utilisez pas ce
purificateur à proximité directe d’une baignoire, d’une
douche ou d’une piscine.
Avertissement ! Afin d’éviter la surchauffe, ne recouvrez
pas le purificateur.
• Assurez-vous de toujours avoir les mains sèches avant
d’utiliser ou de régler des boutons sur l’appareil ou
encore de toucher la fiche et la prise d’alimentation.
• Pour éviter les incendies, ne bloquez pas les entrées ou
la sortie d’air de quelque manière que ce soit. N’utilisez
pas l’appareil sur des surfaces souples, comme un lit,
qui présentent une possibilité de blocage des
ouvertures.
• N’utilisez pas de rallonge.
• Utilisez toujours l’appareil sur une surface plane et
horizontale.
• N’introduisez pas et ne laissez pas passer des objets
étrangers dans les entrées et sorties d’air, sous risque
de choc électrique, d’incendie ou de dommage sur
l’appareil.
• N’utilisez pas l’appareil dans des zones où de l’essence,
de la peinture et d’autres substances inflammables sont
utilisées ou rangées.
• La cause de surchauffe la plus courante est le dépôt de
poussière ou de peluches dans l’appareil. Vérifiez que
ces dépôts sont retirés régulièrement en débranchant
l’appareil et en aspirant les bouches d’air et les grilles.
• Utilisez toujours le purificateur en position verticale.
• Pour débrancher l’appareil, mettez-le hors tension, puis
retirez la fiche de la prise.
Sécurité d’autrui
• Certaines parties du produit sont de petite taille et
peuvent présenter un risque d’étouffement si elles sont
avalées par des enfants ou des personnes qui ont
tendance à mettre des objets non comestibles dans leur
bouche.
• Cet appareil n’est pas prévu pour être utilisé par des
personnes (y compris les enfants) présentant des
capacités physiques, sensorielles ou mentales réduites,
ou manquant d’expérience et de connaissances, sans
surveillance ou sans avoir reçu d’instructions concernant
l’utilisation de l’appareil de la part d’une personne
responsable de leur sécurité.
• Les enfants doivent être surveillés pour s’assurer qu’ils
ne jouent pas avec l’appareil.
• Ne laissez pas les enfants et les personnes non
familiarisées avec ces instructions utiliser cet appareil.
• Ne laissez pas les enfants ou les animaux s’approcher
de la zone de travail ou toucher l’appareil ou le cordon
d’alimentation.
• Lorsque l’appareil est utilisé à proximité d’enfants, une
surveillance étroite doit être exercée.
• Surveillez les enfants de moins de 3 ans en permanence
ou tenez-les à l’écart.
• Les enfants entre trois et huit ans ne doivent
allumer/éteindre l’appareil que s’il a été placé ou installé
dans un environnement lui permettant de fonctionner de
manière optimale, à condition de les surveiller ou de leur
expliquer comment utiliser l’appareil de manière
sécurisée et les risques potentiels.
• Les enfants entre trois et huit ans ne doivent pas
brancher, régler et nettoyer l’appareil, ou encore effectuer
des opérations de maintenance.
Après utilisation
• Débranchez l’appareil avant de le laisser sans
surveillance et avant de changer, nettoyer ou inspecter
des pièces de l’appareil.
• Lorsqu’il n’est pas utilisé, l’appareil doit être rangé dans
un endroit sec. L’appareil doit être rangé hors de portée
des enfants.
Inspection et réparations
• Mettez l’appareil hors tension avant de le nettoyer, de
remplacer des accessoires ou d’approcher des pièces
mobiles en cours d’utilisation.
• Avant d’utiliser l’appareil, vérifiez qu’aucune pièce n’est
endommagée ou défectueuse. Vérifiez si des pièces ne
sont pas cassées, si des interrupteurs ne sont pas
endommagés, et toutes les autres conditions qui peuvent
affecter son fonctionnement.
• N’utilisez pas l’appareil si une pièce est endommagée ou
défectueuse.
• Faites réparer ou remplacer les pièces endommagées ou
défectueuses par un agent de service agréé.
• Avant d’utiliser l’appareil, vérifiez qu’il n’y a aucun signe
de d’endommagement, de vieillissement et d’usure au
niveau du cordon d’alimentation.
• N’utilisez pas l’appareil si la fiche ou le cordon
d’alimentation est endommagé ou défectueux.
• Si le cordon d’alimentation est endommagé, faites-le
remplacer par le fabricant, un agent de service agréé ou
toute autre personne ayant les mêmes qualifications afin
d’éviter tout danger. N'essayez pas de le réparer
vous-même.
• N’essayez jamais de retirer ou de remplacer des pièces
différentes de celles qui sont indiquées dans le présent
manuel.

11
FRANÇAIS
(Traduction des instructions d'origine)
ai
h
g
f
bc
de
Fonctionnalités
1. Panneau de commande
a. Pré-filtre
b. Réinitialisation HEPA
c. Ioniseur
d. UV
e. Lumières nocturnes
f. Veille / Verrouillage
g. Minuterie
h. Vitesse / Automatique
i. Marche / Arrêt
j
k
n
l
m
o
p
r
q
t
s
2. Écran
j) Mode veilleuse
k) Réinitialisation du pré-filtre
l) Rappel de réinitialisation du filtre HEPA
m) Mode automatique
n) Vitesse du ventilateur
o) Ioniseur
p) UV
q) PM2.5
r) Écran LCD
s) Verrouillage enfant
t) Minuterie
3. Anneau lumineux (rouge, violet, bleu) 4. Sortie d’air filtré 5. Capteur arrière
6. Filtre HEPA 7. Couvercle arrière 8. Entrée d’air
Écran/ Fonctionnement
Commande
Cinq réglages de vitesse peuvent être choisis : Vitesse 1, Vitesse 2, Vitesse 3, Vitesse 4 et AUTO.
Appuyez sur le bouton SPEED/AUTO sur le panneau de commande pour sélectionner la vitesse désirée et l’icône correspondante s’allumera sur le cadran pour indiquer la
vitesse sélectionnée.
Quatre durées peuvent être choisies : 2H, 4H, 6H et 8H.
Appuyez sur le bouton MINUTERIE sur le panneau de commande pour sélectionner la durée souhaitée et l’icône correspondante s’allumera sur le cadran pour indiquer la
durée sélectionnée.
Le cadran d’affichage et l’anneau lumineux s’éteindront si le mode VEILLEUSE est activé, et la partie centrale de l’écran affichera « - ».
Appuyez sur le bouton VEILLEUSE du panneau de commande pour activer le mode VEILLEUSE.
Cet appareil est doté d’une fonction d’ionisation indépendante qui, lorsqu’elle est allumée, libère des ions négatifs dans l’air filtré sortant pour faciliter le processus de
purification de l’air, et l’icône d’IONISEUR correspondante sera allumée sur le cadran.
Cet appareil est équipé d'une lampe UV (émetteur UV-C), de sorte qu'il a un fort effet bactéricide et que la structure des micro-organismes peut être détruite par la haute
énergie du spectre ultraviolet. Appuyez sur le bouton « UV » sur le panneau de commande pour allumer la lampe UV et l'icône correspondante « UV » s'allumera.
L'icône « UV » s'affichera en bleu uni pour rappeler à l'utilisateur de remplacer la lampe UV, si l'appareil a fonctionné de manière cumulative pendant 7 300 heures.
L’icône RÉINITIALISATION DU FILTRE s’allumera en rouge pour rappeler à l’utilisateur de remplacer le filtre HEPA si l’appareil a fonctionné cumulativement pendant 2160 heures.
Après avoir remplacé le filtre, maintenez et pressez le bouton RÉINITIALISATION DU FILTRE pendant 3 secondes pour réinitialiser la fonction, l’icône RÉINITIALISATION DU
FILTRE disparaîtra alors du cadran d’affichage.
L’icône PRÉ-FILTRE s’allumera en rouge pour rappeler à l’utilisateur de remplacer le filtre en nylon si l’appareil a fonctionné cumulativement pendant 360 heures.
Après avoir remplacé le filtre, maintenez et pressez le bouton PRÉ-FILTRE pendant 3 secondes pour réinitialiser la fonction, l’icône PRÉ-FILTRE disparaîtra alors du
cadran d’affichage.
L’appareil fonctionnera en mode VEILLE si le mode VEILLE est activé afin que l’utilisateur puisse avoir un environnement de sommeil calme. Appuyez sur le bouton
VEILLE/VERRROUILLAGE du panneau de commande pour activer le mode VEILLE et l’icône du mode VEILLE s’allumera sur le cadran.
Tous les contrôles sont invalides si la fonction VERROUILLAGE ENFANT est activée. Maintenez et pressez le bouton VEILLE/VERROUILLAGE sur le panneau de
commande pendant 3 secondes pour activer la fonction VERROUILLAGE ENFANT et l’icône du mode « Verrouillage enfant » correspondante s’allumera sur le cadran.
Il y a un anneau lumineux autour de l’écran pour indiquer la qualité de l’air actuelle. Lorsque la valeur de PM2,5 est inférieure à 35, l’anneau lumineux s’illumine en bleu,
indiquant que la qualité de l’air est très bonne. Lorsque la valeur de PM2,5 se situe entre 36 et 115, l’anneau lumineux s’illumine en violet, indiquant que la qualité de l’air
est bonne. Lorsque la valeur de PM2,5 est supérieure à 115, l’anneau lumineux s’allume en rouge, indiquant que la qualité de l’air est mauvaise.
PM2,5
INDICATEUR
LAMPE UV
VITESSE/AUTO
MINUTERIE
VEILLE/
VERROUILLAGE
VEILLEUSE
IONISEUR
RAPPEL DE RÉINITIALISATION
DU FILTRE
PRÉ-FILTRE

12
FRANÇAIS (Traduction des instructions d'origine)
Instructions avant utilisation
1. Déballez soigneusement votre purificateur d’air.
2. Choisissez un endroit ferme horizontal sans obstruction
devant l’entrée d’air ou la sortie d’air filtré.
3. Appuyez sur la languette du couvercle du filtre, puis tirez
le couvercle du filtre vers l’arrière pour le retirer.
4. Détachez le filtre HEPA puis sortez-le délicatement du
sac en polyéthylène.
5. Remettez le filtre HEPA en place, assurez-vous que le
filtre à efficacité primaire est dirigé vers l’extérieur.
6. Remettez le couvercle du filtre en place.
Instructions d’utilisation
Important :
• Retirez tous les sacs en polyéthylène des filtres avant
utilisation.
• Placez toujours l’appareil dans un endroit où il y a
suffisamment d’espace libre autour de l’appareil pour
éviter de bloquer l’aspiration d’air.
• Évitez de bloquer la sortie d’air de l’évent filtré (grille
supérieure) pour faciliter la circulation de l’air purifié
dans la pièce.
Pour faire fonctionner votre purificateur d’air :
1. Branchez-le sur une prise électrique de 220 à 240 V/50
à 60 Hz. Vous entendrez deux bips « Bi...Bi ».
2. Appuyez sur le bouton Marche/Arrêt, vous entendrez un
bip « Bi », la LED correspondante s’allumera et l’anneau
lumineux s’allumera de différentes couleurs en fonction
de la qualité de l’air actuelle. L’écran affichera la valeur
de PM2.5.
3. Le purificateur d’air commence à fonctionner à la vitesse
par défaut (réglage AUTO). Si vous souhaitez changer
le réglage, vous pouvez appuyer sur le bouton
VITESSE/AUTO pour sélectionner le réglage de vitesse
souhaité. Cinq réglages de vitesse peuvent être choisis :
Vitesse 1, Vitesse 2, Vitesse 3, Vitesse 4 et AUTO.
Après avoir choisi une vitesse, la LED correspondante
s’allumera.
4. Vous pouvez activer la minuterie après avoir allumé le
purificateur d’air et sélectionner le réglage de vitesse
requis en faisant comme suit : appuyez sur le bouton
MINUTERIE sur le panneau de commande, vous
entendrez un bip « Bi ». Quatre durées peuvent être
choisies : 2H, 4H, 6H et 8H. Après avoir sélectionné la
durée requise, la LED correspondante s’allume. Lorsque
la minuterie expire, le purificateur d’air s’éteint
automatiquement et la LED s’éteint.
5. Pour activer le mode « Veille », appuyez une fois sur le
bouton VEILLE/VERROUILLAGE pour faire passer
l’appareil en mode « Veille », l’icône correspondante du
mode « Veille » sur l’écran s’allume alors.
6. Pour activer la fonction « Verrouillage enfant »,
maintenez et pressez le bouton
VEILLE/VERROUILLAGE pendant 3 secondes pour
activer le verrouillage de l’appareil, l’icône
correspondante de « Sécurité enfant » sur l’écran
s’allume alors.
7. Pour faire passer l’appareil en mode « Veilleuse »,
appuyez une fois sur le bouton VEILLEUSE, l’écran et
l’anneau lumineux s’éteignent alors et la partie centrale
de l’écran affiche « - ».
8. Pour libérer les ions négatifs dans l’air filtré, appuyez une
fois sur le bouton IONISEUR, les ions négatifs sont alors
libérés dans l’air filtré sortant pour aider le processus de
purification de l’air, et l’icône de l’ioniseur sur l’écran
s’allume.
9. Pour activer la fonction « lampe UV » de stérilisation,
appuyez sur le bouton UV sur le panneau de commande
pour allumer la lampe UV et l’icône UV sur l’écran
s’allume alors. L’icône UV sur l’écran s’allumera en bleu
continu pour rappeler à l’utilisateur de remplacer la lampe
UV si l’appareil a fonctionné cumulativement pendant
7300 heures ou plus.
10. Si vous souhaitez arrêter le purificateur d’air, il vous suffit
d’appuyer une fois sur le bouton « Marche/Arrêt ». Le
purificateur d’air s’arrêtera alors de fonctionner après
avoir émis un bip « Bi ».
Changement de la fiche secteur
Si la fiche secteur à besoin d’être remplacée :
• Mettez dûment l’ancienne fiche au rebut.
• Connectez le fil marron à la borne sous tension de la
nouvelle fiche.
• Connectez le fil bleu à la borne neutre.
• Si le produit est de classe l (relié à la terre), connectez le
fil vert/jaune à la borne de terre.
Avertissement ! Si votre appareil est un produit de classe ll
avec double isolation (seulement 2 fils dans le cordon),
aucun raccordement à la borne de terre n’est nécessaire.
Suivez les consignes d’installation fournies avec les fiches de
bonne qualité.
Tout fusible de rechange doit avoir les mêmes caractéris-
tiques nominales que le fusible d’origine fourni avec le
produit.
Nettoyage et entretien
1. Éteignez le purificateur d’air et débranchez-le avant de le
nettoyer.
2. L’extérieur du purificateur d’air peut être nettoyé avec un
chiffon doux, propre et humide.
3. La sortie d’air filtré et le couvercle du filtre peuvent être
dépoussiérés avec une petite brosse douce.
4. Si vous souhaitez nettoyer l’intérieur du purificateur d’air,
veuillez utiliser uniquement un chiffon doux et sec pour
l’essuyer.
5. Ne lavez pas le filtre HEPA.
AVERTISSEMENT : Ne laissez pas l’humidité entrer en
contact avec le corps principal du purificateur d’air.

13
FRANÇAIS
(Traduction des instructions d'origine)
Interprétation du code d’erreur
E11
E1
E5
E0
E2
Cet appareil est hors de vitesse ou sous protection contre la surchauffe. Après 10
minutes, rebranchez l'appareil et rallumez-le.
Le moteur est défectueux, veuillez contacter le centre de service agréé ou le partenaire
pour le contrôle et les réparations.
Le couvercle du filtre n'est pas assemblé correctement, veuillez le réassembler, l'appareil
reviendra en mode de fonctionnement.
Le filtre n'est pas assemblé correctement, veuillez le réassembler, l'appareil reviendra en
mode de fonctionnement.
Le seonsor de poussière ou le cicuit connexe peuvent être endommagés, veuillez
contacter le centre de service agréé ou le partenaire pour vérification et réparation.
Instructions de remplacement du filtre
1. En moyenne, le filtre HEPA doit être nettoyé toutes les
360 heures et remplacé toutes les 2160 heures. La
durée de vie du filtre varie en fonction de la qualité de
l’air et de l’utilisation.
2. Éteignez et débranchez le purificateur d’air avant
d’essayer de remplacer le filtre.
3. Appuyez sur la languette du couvercle du filtre pour
ouvrir le couvercle, puis retirez le filtre HEPA.
4. Jetez l’ancien filtre HEPA et n’essayez pas de le
nettoyer. Puis installez un nouveau filtre HEPA en le
mettant bien en place. Assurez-vous que le filtre à
efficacité primaire est dirigé vers l’extérieur.
5. Remettez le couvercle du filtre en place.
Avertissement :
• Pour nettoyer le capteur de poussière, ouvrez avec
précaution le couvercle à l’arrière de l’appareil.
• Utilisez un chiffon sec ou un coton-tige pour essuyer
soigneusement le capteur. N’appliquez pas de pression
pendant le nettoyage pour éviter d’endommager le
capteur.
Dépannage
L’appareil ne fonctionne
pas.
Pas ou diminution du
débit d’air
vérifier si l'appareil est branché sur l'alimentation.
Vérifiez si l’appareil est allumé.
vérifiez si le filtre est correctement installé et si le couvercle du filtre est bien fermé.
vérifiez l'état du filtre et nettoyez ou remplacez si nécessaire (trop sale).
Vérifiez que rien ne bloque l’entrée d’air et la sortie d’air filtré.
Remplacez le FILTRE HEPA S'IL N'A PAS ÉTÉ REMPLACÉ PÉRIODIQUEMENT
Assurez-vous que le sac en plastique a été retiré du filtre.

14
FRANÇAIS (Traduction des instructions d'origine)
AP3560-B5
Tension 220 - 240 V
Puissance 55 W
Fréquence 50-60 Hz
Caractéristiques techniques
Protection de l’environnement
Collecte séparée. Ce produit ne doit pas être jeté
avec les ordures ménagères.
Si vous décidez de remplacer ce produit BLACK+DECKER,
ou si vous n'en avez plus l'utilité, ne le jetez pas avec vos
déchets domestiques Rendez-le disponible pour une
collecte séparée.
• BLACK+DECKER fournit un dispositif permettant de
collecter et de recycler les produits BLACK+DECKER
lorsqu'ils ont atteint la fin de leur cycle de vie. Pour
pouvoir profiter de ce service, veuillez retourner votre
produit à un réparateur agréé qui se chargera de le
collecter pour nous.
• Pour connaître l'adresse du réparateur agréé le plus
proche de chez vous, contactez le bureau
BLACK+DECKER à l'adresse indiquée dans ce manuel.
Vous pourrez aussi trouvez un liste des réparateurs
agréés de BLACK+DECKER et de plus amples détails
sur notre service après-vente l'adresse suivante :
www.2helpU.com
Garantie
La société BLACK+DECKER est certaine de la qualité de ses
produits et propose une garantie exceptionnelle.
Cette déclaration de garantie vient s’ajouter à vos droits
légaux et n’y porte en aucun cas préjudice.
Si un produit BLACK+DECKER s’avère défectueux en raison
de défauts de matériaux ou de fabrication, ou d’un manque
de conformité, dans les 24 mois à compter de la date
d’achat, la garantie de BLACK+DECKER permet le
remplacement de pièces défectueuses, la réparation ou
l’échange de produits soumis à une usure normale afin de
garantir un minimum d’inconvénients pour le client, sauf si :
le produit a été utilisé à des fins commerciales,
professionnelles ou de location ;
le produit a été utilisé de manière inadéquate ou avec
négligence ;
le produit a subi des dommages provoqués par des
objets, substances ou accidents étrangers ;
des tentatives de réparation ont été effectuées par des
personnes autres que les agents de réparation agréés ou
le personnel d’entretien de BLACK+DECKER.
Pour soumettre une réclamation au titre de la garantie, vous
devrez apporter une preuve d’achat au vendeur ou à un
agent de réparation agréé. Vous pouvez trouver l’agent de
réparation agréé le plus proche en contactant votre agence
BLACK+DECKER locale à l’adresse indiquée dans ce
manuel.
Autrement, une liste d’agents de réparation agréés
BLACK+DECKER et des informations complètes concernant
notre service après-vente, y compris les coordonnées, sont
disponibles en ligne à l’adresse suivante : www.2helpU.com.
Black et Decker (étranger) GmbH (Branch de Dubai)
PO Box 17164, Dubai, Émirats arabes unis

15
ﺔـﻴـﺑﺮـﻌـﻟﺍ
(ﺔﻴﺴﻴﺋﺮﻟﺍ ﺕﺎﻤﻴﻠﻌﺘﻟﺍ)
AP3560-B5
á«æØdG äÉfÉ«ÑdG
220 – 240 OOÎe QÉ«J âdƒa »Hô¡µdG ó¡÷G
55 äGh IQó≤dG
50 - 60 õJôg OOÎdG
ﺔﺌﻴﺒﻟﺍ ﺔﻳﺎﻤﺣ
ﻊﻣ ﺞﺘﻨﳌﺍ ﺍﺬﻫ ﻦﻣ ﺺﻠﺨﺘﻟﺍ ﻡﺪﻋ ﻡﺰﻠﻳ .ﻞﺼﻔﻨﳌﺍ ﻊﻤﳉﺍ
.ﺔﻳﺩﺎﻌﻟﺍ ﺔﻴﻟﺰﻨﳌﺍ ﺔﻣﺎﻤﻘﻟﺍ
BLACK+DECKER èàæe ∫GóÑà°SG ΩÉjC’G øe Ωƒj ‘ Ωõd GPEG
áeɪ≤dG ™e ¬æe ¢ü∏îàJ Óa ,¬eóîà°ùJ ó©J ⁄ GPEG hCG ,∂H ¢UÉÿG
.π°üØæŸG ™ªé∏d èàæŸG Gòg áMÉJEG øe ócCÉJ πH ,iôNC’G á«dõæŸG
ôjhóJ IOÉYE’ ≥aôe BLACK+DECKER ácöT ôaƒJ •
ájÉ¡f ¤EG É¡dƒ°Uh Oôéà BLACK+DECKER äÉéàæe
.ÉkfÉ› áeóÿG √òg Ëó≤J ºàjh .πª©∏d É¡à«MÓ°U ΩóYh ÉgôªY
π«ch …CG ¤EG èàæŸG IOÉYEG ≈Lôj ,áeóÿG √òg øe IOÉØà°SÓd
áHÉ«f äÉéàæŸG ™ªL √QhóH ¤ƒàj ±ƒ°S …òdGh óªà©e áfÉ«°U
.ÉæY
∫ÓN øe óªà©e áfÉ«°U π«ch ÜôbCG ™bƒe ≈∏Y ±ô©àdG ∂æµÁ •
‘ »∏ëŸG BLACK+DECKER Öàµe ≈∏Y ∫É°üJ’G
AÓcƒH áªFÉb óLƒJ ,∂dP øe k’óHh .π«dódG Gòg ‘ í°VƒŸG ¿Gƒæ©dG
BLACK+DECKER ácöûd Ú©HÉàdG øjóªà©ŸG áfÉ«°üdG
∫É°üJ’G πFÉ°Shh ™«ÑdG ó©H Ée äÉeóÿ á∏eɵdG π«°UÉØàdGh
.www.2helpU.com : âfÎfE’G ≈∏Y ÉæH á°UÉÿG
ﻥﺎﻤﻀﻟﺍ
ﺎﹰﻧﺎﻤﺿ ﻡﺪﻘﺗﻭ ﺎﻬﺗﺎﺠﺘﻨﻣ ﺓﺩﻮﺟ ﻲﻓ BLACK+DECKER ﻖﺜﺗ
.ﻞﺟﻷﺍ ﻞﻳﻮﻃ
ﺎﻬﺑ ﻞﺨﻳ ﻻﻭ ﺔﻴﻧﻮﻧﺎﻘﻟﺍ ﻚﻗﻮﻘﺣ ﻰﻟﺇ ﺔﻓﺎﺿﺇ ﺍﺬﻫ ﻥﺎﻤﻀﻟﺍ ﻥﺎﻴﺑ ﺪﻌﹸﻳ
.ﻝﺍﻮﺣﻷﺍ ﻦﻣ ﻝﺎﺣ ﻱﺄﺑ
ﺐﺒﺴﺑ BLACK+DECKER ﺞﺘﻨﻣ ﻲﻓ ﻞﻠﺧ ﺩﻮﺟﻭ ﺔﻟﺎﺣ ﻲﻓ
24 ﻝﻼﺧ ،ﺮﻴﻳﺎﻌﳌﺍ ﻊﻣ ﻖﻓﺍﻮﺘﻟﺍ ﻡﺪﻋ ﻭﺃ ﺔﻋﺎﻨﺼﻟﺍ ﻭﺃ ﺩﺍﻮﳌﺍ ﻲﻓ ﺐﻴﻋ
ﻝﺍﺪﺒﺘﺳﺍ BLACK+DECKER ﻦﻤﻀﺗ ،ﺀﺍﺮﺸﻟﺍ ﺦﻳﺭﺎﺗ ﻦﻣ ﹰﺍﺮﻬﺷ
ﻰﻠﺒﻟﺍﻭ ﻞﻛﺂﺘﻟﺍ ﺓﺎﻋﺍﺮﻣ ﻊﻣ ﺕﺎﺠﺘﻨﳌﺍ ﺡﻼﺻﺇﻭ ﺔﺒﻴﻌﳌﺍ ﺀﺍﺰﺟﻷﺍ
ﻞﻴﻤﻌﻠﻟ ﺝﺎﻋﺯﺇ ﻞﻗﺃ ﻥﺎﻤﻀﻟ ﺕﺎﺠﺘﻨﳌﺍ ﻩﺬﻫ ﻝﺍﺪﺒﺘﺳﺍ ﻭﺃ ﻲﻌﻴﺒﻄﻟﺍ
:ﻢﻟ ﺎﻣ
ﺽﺍﺮﻏﺃ ﻭﺃ ﺔﻴﻨﻬﻣ ﻭﺃ ﺔﻳﺭﺎﲡ ﺽﺍﺮﻏﺃ ﻲﻓ ﺞﺘﻨﳌﺍ ﻡﺍﺪﺨﺘﺳﺍ ﻢﺘﻳ
؛ﺮﻴﺟﺄﺗ
؛ﻝﺎﻤﻫﻹﺍ ﻭﺃ ﻡﺍﺪﺨﺘﺳﻻﺍ ﺀﻮﺴﻟ ﺞﺘﻨﳌﺍ ﺽﺮﻌﺗ
ﻭﺃ ﺔﺒﻳﺮﻏ ﺩﺍﻮﻣ ﻭﺃ ﺀﺎﻴﺷﺃ ﺔﻄﺳﺍﻮﺑ ﻒﻠﺘﻠﻟ ﺞﺘﻨﳌﺍ ﺽﺮﻌﺗ
؛ﺙﺩﺍﻮﺣ
ﺀﻼﻛﻭ ﺮﻴﻏ ﺹﺎﺨﺷﺃ ﺔﻄﺳﺍﻮﺑ ﺞﺘﻨﳌﺍ ﺡﻼﺻﺇ ﺔﻟﻭﺎﺤﻣ
ﺔﻛﺮﺸﻟ ﻊﺑﺎﺘﻟﺍ ﺔﻧﺎﻴﺼﻟﺍ ﻖﻳﺮﻓ ﻭﺃ ﻦﻳﺪﻤﺘﻌﳌﺍ ﺔﻧﺎﻴﺼﻟﺍ
.BLACK+DECKER
ﻊﺋﺎﺒﻠﻟ ﺀﺍﺮﺸﻟﺍ ﻞﻴﻟﺩ ﱘﺪﻘﺗ ﻰﻟﺇ ﺝﺎﺘﲢ ﻑﻮﺳ ،ﻥﺎﻤﻀﻟﺎﺑ ﺔﺒﻟﺎﻄﻤﻠﻟ
ﻞﻴﻛﻭ ﺏﺮﻗﺃ ﻊﻗﻮﻣ ﻰﻠﻋ ﻑﺮﻌﺘﻟﺍ ﻚﻨﻜﳝ .ﺪﻤﺘﻌﳌﺍ ﺔﻧﺎﻴﺼﻟﺍ ﻞﻴﻛﻭ ﻭﺃ
ﺐﺘﻜﻣ ﻰﻠﻋ ﻝﺎﺼﺗﻻﺍ ﻝﻼﺧ ﻦﻣ ﺪﻤﺘﻌﻣ ﺔﻧﺎﻴﺻ
ﺍﺬﻫ ﻲﻓ ﺢﺿﻮﳌﺍ ﻥﺍﻮﻨﻌﻟﺍ ﻲﻓ ﻚﻳﺪﻟ ﻲﻠﶈﺍ BLACK+DECKER
.ﻞﻴﻟﺪﻟﺍ
ﲔﻌﺑﺎﺘﻟﺍ ﻦﻳﺪﻤﺘﻌﳌﺍ ﺔﻧﺎﻴﺼﻟﺍ ﺀﻼﻛﻮﺑ ﺔﻤﺋﺎﻗ ﺪﺟﻮﺗ ،ﺮﺧﺁ ﻞﻳﺪﺒﻛﻭ
ﺎﻣ ﺕﺎﻣﺪﳋ ﺔﻠﻣﺎﻜﻟﺍ ﻞﻴﺻﺎﻔﺘﻟﺍﻭ BLACK+DECKER ﺔﻛﺮﺸﻟ
:ﻰﻠﻋ ﺖﻧﺮﺘﻧﻹﺍ ﻰﻠﻋ ﺎﻨﺑ ﺔﺻﺎﳋﺍ ﻝﺎﺼﺗﻻﺍ ﻞﺋﺎﺳﻭﻭ ﻊﻴﺒﻟﺍ ﺪﻌﺑ
.www.2helpU.com
ﺶﺗﺇ ﻲﺑ ﻡﺃ ﻲﺟ (ﺮﺤﺒﻟﺍ ﺀﺍ ﺭﻭ ﺎﳌ) ﺮﻜﻳﺩ ﺪﻧﺃ ﻙﻼﺑ
ﺓﺪﺤﺘﳌﺍ ﺔﻴﺑﺮﻌﻟﺍ ﺕﺍﺭﺎﻣﻹﺍ ،ﻲﺑﺩ ١٧١٦٤ ﺏ ﺹ

16
ﺔـﻴـﺑﺮـﻌـﻟﺍ (ﺔﻴﺴﻴﺋﺮﻟﺍ ﺕﺎﻤﻴﻠﻌﺘﻟﺍ)
í°TôŸG ∫GóÑà°SG äɪ«∏©J
áÄe çÓK πc ∞¶æoj ¿CG HEPA í°Tôe êÉàëj ,§°SƒàŸG ‘ .1
∞∏àî«°S .áYÉ°S Úà°Sh áÄeh ÚØdCG πc ∫óÑà°ùojh áYÉ°S Úà°Sh
.ΩGóîà°S’Gh AGƒ¡dG IOƒL Ö°ùM í°TôŸG ôªY
´höûdG πÑb QÉ«àdG Qó°üe øe ¬∏°üaGh AGƒ¡dG »≤æe 𫨰ûJ ∞bhCG .2
.í°TôŸG ∫GóÑà°SG ‘
í°Tôe ∫RCG ºK AÉ£¨dG íàØd í°TôŸG AÉ£Z ¿É°ùd ≈∏Y §¨°VG .3
.HEPA
í°Tôe ÖcQ ºK .¬Ø«¶æJ ∫hÉ– ’h HEPA í°Tôe øe ¢ü∏îJ .4
∫É©ØdG »°SÉ°SC’G í°TôŸG ¿CG ócCÉJh ,Gkó«L ¬fɵe ójó÷G HEPA
.êQÉÿG ¤EG ¬Lƒe
.¬fɵe ¤EG GkOó› í°TôŸG AÉ£Z ™LQCG .5
:ôjò–
»Ø∏ÿG ÖfÉ÷G ‘ AÉ£¨dG ¢UôëH íàaG ,QÉѨdG ô©°ûà°ùe ∞«¶æàd •
.IóMƒ∏d
.¢UôëH ô©°ûà°ùŸG í°ùŸ ø£b á©£b hCG áaÉL ¢Tɪb á©£b Ωóîà°SG •
.ô©°ûà°ùŸG ∞∏J Öæéàd ∞«¶æàdG AÉæKCG §¨°V …CG ¢SQÉ“ ’
E11
E1
E5
E0
E2
CÉ£ÿG õeQ Ò°ùØJ
Iôe ¬∏«¨°ûJh RÉ¡÷G π«°UƒJ óYCG , ≥FÉbO 10 ó©H .óFGõdG Úî°ùàdG ó°V ájɪM â– hCG áYöùdG êQÉN RÉ¡÷G Gòg
.iôNCG
.ìÓ°UE’Gh ¢üëØ∏d ∂jöûdG hCG óªà©ŸG áeóÿG õcôà ∫É°üJ’G ≈Lôj , πª©j ’ ∑ôëŸG
.𫨰ûàdG ™°Vh ¤EG RÉ¡÷G Oƒ©«°Sh , ™«ªéàdG IOÉYEG ≈Lôj , í«ë°U πµ°ûH í°TôŸG AÉ£Z ™«ªŒ ºàj ⁄
.𫨰ûàdG ™°Vh ¤EG RÉ¡÷G Oƒ©«°Sh , ™«ªéàdG IOÉYEG ≈Lôj , í«ë°U πµ°ûH Î∏ØdG ™«ªŒ ºàj ⁄
.ìÓ°UE’Gh ¢üëØ∏d ∂jöûdG hCG óªà©ŸG áeóÿG õcôà ∫É°üJ’G ≈Lôj , á∏°üdG äGP IôFGódG hCG QÉѨdG ô©°ûà°ùe ∞∏àj ób
É¡MÓ°UEGh ∫É£YC’G ±É°ûµà°SG
.πª©j ’ RÉ¡÷G
¢†ØîfG hCG AGƒg ≥aóJ óLƒj ’
.QÉ«àdG Qó°üà π°üàe RÉ¡÷G ¿Éc ¿EG ≥≤–
.𫨰ûàdG ó«b RÉ¡÷G ¿Éc ¿EG ≥≤–
.ΩɵMEÉH ≥∏¨e í°TôŸG AÉ£Z ¿CGh í«ë°U πµ°ûH ÉkÑcôe í°TôŸG ¿Éc GPEG ɇ ≥≤–
.(GkóL ï°ùàe) ôeC’G Ωõd GPEG ¬dGóÑà°SG hCG √ójó– AɨdEÉH ºbh Î∏ØdG ádÉM øe ≥≤–
.í°TôŸG AGƒ¡dG êôflh AGƒ¡dG πNóe ó°ùj A»°T OƒLh ΩóY øe ócCÉà∏d ≥≤–
…QhO πµ°ûH ¬dGóÑà°SG ºàj ⁄ GPEG HEPA í°Tôe ∫óÑà°SG
.í°TôŸG øe πjRoCG ób »µ«à°SÓÑdG ¢ù«µdG ¿CG ócCÉJ

ﺔـﻴـﺑﺮـﻌـﻟﺍ
(ﺔﻴﺴﻴﺋﺮﻟﺍ ﺕﺎﻤﻴﻠﻌﺘﻟﺍ)
17
𫨰ûàdG πÑb Ée äɪ«∏©J
.¢UôëH ∂à°UÉN AGƒ¡dG »≤æe äÉjƒàfi ÆôaCG .1
πNóe óæY ≥FGƒY …CG óLƒJ ’ å«M ÉkàHÉK Ékjƒà°ùe Ékfɵe OóM .2
.í°TôŸG AGƒ¡dG êôfl hCG AGƒ¡dG
∞∏î∏d í°TôŸG AÉ£Z Öë°SG ºK ,í°TôŸG AÉ£Z ¿É°ùd ≈∏Y §¨°VG .3
.¬àdGRE’
.¢UôëH Ú∏«ãjEG ‹ƒÑdG ¢ù«c ÆôaCG ºK HEPA í°Tôe π°üaG .4
»°SÉ°SC’G í°TôŸG ¿CG ócCÉJh ,¬fɵe ¤EG HEPA í°Tôe ™LQCG .5
.êQÉÿG ¤EG ¬Lƒe ∫É©ØdG
.¬fɵe ¤EG GkOó› í°TôŸG AÉ£Z ™LQCG .6
𫨰ûàdG äɪ«∏©J
:º¡e
.ΩGóîà°S’G πÑb äÉë°TôŸG øe Ú∏«ãjEG ‹ƒÑdG ¢SÉ«cCG πc ∫RCG •
á«dÉN áMÉ°ùe ∑Éæg ¿ƒµJ å«ëH ¿Éµe ‘ ÉkªFGO IóMƒdG ™°V •
.AGƒ¡dG ¢UÉ°üàeG OGó°ùfG Öæéàd IóMƒdG ∫ƒM á«aÉc
π«¡°ùàd (ájƒ∏©dG áµÑ°ûdG) í°TôŸG AGƒ¡dG êôfl OGó°ùfG ÖæŒ •
.áaô¨dG ‘ í°TôŸG AGƒ¡dG ¿GQhO
:∂à°UÉN AGƒ¡dG »≤æe 𫨰ûàd
ób ,õJôg 60~50/240~âdƒa 220 »FÉHô¡c êôîà ¬∏°UhCG .1
.ÚJôe "»H -»H" ÒØ°U 䃰U ™ª°ùoj
ÒØ°U ´Éª°S øµÁh ,ON/OFF QR ≈∏Y QGôªà°S’G ™e §¨°VG .2
Aƒ°†dG á≤∏M Òæà°Sh ,¬H ¢UÉÿG LED ìÉÑ°üe A»°†«°Sh "»H"
á°TÉ°ûdG ô¡¶oà°Sh ‹É◊G …QÉ÷G AGƒ¡dG IOƒ÷ Ék≤ah ∞∏àfl ¿ƒ∏H
.PM2.5 ᪫b
OGóYE’G) á«°VGÎa’G áYöù∏d Ék≤ah πª©dG ‘ AGƒ¡dG »≤æe CGóÑj .3
§¨°†dG ∂æµÁ ,iôNCG äGOGóYEG QÉ«àNÉH ÖYôJ âæc GPEG .(AUTO
.áHƒ∏£ŸG áYöùdG OGóYEG ójóëàd "SPEED/AUTO" QR ≈∏Y
Speed πª°ûJ ,É¡æe QÉ«àN’G øµÁ áYöù∏d äGOGóYEG ¢ùªN óLƒJ
,QÉ«àN’G ó©H AUTOh Speed 4h Speed 3h Speed 2h 1
.É¡H ¢UÉÿG LED ìÉÑ°üe A»°†«°S
OGóYEG ójó–h AGƒ¡dG »≤æe 𫨰ûJ ó©H âbDƒŸG §«°ûæJ ∂æµÁ .4
:‹ÉàdG ƒëædG ≈∏Y á«∏ª©dG ´ÉÑJG ≥jôW øY áHƒ∏£ŸG áYöùdG
´Éª°S øµª«°Sh ,ºµëàdG áMƒd ‘ "TIMER" QR ≈∏Y §¨°VG
,É¡æ«H QÉ«àN’G øµÁ äGOGóYEG ™HQCG óLƒJ ."»H" ÒØ°U 䃰U
,܃∏£ŸG âbƒdG ójó– ó©H .8H h 6H h 4H h 2H πª°ûJ
∞bƒà«°S ,âbƒdG AÉ°†≤fG óæY .¬H ¢UÉÿG LED ìÉÑ°üe A»°†«°S
.LED ìÉÑ°üe Åأ櫰Sh Ék«FÉ≤∏J πª©dG øY AGƒ¡dG »≤æe
"SLEEP/LOCK" QR ≈∏Y §¨°VG ,"¿ƒµ°ùdG" ™°Vh §«°ûæàd .5
A»°†à°Sh ,"¿ƒµ°ùdG" ™°Vh ‘ RÉ¡÷G πNój ≈àM IóMGh Iôe
.¢Vô©dG á°TÉ°T ‘ "Sleep" ™°VƒdÉH á°UÉÿG áfƒ≤jC’G
QR ≈∏Y §¨°VG ,"∫ÉØWC’G åÑY ó°V πØb" ™°Vh §«°ûæàd .6
‘ RÉ¡÷G πNój ≈àM m
¿GƒK çÓK IóŸ "SLEEP/LOCK"
∫ÉØWC’G åÑY ó°V πØb\`H á°UÉÿG áfƒ≤jC’G A»°†à°Sh ,πØ≤dG ádÉM
.¢Vô©dG á°TÉ°T ‘ "Child lock"
QR ≈∏Y §¨°VG ,"á«∏«∏dG IAÉ°VE’G" ™°Vh ‘ RÉ¡÷G ∫ÉNOE’ .7
¢Vô©dG á°TÉ°T ÅØ£æà°Sh ,IóMGh Iôe "NIGHT LIGHT"
."-" á°TÉ°ûdG øe §°ShC’G Aõ÷G ô¡¶o«°Sh Aƒ°†dG á≤∏Mh
QR ≈∏Y §¨°VG ,í°TôŸG AGƒ¡dG ‘ áÑdÉ°ùdG äÉfƒjC’G ¥ÓWE’ .8
AGƒ¡dG ‘ áÑdÉ°ùdG äÉfƒjC’G ≥∏£æà°Sh ,IóMGh Iôe "IONIZER"
A»°†à°Sh ,AGƒ¡dG á«≤æJ á«∏ªY ‘ IóYÉ°ùª∏d êQÉÿG í°TôŸG
.¢Vô©dG á°TÉ°T ‘ É¡H á°UÉÿG
§¨°VG ,º«≤©à∏d "á«é°ùØæÑdG ¥ƒa á©°TC’G ìÉÑ°üe" áØ«Xh §«°ûæàd .9
¥ƒa á©°TC’G ìÉÑ°üe 𫨰ûàd ºµëàdG áMƒd ‘ "UV" QR ≈∏Y
.á°TÉ°ûdG ‘ á°Vhô©ŸG "UV" áfƒ≤jCG A»°†à°Sh á«é°ùØæÑdG
Òcòàd ¥QRC’G ¿ƒ∏dÉH ¢Vô©dG á°TÉ°T ‘ "UV" áfƒ≤jCG A»°†à°S
ádÉM ‘ á«é°ùØæÑdG ¥ƒa á©°TC’G ìÉÑ°üe ∫GóÑà°SÉH Ωóîà°ùŸG
πµ°ûH áYÉ°S áÄe çÓKh ∞d’BG á©Ñ°S ¤EG π°üJ IóŸ RÉ¡÷G 𫨰ûJ
.»ªcGôJ
QR ≈∏Y §¨°†dG §≤a ∂«∏Y ,AGƒ¡dG »≤æe 𫨰ûJ ±É≤jEG äOQCG GPEG .10
øY AGƒ¡dG »≤æe ∞bƒà«°S ÉgóæYh .IóMGh IôŸ "ON/OFF"
."»H" óMGh ÒØ°U 䃰U ´Éª°S ó©H πª©dG
AÉHô¡µdG ¢ùHÉb ∫GóÑà°SG
:ójóL AÉHô¡c ¢ùHÉb Ö«côJ ¤EG áLÉ◊G ádÉM ‘
.áæeBG á≤jô£H Ëó≤dG ¢ùHÉ≤dG øe ¢ü∏îJ •
.ójó÷G ¢ùHÉ≤dG ‘ »◊G ±ô£dÉH »æÑdG ∂∏°ùdG π°UhCG •
.ójÉëŸG ±ô£dÉH ¥QRC’G π«°UƒàdG ∂∏°S π°UhCG •
/ö†NC’G ∂∏°ùdG π°UhCÉa ,(¢VQDƒe) 1 áÄØdG øe èàæŸG ¿Éc GPEG •
.»°VQC’G ±ô£dÉH ôØ°UC’G
‘ §≤a ¿Éµ∏°S) kÉLhOõe k’õY ádhõ©ŸG 2 áÄØdG øe èàæŸG ¿Éc GPEG !ôjò–
.»°VQC’G ±ô£dÉH π«°Uƒà∏d òFóæY áLÉM Óa ,(πHɵdG
.IOƒ÷G á«dÉY ¢ùHGƒ≤dG ™e á≤aôŸG Ö«cÎdG äɪ«∏©J ™ÑJG
»∏°UC’G ô¡°üŸG ∞«æ°üJ ¢ùØf ≈∏Y ∫óÑà°ùŸG ô¡°üŸG ¿ƒµj ¿CG Öéj
.èàæŸG ™e ≥aôŸG
áfÉ«°üdGh ∞«¶æàdG
.¬Ø«¶æJ πÑb QÉ«àdG øY ¬∏°üaGh AGƒ¡dG »≤æe 𫨰ûJ ∞bhCG .1
¢Tɪb á©£b ᣰSGƒH AGƒ¡dG »≤æŸ »LQÉÿG Aõ÷G ∞«¶æJ øµÁ .2
.á∏∏Ñeh áØ«¶fh áªYÉf
í°TôŸG AÉ£Zh í°TôŸG AGƒ¡dG êôfl øe QÉѨdG ∞«¶æJ øµÁ .3
.IÒ¨°U áªYÉf IÉ°TôØH
ΩGóîà°SG AÉLôH ,πNGódG øe AGƒ¡dG »≤æe ∞«¶æàH ÖZôJ âæc GPEG .4
.¬ë°ùŸ áaÉL áªYÉf ¢Tɪb á©£b
.HEPA í°Tôe π°ù¨J ’ .5
.AGƒ¡dG »≤æŸ »°ù«FôdG πµ«¡dG ¤EG π°üJ áHƒWôdG ´óJ ’ :ôjò–

18
ﺔـﻴـﺑﺮـﻌـﻟﺍ (ﺔﻴﺴﻴﺋﺮﻟﺍ ﺕﺎﻤﻴﻠﻌﺘﻟﺍ)
UV LAMP
ai
h
g
f
b
c
d
e
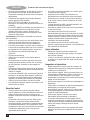
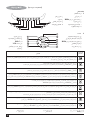
¢üFÉ°üÿG
ºµëàdG áMƒd .1
‹hCG í°Tôe .CG
HEPA í°Tôe Ú«©J IOÉYEG .Ü
AGƒ¡dG øjDƒe .ê
á«é°ùØæÑdG ¥ƒa á©°TC’G .O
á«∏«∏dG IAÉ°VE’G .`g
j
k
n
l
m
o
p
r
q
t
s
á°TÉ°ûdG .2
á«∏«∏dG IAÉ°VE’G ™°Vh (…
‹hC’G í°TôŸG §Ñ°V IOÉYEG (∑
HEPA í°Tôe §Ñ°V IOÉYEG ÒcòJ (∫
»FÉ≤∏àdG ™°VƒdG (Ω
áMhôŸG áYöS (¿
AGƒ¡dG øjDƒe (¢S
á«é°ùØæÑdG ¥ƒa á©°TC’G (´
PM2.5. (±
LCD á°TÉ°T (¢U
∫ÉØWC’G åÑY ó°V πØb (¥
âbDƒŸG (Q
πØb /¿ƒµ°S .h
âbDƒŸG .R
»FÉ≤∏J /áYöùdG .ì
±É≤jE’G/𫨰ûàdG .•
/á°TÉ°ûdG
ºµëàdG
𫨰ûàdG
PM2.5 öTDƒe
»FÉ≤∏J /áYöùdG
âbDƒŸG
πØb /¿ƒµ°S
á«∏«∏dG IAÉ°VE’G
§Ñ°V IOÉYEG ÒcòJ
í°TôŸG
‹hCG í°Tôe
Ió«L AGƒ¡dG IOƒL ¿CG ¤EG IQÉ°TEG ‘ ,¥QRC’G ¿ƒ∏dÉH Aƒ°†dG á≤∏M ÒæJ ±ƒ°S ,ÚKÓKh á°ùªN øe πbCG PM2.5 ᪫b ¿ƒµJ ÉeóæY .…QÉ÷G AGƒ¡dG IOƒL ¤EG IQÉ°TEÓd á°TÉ°ûdG ∫ƒM ÒæJ Aƒ°V á≤∏M óLƒJ
,öûY á°ùªNh áÄe ¥ƒa PM2.5 ᪫b ™ØJôJ ÉeóæY .Ió«L AGƒ¡dG IOƒL ¿CG ¤EG IQÉ°TEG ‘ ,ÊGƒLQC’G ¿ƒ∏dÉH Aƒ°†dG á≤∏M ÒæJ Aƒ°S ,öûY á°ùªNh áÄeh ÚKÓKh áà°S ÚH PM2.5 ᪫b ìhGÎJ ÉeóæY .ájɨ∏d
.áÄ«°S AGƒ¡dG IOƒL ¿CG ¤EG IQÉ°TEG ‘ ,ôªMC’G ¿ƒ∏dÉH Aƒ°†dG á≤∏M ÒæJ Aƒ°S
AUTOh Speed 4h Speed 3h Speed 2h Speed 1 ,É¡æe QÉ«àN’G øµÁ áYöù∏d äGOGóYEG ¢ùªN óLƒJ
.IOóëŸG áYöùdG ¤EG IQÉ°TEÓd ¢Vô©dG ¢Uôb ‘ IQÉàîŸG áfƒ≤jC’G ÒæJ ±ƒ°Sh áHƒ∏£ŸG áYöùdG ójóëàd ºµëàdG áMƒd ‘ "SPEED/AUTO" QR ≈∏Y §¨°VG
.8H h 6H h 4H h 2H ,É¡æ«H QÉ«àN’G øµÁ âbƒ∏d äGOGóYEG ™HQCG óLƒJ
.QÉàîŸG âbƒdG ¤EG IQÉ°TEÓd ¢Vô©dG ¢Uôb ‘ IQÉàîŸG áfƒ≤jC’G ÒæJ ±ƒ°Sh ܃∏£ŸG âbƒdG ójóëàd ºµëàdG áMƒd ‘ "TIMER" QR ≈∏Y §¨°VG
."-" á°TÉ°ûdG øe §°ShC’G Aõ÷G ô¡¶oj ±ƒ°Sh ,"á«∏«∏dG IAÉ°VE’G" ™°Vh §«°ûæJ ádÉM ‘ Aƒ°†dG á≤∏Mh ¢Vô©dG ¢Uôb ÅØ£æj ±ƒ°S
."NIGHT LIGHT" á«∏«∏dG IAÉ°VE’G ™°Vh §«°ûæàd ºµëàdG áMƒd ‘ "NIGHT LIGHT" QR ≈∏Y §¨°VG
.¢Vô©dG ¢Uôb ‘ "IONIZER" áfƒ≤jCG ÒæJ ±ƒ°Sh ,AGƒ¡dG á«≤æJ á∏«ªY ‘ IóYÉ°ùª∏d êQÉÿG í°TôŸG AGƒ¡dG ‘ áÑdÉ°S äÉfƒjCG ,É¡∏«¨°ûJ óæY ,≥∏£J »àdGh ,á∏≤à°ùe AGƒg øjDƒe áØ«Xh ≈∏Y RÉ¡÷G …ƒàëj
"UV" QõdG ≈∏Y §¨°VG .»é°ùØæÑdG ¥ƒa ∞«£∏d á«dÉ©dG ábÉ£dG ᣰSGƒH á≤«bódG á«◊G äÉæFɵdG á«æH ÒeóJ øµÁh º«KGôé∏d …ƒb ÒKCÉJ ¬d ¿ƒµj å«ëH , (UV-C åYÉH) UV ìÉÑ°üà RÉ¡÷G Gòg õ«¡Œ ”
.πHÉ≤ŸG "UV" õeQ A»°†«°Sh á«é°ùØæÑdG ¥ƒa á©°TC’G ìÉÑ°üe 𫨰ûàd ºµëàdG áMƒd ≈∏Y
.áYÉ°S 7300 IóŸ »ªcGôJ πµ°ûH RÉ¡÷G 𫨰ûJ ” GPEG , á«é°ùØæÑdG ¥ƒa á©°TC’G ìÉÑ°üe ∫GóÑà°SÉH Ωóîà°ùŸG Òcòàd É k
°üdÉN ¥QRCG Ékfƒd "UV" áfƒ≤jCG ¢Vô©à°S
.»ªcGôJ πµ°ûH áYÉ°S Úà°Sh áÄeh ÚØdCG ‹Gƒ◊ RÉ¡÷G 𫨰ûJ ádÉM ‘ ∂dPh ,HEPA í°Tôe ∫GóÑà°SÉH Ωóîà°ùŸG Òcòàd ôªMC’G ¿ƒ∏dÉH "FILTER RE-SET" áfƒ≤jCG ô¡¶J ±ƒ°S
.¢Vô©dG ¢Uôb øe "FILTER RE-SET" áfƒ≤jCG »Øàîà°S ºK ,Ú«©àdG IOÉYE’ m
¿GƒK çÓK IóŸ "FILTER RE-SET" QR ≈∏Y QGôªà°S’G ™e §¨°VG ,í°TôŸG ∫GóÑà°SG ó©H
.»ªcGôJ πµ°ûH áYÉ°S Úà°Sh áÄe çÓK ‹Gƒ◊ RÉ¡÷G 𫨰ûJ ádÉM ‘ ∂dPh ,¿ƒ∏jÉædG í°Tôe ∫GóÑà°SÉH Ωóîà°ùŸG Òcòàd ôªMC’G ¿ƒ∏dÉH "PRE-FILTER" áfƒ≤jCG A»°†J ±ƒ°S
.¢Vô©dG ¢Uôb øe "PRE-FILTER" áfƒ≤jCG »Øàîà°S ºK ,Ú«©àdG IOÉYE’ m
¿GƒK çÓK IóŸ "PRE-FILTER" QR ≈∏Y QGôªà°S’G ™e §¨°VG ,í°TôŸG ∫GóÑà°SG ó©H
.¢Vô©dG ¢Uôb ‘ "SLEEP" ™°VƒdG áfƒ≤jCG A»°†à°Sh "¿ƒµ°S" ™°Vh §«°ûæàd ºµëàdG áMƒd ≈∏Y OƒLƒŸG "SLEEP/LOCK" QõdG ≈∏Y §¨°VG .áFOÉg Ωƒf áÄ«ÑH ™àªàdG øe Ωóîà°ùŸG øµªàj å«ëH ,"¿ƒµ°S" ™°VƒdG §°ûof GPEG "¿ƒµ°S" ™°VƒdG ‘ RÉ¡÷G πª©j ±ƒ°S
.¢Vô©dG ¢Uôb ‘ "∫ÉØWC’G åÑY ó°V πØb" ≈∏Y ádGódG áfƒ≤jC’G A»°†à°Sh "CHILD LOCK" ádÉM §«°ûæàd m
¿GƒK çÓK IóŸ ºµëàdG áMƒd ‘ "SLEEP/LOCK" QR ≈∏Y QGôªà°S’G ™e §¨°VG .πª©dG øY §HGƒ¶dG ™«ªL ∞bƒàà°ùa "CHILD LOCK" áØ«Xh ≈∏Y §¨°†dG ádÉM ‘
»Ø∏ÿG ô©°ûà°ùŸG .5 í°TôŸG AGƒ¡dG êôfl .4 (¥QRCG ,ÊGƒLQCG ,ôªMCG) Aƒ°†dG ¢Uôb .3
AGƒ¡dG πNóe .8 »Ø∏ÿG AÉ£¨dG .7 HEPA í°Tôe .6

ﺔـﻴـﺑﺮـﻌـﻟﺍ
(ﺔﻴﺴﻴﺋﺮﻟﺍ ﺕﺎﻤﻴﻠﻌﺘﻟﺍ)
º≤J ’ ,ôgÉ°üŸG ¥GÎMGh ¢ùÑ≤ŸG ≈∏Y π«ªëàdG IOÉjR …OÉØàd •
(¢ùÑ≤ŸG) QÉ«àdG òNCÉe ¢ùØf ‘ iôNCG Iõ¡LCG π«°UƒàH
.OÉé°ùdG πØ°SCG πHɵdG ™°†J ’h ,OÉé°ùdG ≈∏Y AGƒ¡dG »≤æe ™°†J ’ •
.∑Ì©J ‘ ÖÑ°ùàj ’ å«ëH Ò°ùdG ≥WÉæe øY Gkó«©H ∂∏°ùdG ™°V
ôNBG èàæe …CG hCG AÉHô¡µdG ¢ùÑ≤e πØ°SCG Ö«WÎdG RÉ¡L ™°†J ’ •
.áHƒWôdÉH ôKCÉàj ’ ≈àM
≈àM ôNBG èàæe …CG hCG AÉHô¡µdG ¢ùÑ≤e πØ°SCG AGƒ¡dG »≤æe ™°†J ’ •
.áHƒWôdÉH ôKCÉàj ’
πãe ,Aɪ∏d ¬°Vô©j ób ¿Éµe ‘ Ék≤∏£e AGƒ¡dG »≤æe Ωóîà°ùJ ’ •
AGƒ¡dG »≤æe Ωóîà°ùJ ’ .ïÑ£ŸG hCG ,Ωɪëà°S’G áaôZ hCG ,Ωɪ◊G
ΩɪM hCG ,Ωɪëà°S’G áaôZ hCG ,Ωɪ◊ÉH ᣫëŸG øcÉeC’G ‘
.áMÉÑ°ùdG
.AGƒ¡dG »≤æe á«£¨àH º≤J ’ ,IóFGõdG áfƒî°ùdG Öæéàd !ôjò–
,èàæŸG í«JÉØe §Ñ°V hCG 𫨰ûJ πÑb ∂jój ±ÉØL øe ÉkªFGO ócCÉJ •
.á«°ù«FôdG OGóeE’G äÓ°Uhh ¢ùHÉ≤dG á°ùeÓe πÑb hCG
¬LQÉflh AGƒ¡dG πNGóe Öé– ’ ,≥jôM ܃°ûf á«dɪàMG …OÉØàd •
πª©j ¿CG øµÁ å«M ,ôjöùdÉc ,áªYÉf É k룰SCG Ωóîà°ùJ ’ .Ék≤∏£e
.äÉëàØdG ó°S ≈∏Y ∂dP
.á«aÉ°VEG πHÉc á∏°Uh ΩGóîà°SG ô¶ëoj •
.mƒà°ùe »≤aCG í£°S ≈∏Y Ö«WÎdG RÉ¡L 𫨰ûJ ≈∏Y ÉkehO ¢UôMG •
∫ƒNO äÉëàa øe áëàa …CG ‘ áÑjôZ ΩÉ°ùLCG …CG ∫ÉNOEG ÖæŒ •
hCG ,á«FÉHô¡c áeó°U çhóM ‘ ∂dP ÖÑ°ùàj ó≤a ;¬LhôNh AGƒ¡dG
.RÉ¡÷G ∞∏J hCG ,≥jôM ܃°ûf
øjõîJ hCG ΩGóîà°SG ºàj »àdG ≥WÉæŸG ‘ RÉ¡÷G 𫨰ûàH º≤J ’ •
.É¡H ∫É©à°TÓd á∏HÉb iôNCG πFGƒ°S …CG hCG ,AÓ£dG OGƒe hCG ,øjõæÑdG
ÌcC’G ÖÑ°ùdG ó©j RÉ¡÷G ‘ ôHƒdG hCG QÉѨdG øe Ö°SGhQ øjƒµJ ¿EG •
Ö°SGhôdG √òg ádGREG øe ócCÉJ Gòd .IQGô◊G áLQO IOÉjõd ÉkYƒ«°T
äɵѰTh äÉëàa ∞«¶æJh RÉ¡÷G π°üa ∫ÓN øe ΩɶàfÉH
.á«FÉHô¡µdG á°ù浟ÉH ájƒ¡àdG
.…OƒªY m™°Vh ‘ Ö«WÎdG RÉ¡L ÉkªFGO Ωóîà°SG •
ÉÃQ ôNBG èàæe …CG hCG AÉHô¡µdG ¢ùÑ≤e πØ°SCG »≤æe RÉ¡L ™°†J ’ •
.áHƒWôdÉH ôKCÉàj
´õfG ºK ,"𫨰ûàdG ±É≤jEG" QõdG ≈∏Y §¨°†dÉH ºb ,RÉ¡÷G π°üØd •
.»FÉHô¡µdG QÉ«àdG òNCÉe øe ¢ùHÉ≤dG
øjôNB’G áeÓ°S
ôWÉfl ‘ ÖÑ°ùàJ óbh ºé◊G IÒ¨°U RÉ¡÷G AGõLCG ¢†©H ó©oJ •
™°Vh ¤EG Gƒ∏«Á ¢UÉî°TCG …CG hCG ∫ÉØWC’G É¡©∏àHG GPEG ¥ÉæàN’G
.º¡gGƒaCG ‘ πcCÓd á◊É°U ÒZ AÉ«°TCG
äGQó≤dG hhP ¢UÉî°TC’G ¬eóîà°ù«d ºª°üe ÒZ RÉ¡÷G Gòg •
áaô©ŸGh IÈÿGh áæjóàŸG á«∏≤©dGh á«°ù◊Gh á«ægòdGh ájó°ù÷G
hCG º¡«∏Y ±GöTE’G πX ‘ ’EG ,(∫ÉØWC’G ∂dP ‘ ÉÃ) Úà∏«∏≤dG
¢üî°ûdG πÑb øe RÉ¡÷G ΩGóîà°SÉH á≤∏©àŸG äɪ«∏©àdG º¡FÉ£YEG
.º¡àeÓ°S øY ∫hDƒ°ùŸG
.RÉ¡÷ÉH º¡ãÑY ΩóY ¿Éª°†d ∫ÉØWC’G ≈∏Y ±GöTE’G Öéj •
√òg ≈∏Y ™∏£e ÒZ ¢üî°T …CG hCG ∫ÉØWCÓd ìɪ°ùdG ΩóY Öéj •
.RÉ¡÷G ΩGóîà°SÉH äGOÉ°TQE’G
¬°ùŸh RÉ¡÷G ¿Éµe øe ÜGÎb’ÉH äÉfGƒ«◊G hCG ∫ÉØWCÓd íª°ùJ ’ •
.¬H ¢UÉÿG AÉHô¡µdG πHÉc ¢ùŸ hCG
.∫ÉØWC’G øe Üô≤dÉH RÉ¡÷G ΩGóîà°SG óæY Üôb øY ±GöTE’G Ωõ∏j •
øY Gkó«©H äGƒæ°S 3 øe πbCG ôª©H ºg ø‡ ∫ÉØWC’G AÉ≤HEG Öéj •
.QGôªà°SÉH º¡«∏Y ±GöTE’G ºàj ⁄ Ée RÉ¡÷G
,äGƒæ°S 8h äGƒæ°S 3 ÚH ºgQɪYCG ìhGÎJ øjòdG ∫ÉØWCÓd áÑ°ùædÉH •
hCG ¬©°Vh •öûH RÉ¡÷G 𫨰ûJ ±É≤jEG/𫨰ûJ §≤a º¡«∏Y Öéj
Gƒ©°†îj ¿CGh ,¬d ¢ü°üîŸG …OÉ©dG 𫨰ûàdG ¿Éµe ‘ ¬à«ÑãJ
RÉ¡÷G ΩGóîà°SÉH á≤∏©àŸG äÉeƒ∏©ŸÉH ºgójhõJ ºàj ¿CG hCG ±GöTEÓd
.É¡«∏Y …ƒ£æj »àdG ôWÉîŸÉH º∏Y ≈∏Y Gƒfƒµj ¿CGh áæeBG á≤jô£H
äGƒæ°S 8h äGƒæ°S 3 ÚH ºgQɪYCG ìhGÎJ øjòdG ∫ÉØWC’G ≈∏Y Öéj •
…CG AGôLEG hCG ,¬Ø«¶æJ hCG ,¬£Ñ°V hCG ,AÉHô¡µdÉH RÉ¡÷G π«°UƒJ ΩóY
.¬d áfÉ«°U
ΩGóîà°S’G ó©H
RÉ¡÷G ∑ôJ πÑb AÉHô¡µdG áëàa øe ¢ùHÉ≤dG ´õfGh RÉ¡÷G ÅØWCG •
.¬FGõLCG øe AõL …CG ¢üëa hCG RÉ¡÷G ∞«¶æJ πÑbh
Öéj .±ÉL ¿Éµe ‘ ¬æjõîJ Öéj ,RÉ¡÷G ΩGóîà°SG ΩóY ádÉM ‘ •
.∫ÉØWC’G ∫hÉæàe øY Gkó«©H áfqõîŸG Iõ¡LC’G ™«ªL ßØM
ìÓ°UE’Gh ¢üëØdG
hCG äÉ≤ë∏ŸG Ò«¨J hCG ∞«¶æàdG πÑb RÉ¡÷G 𫨰ûJ ±É≤jEÉH ºb •
.ΩGóîà°S’G AÉæKCG ∑ôëàJ »àdG AGõLC’G øe ÜGÎb’G
hCG áØdÉJ AGõLCG ájCG øY ∞°ûµ∏d RÉ¡÷G ¢üëaG ,ΩGóîà°S’G πÑb •
,QGQRC’G ‘ ∞∏J hCG ,AGõLC’G ‘ Qƒ°ùc OƒLh ΩóY øe ≥≤– .áÑ«©e
.RÉ¡÷G 𫨰ûJ ≈∏Y ôKDƒJ ób ádÉM …CG hCG
.Ö«Y hCG ∞∏J ¬H AõL …CG OƒLh ádÉM ‘ RÉ¡÷G Ωóîà°ùJ ’ •
.áØdÉàdG hCG IQƒ°ùµŸG AGõLC’G ìÓ°UEÉH á°üNôe á¡L Ωƒ≤J ¿CG Öéj •
hCG AGÎgG hCG ∞∏J äÉeÓY OƒLh ΩóY øe ≥≤– ,ΩGóîà°S’G πÑb •
.»FÉHô¡µdG QÉ«àdG ∂∏°S ‘ πcBÉJ
∂∏°ùdG hCG ¢ùHÉ≤dG ‘ ∞∏J hCG Ö«Y OƒLh ádÉM ‘ RÉ¡÷G Ωóîà°ùJ ’ •
.»FÉHô¡µdG
ácöûdG ᣰSGƒH ¬dGóÑà°SG »¨Ñæj ,ábÉ£dG ∂∏°S ∞∏J ádÉM ‘ •
áLQO ¢ùØf ≈∏Y »æa …CG hCG É¡d ™HÉàdG áeóÿG π«ch hCG á©æ°üŸG
.∂°ùØæH ¬MÓ°UEG ∫hÉ– ’ .á浇 ôWÉfl …CG Öæéàd ∂dPh π«gCÉàdG
AGõLC’G ∂∏J ±ÓîH RÉ¡÷G AGõLCG øe …CG ∫GóÑà°SG hCG ádGREG ∫hÉ– ’ •
.π«dódG Gòg ‘ IOóëŸG
19

ΩGóîà°S’G øe ¢Vô¨dG
BLACK+DECKERTM AP3560-B5 AGƒ¡dG »≤æe ºª o
°U
IQÉ°†dG äɪ«°ù÷G ádGREG ∫ÓN øe »∏NGódG AGƒ¡dG IOƒL Ú°ùëàd
.áëjôe á«°û«©e áHôŒh »≤f AGƒg ≈∏Y ∫ƒ°üë∏d
.§≤a »∏NGódG ‹õæŸG ΩGóîà°SÓd ¢ü°üfl RÉ¡÷G Gòg
™àªà°ùJ ¿CG ∂d ≈æªàfh . BLACK+DECKER èàæe ∑QÉ«àN’ kGôµ°T
.IóY äGƒæ°ùd èàæŸG Gòg ΩGóîà°SÉH
:‘ RÉ¡÷G Gòg Ωóîà°ùoj ’ .§≤a »∏NGódG ‹õæŸG ∫ɪ©à°SÓd ¢ü°üfl
πª©dG äÉÄ«Hh ÖJɵŸGh ôLÉàŸG ‘ ∫ɪ©dG ïHÉ£e ≥WÉæe •
;iôNC’G
;á«ØjôdG ∫RÉæŸG •
áeÉbE’G øcÉeCGh IÒ¨°üdG ¥OÉæØdGh ¥OÉæØdG ‘ AÓª©dG πÑpb øe •
;iôNC’G
.iôNCG á«dõæe ÒZ øcÉeCG …CG hCG ,QÉ£aE’Gh ΩƒædG øcÉeCG •
áeÓ°ùdG äɪ«∏©J
!ôjò–
.äɪ«∏©àdG πch ¿ÉeC’G äGôjò– πc CGôbG
πØ°SC’ÉH áæ«ÑŸG äɪ«∏©àdGh äGôjòëàdG ´ÉÑJG ‘ Qƒ°üb …CG
≥jôM ܃°ûf hCG á«FÉHô¡c áeó°U çhóM ¤EG …ODƒj ¿CG øµÁ
.á¨dÉH äÉHÉ°UEG ´ƒbh hCG/h
.¬H πbô©àdG ô£N …OÉØàd ájÉæ©H QÉ«àdG ∂∏°S QÉ°ùe §Ñ°VG •
…CG ∫ɪ©à°SG ¿EG .π«dódG Gòg ‘ í°Vƒe ΩGóîà°S’G øe ¢Vô¨dG ¿EG •
»àdG ÒZ RÉ¡÷G Gò¡H á«∏ªY ájCG AGôLEG hCG äÉ≤aôe hCG äÉ≤ë∏e
.á«°üî°ûdG áHÉ°UE’G ô£N ÖÑ°ùj ób π«dódG Gòg ‘ É¡H ≈°Uƒoj
π¨°ûJ ’ .ó∏÷Gh Úæ«©dG ≈∏Y ô£N á«é°ùØæÑdG ¥ƒa á©°TC’G ¿EG !ôjò–
∫GóÑà°SG πÑb π«dódG CGôbG .RÉ¡÷G êQÉN á«é°ùØæÑdG ¥ƒa á©°TC’G åYÉH
.á«é°ùØæÑdG ¥ƒa á©°TC’G åYÉH
¥ƒa á©°TC’G åYÉH ∫GóÑà°SG πÑb QÉ«àdG Qó°üe øe RÉ¡÷G π°üa Öéj
á«é°ùØæÑdG
¥ƒa á©°TC’G äÉFOÉHh åYGƒH ∫GóÑà°SG πÑb Qò◊G »NƒJ Öéj •
øµeCG ¿EG ,á«é°ùØæÑdG
¤EG â«ÑŸG ∞∏J hCG RÉ¡é∏d Oƒ°ü≤ŸG ÒZ ΩGóîà°S’G …ODƒj ób •
¥ƒa á©°TC’G ÖÑ°ùàJ ób .Iô£ÿG á«é°ùØæÑdG ¥ƒa á©°TC’G ÜöùJ
hCG Úæ«©∏d QöV ‘ ,IÒ¨°U äÉYôéH âfÉc ¿EGh ≈àM ,á«é°ùØæÑdG
.ó∏é∏d
IÉYGôe kɪFGO Ú©àj ,á«FÉHô¡µdG Iõ¡LC’G ΩGóîà°SG óæY !ôjò–
ô£N øe óë∏d ∂dPh ;»∏j Ée ∂dP ‘ Éà ᫰SÉ°SC’G áeÓ°ùdG äÉWÉ«àMG
.…OÉŸG Qö†dG hCG ájó°ù÷G áHÉ°UE’G hCG á«FÉHô¡c áeó°üdG hCG ≥jô◊G
øY …QGô◊G ™WÉ≤dG §Ñ°V IOÉYEG øY áŒÉf ôWÉfl ´ƒbƒd ÉkÑæŒ :¬«ÑæJ
RÉ¡L ᣰSGƒH »FÉHô¡µdG QÉ«àdÉH RÉ¡÷G Gòg óe Öéj Óa ,ó°üb ÒZ
É¡FÉØWEGh É¡∏«¨°ûJ ºàj IôFGóH ¬∏«°UƒJ hCG âbDƒŸG πãe ,»LQÉN π«°UƒJ
.ICÉ°ûæŸG ᣰSGƒH ᪶àæe áØ°üH
.áLÉ◊G óæY ¬«dEG ´ƒLô∏d π«dódG Gò¡H ßØàMG •
AÉHô¡µdG ôWÉfl øe áeÓ°ùdG
™e »FÉHô¡µdG QÉ«àdG Qó°üe ó¡L ≥aGƒJ øe ócCÉàdG ΩGóîà°S’G πÑb »¨Ñæj
.äÉØ°UGƒŸG áMƒd ≈∏Y í°VƒŸG ó¡÷G
¤EG áLÉM ’ ∂dòdh ;É k
LhOõe k’õY ∫hõ©e RÉ¡÷G Gòg
.»°VQCG ∂∏°S π«°UƒJ
hCG ¢ùHÉ≤dG hCG ∂∏°ùdG ôª¨J ’ ,á«FÉHô¡c áeó°üd ¢Vô©àdG ô£N Öæéàd •
.ôNBG πFÉ°S …CG ‘ hCG AÉŸG ‘ RÉ¡÷G
áMƒd ≈∏Y í°VƒŸG »FÉHô¡µdG QÉ«àdG ó¡L ≥aGƒJ øe ócCÉàdG »¨Ñæj •
CÉ£N …CG .∂jód Ωóîà°ùŸG »FÉHô¡µdG ΩɶædG ™e RÉ¡é∏d ∞«æ°üàdG
.¿Éª°†dG »¨∏j π«°UƒàdG ‘
∂H ¢UÉÿG RÉ¡÷G ΩGóîà°SG
RÉ¡÷G 𫨰ûJ AÉæKCG ∫ƒ°UƒdG á∏¡°S í£°SC’G IQGôM áLQO ™ØJôJ ób •
.âbƒdG ¢†©Ñd ¬∏«¨°ûJ ±É≤jEG ó©Hh
.RÉ¡÷G 𫨰ûJ πÑb ájÉæ©H πeɵdÉH π«dódG Gòg CGôbG •
RÉ¡÷G ΩGóîà°SG óæY ÉkªFGO Qò◊G nñƒJ •
øY ¢ùHÉ≤dG π°üØd »FÉHô¡µdG QÉ«àdG ∂∏°S ó°T kÉ≤∏£e ∫hÉ– ’ •
.¢ùÑ≤ŸG
ábÉYEG ‘ ∂dP ÖÑ°ùà«°S å«M .AGƒ¡dG »≤æe ¥ƒa A»°T …CG ™°†J ’ •
.AGOC’G ¢VÉØîfG ¤EG …ODƒj ób Ée ,»≤ædG AGƒ¡dG êhôN
âjõdGh IQGô◊G øY kGó«©H AÉHô¡µdG ∂∏°S ™°Vh ≈∏Y ¢UôMGh •
.IOÉ◊G ±Gƒ◊Gh
πNGO §≤°ùJ ób å«M .AGƒ¡dG »≤æe ¥ƒa IÒ¨°üdG AÉ«°TC’G ™°†J ’ •
Aõ÷G ‘ ∞∏àH ÖÑ°ùàj ób Ée ájƒ∏©dG äÉëàØdG ∫ÓN øe IóMƒdG
.IóMƒdG 𫨰ûJ óæY »∏NGódG
¿ôa ‘ hCG É¡æe Üô≤dÉH hCG IQGô◊G QOÉ°üe ¥ƒa RÉ¡÷G ™°Vh ÖæŒ •
.øNÉ°S
.≥∏£dG AGƒ¡dG ‘ RÉ¡÷G Ωóîà°ùJ ’ •
RÉ¡÷G π°üaG ,ΩGóîà°S’G AÉæKCG »FÉHô¡µdG QÉ«àdG ∂∏°ùd ∞∏J çóM GPEG •
πÑb »FÉHô¡µdG QÉ«àdG ∂∏°S ¢ùª∏J ’ .QƒØdG ≈∏Y AÉHô¡µdG Qó°üe øY
.AÉHô¡µdG Qó°üe øY ¬∏°üa
ΩGóîà°S’G ΩóY AÉæKCG AÉHô¡µdG òØæà RÉ¡÷G π«°UƒJ ΩóY øe ócCÉJ •
.∞«¶æàdG πÑbh ¬FGõLCG ádGREG hCG Ö«côJ πÑbh
.áÑbGôe ¿hO •ÓÿG π¨°ûJ ’ •
.ΩGóîà°S’G AÉæKCG IóMƒdG á©HÉàe Öéj •
.áæNÉ°S kÉ룰SCG ¢ùeÓj hCG Ió°†æŸG áaÉM ¥ƒa ¤óàj ∂∏°ùdG ´óJ ’ •
‘ ÖÑ°ùàj ’ å«ëH ,ábóH ¬¡«LƒJh ÉkeÉ“ AÉHô¡µdG ∂∏°S πëH ºb •
.∂à∏bôY hCG CÉ£ÿG ≥jôW øY ∂Wƒ≤°S
.IöTÉÑe QÉ«àdG ¢ùÑ≤e πØ°SCG AGƒ¡dG »≤æe ™°Vh ΩóY Öéj •
20
ﺔـﻴـﺑﺮـﻌـﻟﺍ (ﺔﻴﺴﻴﺋﺮﻟﺍ ﺕﺎﻤﻴﻠﻌﺘﻟﺍ)
La page est en cours de chargement...
La page est en cours de chargement...
La page est en cours de chargement...
La page est en cours de chargement...
-
 1
1
-
 2
2
-
 3
3
-
 4
4
-
 5
5
-
 6
6
-
 7
7
-
 8
8
-
 9
9
-
 10
10
-
 11
11
-
 12
12
-
 13
13
-
 14
14
-
 15
15
-
 16
16
-
 17
17
-
 18
18
-
 19
19
-
 20
20
-
 21
21
-
 22
22
-
 23
23
-
 24
24


BLACK DECKER AP3560-B5 Air Purifier Manuel utilisateur
- Taper
- Manuel utilisateur
dans d''autres langues
Autres documents
-
 Govee H7121 Smart Air Purifier Manuel utilisateur
-
Danby DAP290BAW Manuel utilisateur
-
-
-
LEVOIT Core 300-RAC Manuel utilisateur
-
LEVOIT P350-RAC Manuel utilisateur
-
Danby DAP152BAW-I Le manuel du propriétaire
-
Blueair ECO10 Mode d'emploi
-
Sharp UA-HD60E Le manuel du propriétaire
-
Samsung RS22HKNPN Manuel utilisateur
