NewAge Products 12069 Manuel utilisateur
- Taper
- Manuel utilisateur

IM-FL2.001A-01
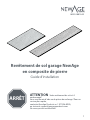
NewAge Stone Composite
Garage Flooring
Installation Guide
STOP
ATTENTION: Is your ooring damaged?
Need help or spare parts? For fastest service,
contact NewAge Products at 1-877-306-8930;
or suppor[email protected].
Do not return to the retailer.

2
Index
General Information - 3
Product Specications - 3
Available Garage Accessories - 4
Tools Needed - 5
Precautions - 6
Acclimation - 6
Expansion gap - 6
Recommended Blades - 6
Recommended Cutting Method - 7
General Suboor Preparation - 8
Concrete suboors - 8
Radiant heating - 9
Baseboard and Quarter Round Preparation - 10
Installation Tips - 11
Getting Started - 12
Flooring installation layout - 12
Installation Options - 13
Installing The Flooring (Tiles / Planks) - 15
Installing The Silver Finishing Strips - 19
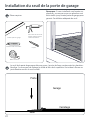
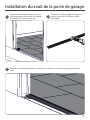
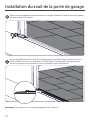
Installing the Garage Door Threshold - 22
Care and Maintenance - 25
Warranty - 26

3
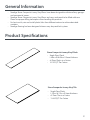
General Information
Product Specications
• NewAge Stone Composite Luxury Vinyl oors have been designed to withstand busy garages
and commercial spaces.
• NewAge Stone Composite Luxury Vinyl oors are heavy and needs to be lifted with care.
Please use proper lifting techniques when handling the products.
• For best results, mix and install planks/tiles from dierent cartons to achieve desirable
variation.
• NewAge ooring has been designed to be an easy drop and lock system.
Stone Composite Luxury Vinyl Plank
• Single Floor Plank:
L 46in x W 8.85in x 9.5mm thickness
• x5 Floor Planks in a Carton
• 14.15 SQFT Per Carton
Stone Composite Luxury Vinyl Tile
• Single Floor Plank:
L 23in x W 12in x 9.5mm thickness
• x7 Floor Tiles in a Carton
• 13.44 SQFT Per Carton

4
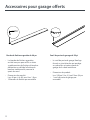
Available Garage Accessories
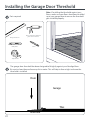
• The NewAge Garage Door Threshold
provides a tight seal that protects your
oors and garage space from outdoor
dirt.
• Product Dimension:
L240in X W 3.5in X H0.6in
• 1 Garage Door Threshold per kit.
46” Silver Finishing Strip
20ft Garage Door Threshold
• The Silver Finishing strips have been
designed to provide a decorative edge
nishing as an alternative to traditional
edge nishing such as a quarter round.
• Product Dimension:
L 46in x W 0.5in x H 1.0in
• 10 Finishing strips per Kit

5
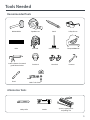
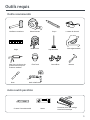
Tools Needed
Ruler
Laser level
Vacuum / Broom
Interior/ Exterior Commercial
grade Silicone Sealant
PencilTape Measure
Safety Glasses
Knee PadsFace Mask
Chisel
Spacers, tapping block
and pulling Iron
LevelerUtility Knife
Rubber Mallet
Multi Tool Cutter
Hammer
Compound Miter Saw
Ruler
Laser level
Vacuum / Broom
Interior/ Exterior Commercial
grade Silicone Sealant
PencilTape Measure
Safety Glasses
Knee PadsFace Mask
Chisel
Spacers, tapping block
and pulling Iron
LevelerUtility Knife
Rubber Mallet
Multi Tool Cutter
Hammer
Compound Miter Saw
Recommended Tools
Alternative Tools

6
• Although acclimation is not required, for best results ooring could be acclimated for 24-48
hours in its desired environment before opening the cartons.
• It is recommended to install the oors when the room temperature is at least 5°C (41°F) to
24°C (75.2°F).
• Carefully follow instructions on page 13 “Installation Options”.
Acclimation
Expansion gap
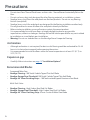
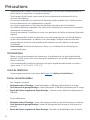
Precautions
• Do not store Floor Tile and Plank boxes on their sides. Store all boxes horizontally at on the
oor.
• Do not use heavy duty tools designed for other ooring materials or installation systems.
• NewAge luxury vinyl oor tiles and planks are nished products. Do not use any ooring
nishes (wax/polish).
• NewAge luxury vinyl tiles and planks are designed for the oating installation method only.
Do not glue down or secure the oor tiles and planks directly to the oor.
• Before starting installation, ensure all cartons contain the correct product.
• It is recommended to install your oors in bright daylight to observe any possible
imperfections, defects or damages. NewAge will not be held responsible for any costs related
to installation or visual defects post installation.
• Warning: Do not use studded tires on the NewAge Stone Composite Flooring.
• NewAge Flooring : 100 Tooth Carbide Tipped Thin Kerf Blade
• NewAge Garage Door Threshold: 100 Tooth Carbide Tipped Thin Kerf Blade
• NewAge 46” Silver Finishing Strips : 100 Tooth carbide tipped Aluminum Saw Blade
• NewAge Flooring : High Carbon Steel End Cut Blades
• NewAge Garage Door Threshold : High Carbon Steel End Cut Blades
• NewAge 46” Silver Finishing Strip: A Semi Circular Bi Metal Saw Blade
Recommended Blades
Compound Miter Saw
Multi-Tool Cutter

7
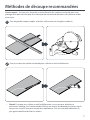
• Tip: When using a Multi-Tool cutter on your NewAge Floor Tiles, Planks and Accessories, it
is recommended to use a slower cutting speed until you are comfortable to cut faster. This
would allow you to gain more control and avoid any errors.
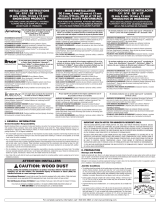
Warning: Be sure to wear a face mask and safety glasses to protect yourself from the dust while
cutting the oor tiles, planks and accessories.
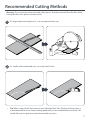
Recommended Cutting Methods
For large simple and straight cuts , use a compound miter saw.
For smaller and complicated cuts, use a multi-tool cutter.
1
2

8
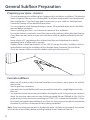
General Suboor Preparation
• Correctly preparing your suboors plays a large part of a satisfactory installation. The NewAge
Stone Composite Flooring uses a “oating oor” installation method which can handle minor
oor imperfections. If you have large gaps or protrusions in your suboors, NewAge Stone
Composite Flooring will not be able to cover them.
• It is not suitable to install NewAge ooring on carpet. All carpet and carpet track’s should be
removed before installation.
• Prior to installing your oors, use a vacuum to remove all dust and debris.
• Ensure the surface is structurally sound, at, clean and dry before installing NewAge Flooring.
If your oors are wet, make sure you wait until they are fully dry before proceeding with the
install.
• Leave at least a 0.5” gap between the surface of the oor and the bottom of an electric
baseboard heater to allow heat to circulate.
• Suboor atness should not exceed 3/16” per 10ft (4.7mm per 3m radius). Suboors must be
leveled before starting the installation of the NewAge Stone Composite Tiles and Planks.
• Chisel any uneven surfaces on the oor before starting the ooring install.
Preparing your space - General
• Make sure all surfaces are dry, clean and free of dust, wax, solvents, paint, grease, oils and old
glue residue.
• Sand or grind any raised areas.
• Gaps and holes should be lled with concrete and nished with a straight edge to even the
oor out.
• It is important to test the moisture level before starting the install. Using a concrete moisture
meter, the moisture vapor emission rate should not exceed 5lbs per 1000sqft in 24hr. If in Situ
probe testing is to be carried out, according to ASTM F2170, it should not exceed 85%. These
tests would not predict the condition of your oors for long-term and would only indicate the
condition of your oors at the time of the test being conducted.
Note: If you have done concrete work in the desired space, sub-oors must properly cure and be
left to dry for at least 60 days before installing NewAge Stone Composite Flooring.
Concrete suboors

9
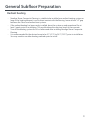
General Suboor Preparation
• NewAge Stone Composite Flooring is suitable to be installed over radiant heating systems as
long as the heating element is not in direct contact with the ooring. Leave at least 1/2” gap
between the Floors and radiant heat systems.
• If the radiant heating has been newly installed, leave the system on and operational for at
least 2 weeks prior to installation. This would reduce the moisture levels in the concrete.
• Turn o the heating system for 24 hrs before and after installing NewAge Stone Composite
Flooring.
• It is recommended for the desired room to be 5°C (41°F) to 24°C (75.2°F) prior to installation.
You may need to use other heating methods prior to install.
Radiant heating

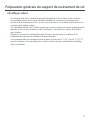
10
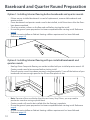
• If there are pre-installed baseboards in need of replacement, remove old baseboards and
quarter rounds.
• If new baseboards and quarter rounds need to be installed, install these items after the oors
have been completed.
• Chisel any uneven surfaces on the oor and wall before starting the install.
• Ensure the general space preparation has been completed before starting install. Reference
page 8.
• Ensure Concrete suboor or Radiant Heating suboor requirements has been followed.
Reference page 8-9.
• NewAge Stone Composite ooring can not be installed with pre-installed quarter rounds. All
Quarter rounds need to be removed before starting install.
• Once all quarter rounds have been removed, cut approximately 11mm o the bottom of your
baseboards to have enough space for the 9.5mm oor planks or tiles.
• Note: If previous oors are thicker than the new Luxury Vinyl Floors, you may need to
purchase a new door casing or plinth block.
• Quarter rounds will need to be installed after the ooring is complete.
• Ensure the general space preparation has been completed before starting install. Reference
page 8.
• Ensure Concrete suboor or Radiant Heating suboor requirements has been followed.
Reference page 8-9.
Option 1: Installing Interior ooring before baseboards and quarter rounds.
Option 2: Installing Interior ooring with pre-installed baseboards and
quarter rounds.
Baseboard and Quarter Round Preparation

11
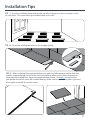
Installation Tips
TIP - 1 : To make installation easier and quicker, equally distance your boxes of planks or tiles
on your oors. This would allow you to better plan your install.
TIP - 2 : Cut a piece of tile/plank and use it as a tapping block.
TIP - 3: When installing ooring around door trims and it is challenging to use the click lock
proles, remove the top section of the click lock prole to allow you to slide in the plank or
tile under the installed oor. Apply the recommended silicone , on page 5, along the click
lock prole and slide it under the installed ooring. Make sure to wipe o any excess glue and
ensure glue used will dry in clear colour.

12
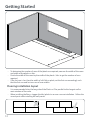
Getting Started
Flooring installation layout
• It is recommended to lay the long side of the Planks or Tiles parallel to the longest wall or
main window of the room.
• When installing the oors, stagger the tiles/planks to ensure a secure installation . Follow the
same layout while installing the wall panels.
• To determine the number of rows of tile/planks are required, measure the width of the room
and width of the planks or tiles.
• Divide the width of the room by the width of the planks / tiles to get the number of rows
required.
• If the last row is less than the width of a full tile or plank, cut the rst row accordingly such
that the rst row and last rows are of even widths.
L
W

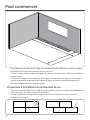
13
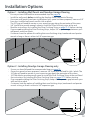
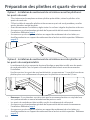
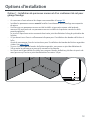
Installation Options
• Ensure you have followed the recommended steps on page 10.
• Install the wall panels before installing the NewAge Stone Composite Flooring.
• Once your wall panels have been installed and your space has been prepared, measure 3/8”
from your Installed wall panels and rst tile or plank.
The 3/8” gap will need to remain as your expansion gap along the perimeter of the room.
• 3/8” should also provide enough space to install the Silver nishing strips at the end.
Read the instructions for Installing the Silver Finishing Strips on page 19-21 before starting.
• If you are not installing the Silver Finishing Strips, keep a 3/8” expansion gap between your
wall panels and tile or plank .
• Customers have the option of installing their own nishing strips, baseboards and quarter
rounds as long as there is at least a 3/8” expansion gap.
• Ensure you have followed the recommended steps on page 10.
• Once your space has been prepared , measure 3/8” from your wall and rst tile / plank. The
3/8” gap will need to remain as your expansion gap along the perimeter of the room.
• 3/8” should also provide enough space to install the Silver Finishing Strips at the end. Read
the instructions for Installing the Silver Finishing Strips on page 19-21 before starting.
• If you are not installing the Silver Finishing Strips, keep a 3/8” expansion gap between your
wall and tile or plank
• Customers have the option of isntalling their own nishing strips, baseboards and quarter
rounds as long as there is at least a 3/8” expansion gap.
Option 1 : Installing Wall Panels and NewAge Garage Flooring
Option 2 : Installing NewAge Garage Flooring only
3/8”
3/8”

14
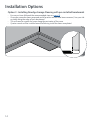
Installation Options
• Ensure you have followed the recommended steps on page 10.
• Once your space has been prepared and all quarter rounds have been removed , line your tile
or plank along the edge of your baseboard.
• This will need to remain the same along the perimeter of the room.
• Quarter rounds will be installed once the ooring install has been completed.
Option 3 : Installing NewAge Garage Flooring with pre-installed baseboards

15
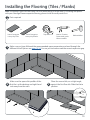
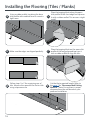
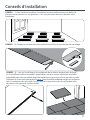
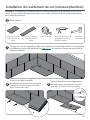
Installing the Flooring (Tiles / Planks)
a
b
c
d
c
c
d
d
a
b
Make sure the open click proles of the
rst tile is at the bottom and right hand
side away from the walls.
Place the second tile, on a slight angle,
against the rst oor tile. Slide the tile to
position.
2 3
1
Stone Composite
Luxury Vinyl Tiles
Tape Measure
Interior / Exterior
Commercial grade
Silicone sealant
Stone Composite
Luxury Vinyl Planks
Or
Rubber Mallet
Parts required
Make sure you have followed the recommended space preparation and read through the
dierent Install Options on page 13-14. Ensure you have measured the correct expansion gap.
Note: Installation layout for the Stone Tiles and Wood planks are the same. If installing wall panels
with your NewAge Stone composite ooring, please install the wall panels rst.

16
Using a rubber mallet, tap along the drop
click prole with medium force to secure a
tight seam.
Place the tapping block along the open
click prole of the short edge and tap over
it with a rubber mallet. This ensures a tight
install.
4
5
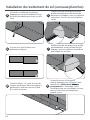
Installing the Flooring (Tiles / Planks)
Make sure the edges are aligned perfectly.
Place the tapping block on the open click
prole of the long edge and tap over it
with a rubber mallet to align the tiles.
Follow steps 1 to 7 for remaining row of
tiles. Measure the space left for the last tile
using a tape measure.
76
8 9
Cut the tile to required length. Refer to
the page 7 for “Recommended Cutting
Method “. Note: Ensure there is proper
clearance from the wall based on your
preferred installation.

17
f
g
e
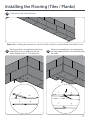
Installing the Flooring (Tiles / Planks)
f
e
Place your tile on an angle along the long
edge of the rst row and drop the tile
down. Repeat steps 4 - 7 for each tile.
Place your second tile on an angle along
the long edge of the rst row and drop the
tile down.
12
e
ef
f
11
Note: When starting the second row, cut the rst tile in half or use the leftover from the rst row.
Install the last tile of the rst row.
10
f
g
f
g

18
13
Installing the Flooring (Tiles / Planks)
Follow steps 1 to 12 for remaining row of tiles.
Note: If NewAge Silver Finishing Strips are not being installed, baseboards and quarter rounds
may now be installed to complete your space.

19
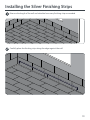
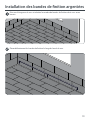
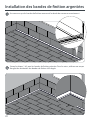
Installing the Silver Finishing Strips
Measure the length of the wall and calculate how many nishing strips are needed.
1
Carefully place the nishing strips along the edges against the wall.
2

20
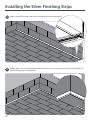
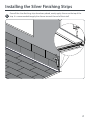
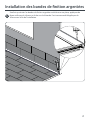
Installing the Silver Finishing Strips
Make sure the nishing strips cover the edges of the tiles properly.
3
Follow steps 1 to 3 for the remaining nishing strips. For corner set ups, miter cut the ends of
the nishing strips to 45 degrees.
4
La page charge ...
La page charge ...
La page charge ...
La page charge ...
La page charge ...
La page charge ...
La page charge ...
La page charge ...
La page charge ...
La page charge ...
La page charge ...
La page charge ...
La page charge ...
La page charge ...
La page charge ...
La page charge ...
La page charge ...
La page charge ...
La page charge ...
La page charge ...
La page charge ...
La page charge ...
La page charge ...
La page charge ...
La page charge ...
La page charge ...
La page charge ...
La page charge ...
La page charge ...
La page charge ...
La page charge ...
La page charge ...
La page charge ...
La page charge ...
La page charge ...
La page charge ...
La page charge ...
La page charge ...
La page charge ...
La page charge ...
-
 1
1
-
 2
2
-
 3
3
-
 4
4
-
 5
5
-
 6
6
-
 7
7
-
 8
8
-
 9
9
-
 10
10
-
 11
11
-
 12
12
-
 13
13
-
 14
14
-
 15
15
-
 16
16
-
 17
17
-
 18
18
-
 19
19
-
 20
20
-
 21
21
-
 22
22
-
 23
23
-
 24
24
-
 25
25
-
 26
26
-
 27
27
-
 28
28
-
 29
29
-
 30
30
-
 31
31
-
 32
32
-
 33
33
-
 34
34
-
 35
35
-
 36
36
-
 37
37
-
 38
38
-
 39
39
-
 40
40
-
 41
41
-
 42
42
-
 43
43
-
 44
44
-
 45
45
-
 46
46
-
 47
47
-
 48
48
-
 49
49
-
 50
50
-
 51
51
-
 52
52
-
 53
53
-
 54
54
-
 55
55
-
 56
56
-
 57
57
-
 58
58
-
 59
59
-
 60
60


NewAge Products 12069 Manuel utilisateur
- Taper
- Manuel utilisateur
dans d''autres langues
- English: NewAge Products 12069 User manual
Documents connexes
Autres documents
-
Mac Allister Coupe carreaux manuel 900 mm Mode d'emploi
-
Pergo LUO46-10 Guide d'installation
-
Art3d A17049B10 Manuel utilisateur
-
Gladiator GAFP32CBZM Manuel utilisateur
-
-
-
-
-
-
 Bruce EVS3231 Guide d'installation
