Electrolux EC4200AOW1 Manuel utilisateur
- Catégorie
- Congélateurs
- Taper
- Manuel utilisateur

EC4200AOW1
................................................ .............................................
EN CHEST FREEZER USER MANUAL 2
FR CONGÉLATEUR COFFRE NOTICE D'UTILISATION 15

CONTENTS
1. SAFETY INSTRUCTIONS . . . . . . . . . . . . . . . . . . . . . . . . . . . . . . . . . . . . . . . . . . . . . . . . . . 3
2. PRODUCT DESCRIPTION . . . . . . . . . . . . . . . . . . . . . . . . . . . . . . . . . . . . . . . . . . . . . . . . . 5
3. OPERATION . . . . . . . . . . . . . . . . . . . . . . . . . . . . . . . . . . . . . . . . . . . . . . . . . . . . . . . . . . . . 6
4. CONTROL PANEL . . . . . . . . . . . . . . . . . . . . . . . . . . . . . . . . . . . . . . . . . . . . . . . . . . . . . . . 6
5. FIRST USE . . . . . . . . . . . . . . . . . . . . . . . . . . . . . . . . . . . . . . . . . . . . . . . . . . . . . . . . . . . . . 7
6. DAILY USE . . . . . . . . . . . . . . . . . . . . . . . . . . . . . . . . . . . . . . . . . . . . . . . . . . . . . . . . . . . . . 7
7. HELPFUL HINTS AND TIPS . . . . . . . . . . . . . . . . . . . . . . . . . . . . . . . . . . . . . . . . . . . . . . . . 8
8.
CARE AND CLEANING . . . . . . . . . . . . . . . . . . . . . . . . . . . . . . . . . . . . . . . . . . . . . . . . . . . . 8
9. WHAT TO DO IF… . . . . . . . . . . . . . . . . . . . . . . . . . . . . . . . . . . . . . . . . . . . . . . . . . . . . . . 10
10.
INSTALLATION . . . . . . . . . . . . . . . . . . . . . . . . . . . . . . . . . . . . . . . . . . . . . . . . . . . . . . . . . 12
11. NOISE . . . . . . . . . . . . . . . . . . . . . . . . . . . . . . . . . . . . . . . . . . . . . . . . . . . . . . . . . . . . . . . . 13
12.
TECHNICAL DATA . . . . . . . . . . . . . . . . . . . . . . . . . . . . . . . . . . . . . . . . . . . . . . . . . . . . . . 14
WE’RE THINKING OF YOU
Thank you for purchasing an Electrolux appliance. You’ve chosen a product that brings with it
decades of professional experience and innovation. Ingenious and stylish, it has been designed
with you in mind. So whenever you use it, you can be safe in the knowledge that you’ll get great
results every time.
Welcome to Electrolux.
Visit our website for:
Get usage advice, brochures, trouble shooter, service information:
www.electrolux.com
Register your product for better service:
www.RegisterElectrolux.com
Buy Accessories, Consumables and Original spare parts for your appliance:
www.electrolux.com/shop
CUSTOMER CARE AND SERVICE
We recommend the use of original spare parts.
When contacting Service, ensure that you have the following data available.
The information can be found on the rating plate. Model, PNC, Serial Number.
Warning / Caution-Safety information
General information and tips
Environmental information
Subject to change without notice.
2
www.electrolux.com

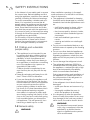
1.
SAFETY INSTRUCTIONS
In the interest of your safety and to ensure
the correct use, before installing and first
using the appliance, read this user manual
carefully, including its hints and warnings.
To avoid unnecessary mistakes and acci-
dents, it is important to ensure that all
people using the appliance are thoroughly
familiar with its operation and safety fea-
tures. Save these instructions and make
sure that they remain with the appliance if
it is moved or sold, so that everyone using
it through its life will be properly informed
on appliance use and safety.
For the safety of life and property keep
the precautions of these user's instruc-
tions as the manufacturer is not responsi-
ble for damages caused by omission.
1.1 Children and vulnerable
people safety
• This appliance is not intended for use
by persons (including children) with re-
duced physical, sensory or mental ca-
pabilities, or lack of experience and
knowledge, unless they have been giv-
en supervision or instruction concerning
use of the appliance by a person re-
sponsible for their safety.
Children should be supervised to en-
sure that they do not play with the ap-
pliance.
• Keep all packaging well away from chil-
dren. There is risk of suffocation.
• If you are discarding the appliance pull
the plug out of the socket, cut the con-
nection cable (as close to the appliance
as you can) and remove the door to
prevent playing children to suffer elec-
tric shock or to close themselves into it.
• If this appliance featuring magnetic
door seals is to replace an older appli-
ance having a spring lock (latch) on the
door or lid, be sure to make that spring
lock unusable before you discard the
old appliance. This will prevent it from
becoming a death trap for a child.
1.2 General safety
WARNING!
Keep ventilation openings, in the appli-
ance enclosure or in the built-in structure,
clear of obstruction.
• The appliance is intended for keeping
foodstuff and/or beverages in a normal
household and similar applications such
as:
– staff kitchen areas in shops, offices
and other working environments;
– farm houses and by clients in hotels,
motels and other residential type en-
vironments;
– bed and breakfast type environ-
ments;
– catering and similar non-retail appli-
cations.
• Do not use a mechanical device or any
artificial means to speed up the thawing
process.
• Do not use other electrical appliances
(such as ice cream makers) inside of re-
frigerating appliances, unless they are
approved for this purpose by the manu-
facturer.
• Do not damage the refrigerant circuit.
• The refrigerant isobutane (R600a) is
contained within the refrigerant circuit of
the appliance, a natural gas with a high
level of environmental compatibility,
which is nevertheless flammable.
During transportation and installation of
the appliance, be certain that none of
the components of the refrigerant cir-
cuit become damaged.
If the refrigerant circuit should become
damaged:
– avoid open flames and sources of ig-
nition
– thoroughly ventilate the room in
which the appliance is situated
• It is dangerous to alter the specifica-
tions or modify this product in any way.
Any damage to the cord may cause a
short-circuit, fire and/or electric shock.
WARNING!
Any electrical component (power
cord, plug, compressor) must be
replaced by a certified service
agent or qualified service person-
nel to avoid hazard.
ENGLISH 3

1.
Power cord must not be length-
ened.
2.
Make sure that the power plug is
not squashed or damaged by the
back of the appliance. A squashed
or damaged power plug may over-
heat and cause a fire.
3.
Make sure that you can come to
the mains plug of the appliance.
4.
Do not pull the mains cable.
5.
If the power plug socket is loose,
do not insert the power plug. There
is a risk of electric shock or fire.
6.
You must not operate the appli-
ance without the lamp cover (if
foreseen) of interior lighting.
• This appliance is heavy. Care should be
taken when moving it.
• Do not remove nor touch items from
the freezer compartment if your hands
are damp/wet, as this could cause skin
abrasions or frost/freezer burns.
• Avoid prolonged exposure of the appli-
ance to direct sunlight.
• Bulb lamps (if foreseen) used in this ap-
pliance are special purpose lamps se-
lected for household appliances use
only. They are not suitable for house-
hold room illumination.
1.3 Daily Use
• Do not put hot pot on the plastic parts
in the appliance.
• Do not store flammable gas and liquid
in the appliance, because they may ex-
plode.
• Do not place food products directly
against the air outlet on the rear wall. (If
the appliance is Frost Free)
• Frozen food must not be re-frozen once
it has been thawed out.
• Store pre-packed frozen food in ac-
cordance with the frozen food manu-
facturer's instructions.
• Appliance's manufacturers storage rec-
ommendations should be strictly ad-
hered to. Refer to relevant instructions.
• Do not place carbonated or fizzy drinks
in the freezer compartment as it creates
pressure on the container, which may
cause it to explode, resulting in damage
to the appliance.
• Ice lollies can cause frost burns if con-
sumed straight from the appliance.
1.4 Care and cleaning
• Before maintenance, switch off the ap-
pliance and disconnect the mains plug
from the mains socket.
• Do not clean the appliance with metal
objects.
• Do not use sharp objects to remove
frost from the appliance. Use a plastic
scraper.
1.5 Installation
For electrical connection carefully
follow the instructions given in
specific paragraph.
• Unpack the appliance and check if
there are damages on it. Do not con-
nect the appliance if it is damaged. Re-
port possible damages immediately to
the place you bought it. In that case re-
tain packing.
• It is advisable to wait at least four hours
before connecting the appliance to al-
low the oil to flow back in the compres-
sor.
• Adequate air circulation should be
around the appliance, lacking this leads
to overheating. To achieve sufficient
ventilation follow the instructions rele-
vant to installation.
• The appliance must not be located
close to radiators or cookers.
• Make sure that the mains plug is acces-
sible after the installation of the appli-
ance.
1.6 Service
• Any electrical work required to do the
servicing of the appliance should be
carried out by a qualified electrician or
competent person.
• This product must be serviced by an
authorized Service Centre, and only
genuine spare parts must be used.
1.7 Environment Protection
This appliance does not contain
gasses which could damage the
ozone layer, in either its refrigerant
4
www.electrolux.com

circuit or insulation materials. The
appliance shall not be discarded
together with the urban refuse and
rubbish. The insulation foam con-
tains flammable gases: the appli-
ance shall be disposed according
to the applicable regulations to
obtain from your local authorities.
Avoid damaging the cooling unit,
especially at the rear near the heat
exchanger. The materials used on
this appliance marked by the sym-
bol
are recyclable.
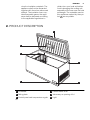
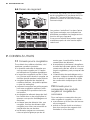
2. PRODUCT DESCRIPTION
2
3
5
6
4
1
1
Lid handle
4
Defrost water drain
2
Rating plate
5
Valve:easy re-opening of lid
3
Control panel and temperature regula-
tor
6
Light
ENGLISH 5

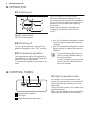
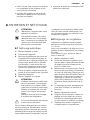
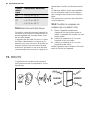
3. OPERATION
3.1 Switching on
B
C
A
A Temperature Regulator
B Half Loaded position
C Full Loaded position
Insert the plug into the wall socket.
Turn the Temperature Regulator to the
Full Loaded position and let the appliance
run for 24 hours to allow the correct tem-
perature to be reached before placing
food inside.
Adjust the Temperature Regulator ac-
cording to the quantity of the stored
foods.
3.2 Switching off
To turn off the appliance, turn the Tem-
perature Regulator to the “OFF” position.
3.3 Temperature regulation
The temperature within the appliance is
controlled by the Temperature Regulator
situated on the control panel.
To operate the appliance, proceed as fol-
lows:
• turn the Temperature Regulator toward
lower settings to obtain the minimum
coldness.
• turn the Temperature Regulator toward
higher settings to obtain the maximum
coldness.
In case of freezing less food vol-
umes, the Half Loaded setting is
the most suitable.
In case of freezing much food vol-
umes, the Full Loaded setting is
the most suitable.
4. CONTROL PANEL
21 3
1
Temperature regulator
2
Pilot light
3
High temperature alarm light
4.1 High temperature alarm
An increase in the temperature in the
freezer (for example due to an power fail-
ure) is indicated by switching on of the
Alarm light
During the alarm phase, don't place food
inside the freezer.
When normal conditions are restored the
Alarm light will switch off automatically.
6
www.electrolux.com

5. FIRST USE
5.1 Cleaning the interior
Before using the appliance for the first
time, wash the interior and all internal ac-
cessories with lukewarm water and some
neutral soap so as to remove the typical
smell of a brand-new product, then dry
thoroughly.
Do not use detergents or abrasive
powders, as these will damage
the finish.
6. DAILY USE
6.1 Freezing fresh food
The freezer compartment is suitable for
freezing fresh food and storing frozen and
deep-frozen food for a long time.
The maximum amount of food that can be
frozen in 24 hours is specified on the rat-
ing plate
1)
The freezing process lasts 24 hours: dur-
ing this period do not add other food to
be frozen.
6.2 Storage of frozen food
When first starting-up or after a period out
of use, before putting the products in the
compartment let the appliance run for 24
hours with the Temperature Regulator to
the Full Loaded position.
In the event of accidental defrost-
ing, for example due to a power
failure, if the power has been off
for longer than the value shown in
the technical characteristics chart
under "rising time", the defrosted
food must be consumed quickly
or cooked immediately and then
re-frozen (after cooling).
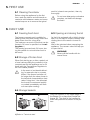
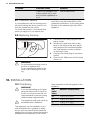
6.3 Opening and closing the lid
As the lid is equipped with a tightly closing
seal, it is not easy to reopen it shortly after
closing (due to the vacuum formed in-
side).
Wait a few minutes before reopening the
appliance. The vacuum valve will help you
to open the lid.
WARNING!
Never pull the handle with im-
mense force.
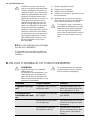
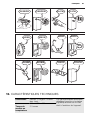
6.4 Storage baskets
AB
Hang the baskets on the upper edge of
the freezer (A) or place them inside the
freezer (B). Turn and fix the handles for
these two positions as shown in the pic-
ture.
1)
Refer to "Technical data"
ENGLISH 7

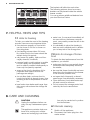
230
806606 946 1061
1201 1336 1611
The baskets will slide into each other.
The following pictures show how many
baskets can be placed inside the various
freezer models.
You can purchase additional baskets from
your local Service Centre.
7. HELPFUL HINTS AND TIPS
7.1 Hints for freezing
To help you make the most of the freezing
process, here are some important hints:
• the maximum quantity of food which
can be frozen in 24 hrs. is shown on
the rating plate;
• the freezing process takes 24 hours.
No further food to be frozen should be
added during this period;
• only freeze top quality, fresh and thor-
oughly cleaned, foodstuffs;
• prepare food in small portions to enable
it to be rapidly and completely frozen
and to make it possible subsequently to
thaw only the quantity required;
• wrap up the food in aluminium foil or
polythene and make sure that the
packages are airtight;
• do not allow fresh, unfrozen food to
touch food which is already frozen, thus
avoiding a rise in temperature of the lat-
ter;
• lean foods store better and longer than
fatty ones; salt reduces the storage life
of food;
• water ices, if consumed immediately af-
ter removal from the freezer compart-
ment, can possibly cause the skin to be
freeze burnt;
• it is advisable to show the freezing in
date on each individual pack to enable
you to keep tab of the storage time.
7.2 Hints for storage of frozen
food
To obtain the best performance from this
appliance, you should:
• make sure that the commercially frozen
foodstuffs were adequately stored by
the retailer;
• be sure that frozen foodstuffs are trans-
ferred from the foodstore to the freezer
in the shortest possible time;
• not open the lid frequently or leave it
open longer than absolutely necessary.
• Once defrosted, food deteriorates rap-
idly and cannot be refrozen.
• Do not exceed the storage period indi-
cated by the food manufacturer.
8. CARE AND CLEANING
CAUTION!
Unplug the appliance before car-
rying out any maintenance opera-
tion.
This appliance contains hydrocar-
bons in its cooling unit; mainte-
nance and recharging must there-
fore only be carried out by author-
ized technicians.
8.1 Periodic cleaning
1.
Switch off the appliance.
2.
Disconnect the mains plug from the
mains socket.
8
www.electrolux.com

3.
Regularly clean the appliance and the
accessories with warm water and
neutral soap. Clean the lid seal care-
fully.
4.
Fully dry the appliance.
5.
Connect the mains plug to the mains
socket.
6.
Switch on the appliance.
CAUTION!
Do not use detergents, abrasive
products, highly perfumed clean-
ing products or wax polishes to
clean the inner side of the appli-
ance.
Prevent damage to the cooling
system.
There is no need to clean the
compressor area.
Many proprietary kitchen surface cleaners
contain chemicals that can attack/dam-
age the plastics used in this appliance.
For this reason it is recommended that
the outer casing of this appliance is only
cleaned with warm water with a little
washing-up liquid added.
8.2 Defrosting the freezer
Defrost the freezer when the frost layer
reaches a thickness of about 10-15 mm.
The best time to defrost the freezer when
it contains no or only a little food.
To remove the frost, do these steps:
1.
Switch off the appliance.
2.
Remove any stored food, wrap it in
several layers of newspaper and put it
in a cool place.
3.
Leave the lid open , remove the plug
from the defrost water drain and col-
lect all defrost water on a tray. Use a
scraper to remove ice quickly.
4.
When defrosting is completed, dry
the interior thoroughly and refit the
plug.
5.
Switch on the appliance.
6.
Set the temperature regulator to ob-
tain the maximum coldness and run
the appliance for two or three hours
using this setting.
7.
Reload the previously removed food
into the compartment.
Never use sharp metal tools to
scrape off frost as you could dam-
age the appliance. Do not use a
mechanical device or any artificial
means to speed up the thawing
process other than those recom-
mended by the manufacturer. A
temperature rise of the frozen
food packs, during defrosting,
may shorten their safe storage life.
The amount of frost on the walls
of the appliance will be increased
by the high level of the outer envi-
ronment humidity and if the frozen
food is not wrapped properly.
8.3 Periods of non-operation
When the appliance is not in use for long
periods, take the following precautions:
1.
Switch off the appliance.
2.
Disconnect the mains plug from the
mains socket.
3.
Remove all food.
4.
Defrost and clean the appliance and
all accessories.
5.
Leave the lid open to prevent un-
pleasant smells.
If the cabinet will be kept on, ask
somebody to check it once in a
while to prevent the food inside
from spoiling in case of a power
failure.
ENGLISH 9

9. WHAT TO DO IF…
CAUTION!
Before troubleshooting, discon-
nect the power supply.
Only a qualified electrician or com-
petent person must do the trou-
bleshooting that is not in this man-
ual.
There are some sounds during
normal use (compressor, refriger-
ant circulation).
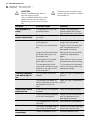
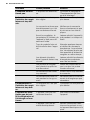
Problem Possible cause Solution
The appliance is
noisy.
The appliance is not sup-
ported properly.
Check if the appliance
stands stable (all the four
feet should be on the floor).
The compressor op-
erates continually.
The temperature is not set
correctly.
Set a warmer temperature.
The lid has been opened
too frequently.
Do not leave the lid open
longer than necessary.
The lid is not closed prop-
erly.
Check if the lid closes well
and the gaskets are un-
damaged and clean.
Large quantities of food to
be frozen were put in at
the same time.
Wait some hours and then
check the temperature
again.
Food placed in the appli-
ance was too warm.
Allow food to cool to room
temperature before storing.
The temperature of the
room that contains the ap-
pliance is too high for effi-
cient operation.
Try to reduce the tempera-
ture in the room where the
appliance stands.
The High tempera-
ture alarm light is
on.
It is too warm inside the
freezer.
Refer to "High Temperature
Alarm".
The cabinet has been re-
cently switched on and the
temperature is still too
high.
Refer to "High Temperature
Alarm".
There is too much
frost and ice.
Products are not wrapped
properly.
Wrap the products better.
The lid is not shut properly
or do not close tightly.
Check if the lid closes well
and the gaskets are un-
damaged and clean.
The temperature is not set
correctly.
Set a warmer temperature.
The water drainage plug is
not correctly positioned.
Position the water drainage
plug in the correct way.
The lid doesn't close
completely.
There is excessive frost. Eliminate excess frost.
10
www.electrolux.com

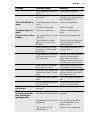
Problem Possible cause Solution
The lid gaskets are dirty or
sticky.
Clean the lid gaskets.
Food packages are block-
ing the lid.
Arrange the packages in
the right way, see the stick-
er in the appliance.
The lid is difficult to
open.
The lid gaskets are dirty or
sticky.
Clean the lid gaskets.
The valve is blocked. Check the valve.
The lamp does not
work.
The lamp is defective. Refer to "Replacing the
lamp".
It is too warm in the
freezer.
The temperature is not set
correctly.
Set a lower temperature.
The lid does not close
tightly or it is not shut
properly.
Check if the lid closes well
and the gasket is undam-
aged and clean.
Before freezing the appli-
ance was not precooled
sufficiently.
Pre-cool the appliance for
enough time.
Large quantities of food to
be frozen were put in at
the same time.
Wait some hours and then
check the temperature
again. Next time insert
smaller quantities of food to
be frozen at any one time.
Food placed in the appli-
ance was too warm.
Allow food to cool to room
temperature before storing.
Products to be frozen are
placed too closely to each
other.
Place the products in a way
so that cold air could circu-
late among them.
The lid has been opened
often.
Try to not open the lid of-
ten.
The lid has been opened
for a long time.
Do not leave the lid open
longer than necessary.
It is too cold inside
the freezer.
The temperature is not set
correctly.
Set a warmer temperature.
The appliance does
not work at all. Nei-
ther cooling nor
lighting works.
Plug is not connected to
the mains socket properly.
Connect the mains plug
properly.
Power does not reach the
appliance.
Try connecting another
electrical device to the
power outlet.
The appliance is not
switched on.
Switch on the appliance.
ENGLISH 11

Problem Possible cause Solution
There is no voltage in the
mains socket (try to con-
nect another appliance in-
to it).
Call an electrician.
9.1 Customer Service
If your appliance is still not working prop-
erly after making the above checks, con-
tact the nearest service centre.
To obtain fast service, it is essential that
when you apply for it you specify the
model and serial number of your appli-
ance which can be found either on the
guarantee certificate or on the rating plate
located on the external right side of the
appliance.
9.2 Replacing the lamp
1.
Disconnect the mains plug from the
mains socket.
2.
Replace the used lamp with a new
lamp of the same power and specifi-
cally designed for household applian-
ces. (the maximum power is shown
on the lamp cover)
3.
Connect the mains plug to the mains
socket.
4.
Open the lid. Make sure that the lamp
comes on.
WARNING!
Do not remove the lamp cover at
the time of replacement.
Do not operate the freezer if the
lamp cover is damaged or miss-
ing.
10. INSTALLATION
10.1 Positioning
WARNING!
If you are discarding an old appli-
ance that has a lock or catch on
the lid, you must ensure that it is
made unusable to prevent young
children being trapped inside.
The appliance shall have the plug
accessible after installation.
This appliance can be installed in a dry,
well ventilated indoor (garage or cellar),
but for optimum performance install this
appliance at a location where the ambient
temperature corresponds to the climate
class indicated on the rating plate of the
appliance:
Cli-
mate
class
Ambient temperature
SN +10°C to + 32°C
N +16°C to + 32°C
ST +16°C to + 38°C
T +16°C to + 43°C
12
www.electrolux.com

10.2 Electrical connection
Before plugging in, ensure that the volt-
age and frequency shown on the rating
plate correspond to your domestic power
supply.
The appliance must be earthed. The pow-
er supply cable plug is provided with a
contact for this purpose. If the domestic
power supply socket is not earthed, con-
nect the appliance to a separate earth in
compliance with current regulations, con-
sulting a qualified electrician.
The manufacturer declines all responsibili-
ty if the above safety precautions are not
observed.
This appliance complies with the E.E.C.
Directives.
10.3 Ventilation requirements
1.
Put the freezer in horizontal position
on a firm surface. The cabinet must
be on all four feet.
2.
Make sure that the clearance be-
tween the appliance and rear wall is 5
cm.
3.
Make sure that the clearance be-
tween the appliance and the sides is
5 cm.
The airflow behind the appliance must be
sufficient.
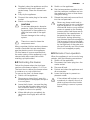
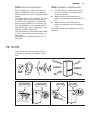
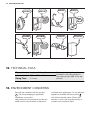
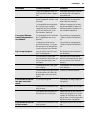
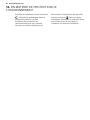
11. NOISE
There are some sounds during normal
running (compressor, refrigerant circula-
tion).
BRRR!
HISSS!
CLICK!
BLUBB!
CRACK!
SSSRR
R!
OK
CLICK!
CLICK!
SSSRRR!
SSSRRR!
ENGLISH 13

BRRR!
BRRR!
HISSS!
HISSS!
BLUBB!
BLUBB!
CRACK!CRACK!
12. TECHNICAL DATA
Dimensions Height × Width × Depth (mm): Further technical information are
situated in the rating plate on
the external right side of the ap-
pliance.
876 × 1336 × 665
Rising Time 31 hours
13. ENVIRONMENT CONCERNS
Recycle the materials with the symbol
. Put the packaging in applicable
containers to recycle it.
Help protect the environment and human
health and to recycle waste of electrical
and electronic appliances. Do not dispose
appliances marked with the symbol
with the household waste. Return the
product to your local recycling facility or
contact your municipal office.
14
www.electrolux.com

SOMMAIRE
1. INSTRUCTIONS DE SÉCURITÉ . . . . . . . . . . . . . . . . . . . . . . . . . . . . . . . . . . . . . . . . . . . . 16
2. DESCRIPTION DE L'APPAREIL . . . . . . . . . . . . . . . . . . . . . . . . . . . . . . . . . . . . . . . . . . . . 19
3. FONCTIONNEMENT . . . . . . . . . . . . . . . . . . . . . . . . . . . . . . . . . . . . . . . . . . . . . . . . . . . . . 20
4. BANDEAU DE COMMANDE . . . . . . . . . . . . . . . . . . . . . . . . . . . . . . . . . . . . . . . . . . . . . . . 20
5. PREMIÈRE UTILISATION . . . . . . . . . . . . . . . . . . . . . . . . . . . . . . . . . . . . . . . . . . . . . . . . . 21
6. UTILISATION QUOTIDIENNE . . . . . . . . . . . . . . . . . . . . . . . . . . . . . . . . . . . . . . . . . . . . . . 21
7. CONSEILS UTILES . . . . . . . . . . . . . . . . . . . . . . . . . . . . . . . . . . . . . . . . . . . . . . . . . . . . . . 22
8.
ENTRETIEN ET NETTOYAGE . . . . . . . . . . . . . . . . . . . . . . . . . . . . . . . . . . . . . . . . . . . . . . 23
9. EN CAS D'ANOMALIE DE FONCTIONNEMENT . . . . . . . . . . . . . . . . . . . . . . . . . . . . . . . . 24
10.
INSTALLATION . . . . . . . . . . . . . . . . . . . . . . . . . . . . . . . . . . . . . . . . . . . . . . . . . . . . . . . . . 27
11. BRUITS . . . . . . . . . . . . . . . . . . . . . . . . . . . . . . . . . . . . . . . . . . . . . . . . . . . . . . . . . . . . . . . 28
12.
CARACTÉRISTIQUES TECHNIQUES . . . . . . . . . . . . . . . . . . . . . . . . . . . . . . . . . . . . . . . . 29
NOUS PENSONS À VOUS
Merci d'avoir choisi ce produit Electrolux. Avec ce produit, vous bénéficiez de dizaines d'années
d'expérience professionnelle et d'innovation. Ingénieux et élégant, il a été conçu sur mesure pour
vous. Grâce à cet appareil, vous savez que chaque utilisation vous apportera satisfaction.
Bienvenue chez Electrolux.
Visitez notre site Internet pour :
Obtenir des conseils d'utilisation, des brochures, de l'aide, des informations :
www.electrolux.com
Enregistrer votre produit pour obtenir un meilleur service :
www.RegisterElectrolux.com
Acheter des accessoires, consommables et pièces de rechange d'origine pour votre
appareil :
www.electrolux.com/shop
SERVICE APRÈS-VENTE
N'utilisez que des pièces de rechange d'origine.
Avant de contacter le service, assurez-vous de disposer des informations suivantes :
Vous trouverez ces informations sur la plaque signalétique. Modèle, PNC, numéro de série.
Avertissement/Attention : consignes de sécurité.
Informations générales et conseils
Informations écologiques
Sous réserve de modifications.
FRANÇAIS 15

1.
INSTRUCTIONS DE SÉCURITÉ
Pour votre sécurité et garantir une utilisa-
tion correcte de l'appareil, lisez attentive-
ment cette notice, y compris les conseils
et avertissements, avant d'installer et
d'utiliser l'appareil pour la première fois.
Pour éviter toute erreur ou accident, veil-
lez à ce que toute personne qui utilise
l'appareil connaisse bien son fonctionne-
ment et ses fonctions de sécurité. Con-
servez cette notice avec l'appareil. Si l'ap-
pareil doit être vendu ou cédé à une autre
personne, veillez à remettre cette notice
au nouveau propriétaire, afin qu'il puisse
se familiariser avec son fonctionnement et
sa sécurité.
Pour la sécurité des personnes et des
biens, conservez et respectez les consi-
gnes de sécurité figurant dans cette noti-
ce. Le fabricant décline toute responsabi-
lité en cas de dommages dus au non-res-
pect de ces instructions.
1.1 Sécurité des enfants et des
personnes vulnérables
• Cet appareil n'est pas destiné à être
utilisé par des enfants ou des person-
nes dont les capacités physiques, sen-
sorielles ou mentales, ou le manque
d'expérience et de connaissance les
empêchent d'utiliser l'appareil sans ris-
que lorsqu'ils sont sans surveillance ou
en l'absence d'instruction d'une per-
sonne responsable qui puisse leur as-
surer une utilisation de l'appareil sans
danger.
Empêchez les enfants de jouer avec
l'appareil.
• Ne laissez pas les différents emballages
à portée des enfants. Ils pourraient
s'asphyxier.
• Si l'appareil doit être mis au rebut, sor-
tez la fiche de la prise électrique, cou-
pez le cordon d'alimentation au ras de
l'appareil et démontez la porte pour évi-
ter les risques d'électrocution et que
des enfants ne restent enfermés à l'in-
térieur.
• Cet appareil est muni de fermetures
magnétiques. S'il remplace un appareil
équipé d'une fermeture à ressort, nous
vous conseillons de rendre celle-ci inuti-
lisable avant de vous en débarrasser.
Ceci afin d'éviter aux enfants de s'en-
fermer dans l'appareil et de mettre ainsi
leur vie en danger.
1.2 Consignes générales de
sécurité
AVERTISSEMENT
Veillez à ce que les orifices de ventilation,
situés dans l'enceinte de l'appareil ou la
structure intégrée, ne soient pas obstrués.
• Les appareils sont destinés uniquement
à la conservation des aliments et/ou
des boissons dans le cadre d’un usage
domestique normal, tel que celui décrit
dans la présente notice.
– dans des cuisines réservées aux em-
ployés dans des magasins, bureaux
et autres lieux de travail ;
– dans les fermes et par les clients
dans des hôtels, motels et autres
lieux de séjour ;
– dans des hébergements de type
chambre d'hôte ;
– pour la restauration et autres utilisa-
tions non commerciales.
• N'utilisez pas d'appareils électriques,
d'agents chimiques ou tout autre systè-
me artificiel pour accélérer le processus
de dégivrage.
• Ne faites pas fonctionner d'appareils
électriques (comme des sorbetières
électriques, ...) à l'intérieur des appa-
reils de réfrigération à moins que cette
utilisation n'ait reçu l'agrément du fabri-
cant.
• N'endommagez pas le circuit frigorifi-
que.
• Le circuit frigorifique de l’appareil con-
tient de l’isobutane (R600a), un gaz na-
turel offrant un haut niveau de compati-
bilité avec l’environnement mais qui est
néanmoins inflammable.
Pendant le transport et l'installation de
votre appareil, assurez-vous qu'aucune
partie du circuit frigorifique n'est en-
dommagée.
Si le circuit frigorifique est endomma-
gé :
16
www.electrolux.com

– évitez les flammes vives et toute au-
tre source d'allumage
– aérez soigneusement la pièce où se
trouve l'appareil
• Ne modifiez pas les spécifications de
l'appareil. Si le câble d'alimentation est
endommagé, il peut causer un court
circuit, un incendie et/ou une électrocu-
tion.
AVERTISSEMENT
Les éventuelles réparations ou in-
terventions sur votre appareil, ain-
si que le remplacement du câble
d'alimentation, ne doivent être ef-
fectuées que par un professionnel
qualifié.
1.
Ne branchez pas le cordon d'ali-
mentation à une rallonge.
2.
Assurez-vous que la prise n'est pas
écrasée ou endommagée par l'ar-
rière de l'appareil. Une prise de
courant écrasée ou endommagée
peut s'échauffer et causer un in-
cendie.
3.
Vérifiez que la prise murale de l'ap-
pareil est accessible.
4.
Ne débranchez pas l'appareil en ti-
rant sur le câble.
5.
Si la prise murale n'est pas bien fi-
xée, n'introduisez pas de prise de-
dans. Risque d'électrocution ou
d'incendie.
6.
N'utilisez pas l'appareil sans le dif-
fuseur de l'ampoule (si présent) de
l'éclairage intérieur.
• Cet appareil est lourd. Faite attention
lors de son déplacement.
• Ne touchez pas avec les mains humi-
des les surfaces givrées et les produits
congelés (risque de brûlure et d'arra-
chement de la peau).
• Évitez une exposition prolongée de
l'appareil aux rayons solaires.
• Les ampoules (si présentes) utilisées
dans cet appareil sont des ampoules
spécifiques uniquement destinées à
être utilisées sur des appareils ména-
gers. Elles ne sont pas du tout adap-
tées à un éclairage quelconque d'une
habitation.
1.3 Utilisation quotidienne
• Ne posez pas d'éléments chauds sur
les parties en plastique de l'appareil.
• Ne stockez pas de gaz ou de liquides
inflammables dans l'appareil (risque
d'explosion).
• Ne placez pas d'aliments directement
contre la sortie d'air sur la paroi arrière
de l'appareil. (Si l'appareil est sans gi-
vre.)
• Un produit décongelé ne doit jamais
être recongelé.
• Conservez les aliments emballés con-
formément aux instructions de leur fa-
bricant.
• Respectez scrupuleusement les con-
seils de conservation donnés par le fa-
bricant de l'appareil. Consultez les ins-
tructions respectives.
• Ne mettez pas de bouteilles ni de boî-
tes de boissons gazeuses dans le com-
partiment congélateur, car la pression
se formant à l'intérieur du contenant
pourrait le faire éclater et endommager
ainsi l'appareil.
• Ne consommez pas certains produits
tels que les bâtonnets glacés dès leur
sortie de l'appareil, car ils peuvent pro-
voquer des brûlures.
1.4 Entretien et nettoyage
• Avant toute opération d'entretien, met-
tez l'appareil à l'arrêt et débranchez-le.
• N'utilisez pas d'objets métalliques pour
nettoyer l'appareil.
• N'utilisez pas d'objet tranchant pour
gratter la couche de givre. N'employez
pour cela qu'une spatule en plastique.
1.5 Installation
Avant de procéder au branche-
ment électrique, respectez scru-
puleusement les instructions four-
nies dans le paragraphe corres-
pondant.
• Déballez l'appareil et vérifiez qu'il n'est
pas endommagé. Ne branchez pas
l'appareil s'il est endommagé. Signalez
immédiatement au revendeur de l'ap-
pareil les dommages constatés. Dans
ce cas, gardez l'emballage.
FRANÇAIS 17

• Avant de brancher votre appareil, lais-
sez-le au moins 4 heures au repos afin
de permettre à l'huile de refluer dans le
compresseur.
• Veillez à ce que l'air circule librement
autour de l'appareil pour éviter qu'il ne
surchauffe. Pour assurer une ventilation
suffisante, respectez les instructions
d'installation.
• L'appareil ne doit pas être placé à
proximité de radiateurs ou de cuisiniè-
res.
• Assurez-vous que la prise principale est
accessible une fois l'appareil installé.
1.6 Maintenance
• Les branchements électriques néces-
saires à l'entretien de l'appareil doivent
être réalisés par un électricien qualifié
ou une personne compétente.
• Cet appareil ne doit être entretenu et
réparé que par un Service après-vente
autorisé, exclusivement avec des piè-
ces d'origine.
1.7 Protection de
l'environnement
Le système frigorifique et l'isola-
tion de votre appareil ne contien-
nent pas de C.F.C. contribuant
ainsi à préserver l'environnement.
L'appareil ne doit pas être mis au
rebut avec les ordures ménagères
et les déchets urbains. La mousse
d'isolation contient des gaz in-
flammables : l'appareil sera mis au
rebut conformément aux règle-
ments applicables disponibles au-
près des autorités locales. Veillez
à ne pas détériorer les circuits fri-
gorifiques, notamment au niveau
du condenseur. Les matériaux uti-
lisés dans cet appareil identifiés
par le symbole
sont recycla-
bles.
18
www.electrolux.com

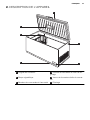
2. DESCRIPTION DE L'APPAREIL
2
3
5
6
4
1
1
Poignée du couvercle
4
Goulotte d'évacuation de l'eau de dé-
givrage
2
Plaque signalétique
5
Vanne de réouverture facile du couver-
cle
3
Bandeau de commande et thermostat
6
Éclairage
FRANÇAIS 19

3. FONCTIONNEMENT
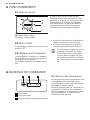
3.1 Mise en marche
B
C
A
A Thermostat
B Position Demi-charge
C Position Charge pleine
Insérez la fiche dans la prise murale.
Placez le thermostat sur la position Char-
ge pleine et attendez 24 heures pour que
la température à l'intérieur de l'appareil
soit bonne avant d'y placer les aliments.
Ajustez le thermostat selon la quantité
d'aliments entreposés dans l'appareil.
3.2 Mise à l'arrêt
Pour éteindre, tournez le thermostat sur la
position “OFF”.
3.3 Réglage de la température
La température à l'intérieur de l'appareil
est contrôlée par un thermostat situé sur
le bandeau de commande.
Pour utiliser l'appareil, procédez comme
suit :
• tournez le thermostat sur la position mi-
nimale pour obtenir moins de froid.
• tournez le thermostat sur la position
maximale pour obtenir plus de froid.
Si vous devez congeler de petites
quantités d'aliments, le réglage
Demi-charge est le plus adapté.
Si vous devez congeler de gran-
des quantités d'aliments, le régla-
ge Charge pleine est le plus adap-
té.
4. BANDEAU DE COMMANDE
21 3
1
Thermostat
2
Voyant lumineux
3
Voyant de l'alarme haute température
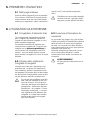
4.1 Alarme haute température
Une augmentation de la température dans
le congélateur (par exemple à cause
d'une panne de courant) est indiquée par
l'allumage du voyant Alarme
Pendant la phase d'alarme, ne placez au-
cun aliment à l'intérieur du congélateur.
Une fois rétablies les conditions normales
de fonctionnement, le voyant Alarme
s'éteint automatiquement.
20
www.electrolux.com
La page charge ...
La page charge ...
La page charge ...
La page charge ...
La page charge ...
La page charge ...
La page charge ...
La page charge ...
La page charge ...
La page charge ...
La page charge ...
La page charge ...
-
 1
1
-
 2
2
-
 3
3
-
 4
4
-
 5
5
-
 6
6
-
 7
7
-
 8
8
-
 9
9
-
 10
10
-
 11
11
-
 12
12
-
 13
13
-
 14
14
-
 15
15
-
 16
16
-
 17
17
-
 18
18
-
 19
19
-
 20
20
-
 21
21
-
 22
22
-
 23
23
-
 24
24
-
 25
25
-
 26
26
-
 27
27
-
 28
28
-
 29
29
-
 30
30
-
 31
31
-
 32
32


Electrolux EC4200AOW1 Manuel utilisateur
- Catégorie
- Congélateurs
- Taper
- Manuel utilisateur
dans d''autres langues
- English: Electrolux EC4200AOW1 User manual
Documents connexes
-
Electrolux EC4230AOW2 Manuel utilisateur
-
Electrolux EC5200AOW2 Manuel utilisateur
-
Electrolux EC3202AOW1 Manuel utilisateur
-
-
-
-
-
-
-