Maytag CDB1500AWS Le manuel du propriétaire
- Catégorie
- Lave-vaisselle
- Taper
- Le manuel du propriétaire

D,shwash
Troubleshooting :ii.iiii:9'lO
Warranty & Service ........ 11
Guide d'utilisation
et d'entretien .............. 12
Gui_ de Uso y Cuidado ..... 24
Part No. 6 920185 A _2005 Maytag Appliances Sales Co.

What You Need to Know About
Safety Instructions
Warning and Important Safety Instructions appearing in this
manual are not meant to cover all possible conditions and
situations that may occur. Common sense, caution and care
must be exercised when installing, maintaining or operating
tile dishwasher.
Always contact your manufacturer about problems or
conditions you do not understand.
Recognize Safety Symbols, Words, Labels
Important Safety Instructions
Products with a vL_)label have been listed with
Underwriter's Laboratories, Inc. - those with a CSA tag have
been listed with Canadian Standards Association.
Nevertheless, as with any other equipment using electricity
and moving parts, there is a potential hazard.
1. Read all instructions before using the dishwasher.
2. Use the dishwasher only for its intended function.
3. Disconnect electrical power to dishwasher before
attempting to service.
4. To avoid electrical shock hazard, the sides and back
must be enclosed and the front panels must be
attached before electrical power is applied to the
dishwasher. Refer to the installation instructions for
proper grounding procedures.
5. Connect to a properly rated, protected and sized
power supply circuit to avoid electrical overload.
6. Children should never be permitted to operate, or play
in, with, or around this dishwasher.
Z Toreduce the risk of injury when loading items to be
washed, sharp or pointed items should be located with
the handles up. Also, load sharp items so they are not
likely to damage the door seal.
8. Do not touch the heating element on the bottom of
the tub during or at the completion of a cycle. It will
be [lot.
9. Use only detergents and rinse additives designed for a
residential automatic dishwasher. Never use soap,
laundry detergent, or hand washing detergent in your
dishwasher. Keep these products out of reach of
children.
10. Do not sit, stand on or abuse the door or dish racks of
the dishwasher.
11. Under certain conditions, hydrogen gas may be
produced in a hot water system that has not been
used for two weeks or more. Hydrogen gas is
explosive. If the [lot water system has not been used
for such a period, turn on all hot water faucets and let
the water flow from each for several minutes. This will
release any accumulated hydrogen gas. As the gas is
flammable, do not smoke or use an open flame during
this process.
12. Do not wash plastic items unless marked "dishwasher
safe" or the equivalent. For plastic items not so
marked, check the manufacturer's recommendations.
13. Do not tamper with controls.
14. To prevent accidental child entrapment and
suffocation risks, always remove the door to the
washing compartment when removing an old
dishwasher from service or discarding it.
15. Use caution when unloading the dishwasher. Dishes
will be [lot if unloaded shortly after a cycle has
completed.
16. Certified residential dishwashers are not intended for
licensed food establishments.
1Z To avoid water, mold or mildew damage to your home,
inlet and drain hose connections should be checked
periodically for leaks.
Save These Instructions
for Future Reference

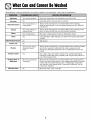
WhatCanandCannotBeWashed
Most tableware, cookware and flatware can safely be washed in your dishwasher. Check with the manufacturer.
Aluminum Yes, except anodized. High water temperature and detergents may affect finish.
Cast Iron No Seasoning will be removed, and iron will rust.
Yes, except antique or Always check manufacturer's recommendation before washing.
China/Stoneware hand-painted. Antique, hand-painted or over-the-glaze patterns may fade. Gold leaf
may discolor.
Crystal Yes, except antique or Always check manufacturer's recommendation before washing. Some
delicate crystal, types of leaded crystal may etch with repeated washings.
Filters Not recommended. May leave a dingy deposit or stain on dishwasher interior.
Glass Yes A specialty glass called milk glass can yellow with repeated dishwasher
washing.
Gold-Plated Flatware No Will discolor.
Pewter, Tin No
Yes, top rack, except Always check manufacturer's recommendationbefore washing. Plastics
Plastics disposable plastic vary in their capacity to withstand high water temperatures and
items, detergents. Disposable plastic itemsare not dishwasher safe for this
reason.
Stainless Steel Yes Run a Rinse Only cycle (select models) if not washing immediately.
Prolonged contact with foods containing salt, vinegar, milk products or
juice could damage finish.
Sterling Silver or No, if has commercial Always check manufacturer's recommendation before washing. Run a
Silverplate "darkening". Rinse Only cycle (select models) if not washing immediately. Prolonged
contact with food containing salt, acid or sulfide (eggs, mayonnaise
and seafood) could damage finish. Commercial "darkening" may be
removed by detergent.
Wooden Items No Wood may warp, crack or discolor.
2

OperatingTips
Before You Start
• Don't prerinse. Simply scrape off any bones or
large food particles.
• If connected to a food waste disposer, make certain
the disposer is empty before starting the
dishwasher.
• Scrape off tomato-based food soils (see page 8).
• Remove certain foods such as mustard,
mayonnaise, lemon juice, vinegar, salt or dressings
from stainless steel flatware as soon as possible.
These foods may cause rusting and pitting if allowed
to remain in contact with the surface for an extended
period of time.
Starting the Dishwasher
1. After loading the dishwasher and adding detergent,
select the desired cycle by pressing the cycle
select pad until the light next to the desired cycle
is illuminated. Choose the desired options by
pressing the pads. The indicator lights for the
selected cycle and options will illuminate. To cancel
an option press the pad again.
2. To start a cycle, close the door until it latches then
press the START/Cancel pad once. After a pause,
the fill will begin. The display countdown (select
models) will flash until START/Cancel is pressed.
Note
• If STARTICancel is not pressed within 30
seconds of choosing your cycle, the dishwasher
will turn off.
The dishwasher remembers your last cycle so you
do not have to reset the cycle each time. To start
the dishwasher using the same cycle and options
selected on the previous wash, just press the
START/Cancel pad.
,
To cancel a running cycle, press the START/Cancel
pad once. The dishwasher will drain, then shut off.
To turn the dishwasher off without draining, press
the START/Cancel pad twice. To prevent
unplanned cycle or option changes, these selections
are "locked in" after 1 minute.
Note
• If the cycle select pad is pressed after the
controls have been "locked in", the light beside
the selected cycle will flash three times.
Adding a Forgotten Item
For best cleaning, the forgotten item should be added
early in the cycle.
1. Grasp door handle and unlatch door without
opening completely. All lights will flash to indicate
that the cycle is suspended.
2. Wait for the water circulation to stop.
3. Open the door and add the item.
4. Close and latch the door. Lights will stop flashing
when the door is properly shut. After a slight delay,
the cycle resumes automatically at the point of
interruption.
Notes
• If the door is opened during a running cycle,
there may be up to a 30 second delay before the
dishwasher restarts after closing the door.
• Extended interruption of the wash cycle is not
recommended.
3

Loading
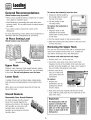
General Recommendations
[Rack features vary by model)
• Items can be centered behind a single tine or loaded
at an angle to maximize space.
• Avoid blocking or preventing the spray arms from
spinning freely. Do not allow items to extend beyond
the racks.
• Face soiled surfaces toward the center of the
dishwasher.
For best dishwashing results follow these guidelines to
determine the best arrangement for your items.
10 Place Setting Load
[Rack features vary by model)
Upper Rack
Lower Rack
Upper Rack
Glasses, cups, stemware, light-weight plastics, plates,
bowls, pans, long-handled utensils etc. can be loaded
in this rack. Do not load glasses over the tines.
Lower Rack
A variety of items such as dinner plates, mixing bowls,
pots and pans and baking dishes can be loaded in this
rack.
Wider items can be placed along the left side and
back of this rack.
Utensil Baskets
Removable Door Utensil Baskets
For best cleaning results, prevent
items from nesting together by
placing some items in the baskets
with handles up and some with
handles down. Load knives
handles up and spoons and forks
handles down.
To remove the basket(s) from the door:
1. Grasp the utensil basket by
the handle. Slide it toward
the top of the door.
2. Lift the basket off the
securing knobs.
To replace the basket(s) in
the door:
1. Align the slots on the
backside of the utensil
basket with securing knobs
on the door.
2. Set the utensil basket on the securing knobs.
3. Slide the basket toward the bottom of the door until
it locks into place.
Removing the Upper Rack
The rack can be removed when tall or oversized items
need to be loaded into the lower rack. Unload the
rack before removing it from the dishwasher.
To remove rack with tab-lock rack stops:
.
2.
Roll the rack '/3to '/_of the way out.
Locate the rack stops at the end of each track.
Squeeze the tab in the middle of the rack stop and
pull the rack stop straight out. Take care to support
the rack while removing the rack stops.
3. Roll the rack all the
way out of the track
and remove from the
dishwasher.
To replace:
1. Replace the
dishwasher rack by Stylemay
guiding the wheels varybymodel
into the tracks.
Rack
Stop
2. Push each rack stop squarely into the end of the
track until the catch pops into the small hole on the
side of the track.
Important: ........
The dishwasher will not _i _ _ _N
operate correctly if the _ _
wash arm is not aligned _ _
with one of the water inlet _ _
holes on back wall of the _ _ _
dishwasher. _ _ _ _,

DishwasherUse
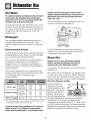
Hot Water
For optimal cleaning and drying results, hot water
is necessary. The incoming water temperature
should be 120 ° F [49 ° C) to properly activate the
detergent and melt greasy food soils.
To check the incoming water temperature, turn on the
hot water faucet nearest the dishwasher and let it run
into a glass in the sink. Place a candy thermometer in
the glass and check the temperature once it has
stopped rising.
Detergent
Use a detergent designed specifically for use in an
automatic dishwasher. Be sure it is fresh. Store
granular detergent in a cool, dry place (not under the
sink).
Recommended Amount
Too little detergent results in poor cleaning, hard water
filming/spotting and poor drying. Too much detergent
can cause permanent etching/cloudiness.
Suds can cause the dishwasher to overflow. Measure
the detergent carefully and use only detergents
designed for use in a dishwasher. Less detergent is
needed in soft water. Try another brand of detergent if
sudsing continues.
The amount of detergent to use is determined by the
hardness of the water and soil level of the load. Refer
to the following chart for detergent usage
recommendations.
Light Soil 2 tsp 6 tsp
Soft (0-4 gpg) Normal Soil /4tsp 6 tsp
Heavy Soil /4tsp 7 tsp
Light Soil /4tsp 6 tsp
Medium (5-9 gpg) Normal Soil /4tsp 6 tsp
Heavy Soil 5 tsp 7 tsp
Hard (10-12 gpg) All Levels 5 tsp 8 tsp
*Your local water utility or state university extension service can tell
you the degree of water hardness in your area.
In extremely hard water conditions (13 grains per
gallon or more*), it is difficult to achieve good
results with any dishwasher. A mechanical water
softener may be necessary to improve water
quality, detergent effectiveness, and protect the
dishwasher parts from the damage that hard
water can cause.
Add recommended amount of detergent to each cup
as shown and close the detergent lid.
Do not use detergent with the Rinse Only (select
models) cycle. Leave the detergent lid open when
running Rinse Only (select models).
Rinse Aid
Regular use of a rinse aid improves drying,
reduces spotting and filming, and reduces
moisture left on the dishwasher interior.
An automatic rinse aid dispenser is located next to the
detergent cup.
The window next to the dispenser cap indicates when
the rinse aid reservoir needs to be refilled. When the
level of rinse aid is below the indicator marks and the
window is nearly clear, it is time to refill the dispenser.
Check the dispenser monthly.
To add rinse aid to the
dispenser, turn the cap
counterclockwise to open.
Remove the cap and pour
liquid rinse aid into the
opening. The amount of
rinse aid dispensed during
the cycle is adjustable by moving the lever inside the
reservoir area. For most water conditions use the
manufacturer recommended setting of "2". Adjust it up to
the "MAX" setting for hard water. Set the lever anywhere
between these amounts as needed to get the best results.
Replace the cap and turn it clockwise to close.
5

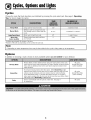
Cycles,OptionsnndLights
Cycles
Choose the cycle that best describes your dishload by pressing the cycle select pad. (See page 3, Operating
Tips, for how to begin the cycle).
Heavy Wash Long cycle for heavy food soils. 132" 2 washes/3 rinses
Medium cycle for average food soils.
Normal Wash The turbidity sensor is active with this 97-117" 1-2 washes**/1-2 rinses**
cycle.
Light/Quick Wash Short cycle for light food soils. 82* 1wash/2 rinses
Rinse Only Rinses dishes being held until there 9 1rinse
(select models) is a full load.
Includes approximately 30 minutes of dry time.
**Number of fills will vary depending on the soil level of each load.
Note [
• Depending on water temperature, there may be time added to the cycle to bring water up to temperature.
Options
In addition to choosing a cycle, choose as many available options as are needed for your dishload.
Hi Temp Wash provides additional heat during the wash portion of the cycle, All cycles
Hi Temp Wash which ensures proper water temperature for better cleaning and drying results. (except Rinse Only
It also adds an additional rinse to the cycle which improves results in hard [select models])
water situations.
For enhanced drying results select this option. When Heated Dry is not
selected, towel drying of some items such as plastic and items with non-stick All cycles
Heated Dry surfaces may be necessary and more moisture may be noticed adhering (except Rinse Only
to the dishwasher interior. In models with plastic interiors, it is normal to [select models])
notice vapor escaping from the door vent as the heat dries your dishes. Vapor
will escape even if Heated Dry is not selected.
Delay Used to automatically start the cycle at a later time. See page 7 All cycles
for instructions.
6

Cycles,OptionsnndLights
Delay
The Delay option can be used to automatically start
the cycle at a later time to reduce daytime heat
buildup in the home or to take advantage of reduced
energy costs if available in your area. This option is
also useful for conserving hot water at times of high
household usage (showers, laundry).
To set up a Delay:
1. Select the appropriate cycle and options for the
load. Close the door.
2. Press the Delay pad until the desired amount of
delay time is selected.
3. The Delay indicator and the count down display
(select models) will flash until the START/Cancel
pad is pressed.
/4. As soon as the START/Cancel pad is pressed, the
flashing will stop and the delay time will begin
counting down. The Delay indicator will remain lit
until the delay time has counted down.
5. The cycle will automatically start as soon as the
delay time expires.
Note
• If 30 seconds elapse between setting the cycle
and options and pressing the START/Cancel
pad, the dishwasher will turn off.
To cancel a Delay:
When the delay is counting down, press the Delay pad
again. The indicator light will go out and the cycle will
start or resume immediately.
To cancel a Delay and the cycle:
• Press START/Cancel once to drain and turn off the
dishwasher.
Or
• Press START/Cancel twice to turn dishwasher off
without draining.
Lights
7

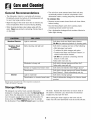
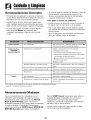
CareandCleaning
General Recommendations
• The dishwasher interior is normally self-cleaning.
Periodically check the bottom of the dishwasher tub
to see if any large particles remain.
• Wipe the edge of the inner door liner to remove any
food soil splashes which occurred during loading.
• When cleaning stainless steel, always wipe with the
grain. Never use products containing chlorine bleach
or citric acid.
• The color from some tomato-based food soils may
occasionally adhere to various components of the
dishwasher interior, causing temporary discoloration.
To minimize this:
• Remove excess tomato-based food soils from dishes,
before loading.
• Run the Heavy Wash cycle when washing loads
containing tomato-based food soils.
• Use a dishwasher detergent that contains chlorine to
better fight staining.
Standard Exterior
Stainless Steel
Exterior
(select models)
Light to nloderate
Daily cleaning and light soil
Moderate to heavy soil
Streaks or fingerprints/restore shine
Discoloration
Interior Light to moderate
Discoloration, or tomato-based stain
*Brand names are trademarks of the respective manufacturer.
**Call 1-877-232-6771 to order.
Soft damp cloth and liquid spray cleaner.
Do Not use abrasive powders or cleaning pads.
Soft cloth or sponge and one of the following:
• Mild detergent and water
• A solution of white vinegar and water
• Formula 409 Glass and Surface Cleaner*, or
similar multi-surface cleaner.
• Do Not use products containing chlorine
bleach or citric acid.
Follow with rinse and dry.
Soft cloth or damp sponge and Bon Ami*.
Follow with rinse and dry.
Soft cloth and Stainless Steel Magic Spray**.
Soft cloth or damp sponge and Cameo Stainless
Steel Cleaner*. Rinse immediately and dry.
Soft cloth or damp sponge.
Switch dishwasher detergent to chlorine-based
product.
Storage/Moving
Fill detergent cup with a fresh-scented dishwasher
detergent or baking soda and select the Normal Wash
cycle. Allow the dishwasher to complete the cycle. Then
turn the water supply off and drain the dishwasher. To
drain, press the START/Cancel pad once to activate
the dishwasher. Press START/Cancel again to activate
the drain. Operate the drain twice to ensure most of
the water is removed. Last, disconnect the electrical
supply and prop open the door.
When turning the water supply to the home off, the
water shut off at the dishwasher must be turned off also.
8

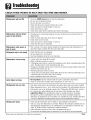
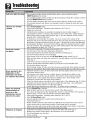
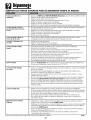
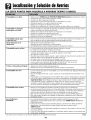
Troubleshooting
CHECK THESE POINTS TO HELP SAVE YOU TIME AND MONEY.
BL : ....
Dishwasher will not fill • Press the START/Cancel pad to start tile dishwasher.
• Be sure door is latched securely.
• Be sure the water is turned on.
• Check that the pad is properly selected for a cycle.
• Check your home's circuit breaker or fuse box.
• Check inlet [lose for a kink.
• Check water valve inlet for sediment and clean if necessary.
Dishwasher will not drain/
water in tub bottom
• If hooked up to a food waste disposer, be sure the knock-out is removed from the
disposer inlet.
• Check for food obstruction in the drain or disposer.
• Check drain hose for a kink.
• Check your home's circuit breaker or fuse box.
• Check that the cycle is completed.
Dishwasher adds water at • This is normal. The sensor (select models) in the pump must stay submerged so a
end of cycle short fill of water is added after the cycle's last drain.
Detergent cup is not empty • Check that the cycle is completed.
• Be sure dispenser is not blocked.
• Use fresh detergent stored in a cool, dry place.
Dishwasher seems noisy "
Cycle takes too long • Hi Temp Wash has been selected and the cycle is extended to heat water.
• Check to see that the incoming water temperature is 120° F (49° C).
Dishwasher has an odor •
A water valve hiss during fill is normal.
Water circulation sounds are normal.
A thumping sound may be a wash arm bumping an item that is extending beyond the
racks. Readjust load to avoid obstructing wash arm.
Chopping or grinding sounds may be heard as the internal chopper blade chops [lard
items like fruit seeds, nuts, etc.
Humming during the drain is normal.
A snap noise is the detergent cup lid hitting the door liner when the dishwasher door
is opened at the end of the cycle. This is normal.
Proper installation affects the noise level.
Dishwasher leaks
*Brandnamesaretrademarksof the res
Run dishes being held in the dishwasher through a Rinse Only cycle (select models).
Marly dishwashers [lave a "new" smell when first installed. This will dissipate with use.
Dishwasher may not be draining properly. (See "Dishwasher Will Not Drain" section.)
Fora strong odor, place baking soda in both sides of the detergent cup. Select
Light/Quick Wash cycle and allow the water to circulate for about 10 minutes.
Interrupt the cycle by unlatching the door and let it stand overnight. Restart the
dishwasher by latching the door and allow it to complete the cycle. Another alternative
is to use a dishwasher cleaning product such as Jet-Dry Dishwasher Cleaner*.
• Check that the dishwasher is level. (Refer to the Installation Instructions.)
• Suds can cause the dishwasher to overflow. Measure the detergent carefully and use
only detergents designed for use in a dishwasher. Less detergent is needed in soft
water. Try another brand of detergent if sudsing continues.
Follow directions closely on how to add a forgotten item (jog.3).
Toavoid rinse aid leaking from the dispenser, be sure the lid is securely attached.
_ectivemanufacturer. Cont.
9

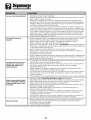
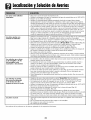
Troubleshooting
Indicator lights flashing • The countdown display (:select models] flashes after a cycle is selected until the
START/Cancel pad is pressed.
• The countdown display (:select models] and the delay indicator flash after a delay is selected
until the START/Cancel pad is pressed.
• All active display indicators flash if the door is opened during a running cycle or delay.
• The currently selected cycle flashes if an attempt is made to change the cycle after cycle
"lock-in".
Glasses are cloudy/ • Select Hi Temp Wash option.
spotted • Check water temperature. Incoming water should be 120° F (49° C].
• Always use a rinse aid.
• Confirm that the cloudiness is removable by soaking the item in white vinegar for
approximately 5 minutes. If removed, the problem is due to [lard water. Adjust detergent
amount being used to match water hardness _pg. 5]. Be sure detergent is fresh, stored
properly and is a high quality brand.
• If cloudiness is not removable, it is etching. This is an erosion of the surface of the
glassware and carl be caused by water that is too hot, from using too much detergent or by
prewashing. Detergent needs food soil to act upon. If etching has occurred, the glassware
is permanently damaged. To prevent further etching, adjust the detergent amount to match
the water hardness, stop prewashing, and use water heating options only when incoming
water temperature is below 120° F (49° C].
Food soil remains • Check water temperature. Incoming water should be 120° F (49° C].
on dishes • Run hot water at the sink before starting the dishwasher.
• Check water hardness and adjust detergent amount accordingly _pg. 5].
• Use fresh detergent stored in a cool dry place.
• Select proper cycle for the soil level and Hi Temp Wash (select models] (pg. 6].
• Make sure the upper rack wash arm connector is correctly aligned in one of the water inlet
holes (pg. 4].
• Load items so they do not block the wash arms (pg. 4].
• Load the utensil basket with knife handles up and spoon and fork handles down.
• Do not place glasses over tines.
• Before loading, scrape off burnt on foods and wipe the starchy film from utensils used with
pasta, rice and oatmeal. These soils require more energy than the rest of the load to clean.
Items washed in the • Aluminum utensils or pans can leave marks when they rub against other items. Leave a
dishwasher or the slight space between items.
dishwasher tub itself • Iron deposits in the water can leave a yellow, brown or orange film on dishes or the
are stained/discolored dishwasher tub. A rust filter may be needed. Check with a water treatment company.
• Separate silver or silver-plated silverware from stainless steel. These metals can be
damaged by contact with each other during washing.
• Color from tomato sauces may adhere to the interior parts of the dishwasher (log. 8]. If light
staining has occurred, leave the door open to oxidize the stain away. Use a dishwasher
detergent that contains chlorine to better fight staining.
• Certain dishwasher detergents may stain silver. Try another brand of detergent.
Items not properly • Be sure Heated Dry is selected.
dried/moisture is • Water droplets may form on the inner door as part of the drying process.
present on the • Use a rinse aid separate from the detergent like Jet Dry* or Cascade Rinse Aid* regularly, to
dishwasher interior improve drying. Turn the rinse aid selector toward the MAX setting.
after the dry cycle • Check water temperature. Incoming water should be 120° F (49° C].
• Select Hi Temp Wash option.
• Increase detergent amount to match water hardness (pg. 5].
• Load properly. _pg. 4]
• Plastic and items with non-stick surfaces are difficult to dry because they have a porous
surface which tends to collect water droplets. Towel drying may be necessary.
• Glasses and cups with concave bottoms hold water and require towel drying. Locate these
items on the more slanted side of the rack for improved results.
Dishware is chipped • Load dishes according to instructions so they do not strike each other _pg. 4].
• Washing fine antique china/crystal in the dishwasher is not recommended.
• Do not load glasses over the tines.
• Do not overload.
*Brand names are trademarks of the respective manufacturer. 10

Wurru,t¥u,d Service
CUSTOMER'S SOLE AND EXCLUSIVE
REMEDY UNDER THIS LIMITED
WARRANTY SHALL BE PRODUCT REPAIR
AS PROVIDED HEREIN. IMPLIED
WARRANTIES, INCLUDING WARRANTIES
OF MERCHANTABILITY OR FITNESSFOR
A PARTICULAR PURPOSE,ARE LIMITED
TO ONE YEAR ORTHE SHORTEST
PERIOD ALLOWED BY LAW. MAYTAG
CORPORATION SHALL NOT BE LIABLE
FOR INCIDENTAL OR CONSEQUENTIAL
DAMAG ES.SOME STATESAN D
PROVINCES DO NOT ALLOW THE
EXCLUSION OR LIMITATION OF
INCIDENTAL OR CONSEQUENTIAL
DAMAGES, OR LIMITATIONS ON THE
DURATION OF IMPLIED WARRANTIES OF
MERCHANTABILITY OR FITNESS,SO
THESE EXCLUSIONS OR LIMITATIONS
MAY NOT APPLYTOYOU. THIS
WARRANTY GIVESYOU SPECIFIC LEGAL
RIGHTS AND YOU MAY ALSO HAVE
OTHER RIGHTS,WHICH VARY STATETO
STATEOR PROVINCE TO PROVINCE.
What is Not Covered By These Warranties
1. Conditions and damages resulting from any of the following:
a. Improper installation, delivery, or maintenance.
b. Any repair, modification, alteration, or adjustment not authorized by the
manufacturer or an authorized servicer.
c. Misuse, abuse, accidents, unreasonable use, or acts of God.
d. Incorrect electric current, voltage, electrical and/or gas supply.
e. Improper setting of any control.
2. Warranties are void if the original serial numbers have been removed, altered,
or cannot be readily determined.
3. Light bulbs, water filters and air filters.
4. Products purchased for commercial or industrial use.
5. Tile cost of service or service call to:
a. Correct installation errors. For products requiring ventilation, rigid metal
ducting must be used.
b. Instruct the user on the proper use of the product.
c. Transport tile appliance to and from the servicer.
6. Any food loss due to refrigerator or freezer product failures.
7. Expenses for travel and transportation for product service in remote locations.
8. Outside of tile United States and Canada this warranty does not apply.
Contact your dealer to determine if another warranty applies.
9. Consequential or incidental damages sustained by any person as a result of
any breach of these warranties. Some states do not allow tile exclusion or
limitation of consequential or incidental damages, so tile above exclusion may
not apply.
If You Need Service
First see the Troubleshooting section in your Use and Care Guide or call tile
dealer from whom your appliance was purchased or call Maytag Services, LLC,
Customer Assistance at 1-800-888-9900 USA and 1-800-888-2002 Canada to
locate an authorized servicer.
Be sure to retain proof of purchase to verify warranty status. Refer to WARRANTY
for further information on owner's responsibilities for warranty service.
If the dealer or service company cannot resolve the problem, write to Maytag
Services, LLC,Attn: CAIR Center, P.O.Box 2370,Cleveland,TN 37320-2370,or call
1-800-688-9900 USA and 1-800-688-2002 Canada. U.S.customers using
TTY for deaf, hearing impaired or speech impaired, call 1-800-688-2080.
User'sguides, service manuals and parts information are available from Maytag
Services, LLC,CustomerAssistance.
Notes: When writing or calling about a service problem, please include:
a. Your name, address and telephone number;
b. Model number and serial number;
c. Name and address of your dealer or servicer;
d. A clear description of the problem you are [laving;
e. Proof of purchase (sales receipt).
11

DW-1
vaisse//e
D_pannage ....... ,.,,,21,22
iiiiiiiiiiiiiiiiiiiiiiiiiiiiiiiiiiiiiiiiiiiiiiiiiiiiiiiiiiiiiiiiiiiiiiiiiiii
Garantie et service ......... 23
Gui_ de Uso y Cuidado ..... 24

Securit6
Ce que vous devez savoir sur
les instructions de sdcurti6
Lesinstructions de s6curit6 importantes et les avertissements
paraissant dans ce guide ne sont pas destin6s _ couvrir toutes
les situations et conditions 6ventuelles qui peuvent se
pr6senter. IIfaut faire preuve de bon sens et de prudence Iors
de I'installation, de I'entretien ou de I'utilisation de I'appareil.
Preneztoujours contact avec votre fabricant, au sujet de
probl6mes ou conditions que vous ne comprenez pas.
Reconnaissez les 6tiquettes, phrases
ou symboles sur la s6curit6
Instructions de securite importantes
Lesproduits portant une 6tiquette (_) ont 6t6 homologu6s par
Underwriter's Laboratories,Inc.- ceux portant une 6tiquette
CSAont 6t6 homologu6s par la CanadianStandards
Association (CSA).N6anmoins,comme pour tout autre
6quipement utilisant 1'61ectricit6et des pieces mobiles,il y a un
danger potentiel.
13
1. Lire la totalit6 des instructions avant d'utiliser le lave-
vaisselle.
2. Utiliser le lave-vaisselle uniquement pour les
applications.
3. D6brancher le lave-vaisselle avant tout entretien.
4. Pour _viter tout risque de choc 61ectrique, les c6t6s et
I'arriere doivent 6tre ferm6s et le panneau avant doit
6tre fix6 avant de brancher le lave-vaisselle. Se
reporter aux instructions d'installation pour les
m6thodes correctes de mise _ la terre.
5. Brancher le lave-vaisselle _ un circuit 61ectrique
correctement prot6g6, d'une puissance nominale
appropri6e et avec ills de calibre ad6quat.
6. II ne faut jamais laisser les enfants utiliser ou jouer
dans, avec ou autour du lave-vaisselle.
7 Pour r6duire le risque de blessure Iors du chargement
du lave-vaisselle, il faut placer les articles pointus ou
aiguis6s avec le manche vers le dessus. De m6me,
Ioger les articles pointus pour qu'ils n'endommagent
pas le joint de la porte.
8. Ne pas toucher _ 1'616mentchauffant au bas de la
cuve durant ou _ la fin d'un cycle car il est chaud.
9. N'utiliser que des d6tergents et des agents de rin£;age
con£;uspour un lave-vaisselle r6sidentiel automatique.
Nejamais utiliser de savon, de d6tergent lessiviel ou de
d6tergent de lavage _ la main dans votre lave-vaisselle.
Garder ces produits hors de port6e des enfants.
10. Ne pas s'asseoir, se mettre debout ou maltraiter la
porte ou les paniers du lave-vaisselle.
11. Sous certaines conditions, de rhydrog_ne peut se former
dans un systSmed'eau chaude qui n'a pas6t6 utilis6
pendant deux semaines ou plus. L'hydreg#ne est un
gaz explosif Si le systSmed'eau chaude n'a pas 6t6
utilis6 pendant une telle p6riode,ouvrir tous les robinets
d'eau chaude et laissercouler I'eau pendant plusieurs
minutes. Ceci diminuera I'accumulation d'hydrog6ne.
Comme il s'agit d'un gaz inflammable, ne pasfumer ou
utiliser de flamme vive durant cette op6ration.
12. Ne pas laver d'articles en plastique ne portant pas
I'indication _<lavable en lave-vaisselle >>.Pour des
articles en plastique sans indication, v6rifier les
recommandations du fabricant.
13. Ne pas circonvenir les commandes.
14. Pour 6viter tout risque d'enfermement et/ou de
suffocation accidentelle d'un enfant, toujours enlever
la porte du compartiment de lavage Iorsque I'on
enl6ve un ancien lave-vaisselle ou qu'on le jette.
15. Faire preuve de prudence en d6chargeant le lave-
vaisselle. La vaisselle peut 6tre chaude si elle est
d6charg6e peu de temps apr6s la fin d'un cycle.
16. Leslave-vaisselle_ usage r6sidentiel certifi6 ne sont pas
con£;uspour les 6tablissements alimentaires
homologu6s.
17 Pour 6viter que I'eau ou la moisissure ne d6t6riore
votre habitation, v6rifiez r6guli6rement les
raccordements d'arriv6e d'eau et les tuyaux
d'6vacuation pour d'6ventuelles fuites.
Conserver ces instructions

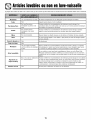
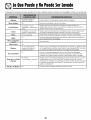
Articlesluvublesounonenluve-vuisselle
La plupart des articles de table et de cuisson ainsi que les couverts peuvent 6tre laves en sdcuritd dans le lave-vaisselle. Wrifier avec le fabricant.
.adaminiam Oui, saul raluminium anodis& De hautes temp6ratures et les d6tergents peuvent attaquer la finition.
Fonte Non I'appr6t serait enlev6 et le fer rouillerait.
Oui, sauf les pi6ces Toujours v6rifier les recommandations du fabricant avant le lavage. Les
PorcelainelGrbs d'antiquite ou peintes _ la porcelaines fines, les motifs peints _ la main ou sur le vernis peuvent s'estomper.
main. Les feuilles d'or peuvent se d6colorer.
Oui, sauf les pisces Toujours verifier les recommandations du fabricant avant le lavage. Certains
Cristal d'antiquite et le cristal types de cristal au plomb peuvent se corroder apr_s des lavages r6p6t6s.
d61icat.
Filtres Non recommand6s. Peuvent laisser un dep6t crasseux ou des taches _ I'int6rieur du lave-vaisselle.
Verre Oui Un verre sp6cial appel6 <<verre laiteux >>peut jaunir par suite de lavages r6p6t6s
au lave-vaisselle.
Couverts plaques or Non Se d6colorent.
_tain, fer blanc Non
Oui, sur panier superieur Toujours verifier les recemmandatiens du fabricant avant le lavage. La capacite
Plastiques sauf les articles en plastique des plastiques _ resister aux hautes temp6ratures et aux d6tergents peut varier.
jeter. Les articles en plastique jetable ne sont pas lavables en lave-vaisselle.
Oui Si ces articles ne sont pas lav6s immediatement, lancer un cycle Rinse Only
Acier inoxydable (Rin_age seulement) (certains mod6les). Le contact prolonge avec la nourriture
centenant du sel, du vinaigre, des preduits laitiers ou du jus peut endommager la
finition.
Non, s'il a subi un traitement Toujours v6rifier les recommandations du fabricant avant le lavage. Sices articles
Argenterie ou de <_noircissement >>. ne sont pas laves immediatement, lancer un cycle Rinse Only (certains mod61es).
argent sterling Le contact prolong_ avec la nourriture contenant du sel, de I'acide ou des
sulfures (oeufs, mayonnaise eu fruits de mer) peut endommager la finitien. Le
<_noircissement >_commercial peut 6tre enlev6 par le d6tergent.
Articles en bois Non Le bois peut se de.',former, se fissurer ou se decolorer.
14

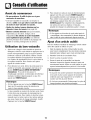
Conseilsd'udlisadon
Avant de commencer
• Ne pas pr_rincer. II suffit de jeter os et gros
morceaux de nourriture.
• Si le lave-vaisselle est raccorde a un broyeur
dechets, veiller & ce que celui-ci soit vide avant
de mettre le lave-vaisselle en marche.
• Gratter los taches tenaces laiss_es par los
aliments & base de tomato (voir page 20).
• I_liminer certains aliments (tels que moutarde,
mayonnaise, jus de citron, vinaigre, sel et
vinaigrettes) des articles en acier inoxydable
aussi rapidement que possible. Cos aliments
peuvent provoquer de la rouille et du piquage s'ils
restent en contact prolonge avec la surface.
Utilisation du lave-vaisselle
1. Apres avoir charge le lave-vaisselle et ajoute du
detergent, choisir le cycle desire en appuyant sur la
touche correspondante, jusqu'a ce que le temoin
lumineux a cote du cycle desire, s'allume. Choisir
los options desirees en appuyant sur los touches.
Los voyants de signalisation pour le cycle choisi et
los options lumineux. Pour annuler une option
appuie le coussin encore.
2. Pour demarrer un cycle, fermer la porte jusqu'_ ce
qu'elle se verrouille, puis appuyer une lois sur la
touche START/Cancel (MISE EN MARCHE/
Annulation). A la suite d'une pause, le
remplissage commence. Le decompte de I'afficheur
(certains modeles) clignote jusqu'_ ce que I'on
appuie sur START/Cancel.
Remarque
• Si I'on n'appuie pas sur la touche STARTICancel
dans los 30 secondes suivant la selection du
cycle, le lave-vaisselle s'arrete.
Le lave-vaisselle se souvient du dernier cycle choisi.
II n'est donc pas necessaire de reprogrammer le
cycle _ chaque lois. Pour mettre en marche le lave-
vaisselle avec le memo cycle et los memos options
que ceux choisis Iors du lavage precedent, il suffit
d'appuyer sur la touche START/Cancel.
.
Pour annuler un cycle en cours de fonctionnement,
appuyer une lois sur la touche START/Cancel. Le
lave-vaisselle procede a une vidange puis s'arrete.
Pour arreter le lave-vaisselle sans qu'il ne commence
une vidange, appuyer deux fois sur la touche
START/Cancel. Pour empecher des changements
non prevus de cycle ou d'option, il n'est plus
possible de changer cos selections apres 1 minute.
Remarque
• Si I'on appuie sur la touche de cycle select apres le
<{verrouillage >>des commandos, le temoin lumineux
situe _ cote du cycle selectionne clignote trois fois.
Ajout d'un article oublie
Pour de meilleurs resultats de nettoyage, I'article oublie
devra etre ajoute au debut du cycle.
1. Saisir la poignee de porte et deverrouiller la porte
sans I'ouvrir completement. Tous los temoins lumineux
clignotent pour indiquer que le cycle est interrompu.
2. Attendre I'arret de la circulation d'eau.
3. Ouvrir la porte et ajouter I'article.
4. Fermer la porte et la verrouiller. Los temoins
lumineux cessent de clignoter Iorsque la porte est
correctement fermee. Apres un court instant, le cycle
reprend automatiquement au point ou il s'est arret&
Remarques
• Si la porte est ouverte pendant le fonctionnement
d'un cycle, il peut y avoir jusqu'a 30 secondes
d'attente avant que I'appareil nese remette en
marche une lois la porte fermee.
• II n'est pas recommande d'interrompre le cycle de
lavage pendant une periode prolongee.
15

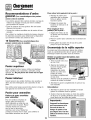
Churgement
Recommandations d'ordre
g n ral [Les caract_ristiques des paniers
varient selon le modble)
• Les articles peuvent etre centres derriere une tige de
retenue ou charges en biais pour tirer le meilleur
parti possible de I'espace.
• I_viter de bloquer les bras gicleurs. Ne rien laisser
depasser des paniers.
• Tourner les surfaces souillees vers le centre du lave-
vaisselle.
Pour obtenir les meilleurs resultats de lavage, observer
les directives suivantes pour determiner la disposition
qui convient le mieux aux articles _ laver.
10 Couverts ([escaract_ristiques des
paniers varient selon le modble)
Panier Panier
inf_rieur Panier pour supbrieur
ustensUes
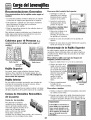
Pour retirer le(s) panier(s) de la porte :
1. Attrapez le panier pour
ustensiles par la poignee.
Faites-le glisser vers le
haut de la porte.
2. Degagez le panier des
boutons de retenue en le
soulevant.
Pour remplacer le(s)
panier(s) de la porte :
1. Alignez les fentes du dos
du panier avec leboutons
de la porte.
2. Placez le panier pour ustensiles sur les boutons de
retenue.
3. Faites glisser le panier vers le bas de la porte
jusqu'_ ce qu'il soit bloque.
Desmontaje de la rejilla superior
Le panier peut etre enleve pour placer des articles
hauts ou surdimensionnes dans le panier inferieur.
Decharger d'abord le panier avant de I'enlever.
Panier sup rieur
II peut recevoir verres, tasses, articles en plastique
leger, assiettes, bols, casseroles, ustensiles 8 long
manche, etc. Ne pas placer les verres sur les tiges
de retenue.
Panier infbrieur
II peut recevoir une variete d'articles, des assiettes
diner, des bols melangeurs, des casseroles et des
plats.
Des articles plus larges peuvent etre places le long du
cote gauche et 8 I'arriere de ce panier.
Panier pour ustensiles
Paniers de porte amovibles
pour ustensiles
Pour de meilleurs resultats de
lavage, evitez de laisser les
divers elements se coller les uns
aux autres dans le panier. Placez
certains d'entre eux manches
vers le haut et les autres
manches vers le bas. Mettez les
couteaux manches vers le haut, puis cuilleres et
fourchettes manches vers le bas.
Retirer unpanier muni de buttes avec
languette de s_ret_ :
1. Tirez le panier vers vous
du 1/3 fl 1/2.
2. Reperez les butees au
bout de chaque guide.
Appuyez sur les
languettes de s0rete
situees au centre des
butees et retirez
les butees completement Le stylepeut
varier
et tout droit.
Assurez-vous de soutenir le panier au poussoir
moment de retirer les butees.
Butte
3. Remettez le panier completement et sortez-le du
lave-vaisselle.
R_installation :
1. Remettez le panier du lave-vaisselle en faisant
glisser les roulettes dans les guides.
2. Inserez chacune des butees au bout des guides
de fa(_on 8 ce qu'elles penetrent dans les petits
trous situes sur les cotes des guides.
Importante :
L'appareil ne fonctionne
pas correctement si le
raccord du bras de
lavage du panier n'est
pas align_ avec I'un des
orifices d'arriv_e d'eau
I'arri_re.
16

Udlisadondulave-vaisselle
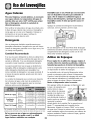
Eau chaude
Pour des r_sultats de nettoyage et de s_chage
optimaux, reau chaude est n_cessaire. La
temperature de I'eau d'arriv_e doit se trouver
entre 49 °C (120 °F) pour activer correctement le
d_tergent et faire fondre la salet_ et la graisse.
Pour v6rifier la temp6rature de I'eau _ son arriv6e,
ouvrir le robinet d'eau chaude le plus proche du lave-
vaisselle et faire couler I'eau dans un verre plac6 dans
1'6vier. Placer un thermometre _ confiserie dans le verre
et v6rifier la temp6rature une fois qu'elle s'est stabilis6e.
D tergent
Utiliser un d6tergent conQu sp6cifiquement pour etre
utilis6 dans un lave-vaisselle automatique. S'assurer
qu'il n'est pas p6rim6 et s'il est en poudre, le ranger
dans un endroit sec et frais (pas sous 1'6vier).
Quantit_ recommand_e
Une trop faible quantit6 de d6tergent entrainerait de
faibles r6sultats de lavage, un d6p0t et I'apparition de
taches dus a I'eau dure et un s6chage inefficace. Une
trop grande quantit6 de d6tergent peut causer un
piquage et un aspect terne permanent.
La mousse peut faire d6border le lave-vaisselle. Dosez
soigneusement le d6tergent et n'utilisez que des
produits sp6cialement conQus pour le lave-vaisselle. La
quantit6 de d6tergent doit etre reduite en pr6sence
d'eau douce. Essayez une autre marque de detergent
si la quantit6 de mousse reste excessive.
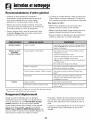
La quantite de detergent _ utiliser est determin6e par
la durete de I'eau et le niveau de salete de la vaisselle.
Se referer au tableau ci-dessous pour connaitre les
recommandations d'utilisation du detergent.
L6ger 2 cuill_res _ the 6 cuill@es a th6
Douce (0-4 gpg) Normal 4 cuill_res _ the 6 cuill@es a th6
Intense 4 cuill_res _ the 7 cuill@es a th6
L6ger 4 cuill_res _ th6 6 cuill@es a th6
Moyenne (5-9 gpg) Normal 4 cuill_res _ the 6 cuill@es a th6
Intense 5 cuill_res _ the 7 cuill@es a th6
Dure (10-12 gpg) Tousles 5 cuill_res _ the 8 cuill6res a th6
Niveaux
*Votre station locale d'approvisionnement en eau ou tout autre
service comp6tent de votre province, peut vous donner le degre de
duret6 de I'eau dans votre r6gion.
En cas d'eau extr_mement dure (13 grains par
gallon ou plus*), il est difficile d'atteindre de bons
r_sultats avec n'importe quel lave-vaisselle. Un
adoucisseur d'eau m_canique peut _tre
17
n_cessaire pour am_liorer la qualit_ de I'eau et
I'efficacit_ du d_tergent et prot_ger les pibces du
lave-vaisselle contre les dommages provoqu_s
par I'eau dure.
Ajouter la quantit6 recommandee de detergent dans
chaque tasse comme il est illustre et fermer le
couvercle du compartiment.
Ne pas utiliser de d6tergent avec le cycle Rinse Only
(RinQage seulement) (certains modeles). Laisser le
couvercle du distributeur de detergent ouvert Iors du
cycle Rinse Only (certains modeles_).
Agent de rin age
L'utilisation r_gulibre d'un agent de rin_age
am_liore le s_chage, r_duit les taches et les
d_p6ts de film ainsi que I'humidit_ & I'int_rieur du
lave-vaisselle.
Un distributeur automatique d'agent de rinQage se
trouve _ c0t6 du godet de d6tergent.
Le hublot _ cote du capuchon du distributeur indique
quand il est necessaire de remplir le reservoir d'agent
de rinQage. Lorsque le niveau d'agent de rinQage se
trouve en dessous de I'indicateur et que le hublot est
presque transparent, il
est temps de remplir le
distributeur. V_rifler le
distributeur tous les
mois.
Pour ajouter de I'agent
de rinQage dans le
distributeur, tourner
lecapuchon vers la gauche pour I'ouvrir. Enlever le
capuchon et verser I'agent de rinQage dans I'ouverture.
La quantite d'agent de rinQage distribuee au cours du
cycle peut etre r6gl6e en deplaQant le levier
I'interieur de la zone du reservoir. La plupart du temps,
utiliser le reglage _{2 >>,recommande par le fabricant.
R6gler _ la position _{MAX >>pour une eau dure. Placer
le levier n'importe ou entre ces deux reperes pour
obtenir les meilleurs resultats. Remettre le capuchon et
le tourner vers la droite pour le fermer.

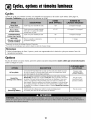
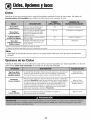
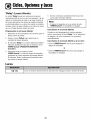
Cycles,optionsettemoinslumineux
Cycles
Choisir le cycle qui convient le mieux _ la vaisselle en appuyant sur la touche cycle select. (Voir page 15,
Conseils d'utilisation, pour la maniere de debuter le cycle.)
Heavy Wash Cycle long pour vaisselle tr_s sale. 132" 2 lavages/3 rin_.ages
[Lavage intense)
Normal Wash Cycle moyen pour vaisselle normale- 97-117" 1-2 lavages**/1-2 rin_.ages**
[Lavage normal) ment sale. Le capteur de turbidite
est actif avec ce cycle.
Light/Quick Wash Cycle court pour vaisselle peu sale. 82* 1 lavages/2 rin_.ages
[Lavage I_ger/rapido)
Rinse Only Rince la vaisselle en attente de 9 1 rin_age
[Rin(;age seulement) prochaines charges.
[certains modbles)
Comprend une duree de s6chage d'environ 30 minutes.
** Le hombre de remplissages varie selon le degr6 de salete de chaque charge.
Remarque
• Selon la temperature de I'eau, il pourra y avoir une augmentation de la duree du cycle pour amener I'eau 8 la
temperature souhaitee.
Options
En plus de choisir un cycle, choisir, parmi les options suivantes disponibles, toutes celles qui seront n_cessaires
selon la charge en cours.
La fonction Hi Temp Wash fait en sorte que I'eau soit plus chaude au cours Tousles cycles
Hi Temp Wash (sauf Rinse Only
[certains modules])
Heated Dry
[Sechage avec chaleur)
du cycle de lavage. La fonction High Temp assure une temp6rature id6ale
pour des lavages et des s6chages optimaux.
Pour de meilleurs resultats de s6chage, s61ectionner cette option. Lorsque
Heated Dry (Sechage avec chaleur) n'est pas choisi, il peut 6tre n6cessaire
de s6cher _ la main certains articles comme ceux en plastique et ceux avec
surface non adh6rente. Plus d'humidit6 peut aussi rester sur I'int6rieur du
lave-vaisselle. Dans les modBles avec interieur en plastique, il est normal que
de la vapeur s'echappe de 1'6vent de la porte pendant que la chaleur sSche
la vaisselle. De la vapeur s'6chappera m6me si I'option Heated Dry n'est pas
selectionn6e.
Tousles cycles
(sauf Rinse Only)
(certains modules)
Delay L'option peut 6tre utilisee pour mettre le cycle automatiquement Tous les cycles
(Demarrage differe) en marche, plus tard. Voir les instructions au-dessous.
18

Cycles,optionsettmoinslumineux
Delay (Dbmarrage differS)
I'option Delay peut etre utilis_e pour mettre le cycle
automatiquement en marche, plus tar& pour reduire
I'accumulation de chaleur pendant la journee dans la
maison, ou pour beneficier de coats energetiques reduits,
si ceci est disponible dans la region. Cette option est
aussi utile pour conserver reau chaude, _ des periodes
d'utilisation domestique elevee (douches, lessive).
R_glage d'un d_marrage Diff_re :
1. S_lectionner le cycle et les options appropri_es
pour la charge. Fermer la porte.
2. Appuyer sur la touche Delay et selectionner la
duree d'attente souhaitee.
3. Le temoin lumineux Delay et I'affichage du compte
rebours (certains modeles) clignoteront jusqu'_
ce que I'on appuie sur la touche START/Cancel
(MISE EN MARCHE/Annulation).
4. Une lois que I'on a appuye sur la touche
START/Cancel, le temoin lumineux s'arrete de
clignoter et le compte _ rebours commence. Le
temoin lumineux Delay restera allume jusqu'_ la fin
du compte _ rebours.
5. Le cycle commencera automatiquement
I'expiration du delai d'attente.
Remarque
• Si trente secondes s'ecoulent entre un reglage du
cycle et des options et une pression sur la touche
START/Cancel, le lave-vaisselle se mettra _ I'arret.
Annulation d'un demarrage differe :
Lors du compte a rebours, appuyer sur la touche
Delay de nouveau. Le temoin lumineux s'eteindra et
le cycle commencera ou reprendra immediatement.
Annulation d'un demarrage diff_r_ et d'un cycle :
• Appuyer une fois sur la touche STARTICancel pour
evacuer I'eau et arreter le lave-vaisselle.
Oil
• Appuyer deux fois sur la touche START/Cancel pour
arreter le lave-vaisselle sans evacuer I'eau.
Temoins lumineux
19
La page est en cours de chargement...
La page est en cours de chargement...
La page est en cours de chargement...
La page est en cours de chargement...
La page est en cours de chargement...
La page est en cours de chargement...
La page est en cours de chargement...
La page est en cours de chargement...
La page est en cours de chargement...
La page est en cours de chargement...
La page est en cours de chargement...
La page est en cours de chargement...
La page est en cours de chargement...
La page est en cours de chargement...
La page est en cours de chargement...
La page est en cours de chargement...
-
 1
1
-
 2
2
-
 3
3
-
 4
4
-
 5
5
-
 6
6
-
 7
7
-
 8
8
-
 9
9
-
 10
10
-
 11
11
-
 12
12
-
 13
13
-
 14
14
-
 15
15
-
 16
16
-
 17
17
-
 18
18
-
 19
19
-
 20
20
-
 21
21
-
 22
22
-
 23
23
-
 24
24
-
 25
25
-
 26
26
-
 27
27
-
 28
28
-
 29
29
-
 30
30
-
 31
31
-
 32
32
-
 33
33
-
 34
34
-
 35
35
-
 36
36


Maytag CDB1500AWS Le manuel du propriétaire
- Catégorie
- Lave-vaisselle
- Taper
- Le manuel du propriétaire
dans d''autres langues
- English: Maytag CDB1500AWS Owner's manual
- español: Maytag CDB1500AWS El manual del propietario
Documents connexes
-
Maytag Performa PDB2430 Manuel utilisateur
-
Maytag PDBL390AWB Le manuel du propriétaire
-
-
-
-
Maytag MDB9750AWQ Le manuel du propriétaire
-
Maytag MDB8951BWB44 Le manuel du propriétaire
-
-
-