Mutsy Nexo Manuel utilisateur
- Catégorie
- Poussettes
- Taper
- Manuel utilisateur

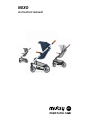
NEXO
instruction manual

1
6
2
3
9
17
4
14
15
5
12
7
8
10
11
13
16

b
a
c
d
e
f
g

p
q1
q2
r
h
i
j
m
n
o

click!
x
s
v
u
t

US Instruction manual Mutsy Nexo
F Mode d`emploi Mutsy Nexo
ES Manual de instrucciones Mutsy Nexo
EN
FR
ES

2
Content
Introduction ........................................................................................................... 2
Warnings ................................................................................................................ 2
Guarantee .............................................................................................................. 4
Maintenance and points for attention .................................................................... 5
Contents of the box ................................................................................................ 6
Summery of parts: part of the drawing .................................................................. 6
Orientation ............................................................................................................ 6
The frame ............................................................................................................... 7
The wheels ............................................................................................................. 7
The brake ............................................................................................................... 8
The push bar .......................................................................................................... 8
The pushchair seat ................................................................................................. 8
The Maxi-Cosi car seat .......................................................................................... 11
Introduction
· To get the best out of this product, we recommend careful use and main-
tenance. Read these instructions for use carefully before you start using
the pushchair and keep the instructions for future reference.
· If you have any questions, comments, problems or complaints, please con
-
tact your retailer.
· If you want to know what accessories are available for this product or if you
want to stay informed of new Mutsy products then go to www.mutsy.com.
⚠ WARNINGS
general
· IMPORTANT: Keep these instructions for future reference
· WARNING: Read through these instructions for use carefully, and keep them in a
safe place for future reference. Failure to observe the instructions for use may put
your child’s safety at serious risk.
· WARNING: You are responsible for your own child’s safety. Never leave your child
unattended.
· WARNING: Avoid serious injury from falling or sliding out. Always use the ve point
safety harness.
· WARNING: Ensure that the frame and handlebar are completely unfolded and that
all locking devices are engaged before use.
· WARNING: Check that the pram body or seat unit or car seat attachment devices
are correctly engaged before use.
· WARNING: Do not let your child play with this product.
· WARNING: Never leave your child unattended, this can be dangerous.
· WARNING: Always check that the accessories have been secured properly before

3
EN
you start using the pram.
· WARNING: Only use the pram for one child at a time.
· WARNING: Always apply the brakes when parking the pram.
· WARNING:
Make sure that the brakes are applied when placing or removing your child.
· WARNING: You must take your child from the pram before lifting the pram or using
stairs, escalators or lifts.
· WARNING: This product is not suitable for running or skating.
· WARNING: Use only replacement parts supplied or recommended by Mutsy.
safety during adjustment
· WARNING: To avoid pinching of ngers, keep children away from the frame when
folding and unfolding the product.
· WARNING: When making adjustments ensure that all parts of the child’s body are
clear of any moving parts
seat
· WARNING: The seat unit is suitable for children from birth up to 55 lbs. (25 kg) and
up to 42.7 in. (108 cm) in height.
· WARNING: For infants from 0 to 6 months, the pram must be set to reclined car-
riage position.
· WARNING: For infants from 0 to 6 months, the seating surface must be set to a at
position.
· Warning: Child may slip into leg openings and strangle. Never use in reclined car-
riage position of the seat unless the child is properly secured with the 5-point
safety harness.
· WARNING: Always secure your child with the 5-point safety harness combined
with the strap running between the legs.
· WARNING: After unfolding the seat, always push the bumper bar to its upright
position before placing a child in the seat. Make sure that no child is near the
bumper bar when moving it.
· WARNING: If your child is younger than 6 months always use the pram body or the
reclined carriage position of the seat.
· WARNING: The sitting position of the pushchair is not suitable for children from 0
to 6 months. Children from 0 to 6 months must only be transported with the push-
chair in reclined carriage position.
· WARNING: For children from 0 to 6 months, the crotch strap of the safety harness
must be xed in the rear opening of the seat.
· WARNING: The reclined and upright positions of the seat are suitable for children
from 6 months and upwards to 55 lbs (25 kg).
stability
· WARNING: A shopping basket is located between the wheels underneath the

4
frame. The maximum permissible weight for this basket is 11 lbs. (5 kg).
· WARNING: Bags, accessories or both, other than recommended by the manufac-
turer, can, when placed on the product, result in an unstable pram. Exclusively use
original Mutsy accessories.
· WARNING: Overloading can result in a dangerous, instable situation.
· WARNING: Shopping bags or other heavy objects must not be hung on the push
bar due to the risk of toppling.
· WARNING: This product may become unstable if a parcel bag or parcel rack, other
than one recommended by the manufacturer is used.
· WARNING: You need to tilt the pram on its rear wheels if you want to get on or get
o the kerb.
car seat
· WARNING: The maximum permissible weight as indicated on the relevant product
applies when using a car seat.
· WARNING: For car seats used in conjunction with the frame, this vehicle does not
replace a cot or a bed. Should your child need to sleep, then it should be placed in
a suitable pram body, cot or bed.
· WARNING: When using a Maxi-Cosi Prezi make sure the pushbar height limiters are
assembled.
· The Mutsy Nexo has been approved according to the 16 CFR 1227 and SOR/2016-
167 standards.
Guarantee
All Mutsy products come with a two-year guarantee, which starts on
the day of purchase. In the event of a manufacturing fault, Mutsy will
work with its retailers to provide a solution. Manufacturing faults will be
repaired under the guarantee. The guarantee does cover exchanges or
returns of Mutsy products.
The guarantee will only be honoured if you can provide the following at
the store at which the product was purchased:
· a completed guarantee card
· a copy of the purchase receipt
· a clear description of the defect
· your product
The guarantee card can be found on:
http://mutsy.com/usen/service/warranty
This card must be completed correctly and submitted digitally. You will also
need to enter the serial number. This number can be found on a white sticker
on the product; it is usually located on the underside.

5
EN
The guarantee does not apply:
· if the problem concerns fabric discolouration
· if the fabric has been damaged by water
· in relation to damage caused by the use of non-original Mutsy accessories.
· if you cannot provide the purchase receipt
· if you have used the product incorrectly or unreasonably
· in relation to regular wear and tear that occurs as a result of day-to-day use
· in the event of damage caused by bad maintenance, neglect or an accident
· if damage has been caused as a result of modications to the product that
have been carried out by the consumer, without permission from the
manufacturer
· if the damage is not reported promptly (within 2 months)
Mutsy provides no guarantee in relation to shrinkage or defects concern-
ing the fabric elements that have been caused as a result of cleaning.
Safety is a priority for Mutsy. We therefore full the highest safety stan-
dards:
· Europe: EN 1888
· UK: BS EN 1888
· Canada: SOR/ 85 - 379
· USA: 16 CFR 1227
· AS/NZS 2088:2013
For questions or comments, please contact us via: www.mutsy.com/
usen/contact
Maintenance and points for attention
The frame
· Regularly check the locking mechanism of the frame. After cleaning
you can spray some Teon spray on it and rub it with a soft cloth. This
also applies to other moving parts.
The wheels
· To let the wheels run smoothly the wheel axles must regularly be cleaned
and lubricated with acid-free vaseline. The wheels can never be lubricat-
ed with oil.
The fabrics
· The upholstery of the pram is not removable.
· You can treat stains on the outer fabric or lining of non-removable
fabric parts with some liquid bleach-free soap. Always treat the whole
area.

6
· Removable fabric parts can be washed in the washing machine at 30°
with a wool wash programme. Wash without bleach and do not tum-
ble-dry. Do not iron and do not dry-clean. Close all zips, velcro parts
and pressing studs before washing.
· All Mutsy fabrics have been tested on water resistance however if the
pram gets really wet, the water can penetrate the inner and outer fab-
rics and leave circles behind. To prevent this we recommend you to
always use the rain covers in case of wet weather.
· Always let a wet pram dry with a fully unfolded hood.
· Even though Mutsy fabrics are selected with the utmost care and are
tested on colour fastness, the fabrics can discolour. Mutsy shall not be
liable for any possible discolouration.
Contents of the box
· 1 frame with pushchair seat and basket
· 2 front wheels
· 2 rear wheels
· 1 hood
· 1 bumper bar
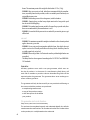
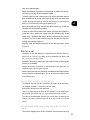
Summary of parts: part of the drawing
01. push bar
02. height adjustment button push bar
03. upper frame unlocking buttons
04. lower frame unlocking buttons
05. fastening adjustment backrest
06. hood
07. upper fabric fastening of seat
08. bumper bar
09. bumper bar release button
10. lower fabric fastening of seat
11. hinge point seat
12. leg support
13. folding safeguard
14. rear wheel release button
15. brake pedal
16. swivelling wheel locking
17. adjustment strap
Orientation
· References in the text to the front, rear, left or right side of the pram are
described from the perspective of a user walking behind the pram.

7
EN
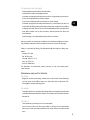
The frame
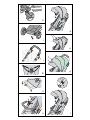
Unfold the frame (a, b)
· Keep children away from all moving parts when unfolding.
· Press the unfolding safeguard inwards (a1) and lift the upper frame up
until the lower support clicks into place. Move the push-bar backwards
until you hear a second click. (b)
· Before use always check that the pram has been unfolded and secured
correctly.
Fold the frame (c,d)
· Stand behind the frame and put the frame on the brake. Put the
height adjustment buttons (c1) of the push bar in the lowest position.
Pull the release buttons of the upper frame (c2) towards you on both
sides and turn the push bar forwards until the push bar is on the lower
support. (c3)
· Pinch the lower frame unlocking buttons and fold the frame. (d)
· The folding safeguard locks automatically when the product is folded up.
· You can carry the frame from the push bar when the unfolding safe-
guard has been locked.
The wheels
Assemble the rear wheels (e)
· Slide the axle of the rear wheel in the rear wheel casing until you hear a
click.
· Pull the wheel to check that it has been attached rmly.
Disassemble the rear wheels (f)
· Press the button at the back side of the rear wheel casing and take the
wheel o the frame
Assemble the front wheels (g)
· Slide the axle of the front wheel upwards in the front wheel casing until
you hear a click.
· Pull the wheel to check that it has been attached rmly.
Disassemble the front wheels (g)
· Push the button on the back side of the front wheel (g1) and pull the
wheel from the front wheel casing. (g2)
The swivelling wheels (h)
· Turn the ring above the front wheel outwards on both sides in order to
block the swivel setting. The swivelling wheels will automatically be

8
locked when the wheels are placed in forward direction.
· Turn the ring above the front wheel on both sides inwards to unlock
the swivelling wheels.
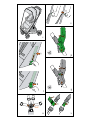
The brake (i)
· Push the brake pedal downwards with your foot to block the rear
wheels.
· Push the brake pedal upwards with your foot to unblock the rear
wheels.
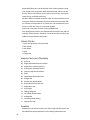
The push bar (j)
· The push bar has three dierent height positions. Press the height ad-
justment buttons (j1) and move the push-bar higher or lower while
keeping the buttons depressed.
· Release the button when the push bar is in the desired position.
The pushchair seat (0 months up to 55 lbs.)
· The pushchair seat is suitable for children from 0 months and upwards,
up to 55 lbs (25kg).The seat can be folded up and unfolded along with
the frame. The back support and leg support are adjustable. Make sure
that the frame has been fully unfolded and the brake is blocked during
all actions indicated below.
Reclined carriage position (0 - 6 months) (t)
Infants younger than 6 months must be strolled in a at fully reclined po-
sition. To do so, you must set the pushchair seat in the reclined position.
This position makes the reclining angle at and ensures more comfort
and safety. The reclined carriage position has ve aspects:
· The seat needs to be set into the at fully reclined position; A double
strap is located at both sides of the seat. Pull the outer strap down-
wards until the top press-stud (t1) is visible. Push the seat slightly high-
er to create more room. Now fasten the press-stud. The seat is now in
the reclined position.
· The backrest must be set in the fully reclined position. See ‘Adjusting
the backrest’.
· The zip for the leg rest barrier is at the bottom of the leg rest.
· Open the zipper and pull it from the pocket.
· Fold back the fabric of the leg support.
· Fasten the press studs of the leg rest barrier to the corresponding studs
on the side of the seat.
· The padded crotch strap of the safety belt must be mounted in the rear
opening of the seat. See ‘The 5-point safety belt’.

9
EN
· The shoulder straps must be mounted in the under most openings of
the backrest. See ‘The 5-point safety belt’.
Never use the reclined carriage position of the seat unless the child is
properly secured with the 5-point safety harness.
The pushchair seat must be removed from the reclined carriage position
for infants from 6 months and up to 25 kg.
· The seat needs to be set be set into the sitting position. Pull the outer
strap partially out of the upholstery to loosen the press-stud (t2). Loos-
en the press-stud. Push the seat down completely.
· The backrest can be set to any desirable position. See ‘Adjusting the
backrest’.
· Undo the press studs in order to store the leg rest barrier. Open the zip
on the pocket.
· First fold the two sides with the press studs inwards and then fold in the
centre section. Put the 2 fabric parts under the centre section when
folding and make sure that there are no sharp corners in the ribbing.
· Close the zip on the pocket.
· The padded crotch strap of the safety belt must be mounted in the
foremost opening of the seat. See ‘The 5-point safety belt’.
· The shoulder straps must be mounted in one of the top three pairs of
openings of the backrest. See ‘The 5-point safety belt’.
Adjust the back support (m)
· The button for adjusting the back support is located at the rear of the
back support.
· Pinch the button and continue pressing it while moving the back sup-
port backwards to lower the back support. Release the button when
the back support has reached the desired position.
· Pinch the button and continue pressing it while moving the back sup-
port forwards to bring the back support in an upright position. Re-
lease the button when the back support has reached the desired
position.
Adjust the leg support (n)
· Lift the leg support to place it upwards.
· Pull the tube (n1) at the bottom of the leg rest to lower it again.
Attach and remove bumper bar (o)
· To secure the front bumper, press the ends of the bumper into the re-
cesses (o1) intended for this purpose on the frame until you hear a click.
· Press the unlock buttons (o2) on the inside of the bumper bar to re-

10
move the bumper bar from the frame.
Place the hood (p)
· Press the clips of the hood on the correct location on the frame. The
hood is fixed on the tubes of the frame. (p1)
· Subsequently, attach the fabric of the hood to the top of the back
support using the studs. (p2)
Adjust the hood (q)
· Hold the front hood bar in the centre and move it forwards or rear-
wards to adjust the hood (q1)
· Open the zipper in the centre of the opened hood in order to enlarge it.
(q2)
· Close the zipper to again reduce the hood.
· Pull the ap on the front side of the hood outwards to additionally en-
large the hood. Push the ap inwards to again reduce the hood.
Remove the hood (r)
· Release the studs at the top of the seat (r1). Then press the lip (r2) at the
bottom of the clips of the hood inwards and remove the hood.
Assemble the rain cover on the pushchair (s)
· Make sure that the hood of the pushchair is in the upright position.
· Possibly open the zipper in the rain cover to adapt it to the enlarged
hood of the pushchair.
· Place the rain cover from top to bottom over the pushchair and make
sure that the rain cover is attached well behind the back support and
over the footrest.
The 5-point safety harness (u)
· Place your child in the pushchair and make sure that the legs of your
child are placed on each side of the crotch strap.
· Make sure that the hip and shoulder belt is positioned correctly over
your child and place both plastic clamps in the central part of the har
-
ness attached to the crotch strap.
· In order to adapt the length of the shoulder belts, you release the shoul
-
der protection from the belt by pulling the Velcro loose. The straps of
the belt are now free in order to adapt the length. You adapt the length
by sliding the straps over the shoulder belts until both shoulder belts
properly harness your child. Slide the strap down to make the belt lon
-
ger. Move the strap upwards to make the belt shorter. This will create
a loop in the belt. Hold on to the strap and pull the clamps to take the

11
EN
loop out of the belt again.
· Attach the shoulder protection to the belt again on both sides after ad
-
justment by pressing the velcro together again.
· The back support contains three positions for the shoulder belts. Release
both shoulder belts by inserting the fastening rings at the rear of the back
support through the openings. Look for the fastening ring through the
fabric (v1). Tilt it and push it through the opening. (v2)
· Move the attachment rings through the desired openings so that the
shoulder belts are positioned properly.
· In order to adjust the position of the crotch strap, open the upholstery
under the seat by pulling the velcro loose. The fastening ring of the
crotch strap is located at the bottom of the seat between the seat and
the elastic. You can tilt the fastening ring with your hand and push it
through the opening to adjust it.
· Regularly check the length and position of the belts and adjust, where
necessary.
Maxi-Cosi car seat
· The Maxi-Cosi car seat adapters are suitable for use with the Maxi Cosi
Mico: 5-22 lbs. 19-22 in. (2,2-10 kg, 48-74 cm) and Maxi Cosi Prezi: 4-30
lbs., <29 in. (1.8-13.6 kg, <74cm).
· WARNING: When using a Maxi-Cosi Prezi make sure the pushbar height
limiters are assembled.
· Always observe the instructions in the manual of your Maxi-Cosi car
seat before you start using the car seat.
· Make sure that the frame has fully been unfolded and the brake blocked
during all actions indicated below. The car seat can be combined with
the pushchair seat.
Place the Maxi-Cosi adapters on the frame (y)
· The adapter marked with ‘R’ is placed on the right side of the frame,
the adapter marked ‘L’ is placed on the left side.
· Remove the bumper bar and the hood.
· There is an opening at the front of the adapter. Put the opening of
the adapter around the cam (y1) on the frame from the outside.
· Turn the top of the adapter inwards (y2) until it clicks. Check that the
adapter has been attached properly by trying to lift it from the
frame.
Place the pushbar height limiters when using a Maxi Cosi Prezi car
seat. (X)
· The pushbar height limiters ensure sucient space between the prezi

12
carseat and the pushbar to avoid the risk of head entrapment.
· Make sure the pushbar is not in lowest position
· Place the height limiters hard part (X1) on the inside of the pushbar
tube with the velcro facing inside.
· Strap the fabric around the pushbar and close the velcro.
Place the Maxi-Cosi car seat on the adapters
· Orientate the Maxi-Cosi car seat such that it is directed rearwards on
the frame.
· Hold the Maxi-Cosi car seat with the central hinge points of the sup
-
port bar directly above the adapters.
· Lower the Maxi-Cosi car seat and press solidly into the adapters until
you hear a click. Check that the Maxi-Cosi car seat has been placed
horizontally and has been attached properly by trying to lift it from
the frame.
Remove the Maxi-Cosi car seat from the adapters
· Operate the unlocking system of the Maxi-Cosi car seat.
· Lift the Maxi-Cosi car seat straight up from the frame.
Remove the Maxi-Cosi adapters from the frame (z)
· Press the release button (z1) on the adapter. Turn the top of the adapter
outwards (z2) and take the adapter out of the cam from the top. (z3)

13
FR
Table des matières
Introduction ......................................................................................................... 13
Avertissements .................................................................................................... 13
Garantie ............................................................................................................... 15
Entretien et points importants ............................................................................. 16
Contenu de l’emballage ........................................................................................ 17
Liste des pièces: gurant sur le dessin d’ensemble .............................................. 17
Orientation ........................................................................................................... 18
Le châssis ............................................................................................................. 18
Les roues .............................................................................................................. 18
Le frein ................................................................................................................. 19
Le guidon ............................................................................................................ 19
Le siège de poussette .......................................................................................... 19
Le siège auto Maxi-Cosi ........................................................................................ 22
Introduction
· An de pouvoir utiliser ce produit de manière optimale, nous vous
conseillons de l’utiliser avec soin et de bien l’entretenir. Lisez ce mode
d’emploi attentivement avant d’utiliser la poussette, puis conservez-le
pour vous y rapporter ultérieurement.
· Si vous avez des questions, des remarques, des problèmes ou des récla-
mations, prenez contact avec votre vendeur.
· Si vous souhaitez connaître les accessoires disponibles pour ce produit,
ou être informé des nouveaux produits Mutsy, visitez : www.mutsy.com.
⚠ ADVERTISSEMENT
général
· AVERTISSEMENT : Lisez attentivement ce mode d’emploi, puis rangez-le dans un en-
droit sûr pour vous y rapporter ultérieurement. Le non-respect des consignes de ce
mode d’emploi peut avoir des conséquences graves pour la sécurité de votre enfant.
· AVERTISSEMENT : Vous êtes personnellement responsable de la sécurité de votre en-
fant. Ne laissez jamais votre enfant sans surveillance.
· AVERTISSEMENT : Évitez les blessures graves dues aux chutes ou glissades. Utilisez tou-
jours le harnais de sécurité à cinq points.
· AVERTISSEMENT : Avant toute utilisation de la poussette, vériez le dépliage et le ver-
rouillage corrects et complets du châssis (y compris du guidon).
· AVERTISSEMENT : Avant toute utilisation, vériez que les dispositifs de xation du lan-
dau, du siège ou du siège auto sont correctement bloqués.
· AVERTISSEMENT : Ne laissez pas votre enfant jouer avec ce produit.
· AVERTISSEMENT : Ne laissez pas votre enfant sans surveillance, ça peut être dangereux.
· AVERTISSEMENT :
Avant d’utiliser la poussette, vériez toujours la bonne xation

14
des accessoires.
· AVERTISSEMENT : Utilisez la poussette pour un seul enfant à la fois.
· AVERTISSEMENT : Lorsque vous faites un arrêt prolongé, activez toujours le frein de la
poussette.
· AVERTISSEMENT : Assurez-vous toujours que les freins sont activés lorsque vous posez
ou enlevez votre enfant.
· AVERTISSEMENT : Vous devez enlever l’enfant de la poussette avant de la soulever ou de
monter sur un escalier, un escalier roulant ou dans un ascenseur.
· AVERTISSEMENT : Ce produit n’est pas fait pour la course ou le patinage.
· AVERTISSEMENT : Utilisez uniquement des pièces détachées fournies ou recomman-
dées par Mutsy.
la sécurité pendant le réglage
· AVERTISSEMENT : Tenez les enfants à l’écart pendant que le châssis est replié ou déplié
pour éviter que les doigts ne se coincent.
· AVERTISSEMENT : Lorsque vous ajustez la poussette, assurez-vous qu’aucune partie du
corps de votre enfant ne s’approche des éléments mobiles.
siège poussette
· AVERTISSEMENT : Le châssis combiné au siège poussette est conçu pour les enfants de
la naissance jusqu’à un poids de 25 kg (55 lbs) et jusqu’à 108 cm (42.7 in.).
· AVERTISSEMENT: pour des enfants de 0 à 6 mois, la poussette doit être mise en position
inclinée de la poussette.
· AVERTISSEMENT: pour des enfants de 0 à 6 mois, l’assise doit être mise en position al-
longée.
· AVERTISSEMENT : L’enfant peut glisser dans les ouvertures pour les jambes et s’étran-
gler. N’utilisez jamais le siège en position complètement inclinée sauf si l’enfant est
proprement attaché avec le harnais de sécurité à 5 points.
· AVERTISSEMENT : Attachez toujours votre enfant avec la ceinture à 5 points, combinée à
la pièce d’entrejambe.
· AVERTISSEMENT : Après dépliage du siège, poussez toujours la barre de maintien en
position debout avant de placer votre enfant dans le siège. Assurez-vous qu’aucun en-
fant ne se trouve près de la barre de maintien lorsque vous la manipulez.
· AVERTISSEMENT : Si votre enfant n’a pas encore 6 mois, utilisez toujours le landau ou la
poussette avec le siège en position inclinée de la poussette.
· AVERTISSEMENT: la position assise de la poussette ne convient pas à des enfants de 0 à
6 mois. Des enfants de 0 à 6 mois ne doivent être transportés que dans la position
allongée de la poussette.
· AVERTISSEMENT: pour des enfants de 0 à 6 mois, la pièce d’entrejambe de la ceinture de
sécurité doit être montée dans l’ouverture arrière de l’assise.
· AVERTISSEMENT: que ce soit en position assise ou allongée, le siège de poussette
convient à des enfants à partir de 6 mois et jusqu’à 55 lbs (25 kg).

15
FR
stabilité
· AVERTISSEMENT: Entre les roues, en bas du châssis, se trouve un panier à provisions. Le
poids maximal autorisé pour ce panier est de 22 lbs (5 kg).
· AVERTISSEMENT: La pose de sacs, accessoires ou les deux sur le produit, autres que ceux
préconisés par le fabricant, peut déstabiliser la poussette. Utilisez exclusivement les
accessoires originaux de Mutsy.
· AVERTISSEMENT: La surcharge peut créer une situation dangereuse et instable.
· AVERTISSEMENT: Ne suspendez pas de sacs à provision ou autres objets lourds sur le
guidon à cause du danger de basculement.
· AVERTISSEMENT: Ce produit peut devenir instable si un sac à colis, autre que celui re-
commandé par le fabricant est utilisé.
· AVERTISSEMENT: vous devez basculer la poussette et rouler sur les roues arrière pour
monter et descendre d’une bordure de trottoir.
siège auto
· AVERTISSEMENT: Lorsque vous utilisez un siège auto, le poids maximal autorisé est celui
indiqué sur le produit en question.
· AVERTISSEMENT: Pour les sièges auto utilisés conjointement avec le châssis, cette com-
binaison ne remplace pas une nacelle ou un lit. Si votre enfant a besoin de dormir, il doit
être posé dans un landau, nacelle ou lit appropriés.
· AVERTISSEMENT : en utilisant un Maxi-Cosi Prezi, assurez-vous que les limiteurs de hau-
teur de guidon soient assemblés.
· Le Mutsy Nexo est conforme aux normes 16 CFR 1227 et SOR/2016-167.
Garantie
Tous les produits Mutsy sont garantis pendant deux ans à partir de la
date d’achat. Si un défaut de production est avéré, Mutsy orira une
solution en coopération avec le revendeur. La réparation de tels défauts
est donc couverte par la garantie.
La garantie n’est pas valable sur l’échange ou le retour de produits Mutsy.
La garantie est valable uniquement si vous présentez les documents sui-
vants au magasin où vous avez acheté le produit :
· une carte de garantie remplie
· une copie de votre preuve d’achat
· une description claire du défaut
· votre produit
La carte de garantie se trouve sur :
http://mutsy.com/frfr/service/garantie
Remplissez entièrement et correctement cette carte, puis envoyez-la par
La page est en cours de chargement...
La page est en cours de chargement...
La page est en cours de chargement...
La page est en cours de chargement...
La page est en cours de chargement...
La page est en cours de chargement...
La page est en cours de chargement...
La page est en cours de chargement...
La page est en cours de chargement...
La page est en cours de chargement...
La page est en cours de chargement...
La page est en cours de chargement...
La page est en cours de chargement...
La page est en cours de chargement...
La page est en cours de chargement...
La page est en cours de chargement...
La page est en cours de chargement...
La page est en cours de chargement...
La page est en cours de chargement...
La page est en cours de chargement...
La page est en cours de chargement...
-
 1
1
-
 2
2
-
 3
3
-
 4
4
-
 5
5
-
 6
6
-
 7
7
-
 8
8
-
 9
9
-
 10
10
-
 11
11
-
 12
12
-
 13
13
-
 14
14
-
 15
15
-
 16
16
-
 17
17
-
 18
18
-
 19
19
-
 20
20
-
 21
21
-
 22
22
-
 23
23
-
 24
24
-
 25
25
-
 26
26
-
 27
27
-
 28
28
-
 29
29
-
 30
30
-
 31
31
-
 32
32
-
 33
33
-
 34
34
-
 35
35
-
 36
36
-
 37
37
-
 38
38
-
 39
39
-
 40
40
-
 41
41


Mutsy Nexo Manuel utilisateur
- Catégorie
- Poussettes
- Taper
- Manuel utilisateur
dans d''autres langues
- English: Mutsy Nexo User manual
- español: Mutsy Nexo Manual de usuario
Autres documents
-
Jane NEXT Le manuel du propriétaire
-
mothercare My3 My4 Pushchair Mode d'emploi
-
Britax B-Smart Le manuel du propriétaire
-
ABC Design Turbo S 4F Mode d'emploi
-
-
 ickle bubba 10-005-101-014 Manuel utilisateur
-
-
Quinny Speedi Instructions For Use & Warranty
-
iCandy Peach 2 Manuel utilisateur
-
 Contours ZL030 Manuel utilisateur

