Siemens HG10LE150 Manuel utilisateur
- Catégorie
- Fours
- Taper
- Manuel utilisateur


3
Ú Table of contents
[en]Instruction manual
Important safety information.....................................................3
Causes of damage .............................................................................5
Your new appliance ....................................................................6
The oven...............................................................................................6
The timer...............................................................................................6
Cooling fan...........................................................................................6
Accessories .........................................................................................6
Before using the oven for the first time....................................7
Baking out the oven ...........................................................................7
Cleaning the accessories..................................................................7
How to operate your oven..........................................................7
Oven lighting........................................................................................7
Operating modes................................................................................7
Operating the oven.............................................................................7
Operating the grill ...............................................................................8
Operating the rotary spit....................................................................8
Operating the timer.............................................................................8
Care and cleaning ......................................................................9
Cleaning agents ..................................................................................9
Catalytic cooking compartment panels..........................................9
Removing and installing the door panels ......................................9
Removing and fitting the appliance door.................................... 10
Removing and inserting the hook-in racks ................................. 11
Troubleshooting .......................................................................11
Replacing the oven light bulb........................................................ 11
After-sales service ...................................................................12
Energy and environment tips..................................................12
Saving energy................................................................................... 12
Environmentally-friendly disposal.................................................. 12
Tips for using your appliance .................................................12
Baking................................................................................................12
Roasting and grilling .......................................................................13
Produktinfo
Additional information on products, accessories, replacement
parts and services can be found at www.siemens-home.com
and in the online shop www.siemens-eshop.com
: Important safety information
Read these instructions carefully. Only then
will you be able to operate your appliance
safely and correctly. Retain the instruction
manual and installation instructions for
future use or for subsequent owners.
This appliance is only intended to be fully
fitted in a kitchen. Observe the special
installation instructions.
Check the appliance for damage after
unpacking it. Do not connect the appliance
if it has been damaged in transport.
Only allow a licensed professional to
connect the appliance. Damage caused by
incorrect connection is not covered under
warranty. Call the after-sales service if you
want to convert your appliance to a different
type of gas.
This appliance is intended for domestic use
and the household environment only. This
appliance must only be used to prepare
food and drinks and must never be used as
a heater. Do not leave the appliance
unattended during operation. Only use the
appliance indoors.
This appliance is not intended for operation
with an external clock timer or a remote
control.
This appliance may be used by children
over the age of 8 years old and by persons
with reduced physical, sensory or mental
capabilities or by persons with a lack of
experience or knowledge if they are
supervised or are instructed by a person
responsible for their safety how to use the
appliance safely and have understood the
associated hazards.
Children must not play with, on, or around
the appliance. Children must not clean the
appliance or carry out general maintenance
unless they are at least 8 years old and are
being supervised.
Keep children below the age of 8 years old
at a safe distance from the appliance and
power cable.
Always slide accessories into the cooking
compartment correctly. See "Description of
accessories in the instruction manual.
Risk of overheating!
In the event of a power cut, the cooling fan
does not work. The appliance may
overheat. The touchable parts become very
hot and may cause injury. Due to the high
temperatures, the appliance and the fitted
unit could be damaged. In the case of a
power cut, the appliance must not be
manually ignited and put into operation.

4
WHAT TO DO IF YOU SMELL GAS!
Escaping gas may cause an explosion.
If you smell gas or notice any faults in the
gas installation:
■
Immediately shut off the gas supply or
close the gas cylinder valve.
■
Immediately extinguish all naked flames
and cigarettes.
■
Do not use any light or appliance switches
and do not pull any plugs out of sockets.
Do not use any telephones or mobile
phones within the building.
■
Open windows and ventilate the room.
■
Call the aftersales service or the gas
supplier.
Risk of asphyxiation!
The use of a gas cooker leads to a build-up
of heat, moisture and products of
combustion in the room where the
appliance is installed. Ensure that the
installation room is well ventilated. The
natural ventilation openings must be kept
open or a mechanical ventilation device
must be provided (e.g. an extractor hood).
Intensive and persistent use of the
appliance may mean that it is necessary to
have additional ventilation (e.g. opening a
window), or more effective ventilation (e.g.
operating the existing mechanical
ventilation device at a higher setting).
Risk of fire!
■
A draught is created when the appliance
door is opened. Greaseproof paper may
come into contact with the heating
element and catch fire. Do not place
greaseproof paper loosely over
accessories during preheating. Always
weight down the greaseproof paper with a
dish or a baking tin. Only cover the
surface required with greaseproof paper.
Greaseproof paper must not protrude over
the accessories.
Risk of fire!
■
Combustible objects that are left in the
cooking compartment may ignite. Never
store combustible items in the cooking
compartment. Never open the appliance
door if there is smoke inside. Switch off
the appliance and unplug the mains plug
or switch off the fuse in the fuse box. Shut
off the gas supply.
Risk of fire!
■
Hot oil and fat can ignite very quickly.
Never leave hot fat or oil unattended.
Never use water to put out burning oil or
fat. Switch off the hotplate. Extinguish
flames carefully using a lid, fire blanket or
something similar.
Risk of fire!
■
The appliance becomes very hot and
flammable materials could catch fire.
Never store or use flammable
objects (e.g. spray cans, cleaning agents)
under the appliance or in its immediate
vicinity. Never place flammable items on
or in the appliance.
Risk of fire!
■
Under no circumstances should a baking
sheet, a baking tray, a pan or another form
of cookware be placed directly on the
oven floor. This causes the floor of the
appliance to overheat and can seriously
damage the bottom of the fitted unit.
Risk of fire!
■
The rear of the appliance becomes very
hot. This may cause damage to the power
cables. Electricity and gas lines must not
come into contact with the rear of the
appliance.
Risk of burns!
■
The appliance becomes very hot. Never
touch the interior surfaces of the cooking
compartment or the heating elements.
Always allow the appliance to cool down.
Keep children at a safe distance.
Risk of serious burns!
■
Accessories and ovenware become very
hot. Always use oven gloves to remove
accessories or ovenware from the cooking
compartment.
Risk of burns!
■
Alcoholic vapours may catch fire in the hot
cooking compartment. Never prepare food
containing large quantities of drinks with a
high alcohol content. Only use small
quantities of drinks with a high alcohol
content. Open the appliance door with
care.
Risk of burns!
■
The accessible parts become very hot
when in operation. Never touch hot parts.
Keep children at a safe distance.

5
Risk of scalding!
■
The accessible parts become hot during
operation. Never touch the hot parts. Keep
children at a safe distance.
Risk of scalding!
■
When you open the appliance door, hot
steam may escape. Open the appliance
door with care. Keep children at a safe
distance.
Risk of scalding!
■
Water in a hot cooking compartment may
create hot steam. Never pour water into
the hot cooking compartment.
Risk of injury!
■
Scratched glass in the appliance door
may develop into a crack. Do not use a
glass scraper, sharp or abrasive cleaning
aids or detergents.
Risk of injury!
■
Incorrect repairs are dangerous. Repairs
may only be carried out, and damaged
power and gas lines replaced, by an after-
sales engineer trained by us. If the
appliance is faulty, unplug the mains plug
or switch off the fuse in the fuse box. Shut
off the gas supply. Contact the after-sales
service.
Risk of injury!
■
Faults or damage to the appliance are
dangerous. Never switch on a faulty
appliance. Unplug the appliance from the
mains or switch off the circuit breaker in
the fuse box. Shut off the gas supply.
Contact the after-sales service.
Risk of electric shock and serious injury!
■
The cable insulation on electrical
appliances may melt when touching hot
parts of the appliance. Never bring
electrical appliance cables into contact
with hot parts of the appliance.
Risk of electric shock!
■
Do not use any high-pressure cleaners or
steam cleaners, which can result in an
electric shock.
Risk of electric shock!
■
When replacing the cooking compartment
bulb, the bulb socket contacts are live.
Before replacing the bulb, unplug the
appliance from the mains or switch off the
circuit breaker in the fuse box.
Causes of damage
Caution!
■ Accessories, foil, greaseproof paper or ovenware on the
cooking compartment floor: do not place accessories on the
cooking compartment floor. Do not cover the cooking
compartment floor with any sort of foil or greaseproof paper.
Do not place ovenware on the cooking compartment floor.
This will cause heat accumulation. The baking and roasting
times will no longer be correct and the enamel will be
damaged.
■ Inserting accessories: depending on the appliance model,
accessories can scratch the door panel when closing the
appliance door. Always insert the accessories into the
cooking compartment as far as they will go.
■ Water in a hot cooking compartment: do not pour water into
the cooking compartment when it is hot. This will cause
steam. The temperature change can cause damage to the
enamel.
■ Moist food: do not store moist food in the cooking
compartment when it is closed for prolonged periods This will
damage the enamel.
■ Fruit juice: when baking particularly juicy fruit pies, do not
pack the baking tray too generously. Fruit juice dripping from
the baking tray leaves stains that cannot be removed. If
possible, use the deeper universal pan.
■ Cooling with the appliance door open: only allow the cooking
compartment to cool when it is closed. Even if the appliance
door is only open a little, front panels of adjacent units could
be damaged over time.
■ Very dirty door seal: If the door seal is very dirty, the
appliance door will no longer close properly when the
appliance is in use. The fronts of adjacent units could be
damaged.Always keep the door seal clean.
■ Oven door as a bearing surface: do not stand or place
objects on the oven door when it is open. Do not hang
objects on the oven door.
■ Carrying the appliance: do not carry or hold the appliance by
the door handle. The door handle cannot support the weight
of the appliance and could break.
■ Heavy accessories: do not pull out heavily laden accessories
too far without first unloading them sufficiently. Heavy
accessories will tip when pulled out. This causes pressure to
be exerted on the shelf supports in the cooking compartment,
which can damage the enamel. Relieve the strain on the
accessories when they are pulled out by raising them slightly
with one hand. Caution: always use an oven cloth or oven
gloves when handling hot accessories.
■ Grilling: do not insert the baking tray or universal pan higher
than level 3 when grilling. The high heat distorts it and the
enamel may be damaged when it is removed. At level 4 and
5, only grill directly on the wire rack.

6
Your new appliance
Get to know your appliance. You will find information on the
control panel, the oven, types of heating and accessories.
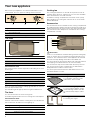
The oven
Control knob for oven
This control knob is used to adjust the heat setting of the oven
and the grill.
There is a limit stop between settings
G and Max. Do not turn
the knob beyond this point.
The indicator light will light up when the grill is switched on.
The timer
You can use the timer to set a cooking time.
An audible signal sounds once the cooking time has elapsed.
Control knob for timer
Use this control knob to set the cooking time. You can also use
this control knob to switch the oven lighting on.
Cooling fan
The cooling fan switches on and off as required. The hot air
escapes above the door. Caution: Do not cover the ventilation
slots. Otherwise the oven will overheat.
So that the cooking compartment cools down more quickly
after operation, the cooling fan continues to run for a certain
period afterwards.
Accessories
The accessories can be inserted into the cooking compartment
at 4 different levels. Always insert them as far as they will go so
that the accessories do not touch the door panel. Ensure that
the accessories have always been inserted into the cooking
compartment correctly.
: Risk of fire!
Under no circumstances should a baking sheet, a baking tray,
a pan or another form of cookware be placed directly on the
oven floor. This causes the floor of the appliance to overheat
and can seriously damage the bottom of the fitted unit.
You can pull out the accessories two thirds of the way without
them tipping. This allows dishes to be removed easily.
The accessories may become deformed when they become
hot. As soon as they have cooled down, the deformation
disappears with no effect on the function.
You can buy accessories from the after-sales service, from
specialist retailers or online.
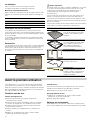
Explanation
1 Control knob for timer
2 Grill indicator light
3 Control knob for oven and grill
Explanation
1 Electric grill
2 Oven gas burners
Setting Meaning
Û
Off. The oven does not heat up.
Min Economy flame, lowest power
150-250 Oven gas burner on, temperature range in °C
Max Large flame, highest power
G
The grill heats up and the rotary spit turns.
Setting Meaning
Û
Off
5 - 90 Cooking time in minutes
^
Switching on the oven lighting
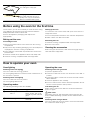
Accessories Description
Baking and roasting shelf
For ovenware, cake tins, joints,
grilled items, frozen meals.
Enamelled baking tray
For moist cakes, pastries, frozen
meals and large roasts. Can also
be used as a drip tray to collect
fat.
Locking pins
For locking the hinges.

7
Before using the oven for the first time
In this section, you can find out what you must do before using
your appliance to prepare food for the first time. Read the
Safety information section beforehand.
Remove the appliance packaging and dispose of it
appropriately.
Baking out the oven
Precleaning the oven
1. Remove accessories and hook-in racks from the cooking
compartment.
2. Fully remove any remaining packaging, such as small pieces
of polystyrene, from the cooking compartment.
3. Some parts are covered with a protective film. Remove the
protective film.
4. Clean the outside of the appliance with a soft, damp cloth.
5. Clean the cooking compartment with hot soapy water.
Heating up the oven
To remove the new cooker smell, heat up the oven when it is
empty and closed.
1. Turn the temperature selector to the maximum temperature.
2. Switch off the oven after 45 minutes.
Recleaning the oven
1. Clean the cooking compartment with hot soapy water.
2. Fit the hook-in racks.
Cleaning the accessories
Before using the accessories, clean them thoroughly using a
cloth and warm soapy water.
How to operate your oven
Oven lighting
Switching on the oven lighting
Turn the control knob to the
^ position.
The oven lighting switches on when the timer is switched on or
the oven door is opened.
Switching off the oven lighting
Turn the control knob to the
Û position.
The oven lighting switches off.
Operating modes
The following operating modes are available.
Operating the oven
Switching on the oven gas burner
1. Open the appliance door.
2. Press the control knob for the oven and turn it to the 250 °C
position.
3. Press and hold the control knob for a few seconds until the
flame stabilises.
4. Close the appliance door carefully.
5. Turn the control knob to set the desired temperature. Do not
turn the knob beyond the "Min" position.
If the flame goes out
Switch off the control knob. Wait one minute and switch the
burner on again.
: Risk of fire!
If the flame goes out, gas will escape. Never leave the gas
burner unattended during operation. Ensure that there are no
draughts.
Switching off the oven gas burner
Turn the control knob to the
Û position. Press and hold down
the control knob while doing so.
Rotary spit holder
For holding the rotary spit.
Rotary spit
For roasts and large pieces of
poultry. Use only in combination
with the enamelled baking tray.
Operating mode Application
[
Oven gas burner 150-
250 °C
For cakes and pastries,
bakes, poultry, lean joints
of meat, e.g. beef, veal and
game.
G
Electric grill For steaks, sausages, fish
and toast.

8
Operating the grill
The appliance door must be closed when grilling.
Notes
■ It is not possible to use the oven gas burner and the grill at
the same time.
■ When using the grill, a cooking time of 60 minutes must not
be exceeded.
■ When switching on the grill, the drive for the rotary spit is
automatically activated.
Switching on the grill
Press the control knob for the oven and turn it to the
G
position.
The indicator light will light up when the grill is switched on.
Switching off the grill
Turn the control knob to the
Û position.
Operating the rotary spit
The rotary spit can be used with excellent results to cook joints,
such as rolled roasting joints and poultry. The meat is roasted
thoroughly and evenly.
The drive for the rotary spit is automatically activated as soon
as you switch on the grill.
Preparing roasts
1. Place the joint as centrally as possible on the rotary spit and
secure it at both ends with the retaining clips.
You can also secure the joint using kitchen twine.
2. With poultry, bind the ends of the wings underneath the back
and the thighs against the body. This prevents them from
overbrowning.
3. Pierce the skin on the underside of the wings to allow the fat
to escape.
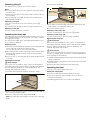
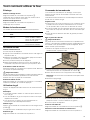
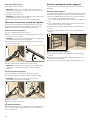
Inserting the rotary spit
: Risk of burns!
Never touch the hot surfaces of the cooking compartment or
the heating elements. Children must be kept at a safe distance
from the appliance at all times. Open the appliance door
carefully. Hot steam may escape.
1. Insert the rotary spit shelf at level 2 as far as it will go.
2. Slide the rotary spit into the motor mount in the back wall of
the cooking compartment (a).
3. Place the rotary spit on the rotary spit shelf (b).
Note: The rotary spit must engage correctly in the rotary spit
shelf.
4. Unscrew the handle (c).
5. Pour water into a baking tray and slide the baking tray into
shelf position 1 to collect the drips of fat.
6. Close the appliance door.
Switching on the rotary spit
Turn the control knob for the oven to the
G position.
Switching off the rotary spit
Turn the control knob for the oven to the
Û position.
Removing the rotary spit
: Risk of burns!
Never touch the hot surfaces of the cooking compartment or
the heating elements. Children must be kept at a safe distance
from the appliance at all times. Open the appliance door
carefully. Hot steam may escape.
: Risk of burns!
Never touch the rotary spit or other accessories directly when
they are hot. Always wear oven gloves or heat-resistant gloves
when handling hot accessories.
1. Carefully open the appliance door and screw the handle back
onto the rotary spit.
2. Carefully pull the rotary spit from the mount in the back wall
and remove it.
3. Remove the rotary spit shelf and the baking tray.
Operating the timer
The timer runs independently of the oven.
Setting the cooking time
1. Turn the control knob clockwise as far as the stop.
2. Turn the control knob anti-clockwise until you reach the
required cooking time.
An audible signal sounds once the time has elapsed.
D
E
F

9
Care and cleaning
With good care and cleaning, your oven will remain clean and
fully-functioning for a long time to come. Here we will explain
how to maintain and clean your oven correctly.
Notes
■ Slight differences in the colours on the front of the oven are
caused by the use of different materials, such as glass,
plastic and metal.
■ Shadows on the door panel which look like streaks, are
caused by reflections made by the oven light.
■ Enamel is baked on at very high temperatures. This can
cause some slight colour variations. This is normal and does
not affect their function. The edges of thin trays cannot be
completely enamelled. As a result, these edges can be
rough. This will not impair the anti-corrosion protection.
: Risk of electric shock!
Do not use any high-pressure cleaners or steam cleaners,
which can result in an electric shock.
: Risk of burns!
The appliance becomes very hot. Never touch the interior
surfaces of the cooking compartment or the heating elements.
Always allow the appliance to cool down. Keep children at a
safe distance.
Cleaning agents
To ensure that the different surfaces are not damaged by using
the wrong cleaning agent, pay attention to the information in the
table. Do not use
■ sharp or abrasive cleaning agents,
■ cleaning agents with a high alcohol content,
■ hard scouring pads or cleaning sponges,
■ high-pressure cleaners or steam cleaners.
Wash new sponge cloths thoroughly before use.
Catalytic cooking compartment panels
The catalytic cooking compartment panels are coated with self-
cleaning enamel.
The surfaces clean themselves while the oven is in operation.
Larger splashes will only be removed after the oven has been
used several times.
Self-cleaning surfaces
The side walls are covered with catalytic panelling. Never clean
these surfaces with oven cleaner. Slight discolouration of the
enamel does not affect automatic self-cleaning.
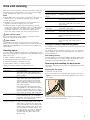
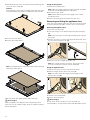
Removing and installing the door panels
To facilitate cleaning, you can remove the glass panels from the
oven door.
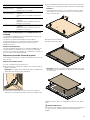
Removing the door panels
1. Open the oven door fully.
2. Lock both hinges on the left and right using the locking pin.
Note: The locking pins must be fully inserted into the holes in
the hinges.
3. Lift the bottom of the inner panel slightly until the fastening
pins come out of the holder (1).
Area Cleaning agents
Oven front Hot soapy water:
Clean with a dish cloth and dry with a
soft cloth. Do not use glass cleaners or
glass scrapers.
Stainless steel Hot soapy water:
Clean with a dish cloth and dry with a
soft cloth. Remove flecks of limescale,
grease, starch and albumin (e.g. egg
white) immediately. Corrosion can form
under such residues.
Special stainless steel cleaning prod-
ucts suitable for hot surfaces are availa-
ble from our after-sales service or from
specialist retailers. Apply a very thin layer
of the cleaning product with a soft cloth.
Aluminium Clean with a mild window cleaning agent.
Using a window cloth or a non-fluffing
microfibre cloth, wipe over the surfaces
lightly in a horizontal direction.
Enamel surfaces
(smooth surfaces)
Apply commercially available washing-up
liquid or a vinegar solution with a soft,
damp cloth or chamois; dry with a soft
cloth. Soak baked-on food residues with
a damp cloth and detergent. If the cook-
ing compartment is heavily soiled, use a
gel oven cleaner. This can be applied to
the affected area. Leave the cooking
compartment open after cleaning to
allow it to dry.
Self-cleaning sur-
faces (rough sur-
faces)
Note the instructions in the section:
Catalytic cooking compartment panel
Gas burner Never clean the gas burners in the cook-
ing compartment yourself.
Door panels Glass cleaner:
Clean with a soft cloth. Do not use a
glass scraper.
Glass cover for the
oven light
Hot soapy water:
Clean with a dish cloth.
Seal
Do not remove.
Hot soapy water:
Clean with a dish cloth. Do not scour.
Rails Hot soapy water:
Soak and clean with a dish cloth or
brush.
Accessories Hot soapy water:
Soak and clean with a dish cloth or
brush.
Area Cleaning agents

10
4. Carefully lift the top of the inner panel until the fastening pins
come out of the holder (2).
Caution!
When lifting the inner panel, the middle panel may stick to the
inner panel. Make sure that the middle panel does not fall.
5. Remove the inner panel.
6. Remove the middle panel.
Note: The middle panel is kept in place with rubber bushings
rather than retaining pins.
Clean the panels with glass cleaner and a soft cloth.
: Risk of injury!
Scratched glass in the appliance door may develop into a
crack. Do not use a glass scraper, sharp or abrasive cleaning
aids or detergents.
Fitting the door panels
1. Reinsert the middle panel.
Note: Make sure that the panel is seated correctly. All rubber
bushings must lay flat against the outer panel.
2. Reinsert the inner panel.
Note: All four fastening pins must engage in the holders
provided for them.
3. Remove the locking pins and close the oven door.
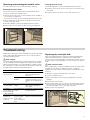
Removing and fitting the appliance door
If the oven is very heavily soiled, the oven door can be removed
for easier cleaning. Normally, however, this is not necessary.
Removing the appliance door
1. Open the oven door fully.
2. Lock both hinges on the left and right using the locking pin
(a).
Note: The locking pins must be fully inserted into the holes in
the hinges.
3. Grip the oven door on either side with both hands and close
the oven door by approx. 30° (b).
4. Raise the oven door slightly and pull it out.
Note: Do not fully close the oven door. The hinges could
become bent and the enamel could be damaged.
Fitting the appliance door
1. Grip the oven door on either side with both hands.
2. Slide the hinges into the slots in the oven (a).
Note: The notch below the hinges must engage into the
frame of the oven (b).
3. Lower the door downwards.
4. Remove the locking pins.
: Risk of injury!
Do not reach into the hinge if the oven door falls out
unintentionally or a hinge snaps closed. Call after-sales service.
DE
ED

11
Removing and inserting the hook-in racks
You can remove the hook-in racks for easier cleaning.
Removing the hook-in racks
The hook-in racks are each fixed to the side panels of the
cooking compartment at three points.
1. Grip the front of the hook-in rack and pull it to the middle of
the cooking compartment.
The front hook of the hook-in rack will release from the hole.
2. Fold out the hook-in rack further and pull it from the rear
holes of the side panel.
3. Hold the catalytic cooking compartment panel in place.
4. Remove the hook-in rack from the cooking compartment.
Inserting the hook-in rack
1. Hold the catalytic cooking compartment panel in place.
2. Insert the hooks of the hook-in rack into the rear holes in the
side panel.
3. Press the front hook of the hook-in rack into the hole.
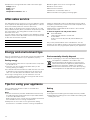
Troubleshooting
Malfunctions often have simple explanations. Refer to the table
before calling the after-sales service, as you may be able to
remedy the fault yourself.
: Risk of injury!
Incorrect repairs are dangerous. Repairs may only be carried
out, and damaged power and gas lines replaced, by an after-
sales engineer trained by us. If the appliance is faulty, unplug
the mains plug or switch off the fuse in the fuse box. Shut off
the gas supply. Contact the after-sales service.
--------
Replacing the oven light bulb
If the oven light bulb fails, it must be replaced. Replacement
heat-resistant bulbs can be obtained from the after-sales
service or from specialist retailers. Please specify the E number
and FD number of your appliance. Do not use any other type of
bulb.
: Risk of electric shock!
When replacing the cooking compartment bulb, the bulb socket
contacts are live. Before replacing the bulb, unplug the
appliance from the mains or switch off the circuit breaker in the
fuse box.
1. Allow the cooking compartment to cool down.
2. Open the appliance door.
3. Place a tea towel in the cooking compartment to prevent
damage.
4. Remove the hook-in racks.
5. Remove the glass cover. To do this, open the glass cover at
the front with your hand. Should you experience difficulties
removing the glass cover, use a spoon to help.
6. Remove the oven light bulb.
D
E
Malfunction Possible cause Solution
The appliance
does not work
Power cut Check whether other
kitchen appliances are
working
Faulty circuit
breaker
Check in the fuse box to
make sure that the circuit-
breaker for the appliance is
OK
The oven light-
ing has failed.
Oven light is
faulty
Replace the oven light.
(See section "Replacing
oven light")
The flame
(oven) does not
burn through all
outlet openings.
Normal build-up
of dirt
The burner must be profes-
sionally cleaned.
The door panel
steams up
when the oven
heats up.
Normal occur-
rence; caused
by the differ-
ence in tempera-
ture
Not possible; this has no
effect on oven performance.

12
7. Replace the oven light bulb with a bulb of the same type:
Voltage: 230 V;
Power: 40 W;
Fitting: G9;
Temperature resistance: 300 °C
8. Refit the glass cover for the oven light bulb.
9. Refit the hook-in racks.
10.Remove the tea towel.
11.Switch the circuit breaker back on.
12.Check that the oven lighting is working again.
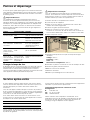
After-sales service
Our after-sales service is there for you if your appliance needs
to be repaired. We will always find the right solution in order to
avoid unnecessary visits from a service technician.
When calling us, please give the product number (E no.) and
the production number (FD no.) so that we can provide you with
the correct advice. The rating plate is located on the side
behind the oven door.
You can make a note of the numbers of your appliance and the
telephone number of the after-sales service in the space below
to save time should it be required.
Please be aware that a visit by an after-sales engineer will be
charged if a problem turns out to be the result of operator error,
even during the warranty period.
Please find the contact data of all countries in the enclosed
customer service list.
To book an engineer visit and product advice
Rely on the professionalism of the manufacturer. You can
therefore be sure that the repair is carried out by trained service
technicians who carry original spare parts for your appliances.
Energy and environment tips
Here you can find tips on how to save energy when baking and
roasting and how to dispose of your appliance properly.
Saving energy
■ Only preheat the oven when it is specified in the recipe that
you should do so.
■ Open the oven door as little as possible while you are
cooking, baking or roasting.
■ It is best to bake several cakes one after the other. The oven
is still warm. This reduces the baking time for the second
cake. You can also place two loaf tins next to each other.
■ For longer cooking times, you can switch the oven off
10 minutes before the end of the cooking time and use the
residual heat to finish cooking.
Environmentally-friendly disposal
Dispose of packaging in an environmentally-friendly manner.
Tips for using your appliance
Here you will find a selection of tips on ovenware and
preparation methods.
Notes
■ Use the accessories provided. Additional accessories may
be obtained as special accessories from specialist retailers
or from the after-sales service.
Before using the oven, remove any unnecessary accessories
and ovenware from the cooking compartment.
■ Always use an oven cloth or oven gloves when taking
accessories or cookware out of the cooking compartment.
Baking
Baking tins
■ Use light-coloured baking tins and trays wherever possible.
■ Always place the baking tins on the middle of the baking and
roasting wire rack.
E no. FD no.
After-sales service
O
GB 0344 892 8999
Calls charged at local or mobile rate.
IE 01450 2655
0.03 € per minute at peak. Off peak 0.0088 € per
minute.
This appliance is labelled in accordance with
European Directive 2012/19/EU concerning used
electrical and electronic appliances (waste electrical
and electronic equipment - WEEE). The guideline
determines the framework for the return and recycling
of used appliances as applicable throughout the EU.

13
Baking tips
Roasting and grilling
Ovenware
You may use any heatresistant ovenware. Always place the
ovenware in the middle of the wire rack. The enamelled baking
tray is also suitable for large roasts.
Roasting tips
■ A a lower temperature produces more even browning.
■ Depending on the size of the joint, add 2 or 3 tablespoons of
liquid to lean meat and 8 to 10 tablespoons of liquid to pot
roasts.
■ When cooking duck or goose, pierce the skin on the
underside of the wings to allow the fat to run out.
■ Poultry will turn out particularly crispy and brown if you baste
it towards the end of the roasting time with butter, salted
water or orange juice.
■ Turn pieces of meat halfway through the cooking time.
■ When the roast is ready, turn off the oven and allow it to rest
for an additional 10 minutes. This will allow the meat juices to
distribute themselves better inside the roast.
■ When roasting large pieces of meat, you may find that the
amount of steam and condensation on the oven door is more
than usual. This is a normal occurrence which has no effect
on the oven's performance. Once roasting is complete, dry
the oven door and window with a cloth.
■ If you are roasting on the wire rack, insert the enamelled
baking tray into shelf position 1 to collect the drips of fat.
Grilling tips
■ If possible, grill items should be of equal thickness. They
should be at least 2 to 3 cm thick. This ensures that they
brown evenly while also remaining succulent.
■ Place the food to be grilled in the centre of the wire rack.
Pour a little water into the enamelled baking tray and insert
this into the shelf position underneath the grill to collect the
drips of fat. Never place it on the cooking compartment floor.
■ Drizzle some oil over the food to be grilled before you place it
on the wire rack under the grill.
■ If the food to be grilled is thin, turn it over halfway through
grilling; if it is thick, turn it over several times during grilling.
Use tongs when turning the food to avoid piercing it and, in
the case of meat, to keep the meat juices inside the meat.
■ Dark meats such as lamb and beef brown better and more
quickly than light meats such as pork and veal.
Tips on using the rotary spit
■ Place the joint as centrally as possible on the rotary spit and
secure it at both ends with the retaining clips.
■ You can also truss the joint with string. With poultry, bind the
ends of the wings underneath the back and the thighs
against the body. This prevents them from overbrowning.
Pierce the skin on the underside of the wings to allow the fat
to escape.
Roasting tips
How to establish whether sponge cake
is baked through.
Approx. 10 minutes before the end of the baking time stated in the recipe, insert a cock-
tail stick into the cake at its deepest point. If no cake mixture sticks to the wood, the cake
is ready.
The cake collapses. Use less fluid next time or set the oven temperature 10 degrees lower. Note the stirring
times indicated in the recipe.
The cake has risen high in the middle
and less around the edges.
Do not grease the sides of the springform cake tin. After baking, carefully loosen the
cake using a knife.
The cake is too dark on the top. Place it lower in the oven, select a lower temperature and bake the cake for a little
longer.
The cake is too dry. When it is done, make small holes in the cake using a cocktail stick. Then drizzle fruit
juice or an alcoholic drink over it. Next time, set the temperature 10 degrees higher and
reduce the baking time.
The bread or cake (e.g. cheesecake)
looks good but is sticky on the inside
(soggy with wet streaks).
Next time, use less liquid and bake at a lower temperature for slightly longer. For cakes
with a moist topping, bake the base first. Sprinkle it with almonds or bread crumbs and
then place the topping on top. Take care to follow recipes and baking times.
The pastries are not evenly browned. Select a slightly lower temperature to ensure that the cake is baked more evenly. Excess
greaseproof paper can affect the air circulation. Always cut the greaseproof paper to suit
the size of the baking tray.
The bottom of a fruit flan is too light. Place the cake one level lower the next time.
The fruit juice overflows. Next time, use the deeper universal pan, if you have one.
Small baked items made out of yeast
dough stick to one another during bak-
ing.
There should be a gap of approx. 2 cm around each item. This gives enough space for
the baked items to expand and turn brown on all sides.
Condensation forms when you bake
moist cakes.
Baking may create water vapour, which escapes above the door. The steam may settle
and form water droplets on the control panel or on the fronts of adjacent units. This is a
natural process.
How can you tell when the roast is
ready?
Use a meat thermometer (available from specialist retailers) or carry out a "spoon test".
Press down on the roast with a spoon. If it feels firm, it is ready. If the spoon can be
pressed in, it needs to be cooked for a little longer.
The roast is too dark and the crackling
is burnt in places.
Check the shelf position and temperature.
The roast looks good but the juices are
burnt.
Next time, use a smaller roasting dish and add more liquid.
The roast looks good, but the juices are
too clear and watery.
Next time, use a larger roasting dish and add less liquid.

14
Þ Table des matières
[fr]Notice d’utilisation
Précautions de sécurité importantes..................................... 14
Causes de dommages ................................................................... 17
Votre nouvel appareil............................................................... 17
Le four................................................................................................ 17
Le minuteur .......................................................................................18
Ventilateur de refroidissement.......................................................18
Accessoire.........................................................................................18
Avant la première utilisation................................................... 18
Chauffe à vide du four ....................................................................18
Nettoyer les accessoires ................................................................18
Voici comment utiliser le four................................................. 19
Eclairage............................................................................................19
Modes de fonctionnement ............................................................. 19
Utilisation du four.............................................................................19
Utilisation du gril ..............................................................................19
Commande du tournebroche ........................................................ 19
Utilisation du minuteur .................................................................... 20
Entretien et nettoyage ............................................................. 20
Nettoyants .........................................................................................20
Panneaux catalytiques du compartiment de cuisson ............... 21
Dépose et pose des vitres de la porte........................................ 21
Décrocher et accrocher la porte de l'appareil ........................... 22
Retrait et montage des grilles supports ...................................... 22
Pannes et dépannage.............................................................. 23
Changer la lampe du four..............................................................23
Service après-vente................................................................. 23
Conseils concernant l'énergie et l'environnement ............... 24
Economie d'énergie......................................................................... 24
Elimination écologique....................................................................24
Conseils pour l'utilisation ....................................................... 24
Cuisson de pain et de pâtisseries................................................ 24
Rôtissage et grillade .......................................................................25
Produktinfo
Vous trouverez des informations supplementaires concernant
les produits, accessoires, pièces de rechange et services sur
Internet sous : www.siemens-home.com et la boutique en
ligne : www.siemens-eshop.com
: Précautions de sécurité importantes
Lire attentivement ce manuel. Ce n'est
qu'alors que vous pourrez utiliser votre
appareil correctement et en toute sécurité.
Conserver la notice d'utilisation et de
montage pour un usage ultérieur ou pour le
propriétaire suivant.
Cet appareil est conçu pour être encastré
uniquement. Respecter la notice spéciale
de montage.
Contrôler l'état de l'appareil après l'avoir
déballé. Ne pas le raccorder s'il présente
des avaries de transport.
Seul un spécialiste agréé est habilité à
raccorder l'appareil. En cas de dommages
dus à un raccordement incorrect, il n'y a
aucun droit à la garantie. Pour la
modification à un autre type de gaz, appeler
le service après-vente.
Cet appareil est destiné exclusivement à
une utilisation domestique et non
professionnelle. Utiliser l'appareil
uniquement pour préparer des mets et des
boissons, ne jamais l'utiliser comme
appareil de chauffage. Surveiller l'appareil
pendant son fonctionnement. Utiliser
l'appareil uniquement à l'intérieur.
Cet appareil n'est pas conçu pour un
fonctionnement avec une minuterie externe
ou une commande à distance.
Cet appareil peut être utilisé par des
enfants de 8 ans ou plus et par des
personnes dotées de capacités physiques,
sensorielles ou mentales réduites ou
disposant de connaissances ou
d’expérience insuffisantes, sous la
surveillance d'un tiers responsable de leur
sécurité ou bien lorsqu'ils ont reçu des
instructions liées à l'utilisation de l'appareil
en toute sécurité et qu'ils ont intégré les
risques qui en résultent.
Les enfants ne doivent pas jouer avec
l'appareil. Le nettoyage et l'entretien
effectué par l'utilisateur ne doivent pas être
accomplis par des enfants, sauf s'ils sont
âgés de 8 ans et plus et qu'un adulte les
surveille.
Les enfants de moins de 8 ans doivent être
tenus à distance de l'appareil et du cordon
d'alimentation.
Toujours insérer les accessoires à l'endroit
dans le four. Voir la description des
accessoires dans la notice d'utilisation.

15
Risque de surchauffe !
Lors d'une coupure de courant, le
ventilateur de refroidissement ne fonctionne
pas. L'appareil peut surchauffer. Les pièces
touchables deviennent très chaudes et
peuvent occasionner des blessures.
L'appareil et les meubles d'encastrement
peuvent subir des dommages par les
températures élevées. Lors d'une coupure
de courant, l'appareil ne doit pas être
allumé manuellement et être utilisé.
COMPORTEMENT EN CAS D'ODEUR DE
GAZ !
Du gaz qui s'échappe peut conduire à une
explosion.
En cas de constatation d'odeur de gaz ou
de dérangements sur l'installation de gaz :
■
Fermer immédiatement l'arrivée du gaz ou
le robinet de la bouteille de gaz.
■
Eteindre immédiatement tout feu nu et
cigarettes.
■
Ne plus actionner les interrupteurs de
lumière et d'appareils, ne pas retirer de
connecteurs de la prise. Ne pas utiliser le
téléphone ou le portable dans la maison.
■
Ouvrir les fenêtres et aérer en grand la
pièce.
■
Appeler le service après-vente ou la
société de distribution de gaz.
Risque d'asphyxie !
L'utilisation de l'appareil de cuisson au gaz
conduit à la formation de chaleur,
d'humidité et de produits de combustion
dans la pièce où l'appareil est installé.
Veiller à un bonne aération de la pièce où
l'appareil est installé. Les bouches
d'aération naturelles doivent rester ouvertes
ou il faut prévoir une installation mécanique
de ventilation (p.ex. une hotte). Une
utilisation intensive et de longue durée de
l'appareil peut rendre nécessaire une
aération supplémentaire, p.ex. en ouvrant
une fenêtre, ou une aération plus efficace,
p.ex. faire fonctionner l'installation
mécanique de ventilation à un niveau de
puissance supérieur.
Risque d'incendie !
■
Il se produit un courant d'air lors de
l'ouverture de la porte de l'appareil. Le
papier sulfurisé peut toucher les
résistances chauffantes et s'enflammer.
Ne jamais poser de papier sulfurisé non
attaché sur un accessoire lors du
préchauffage. Toujours déposer un plat ou
un moule de cuisson sur le papier
sulfurisé pour le lester. Recouvrir
uniquement la surface nécessaire de
papier sulfurisé. Le papier sulfurisé ne doit
pas dépasser des accessoires.
Risque d'incendie !
■
Des objets inflammables, rangés dans le
compartiment de cuisson peuvent
s'enflammer. Ne jamais conserver des
objets inflammables dans le compartiment
de cuisson. Ne jamais ouvrir la porte de
l'appareil en cas de production de fumée
dans l'appareil. Eteindre l'appareil et
retirer la fiche secteur ou désactiver le
fusible dans le boîtier à fusibles. Fermer
l'arrivée de gaz.
Risque d'incendie !
■
L'huile et la graisse chaude s'enflamme
rapidement. Ne jamais laisser l'huile et la
graisse chaude sans surveillance. Ne
jamais éteindre le feu avec de l'eau.
Eteindre le foyer. Etouffer les flammes
prudemment avec un couvercle, une
couverture ou similaire.
Risque d'incendie !
■
L'appareil devient très chaud, des
matières inflammables peuvent
s'enflammer. Ne jamais ranger ou utiliser
des objets inflammables (p.ex. aérosols ,
nettoyants) en-dessous de l’appareil ou à
proximité. Ne jamais poser des objets
inflammables sur ou dans l'appareil.
Risque d'incendie !
■
Ne jamais mettre une grille, une plaque à
pâtisserie, une poêle ou un autre récipient
directement sur la sole du four. Cela
conduit à une surchauffe du fond de
l'appareil et peut considérablement
endommager le fond du meuble
d'encastrement.
Risque d'incendie !
■
La face arrière de l'appareil devient très
chaud. Cela peut conduire à un
endommagement des conduites de
raccordement. Les conduites électrique et
de gaz ne doivent pas toucher la face
arrière de l'appareil.

16
Risque de brûlure !
■
L'appareil devient très chaud. Ne jamais
toucher les surfaces intérieures chaudes
du compartiment de cuisson ni les
résistances chauffantes. Toujours laisser
l'appareil refroidir. Tenir les enfants
éloignés
Risque de brûlure !
■
Les récipients ou les accessoires
deviennent très chaud. Toujours utiliser
des maniques pour retirer le récipient ou
les accessoires du compartiment de
cuisson.
Risque de brûlure !
■
Les vapeurs d'alcool peuvent s'enflammer
dans un compartiment de cuisson chaud.
Ne jamais préparer de plats contenant de
grandes quantités de boissons fortement
alcoolisées. Utiliser uniquement de petites
quantités de boissons fortement
alcoolisées. Ouvrir la porte de l'appareil
avec précaution.
Risque de brûlure !
■
Les éléments accessibles deviennent
chauds pendant le fonctionnement. Ne
jamais toucher les éléments chauds.
Eloigner les enfants.
Risque de brûlures !
■
Les éléments accessibles deviennent
chauds pendant le fonctionnement. Ne
jamais toucher les éléments chauds.
Eloigner les enfants.
Risque de brûlure !
■
De la vapeur chaude peut s'échapper lors
de l'ouverture de la porte de l'appareil.
Ouvrir la porte de l'appareil avec
précaution. Tenir les enfants éloignés
Risque de brûlure !
■
La présence d'eau dans un compartiment
de cuisson chaud peut générer de la
vapeur d'eau chaude. Ne jamais verser
d'eau dans le compartiment de cuisson
chaud.
Risque de blessure !
■
Un verre de porte d'appareil rayé peut se
fendre. Ne pas utiliser de racloir à verre, ni
de produit de nettoyage agressif ou
abrasif.
Risque de blessure !
■
Les réparations inexpertes sont
dangereuses. Seul un technicien du
service après-vente formé par nos soins
est habilité à effectuer des réparations et à
remplacer des câbles électriques ou
conduites de gaz défectueux. Si l'appareil
est défectueux, retirer la fiche secteur ou
déconnecter le fusible dans le boîtier à
fusibles, fermer l'arrivée de gaz. Appeler le
service aprèsvente.
Risque de blessure !
■
Des dérangements ou dommages sur
l'appareil sont dangereux. Ne jamais
mettre en service un appareil défectueux.
Retirer la fiche secteur ou déconnecter le
fusible dans le boîtier à fusibles. Fermer
l'arrivée de gaz. Appeler le service
aprèsvente.
Risque de choc électrique !
■
L'isolation des câbles des appareils
électroménagers peut fondre au contact
des pièces chaudes de l'appareil. Ne
jamais mettre le câble de raccordement
des appareils électroménagers en contact
avec des pièces chaudes de l'appareil.
Risque de choc électrique !
■
De l'humidité qui pénètre peut
occasionner un choc électrique. Ne pas
utiliser de nettoyeur haute pression ou de
nettoyer à vapeur.
Risque de choc électrique !
■
Lors du remplacement de l'ampoule du
compartiment de cuisson, les contacts du
culot de l'ampoule sont sous tension.
Retirer la fiche secteur ou couper le
fusible dans le boîtier à fusibles avant de
procéder au remplacement.

17
Causes de dommages
Attention !
■ Accessoires, feuille, papier cuisson ou récipient sur le fond
du compartiment de cuisson : Ne posez pas d'accessoires
sur le fond du compartiment de cuisson. Ne recouvrez pas le
fond du compartiment de cuisson d'une feuille, quel que soit
le type, ni de papier cuisson. Ne pas placer de plat sur la
sole du compartiment de cuisson. Cela crée une
accumulation de chaleur. Le temps de cuisson n'est plus le
même et l'émail sera endommagé.
■ Introduire l'accessoire : Selon le modèle d'appareil, les
accessoires peuvent rayer la vitre en fermant la porte.
Introduire les accessoires toujours jusqu'en butée dans le
compartiment de cuisson.
■ Eau dans le compartiment de cuisson chaud : Ne versez
jamais d'eau dans le compartiment de cuisson chaud. Cela
produit de la vapeur d'eau. Le changement de température
peut occasionner des dommages sur l'émail.
■ Aliments humides : Ne conservez pas d'aliments humides
dans le compartiment de cuisson pendant une longue durée.
Cela endommage l'émail.
■ Jus de fruits : Ne garnissez pas trop la plaque à pâtisserie en
cas de gâteaux aux fruits très juteux. Le jus de fruits qui
goutte de la plaque laisse des taches définitives. Utilisez de
préférence la lèchefrite à bords hauts.
■ Refroidissement la porte de l'appareil ouverte : Laissez
refroidir le compartiment de cuisson uniquement la porte
fermée. Même si la porte de l'appareil n'est qu'entrouverte,
les façades des meubles voisins risquent d'être
endommagées au fil du temps.
■ Joint de porte très encrassé : si le joint de la porte est très
encrassé, la porte de l'appareil ne fermera plus correctement
lors du fonctionnement. La façade des meubles voisins peut
être endommagée.Veillez à ce que le joint de l'appareil soit
toujours propre.
■ Porte du four utilisée comme surface d'assise : Il est interdit
de grimper ou de s'asseoir sur la porte du four ouverte. Ne
pas se suspendre à la porte du four.
■ Transporter l'appareil : Ne transportez ou ne portez pas
l'appareil par la poignée de la porte. La poignée ne
supportera pas le poids de l'appareil et risque de se casser.
■ Accessoires lourds : Ne retirez pas trop loin les accessoires
lourdement chargés, sans les soulager. Un accessoire lourd
bascule en le retirant. Il exerce une pression sur les nervures
du compartiment de cuisson, ce qui risque d'endommager
l'émail. Soulagez l'accessoire retiré, en le relevant légèrement
avec une main. Attention ! Utilisez toujours des maniques en
cas d'accessoires chauds.
■ Grillades : Pour des grillades, n'enfournez la plaque à
pâtisserie ou la lèchefrite pas plus haut que le niveau 3. Elle
se déforme par la forte chaleur et endommage l'émail lors du
défournement. Ne grillez au niveau 4 et 5 que directement
sur la grille.
Votre nouvel appareil
Les informations qui suivent vont vous permettre de vous
familiariser avec votre nouvel appareil. Vous obtenez des
informations sur le bandeau de commande, le four, les modes
de cuisson et les accessoires.
Le four
Manette de commande du four
Cette manette de commande sert à régler la puissance de
chauffe du four et du gril.
Il y a une butée entre les positions
G et Max. Ne tournez pas la
manette plus loin.
Le voyant lumineux est allumé lorsque le gril est en marche.
Explication
1 Manette de commande du minuteur
2 Voyant lumineux du gril
3 Manette de commande Four et Gril
Explication
1 Gril électrique
2 Brûleur du four
Position Signification
Û
Eteint. Le four ne chauffe pas.
MIN Petite flamme, puissance minimale
150-250 Brûleur du four allumé, fourchette de
température en °C
MAX Grande flamme, puissance maximale
G
Le gril chauffe et le tournebroche fonctionne.

18
Le minuteur
Avec le minuteur vous pouvez régler une durée.
Un signal retentit après écoulement de la durée.
Manette de commande du minuteur
Cette manette de commande permet de régler la durée. Cette
manette de commande permet aussi d'allumer l'éclairage du
four.
Ventilateur de refroidissement
Le ventilateur de refroidissement se met en marche et se
coupe selon les besoins. L'air chaud s'échappe au-dessus de
la porte. Attention ! Ne pas couvrir les fentes d'aération. Sinon,
le four surchauffe.
Le ventilateur continue de fonctionner un certain temps, afin
que le compartiment de cuisson refroidisse plus vite après le
fonctionnement.
Accessoire
Les accessoires peuvent être enfournés à 4 niveaux différents.
Introduisez-le toujours jusqu'en butée, afin que l'accessoire ne
touche pas la vitre de la porte. Assurez-vous d'insérer les
accessoires toujours dans le bon sens dans le compartiment
de cuisson.
: Risque d'incendie !
Ne jamais mettre une grille, une plaque à pâtisserie, une poêle
ou un autre récipient directement sur la sole du four. Cela
conduit à une surchauffe du fond de l'appareil et peut
considérablement endommager le fond du meuble
d'encastrement.
Vous pouvez sortir l'accessoire aux deux tiers sans qu'il ne
bascule. Il est ainsi plus facile de retirer les plats du four.
Lorsque l'accessoire devient chaud il peut se déformer. Cela
n'a aucune influence sur le fonctionnement, il reprend sa forme
dès qu'il est refroidi.
Vous pouvez acheter des accessoires auprès du service après-
vente, dans le commerce spécialisé ou sur Internet.
Avant la première utilisation
Vous apprendrez ici ce que vous devez faire avant d'utiliser
votre appareil pour la première fois pour préparer des mets.
Avant de commencer, lisez le chapitre Consignes de sécurité.
Retirez l'emballage de l'appareil et éliminez-le conformément
aux réglementations en la matière.
Chauffe à vide du four
Premier nettoyage du four
1. Retirer les accessoires et les grilles supports du
compartiment de cuisson.
2. Enlever tous les résidus d'emballage, tels que des petits
morceaux de polystyrène, du compartiment de cuisson.
3. Certaines parties sont recouvertes d'un film protecteur.
Enlever le film protecteur.
4. Nettoyer l'extérieur de l'appareil avec un chiffon doux,
humide.
5. Nettoyer le compartiment de cuisson à l'eau chaude
additionnée de produit à vaisselle.
Chauffer le four
Pour éliminer l'odeur de neuf, chauffer le four vide et fermé.
1. Régler le thermostat sur la température maximale.
2. Eteindre le four au bout de 45 minutes.
Nettoyage ultérieur du four
1. Nettoyer le compartiment de cuisson à l'eau chaude
additionnée de produit à vaisselle.
2. Monter les grilles supports.
Nettoyer les accessoires
Avant d'utiliser les accessoires, nettoyez-les soigneusement
avec de l'eau additionnée de produit à vaisselle et une lavette.
Position Signification
Û
Eteint
5 - 90 Durée en minutes
^
Allumer l'éclairage du four
Accessoires Description
Grille à pâtisserie/de rôtissage
Pour de la vaisselle, des moules
à gâteau, rôtis, grillades, plats
surgelés.
Plaque à pâtisserie émaillée
Pour des gâteaux fondants, pâtis-
series, plats surgelés et gros
rôtis. Egalement utilisable
comme collecteur de graisse.
Tiges de sécurité
Pour bloquer les charnières.
Support de tournebroche
Pour poser la broche.
Tournebroche
Pour des rôtis et des grosses
volailles. L'utiliser uniquement en
combinaison avec la plaque à
pâtisserie émaillée.

19
Voici comment utiliser le four
Eclairage
Allumer l'éclairage du four
Régler la manette de commande sur la position
^.
L'éclairage du four s'allume aussi quand le minuteur est en
marche ou la porte du four est ouverte.
Eteindre l'éclairage du four
Régler la manette de commande sur la position
Û.
L'éclairage du four s'éteint.
Modes de fonctionnement
Les modes de fonctionnement suivants sont disponibles.
Utilisation du four
Allumer le brûleur du four
1. Ouvrir la porte de l'appareil.
2. Appuyer sur la manette de commande du four et la régler sur
la position 250 °C.
3. Maintenir la manette enfoncée pendant quelques secondes
le temps que la flamme se stabilise.
4. Fermer prudemment la porte de l'appareil.
5. Régler la température désiré au moyen de la manette de
commande. Ne pas tourner plus loin que la position “Min”.
Si la flamme s'éteint de nouveau
Placez la manette de commande sur la position Arrêt. Attendez
une minute et répétez l'allumage.
: Risque d'incendie !
Du gaz s'échappe lorsque la flamme s'éteint. Ne laissez pas les
brûleurs sans surveillance pendant leur fonctionnement.
Assurez-vous qu'il n'y a pas de courant d'air.
Eteindre le brûleur du four
Régler la manette de commande sur la position
Û. Ce faisant,
maintenir la manette de commande appuyée.
Utilisation du gril
La porte de l'appareil doit être fermée lors du fonctionnement
du gril.
Remarques
■ Il n'est pas possible d'utiliser en même temps le brûleur du
four et le gril.
■ Lors de l'utilisation du gril, le temps de cuisson ne doit pas
dépasser 60 minutes.
■ Lors de la mise en marche du gril, l'entraînement du
tournebroche est automatiquement activé.
Allumer le gril
Appuyer sur la manette de commande du four et la régler sur la
position
G.
Le voyant lumineux est allumé lorsque le gril est en marche.
Eteindre le gril
Régler la manette de commande sur la position
Û.
Commande du tournebroche
Le tournebroche est idéal pour le rôtissage, comme pour
préparer du rôti roulé et de la volaille. La viande sera cuite
uniformément.
L'entraînement du tournebroche est automatiquement activé
dès la mise en marche du gril.
Préparer le rôti
1. Embrocher le rôti sur le tournebroche en le centrant le mieux
possible et le fixer aux deux extrémités avec les crochets.
Le rôti peut être fixé en plus avec de la ficelle de cuisine.
2. En cas de volaille, fixer les extrémités des ailes sous le dos et
les cuisses au corps. De cette sorte, elles ne brunissent pas
trop.
3. Piquer la peau en-dessous des ailes, la graisse peut ainsi
s'écouler.
Mise en place de la broche
: Risque de brûlure !
Ne jamais toucher les surfaces chaudes du compartiment de
cuisson ni les éléments chauffants. Eloigner systématiquement
les enfants. Ouvrir prudemment la porte de l'appareil. De la
vapeur chaude peut s'échapper.
1. Introduire le support de la broche au niveau
d'enfournement 2 jusqu'en butée.
2. Pousser le tournebroche dans le logement du moteur situé
dans la paroi arrière du compartiment de cuisson (a).
3. Placer le tournebroche sur le support de la broche (b).
Remarque : La broche doit correctement s'encliqueter dans
le support.
4. Dévisser la poignée (c).
5. Verser de l'eau sur une plaque à pâtisserie et enfourner la
plaque au niveau 1 comme collecteur de graisse.
6. Fermer la porte de l'appareil.
Activer le tournebroche
Régler la manette de commande du four sur la position
G.
Désactiver le fonctionnement du tournebroche
Régler la manette de commande du four sur la position
Û.
Mode de fonctionne-
ment
Utilisation
[
Brûleur du four 150 -
250 °C
Pour des gâteaux et pâtis-
series, soufflés, volailles,
pièces de rôtis maigres de
bœuf, veau et gibier.
G
Gril électrique Pour des steaks, saucis-
ses, poissons et toasts
D
E
F

20
Retirer la broche
: Risque de brûlure !
Ne jamais toucher les surfaces chaudes du compartiment de
cuisson ni les éléments chauffants. Eloigner systématiquement
les enfants. Ouvrir prudemment la porte de l'appareil. De la
vapeur chaude peut s'échapper.
: Risque de brûlure !
Ne jamais toucher directement le tournebroche chaud ou
d'autres accessoires chauds. Saisir un accessoire chaud
uniquement avec des maniques ou des gants thermoisolants.
1. Ouvrir prudemment la porte de l'appareil et revisser la
poignée sur le tournebroche.
2. Retirer prudemment le tournebroche de son logement dans
paroi arrière et l'enlever.
3. Enlever le support de la broche et la plaque à pâtisserie.
Utilisation du minuteur
Le minuteur fonctionne indépendamment du four.
Réglage de la durée
1. Tourner la manette de commande à droite jusqu'en butée.
2. La tourner à gauche jusqu'à la durée désirée.
Une fois la durée écoulée, un signal sonore retentit.
Entretien et nettoyage
Si vous entretenez et nettoyez soigneusement votre four il
gardera longtemps l'aspect du neuf et restera opérationnel.
Nous vous expliquons ici comment entretenir et nettoyer
correctement votre four.
Remarques
■ Les légères variations de couleur apparaissant sur la façade
du four sont dues aux différents matériaux tels que le verre,
le plastique et le métal.
■ Des ombres sur la vitre de la porte, qui ressemblent à des
stries, sont des reflets de lumière de la lampe du four.
■ L'émail est cuit à des températures très élevées. Ceci peut
engendrer des différences de teintes. Ce phénomène est
normal et n'a aucune incidence sur le fonctionnement du
four. Les bords de plaques minces ne peuvent pas être
émaillés complètement. Ils peuvent donc présenter des
aspérités. La protection contre la corrosion n'en est pas
compromise.
: Risque de choc électrique !
De l'humidité qui pénètre peut occasionner un choc électrique.
Ne pas utiliser de nettoyeur haute pression ou de nettoyer à
vapeur.
: Risque de brûlure !
L'appareil devient très chaud. Ne jamais toucher les surfaces
intérieures chaudes du compartiment de cuisson ni les
résistances chauffantes. Toujours laisser l'appareil refroidir.
Tenir les enfants éloignés
Nettoyants
Afin de ne pas endommager les différentes surfaces en utilisant
des nettoyants inappropriés, veuillez respecter les indications
dans le tableau. N'utilisez pas
■ de produits agressifs ou récurants,
■ de nettoyants fortement alcoolisés,
■ de tampons en paille métallique ni d'éponges à dos récurant,
■ de nettoyeurs haute pression ni de nettoyeurs à vapeur.
Avant d'utiliser des lavettes éponges neuves, rincez-les
soigneusement.
Niveau Nettoyants
Façade du four Eau chaude additionnée de produit à
vaisselle :
Nettoyer avec une lavette et sécher avec
un chiffon doux. Ne pas utiliser de net-
toyant pour vitres ou de grattoir pour
vitres.
Inox Eau chaude additionnée de produit à
vaisselle :
Nettoyer avec une lavette et sécher avec
un chiffon doux. Éliminer immédiatement
les dépôts calcaires, de graisse, de
fécule et de blanc d'œuf. De la corrosion
peut se former sous ces salissures.
Auprès du service après-vente et dans le
commerce spécialisé, vous pouvez vous
procurer des produits d'entretien spé-
ciaux pour inox qui sont appropriés pour
des surfaces chaudes. Appliquer avec
un chiffon doux une pellicule mince de
produit d'entretien.
Aluminium Nettoyer avec un nettoyant doux pour
vitres. Passer horizontalement et sans
pression sur les surfaces avec un chiffon
pour vitres ou un chiffon à microfibres ne
peluchant pas.
Surfaces émaillées
(surface lisse)
Produit à vaisselle usuel du commerce
ou de l'eau au vinaigre : appliquer avec
un chiffon doux et humide ou une peau
de chamois ; sécher avec un chiffon
doux. Ramollir les résidus d'aliment
incrustés avec un chiffon humide et du
produit à vaisselle. En cas d'encrasse-
ment important, utiliser du gel de net-
toyage pour four. Il peut être appliqué de
façon précise. Après le nettoyage, laisser
le compartiment de cuisson ouvert, afin
qu'il sèche.
Surfaces autonet-
toyantes (surface
rugueuse)
Respecter les consignes dans le cha-
pitre : Revêtement catalytique du com-
partiment de cuisson
Brûleurs Ne jamais nettoyer soi-même les brû-
leurs dans le compartiment de cuisson.
Vitres de la porte Nettoyant pour vitres :
Nettoyer avec un chiffon doux. Ne pas
utiliser de racloir à verre.
La page est en cours de chargement...
La page est en cours de chargement...
La page est en cours de chargement...
La page est en cours de chargement...
La page est en cours de chargement...
La page est en cours de chargement...
La page est en cours de chargement...
La page est en cours de chargement...
-
 1
1
-
 2
2
-
 3
3
-
 4
4
-
 5
5
-
 6
6
-
 7
7
-
 8
8
-
 9
9
-
 10
10
-
 11
11
-
 12
12
-
 13
13
-
 14
14
-
 15
15
-
 16
16
-
 17
17
-
 18
18
-
 19
19
-
 20
20
-
 21
21
-
 22
22
-
 23
23
-
 24
24
-
 25
25
-
 26
26
-
 27
27
-
 28
28


Siemens HG10LE150 Manuel utilisateur
- Catégorie
- Fours
- Taper
- Manuel utilisateur
dans d''autres langues
- English: Siemens HG10LE150 User manual