
© 2021.02 Lindab Ventilation. All forms of reproduction without written permission are forbidden. is the registered trademark of Lindab AB.
Lindab's products, systems, product and product group designations are protected by intellectual property rights (IPR).
lindab | we simplify construction
LindabMBV
Room supply unit - Installation instruction - UK
Tilluft enhed - Installations vejledning - DK
Rumsförsörjningsenhet - Montageinstruktion - SE
Tuloilmalaite - Asennusohje - FI
Anschlusskasten - Montageanleitung - DE
Plenum di mandata - Istruzioni di montaggio - IT
Plénum de soufflage - Instructions de montage - FR

2
-P
-T
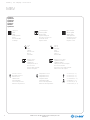
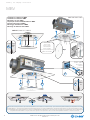
Presence sensor
Bevægelsessensor
Nävarosensor
Liiketunnistin
Präsenzmelder
Sensora di presenza
Détecteur de présence
2 x sensor (-P, -T)
2 x sensor (-P, -T)
2 x sensor (-P, -T)
2 x antureita (-P, -T)
2 x Melder (-P, -T)
2 x Sensora (-P, -T)
2 x Détecteur (-P, -T)
Temperature sensor
Temperatursensor
Temperatursensor
Lämpötila-anturi
Temperaturmelder
Sensora di temperatura
Détecteur de température
-P-T
+
Lindab reserves the right to make changes without prior notice
2021-02-18
Lindab reserves the right to make changes without prior notice
2021-02-18
lindab | we simplify construction
MBV
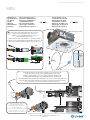
Lock
Lås
Låsa
Lukitse
Geschlossen
Blocco
Verrouiller
Unlock
Lås op
Låsa upp
Avaa
Geöffnet
Sblocco
Déverrouiller
supply air
Tilluft
Tilluft
Sisäänpuhallus
Zuluft
Aria di mandata
Soufflage
Open damper
Åbent spjæld
Öppet spjäll
Säätöpelti auki
Geöffnete Drossel
Serranda aperta
Registre ouvert
Damper motor
Spjældmotor
Spjällmotor
Säätöpelti moottori
Drossel motor
Motore della serranda
Moteur du registre
Damper motor cable
Spjældmotor kabel
Spjällmotorkabel
Säätöpelti moottorin kaapeli
Drossel motorkabel
Cavo del motore della serranda
Câble moteur de registre
Closed damper
Lukket spjæld
Stängt spjäll
Suljettu säätöpelti
Geschlossene Drossel
Serranda chiusa
Registre fermé
Symbols
Symboler
Symboler
Symbolit
Symbole
Simboli
Symboles

3
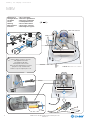
MHS M8
Accessories
Tilbehør
Tillbehör
Lisävarusteet
Zubehör
Accessori
Accessoires
S
SUPPLY
Lindab A/S
Lucernemarken 17 DK- 3520 Farum
Phone +45 7323 2525 Fax +45 7323 2526
www.lindab.com
MBX-XXX-XXX-X
Lindab
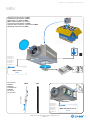
Example 1:
Eksempel 1:
Exempel 1:
Esimerkki 1:
Beispiel 1:
Esempio 1:
Exemple 1:
MBV-160-250
Lindab A/S
Lucernemarken 17 DK- 3520 Farum
Phone +45 7323 2525 Fax +45 7323 2526
www.lindab.com
MBX-XXX-XXX-X
Lindab
MBV-160-250-CT-RC-10
600 - 1000 mm
6
Lindab reserves the right to make changes without prior notice
2021-02-18
lindab | we simplify construction
MBV
Unpacking and protection of MBV
Udpakning og beskyttelse af MBV
Uppackning och skydd av MBV
MBV -laatikon pakkaus ja suojaus
Auspacken und Schützen des MBV
Apertura della confezione e protezione di MBV
Déballage et protection de MBV
Example 2:
Eksempel 2:
Exempel 2:
Esimerkki 2:
Beispiel 2:
Esempio 2:
Exemple 2:

4
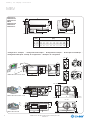
Ød1Ød2
[mm] [mm]
250
125 200
160 250
200 315
315
m
[kg]
11,1
4,2
6,0
7,8
W
310
380
460
540
L
376
459
565
698
H
188
222
263
313
e
40
40
40
60
D
78
78
78
118
C
291
352
425
514
B
137
112
75
92
a
96
116
116
116
86
75
W
250
175
46
CT + RC
W68
49 (L) Lux
44
CT
126 85
175
85
99
119
a
Trafo 10VA / 20VA
46
CT + RC
W68 49 (L) Lux
44
CT
126 85
175
85
99
119
a
Trafo 10VA / 20VA
25
38
W
W + 50
151
250
87
105
a
25
25 38W
W + 50
151
250
87
105
a
25
Trafo 10VA
37
56
93
66
68
Trafo 10VA
Trafo 20VA
53
56
108
66
68
Trafo 20VA
Trafo 10VATrafo 20VA
56
93
37
Trafo 10VATrafo 20VA
56
108
53
MBV-160-250-CT-RC-L-10
MBV-160-250-CN
MBV-160-250-CT-RC-20-P
(P) IP54
RC
e 7
15 - 18 Ød2
C
B
L Ød
1
D
a
H
e 7
15 - 18 W/2
CW
B
L Ød
1
D
a
H
Lindab reserves the right to make changes without prior notice
2021-02-18
Lindab reserves the right to make changes without prior notice
2021-02-18
lindab | we simplify construction
MBV
Dimensions
Dimensioner
Dimensioner
Mitat
Dimensionen
Dimensioni
Dimensions
Configuration examples - Konfigurationseksempler - Konfigurationsexempel - Kokoonpanoesimerkkejä -
Konfigurationsbeispiele - Esempi di configurazione - Exemples de configuration

5
A - A
Ød1
MHS M8
600 - 1000 mm
M8MHS
A
A
Ød1 = 125-200 => 1 x
Ød1 = 250 => 2 x
MBV
X
Size X
250 350
315 350
Lindab reserves the right to make changes without prior notice
2021-02-18
lindab | we simplify construction
MBV
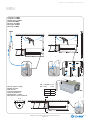
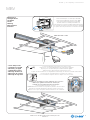
Installation of MBV
Installation af MBV
Upphängning av MBV
Kannakointi MBV
Montage des MBV
Montaggio di MBV
Montage de MBV
Directly against ceiling
Direkte mod loft
Dikt mot tak
Suoraan kattopintaan
Direkt an die Decke
Direttamente a soffitto
Directement contre le plafond

6
LCP-P-T, LCC-P-T, LKP-P
LCP LKPLCC
MBV-160-250-CT-RC
!
A A B B
DD
C
Click !
x3
D
Click !
x3
A
x4
C
Click !
Click !
Click !
Lindab reserves the right to make changes without prior notice
2021-02-18
Lindab reserves the right to make changes without prior notice
2021-02-18
lindab | we simplify construction
MBV
Installation of diffuser in MBV
Installation af armatur i MBV
Montering av don i MBV
Hajottajan asennus liitäntälaatikkoon MBV
Durchlassmontage im MBV
Montaggio del diffusore in MBV
Montage du diffuseur dans MBV
Service wire
Service wire
Service vajror
Huoltovaijerit
Service Draht
Cavo per manutenzione
Cable de maintien
Connect - tilslut
tilsluta - kytkeä
Anschließen
collegare
connectez
Do not remove the protective cap of the temperature sensor before commissioning - Fjern ikke beskyttelseshætten på temperatursensoren
før idriftsættelse - Ta inte bort skyddslocket på temperatursensorn innan idrifttagning - Älä poista lämpöanturin suojaa ennen käyttöönottoa -
Die Schutzkappe des Temperatursensors nicht vor Inbetriebnahme abnehmen - Non rimuovere il cappuccio protettivo del sensore di tempera-
tura prima del reale utilizzo - Ne pas enlever le capuchon de protection de la sonde de température avant le commissionnement.

7
MBV-160-250-CT-RC
CN / CT
LCP-P-T, LCC-P-T / LKP-P
C
D
Disconnect power/signal cable from CN / CT card.
Afbryd power/signal kabel fra CN / CT kortet.
Koppla bort ström/signalkabel från CN / CT kort.
Irroita kaapeli CN/CT-kortista.
Trennen Sie das Strom-/Signalkabel von der CN/CT -Karte.
Scollegare il cavo di alimentazione/segnale dalla scheda CN / CT.
Déconnecter câble alimentation/signal de la carte CN / CT.
Click !
x3
Click !
Click !
Click !
B
-P-T
+
SUP
G+
G0-
CO2
G+
G0-
S2
S1
RC LINKRC LINK
RC
IN/OUT
PRES. /
TEMP.
LINK
H
C
G0-
G+
COOL
S
G0-
G+
HEAT
S
G0-
G+
G+
G0-
S
P
DAMPER
POWER
BUS-OK
SCC
ON
12
CTS
TERA
SHIELD
BUS
SH
G0-
A
BREGULA CONTROL PASCAL 4
3
2
1
›
STANDBY
SERVICE
COOL
HEAT
OFF
G+ Load 24V
G0- Neutral 24V
C
Cool Control
H
Heat Control
Link/RC
H/C/24V
G+ Load 24V
G0- Neutral 24V
S Control
Cool
Actuator
G+ Load 24V
G0- Neutral 24V
S Control
Heat
Actuator
G+ Load 24V
G0- Neutral 24V
S Control
P Position
Air flow
Damper
8 G0- Neutral 24V
7 G+ Load 24V
6
5 RS485 B
4 RS485 A
3 Damper Pos 0-10V
2 Damper Control 0-10V
1
RJ45
SH Shield
G0- Neutral 24V
A
B
BUS
RS485
G0- Neutral 24V
G+ Load 24V
SupplySupply
24V24V
S1 DI2
S2 +24VDC
G0- Neutral 24V
G+ Load 24V
CO2
Sensor
AO1 1
AO2 2
AI2 3
DI1 4
+24VDC 5
DI2 6
7
8
Link
RJ45
AO1 1
AO2 2
AI2 3
DI1 4
+24VDC 5
DI2 6
7
8
Link
RJ45
(23) AO1 1
(24) AO2 2
(31) AI2 3
(32) DI1 4
(40) +24VDC 5
(33) DI2 6
(10) G+ Load 24V 7
(11) G0- Neutral 24V 8
RC in/out
RJ45
AI1 1
Signal neutral 2
3
DI1 4
+24VDC 5
DI2 6
G+ Load 24V 7
G0- Neutral 24V 8
Presence
Temp
RJ45
Regula Control Pascal
Pascal
Rc LINK
Rc LINK
CO2 in - S1
CO2 in - S2
CO2 out - N
CO2 out - L
REGULA CONNECT
LINDAB
Presence in - S1
Presence in - S2
Presence out - N
Presence out - L
Damper in - Pos
Damper out - S
Damper out - N
Damper out - L
Heating 0-10V- S
Heating 0-10V- N
Heating 0-10V- L
Supply Link2 - N
Supply Link2 - L
Supply Link1 - N
Supply Link1 - L
Supply in - N
Supply in-24V - L
N = Neutral
L = Load
S = Signal
RC in / out
SUP
G+
G0-
CO2
G+
G0-
S2
S1
RC LINKRC LINK
RC
IN/OUT
PRES. /
TEMP.
LINK
H
C
G0-
G+
COOL
S
G0-
G+
HEAT
S
G0-
G+
G+
G0-
S
P
DAMPER
POWER
BUS-OK
SCC
ON
12
CTS
TERA
SHIELD
BUS
SH
G0-
A
BREGULA CONTROL PASCAL
›
STANDBY
SERVICE
COOL
HEAT
OFF
G+ Load 24V
G0- Neutral 24V
C
Cool Control
H
Heat Control
Link/RC
H/C/24V
G+ Load 24V
G0- Neutral 24V
S Control
Cool
Actuator
G+ Load 24V
G0- Neutral 24V
S Control
Heat
Actuator
G+ Load 24V
G0- Neutral 24V
S Control
P Position
Air flow
Damper
8 G0- Neutral 24V
7 G+ Load 24V
6
5 RS485 B
4 RS485 A
3 Damper Pos 0-10V
2 Damper Control 0-10V
1
RJ45
SH Shield
G0- Neutral 24V
A
B
BUS
RS485
G0- Neutral 24V
G+ Load 24V
Supply
Supply
24V
24V
S1 DI2
S2 +24VDC
G0- Neutral 24V
G+ Load 24V
CO2
Sensor
AO1 1
AO2 2
AI2 3
DI1 4
+24VDC 5
DI2 6
7
8
Link
RJ45
AO1 1
AO2 2
AI2 3
DI1 4
+24VDC 5
DI2 6
7
8
Link
RJ45
(23) AO1 1
(24) AO2 2
(31) AI2 3
(32) DI1 4
(40) +24VDC 5
(33) DI2 6
(10) G+ Load 24V 7
(11) G0- Neutral 24V 8
RC in/out
RJ45
AI1 1
Signal neutral 2
3
DI1 4
+24VDC 5
DI2 6
G+ Load 24V 7
G0- Neutral 24V 8
Presence
Temp
RJ45
Regula Control Pascal
Pascal
Rc LINK
Rc LINK
CO2 in - S1
CO2 in - S2
CO2 out - N
CO2 out - L
REGULA CONNECT
LINDAB
Presence in - S1
Presence in - S2
Presence out - N
Presence out - L
Damper in - Pos
Damper out - S
Damper out - N
Damper out - L
Heating 0-10V- S
Heating 0-10V-
N
Heating 0-10V- L
Supply Link2 - N
Supply Link2 - L
Supply Link1 - N
Supply Link1 - L
Supply in - N
Supply in-24V -
L
N = Neutral
L = Load
S = Signal
RC in / out
CT
CN
A
Lindab reserves the right to make changes without prior notice
2021-02-18
lindab | we simplify construction
MBV
Do NOT disconnect cable here!
Frakobl IKKE kablet her!
Koppla INTE bort kabeln här!
Älä irroita kaapelia
Trennen Sie hier NICHT das Kabel!
NON scollegare il cavo qui!
Ne déconnectez pas le câble ici!
Maintenance - Take out damper unit V
Vedligeholdelse - Demonter spjældenhed V
Underhåll - Demontera spjällenhet V
Huolto - V-Säätöpellin irroitus
Wartung - Drossel V demontieren
Manutenzione - Smontaggio serranda V
Entretien - Démontage du registre V
- Insert damper unit V
- Installation af V-spjæld
- Montering av V-spjäll
- V-säätöpellin asennus
- Montage der V-Drossel
- Montaggio di seranda V
- Montage de registre V
( A I ) ( I A )
Hold manual switch down (C) and move damper to closed position (D).
Hold manuel knap nede (C) og flyt spjældet til lukket position (D).
Håll den manuella knappen nere (C) och flytta spjället till stängt läge (D).
Pidä painiketta alhaalla (C) ja siirrä säätöpelti suljettuun asentoon (D).
Handentriegelung gedrückt halten (C) und Klappe in die geschlossene Position fahren (D).
Tenere premuto l’interruttore manuale (C) e portare la serranda in posizione chiusa (D).
Presser et maintenir le switch manuel (C) et fermer le registre (D).

8
E
I
H
Pull the damper housing to the side.
Træk spjældhuset til siden.
Dra spjällhuset till sidan
Käännä pellin runkoa sivulle
Ziehen Sie das Reglergehäuse zur Seite.
Spingere il corpo serranda a lato
Retirer le corps du registre par le coté
G
F
MBV-160-250-CN
CN / CT
11
2
2
Lindab reserves the right to make changes without prior notice
2021-02-18
Lindab reserves the right to make changes without prior notice
2021-02-18
lindab | we simplify construction
MBV
Maintenance - Take out damper
Vedligeholdelse - Demonter spjældenhed
Underhåll - Demontera spjällenhet
Huolto - V-Säätöpellin irroitus
Wartung - Drossel demontieren
Manutenzione - Smontaggio serranda
Entretien - Démontage du registre
( A I )
LCP-P-T / LCC-P-T / LKP-P

9
8-7
F
Lindab reserves the right to make changes without prior notice
2021-02-18
lindab | we simplify construction
MBV
Maintenance
Vedligeholdelse
Underhåll
Huolto
Wartung
Manutenzione
Entretien
- Insert damper unit
- Installation af spjæld
- Montering av spjäll
- Säätöpellin asennus
- Montage der Drossel
- Montaggio di seranda
- Montage de registrere
Demounted damper can be kept inside MBV
Demonteret spjæld kan obevares inde i MBV
Demonterad spjäll kan ligga kvar inuti MBV
Irroitettu säätöosa voidaan pitää laatikossa
Demontierte Drossel kann im MBV aufbewahrt werden
La serranda smontata può rimanere all’interno del MBV
Le registre demonté peut être laisser à l’intérieur du MBV
To re-insert damper, follow steps A-I in reverse order.
Følg trin A-I i omvendt rækkefølge for at geninstallere spjældet.
Följ steg A-I i omvänd ordning för att återinstallera spjället.
Takaisinasennus päinvastaisessa järjestyksessä A-I.
Folgen Sie den Schritten A-I in umgekehrter Reihenfolge, um die Drossel wieder einzusetzen.
Per reinserire la serranda ripetere le operazioni A-I a ritroso.
Pour ré-installer le registre suivre les étapes A en sens inverse.
MBV-160-250-CT-RC
CN / CT
MBV-160-250-CT-RC
Click !
Click !Click !
( I A )
! Step F. Press the damper housing straight into the connection.
! Trin F. Tryk spjældhuset direkte ind i tilslutningen.
! Steg F. Tryck in spjällhuset direkt i anslutningen.
Työnnä peltiosa liitokseen suorassa.
! Schritt F. Drücken Sie das Drosselgehäuse gerade in den Anschluss.
Spingere la serranda direttamente all’interno della connessione.
Appuyer sur le corps du registre directement dans le raccordement.

www.lindab.comwww.lindab.com
Most of us spend the majority of our time indoors. In-
door climate is crucial to how we feel, how productive
we are and if we stay healthy.
We at Lindab have therefore made it our most important
objective to contribute to an indoor climate that improves
people’s lives. We do this by developing energy-efficient
ventilation solutions and durable building products. We
also aim to contribute to a better climate for our planet
by working in a way that is sustainable for both people
and the environment.
Lindab | For a better climate
For a better climate
-
 1
1
-
 2
2
-
 3
3
-
 4
4
-
 5
5
-
 6
6
-
 7
7
-
 8
8
-
 9
9
-
 10
10


dans d''autres langues
- dansk: Lindab MBV Brugermanual
Documents connexes
Autres documents
-
 Sammode PASCAL 100-133 Manuel utilisateur
-
OJ Electronics AHC-3000 Mode d'emploi
-
Regin OPTIGO OP10 Mode d'emploi
-
BITZER VARIPACK IP20/IP55/66 Mode d'emploi
-
Atlantic CIAO CONFORT 3224 MBV Le manuel du propriétaire
-
ABB ACS580-01 drives Quick Installation And Start-Up Manual
-
-
-
