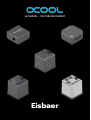
Alphacool Eisbaer Aurora AIO CPU Water Cooler Manuel utilisateur
- Taper
- Manuel utilisateur

Eisbaer

Eisbaer Alphacool International GmbH
2

Eisbaer Alphacool International GmbH
3
Lisez les instructions de sécurité avant de
commencer l‘installation.
FR
DE Lesen Sie die Sicherheitshinweise, bevor Sie mit
der Installation beginnen.
EN Read the safety instructions before starting the
installation.

Eisbaer Alphacool International GmbH
4
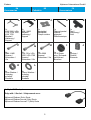
Accessories Zubehör Accessoires 4
Masurement Maße Mesure 5
Alphacool Eisbaer (Solo) serie 5
Alphacool Eisbaer Aurora (Solo) serie 5
Alphacool Eisbaer LT (Solo) serie 6
Alphacool Eisbaer Aurora LT (Solo) serie 6
LGA 115x / 1200 / 1700 / 2066 7
AM4 / AM5 7
Preparation Vorbereitung Préparation 8
LGA 2066 Mounting LGA 2066 Montage LGA 2066 Montage 10
LGA 1700 Mounting LGA 1700 Montage LGA 1700 Montage 11
LGA 115x Mounting LGA 115x Montage LGA 115x Montage 12
LGA 1200 Mounting LGA 1200 Montage LGA 1200 Montage 12
AM4 / AM5 Mounting AM4 / AM5 Montage AM4 / AM5 Montage 13
Pump connection Pumpenanschluss Connexion de pompe 14
Alphacool Eisbaer LT (Solo) serie 14
Alphacool Eisbaer (Solo) serie 15
Digital RGB connection Digital RGB Anschluss Connexion RGB Digital 16
Alphacool Eisbaer Aurora (Solo) serie 16
Alphacool Eisbaer Aurora LT (Solo) serie 17
EN
Table of contents
DE
Inhaltsverzeichnis
FR
Table des matières

EN DE FR
2x
LGA 2066, LGA
115x, LGA 1200,
LGA 1700
Bracket /
Halterung /
Support
2x
AM4 / AM5
Bracket /
Halterung /
Support
1x
Backplate /
Backplate /
Plaque arrière
1x
Thermal paste /
Wärme-
leitpaste /
Pâte thermique
1x
Tool /
Werkzeug /
Outil
4x
AM4 / AM5
Screws /
Schrauben /
Vis
4x
LGA 115x, LGA
1200, LGA 1700
Screws /
Schrauben / Vis
4x
LGA 2066
Screws /
Schrauben / Vis
1x
G1/4 Screw
plug / Schraub-
verschluss /
Bouchon
4x
Springs /
Federn /
Ressorts
4x
2mm Washer /
Unterleg-
scheibe/
Rondelle
4x
0,5mm Washer /
Unterleg-
scheibe /
Rondelle
GH I J
K L
1x Digital-RGB adapter
Only with: / Nur bei: / Uniquement avec:
Alphacool Eisbaer (Solo) Serie
Alphacool Eisbaer Aurora (Solo) Serie
Alphacool Eisbaer Aurora LT (Solo) Serie
Eisbaer Alphacool International GmbH
5
Accessories Zubehör Accessoires
A B C DE
F

Eisbaer Alphacool International GmbH
6
Masurement Maße Mesure
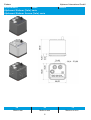
Alphacool Eisbaer (Solo) serie
Alphacool Eisbaer Aurora (Solo) serie
EN DE FR
Size in mm Maße in mm Mesure en mm

Eisbaer Alphacool International GmbH
7
EN DE FR
Size in mm Maße in mm Mesure en mm
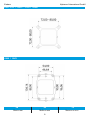
Alphacool Eisbaer LT (Solo) serie
Alphacool Eisbaer Aurora LT (Solo) serie

Eisbaer Alphacool International GmbH
8
EN DE FR
Size in mm Maße in mm Mesure en mm
LGA 115x / 1200 / 1700 / 2066
AM4 / AM5

Eisbaer Alphacool International GmbH
9
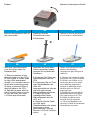
Preparation Vorbereitung Préparation
EN DE FR
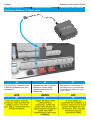
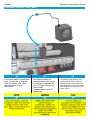
Connect your connections to
IN and OUT as shown. All
connections with a max.
diameter of 18mm are
compatible.
Schließen Sie ihre
Anschlüsse wie dargestellt
an IN und OUT. Kompatibel
sind alle Anschlüsse mit
einem max. Durchmesser
von 18mm.
Branchez vos connexions à
IN et OUT comme indiqué.
Tous les raccords d'un
diamètre maximal de 18 mm
sont compatibles.
EN DE FR
The ll port can be used for
relling if necessary. Screw in
the screw cap with the
enclosed tool.
Der Fillport kann bei Bedarf
zum Nachfüllen verwendet
werden. Drehen Sie den
Schraubverschluss mit dem
beiliegenden Werkzeug
ein.
L'orice de remplissage peut
être utilisé pour faire le plein
si nécessaire. Vissez le
bouchon à l'aide de l'outil
fourni.
I

Eisbaer Alphacool International GmbH
10
EN DE FR
Remove the protective lm on
the cooler plate.
Entfernen Sie die
Schutzfolie auf dem
Kühlerboden.
Retirez le lm de protection
sur le fond du refroidisseur.
EN DE FR
After you have dismantled
your old cooler clean the
hardware rst:
1. Remove residues of the
thermal paste from the CPU.
2. Use a cloth or cotton swab
to help. With isopropanol
alcohol, you can also remove
dried heat-conducting paste.
3. Apply a pea-sized blob of
thermal paste to the CPU.
4. Spread the paste with the
aid of a plastic strip or similar
to form an even, thin layer
(<0,5mm layer thickness).
Nachdem Sie Ihren alten
Kühler demontiert haben,
reinigen Sie zunächst die
Hardware:
1. Entfernen Sie Reste der
Wärmeleitpaste von der
CPU.
2. Verwenden Sie ein Tuch
oder Wattestäbchen als
Hilfe. Mit
Isopropanolalkohol können
Sie auch getrocknete
Wärmeleitpaste entfernen.
3. Tragen Sie einen
erbsengroßen Klecks
Wärmeleitpaste auf die
CPU auf.
4. Verteilen Sie die Paste
mit Hilfe eines
Plastikstreifens oder etwas
ähnlichem zu einer
gleichmäßigen, dünnen
Schicht (< 0,5 mm Schicht-
dicke).
Après avoir démonté votre
ancien refroidisseur,
commencez par nettoyer le
matériel:
1. Retirez les restes de pâte
thermique de l'unité centrale.
2. Utilisez un chion ou un
coton-tige pour vous aider.
Vous pouvez également
enlever la pâte thermique
séchée avec de l'alcool
isopropylique.
3. Appliquez une goutte de
pâte thermique de la taille
d'un petit pois sur le CPU.
4. étalez la pâte en une
couche ne et régulière
(< 0,5 mm d'épaisseur de
couche) à l'aide d'une bande
de plastique ou autre.
D

Eisbaer Alphacool International GmbH
11
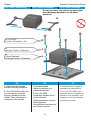
EN DE FR
1. Select the appropriate
bracket and plug it together.
2. The LGA 2066 screws are
put through the pressure
springs, washers and the
holder, Then everything is
mounted on the socket.
1. Entsprechende
Halterung wählen und
zusammenstecken.
2. Die LGA 2066
Schrauben werden durch
die Druckfedern,
Unterlegscheiben und den
Halter gesteckt.
Anschließend wird alles auf
den Sockel montiert.
1. Sélectionnez le support
approprié et emboîtez-le.
2. Les vis LGA 2066 sont
passées par les ressorts de
pression, les rondelles et le
support. Le tout est ensuite
monté sur le socle.
LGA 2066 Mounting LGA 2066 Montage LGA 2066 Montage
4x
0,5mm Washers /
Unterlegscheiben / Rondelles
4x
Springs / Federn / Ressorts
4x LGA 2066
Screws / Schrauben / Vis
Do not use tools, only tighten up hand-tight!
Kein Werkzeug benutzen, nur handfest
anziehen!
A
L
J
H

Eisbaer Alphacool International GmbH
12
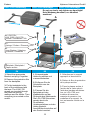
EN DE FR
1. Select the appropriate
Bracket and plug it together.
2. Remove the protective lm
from the backplate.
3. Fix the backplate to the
back of the mainboard with
the tape. The LGA 1700
screws are inserted through
the pressure springs,
washers and the holder. Then
everything is mounted on the
socket.
1. Entsprechende
Halterung wählen und
zusammenstecken.
2. Entfernen Sie die
Schutzfolie von der
Backplate.
3. Fixieren Sie die
Backplate mit den
Klebestreifen auf der
Rückseite des Mainboards.
Die LGA 1700 Schrauben,
werden durch die
Druckfedern,
Unterlegscheiben und den
Halter gesteckt.
Anschließend wird alles auf
den Sockel montiert.
1. Sélectionnez le support
approprié et branchez-le.
2. Retirez le lm de protection
de la plaque arrière.
3. Fixez la plaque arrière à
l'arrière de la carte mère à
l'aide des bandes adhésives.
Les vis LGA 1700 sont
insérées à travers les
ressorts de pression, les
rondelles et le support. Le
tout est ensuite monté sur le
socle.
LGA 1700 Mounting LGA 1700 Montage LGA 1700 Montage
4x LGA 115x,
LGA 1200, LGA 1700
Screws / Schrauben / Vis
4x
Springs / Federn / Ressorts
4x
2mm Washer / Unterleg-
scheiben / Rondelles
1x
Backplate / Backplate /
Plaque arrière
Do not use tools, only tighten up hand-tight!
Kein Werkzeug benutzen, nur handfest
anziehen!
A
C
K
J
G

Eisbaer Alphacool International GmbH
13
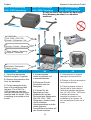
EN DE FR
1. Select the appropriate
Bracket and plug it together.
2. Remove the protective lm
from the backplate.
3. Fix the backplate to the
back of the mainboard with
the tape. The LGA 115x /
1200 screws are inserted
through the pressure springs,
washers and the holder. Then
everything is mounted on the
socket.
1. Entsprechende
Halterung wählen und
zusammenstecken.
2. Entfernen Sie die
Schutzfolie von der
Backplate.
3. Fixieren Sie die
Backplate mit den
Klebestreifen auf der
Rückseite des Mainboards.
Die LGA 115x / 1200
Schrauben, werden durch
die Druckfedern,
Unterlegscheiben und den
Halter gesteckt.
Anschließend wird alles auf
den Sockel montiert.
1. Sélectionnez le support
approprié et branchez-le.
2. Retirez le lm de protection
de la plaque arrière.
3. Fixez la plaque arrière à
l'arrière de la carte mère à
l'aide des bandes adhésives.
Les vis LGA 115x / 1200 sont
insérées à travers les
ressorts de pression, les
rondelles et le support. Le
tout est ensuite monté sur le
socle.
LGA 115x Mounting LGA 115x Montage LGA 115x Montage
LGA 1200 Mounting LGA 1200 Montage LGA 1200 Montage
4x LGA 115x,
LGA 1200, LGA 1700
Screws / Schrauben / Vis
4x
Springs / Federn / Ressorts
4x
0,5mm Washer / Unterleg-
scheiben / Rondelles
1x
Backplate / Backplate /
Plaque arrière
Do not use tools, only tighten up hand-tight!
Kein Werkzeug benutzen, nur handfest
anziehen!
A
C
L
J
G

Eisbaer Alphacool International GmbH
14
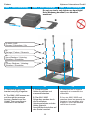
EN DE FR
1. Select the appropriate
bracket and plug it together.
2. The AM4 / AM5 screws are
put through the pressure
springs, washers and the
holder. Then everything is
mounted on the socket.
1. Entsprechende
Halterung wählen und
zusammenstecken.
2. Die AM4 / AM5
Schrauben werden durch
die Druckfedern,
Unterlegscheiben und den
Halter gesteckt.
Anschließend wird alles auf
den Sockel montiert.
1. Sélectionnez le support
approprié et connectez-les
ensemble.
2. Les vis AM4 / AM5 sont
passées dans les ressorts de
pression, les rondelles et le
support. Le tout est ensuite
monté sur le socle.
4x AM4 / AM5
Screws / Schrauben / Vis
J
4x
Springs / Federn / Ressorts
4x
2mm Washers / Unterleg-
Scheiben / Rondelles
4x
0,5mm Washers / Unterleg-
Scheiben / Rondelles
AM4 / AM5 Mounting AM4 / AM5 Montage AM4 / AM5 Montage
Do not use tools, only tighten up hand-tight!
Kein Werkzeug benutzen, nur handfest
anziehen!
B
L
K
F

Eisbaer Alphacool International GmbH
15
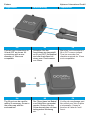
EN DE FR
Plug the 3-pin connector into
a free fan connector on your
mainboard.
Stecken Sie den 3-Poligen
Stecker in einen freien
Lüfteranschluss auf Ihr
Mainboard.
Branchez le connecteur à 3
broches dans un connecteur
de ventilateur libre sur votre
carte mère.
Alphacool Eisbaer LT (Solo) serie
Pump connection Pumpenanschluss Connexion de pompe

Eisbaer Alphacool International GmbH
16
EN DE FR
The cooler has an illuminated
logo. To activate it, plug the
3-pin connector into a free
fan connector on your
mainboard.
Der Kühler besitzt ein
beleuchtetes Logo. Um es
zu aktivieren stecken Sie
den 3-Poligen Stecker in
einen freien
Lüfteranschluss auf Ihr
Mainboard.
La glacière est dotée d'un
logo éclairé. Pour l'activer,
branchez le connecteur à 3
broches dans un connecteur
de ventilateur libre sur votre
carte mère.
Alphacool Eisbaer (Solo) serie

Eisbaer Alphacool International GmbH
17
Digital RGB Controller
Add more Digital RGB LEDs
Digital RGB connection Digital RGB Anschluss Connexion RGB Digital
Alphacool Eisbaer Aurora (Solo) serie
EN DE FR
To control the digital - RGB
lighting, connect the included
adapter to the 3 - pin female
connector and plug it to a
digital - RGB controller (e.g.
Alphacool Aurora Eiscontrol,
Art.: 15360, not included).
You can connect additional
digital - RGB LEDs to the
remaining 3 - pin male
connector. Then plug the 3-
pin connector (pump
connector) into a free fan
connector on your
mainboard.
Um die Digital - RGB
Beleuchtung zu steuern,
schließen Sie den
beiliegenden Adapter an
den 3-Pin female Stecker
an und verbinden Sie
diesen mit einem Digital -
RGB Controller (z.B.
Alphacool Aurora
Eiscontrol, Art.: 15360,
nicht im Lieferumfang
enthalten). An den übrigen
3-Pin male Stecker können
Sie zusätzliche Digital -
RGB LEDs anschließen.
Anschließend Stecken Sie
den 3-Poligen Stecker
(Pumpenanschluss) in
einen freien
Lüfteranschluss auf Ihr
Mainboard.
Pour contrôler l'éclairage
Digital - RGB, connectez
l'adaptateur fourni au
connecteur femelle 3 broches
et branchez-le à un
contrôleur Digital - RGB (par
ex. Alphacool Aurora
Eiscontrol, Art. 15360, non
fourni).
Vous pouvez connecter des
LEDs Digital - RGB
supplémentaires au
connecteur mâle 3 broches
restant. Branchez ensuite le
connecteur à 3 broches
(connecteur de pompe) dans
un connecteur de ventilateur
libre sur votre carte mère.

Eisbaer Alphacool International GmbH
18
Digital RGB Controller
Add more Digital RGB LEDs
Alphacool Eisbaer Aurora LT (Solo) serie
EN DE FR
To control the digital - RGB
lighting, connect the included
adapter to the 3 - pin female
connector and plug it to a
digital - RGB controller (e.g.
Alphacool Aurora Eiscontrol,
Art.: 15360, not included).
You can connect additional
digital - RGB LEDs to the
remaining 3 - pin male
connector. Then plug the 3-
pin connector (pump
connector) into a free fan
connector on your
mainboard.
Um die Digital - RGB
Beleuchtung zu steuern,
schließen Sie den
beiliegenden Adapter an
den 3-Pin female Stecker
an und verbinden Sie
diesen mit einem Digital -
RGB Controller (z.B.
Alphacool Aurora
Eiscontrol, Art.: 15360,
nicht im Lieferumfang
enthalten). An den übrigen
3-Pin male Stecker können
Sie zusätzliche Digital -
RGB LEDs anschließen.
Anschließend Stecken Sie
den 3-Poligen Stecker
(Pumpenanschluss) in
einen freien
Lüfteranschluss auf Ihr
Mainboard.
Pour contrôler l'éclairage
Digital - RGB, connectez
l'adaptateur fourni au
connecteur femelle 3 broches
et branchez-le à un
contrôleur Digital - RGB (par
ex. Alphacool Aurora
Eiscontrol, Art. 15360, non
fourni).
Vous pouvez connecter des
LEDs Digital - RGB
supplémentaires au
connecteur mâle 3 broches
restant. Branchez ensuite le
connecteur à 3 broches
(connecteur de pompe) dans
un connecteur de ventilateur
libre sur votre carte mère.

Eisbaer Alphacool International GmbH
19

V.2.02-08.2022
Alphacool International GmbH
Marienberger Str. 1
D-38122 Braunschweig
Germany
Support: +49 (0) 531 28874 - 0
Fax: +49 (0) 531 28874 - 22
E-Mail: [email protected]
https://www.alphacool.com
General Managers: Andreas Rudnicki, Fabian Noelte
WEEE-Reg.-Nr.: DE 54464644
Trade Register: Amtsgericht Braunschweig HRB 202390
VAT.ID.Nr.: DE270458421
Tax number: 13/207/02047
-
 1
1
-
 2
2
-
 3
3
-
 4
4
-
 5
5
-
 6
6
-
 7
7
-
 8
8
-
 9
9
-
 10
10
-
 11
11
-
 12
12
-
 13
13
-
 14
14
-
 15
15
-
 16
16
-
 17
17
-
 18
18
-
 19
19
-
 20
20


Alphacool Eisbaer Aurora AIO CPU Water Cooler Manuel utilisateur
- Taper
- Manuel utilisateur
dans d''autres langues
Documents connexes
-
Alphacool Eisbaer AiO Manuel utilisateur
-
Alphacool Eiswolf 2 AIO – 360mm RTX 4090 Aorus Master Manuel utilisateur
-
Alphacool ACTIVE BACKPLATE 3090 FTW Eisblock Aurora GPX-N Acrylic Active Backplate Manuel utilisateur
-
-
Alphacool Core M.2 Mode d'emploi
-
Alphacool Eiswolf 2 Manuel utilisateur
-
-
-
Alphacool ST30 Manuel utilisateur
-