
V2.0 EU (07/2021)
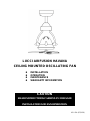
LUCCI AIRFUSION HAVANA
CEILING MOUNTED OSCILLATING FAN
⚫ INSTALLATION
⚫ OPERATION
⚫ MAINTENANCE
⚫ WARRANTY INFORMATION
CAUTION
READ INSTRUCTIONS CAREFULLY FOR SAFE
INSTALLATION AND FAN OPERATION.

Airfusion HAVANA Installation Instructions
2 | P a g e
CONTENTS
GB
Installation instruction manual .......................................................................................... 3
D
Installationsanleitung ........................................................................................................ 16
F
Guide d’installation............................................................................................................ 30
E
Manual de instrucciones de instalación............................................................................. 44
I
Manuale delle istruzioni di installazione............................................................................ 58
NL
Installatiehandleiding......................................................................................................... 71
Contact:
Beacon International Ltd
Hong Kong Head Office: Room 05, 18/F, Kimberland Center, 55 Wing Hong Street, Cheung Sha Wan Kowloon, Hong Kong
Tel +852 34915904 Fax +852 34915917
China showroom / Office: 11/Fl, Guzhen Lighting Building B, Mid Zhongxing Road, Guzhen, Zhongshan, GuangDong,
China.
Tel: +86 760 8986 6388 Fax: +86 760 8986 6380
www.beaconinternational.com
Beacon Lighting Europe GmbH
Campus Fichtenhain 42, 47807 Krefeld, Germany
TEL +49 (2151) 325 82 39 FAX +49 (2151) 325 70 65
www.beaconlighting.eu

Airfusion HAVANA Installation Instructions
3 | P a g e
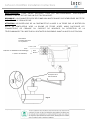
THANK YOU FOR PURCHASING
Thank you for purchasing this quality Lucci product. To ensure correct function and safety, please read and
follow all instructions carefully before assembly, installation and use of this ceiling fan. Please keep
instructions for future reference.
SAFETY PRECAUTIONS
1. This appliance can be used by children aged from 8 years and above and persons with reduced physical,
sensory or mental capabilities or lack of experience and knowledge if they have been given supervision
or instruction concerning the use of the appliance in a safe way and understand the hazards involved.
Cleaning and maintenance shall not be undertaken by children without supervision.
2. Children should be supervised to ensure that they do not play with the appliance.
3. An all-pole disconnection switch must be incorporated into the fixed wiring, in accordance with local
wiring rules.
4. Do not dispose of electrical appliances as unsorted municipal waste, use separate collection facilities.
Contact your local government for information regarding the collection systems available.
5. If electrical appliances are disposed of in landfills or dumps, hazardous substances can leak into the
ground water and get into the food chain, damaging your health and well-being.
6. The structure to which the fan is to be mounted must be capable of supporting a weight of 16kg.
7. The fan should be mounted so that the blades are at least 2.3 m above the floor in Europe. (Refer to the
‘Clearance requirement’ section for more information.)
8. This fan is suitable for indoor and alfresco areas where the fan is fully undercover with a minimum of 2
walls. This fan is not waterproof. When installed in an alfresco area, the ceiling fan must be positioned in
a location protected from water, wind, dust and salt. Exposure to these elements will void the warranty.
Mounting the fan in a situation where it is subject to water or moisture is dangerous and may increase the
risk of damage, injury or electrical shock and will void the warranty.
9. Must be assembled and installed by a licensed electrician.
10. WARNING: If unusual wobbling or oscillating movement is observed, immediately stop using the ceiling
fan and contact the manufacturer, its service agent or suitably qualified persons.
11. The replacement of parts of the safety suspension system device shall be performed by the
manufacturer, its service agent or suitably qualified persons.
12. The fixing means for attachment to the ceiling such as hooks or other devices shall be fixed with a
sufficient strength to withstand 4 times the weight of the ceiling fan; that the mounting of the suspension
system shall be performed by the manufacturer, its service agent or suitably qualified persons.

Airfusion HAVANA Installation Instructions
4 | P a g e
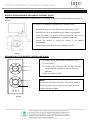
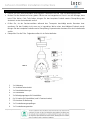
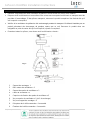
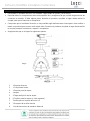
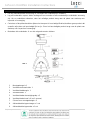
PARTS LIST
• Unpack your ceiling fan carefully. Remove all parts and hardware.
• Lay out all the components on a smooth surface and make sure there are no components missing before
assembling. If parts are missing, return the complete product to the place of purchase for inspection or
replacement.
• Check whether the ceiling fan has been damaged during transport. Do not operate/install any product
which appears damaged in any way. Return the complete product to the place of purchase for inspection,
repair or replacement.
• Examine all parts, you should have the following:
1
Mounting bracket x 1
2
Fan motor assembly x 1
3
Fan blade bracket x 1
4
Fan bladesx 3
5
Fan blades fixing cap x 3
6
Fan blades screw x 9 (and 1 spare)
7
Screw for mounting bracket x 2
8
Remote receiver x 1 set
9
Remote transmitter x 1 set
Fig. 1

Airfusion HAVANA Installation Instructions
5 | P a g e
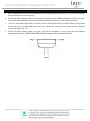
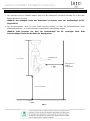
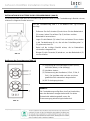
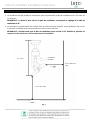
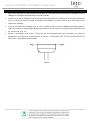
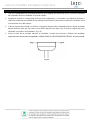
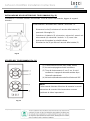
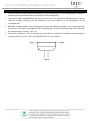
CLEARANCE REQUIREMENT
• The fan must be installed so that the lowest point of the fan blade must be 2.3m from the floor (In Europe).
NOTE: The lowest point of the fan blade is when the fan head is adjusted to 45°.
• The ceiling fan must be installed in a location so that the blades are a minimum 1M spacing from the tip of
the blade to the nearest objects or walls.
NOTE: Please be aware of that the fan head can be oscillating 60°. Please take this into
consideration when selecting the installation location.
Fig. 2

Airfusion HAVANA Installation Instructions
6 | P a g e
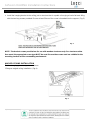
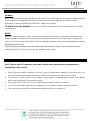
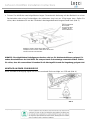
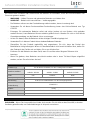
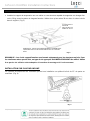
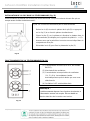
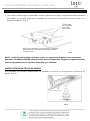
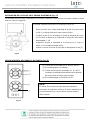
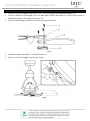
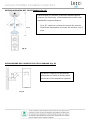
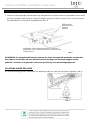
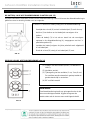
INSTALLATION OF THE MOUNTING BRACKET
• Install the hanging bracket to the ceiling joist or structure that is capable of carrying a load of at least 16kg,
with the two long screws provided. Ensure at least 30mm of the screw is threaded into the support. (Fig. 3)
NOTE: The bracket screws provided are for use with wooden structures only. For structures other
than wood, the appropriate screw type MUST be used. Ensure the screws used are suitable for the
mounting surface and the surrounding environment.
ANGLED CEILING INSTALLATION
This fan hanging system supportsa maximum
13 degree angled ceiling installation. (Fig.4)
Fig. 4
Fig. 3
16 KG

Airfusion HAVANA Installation Instructions
7 | P a g e
INSTALLATION OF THE FAN BLADES
• Align the 3 mounting holes on the blade (3) to the 3 mounting holes of the blade bracket (2);
• Insert the fixing cap (4) into the mouting holes from the bottom of the blade (3) and secure by tightening
the 3 screws (1) from the top of the blade bracket (2);
• Once completed, repeat the same process on the remaining blades.
• Install the assembled fan-blades (7) to the motor part (5);
• Tighten the 2 set screws (6) on the side of the motor shaft;
Fig. 5
Fig. 6

Airfusion HAVANA Installation Instructions
8 | P a g e
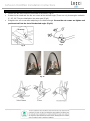
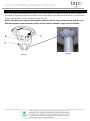
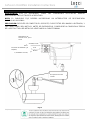
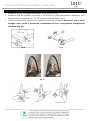
HANGING THE FAN
Lift the fan assembly onto the mounting bracket. Ensure thekey slot (A) of the hanger ball is positioned on the
key pin (B) of the mounting bracket (C) to prevent the fan from rotating when in operation.(Fig.7A)
NOTE: Please be aware of that the fan head can be oscillating 60°. There are key slots (Fig.7B)
provided on the hanger ball which allow you to adjust the direction of the fan according to your
requirement.
Fig. 7A
Fig. 7B

Airfusion HAVANA Installation Instructions
9 | P a g e
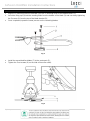
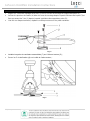
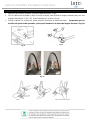
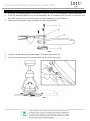
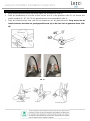
ADJUSTMENT OF THE FAN HEAD
• Loosen the two set screws on both sides of the motor; (Fig.8)
• Rotate the fan head and aim the arm screw at the desired angle (There are only three angles available:
0°, 45°, 90°.They are labelled on the motor part) (Fig.9)
• Retighten the set screws after adjusting to the desired angle. Ensure the set screws are tighten and
postioned well into the slot of the desired angle. (Fig.10)
Fig. 8
Fig. 9
Fig. 10

Airfusion HAVANA Installation Instructions
10 | P a g e
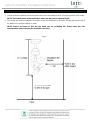
ELECTRICAL WIRING DIAGRAM
WARNING: FOR YOUR SAFETY ALL ELECTRICAL CONNECTIONS MUST BE UNDERTAKEN BY A
LICENSED ELECTRICIAN.
NOTE: AN ADDITIONAL ALL POLE DISCONNECTION SWITCH MUST BE INCLUDED IN THE FIXED
WIRING.
CAUTION: ENSURE THE EARTHING CONTINUNITY ON THE METAL BODY OF THE FAN TO THE
EARTH TERMINAL AFTER CONNECTIING THE MOUNTING BRACKET, REMOTE RECEIVER, AND FAN
MOTOR WIRING CONNECTORS TOGETHER BEFORE POWERING ON.
Fig. 11

Airfusion HAVANA Installation Instructions
11 | P a g e
FINISHING THE INSTALLATION
• After completing the electrical connection at the mounting bracket terminal block, connect the ceiling fan
wiring via the quick connector plug.
• Ensure the earth wiring is secure and correct, by performing an earthing continuity test from the fan’s
accessible metal body back to the earth terminal at the terminal block on the mounting bracket.
• Cover the mounting bracket with the canopy. Ensure all electrical wiring is tucked inside the canopy and
that the wires are not damaged during this step. Secure the canopy to the hanger bracket using the
screws provided. (Fig. 12 )
• Switch ON mains power supply to the fan. Test the fan operations or enjoy using the fan following
instructions the under “USING YOUR CEILING FAN” section of this instruction manual.
Fig.12

Airfusion HAVANA Installation Instructions
12 | P a g e
USING YOUR CEILING FAN
BATTERY INSTALLATION IN THE REMOTE CONTROL (Fig.13)
Your ceiling fan is controlled by the remote control. The following must be considered before operating the
remote.
OPEARATION OF THE REMOTE CONTROLLER (Fig.14)
Fig. 14
(1) Control of the speed (HIGH, MEDIUM, LOW);
(2) Fan On/Off;
(3) Timing control of the fan (1Hr, 3Hr, 6Hr). The fan
will be stopped automaticly after the time you
selected.
(4) 60° Oscillation On/Off
NOTE:
The remote has memory function if the mains power is
turned off. It will recover from the last status when the
power is turned on again.
Fig. 13
1 x CR2032 3V battery is required for the remote control.
- Remove the screw (6) and Pull out the battery tray (2) by
pressing the clip (1) and pulling out the battery tray together.
- Place the battery (3) on the tray and insert the tray back to
remote hand set (4) indicated by “+” polarity symbol (5).
- Ensure the polarity is correct as shown in the battery
compartment.
- Reinstall the screw (6) to secure the battery tray (2).

Airfusion HAVANA Installation Instructions
13 | P a g e
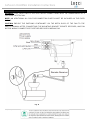
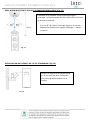
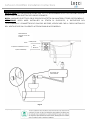
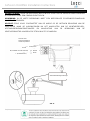
EFFECTIVE LOCATION FOR THE INFRA-RED CONTROL (Fig.15)
INSTALLATION OF THE REMOTE HOLDER (Fig.16)
Fig. 16
The transmitter and receiver are communicated by infra-red
signal. The remote controller must be operated within the
following distances:
- Approximately 45° from the infra red sensor to the left &
right.
- Distance from transmitter to the infra red sensor: Max.3
meters.
Fig. 15
Install the remote holder onto the wall
by the two screws provided, then place
the remote controller onto the holder.

Airfusion HAVANA Installation Instructions
14 | P a g e
AFTER INSTALLATION
WOBBLE:
NOTE: Ceiling fans tend to move during operation due to the fact that they are mounted on a rubber grommet.
If the fan was mounted rigidly to the ceiling it would cause excessive vibration. Movement of a few
centimetres is quite acceptable and DOES NOT suggest any problem.
TO REDUCE THE FAN WOBBLE: Please check that all screws which fix the mounting bracket and down
rod are secure.
NOISE:
When it is quiet (especially at night) you may hear occasional small noises. Slight power fluctuations and
frequencysignals superimposed in the electricity for off-peak hot water control, may cause a change in fan
motor noise. This isnormal. Please allow a 24-hour “settling-in” period, most noises associated with a new fan
disappear during this time.
The manufacturer’s warranty covers actual faults that may develop and NOT minor complaints such as
hearing themotor run – All electric motors are audible to some extent.
CARE & CLEANING
NOTE: Always turn OFF the power at the mains switch before performing any maintenance or
attempting to clean your fan.
• Every 6 months periodic cleaning of your fan is the only maintenance required. Use a soft brush or lint
free cloth to avoidscratching the paint finish. Please turn off electricity power when you do so.
• Do not soak or immerse your fan in the water or other liquids. It could damage the motor or the blades
and create the possibility of an electrical shock.
• Ensure that the fan does not come in contact with any organic solvents or cleaners.
• To clean the fan blade, wipe with only a damp clean cloth with NO organic solvents or cleaners.
• The motor has a permanently lubricated ball bearing so there is no need to oil.

Airfusion HAVANA Installation Instructions
15 | P a g e
SAFETY AND PRECAUTION OF THE BUTTON BATTERY
To prevent false operation during battery insertion or replacement, this ceiling fan must be disconnected from
the supply mains.
- WARNING – Keep new and used batteries away from children.
- CAUTION – Do not ingest battery—Chemical burn hazard.
- Batteries must be removed from the remote transmitter before it is discarded.
- Always use Lithium CR2032 battery type with this ceiling fan remote controller.
- Dispose of exhausted batteries immediately and safely (so they cannot be retrieved by children). Flat
batteries can still be dangerous. Contact your local council to safely dispose of the battery.
- Ensure the batteries are inserted with the correct polarity.
- Do not use rechargeable batteries in this product.
- Regularly check the product and make sure the battery box lid is correctly secured. If the battery
compartment does not close securely, stop using the product and keep it away from children.
- Remove batteries from the product when not in use for long periods of time.
- If you think batteries might have been swallowed or placed inside any part of the body, seek
immediate medical attention.
TECHNICAL INFORMATION
Fan Type
Ceiling mounted, 60° oscillating fan
Model No./SKU#
LD-15’’ HAVA-ORB/
SKU# 213160
LD-15’’ HAVA-BLK/
SKU# 213161
LD-15’’ HAVA-CHW/
SKU# 213162
Colour
Orb
Black
White
Rated Voltage
220-240V~ 50Hz
Rated Wattage
55W ( 51W fan motor + 4W oscillation motor)
Battery for remote
CR2032 3V
Weight
3.8kg
Size
Dia: 380mm H: 550mm Max.
Canopy Dimensions
H: 60mm Dia: 130mm
WARRANTY INFORMATION
IN EUROPE – If you are a European customer please contact the retail outlet where the fan was purchased
for warranty service.

Airfusion HAVANA Installation Instructions
16 | P a g e
VIELEN DANK FÜR IHREN KAUF
Vielen Dank, dass Sie sich für dieses Qualitätsprodukt von Lucci entschieden haben. Lesen und befolgen Sie
bitte sorgfältig alle Anleitungen, bevor Sie das Produkt benutzen, um eine einwandfreie Funktion und
Sicherheit bei Montage, Installation und Gebrauch zu gewährleisten. Bitte bewahren Sie die Anleitungen zum
Nachlesen auf.
SICHERHEITSVORKEHRUNGEN
1. Dieses Gerät kann von Kindern ab 8 Jahren sowie Personen mit eingeschränkten physischen,
sensorischen oder geistigen Fähigkeiten oder Mangel an Erfahrung und Wissen im Umgang mit dem
Gerät verwendet werden, wenn sie beaufsichtigt oder bezüglich des sicheren Gebrauchs unterwiesen
wurden und die daraus resultierenden Gefahren verstanden haben. Die Reinigung und Wartung dürfen
nicht durch Kinder ohne Aufsicht erfolgen.
2. Kinder müssen beaufsichtigt werden, um sicherzustellen, dass sie nicht mit dem Gerät spielen.
3. In die feste Verkabelung muss ein allpoliger Trennschalter gemäß den örtlichen
Verkabelungsvorschriften eingebaut werden.
4. Entsorgen Sie elektrische Geräte nicht als unsortierten Hausmüll, sondern nutzen Sie separate
Sammelstellen. Wenden Sie sich an Ihre Gemeindeverwaltung, um Informationen über die verfügbaren
Sammelsysteme zu erhalten.
5. Wenn Elektrogeräte auf Deponien entsorgt werden, können gefährliche Stoffe in das Grundwasser
eindringen und in die Nahrungskette gelangen, was Ihrer Gesundheit und Ihrem Wohlbefinden schadet.
6. Die Struktur, an der der Ventilator montiert werden soll, muss ein Gewicht von 16 kg tragen können.
7. Der Ventilator sollte in Europa so montiert werden, dass sich die Flügel mindestens 2,3 m über dem
Boden befinden. (Weitere Informationen finden Sie im Abschnitt „Mindestabstände“).
8. Dieser Ventilator ist für Innen- und Außenbereiche geeignet, sofern er sich vollständig unter einem Dach
befindet und von mindestens 2 Wänden umgeben ist. Dieser Ventilator ist nicht wasserfest. Im Freien
muss der Deckenventilator an einem Ort installiert werden, der vor Wasser, Wind, Staub und Salz
geschützt ist. Andernfalls erlischt die Garantie. Die Montage des Ventilators unter Bedingungen, unter
denen er Wasser oder Feuchtigkeit ausgesetzt ist, ist gefährlich und kann das Risiko von Schäden,
Verletzungen oder Stromschlägen erhöhen und führt zum Erlöschen der Garantie.
9. Das Produkt muss von einem geprüften Elektriker zusammengebaut und installiert werden.
10. WARNUNG: Bei ungewöhnlichen Unwucht- oder Schwenkbewegungen ist der Deckenventilator sofort
außer Betrieb zu nehmen und der Hersteller, sein Servicepartner oder entsprechend qualifizierte
Personen zu kontaktieren.

Airfusion HAVANA Installation Instructions
17 | P a g e
11. Teile der Sicherheitsaufhängung müssen vom Hersteller, seinem Servicepartner oder entsprechend
qualifizierten Personen ausgetauscht werden.
12. Die Befestigungsmittel für die Deckenmontage, wie z. B. Haken oder andere Vorrichtungen, müssen so
fest montiert werden, dass sie das 4-fache Gewicht des Deckenventilators halten können. Die Montage
des Aufhängungssystems muss vom Hersteller, seinem Servicepartner oder entsprechend qualifizierten
Personen ausgeführt werden.

Airfusion HAVANA Installation Instructions
18 | P a g e
TEILELISTE
• Packen Sie Ihren Deckenventilator vorsichtig aus. Entnehmen Sie alle Teile und Befestigungsmittel.
• Breiten Sie alle Bauteile auf einer glatten Fläche aus und vergewissern Sie sich vor der Montage, dass
keine Teile fehlen. Falls Teile fehlen, bringen Sie das komplette Produkt zwecks Überprüfung oder
Austausch zu der Verkaufsstelle zurück.
• Prüfen Sie, ob der Deckenventilator während des Transports beschädigt wurde. Benutzen bzw.
montieren Sie das Produkt nicht, wenn es in irgendeiner Weise einen beschädigten Eindruck macht.
Bringen Sie das komplette Produkt zwecks Überprüfung, Reparatur oder Austausch zu der Verkaufsstelle
zurück.
• Überprüfen Sie alle Teile. Folgendes sollte sich im Paket befinden:
1
1 x Halterung
2
1 x Ventilatormotoreinheit
3
1 x Rotorblatthalterungen
4
3 x Rotorblätter
5
3 x Befestigungskappe für Rotorblätter
6
9 x Schraube für Rotorblätter (und 1 Ersatzschraube)
7
2 Schrauben für Halterung
8
1 x Fernbedienungsempfänger
9
1 x Fernbedienungssender
Abb. 1

Airfusion HAVANA Installation Instructions
19 | P a g e
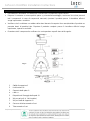
MINDESTABSTÄNDE
• Der Ventilator muss so installiert werden, dass sich der niedrigste Punkt des Rotorblatts 2,3 m über dem
Boden befindet (in Europa).
HINWEIS: Der niedrigste Punkt des Rotorblatts ist erreicht, wenn der Ventilatorkopf auf 45°
eingestellt ist.
• Der Deckenventilator muss an einer Stelle montiert werden, an dem die Rotorblattspitzen einen
Mindestabstand von 1 m zu den nächsten Gegenständen oder Wänden haben.
HINWEIS: Bitte beachten Sie, dass der Ventilatorkopf um 60° schwingen kann. Bitte
berücksichtigen Sie dies bei der Wahl des Montageortes.
Abb. 2
H = 0,55 m
Schwingung 60
Grad
Wand oder ein
anderer
Gegenstand
>2,3 m in Europa
Boden

Airfusion HAVANA Installation Instructions
20 | P a g e
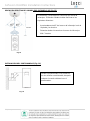
MONTAGE DER HALTERUNG
• Fixieren Sie mithilfe der zwei mitgelieferten langen Schrauben die Halterung mit dem Baldachin an einem
Deckenbalken oder einem Deckenträger, der mindestens eine Last von 16 kg tragen kann. Stellen Sie
sicher, dass mindestens 30 mm der Schraube in das tragende Bauteil eingeschraubt sind. (Abb. 3)
HINWEIS: Die mitgelieferten Befestigungsschrauben sind nur für Holzkonstruktionen geeignet. Für
andere Konstruktionen als Holz MUSS der entsprechende Schraubentyp verwendet werden. Stellen
Sie sicher, dass die verwendeten Schrauben für die Montagefläche und die Umgebung geeignet sind.
MONTAGE AN EINER SCHRÄGDECKE
Diese Ventilator-Aufhängung eignet sich für eine maximale Deckenschräge von 13 Grad. (Abb. 4)
Abb. 4
Abb. 3
DECKENTRÄGER
MUSS EINE
TRAGFÄHIGKEIT
VON BIS ZU 16
KG AUFWEISEN.
HINWEIS: DIESES BILD DIENT NUR ZUR
VERANSCHAULICHUNG UND ZEIGT NICHT DIE
TATSÄCHLICHE HALTERUNG.
La page est en cours de chargement...
La page est en cours de chargement...
La page est en cours de chargement...
La page est en cours de chargement...
La page est en cours de chargement...
La page est en cours de chargement...
La page est en cours de chargement...
La page est en cours de chargement...
La page est en cours de chargement...
La page est en cours de chargement...
La page est en cours de chargement...
La page est en cours de chargement...
La page est en cours de chargement...
La page est en cours de chargement...
La page est en cours de chargement...
La page est en cours de chargement...
La page est en cours de chargement...
La page est en cours de chargement...
La page est en cours de chargement...
La page est en cours de chargement...
La page est en cours de chargement...
La page est en cours de chargement...
La page est en cours de chargement...
La page est en cours de chargement...
La page est en cours de chargement...
La page est en cours de chargement...
La page est en cours de chargement...
La page est en cours de chargement...
La page est en cours de chargement...
La page est en cours de chargement...
La page est en cours de chargement...
La page est en cours de chargement...
La page est en cours de chargement...
La page est en cours de chargement...
La page est en cours de chargement...
La page est en cours de chargement...
La page est en cours de chargement...
La page est en cours de chargement...
La page est en cours de chargement...
La page est en cours de chargement...
La page est en cours de chargement...
La page est en cours de chargement...
La page est en cours de chargement...
La page est en cours de chargement...
La page est en cours de chargement...
La page est en cours de chargement...
La page est en cours de chargement...
La page est en cours de chargement...
La page est en cours de chargement...
La page est en cours de chargement...
La page est en cours de chargement...
La page est en cours de chargement...
La page est en cours de chargement...
La page est en cours de chargement...
La page est en cours de chargement...
La page est en cours de chargement...
La page est en cours de chargement...
La page est en cours de chargement...
La page est en cours de chargement...
La page est en cours de chargement...
La page est en cours de chargement...
La page est en cours de chargement...
La page est en cours de chargement...
La page est en cours de chargement...
-
 1
1
-
 2
2
-
 3
3
-
 4
4
-
 5
5
-
 6
6
-
 7
7
-
 8
8
-
 9
9
-
 10
10
-
 11
11
-
 12
12
-
 13
13
-
 14
14
-
 15
15
-
 16
16
-
 17
17
-
 18
18
-
 19
19
-
 20
20
-
 21
21
-
 22
22
-
 23
23
-
 24
24
-
 25
25
-
 26
26
-
 27
27
-
 28
28
-
 29
29
-
 30
30
-
 31
31
-
 32
32
-
 33
33
-
 34
34
-
 35
35
-
 36
36
-
 37
37
-
 38
38
-
 39
39
-
 40
40
-
 41
41
-
 42
42
-
 43
43
-
 44
44
-
 45
45
-
 46
46
-
 47
47
-
 48
48
-
 49
49
-
 50
50
-
 51
51
-
 52
52
-
 53
53
-
 54
54
-
 55
55
-
 56
56
-
 57
57
-
 58
58
-
 59
59
-
 60
60
-
 61
61
-
 62
62
-
 63
63
-
 64
64
-
 65
65
-
 66
66
-
 67
67
-
 68
68
-
 69
69
-
 70
70
-
 71
71
-
 72
72
-
 73
73
-
 74
74
-
 75
75
-
 76
76
-
 77
77
-
 78
78
-
 79
79
-
 80
80
-
 81
81
-
 82
82
-
 83
83
-
 84
84


dans d''autres langues
- italiano: LUCCI 213161 Manuale utente
- español: LUCCI 213161 Manual de usuario
- Deutsch: LUCCI 213161 Benutzerhandbuch
- Nederlands: LUCCI 213161 Handleiding
Documents connexes
Autres documents
-
Lucci Air 210013 Guide d'installation
-
 Pro Breeze PB-01B-UK-FBA-3 Manuel utilisateur
-
LIVARNO 329949 Le manuel du propriétaire
-
-
Sygonix 2472505 Manuel utilisateur
-
-
Eglo 35098 Manuel utilisateur
-
Eglo 35096 Manuel utilisateur
-
 CaseFan Eco Airscrew Manuel utilisateur
-
Eglo SUSALE Manuel utilisateur

