
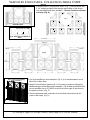
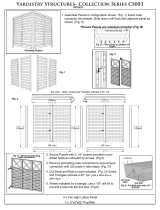
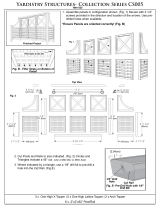
Fig. 1
Yardistry Structures- Collection Series CS002
Finished Project
Fig. A - Filler Strips on Bottom of
Panel!
Pilot holes to the right
3’ 5”
(125.7cm)
4’ 1 1/2”
1. Assemble panel in conguration shown. (Fig. 1) Secure panels with
2 1/4” screws provided in the direction and location of the arrows.
Use pre-drilled holes when available. *Ensure Panels are oriented
correctly! (Fig. A)
6 x One High X Topper | 2 x Two High X Panel | 6 x Arch Topper |10 x -2”x2”x62” Post/Rail
Fig. 2
2. Cut Posts and Rails to size indicated in Fig. 2. (It is recommended to use a
Mitre Box or Mitre Saw)
3. Attach Post and Rails to panels with 2 1/4” screws in locations indicated by
circles using pre-drilled holes where available. (Fig.3) When pre-drilled holes
are not available use a 1/8” Drill Bit to drill holes on an angle in the inside of
the panel as shown. (Fig. F)
4. Remove protruding male connectors to ensure ush connection with 2x2
posts in later steps. (Fig. D)
(104.1cm)
(104.1cm)
(49.5cm) (49.5cm) (49.5cm) (49.5cm)(99.1cm)
(54cm)
(54cm)
(125.7cm)
4’ 1 1/2”
(157.5cm) (157.5cm)
(143.5cm)
4’ 8 1/2”
3’ 5”
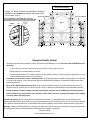
B.
niveau que le panneau adjacent.
panneau vers le bas jusqu'à ce qu'il soit au même
pièces de raccordement femelles. Faites glisser le
Assemblez les panneaux côte à côte.
Conecte los paneles lado a lado.
Assemble Panels side by side. (Maximum 3 wide x 3 high)
Insérez les pièces de raccordement mâles dans les
Insert male into female. Slide down until flush with
adjacent panel.
Introduzca el extremo macho en el extremo hembra.
Deslícelo hacia abajo hasta que quede al ras del
panel adyacente.
*Les vis sons 2 1/4po
fourniers avec
poteau/Rail
2 x 2 x 62po.
C.
Screws* are 2 1/4"
included with
2x2x62" post/rail.
*Use los tornillos de
acero inoxidable
de 2 1/4" que se
incluyen en el
juego de
postes/travesaños
de 2x2x62".
Remove the male connectors from the outside of the
panel assembly.
Quite los conectores masculinos del exterior de la
asamblea de panel.
Enlever les connecteurs mâles de l'extérieur de
l'assemblée de panneau.
le connecteur
mâle court
connector
conector
masculino
short male
corto
male
connector
conector
masculino
connecteur
mâle
Fig. D - Remove protruding
male connectors
YM11522

!Important Safety Notice!
• Yardistry components are intended for privacy, decorative and ornamental use only. Product is NOT INTENDED for the
following:
- A safety barrier to prevent unsupervised access to pools, hot tubs, spas, or ponds.
- Safety railings for elevated platforms or decks.
- As load bearing support for a building, structure, heavy objects or swings. - Used in structures that trap wind, rain or
snow that would create extra load on the product.
• Permanent structures may require a building permit. As the purchaser and or installer of this product you are advised
to consult local planning, zoning, and building inspection departments for guidance on applicable building codes and or
zoning requirements.
• WoodisNOTameretardantandwillburn.Grills, re pits and chimneys are a re hazard if placed too close to a
Yardistry structure. Consult user’s manual of the grill, re pit or chimney for safe distances from combustible materials.
• During installation, follow all safety warnings provided with your tools and use OHSA approved safety glasses.
• Some structures may require two or more people to install safely. Check for underground utilities before digging
or driving stakes into the ground!
General Information: Wood components are manufactured with Cedar (C. Lanceolata) which is protected with factory
applied water-based stain. Knots, small checks (cracks) and weathering are naturally occurring and do not affect the strength
of the product. Annual application of a water-based water repellent sealant or stain will help reduce weathering and checks.
Warranty: Yardistry Limited products are backed by a 5 year limited lifetime warranty from the date of original retail purchase
for manufacturing defects and if installed as per manufacturer’s installation instructions.
Patents Pending
www.YardistryStructures.com
B.
niveau que le panneau adjacent.
panneau vers le bas jusqu'à ce qu'il soit au même
pièces de raccordement femelles. Faites glisser le
Assemblez les panneaux côte à côte.
Conecte los paneles lado a lado.
Assemble Panels side by side. (Maximum 3 wide x 3 high)
Insérez les pièces de raccordement mâles dans les
Insert male into female. Slide down until flush with
adjacent panel.
Introduzca el extremo macho en el extremo hembra.
Deslícelo hacia abajo hasta que quede al ras del
panel adyacente.
*Les vis sons 2 1/4po
fourniers avec
poteau/Rail
2 x 2 x 62po.
C.
Screws* are 2 1/4"
included with
2x2x62" post/rail.
*Use los tornillos de
acero inoxidable
de 2 1/4" que se
incluyen en el
juego de
postes/travesaños
de 2x2x62".
Remove the male connectors from the outside of the
panel assembly.
Quite los conectores masculinos del exterior de la
asamblea de panel.
Enlever les connecteurs mâles de l'extérieur de
l'assemblée de panneau.
le connecteur
mâle court
connector
conector
masculino
short male
corto
male
connector
conector
masculino
connecteur
mâle
2 1/4” Screw
Drill Hole on an Angle
Thick Piece
of Wood
Skinny Piece
of Wood
Groove
Fig. F
5. Using a 1/8” drill bit, pre-drill Post and Rails in locations
indicated by the arrows and attach to side posts using
2 3/4” screws. (Fig.3)
*If you purchased the Post Stake to secure your
project, please refer to the instructions provided with
the post stake to anchor your project to the ground.
Fig. 3
Screw from Behind
Screw from Behind
Screw from Behind
Screw from Behind
Center the Panels on Posts and
Rails before attaching!
-
 1
1
-
 2
2


dans d''autres langues
- English: Yardistry YM11522 Installation guide
Documents connexes
-
 Yardistry Planter Box Manuel utilisateur
-
 Yardistry YM11523 Mode d'emploi
-
 Yardistry YM11523 Information produit
-
 Yardistry YM11525 Guide d'installation
-
 Yardistry YP21017 Guide d'installation
-
 Yardistry YM11703 Mode d'emploi
-
 Yardistry Milan Entrance Arbors Manuel utilisateur
-
 Yardistry 12 ft. Gazebo Wood Counter Manuel utilisateur


