Bay Networks CM 100 Getting Started Manual
- Taper
- Getting Started Manual

Getting Started
with the CM 100


Getting Started
with the CM 100
Version 2.0
302694-C Rev 00
May1999
Copyright © 1999 Bay Networks
All rights reserved. Printed in the USA.
The information in this document is subject to change without notice. The statements, configurations, technical data,
and recommendations in this document are believed to be accurate and reliable, but are presented without express or
implied warranty. Users must take full responsibility for their applications of any products specified in this document.
The information in this document is proprietary to Bay Networks.
Trademarks
Microsoft, Microsoft Access, MS-DOS, Windows 95, and Windows NT are registered trademarks of Microsoft
Corporation. All other trademarks and registered trademarks are the property of their respective owners.
Restricted Rights Legend
Use, duplication, or disclosure by the United States Government is subject to restrictions as set forth in subparagraph
(c)(1)(ii) of the Rights in Technical Data and Computer Software clause at DFARS 252.227-7013. Notwithstanding
any other license agreement that may pertain to, or accompany the delivery of, this computer software, the rights of the
United States Government regarding its use, reproduction, and disclosure are as set forth in the Commercial Computer
Software-Restricted Rights clause at FAR 52.227-19.

iv 302694-C Rev 00
Getting Started with the CM 100 V2.0
Note: This equipment has been tested and found to comply with the limits for a Class B digital device, pursuant to part 15 of the FCC
rules. These limits are designed to provide reasonable protection against harmful interference in a residential installation. This equipment
generates, uses, and can radiate radio frequency energy and, if not installed and used in accordance with the instructions, may cause
harmful interference to radio communications. However, there is no guarantee that interference will not occur in a particular installation.
If this equipment does cause interference to radio or television reception, which can be determined by turning the equipment off and on,
the user is encouraged to try to correct the interference by one or more of the following measures:
• Reorient or relocate the receiving antenna
• Increase the separation between the equipment and the receiver.
• Connect the equipment into an outlet on a circuit different from that to which the receiver is connected.
• Consult the dealer or an experienced radio/TV technician. To maintain compliance with FCC radio frequency emission limits, RG-
6/U type CATV cable is required for connection to the CATV system. Any changes or modifications may void the user’s authority to
operate this equipment.
Note: The CM 100 must be operated with the supplied line cord or with a line cord meeting IEC227 H03 VV-F or IEC227 H03 VVH2-F
having conductors with a cross sectional area not less than .75 mm
2
.
Warning - The CM 100 is designed to work with single-phase power systems having a grounded neutral conductor. To
reduce the risk of electrical shock, do not plug the CM 100 into any other type of power system. Contact your facilities
manager or certified electrician if you are not sure what type of power is supplied to your building. To reduce the risk of
shock, always plug the cord into a grounded power outlet.
Warnung - Die CM 100 ist für den Betrieb mit einphasigen Stromversorgungssystemen ausgelegt, die einen geerdeten
neutralen Leiter haben. Um die Gefahr elektrischer Schläge zu reduzieren, dürfen Sie das Gerät nicht an andere
Stromversorgungssysteme anschließen. Wenn Sie nicht wissen, welche Stromart in Ihrem Gebäude zur Verfügung steht, bitten
Sie Ihren Hausverwalter oder einen zugelassenen Elektriker um Auskunft. Schließen Sie das Gerät immer an eine geerdete
Steckdose an, um Stromschläge zu vermeiden.
Danger - CM 100 est conçu pour un fonctionnement avec des systèmes d’alimentation mono-phasés pourvus d’un conducteur
neutre mis à la terre. Pour limiter les risques d’accidents électriques, ne connectez pas CM 100 à un autre type d’alimentation.
Contactez le directeur du site ou un électricien certifié si vous ne connaissez pas le type d’alimentation dont est pourvu le
bâtiment. Pour limiter les risques d’accidents électriques, branchez toujours ce cordon sur une prise de terre.
Aviso - CM 100 ha sido concebido para funcionar con sistemas de alimentación monofásicos provistos de un conductor neutro
puesto a tierra. Para disminuir el riesgo de accidentes eléctricos, no hay que enchufar este equipo a ningún otro tipo de
sistema de alimentación. Hay que ponerse en contacto con el administrador de la instalación o con un electricista autorizado
en caso de duda sobre el tipo de alimentación que posee el edificio. Para disminuir el riesgo de accidentes eléctricos, hay que
conectar siempre este equipo a una toma de alimentación con conexión a tierra.
Caution - To ensure reliable operation of the CM 100 and to protect it from overheating, openings in the equipment must not
be blocked or covered. The CM 100 should never be placed near a radiator heat register.
Achtung - Um einen zuverlässigen Betrieb der CM 100 zu gewährleisten und sie vor Überhitzung zu schützen, dürfen
Geräteöffnungen nicht verstopft oder abgedeckt werden. Die CM 100 sollte nicht in der Hähe von Heizkörpern aufgestellt
werden.
Attention - Pour assurer le bon fonctionnement de CM 100 et pour le mettre à l’abri de toute surchauffe, les ouvertures ne
doivent être ni entravées, ni recouvertes. CM 100 ne doit jamais être place à proximité d’un accumulateur de chaleur
thermique.
Precaución - Para garantizar el buen funcionamiento de CM 100 y para protegerlo de un eventual recalentamiento, las
aberturas no deben quedar obstruidas o recubiertas. CM 100 no debe jamás colocarse cerca de un acumulador de calor
térmico.

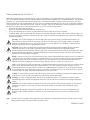
IMPORTANT SAFETY INSTRUCTIONS
Read Instructions - All the safety and operating instructions should be read before the product is operated.
Retain Instructions - The safety and operating instructions should be retained for future reference.
Heed Warnings - All warnings on the product and the operating instructions should be adhered to.
Follow Instructions - All operating and use instructions should be followed.
Grounding - This product is equipped with a three-wire grounding-type plug, a plug having a third (grounding) pin. This plug
will only fit into a grounding-type power outlet. This is a safety feature. If you are unable to insert the plug into the outlet,
contact your electrician to replace your obsolete outlet. Do not defeat the safety purpose of the grounding-type plug.
Outdoor Antenna Grounding - Since an outside antenna or cable system is connected to the product, be sure that the
antenna or cable system is grounded to provide some protection against voltage surges and built-up static charges. Article 810
of the National Electrical Code, ANSI/NFPA 70, provides information with regard to proper grounding of the mast and supporting
structure, grounding of the lead-in wire to the antenna discharge unit, size of grounding conductors, location of antenna-
discharge unit, connection of grounding electrodes, and requirements for the grounding electrodes.
Lightning - For added protection for this product during a lightning storm, or when it is left unattended and unused for long
periods of time, unplug it from the wall and disconnect the antenna or cable system. This will prevent damage to the product
due to lightning and power-line surges.
Power Lines - An outside antenna system should not be located in the vicinity of overhead power lines or other light or power
circuits, or where it can fall into such power lines or circuits. When installing an outside antenna system, extreme care should
be taken to keep from touching such power lines or circuits as contact with them may be fatal.
Note to CATV System Installer - This reminder is provided to call the CATV systems installer's attention to Section 820-40 of
the NEC which provides guidelines for proper grounding and, in particular, specifies that the cable ground shall be connected to
the grounding system of the building, as close to the point of cable entry as practical.
302694-C Rev 00 v
Getting Started with the CM 100 V2.0

EN 55 022 Statement
This is to certify that CM 100 is shielded against the generation of radio interference in accordance
with the application of Council Directive 89/336/EEC, Article 4a. Conformity is declared by the
application of EN 55 022 Class B (CISPR 22).
Voluntary Control Council for Interference (VCCI) Statement
This is a Class B product based on the standard of the Voluntary Control Council for Interference from
Information Technology Equipment (VCCI). If this is used near a radio or television receiver in a
domestic environment, it may cause radio interference. Install and use the equipment according to the
instruction manual.
This digital apparatus does not exceed the Class B limits for radio noise emissions from digital
apparatus set out in the Radio Interference Regulation of the Canadian Department of Communica-
tions.
Règlement sur le brouillage radioélectrique du ministère des Communications
Cet appareil numérique (CM 100) respecte les limites de bruits radioélectriques visant les appareils
numériques de Classe B prescrites dans le Règlement sur le brouillage radioélectrique du Ministère des
Communications du Canada.
EC Declaration of Conformity
This product conforms to the provisions of Council Directive 89/336/EEC and 73/23/EEC.
vi 302694-C Rev 00
Getting Started with the CM 100 V2.0

CONTENTS
A Prepare a Location for the CM 100
B Check Equipment and System Requirements
C Install Ethernet Twisted Pair Cable and Cable TV Coaxial Cable
D Install External Power Supply and Power Cord
E Description of Diagnostic LEDs and CM 100 Power Up Sequence
F Troubleshooting Checklist
G If you Still Need Help
Your location requirements are:
• A sturdy, level surface for placement
• A well ventilated room
• A stable environment with no abrupt temperature or humidity changes
• No exposure to chemicals or direct sunlight
A
Prepare a Location for the CM 100
302694-C Rev 00 1
Getting Started with the CM 100 V2.0
Overhead View
CM 100 Lying Flat
30"
3"
3"

B
Locate each item in the list below:
➊
CM 100
➋ User Guide (Getting Started with the CM 100)
➌ CM 100 Power Supply
➍ CM 100 Power Supply Power Cord (Domestic Only)
➎ Cable TV Drop Cable (Provided by Cable Operator)
➏ Twisted Pair Ethernet Cable (Standard) (Recommend CAT5/RJ-45, 297 feet max)
➐ Ethernet Ready (Network Interface Card installed) Computer (IBM Compatible,
Apple Macintosh, or other Ethernet ready workstation computing device)
Check Equipment and System Requirements
2 302694-C Rev 00
Getting Started with the CM 100 V2.0
➋
➌
➍
➎
➏
➐
➊

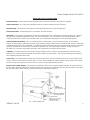
C
Install Ethernet Twisted Pair Cable and Cable
TV Coaxial Cable
Connect Communications Cables as Follows:
➊
Plug one end of the 10Base-T Twisted Pair cable in the PC Ethernet card’s RJ-45
modular jack
➋ Plug the other end of the 10Base-T Twisted Pair cable in the CM 100’s RJ-45
modular jack
➌ Attach the cable TV “Drop” cable to the CM 100’s “F” connector
302694-C Rev 00 3
Getting Started with the CM 100 V2.0
➋
➌
➊
ET HERNET
PO W ER
12 VDC
PC Rear View
Cable TV “Drop” Cable
Cornerstone CM 100
Rear View
Ethernet Cable

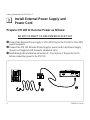
D
Install External Power Supply and
Power Cord
Prepare CM 100 to Receive Power as follows:
DO NOT CONNECT TO THE POWER OUTLET YET
➊ Connect the External Power supply’s 5-Pin DIN Plug to the CM 100’s 5-Pin DIN
power receptacle
➋ Connect the CM 100 External Power Supply’s power cord to the Power Supply
(Power cord supplied with Domestic shipments only)
➌ Read through the information on Section E - Description of Diagnostic LEDs
before connecting power to the CM 100
4 302694-C Rev 00
Getting Started with the CM 100 V2.0
➋
➊

E
Description of Diagnostic LEDs and CM 100
Power Up Sequence
Power Up LED Monitoring Procedure:
PLEASE REVIEW POWER UP SEQUENCE BEFORE YOU CONNECT
CM_100 TO POWER
➊ The CM 100 goes through the following sequence when it’s connected to a
properly rated power outlet using its supplied power supply and power cord:
CM 100 State LED Activity
Diagnostics Running 11 different combinations of LED states
Diagnostics Failed LED sequence halts on failed test
Software Running Power LED on solid, CM OK LED blinking
Scanning (Acquire Downstream Frequency) Power LED on solid, CM OK and Broadband Sync LEDs blinking
Ranging (Acquire Upstream Frequency) Power LED on solid, CM OK and Broadband Act LEDs blinking,
Broadband Sync LED on solid
DHCP Process (Acquire IP Address) Power LED on solid, CM OK and Ethernet Act LEDs blinking,
Broadband Act and Broadband Sync LEDs on solid
TFTP Process (Acquire Config File) Power LED on solid, CM OK LED blinking, Ethernet Act, Broadband
Act, and Broadband Sync LEDs on solid
Registered (Normal Operation) Power, and CM OK LEDs on solid, Ethernet Link LED on solid if
connected to an Ethernet device, Ethernet Act and Broadband Act LEDs
under hardware control (will blink if transmit is active), Broadband Sync
LED on solid
➋ Connect the CM 100 to the power outlet
302694-C Rev 00 5
Getting Started with the CM 100 V2.0
CM 100 LEDs
Ethernet
Broadband
CM OKPower Link
Act
Act
Sync

F
Troubleshooting Checklist
Common Installation and Setup Problems
➊ CM 100 not authorized to be on-line by cable operator
➋ Cable operator’s supporting equipment turned off or not working properly
What to Do In Case of Problems
➊ Verify that your computer’s Ethernet connection is valid (Link LED on solid)
➋ Verify with your cable operator that your CM 100’s labeled information is
entered in their database
➌ Verify with your cable operator that the supporting Data Over Cable TV headend
equipment is working properly
G
If You Still Need Help
➊ Review the installation procedures, especially Section E - Description of Diag-
nostic LEDs and CM 100 Power Up Sequence
Call Your Cable Operator’s Help Desk
➊ Enter your cable operator’s telephone number here:________________________
6 302694-C Rev 00
Getting Started with the CM 100 V2.0


Printed in U.S.A
-
 1
1
-
 2
2
-
 3
3
-
 4
4
-
 5
5
-
 6
6
-
 7
7
-
 8
8
-
 9
9
-
 10
10
-
 11
11
-
 12
12
-
 13
13
-
 14
14


Bay Networks CM 100 Getting Started Manual
- Taper
- Getting Started Manual
dans d''autres langues
- English: Bay Networks CM 100
Autres documents
-
Atlantis A02-WS2 GX01 Manuel utilisateur
-
Alpha XM3.1-HP Broadband UPS Technical Manual
-
red lion EL326 Guide d'installation
-
Yamaha MRX7 Le manuel du propriétaire
-
-
Netgear MBR1516 Manuel utilisateur
-
MicroNet SP3350A Manuel utilisateur
-
Winmate M101BK Manuel utilisateur
-
Morningstar TS-MPPT 150V Manuel utilisateur
-
Morningstar Tristar MPPT Solar Charging System Controller Manuel utilisateur