Magimix La M400 Maestria Le manuel du propriétaire
- Catégorie
- Cafetières
- Taper
- Le manuel du propriétaire

MAESTRIA
BY NESPRESSO
*
*ma machine

x 1
x 1
x 1
ON
OFF
x 1
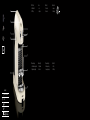
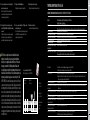
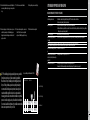
Maestria M400
220-240V 50/60Hz <2300W
max
19 bar
5.3 kg
1.4 l
17 cm 30 cm 39.5 cm
1
2
3
4
5
6
7
9
8
10
11
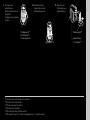
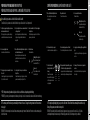
Réservoir d’eau
3. Water tank
Waterreservoir
Bouton Marche/Arrêt
1. ON/OFF button
AAN/UIT knop
Levier
2. Lever
Capsuleklem
Voyant lumineux
6. Indication lights
Indicatieleds
Cordon d’alimentation et rangement
5. Power cord and storage
Voedingskabel en opbergruimte
Boutons Espresso et Lungo
7. Espresso and Lungo dials
Espresso en Lungo-knoppen
Sortie Café
8. Coee outlet
Koe-uitloop
Levier vapeur
4. Steam handle
Stoombediening

1.
1. Frothing position *
(1)
2. Vertical position *
(2)
3. Steam out position *
(3)
Capsule container:
10–14 capsules *
(6)
Drip tray and grid *
(5)
2.
3.
Up right position *
(4)
*(1) Position mousse de lait / Stand voor het opschuimen
*(2) Position verticale / Verticale stand
*(3) Position sortie vapeur / Stoomstand
*(4) Position verticale / Ingeklapt
*(5) Bac et grille d’égouttage / Lekbakje en rooster
*(6) Bac à capsules usagées (10 – 14 capsules) / Opvangbakje voor 10 – 14 gebruikte capsules
Unité de maintenance
11. Maintenance unit
Onderhoudselement
Tube et buse vapeur et zone de
manipulation
9. Steam pipe, nozzle
and handling area
Stoompijpje, nozzle en gebruiks-
onderdeel
Support de tasse amovible
10. Removable cup support
Afneembaar kopjesrooster

EN
FR
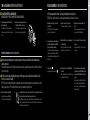
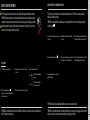
Nespresso est un système original orant un Espresso parfait, tasse après tasse.
Toutes les machines Nespresso sont équipées d’un système d’extraction unique à très haute pression allant jusqu’à 19 bars de pression. Chaque paramètre est calculé avec précision pour exprimer la
totalité des arômes de chaque Grand Cru, lui donner du corps et orir une crèma d’une densité et d’une onctuosité incomparables.
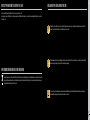
CONTENU
CONSIGNES DE SÉCURITÉ
PRÉPAREZ VOTRE MACHINE POUR LA PREMIÈRE UTILISATION
LA PRÉPARATION DU CAFÉ
BARISTA: FAITES MOUSSER LE LAIT
RECETTES
MODE MENU
LA VIDANGE
L’ENTRETIEN & LE NETTOYAGE
LE DÉTARTRAGE
LE DÉPANNAGE
CONTACTEZ LE CLUB NESPRESSO
MISE AU REBUT ET PROTECTION DE L’ENVIRONNEMENT
ECOLABORATION: ECOLABORATION.COM
GARANTIE LIMITÉE
Nespresso, an exclusive system creating the perfect Espresso, time after time.
All Nespresso machines are equipped with a unique extraction system that guarantees up to 19 bar pressure. Each parameter has been calculated with great precision to ensure that all the aromas
from each Grand Cru can be extracted, to give the coee body and create an exceptionally thick and smooth crema.
CONTENT/
Caution – The safety precautions are part of the appliance. Read them carefully before using your new appliance for the rst time. Keep them
in a place where you can nd and refer to them later on.
Caution – When you see this sign, please refer to the safety precautions to avoid possible harm and damage.
SAFETY PRECAUTIONS
Information – When you see this sign,
please take note of the advice for the
correct and safe usage of your appliance.
r
The appliance is intended to prepare
beverages according to these instructions.
r
Do not use the appliance for other than
intented use.
r
This appliance has been designed for indoor
and non extreme temperature conditions
use only.
r
Protect the appliance from direct sunlight
eect, prolonged water splash and
humidity.
r
This appliance is intended to be used in
households and similar applications only
such as: sta kitchen areas in shops, oces
and other working environments, farm
houses; by clients in hotels, motels and
other residential type environments; bed
and breakfast type environments.
r
This appliance can be used by children
aged from 8 years and above and persons
with reduced physical, sensory or mental
capabilities or lack of experience and
knowledge if they have been given
supervision or instruction concerning use of
the appliance in a safe way and understand
the hazards involved. Children shall not
play with the appliance. Cleaning and user
maintenance shall not be made by children
without supervision.
r
Children should be supervised to ensure
that they not play with the appliance.
r
The manufacturer accepts no responsability
and the warranty will not apply for any
commercial use, inappropriate handling
or use of the appliance, any damage
resulting from use for other purposes,
faulty operation, non-professionals repair
or failure to comply with the instructions.
Avoid risk of fatal electric shock and re
r*O DBTF PG BO FNFSHFODZ JNNFEJBUFMZ
remove the plug from the power socket.
r0OMZQMVHUIFBQQMJBODFJOUPTVJUBCMFFBTFMZ
accessible, earthed mains connections.
Make sure that the voltage of the power
source is the same as that specied on
the rating plate. The use of an incorrect
connection voids the warranty.
r5IFBQQMJBODFNVTUPOMZCFDPOOFDUFEBGUFS
installation.
r%P OPU QVMM UIF DPSE PWFS TIBSQ FEHFT
clamp it or allow it to hang down.
r,FFQUIFDPSEBXBZGSPNIFBUBOEEBNQ
r*GUIFTVQQMZDPSEJTEBNBHFEJUNVTUCF
replaced by the manufacturer, its service
agent or similarly qualied persons.
r*GUIFDPSEJTEBNBHFEEPOPUPQFSBUFUIF
appliance.
r3FUVSOUIFBQQMJBODFUPUIFNespresso Club
or to a Nespresso authorized representative.
r*G BOFYUFOTJPO DPSE JT SFRVJSFE VTF POMZ
an earthed cord with a conductor cross-
section of at least 1.5mm
2
or matching
input power.
r5PBWPJEIB[BSEPVTEBNBHFOFWFSQMBDFUIF
appliance on or beside hot surfaces such as
radiators, stoves, ovens, gas burners, open
ame, or similar.
r"MXBZTQMBDFJUPOBIPSJ[POUBMBTUBCMFBOE
SAFETY PRECAUTIONS/
PREPARING YOUR MACHINE FOR FIRST USE/
COFFEE PREPARATION/
BARISTA: FROTHING YOUR MILK/
RECIPES/
MENU MODES/
EMPTYING MODE/
CARE & CLEANING/
DESCALING/
TROUBLESHOOTING/
CONTACT THE NESPRESSO CLUB/
DISPOSAL AND ENVIRONMENTAL PROTECTION/
ECOLABORATION: ECOLABORATION.COM/
LIMITED WARRANTY/
EN Instruction manual FR Manuel d’instructions 6
NL Gebruiksaanwijzing 30
6
7
7 – 11
12
13
14 – 15
16 – 19
20
21
22
23
25
26
26
27
28

EN
FR
Avertissement – Les consignes de sécurité font partie de l’appareil. Veuillez les lire attentivement avant d’utiliser votre nouvel appareil.
Gardez-les dans un endroit où vous pourrez les retrouver et vous y référer ultèrieurement.
Avertissement – lorsque ce symbole apparaît, veuillez consulter les mesures de sécurité pour éviter d’éventuels dangers et dommages.
CONSIGNES DE SECURITE
Information – Lorsque ce symbole
apparaît, veuillez prendre connaissance
du conseil pour une utilisation sûre et
conforme de votre appareil.
r-BQQBSFJM FTU DPOÉV QPVS QSÊQBSFS EFT
boissons conformément à ces instructions.
r/VUJMJTF[ QBT MBQQBSFJM QPVS EBVUSFT
usages que ceux prévus.
r$FUBQQBSFJMBÊUÊDPOÉVTFVMFNFOUQPVS
un usage intérieur, pour un usage dans
des conditions de températures non
extrêmes.
r1SPUÊHF[WPUSFBQQBSFJMEFTFíFUTEJSFDUT
des rayons du soleil, des éclaboussures
d’eau et de l’humidité.
r$FUBQQBSFJMFTUQSÊWVQPVSVOFVUJMJTBUJPO
domestique et des utilisations similaires
seulement comme: les espaces cuisine
dans les magasins, les bureaux ou autres
environnements de travail, les fermes;
une utilisation par les clients dans les
hôtels, les chambres d’hôtes et autres
environnements résidentiels ou du type
bed&breakfast.
r$FUUF NBDIJOF QFVU ËUSF VUJMJTÊF QBS
des enfants âgés de 8 ans et plus et des
personnes avec des capacités physiques,
sensorielles ou mentales réduites
ou qui manquent d’expérience et de
connaissances, si elles ont été formées
ou encadrées sur l’utilisation de l’appareil
EVOF GBÉPO TÚSF FU DPNQSFOOFOU MFT
risques encourus. Les enfants ne doivent
pas jouer avec la machine. Le nettoyage et
l’entretien utilisateur ne doit pas être fait
par des enfants sans surveillance.
r-FT FOGBOUT EFWSBJFOU ËUSF TVSWFJMMÊT
pour s’assurer qu’ils ne jouent pas avec la
machine.
r
Le fabricant décline toute responsabilité
et la garantie ne s’appliquera pas en
cas d’usage commercial, d’utilisations
ou de manipulations inappropriées,
de dommages résultant d’un usage
incorrect, d’un fonctionnement erroné,
d’une réparation par un non professionnel
ou du non respect des instructions.
Evitez les risques d’incendie et de choc
électrique fatal
r
En cas d’urgence: débranchez
immédiatement l’appareil de la prise
électrique.
even surface. The surface must be resistant to
heat and uids, like water, coee, descaler or
similar.
r%JTDPOOFDU UIF BQQMJBODF GSPN UIF NBJOT
when not in use for a long period. Disconnect
by pulling out the plug and not by pulling the
cord itself or the cord may become damaged.
r#FGPSF DMFBOJOH BOE TFSWJDJOH SFNPWF UIF
plug from the mains socket and let the
appliance cool down.
r/FWFSUPVDIUIFDPSEXJUIXFUIBOET
r/FWFSJNNFSTFUIFBQQMJBODFPSQBSUPGJUJO
water or other liquid.
r/FWFS QVU UIF BQQMJBODF PS QBSU PG JU JO B
dishwaher.
r&MFDUSJDJUZ BOE XBUFS UPHFUIFS JT EBOHFSPVT
and can lead to fatal electrical shocks.
r%POPUPQFOUIFBQQMJBODF)B[BSEPVTWPMUBHF
inside!
r%POPUQVUBOZUIJOHJOUPBOZPQFOJOHT%PJOH
so may cause re or electrical shock !
Avoid possible harm when operating the
appliance
r/FWFSMFBWFUIFBQQMJBODFVOBUUFOEFEEVSJOH
operation.
r%POPUVTFUIFBQQMJBODFJGJUJTEBNBHFEPS
not operating perfectly. Immediately remove
the plug from the power socket. Contact
the Nespresso Club or Nespresso authorized
representative for examination, repair or
adjustment.
r" EBNBHFE BQQMJBODF DBO DBVTF FMFDUSJDBM
shocks, burns and re.
r"MXBZTDPNQMFUFMZDMPTFUIFMFWFSBOEOFWFS
lift it during operation. Scalding may occur.
r%POPUQVUñOHFSTVOEFSDPíFFPVUMFUSJTL
of scalding.
r%POPUQVUñOHFSTJOUPDBQTVMFDPNQBSUNFOU
or the capsule shaft. Danger of injury!
r8BUFSDPVMEóPXBSPVOEBDBQTVMFXIFOOPU
perforated by the blades and damage the
appliance.
r/FWFSVTFBEBNBHFEPSEFGPSNFEDBQTVMF
If a capsule is blocked into the capsule
compartment, turn the machine o and
unplug it before any operation. Call the
Nespresso Club or Nespresso authorized
representative.
r"MXBZT ñMM UIF XBUFS UBOL XJUI GSFTI
drinking, cold water.
r&NQUZXBUFSUBOLJGUIFBQQMJBODFXJMMOPUCF
used for an extended time (holidays,etc.)
r3FQMBDF XBUFS JO XBUFS UBOL XIFO UIF
appliance is not operated for a weekend or
a similar period of time.
r%P OPU VTF UIF BQQMJBODF XJUIPVU UIF ESJQ
tray and drip grid to avoid spilling any liquid
on surrounding surfaces.
r%P OPU VTF BOZ TUSPOH DMFBOJOH BHFOU PS
solvent cleaner. Use a damp cloth and mild
cleaning agent to clean the surface of the
appliance.
r8IFO VOQBDLJOH UIF NBDIJOF SFNPWF UIF
plastic lm and dispose.
r5IJT BQQMJBODF JT EFTJHOFE GPS Nespresso
coee capsules available exclusively through
the Nespresso Club or your Nespresso
authorized representative. Nespresso quality
is only guaranteed when Nespresso capsules
are used in Nespresso appliances.
r'PSZPVSPXOTBGFUZZPVTIPVMEVTFPOMZQBSUT
and appliance accessories from Nespresso
that are designed for your appliance.
r"MM Nespresso appliances pass stringent
controls. Reliability tests under practical
conditions are performed randomly on
selected units. This can show traces of any
previous use.
rNespresso reserves the right to change
instructions without prior notice.
Descaling
rNespresso descaling agent, when used
correctly, helps ensure the proper
functioning of your machine over its lifetime
and that your coee experience is as perfect
as the rst day. For the correct amount and
procedure to follow, consult the user manual
included in the Nespresso descaling kit.
SAVE THESE INSTRUCTIONS
Pass them on to any subsequent user.
This instruction manual is also available as a PDF at nespresso.com
8
9

EN
FR
r
#SBODIF[MBQQBSFJMVOJRVFNFOUÆEFTQSJTFT
BEBQUÊFT GBDJMFNFOU BDDFTTJCMFT FU SFMJÊFT
Æ MB UFSSF -BQQBSFJM EPJU ËUSF DPOOFDUÊ
VOJRVFNFOU BQSÍT MJOTUBMMBUJPO "TTVSF[
WPVT RVF MB UFOTJPO EF MB TPVSDF EÊOFSHJF
TPJUMBNËNFRVFDFMMFJOEJRVÊFTVSMBQMBRVF
TJHOBMÊUJRVF-VUJMJTBUJPOEVOCSBODIFNFOU
JOBEBQUÊBOOVMFMBHBSBOUJF
r
-BQQBSFJM EPJU ËUSF DPOOFDUÊ VOJRVFNFOU
BQSÍTMJOTUBMMBUJPO
r
/FUJSF[QBTMFDPSEPOEBMJNFOUBUJPOTVSEFT
CPSET USBODIBOUT BUUBDIF[MF PV MBJTTF[MF
QFOESF
r
(BSEF[ MF DPSEPO EBMJNFOUBUJPO MPJO EF MB
DIBMFVSFUEFMIVNJEJUÊ
r
4JMFDPSEPOEBMJNFOUBUJPOFTUFOEPNNBHÊJM
EPJUËUSFSFNQMBDÊQBSMFGBCSJDBOUTPOBHFOU
BQSÍTWFOUF PV EFT QFSTPOOFT EF NËNF
RVBMJñDBUJPO 4J MF DPSEPO EBMJNFOUBUJPO
FTU FOEPNNBHÊ OF GBJUFT QBT GPODUJPOOFS
MBQQBSFJM3FUPVSOF[WPUSFBQQBSFJMBV$MVC
NespressoPVÆVOSFWFOEFVSNespressoBHSÊÊ
r
4JMFDPSEPOEBMJNFOUBUJPOFTUFOEPNNBHÊ
OFGBJUFTQBTGPODUJPOOFSMBQQBSFJM
r
3FUPVSOF[WPUSFBQQBSFJMBV $MVC Nespresso
PVÆVOSFWFOEFVSNespressoBHSÊÊ
r
4JVOFSBMMPOHFÊMFDUSJRVFTBWÍSFOÊDFTTBJSF
OVUJMJTF[ RVVO DÄCMF SFMJÊ Æ MB UFSSF EPOU
MFDPOEVDUFVSBVOFTFDUJPOEBVNPJOT
NN
2
r
"ñO EÊWJUFS EF EBOHFSFVY EPNNBHFT OF
QMBDF[ KBNBJT MBQQBSFJM TVS PV Æ DÔUÊ EF
TVSGBDFT DIBVEFT UFMMFT RVF MFT SBEJBUFVST
MFTDVJTJOJÍSFTMFTGPVSTMFT CSÚMFVSTÆHB[
MFT GFVY OVT PV EFT TPVSDFT EF DIBMFVS
TJNJMBJSFT
r
1MBDF[MF UPVKPVST TVS VOF TVSGBDF
IPSJ[POUBMF TUBCMF FU SÊHVMJÍSF -B TVSGBDF
EPJUËUSFSÊTJTUBOUFÆMBDIBMFVSFUBVYóVJEFT
DPNNFMFBVDBGÊMFEÊUBSUSBOUPVBVUSFT
r
%ÊCSBODIF[MBQQBSFJMEFMBQSJTFÊMFDUSJRVF
MPSTRVJMOFTUQBTVUJMJTÊQFOEBOUVOFQÊSJPEF
QSPMPOHÊF
r
%ÊCSBODIF[MBQQBSFJMFOUJSBOUTVSMBñDIFFU
OPOQBTTVSMFDPSEPOEBMJNFOUBUJPOBñOEF
OFQBTMFOEPNNBHFS
r
"WBOU MF OFUUPZBHF FU MFOUSFUJFO EF WPUSF
BQQBSFJMEÊCSBODIF[MFEFMBQSJTFÊMFDUSJRVF
FUMBJTTF[MFSFGSPJEJS
r
/FUPVDIF[KBNBJTMFñMÊMFDUSJRVFBWFDEFT
NBJOTNPVJMMÊFT
r
/FQMPOHF[KBNBJTMBQQBSFJMFOFOUJFSPVFO
QBSUJFEBOTMFBVPVEBOTEBVUSFTMJRVJEFT
r
/FNFUUF[KBNBJTMBQQBSFJMPVVOFQBSUJFEF
DFMVJDJEBOTVOMBWFWBJTTFMMF
r
-ÊMFDUSJDJUÊFUMFBVFOTFNCMFTPOUEBOHFSFVY
FUQFVWFOUDPOEVJSFÆEFTDIPDTÊMFDUSJRVFT
NPSUFMT
r
/PVWSF[QBTMBQQBSFJM7PMUBHFEBOHFSFVYÆ
MJOUÊSJFVS
r
/F NFUUF[ SJFO EBOT MFT PVWFSUVSFT $FMB
QPVSSBJUQSPWPRVFSVOJODFOEJFPV VO DIPD
ÊMFDUSJRVF
Évitez les dommages possibles lors de
l’utilisation de l’appareil
r
/FMBJTTF[KBNBJTMBQQBSFJMTBOTTVSWFJMMBODF
QFOEBOUTPOGPODUJPOOFNFOU
r
/VUJMJTF[QBTMBQQBSFJMTJMFTUFOEPNNBHÊ
PV OF GPODUJPOOF QBT QBSGBJUFNFOU
%ÊCSBODIF[MF JNNÊEJBUFNFOU EF MB QSJTF
ÊMFDUSJRVF $POUBDUF[ MF $MVC Nespresso
PV VO SFWFOEFVS Nespresso BHSÊÊ QPVS MB
SÊQBSBUJPOPVMFSÊHMBHFEFWPUSFBQQBSFJM
r
6OBQQBSFJMFOEPNNBHÊQFVUQSPWPRVFSEFT
DIPDTÊMFDUSJRVFTCSÚMVSFTFUJODFOEJFT
r
3FGFSNF[ UPVKPVST CJFO DPNQMÍUFNFOU MF
MFWJFS FU OF MF TPVMFWF[ KBNBJT QFOEBOU MF
GPODUJPOOFNFOU EFT CSÚMVSFT QFVWFOU TF
QSPEVJSF
r
/FNFUUF[QBTWPTEPJHUTTPVTMBTPSUJFDBGÊJM
ZBVOSJTRVFEFCSÚMVSF
r
/F NFUUF[ QBT WPT EPJHUT EBOT MF
DPNQBSUJNFOUÆDBQTVMFTPVEBOTMFCBDEF
SÊDVQÊSBUJPOEFTDBQTVMFT*MFYJTUFVOSJTRVF
EFCMFTTVSF
r
-FBV QFVU TÊDPVMFS BVUPVS EVOF DBQTVMF
RVBOE DFMMFDJ OB QBT ÊUÊ QFSGPSÊF QBS MFT
MBNFTFUFOEPNNBHFSMBQQBSFJM
r/VUJMJTF[KBNBJTVOFDBQTVMFFOEPNNBHÊF
PV EÊGPSNÊF4J VOF DBQTVMF FTU CMPRVÊF
EBOTMFDPNQBSUJNFOUÆDBQTVMFTÊUFJHOF[
MBQQBSFJM FU EÊCSBODIF[MF BWBOU UPVUF
PQÊSBUJPO"QQFMF[MF$MVCNespressoPVVO
SFWFOEFVSNespressoBHSÊÊ
r
3FNQMJTTF[ UPVKPVST MF SÊTFSWPJS BWFD EF
MFBVGSBJDIFQPUBCMFFUGSPJEF
r
7JEF[ MF SÊTFSWPJS EFBV TJ MBQQBSFJM OFTU
QBT VUJMJTÊ QFOEBOU VOF EVSÊF QSPMPOHÊF
WBDBODFTFUDw
r
3FNQMBDF[MFBVEVSÊTFSWPJSEFBVRVBOE
MBQQBSFJMOFTUQBTVUJMJTÊQFOEBOUVOXFFL
FOEPVVOFQÊSJPEFEFUFNQTTJNJMBJSF
r
/VUJMJTF[ QBT MBQQBSFJM TBOT MF CBD
EÊHPVUUBHF FU TB HSJMMF BñO EÊWJUFS EF
SFOWFSTFS EV MJRVJEF TVS MFT TVSGBDFT
FOWJSPOOBOUFT
r
/FOFUUPZF[KBNBJTWPUSFBQQBSFJMBWFDVO
QSPEVJUEFOUSFUJFOPVVOTPMWBOU6UJMJTF[
VO DIJíPO IVNJEF FU VO EÊUFSHFOU EPVY
QPVSOFUUPZFSMBTVSGBDFEFMBQQBSFJM
r
-PST EV EÊCBMMBHF EF MBQQBSFJM SFUJSFS MF
ñMNQMBTUJRVFTVSMBHSJMMFEÊHPVUUBHF
r
$FUBQQBSFJMFTUDPOÉVQPVSEFTDBQTVMFTEF
DBGÊ Nespresso EJTQPOJCMFT FYDMVTJWFNFOU
WJB MF $MVC Nespresso PV WPUSF SFWFOEFVS
NespressoBHSÊÊ-BRVBMJUÊNespressoOFTU
HBSBOUJFRVFMPSTRVFMFTDBQTVMFTNespresso
TPOUVUJMJTÊFTEBOTMFTBQQBSFJMTNespresso
r
1PVS WPUSF QSPQSF TÊDVSJUÊ WPVT EFWF[
VUJMJTFSTFVMFNFOUMFTQJÍDFTFUBDDFTTPJSFT
EBQQBSFJMT Nespresso RVJ TPOU DPOÉVT
TQÊDJBMFNFOUQPVSWPUSFBQQBSFJM
r
5PVTMFTBQQBSFJMTNespressoTPOUTPVNJTÆ
EFTDPOUSÔMFTTÊWÍSFT%FTUFTUTEFñBCJMJUÊ
EBOT EFT DPOEJUJPOT SÊFMMFT EVUJMJTBUJPO
TPOU FíFDUVÊT BV IBTBSE TVS EFT VOJUÊT
TÊMFDUJPOOÊFT $FSUBJOT BQQBSFJMT QFVWFOU
EPOD NPOUSFSEFT USBDFT EVOF VUJMJTBUJPO
BOUÊSJFVSF
r
Nespresso TF SÊTFSWF MF ESPJU EF NPEJñFS
TBOTQSÊBWJTMBOPUJDFEVUJMJTBUJPO
Détartrage
r
-PSTRVJM FTU VUJMJTÊ DPSSFDUFNFOU MF
EÊUBSUSBOU Nespresso QFSNFU EBTTVSFS
MF CPO GPODUJPOOFNFOU EF WPUSF BQQBSFJM
UPVU BV MPOH EF TB WJF FU WPVT QFSNFU
EF NBJOUFOJS VOF FYQÊSJFODF DBGÊ BVTTJ
QBSGBJUFRVBVQSFNJFSKPVS1PVSMFEPTBHF
FYBDUFUMBQSPDÊEVSFÆTVJWSFDPOTVMUF[MF
NBOVFM EVUJMJTBUJPOJODMVT EBOT MF LJU EF
EÊUBSUSBHFNespresso
$0/4&37&;-&4*/4536$5*0/446*7"/5&4
5SBOTNFUUF[MFTBVYVUJMJTBUFVSTVMUÊSJFVST
$FNBOVFMEJOTUSVDUJPOFTUÊHBMFNFOUEJTQPOJCMFFOWFSTJPO1%'TVSOFTQSFTTPDPN

1: 25 ml
2: 30 ml
3: 40 ml
4: 50 ml
5: 60 ml
1: 70 ml
2: 90 ml
3: 110 ml
4: 130 ml
5: 150 ml
EN
FR
Rincez et remplissez le réservoir d’eau avec
de l’eau potable.
Tournez le bouton jusqu’au
niveau de café désiré et appuyez
sur le bouton pour commencer
votre préparation.
Remettez le réservoir d’eau.
La préparation s’arrêtera automatiquement ou appuyez
sur un bouton café pour l’interrompre à tout moment.
Allumez la machine.
Le support de tasse peut être relevé pour y placer un verre
à recettes.
Levez et baissez le levier an d’éjecter la capsule dans le
bac à capsules.
Levez le levier et insérez une capsule Nespresso. Baissez le levier et placez une tasse sous la sortie café.
REMARQUE: pendant la chaue de la machine (lumières clignotantes), vous pouvez presser le bouton café. Le café s’écoulera
automatiquement quand la machine sera prête. Pendant la préparation du café, la fonction vapeur n’est pas utilisable.
Tout d’abord, lisez les précautions de sécurité an d’éviter les risques d’incendie et de choc éléctrique mortel.
Placez le support de tasse en position verticale, puis
enlevez l’unité de maintenance et le réservoir d’eau.
Soulevez le support de tasse et placez un récipient (min
0,5L) sous l’orice de sortie café.
Tournez le bouton Lungo sur 5 et appuyez sur le bouton
pour rincer la machine. Répetez l’opération 3 fois.
Rincez et remplissez le réservoir d’eau avec de l’eau
potable. Remettez le réservoir d’eau et l’unité de
maintenance.
Allumez la machine.
Mettez le levier vapeur en position «OFF» et la buse
vapeur en position verticale.
Les voyants lumineux clignotent:
la machine chaue (25 sec)
Les voyant lumineux sont xes:
la machine est prête
Fermez le levier et branchez la machine.
Ajustez la longueur du cordon d’alimentation et rangez
le surplus sous l’appareil à l’aide de la xation de
rangement.*
REMARQUE: l’arrêt automatique: la machine s’éteint automatiquement après 9 minutes d’inutilisation. Pour retirer cet arrêt automatique allez
dans le mode menu.
*REMARQUE: pour cette opération uniquement, la machine peut être placée sur le coté sur une surface non abrasive an d’eviter tout dommage.
Les voyants lumineux clignotent:
la machine chaue (25 sec)
Les voyants lumineux sont xes:
la machine est prête
PRÉPAREZ VOTRE MACHINE POUR LA PREMIÈRE UTILISATION
LA PRÉPARATION DU CAFÉ/COFFEE PREPARATION/
1. Rinse and ll water tank with potable water.
4.
Lift lever and insert Nespresso capsule.
7. Turn dial to desired coee
level and press button to start
brewing.
NOTE: during heat up (blinking lights), you can press the coee button. Coee will start to ow automatically when machine is ready.
During coee preparation, steam function is not possible.
2. Reposition water tank .
5. Close lever and place cup under coee outlet.
8. The preparation will stop automatically, or press any
coee button to stop the preparation at any time.
3. Close lever and switch machine on.
6. Cup support can be turned up right to support Macchiato
glass.
9. Remove cup. Lift and close lever to eject capsule into
container.
Blinking lights: heat up (25 sec.)
Steady: ready
1. Fully insert cup support into upright position, remove
maintenance unit and water tank.
First read the safety precautions to avoid risks of fatal electrical shock and re.
4. Close lever and plug into mains.
7. Lift cup support and place container (min. 0.5L) under
coee outlet.
8. Set Lungo button to 5 and press to rinse the machine.
Repeat 3 times.
*NOTE: for this operation only, machine can be placed on it’s side on a soft surface to avoid any damage to the nishing.
5. Rinse and ll water tank with potable water. Reposition
water tank and maintenance unit.
6. Switch machine on.
3. Ensure steam handle is set to o, and steam pipe in
vertical position.
Blinking lights: heat up (25 sec.)
Steady: ready
2. Adjust cord length and store excess under machine with
cord storage xation.*
PREPARING YOUR MACHINE FOR FIRST USE/
NOTE: automatic power o: machine stops automatically after 9 minutes of non-use. To change this setting visit auto shut o section in menu
mode page 20.
12
13

EN
FR
Poursuivez les étapes précédentes de «RINCAGE VAPEUR».
Tournez le levier sur
.
ASTUCE: pour une mousse de lait parfaite, utilisez du lait frais à température réfrigérée (autour de 4° C). Pour un meilleur résultat, utilisez
un pot à lait pour faire mousser votre lait.
REMARQUE: à des ns de sécurité, la fonction vapeur s’interrompt après 90 secondes. Pour la remettre en marche, mettez le levier vapeur à
«ON», puis remettez-le à
.
*REMARQUE: le pot à lait doit être le double du volume de la quantité de la recette souhaitée pour permettre la préparation.
Remplissez le pot à lait au niveau requis en fonction de
la recette.* Ajustez le tube vapeur sur la position mousse, et tenez-le
dans le fond du pot à lait pour éviter les éclaboussures.
Dès que votre mousse atteint le niveau ou température
désiré (environ 65° C), elle est prête.
Mettez le levier vapeur à «ON» et enlevez immédiatement
la buse du pot à lait.
REMARQUE: si vous voulez seulement chauer votre lait et ne pas créer de mousse, assurez vous que le tube vapeur soit poussé au plus haut
point, de sorte qu’il y ait un écart entre le bas de la conduite de vapeur et la buse.
Pour un meilleur rendement et à des ns d’hygiène, il est impératif de rincer la sortie vapeur pendant au moins 5 secondes avant et après chaque
préparation à base de lait pour éviter l’accumulation de résidus (voir la section Entretien et nettoyage).
Remplissez le réservoir d’eau avec de l’eau potable.
Tournez le levier vapeur sur
. Faites sortir de la
vapeur par la buse pendant 5 secondes.
Soulevez le support de tasse et ajustez le tuyau sur la
position vapeur.
Lorsque c’est terminé, remettez le levier vapeur
sur «ON».
Tournez le levier vapeur sur «ON».
Le voyant lumineux du milieu clignote: la
machine chaue
Le voyant lumineux est xe:
la machine est prête
REMARQUE: lorsque le levier vapeur est sur «ON», la fonction vapeur restera en mode chaue. Pour économiser de l’énergie, lorsque vous avez
terminé, mettez le levier vapeur sur «OFF».
BARISTA: FAITES MOUSSER VOTRE LAIT
RINÇAGE VAPEUR
PRÊT A FAIRE VOTRE MOUSSE DE LAIT
ATTENTION: le tube de vapeur sera chaud pendant et après l’usage, manipulez le avec soin. Utilisez unqiuement la zone de
manipulation en caoutchouc pour éviter les brûlures.
REMARQUE: après une période de sans non-utilisation, et à cause de l’eau résiduelle des préparations précédentes restant
dans la machine , de la vapeur peut être libérée lors du chauage de la machine. Cela peut arriver et ne cause aucun
dommage à votre machine.
Rincez ensuite la sortie vapeur de votre machine pendant
au moins 5 secondes pour éliminer tout résidu de lait.
NOTE: if you only want to heat the milk and not create froth, ensure that the steam pipe is pushed up to the highest point, so that there is a
gap between the bottom of the steam pipe and nozzle.
READY TO FROTH YOUR MILK/
1. Complete previous Steam Out steps. 3. Adjust steam pipe into frothing position, and hold it in
bottom of jug to avoid splashes.
4. Move steam handle to .
7. Proceed to steam out your machine for 5 seconds
minimum to remove any milk residues.
2. Fill milk jug to required amount based on recipe.*
5. Once milk froth has reached desired level or temperature
(about 65° C), it is ready.
6. Move steam handle back to ON position and remove milk
jug immediately from below the steam pipe.
TIPS: for perfect milk froth, use fresh milk at refrigerator temperature (about 4° C). For best results, use a milk jug to froth your milk.
*NOTE: milk jug should be double the volume of recipe quantity desired to enable preparation.
BARISTA: FROTHING YOUR MILK/
STEAM OUT/
1. Fill water tank with potable water.
4.
Move steam handle to . Run steam through
nozzle for 5 sec. to steam out.
NOTE: when steam handle is set to ON, steamer function will remain in heat up mode. To save energy, when done move handle to OFF.
2. Lift cup support and adjust steam pipe into steam out
position.
3. Set steam handle to ON.
5. Move steam handle back to ON when done.
Middle light blinking: heat up
Middle light steady: ready
CAUTION: steam pipe will be hot during and after usage. Use rubber grip area only to avoid burns.
For best performance and hygienic purposes, a steam out of 5 seconds minimum MUST be done before and after each usage to avoid milk
residues from remaining inside and outside the steam nozzle. (See care and cleaning section).
NOTE: after a period of non use and because of residual water in the machine from previous preparations, steam may
release during the heat up. This may happen and will not cause any damage to your machine.
NOTE: as a safety precaution, the steam function will cut out after 90 seconds. To start again move steam handle to ON, then back to
.
14
15

EN
FR
Proportions:
1 capsule Espresso
Complétez de mousse de lait chaud sur le dessus
Remplir un grand verre (300 ml) de mousse de lait chaud. Complétez-le avec un Espresso.
Intense: Grand Cru Indriya
from India/Léger: Grand Cru Volluto
Proportions:
1 capsule Espresso
Complétez de mousse de lait chaud sur le dessus
Préparez un Espresso dans une tasse à Espresso et disposez sur le dessus de la mousse de
lait chaud.
Intense: Grand Cru Indriya from India/Léger: Grand Cru Volluto
Proportions:
1 capsule Espresso
Complétez de mousse de lait chaud sur le dessus
Préparez un Espresso dans une tasse à Cappucino et disposez sur le dessus de la mousse de
lait chaud.
Intense: Grand Cru Ristretto/Léger: Grand Cru Rosabaya
de Columbia
Proportions:
1 capsule Lungo
Complétez avec de la mousse de lait chaud
Préparez un Lungo dans un grand verre (350 ml) et disposez sur le dessus de la mousse de
lait chaud.
Intense: Grand Cru Fortissio Lungo/Léger: Grand Cru Vivalto Lungo
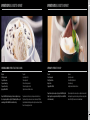
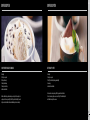
CLASSIC RECIPESLES RECETTES CLASSIQUES
LATTE MACCHIATO ESPRESSO MACCHIATOCAFÈ LATTECAPPUCCINO
Proportions:
1 Espresso capsule
Topped up with hot milk froth
Fill a tall glass with hot milk froth (300 ml). Top up with an Espresso preparation.
Intense: Indriya
from India Grand Cru/Light: Volluto Grand Cru
Proportions:
1 Espresso capsule
Topped up with hot milk froth
Prepare an Espresso in an Espresso cup and top up with hot milk froth.
Intense: Indriya from India Grand Cru/Light: Volluto Grand Cru
Proportions:
1 Espresso capsule
Topped up with hot milk froth
Prepare an Espresso in a Cappuccino cup and top up with hot milk froth.
Intense: Ristretto Grand Cru/Light: Rosabaya de Columbia Grand Cru
Proportions:
1 Lungo capsule
Topped up with hot milk
Prepare a Lungo in a tall glass (350 ml) and top up with hot milk.
Intense: Fortissio Lungo Grand Cru/Light: Vivalto Lungo Grand Cru
CLASSIC RECIPES/CLASSIC RECIPES/
CAPPUCCINO/ CAFFÉ LATTE/ LATTE MACCHIATO/ ESPRESSO MACCHIATO/
16
17

EN
FR
Proportions:
1 capsule Espresso Livanto
Du chocolat After Eight à la menthe
Du chocolat au nougat
Complétez de mousse de lait chaud sur le dessus
Préparez la capsule Livanto dans une tasse à Espresso. Complétez avec la mousse de lait
chaud. Saupoudrez de copeaux de chocolat au nougat sur le dessus et ajoutez pour nir
un chocolat After Eight® à la mousse de lait. Servez immédiatement.
Proportions:
2 capsules Espresso Volluto
1 boule de glace vanille
2 cuillères à café de sirop de caramel
1 cuillère à café de pépites de chocolat
Complétez de mousse de lait chaud sur le dessus
Préparez la mousse de lait chaud, ajoutez-y le sirop de caramel et mettez-la de coté.
Préparez deux cafés Espresso dans une tasse et versez-les dans un verre (350 ml) froid.
Ajoutez immédiatement la boule de glace vanille et complétez avec la mousse de lait chaud.
Décorez le tout avec des pépites de chocolat.
LES RECETTES GOURMET
CAFÉ AFTER EIGHT®
LES RECETTES GOURMET
CAFÉ GLACÉ VANILLE CARAMEL
GOURMET RECIPES/
Proportions:
1 Livanto Espresso capsule
After Eight® mint chocolate
Nougat chocolate
Topped up with hot milk froth
Prepare the Livanto capsule into an Espresso cup. Top it up with hot milk froth. Sprinkle
shavings of nougat chocolate on top and add an After Eight® chocolate to the milk froth
to nish. Serve immediately.
AFTER EIGHT® COFFEE/
GOURMET RECIPES/
Proportions:
2 Volluto Espresso capsules
1 scoop of vanilla ice cream
2 teaspoons of caramel syrup
1 teaspoon of chocolate chips
Topped up with hot milk froth
Prepare the hot milk froth, add the caramel syrup to it and set aside. Prepare two Espresso
coees into a cup and pour them into a cold glass (350 ml). Immediately add the scoop of ice
cream and top up with the hot milk froth. Decorate with chocolate chips.
ICED VANILLA CARAMEL COFFEE/
18
19

1:
2:
3:
4:
5:
EN
FR
En mode menu, réglez le bouton Espresso sur la position 3
pour la vidange.
Tournez le levier vapeur sur «ON».
La machine s’éteint automatiquement.
Retirez le réservoir d’eau et levez le levier.
Ajustez le tuyau de vapeur sur la position vapeur.
Pressez le bouton Lungo pour vider la machine (lorsque le
voyant café cesse de clignoter, la machine est prête).
La lumière du milieu clignote:
vidange
Réglez le levier vapeur sur
:
REMARQUE: l’appareil sera bloqué pendant 20 minutes après la vidange.
La lumière du milieu est xe:
c’est ni
Réglez le bouton Espresso sur: Réglez le bouton Lungo sur:
Arrêt automatique 1: 9 min, 2: 30 min, 3: 60 min, 4: 2 h, 5: 8 h
Dureté de l’eau 1: fort, 2: moyen, 3: léger
Vidange Voir la section vidange
Réinitialisation aux réglages usines
Détartrage Voir la section détartrage
Pressez simplement le bouton Lungo pour réinitialiser les réglages usines (économie d’énergie: 9 min, niveau
d’intensité de l’eau: fort).
REMARQUE: en mode «Menu», vous pouvez changer les options sans quitter à chaque fois. Pour quitter le mode «Menu», appuyez et maintenez le
bouton Espresso pendant 5 secondes (les voyants de café stabilisés conrment la sortie).
Pour entrer dans le mode «Menu», pressez et maintenez le
bouton Espresso en même temps que vous allumez la machine
(la lumière du milieu s’éclaire en orange).
Réglez les boutons pour les paramètres
requis (voir tableau ci-dessous).
Une fois sélectionné, appuyez sur le bouton Lungo pour commencer (la
lumière du milieu s’allume en continu pour conrmer et clignote orange. Le
nombre de clignotements correspond au réglage sélectionné).
REMARQUE: votre machine doit être vidée avant et après toute longue période de non utilisation.
MODE VIDANGE
CAFÉ & TUBE VAPEUR
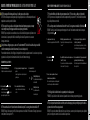
MODE MENU EMPTYING MODE/
1. While in menu mode, set Espresso button to position 3
for emptying.
4. Turn steam handle to ON.
7. Machine switches o automatically when nished.
2. Remove water tank and lift lever.
5. Adjust steam pipe into steam out position.
NOTE: appliance will be blocked for approximately 20 minutes after emptying.
3. Press Lungo button to empty machine (ready when
coee lights stop blinking).
6. Set steam handle to :
Middle light blinking: emptying
Middle light steady: done
COFFEE & STEAM PIPE/
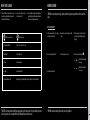
MENU MODES/
1. To enter menu modes, press and hold the Espresso button
while turning the machine on (middle light steady orange).
2. Set the dials to the required settings (see
chart below).
Set Espresso dial to: Set Lungo dial to:
Auto Shut O 1: 9 min, 2: 30 min, 3: 60 min, 4: 2 hrs, 5: 8 hrs
Water Hardness 1: hard, 2: medium, 3: soft
Emptying See emptying section
Reset To Factory Setting
3. Once selected, press the Lungo button to conrm (middle light steady to
conrm, and blinks orange accordingly to selected number).
NOTE: when in menu mode you can change between options without exiting each time. To exit menu mode, press and hold the Espresso button
for 5 seconds (steady coee lights conrm exit).
Descaling See descaling section
Simply press the Lungo button to reset to factory setting (power save: 9 min, water hardness level: hard).
NOTE: your machine should be emptied before and after a long period of non-use.
20
21

EN
FR
Réglez la poignée de la vapeur sur la fonction .
Mettez la machine hors tension et réglez le bouton
Espresso sur 4 et le bouton Lungo sur 1.
Ouvrez et fermez le levier pour éjecter la capsule.
Videz le bac de récupération d’eau et le bac à capsules
usagées puis replacez-les dans la machine.
Remplir le réservoir d’eau avec 2 sachets de produit
détartrant Nespresso et le reste avec de l’eau.
Appuyez sur le bouton Lungo pour démarrer le détartrage.
Le voyant du milieu se met à clignoter.
Placez un récipient (min 1,5 L) sous la sortie café et la
buse vapeur.
Plusieurs opérations entre le débit du café et de la buse
vapeur se produiront. Ne touchez pas la machine lors
de cette opération. Le voyant du milieu indique que le
détartrage est terminé.
Pour accèder au mode détartrage maintenez appuyé
le bouton Espresso lorsque la machine est allumée. Le
voyant orange du milieu reste allumé pour conrmer le
mode détartrage.
REMARQUE: durée d’environ 20 minutes. Le voyant orange du milieu indique que le détartrage est nécessaire.
Pour assembler/démonter l’unité de maintenance,
assurez-vous que le support de tasse est dans en position
verticale.
L’unité de maintenance peut être retirée en un seul
morceau et séparée pour un nettoyage plus facile.
Retirez l’embout de la buse à mousse de lait en le tournant dans le sens des aiguilles d’une montre juste qu’a
DFRVFÉBTPSUFOTVJUFUJSF[MBNBODIFWFSTMFCBT-FNBODIFQFVUËUSFMBWÊÆMFBVTBWPOOFVTF"TTVSF[WPVT
que les ouvertures sont exemptes de résidus.
Essuyez le tube vapeur avec un chion humide
(voir la section pour savoir comment vidanger).
ATTENTION: soyez extrêmement prudent lorsque vous manipulez le tuyau à vapeur. Utilisez uniquement la zone de manipulation en caoutchouc.
Tournez le levier vapeur sur «OFF» et attendez qu’il refroidisse avant de la manipuler pour éviter les blessures.
Pour un meilleur rendement et à des ns d’hygiène, nettoyez la buse vapeur après chaque utilisation pour enlever les résidus de lait à l’intérieur
et à l’extérieur de la buse.
NE LAVEZ PAS LES PIECES COMPOSANTS AU LAVEVAISSELLE
LE MODE DÉTARTRAGEENTRETIEN & NETTOYAGE
NETTOYAGE DU TUBE VAPEUR
DESCALING MODE/
CARE & CLEANING/
1. To remove maintenance unit from machine, lift cup
support in upright position.
3. Wipe down the steam pipe with a damp cloth.
2. Maintenance unit can be removed in one piece and
assembled/disassembled for easy cleaning.
4. To remove the frothing sleeve, twist the nozzle clockwise until it comes out then pull the sleeve downwards.
Sleeve can be washed in soapy water. Make sure openings are free of residue.
STEAM PIPE CLEANING/
DO NOT WASH PARTS IN A DISHWASHER/
CAUTION: use extreme caution when handling the steam pipe. Use rubber grip area only to avoid injury. Turn steam handle to OFF and
allow for it to cool down before handling.
For better performance and hygienic purposes clean your steam pipe after each usage to avoid milk residues from remaining inside and
outside the steam nozzle.
NOTE: duration approximately 20 minutes. Steady orange middle light indicates descaling is needed.
7. Set steam handle to .
1. Turn machine o and set Espresso button to 4 and
Lungo button to 1.
2. Open and close the lever to eject the capsule. 3. Empty drip tray and used capsule container and
replace.
5. Fill water tank with 2 Nespresso descaling liquid agents
and the rest with water.
8. Press Lungo button to start descaling. ddle light will
start to blink.
6. Place a container (min 1.5 L) below coee outlet and
steam pipe.
9. A mix of operations between coee and steam pipe
ow will occur. Do not touch the machine during this
operation. Steady middle light indicates descaling is
complete.
4. To enter descaling mode press and hold the Espresso
button while turning the machine on. Middle light
steady orange to conrm descaling mode.
22
23

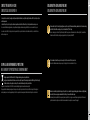
(40 ml)
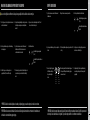
fH
36
18
0
20
10
0
CaCO
3
360 mg/l
180 mg/l
0 mg/l
dH
French grade
Degré français
German grade
Degré allemand
Calcium carbonate
Carbonate de
calcium
fH
dH
CaCO
3
800
2400
3200
30min
45min
60min
EN
FR
AVERTISSEMENT: la solution de détartrage peut être nocive. Évitez le
contact avec les yeux, la peau et les surfaces. Nous préconisons le kit
de détartrage Nespresso disponible auprès du Club Nespresso, dans la
mesure où il est spécialement adapté à votre machine. Attention à ne
pas utiliser d‘autres produits (du type vinaigre), qui laisserait un goût
au café et pourrait endommager la machine. Sur la base de la dureté
de l‘eau, le tableau suivant vous indiquera la fréquence de détartrage
requise pour une performance optimale de votre machine. Pour tout
renseignement complémentaire sur le détartrage, veuillez contacter
votre Club Nespresso.
Kit de détartrage Nespresso: Ref. 3035/CBU-2
Remplacez le récipient vide comme pour l’étape 6.
Une fois cette opération eectuée, videz et rincez le
réservoir d’eau, le bac de récupération d’eau et le bac
à capsules usagées puis replacez-les.
3ÊHMF[MFCPVUPO-VOHPTVSQPVSMFSJOÉBHFFUBQQVZF[
sur le bouton Lungo. Tous les voyants clignotent. Les
WPZBOUTBMMVNÊTJOEJRVFOURVFMFSJOÉBHFFTUUFSNJOÊ
Remplir le réservoir d’eau avec de l’eau potable.
Une fois l’opération eectuée, déplacez la poignée vapeur
sur OFF. Videz le bac de récupération d’eau et le bac à
capsules usagées puis replacez-les.
La machine est maintenant prête à l’emploi.
Pas de lumière.
£
La machine s’est éteinte automatiquement; appuyez sur le bouton ON/OFF.
£
Contrôlez le réseau électrique: prise de courant, tension et fusible.
Pas de café, ni d’eau.
£
Vériez l’état du réservoir d’eau, s’il est vide, remplissez-le avec de l’eau potable.
£
Appuyez sur le bouton du café à plusieurs reprises jusqu’à ce que le café/eau sorte (peut se produire à la première utilisation, après la
vidange ou une longue période de non d’inutilisation).
Le café est insusamment chaud.
£
Préchauez la tasse. Détartrez si nécessaire.
Pas de mousse de lait lors de l’utilisation du
tube à vapeur.
£
Ajustez correctement le tuyau à vapeur et la buse. Réglez et nettoyez le tube vapeur. Assurez-vous d’utiliser du lait adequat à bonne
température.
Le levier ne peut pas être abaissé entière-
ment.
£
Videz le bac à capsules. Vériez qu’il n’y a pas de capsule bloquée à l’intérieur de l’appareil.
Fuite ou écoulement anormal de café.
£
Vériez que le réservoir d’eau est bien positionné. Nettoyez la sortie café.
Voyant du milieu en orange continu. qui
clignote constamment.
£
Le détartrage est nécessaire.
Pas de café, juste de l’eau qui coule
(malgré une capsule insérée).
£
En cas de diculté, appelez le Club Nespresso.
La machine s’éteint automatiquement.
£
Pour économiser de l’énergie, la machine s’éteindra après 9 minutes d’inutilisation.
£
Pour changer ce réglage consultez le paragraphe mode «Menu» page 20.
Dureté de l’eau : Détartrez après :
DÉPANNAGE
ALARMES ERREUR ET DETARTRAGE
No lights.
£
The machine has switched o automatically; press ON/OFF button.
£
Check the mains: plug, voltage, fuse.
No coee, no water.
£
Check the water tank, if empty, ll with potable water.
£
Press coffee button several times until the coffee/water comes out (may occur on first use, after emptying, a long period of non use).
Coee is not hot enough.
£
Preheat cup. Descale the machine if necessary.
No milk froth when using steam pipe.
£
Adjust and clean steam pipe. Ensure to use right milk at right temperature.
The lever cannot be closed completely.
£
Empty the capsule container/Check that there is not a capsule blocked inside the machine.
Leakage or unusual coee ow.
£
Check that the water tank is in position. Clean coee outlet.
Steady middle orange light.
£
Descaling needed.
No coee, water just comes out (despite
inserted capsule).
£
In case of diculties, call the Nespresso Club.
Machine switches itself o automatically.
£
To save energy the machine will turn itself o after 9 minutes of non use.
£
See paragraph on ‘Menu Modes’ to change this setting. See ‘menu modes’ page 20.
TROUBLESHOOTING/
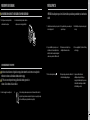
CAUTION: the descaling solution can be harmful. Avoid contact
with eyes, skin and surfaces. Never use any product other than
the Nespresso descaling kit available at the Nespresso Club to avoid
damage to your machine. The following table will indicate the
descaling frequency required for the optimum performance of your
machine, based on water hardness. For any additional questions you
may have regarding descaling, please contact your Nespresso Club.
Nespresso descaling kit: Ref. 3035/CBU-2
Water hardness: Descale after:
ALARMS ERROR AND DESCALING/
12. Replace empty container as per step 6. 10. Once done, empty and rinse water tank, drip tray and
capsule container, and replace.
13. Turn Lungo dial to 2 for rinse mode and press Lungo
button. All lights will blink. Steady lights indicate rinsing
is complete.
11. Fill up water tank with drinking water.
14. Once done, move steam handle to OFF. Empty container
and drip tray and replace.
15 . Machine is now ready for use.
24
25

EN
FR
Cet appareil est conforme à la directive 2002/96/CE de l’UE. Les matériaux d’emballage et l’appareil contiennent des matériaux recyclables.
Votre appareil contient des matériaux précieux qui peuvent être récupérés ou être recyclables. La séparation des déchets restants, en diérentes catégories, facilite le recyclage des
matières premières précieuses Laissez votre appareil à un point de collecte. Vous pouvez obtenir des renseignements sur l’évacuation des déchets auprès de vos autorités locales.
CONTACTEZ LE CLUB NESPRESSO
MISE AU REBUT ET PROTECTION DE L’ENVIRONNEMENT
Si vous avez besoin d’informations supplémentaires, en cas de problèmes ou simplement pour demander conseil, appelez le Club Nespresso ou votre revendeur Nespresso agréé.
Les coordonnées de votre Club Nespresso le plus proche ou de votre représentant Nespresso peuvent être trouvées dans le dossier «Bienvenue chez Nespresso» dans la boîte de votre
machine ou sur nespresso.com
/PVTOPVTTPNNFTFOHBHÊTÆBDIFUFSMFDBGÊEFMBQMVTIBVUFRVBMJUÊDVMUJWÊEFGBÉPOSFTQFDUVFVTFEFMFOWJSPOOFNFOUFUEFTDVMUJWBUFVST%FQVJTOPVTUSBWBJMMPOTFO
collaboration avec la Rainforest Alliance, à développer notre programme Nespresso AAA pour une Qualité Durable
TM
.
Nous avons choisi l’aluminium comme matière pour nos capsules, car il protège le café et les arômes des Grands Crus Nespresso.
L’aluminium est également recyclable à l’inni, sans pour autant perdre de ses qualités. Nespresso s’engage à concevoir et fabriquer des appareils qui sont à la fois innovants,
performants et conviviaux. Nous intégrons aussi des bénéces environnementaux dans la conception de nos nouveaux et futurs appareils.
ECOLABORATION: ECOLABORATION.COM
As we may not have foreseen all uses of your appliance, should you need any additional information, in case of problems or simply to seek advice, call the Nespresso Club or your Nespresso
authorized representative.
Contact details for your Nespresso Club or your Nespresso authorized representative can be found in the «Welcome to Nespresso» folder in your machine box or at nespresso.com
This appliance complies with the EU Directive 2002/96/EC. Packaging materials and appliance contain recyclable materials.
Your appliance contains valuable materials that can be recovered or can be recyclable. Separation of the remaining waste materials into dierent types facilitates the recycling
of valuable raw materials. Leave the appliance at a collection point. You can obtain information on disposal from your local authorities.
CONTACT THE NESPRESSO CLUB/
DISPOSAL AND ENVIRONMENTAL PROTECTION/
We have committed to buy coee of the very highest quality grown in a way that is respectful of the environment and farming communities. Since 2003 we have been working
together with the Rainforest Alliance developing our Nespresso AAA Sustainable Quality
TM
Coee Program.
We chose aluminium as the material for our capsules because it protects the coee and aromas of the Nespresso Grands Crus.
Aluminium is also indenitely recyclable, without loosing any of its qualities. Nespresso is committed to designing and making appliances that are innovative, high-performing
and user-friendly. Now we are engineering environmental benets into the design of our new and future machine ranges.
ECOLABORATION: ECOLABORATION.COM/
26
27

EN
FR
UNE GARANTIE LIMITEE
Nespresso garantit ce produit contre les défauts de matériels et de fabrication pour une période de deux années. La période de garantie commence à la date d’achat et Nespresso exige la présentation
de la preuve d’achat originale pour déterminer cette date. Pendant la période de garantie, Nespresso répare ou remplace, à sa discrétion, tous produits défectueux sans frais pour le propriétaire.
Cet appareil est conforme à la directive 2002/96/CE de l’UE. Les produits de remplacement ou les pièces réparées seront exclusivement garanties pour la part non expirée de la garantie initiale
ou pendant six mois, la durée retenue étant la plus longue. Cette garantie limitée ne s’applique pas aux défauts résultant d’une négligence, d’un accident, ou de toute autre raison échappant au
contrôle raisonnable de Nespresso, y compris mais sans s’y limiter: l’usure normale, la négligence ou le défaut de suivi des instructions du produit, l’entretien incorrect ou inadéquat, les dépôts de
calcium ou le détartrage; la connexion à une alimentation inadéquate, la modication ou la réparation non autorisée du produit, l’utilisation à des ns commerciales; un incendie, la foudre, une
inondation ou d’autres causes externes. Cette garantie est valable uniquement dans le pays d’achat ou dans d’autres pays où Nespresso vend et entretient le même modèle, avec des spécications
techniques identiques. Le service de garantie en dehors du pays d’achat est limité aux termes et conditions de la garantie correspondante dans le pays de service. Lorsque le coût de la réparation ou
du remplacement n’est pas couvert par cette garantie, Nespresso en avise le propriétaire et le coût sera à la charge du propriétaire. Cette garantie limitée représente l’étendue de la responsabilité de
Nespresso quelle qu’en soit la cause. Sauf dans la mesure où cela est prévu par la législation en vigueur, les conditions de cette garantie limitée n’excluent, ni ne restreignent, ni ne modient les droits
légaux obligatoires relatifs à votre achat du produit, voire y sont complémentaires.» La garantie limitée s’applique uniquement aux produits de la marque Nespresso. Les produits marqués à la fois de
la marque Nespresso et de celle d’un autre producteur sont régis exclusivement par la garantie fournie par cet autre producteur. Si vous pensez que votre produit est défectueux, contactez Nespresso
QPVSPCUFOJSEFTJOTUSVDUJPOTTVSMBGBÉPOEFQSPDÊEFSÆVOFSÊQBSBUJPO5PVTEÊGBVUTPVEZTGPODUJPOOFNFOUSÊTVMUBOUEFMVUJMJTBUJPOEFDBQTVMFTOPOBVUIFOUJñÊFTNespresso ne seront pas couverts
par cette garantie. Pour obtenir nos coordonnées, n’hésitez pas à vous rendre sur notre site Internet www.nespresso.com
Nespresso warrants this product against defects in materials and workmanship for a period of 2 years. The warranty period begins on the date of purchase and Nespresso requires presentation of
the original proof of purchase to ascertain the date. During the warranty period, Nespresso will either repair or replace, at its discretion, any defective product. This appliance complies with the EU
Directive 1999/44/EC. Replacement products or repaired parts will be warranted for only the unexpired portion of the original warranty or six months, whichever is greater. This limited warranty
does not apply to any defect resulting from negligence, accident, misuse, or other reason beyond Nespresso’s reasonnable control, included but not limited to : normal wear and tear, negligence or
failure to follow the product instructions, improper or inadequate maintenance, calcium deposits or descaling; connection to improper power supply; unauthorized product modication or repair;
use for commercial purposes; re, lightning, ood or other external causes. This warranty is valid only in the country of purchase or in such other countries where Nespresso sells and services the
same model with identical technical specications. Warranty service outside the country of purchase is limited to the terms and conditions of the corresponding warranty in the country of service.
Where the cost of repairs or replacement is not covered by this warranty, Nespresso will advise the owner and the cost shall be charged to the owner. This limited Warranty shall be the full extent of
Nespresso’s liability however caused. Except to the extend allowed by applicable law, the terms of this limited warranty do not exclude, restrict or modify the mandatory statutory rights applicable to
the sale of this product and are in addition to those rights. The limited warranty applies only to this single-branded Nespresso product. Products marked with both the Nespresso Brand and another
producer are governed exclusively by the warranty provided by that other producer. If you believe your product is defective, contact Nespresso for Instructions on how to proceed with a repair. Any
defect or dysfunction resulting from the use of non-genuine Nespresso capsules will be not covered by this warranty. Please visit our website at www.nespresso.com for contact details.
LIMITED WARRANTY/
Please consult your warranty card included with the machine for more information. Only the use of Nespresso capsules will guarantee the proper functioning and lifetime of your Nespresso
machine. Any defect resulting from the usage of non-genuine Nespresso capsules will not be covered by this warranty.
Veuillez consulter votre carte de garantie incluse avec la machine pour plus d’information. Seul l’usage descapsules Nespresso garantit le bon fonctionnement et la longévité de votre machine
Nespresso. Tout dommage ou dysfonctionnement occasionnépar l’utilisation de capsules autres que de marque Nespresso ne sera pas couvert par cette garantie.
28
29
La page est en cours de chargement...
La page est en cours de chargement...
La page est en cours de chargement...
La page est en cours de chargement...
La page est en cours de chargement...
La page est en cours de chargement...

1:
2:
3:
4:
5:
NL
1. Stel in het menukeuze-overzicht de Espresso knop in op
positie 3 om de machine te ledigen.
4.
Plaats de stoombediening in de stand ON.
7.
De machine schakelt nu vanzelf uit.
2.
Verwijder het waterreservoir en klap de capsuleklem
omhoog.
5.
Zet het stoompijpje in de stoomstand.
3.
Druk de Lungo knop in om de machine te legen. (dit
proces is afgelopen als het koelampje stopt met
knipperen).
Middelste indicatielampje knippert:
machine legen
6.
Plaats de stoombediening in de stand :
OPMERKING: de machine wordt na het ledigen van het systeem 20 min. geblokkeerd.
Middelste indicatielampje brandt
constant: gereed
Stel de Espressotoets in op:in op: Stel de Lungotoets in op:
Automatische uitschakeling 1: 9 min, 2: 30 min, 3: 60 min, 4: 2 uur, 5: 8 uur
Waterhardheid 1: hard, 2: middel, 3: zacht
Ledigen zie het onderdeel ‘Ledigen’
Fabrieksinstellingen herstellen
Ontkalken zie het onderdeel ‘Ontkalken’
Druk de Lungo knop in om de fabrieksinstellingen te herstellen (energiestand: 9 min.; waterhardheid: hard).
OPMERKING: in de menu modus kunnen de instellingen aangepast worden zonder het menu te verlaten. Om de menu-instellingen te verlaten,
de Espresso knop gedurende 5 seconden ingedrukt houden (de koelampjes lichten op om dit te bevestigen).
1. Om de menu-instellingen op te roepen, drukt u de Espressotoets
in en houdt u deze ingedrukt terwijl u de machine inschakelt
(het lampje in het midden licht oranje op).
2. Stel de gewenste instellingen voor de toetsen
in (zie onderstaande tabel).
3. Nadat de instellingen voltooid zijn, de Lungo knop indrukken ter
bevestiging (het lampje in het midden brandt onafgebroken en
licht oranje op naar gelang het gekozen nummer).
OPMERKING: als u uw machine gedurende langere tijd niet gebruikt of na lange tijd opnieuw in gebruik neemt, dient u de machine te
ledigen.
MENUINSTELLINGEN MACHINE LEDIGEN
KOFFIE & STOOMPIJP
42
43
La page est en cours de chargement...
La page est en cours de chargement...
La page est en cours de chargement...
La page est en cours de chargement...

-
 1
1
-
 2
2
-
 3
3
-
 4
4
-
 5
5
-
 6
6
-
 7
7
-
 8
8
-
 9
9
-
 10
10
-
 11
11
-
 12
12
-
 13
13
-
 14
14
-
 15
15
-
 16
16
-
 17
17
-
 18
18
-
 19
19
-
 20
20
-
 21
21
-
 22
22
-
 23
23
-
 24
24
-
 25
25
-
 26
26
-
 27
27


Magimix La M400 Maestria Le manuel du propriétaire
- Catégorie
- Cafetières
- Taper
- Le manuel du propriétaire
dans d''autres langues
- English: Magimix La M400 Maestria Owner's manual
- Nederlands: Magimix La M400 Maestria de handleiding
Documents connexes
Autres documents
-
Krups YY1800FD Le manuel du propriétaire
-
Nespresso CitiZ & milk Manuel utilisateur
-
-
-
-
-