Candy CHK46C Manuel utilisateur
- Catégorie
- Plaques de cuisson
- Taper
- Manuel utilisateur

1
CHK46C
CeramicHob
InstructionManual

2
Content
1…………………………………..…………………Safetyinstructions
2…………………………………..…………………Installation
3…………………………………..…………………DescriptionoftheCeramichobsurfacelayout
4…………………………………..…………………Usingtheceramichob
5…………………………………..…………………Hobguidelines
6…………………………………..…………………Maintenanceandcleaning
7…………………………………..…………………Environmentalnote

3
Safety instructions
This User Instruction Manual contains important information, including safety
& installation points, which will enable you to get the most out of your
appliance. Please keep it in a safe place so that it is easily available for future
reference; for you or any person not familiar with the operation of the appliance.
Caution!
⚫ Do not use the ceramic hob until you
have read this instruction manual.
The ceramic hob is intended for
household use only.
⚫ The appliance becomes hot during
operation. Take care not to touch the
hot surface.
⚫ Always keep children away from the
ceramic hob.
⚫ While in operation direct contact with
the ceramic hob may cause burns!
⚫ Ensure that small items of household
equipment, including connection leads,
do not touch the hob as the insulation
material of this equipment is usually
not resistant to high temperatures.
⚫ Do not leave the ceramic hob
unattended when frying. Oils and fats
may catch fire due to overheating or
boiling over.
⚫ Do not switch on the hob until a pan
has been placed on it.
⚫ Do not put pans weighing over 25kg
on the hob.
⚫ Do not use the ceramic hob in the
event of a technical fault. Any faults
must be fixed by an appropriately
qualified and authorized person.
⚫ In the event of any incident caused by
a technical fault, disconnect the power
and report the fault to the service
centre to be repaired.
⚫ The rules and provisions contained in
this instruction manual should be
strictly observed. Do not allow
anybody who is not familiar with the
contents of this instruction manual to
operate the ceramic hob.
⚫ The ceramic hob should not be
cleaned using steam cleaning
equipment.
⚫ IMPORTANT: The adjacent
furniture or housing and all materials
used in the installation must be able to
withstand a minimum temperature of
95°C above the ambient temperature
of the room it is located in, whilst in
use.
⚫ Any damage caused by the appliance
being installed in contravention of this
temperature limit, or by placing
adjacent cabinet materials closer than
4mm to the appliance, will be the
liability of the owner.
⚫ This appliance complies with all
current European safety legislation.
We do wish to emphasize that this
compliance does not remove the fact
that the appliance surfaces will
become hot during use and retain heat
after operation.
Child Safety
⚫ We strongly recommend that
babies and young children are
prevented from being near to the
appliance and not allowed to touch
the appliance at any time.

4
⚫ If it is necessary for younger family
members to be in the kitchen,
please ensure that they are kept
under close supervision at all times.
General Safety
⚫ This appliance is not intended for
use by persons (including children)
with reduced physical, sensory or
mental capabilities, or lack of
experience and knowledge, unless
they have been given supervision
or instruction concerning use of the
appliance by a person responsible
for their safety.
⚫ Children should be supervised to
ensure that they do not play with
the appliance.
⚫ NEVER try to extinguish a fire with
water, but switch off the appliance
and then cover flame e.g. with a lid
or a fire blanket.
⚫ WARNING: Danger of fire: do not
store items on the cooking surfaces.
⚫ Means for disconnection must be
incorporated in the fixed wiring in
accordance with the wiring rules.
⚫ Do not allow electrical fittings or
cables to come into contact with
areas on the appliance that get hot.
⚫ Do not use the appliance to heat
the room it is located in or to dry
clothing.
⚫ Do not install the appliance next to
curtains or soft furnishings.
⚫ If the supply cord is damaged, it
must be replaced by the
manufacturer, its service agent or
similarly qualified persons in order
to avoid a hazard.
⚫ The appliance is not intended to be
operated by means of an external
timer or separate remote-control
system.
⚫ Power cord can’t accessible after
installation.
⚫ This product can be worked but not
through outside timer and remote
control.
⚫ Warning: If the surface is cracked,
switch off the appliance to avoid the
possibility of electric shock, for hob
surfaces of glass ceramic or similar
material which protect live parts.
⚫ Warning: a steam cleaner is not be
used.
⚫ CAUTION: The cooking process
has to be supervised. A short term
cooking process has to be
supervised continuously.
⚫ WARNING: Unattended cooking
on a hob with fat or oil can be
dangerous and may result in a fire.
⚫ This appliance should be
connected to a circuit which
incorporates an isolating switch
which can accessible by the user
after installation providing full
disconnection from the power
supply. The disconnection may be
achieved by incorporating a switch
in the fixed wiring in accordance
with the wiring rules.
⚫ Warning: Before obtaining access
to terminals, all supply circuits must
be disconnected.
⚫ WARNING: Use only hob guards
designed by the manufacturer of
the cooking appliance or indicated
by the manufacturer of the
appliance in the instructions for use
as suitable or hob guards
incorporated in the appliance. The
use of inappropriate guards can
cause accidents.
⚫ WARNING: The appliance and its
accessible parts become hot during
use.
⚫ Care should be taken to avoid
touching heating elements.
⚫ Regarding the instructions for how
to Installation,thanks to refer to the
section “Installation”.

5
Installation
Electrical connection
Before connecting the appliance, make sure that the supply voltage
marked on the Rating Plate corresponds with your mains supply voltage.
WARNING: THIS APPLIANCE MUST BE EARTHED.
⚫ If you have to change the oven power cord, the earthing (yellow/green) conductor
must always be 10 mm longer than the line conductors.
⚫ Care must be taken to ensure that the temperature of the mains supply cable does
not exceed 50°C.
⚫ If the mains supply cable is damaged, then it must be replaced by an appropriate
replacement which can be obtained from Spares Department.
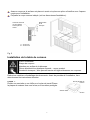
Assembly of ceramic hob :
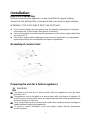
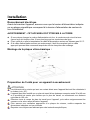
Preparing the unit for a built-in appliance
WARNING
The kitchen units that are in direct contact with the appliances must be heat-
proof(min. 95°).
The appliance can be installed on a work surface with a thickness of between 30
and 40 mm and near to walls which are higher than the work surface,maintaining a
minimum distance of 100 mm.
Carry out all cutting of the unit and work surface then carefully remove shavings or
sawdust before inserting the appliances.
To ensure a correct ventilation of the hob please comply with the dimensions
shows in figures .

6
Always refer to the manufacturer for specific instructions,
Make sure the surface is level and square and that no part interferes with the
space required for installation.
Prepare the cut as indicated(see installation dimensions).
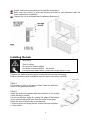
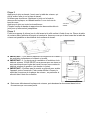
Installing the hob
WARNING
Risk of cutting.
Be careful of cutting edges.
End parts in foamed plastic - be careful.
During transportation these could cause slight injury or cuts.
Remove the material and envelope of documents from the packaging.
Before proceeding with installation read the work instructions carefully.
Step.1
Put a towel or cloth on the work surface.Place the hob face
down on the protected surface.
Step.2
Apply the strip seal,supplied with the hob,which is for sealing
it onto the work surface.
Do not use silicone. Apply the seal to the edge of the bottom
of the hob,leaving about 3mm from the edge of the glass.
Apply the seal all around the circumference.
Cut any excess and bring the two ends of the seal together
so they match.

7
Step.3
Fix the brackets(4 pcs) on the front side and rear side by screw.Put the hob in the cut-
out cabinet,and make it centered.Ensure that the front edge of the hob is parallel to the
side edge of the work surface.
⚫ IMPORTANT: You must observe the ventilation
requirements shown in the drawing opposite.
⚫ IMPORTANT: There are ventilation holes around the
outside of the hob. YOU MUST ensure that these
holes are not blocked by the work top, when you put
the hob into position (see drawing opposite).
⚫ IMPORTANT: Do not use a silicon sealant to seal the
appliance against the aperture. This will make it
difficult to remove the hob from the aperture in future,
particularly if it needs to be serviced.
⚫ Carefully turn the hob back over and then gently lower it into the aperture hole that
you have cut out.
Fitting guidelines
The ceramic hob is manufactured to work with two-phase
alternating current (400V2N~50Hz).The voltage rating of the
ceramic hob heating elements is 230V. Adapting the ceramic
hob to operate with one-phase current is possible by
appropriate bridging in the connection box according to the
connection diagram below. The connection diagram is also
found on the cover of the connection box. Remember that
the connection wire should match the connection type and
the power rating of the ceramic hob.
The connection cable must be secured in a strain-relief clamp.
Warning!
Remember to connect the safety circuit to the connection box terminal marked with
.The electricity supply for the ceramic hob must have a safety switch which
enables the power to be cut off in case of emergency. The distance between the
working contacts of the safety switch must be at least 3mm.
Before connecting the ceramic hob to the power supply it is important to read the
information on the data plate and the connection diagram.
2
1

8
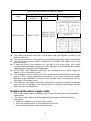
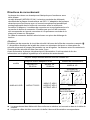
wires for each domino hob with 4D models
model
Adaptive voltage range and wires
The wiring diagram
220-240 1N~
50-60Hz
380-420 2N~ 50-
60Hz
KADO K 1/5
AHW-4A1-60-R
H05VV-F 3G2.5
H05VV-F 4G2.5
H05GG-F 4G2.5
H07RN-F 4G2.5
KADO XT
⚫ The cable connections must be in accordance with the diagram located on the
bottom of the hob.
⚫ The cable type must be connected to the corresponding power supply terminal box.
⚫ You should use a good quality screwdriver to carefully, fully tighten ALL of the
terminal screws.
⚫ If when the hob is first switched on, only two of the zones work, you should
recheck that the terminal screws are all fully tightened. This should be done before
contacting the Customer Care Department.
⚫ IMPORTANT: The appliance must NOT be connected to the mains supply by
means of a 13A plug and socket.
⚫ This appliance must be wired into a 30 A double pole switched fused spur outlet,
having 3 mm contact separation and placed in an easily accessible position
adjacent to the appliance. It should not be located above the appliance and no
more than 1.25m away from it.
⚫ The cable can be looped if necessary, but make sure that is not kinked or trapped
when the hob is in position. Care must be taken to avoid the cable being in contact
with hot parts of the appliance.
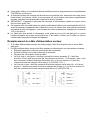
Replacing the mains supply cable
If the mains supply cable is damaged, then it must be replaced by an appropriate
replacement.
The mains supply cable should be replaced in accordance with the following
instructions:
➢ Switch the appliance off at the control switch.
➢ Open the terminal block on the underside of the hob.
➢ Unscrew the terminal screws fixing the cable.

9
➢ The “green-yellow” earth wire must be connected to the terminal marked . It
must be about 10 mm longer than the live and neutral wires.
➢ The “blue” neutral wire must be connected to the terminal marked with letter (N)
- the live wire(L1) must be connected to the terminal marked with letter (L1)
(220-240V 1N~).
➢ The “blue” neutral wire must be connected to the terminal marked with letter (N)
- the live wire L1 must be connected to the terminal marked with letter (L1),. the
live wire L2 must be connected to the terminal marked with letter (L2) (380-
420V 2N~).
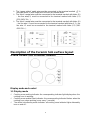
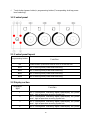
Description of the Ceramic hob surface layout
4 zone ceramic hob schematic diagram
Display mode and control
1.1 Display mode
✓ Cooking zone working indicator: the corresponding indicator light display when the
cooking zone is working;
✓ Cooking zone residual heat indicator: the corresponding indicator flashes when the
cooking zone stops working (once every 1 second);
✓ The whole hob standby mode indicator: all cooking zone indicator lights alternately
turn on and off .

10
✓ Touch button(power button)+ programming button(Corresponding hob top power
level selecting).
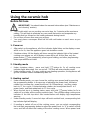
1.2 Control panel
2.1 Control panel layout:
Icons &
programming button
Function
M1
Power button: press and hold to turn on or off the hob
BM1
NO.1 cooking zone power level selecting
BM2
NO.2 cooking zone power level selecting
BM3
NO.3 cooking zone power level selecting
BM4
NO.4 cooking zone power level selecting
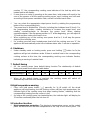
2.2 Display section
Indicator
light
Function
1
NO.1 cookingzone indicating digital tube:display the power
level , high temperature warning symbol etc.
2
NO.2 cookingzone indicating digital tube:display the power
level , high temperature warning symbol etc.
3
NO.3 cookingzone indicating digital tube:display the power
level , high temperature warning symbol etc.
4
NO.4 cookingzone indicating digital tube:display the power

11
level , high temperature warning symbol etc.
Using the ceramic hob
Before first use
IMPORTANT: You should clean the ceramic hob surface (see “Maintenance
and cleaning” section).
✓ You should switch on one cooking zone at a time, for 5 minutes at the maximum
setting. This will help to eliminate any new smell that exists and evaporate any
humidity that has formed on the heating elements during transit.
✓ Do not burn off more than one zone at once.
✓ You must place a saucepan filled half full with cold water on each zone as you
burn it off.
1. Power on
✓ After switch on the appliance, all of the indicator digital tubes on the display screen
will lit on for 2s, then the appliance goes into shutdown mode.
✓ Shutdown status: All the display will close except the indicator light of the heated
cooking zone always on, all of display screen will be off. At this time, only the
power button “ ” can operated by pressing and holding, and other programming
button operations are invalid.
2. Standby mode
✓ Under shutdown status, press and hold “ ” button for 3s, all cooking zone
indicator lights alternately turn on and off . The hob will enter standby mode.
✓ Under standby mode, if no any cooking zone heating operation, the appliance will
go into shutdown status automatically after 10s.
3. Heating control
✓ Under standby mode, you can choose the cooking zone power level by pressing
the programming button. In the process of adjusting the power level, clockwise
rotation can increase the power level from 0 to 15(maximum), and then rotate
back to “0” for a cycle; Counterclockwise rotation can be adjusted from15 to 1
power levels, and then rotate back to “0” for a cycle.
✓ When the hob top is in heating status, press and hold “ ” power button for 3s to
switch off, and stop all the cooking zones to heat. The corresponding cooking zone
indicator of the hob top which has heated before will display high temperature
warning .
✓ Under standby mode, if some hob tops still exist residual heat, corresponding hob
top indicator light will display.
✓ If needing to switch off one of the cooking zones, you can select corresponding
the hob top's programming button to adjust the power level to “0” to switch off that
zone, and will not affect the heating of the other cooking zones. When power level

12
reaches “0”, the corresponding cooking zone indicator of the hob top which has
heated before will display.
✓ If more than one zone is operating at the same time, total power will equal to the
sum of the powers of all the working cooking zones, each cooking zone will work
according to their power modulation ratio, and will not affect each other.
✓ You can select the appropriate output power level by rotating the programming
button of the corresponding hob.
✓ The power level is divided into 16 levels, including the shutdown level (0 level). For
the programming button, rotating clockwise to increase the power level, and
rotating counterclockwise to decrease the power level. When rotating
counterclockwise, if the fire power position is “0” at the beginning, you will adjust to
15 level and then reduce the level in turn.
✓ When switching any of the cooking zone power level to 0, it will stop the power
output of that cooking zone.
✓ If a cooking zone has been heated,power level of all the cooking zone are “0”, the
appliance will automatically enter into shutdown status after 1 minute no operation.
4. Shutdown
✓ Under standby mode or heating mode, press and holding “ ” button for 3s,the
appliance will go into shutdown mode. If there is residual heat in the corresponding
cooking surface at this time, the corresponding cooking zone indicator flashes,
indicating a warning of residual heat.
7. Default timing
✓ All the cooking zones have default timing function.The relationship of default
timing and power level refers to table below:
Power Level
1
2
6
4
5
6
7-15
Default timing(h)
6h
6h
5h
5h
4h
4h
1.5h
✓ When all the default timing is reached, the cooking zones will switch off
automatically and enter into standby mode.
8.High temperature warning
✓ Press and hold power button “ ” manually for 3s till switch off, the whole
appliance will stop heating, but the cooking surface still has high temperature, the
indicator light of the cooking zone that stops heating flashes, indicating that the
corresponding heating furnace surface is hot.
✓ As long as the cooking zone has heated before, the indicator light will display for
35 minutes continually after the hob turn off.
9.Protection function
✓ High temperature protection: The electronic temperature sensor on the control
panel will transmit the real-time temperature to the chip of the control panel. The

13
control sensor starts protection when the electronic temperature sensor gauge the
current temperature is higher than a certain value, to reduce the heating level of
the cooking zone currently, and resumes the heating level after the temperature
drops.
✓ Residual heat protection: When the whole appliance stops heating, the indicator
light of the relative cooking zone will display, indicating that cooking surface
temperature is too high, please do not touch to avoid getting burned.
✓ Safety cut-off protection:For the models with plug,when cut off after 1S at any
time,the voltage between L/N of the plug should fall to below safe voltage range.
10. PCB board fault codes and solutions
When a PCB board failure occurs, the timer digital tubes on the display panel always
display the fault code, and all the burners that are being heated stop heating, and
automatically return to the shutdown state after 1 minute. For the burners that have
been worked, their indicator light continue to display slowly (display 1 time per
second) , indicating that cooking surface temperature is too high. When the fault code
appears, please refer to the scheme in the following table to solve.
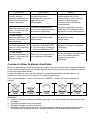
How to use the hot plate
Put the pot in center of the heating zone, Turn the knob clockwise and anticlockwise to
turn on the hob.
Fault code
Type of fault
Solution
All indicator lights
display quickly
(display
0.5s/times)
The display board does not
receive the signal of power
supply board.
The communication line failure
of power supply board or
display board can cause
communication anomalies.
Replace the display board
first. If the fault persists,
replace the power supply
board.
All indicator lights
display quickly
(display
0.5s/times)
The power supply board does
not receive the signal of
display board.
All indicator lights
display quickly
(display
0.5s/times)
Power supply board relay
failure
Replace the power supply
board.
All indicator lights
display quickly
(display
0.5s/times)
1.Open circuit of the display
board NTC.
2.Short circuit of the display
board NTC.
Replace the display board
All indicator lights
display quickly
(display
0.5s/times)
High temperature protection
on the display board.
Replace the Insulated silicone
strip of circuit panel first. If
the fault persists, replace the
display board .

14
High temperature indication lamp:
When the glass plate is too hot, the high temperature indication lamp will light up, don’t
touch the glass plate until the indication lamp goes out.
Shut down:after using,please turn the knob to “OFF”,the hob will stop heating.
Caution!
➢ Ensure the heating plate is clean-a soiled zone does not transfer all of the heat.
➢ Protect the plate against corrosion.
➢ Switch off the plate against corrosion.
➢ Do not leave pans with prepared dishes based on fats and oils unattended on the
switched-on plate; hot fat can spontaneously catch fire.
Hob guidelines
The first few times the hob top is used, it may give off an acrid, burning smell. This
smell will disappear completely with repeated use.
The worktop is fitted with cooking areas of different diameter and power.
The positions where the heat will radiate from are clearly marked on the hob top.
The saucepans must be positioned exactly on these zones for efficient heating to
occur. Pans should have the same diameter as the cooking zone that they are
being used on.
You should not use saucepans with rough bottoms, as this can scratch the
ceramic surface.
Before use, make sure that the bottoms of the saucepans are clean and dry.
When cold, the bottom of the pans should be slightly concave, as they expand
when hot and lie flat on the surface of the hob. This will allow the heat to transfer
more easily.
The best thickness for the bottom of the pans is 2 – 3 mm of enamelled steel and
4 – 6 mm for stainless steel with sandwich type bottoms.
If these rules are not followed, then there will be a great loss of heat and energy.
Heat not absorbed by the saucepan, will spread to the hob, frame and surrounding
cabinets.
Preferably cover pans with a lid to permit cooking at a lower heat.
Always cook vegetables and potatoes, etc. in as little water to reduce cooking
times.
Food or liquid that has high sugar content may damage the hob top if it comes into
contact with the ceramic hob surface. Any spillages should be wiped up
immediately, however this may not prevent the hob surface from becoming
damaged.
IMPORTANT: The ceramic hob surface is tough; however it is not unbreakable
and can be damaged. Especially if pointed or hard objects are allowed to fall on it
with some force.

15
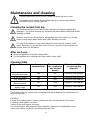
Maintenance and cleaning
Cleaning operations must only be carried out when the hob is cool.
The appliance should be disconnected from your mains supply before
commencing any cleaning process.
Cleaning the ceramic hob top
Any residues that are left on the hob top surface from cleaning agents will
damage it. You should remove any residues with warm water mixed with a little
washing up liquid.
Abrasive cleaners or sharp objects will damage the hob surface; you should
clean it using warm water mixed with a little washing up liquid.
You may find it easier to clean some deposits whilst the hob surface is still
warm. However you should take care not to burn yourself if cleaning the hob
surface when it is still warm.
After each use
◆ Wipe the appliance over with a damp cloth.
◆ Dry the appliance by rubbing the surface with a clean cloth.
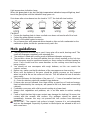
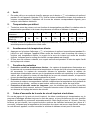
Cleaning table
Type of deposit
Remove
immediately?
Remove when
the appliance
has cooled
down?
What should I use
to remove the
deposit?
Sugar or food/liquid
containing sugar
Yes
No
Ceramic hob scraper
Tin foil or plastic
Yes
No
Ceramic hob scraper
Fat splashes
No
Yes
Ceramic hob cleaner
Metallic
discolouration
No
Yes
Ceramic hob cleaner
Water splashes or
water rings
No
Yes
Ceramic hob cleaner
Important!
The inside of the hob should only be washed with warm water and a small amount of
washing-up liquid.
Caution!
Ensure the heating plate is clean-a soiled zone does not transfer all of the heat.
Protect the hob against corrosion.
Switch off the hob against corrosion.
Do not leave pans with prepared dishes based on fats and oils unattended on the
switched-on plate; hot fat can spontaneously catch fire.

16
IMPORTANT: If your appliance appears not to be operating correctly, Please
contact with dealer.
DO NOT ATTEMPT TO REPAIR THE APPLIANCE YOURSELF.
Please note that if an engineer is asked to attend whilst the product is under guarantee
and finds that the problem is not the result of an appliance fault, then you may be
liable for the cost of the call out charge.
The appliance must be accessible for the engineer to perform any necessary repair. If
your appliance is installed in such a way that an engineer is concerned that damage
will be caused to the appliance or your kitchen, then he will not complete a repair.
Environmental note
Note: Before discarding an old appliance, switch off and disconnect it from
the power supply. Cut off and render any plug useless. Cut the cable off
directly behind the appliance to prevent misuse. This should be undertaken
by a competent person.
This appliance is marked according to the European directive 2002/96/EC on Waste
electrical and Electronic Equipment (WEEE). By ensuring this product is disposed of
correctly, you will help prevent potential negative consequences for the environment
and human health, which could otherwise be caused by inappropriate waste handling
of this product.
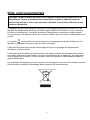
The symbol on the product or on the documents accompanying the product
indicates that this appliance may not be treated as household waste.
Instead it shall be handed over to the applicable collection point for the recycling of
electrical and electronic equipment.
Disposal must be carried out in accordance with local environmental regulations for
waste disposal. For more detailed information about treatment, recovery and recycling
of this product, please contact your local city office or local waste management office.
The packaging materials that we use are environmentally friendly and can be recycled.
Please discard all packaging material with due regard for the environment.

1
Manuel d'utilisation
de la
table de cuisson en céramique

2
Sommaire
Consignes de sécurité ............................................................................................................................... 3
Installation ................................................................................................................................................. 5
Description de la disposition de la surface de la plaque de cuisson vitrocéramique ................................ 10
Utilisation de la plaque de cuisson vitrocéramique ................................................................................... 11
Recommandations relatives à la table de cuisson .................................................................................... 15
Entretien et nettoyage .............................................................................................................................. 15
Note environnementale ............................................................................................................................ 17

3
Consignes de sécurité
Cette notice utilisateur contient des informations importantes, y compris des points de sécurité
et d'installation, qui vous permettront de tirer le meilleur parti de votre appareil. Conservez-le
dans un endroit sûr afin qu'il soit facilement consultable à l'avenir ; pour vous et toute personne
ne connaissant pas le fonctionnement de l'appareil.
Attention!
N'utilisez pas la plaque vitrocéramique
tant que vous n'avez pas lu cette notice
d'utilisation. La plaque de cuisson en
céramique est réservée à un usage
domestique.
L'appareil chauffe pendant l'utilisation.
Veillez à ne pas toucher la surface
chaude.
Gardez toujours les enfants à l'écart de la
plaque vitrocéramique.
Pendant le fonctionnement, un contact
direct avec la plaque de cuisson en
céramique peut causer des brûlures !
Assurez-vous que les petits éléments de
l'équipement ménager, y compris les fils
de connexion, ne touchent pas la plaque
de cuisson, car le matériau isolant de cet
équipement n'est généralement pas
résistant aux températures élevées.
Ne laissez pas la plaque de cuisson en
céramique sans surveillance pendant la
friture. Les huiles et graisses peuvent
prendre feu en raison de la surchauffe ou
de l'ébullition.
N'allumez pas la plaque de cuisson tant
qu'une poêle n'a pas été placée dessus.
Ne pas mettre de casseroles de plus de
25 kg sur la plaque de cuisson.
Ne pas utiliser la plaque céramique en
cas de défaut technique. Toute panne doit
être réparée par une personne agréée et
formée de manière appropriée.
En cas d'incident causé par un défaut
technique, débranchez l'alimentation et
signalez le défaut à réparer au centre de
service.
Les règles et dispositions contenues dans
cette notice d'utilisation doivent être
strictement respectées. Ne permettez pas
à quiconque qui ne connaît pas le
contenu de ce manuel d'instruction de
faire fonctionner la plaque de cuisson en
céramique.
La plaque vitrocéramique ne doit pas être
nettoyée à l'aide d'un équipement de
nettoyage à la vapeur.
IMPORTANT : Les meubles ou
logements adjacents et tous les matériaux
utilisés dans l'installation doivent pouvoir
résister à une température minimale de
95°C supérieure à la température
ambiante de la pièce dans laquelle ils se
trouvent, pendant l'utilisation.
Tout dommage causé par l'installation de
l'appareil en violation de cette limite de
température, ou en plaçant les matériaux
de l'armoire adjacente à moins de 4 mm
de l'appareil, sera à la charge du
propriétaire.
Cet appareil est conforme à l'ensemble de
la législation européenne en vigueur en
matière de sécurité. Nous tenons à
souligner que cette conformité n'élimine
pas le fait que les surfaces de l'appareil
deviendront chaudes pendant l'utilisation
et retiendront la chaleur après le
fonctionnement.
Sécurité des enfants
Nous recommandons vivement
d'empêcher les bébés et les jeunes
enfants d'être près de l'appareil et de ne
pas le toucher à tout moment.
S'il est nécessaire que les jeunes
membres de la famille soient dans la
cuisine, veuillez vous assurer qu'ils sont
maintenus sous surveillance étroite en
tout temps.

4
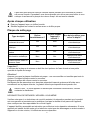
Sécurité générale
L’utilisation de cet appareil est interdite à
toutes les personnes (y compris les
enfants) dont les capacités physiques et
mentales sont réduites, ou qui sont
dépourvues d’expérience dans l’utilisation
d’appareils électriques, à moins qu’elles
ne soient surveillées ou instruites par des
adultes et personnes responsables de
leur sécurité.
Les enfants doivent rester sous
surveillance afin d’être sûrs qu'ils ne
jouent pas avec l'appareil.
N’essayez JAMAIS d’éteindre un feu avec
de l’eau, mais éteignez l’appareil, puis
couvrez la flamme avec un couvercle ou
une couverture anti-feu, par exemple.
AVERTISSEMENT : Risque
d’incendie : ne pas stocker d'objets sur les
surfaces de cuisson.
Des moyens de déconnexion doivent être
incorporés dans le câblage fixe
conformément aux règles de câblage.
Ne laissez pas les raccords ou câbles
électriques entrer en contact avec des
zones chaudes de l'appareil.
Ne pas utiliser l'appareil pour chauffer la
pièce dans laquelle il se trouve ou pour
sécher les vêtements.
N'installez pas l'appareil à côté de rideaux
ou de tissus d'ameublement.
Si le câble d'alimentation est endommagé,
il doit être remplacé par le fabricant, son
agent d'entretien ou des personnes
dotées du même type de qualification, afin
d'éviter tout risque.
L'appareil n'est pas destiné à être utilisé
au moyen d'une minuterie externe ou d'un
système de télécommande séparé.
Le cordon d'alimentation ne peut pas être
accessible après l'installation.
Ce produit peut être utilisé mais pas avec
une minuterie extérieure et une
télécommande.
Avertissement : Si la surface est
fissurée, éteignez l’appareil pour éviter
tout risque d’électrocution, pour les tables
de cuisson en vitrocéramique ou matériau
similaire qui protègent les pièces sous
tension
Attention : les nettoyeurs à vapeur ne
doivent pas être utilisés.
ATTENTION : La cuisson doit être
surveillée. Les cuissons de courte durée
doivent être surveillées en permanence.
AVERTISSEMENT : Faire chauffer
la plaque sans surveillance avec de la
graisse ou de l’huile peut être dangereux
et provoquer un incendie.
Cet appareil doit être connecté à un circuit
qui intègre un interrupteur d'isolement
accessible à l'utilisateur après l'installation
assurant une déconnexion complète de
l'alimentation. La déconnexion peut être
réalisée en incorporant un commutateur
dans le câblage fixe conformément aux
règles de câblage.
Avertissement : Avant d’accéder aux
appareils, tous les circuits d’alimentation
doivent être coupés.
AVERTISSEMENT : Utilisez
uniquement le dispositif de protection de
votre table de cuisson conçu par le
fabricant de votre appareil ou un dispositif
indiqué par celui-ci comme étant
compatible ou bien utilisez le dispositif de
protection fourni avec l’appareil.
L’utilisation d’un dispositif de protection
non approprié peut provoquer des
accidents.
AVERTISSEMENT : L’appareil et
ses parties accessibles chauffent pendant
l’utilisation.
Des précautions doivent être prises pour
éviter de toucher les éléments chauffants.
En ce qui concerne les instructions
d'installation, veuillez vous référer à la
section «Installation».
La page est en cours de chargement...
La page est en cours de chargement...
La page est en cours de chargement...
La page est en cours de chargement...
La page est en cours de chargement...
La page est en cours de chargement...
La page est en cours de chargement...
La page est en cours de chargement...
La page est en cours de chargement...
La page est en cours de chargement...
La page est en cours de chargement...
La page est en cours de chargement...
La page est en cours de chargement...
-
 1
1
-
 2
2
-
 3
3
-
 4
4
-
 5
5
-
 6
6
-
 7
7
-
 8
8
-
 9
9
-
 10
10
-
 11
11
-
 12
12
-
 13
13
-
 14
14
-
 15
15
-
 16
16
-
 17
17
-
 18
18
-
 19
19
-
 20
20
-
 21
21
-
 22
22
-
 23
23
-
 24
24
-
 25
25
-
 26
26
-
 27
27
-
 28
28
-
 29
29
-
 30
30
-
 31
31
-
 32
32
-
 33
33


Candy CHK46C Manuel utilisateur
- Catégorie
- Plaques de cuisson
- Taper
- Manuel utilisateur
dans d''autres langues
- English: Candy CHK46C User manual
Documents connexes
Autres documents
-
ROSIERES RI633DC/G3 Manuel utilisateur
-
Samsung NZ63R3727BK Manuel utilisateur
-
Indesit KN6I66A(W)/FR Mode d'emploi
-
-
-
Whirlpool KN6I66A(W)/FR Le manuel du propriétaire
-
ROSIERES RBI647IN Le manuel du propriétaire
-