
www.swannsecurity.comSwann Communications • Toll Free Technical Support: USA - 1-800-627-2799, Australia - 1300 13 8324 • Email: tech@swannsecurity.com
.com
Easy Setup Guide
DVR8-2500
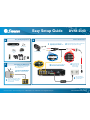
Connecting the DVR to TV
C
Back of
DVR
Back of TV
INPUT
Connect the RCA end of the RCA
to BNC cable to the back of the
TV INPUT socket
1
Connect the BNC plug end of the
cable to the top VIDEO INPUT
socket on the back of the DVR
2
Tune your TV to the correct INPUT -
this is sometimes labelled A/V, input,
source, L1, L2, etc. - consult TV
manual for details
3
B
Camera Connections
Cameras Optional
1
Connect the DC power sockets on the extension
cables to the power splitter’s DC plugs.
2
Connect the power
splitter’s DC socket
to the DC plug on
the power supply.
4
Plug in the DVR and
camera power adapter
to power outlets.
5
Connect the other end of the BNC plug
of the extension cable to the camera
connections on the back of the DVR.
3
Connect the camera cable’s BNC
socket & DC socket to the BNC
plug & DC plug on the extension cable.
A
BNC to RCA Cable
Power Adapter
Cable
Remote
Control
DVR Power
Adapter
DVR8-2500 Unit
SR342-2DE-50010-240809
Easy Set Up Components
Cameras and Accessories Optional

www.swannsecurity.comSwann Communications • Toll Free Technical Support: USA - 1-800-627-2799, Australia - 1300 13 8324 • Email: tech@swannsecurity.com
.com
Guide d’installation rapide
DVR8-2500
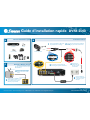
Brancher le DVR sur une TV
C
Vue arrière du DVR
Vue arrière de la TV
INPUT
Connectez l’extrémité RCA du câble
RCA vers BNC à l’arrière de la prise
ENTREE TV
1
Connectez l’extrémité de la prise
BNC du câble à la prise ENTREE
VIDEO située à l’arrière du DVR,
en haut.
2
Réglez votre TV sur l’ENTREE correcte,
parfois appelée A/V, entrée, source, L1,
L2 etc. Consultez le guide de votre
téléviseur pour plus de détails.
3
B
Connexions caméras
Caméras optionnelles
1
Connectez l’autre extrémité de la prise BNC de
la rallonge aux prises caméra situées à l’arrière
du DVR.
2
Branchez la prise
séparateur à la prise
DC située au niveau
de l’alimentation.
4
Branchez le DVR et les
adaptateurs d’alimentations
de la caméra sur prises
électriques.
5
Connectez les prises d’alimentation DC
de la rallonge aux séparateurs d’alimentation.
3
Connectez la prise BNC du câble caméra
à la prise BNC située sur la rallonge.
A
Câble RCA
Adaptateur alimentation
Télécommande
Adaptateur DVR
Unité DVR8-2500
SR342-2DE-50010-240809
Eléments d’installation rapide
Caméras et accessoires optionnels

www.swannsecurity.comSwann Communications • Toll Free Technical Support: USA - 1-800-627-2799, Australia - 1300 13 8324 • Email: tech@swannsecurity.com
.com
Guía de Instalación Fácil
DVR8-2500
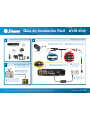
Conectando el DVR a la TV
C
Parte posterior del DVR
INPUT
Parte posterior de la TV
Conecte el extremo RCA del cable
RCA a BNC en la parte posterior de
la toma para ENTRADA de la TV.
1
Conecte el extreme del enchufe
BNC del cable a la toma de
ENTRADA DE VIDEO superior en
la parte posterior del DVR.
2
Sintonice su TV en la ENTRADA
correcta, esta se llama a veces A/V,
input, source, L1, L2, etc., consulte
el manual de la TV por detalles.
3
B
Conexiones de la Cámara
Cámaras Opcionales
1
Conecte las tomas de corriente DC en los cables
de extensión a los enchufes de corriente del divisor
de corriente.
2
Conecte la toma DC
del divisor de corriente
al enchufe DC en la
fuente de energía.
4
Conecte el DVR y el
adaptador de corriente de
la cámara a las tomas de
corriente.
5
Conecte el otro extreme del enchufe BNC del
cable de extensión a las conexiones para cámara
en la parte posterior del DVR.
3
Conecte la toma BNC del cable de la
cámara al enchufe BNC en el cable de
extensión.
A
Cable RCA
Adaptador de Corriente
del DVR
Control Remoto
Cable del Adaptador
de Corriente
Unidad DVR8-2500
SR342-2DE-50020-240809
Instale Fácilmente los Componentes
Cámaras y Accesorios Opcionales

www.swannsecurity.comSwann Communications • Telefon/Kundecenter - Danmark 43 68 20 14 - Sverige 08 517 615 58 • Email: eusupport@swannsecurity.com
.com
Let installationsvejledning
DVR8-2500
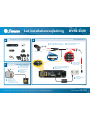
Forbindelse af DVR til tv
C
Bagsiden af DVR
1
2
3
Bagsiden af tv'et
INPUT
Sæt RCA-enden af RCA-
til BNC-kablet i på bagsiden
af tv’et i INPUT-stikket
Sæt kablets BNC-ende
i det øverste
VIDEO INPUT-stik
bag på DVR’et
Indstil tv’et til den
rigtigt indgang – den
markeres ofte som A/V,
input, source, L1, L2, etc.
– se tv-vejledningen for detaljer
Sæt kamerakablets BNC- og DC-stik i
BNC- og DC-stikkene i forlængerkablet.
Sæt forlængerkablets DC-strømstik i
strømfordeleren DC-stik.
Sæt strømfordelerens
DC-stik i DC-stikket
på strømforsyningen.
Sæt DVR’ets og
kameraets strømadapter
i stikkontakter.
Sæt den anden ende af forlængerkablets
BNC-stik ind i kameraets forbindelse på
bagsiden af DVR’et.
b
a
g
s
id
en a
f
DVR’
et
.
B
Kameraforbindelser
Ekstraudstyr til kamera
13
4
5
2
A
RCA-kabel
Strømadapterkabel
Kamera og ekstra tilbehør
Fjernbetjening
DVR-strømadapter
DVR8-2500 enhed
Komponenter der er lette at sætte sammen
E2DE160910D
-
 1
1
-
 2
2
-
 3
3
-
 4
4


dans d''autres langues
- English: Swann DVR8-2500 User manual
- español: Swann DVR8-2500 Manual de usuario
- dansk: Swann DVR8-2500 Brugermanual
Documents connexes
-
Swann DVR4-2500 Manuel utilisateur
-
Swann SW344-DPS Guide d'installation
-
-
Swann DVR4-950 Guide d'installation
-
-
-
-
-
-