© 2009 Sony Corporation Printed in Czech Republic (EU)
4-113-365-31 (1)
Operating instructions
Mode d’emploi
Инструкции за експлоатация
XM-ZZR3301
MONAURAL Power
Amplifier
Моно усилвател
Ръководство на потребителя
e model and serial numbers are located on the bottom of the unit.
Record the serial number in the space provided below.
Моделът и серийният номер се намират от долната страна на устройството.
Запишете серийния номер в празното място по-долу.
Номер на модел XM-ZZR3301 Сериен No.
Dimensions/Dimensions/Размери
Unit: mm (in)
Unité : mm (po)
Устройство: mm
Features
Maximum power output of 1,100 W (at 2 Ω).
Class D Technology*
1
This Power Amplifier is designed to be used with subwoofers
only.
Dynamic Distortion Suppressor*
2
Active Thermal Control*
3
Direct connection can be made with the speaker output of
your car audio unit if it is not equipped with a line output
(High Level Input Connection).
Hi-level Sensing Power On feature allows unit to be
activated without need for REMOTE connection.
Built in variable LPF (Low pass filter), variable subsonic
filter, and low boost circuit.
Protection circuit and indicator provided.
Two speakers terminals for parallel subwoofer connections.
*
1
Class D Technology
The Class D Technology is a method to convert and amplify
music signals with MOSFETs to high speed pulse signals.
Furthermore, it features high efficiency and low heat
generation.
*
2
Dynamic Distortion Suppressor
The Dynamic Distortion Suppressor suppresses distortion
that occurs at higher playback levels for clear bass
reproduction.
*
3
Active Thermal Control
The Active Thermal Control regulates unit operating
temperature for stable, long-term playback at high volume.
Caractéristiques
Puissance de sortie maximale de 1 100 W (à 2 ).
Technologie de classe D*
1
Cet amplificateur de puissance est conçu uniquement pour
un caisson de graves.
Suppresseur de distorsion dynamique*
2
Contrôle thermique actif*
3
Une connexion directe est possible avec la sortie haut-
parleur de votre autoradio si celui-ci n’est pas équipé d’une
sortie de ligne (connexion d’entrée haut niveau).
Une fonction de mise sous tension par détection de haut
niveau permet à cet appareil d’être activé sans raccordement
à REMOTE.
LPF (Filtre passe-bas) intégré et filtre subsonique intégré et
circuit à faible amplification.
Avec circuit et indicateur de protection.
Deux bornes de haut-parleurs permettent les raccordements
d’un caisson de graves en parallèle.
*
1
Technologie de classe D
La technologie de classe D est une méthode permettant de
convertir et d’amplifier des signaux musicaux grâce à des
MOSFET pour obtenir des signaux par impulsion à grande
vitesse. De plus, il appartient à la génération d’appareils
alliant efficacité de haut niveau et un faible dégagement de
chaleur.
*
2
Suppresseur de distorsion dynamique
Le suppresseur de distorsion dynamique supprime la
distorsion qui se produit avec des niveaux de lecture
supérieurs afin d’obtenir une reproduction claire des sons
graves.
*
3
Contrôle thermique actif
Le contrôle thermique actif régule la température de
fonctionnement de l’appareil afin de garantir une lecture
stable sur de longues durées avec un volume élevé.
Характеристики
Максимално изходно захранване от 1,100 W (при 2 ома).
Технология от клас D*1
Този усилвател е проектиран за използване само със
субуфери.
Динамично потискане на смущенията *2
Активен термален контрол*3
Директна връзка може да бъде извършена с изходите на
говорителите на вашата автомобилна аудио система
само, ако тя не притежава линеен изход (Входна връзка
от високо ниво).
Функцията за включване на захранването позволява
активиране на устройството без да се налага
използването на REMOTE връзка.
Вграден променлив LPF (нискочестотен филтър),
променлив нискоскоростен филтър и верига със слабо
усилване.
Снабден със защитна верига и индикатор.
Два терминала за говорители за паралелна връзка на
субуфера.
*
1
Технология от клас D
Технологията от клас D е начин за преобразуване и
усилване на музикални сигнали чрез MOSFET до
високоскоростни пулсови сигнали. Технологията е
високо ефикасна и почти не генерира топлина.
*
2
Динамично потискане на смущенията
Функцията потиска смущенията, които се получават
при по-високи нива на възпроизвеждане, за да се получи
по-ясен бас звук.
*
3
Активен термален контрол
Активният термален контрол регулира работната
температура за стабилно и дълго възпроизвеждане с
висока сила на звука.
Packaging cushions are made from paper.
Halogenated flame retardants are not used in cabinets.
Halogenated flame retardants are not used in printed wiring
boards.
Specifications
AUDIO POWER SPECIFICATIONS
POWER OUTPUT AND TOTAL HARMONIC DISTORTION
330 watts minimum continuous average power into 4 ohms, 20 Hz to 200 Hz with no more than 1.0% total
harmonic distortion per Car Audio Ad Hoc Committee standards.
Other Specifications
Технически характеристики
ТЕХНИЧЕСКИ ХАРАКТЕРИСТИКИ НА АУДИО ЗАХРАНВАНЕТО
МОЩНОСТ И ОБЩИ ХАРМОНИЧНИ ИЗКРИВЯВАНИЯ
Минимум 330 вата продължителна средна мощност в 4 ома, 20 Hz до 200 Hz с не повече от 1.0%
хармонични изкривявания според стандартите на Car Audio Ad Hoc Committee.
Други технически характеристики
Circuit system Class D Technology
Pulse power supply
Inputs RCA pin jacks
High level input connector
Outputs Speaker terminals
Through out pin jacks
Suitable speaker impedance
2 – 8 Ω
Maximum outputs 1,100 W (at 2 Ω)
600 W (at 4 Ω)
Rated outputs (supply voltage at 14.4 V)
600 W RMS (50 Hz 1.0 % THD + N,
at 2 Ω)
330 W RMS (20 Hz – 200 Hz, 1.0 %
THD + N, at 4 Ω)
SN Ratio 65 dBA (Reference 1 W into 4 Ω)
Frequency response 10 – 300 Hz (
dB)
Harmonic distortion 0.1 % or less (at 50 Hz, 4 Ω)
Input level adjustment range
0.3 – 6.0 V (RCA pin jacks)
6.5 – 16.0 V (High level input)
Subsonic filter 6 – 70 Hz, 12 dB/oct
Low pass filter 50 – 300 Hz, 12 dB/oct
Low boost 0 – 10 dB (40 Hz)
Power requirements 12 V DC car battery
(negative ground)
Power supply voltage 10.5 – 16 V
Current drain at rated output: 60 A (at 2 Ω)
Remote input: 1 mA
Dimensions Approx. 356.8 × 55 × 276.8 mm
(14
1
/
8
× 2
1
/
4
× 11 in)
(w/h/d) not incl. projecting parts and
controls
Mass Approx. 2.9 kg (6 lb 7 oz) not incl.
accessories
Supplied accessories Mounting screws (4)
High level input cord (1)
Protection cap (1)
Design and specifications are subject to change without notice.
CEA2006 Standard
Power Output: 330 Watts RMS at 4 Ohms < 1 % THD+N
SN Ratio: 65 dBA (reference: 1 Watt into 4 Ohms)
Верижна система Технология от клас D
Пулсово захранване
Входове Жак с RCA пинове
Входен конектор от високо ниво
Изходи Терминали за говорителите
Жакове за извеждане
Подходящ импеданс на говорителите
2 - 8 Ω
Максимална мощност 1100 W (при 2 ома)
600 W (при 4 ома)
Измерена мощност (захранващо напрежение 14.4 V)
600 W RMS (50 Hz 1.0% THD + N,
при 2 Ω)
330 W RMS (20 Hz – 200 Hz 1.0%
THD +N, при 4Ω)
SN съотношение 65 dBA (справка 1 W при 4 ома)
Честотен отговор 10 – 300 Hz (
dB)
Хармонични изкривявания
0.1 % или по-малко (при 50 Hz, 4 Ω)
Обхват за настройка на входящото ниво
0.3 – 6.0 V (жакове с RCA пинове)
6.5 – 16.0 V (вход от високо ниво)
Ниско-скоростен филтър
6 – 70 Hz, 12 dB/oct
Нискочестотен филтър 50 – 300 Hz, 12 dB/oct
Усилване на ниските честоти
0 – 10 dB (40 Hz)
Изисквания към захранването
12 V DC автомобилен акумулатор
(отрицателно заземяване)
Захранващ волтаж 10.5 – 16 V
Разход на електроенергия
при измерен изход: 60 А (при 2 Ω)
Дистанционен вход: 1 mA
Размери Прибл. 356.8 х 55 х 276.8 mm
(ш/в/д) без издадените части и
бутоните
Тегло Прибл. 2.9 kg без допълнителните
аксесоари
Приложени аксесоари Винтове за инсталиране (4)
Кабел за въвеждане на сигнал (1)
Защитно капаче (1)
Дизайнът и техническите характеристики са обект на
промяна без предупреждение.
Spécifications
Circuiterie Technologie de classe D
Alimentation par impulsions
Entrées Prises à broches RCA
Connecteur d’entrée haut niveau
Sorties Bornes de haut-parleurs
Prises à broches à sortie directe
Impédance appropriée pour les enceintes
2 – 8 Ω
Sorties maximales 1 100 W (à 2 Ω)
600 W (à 4 Ω)
Sorties nominales (tension d’alimentation à 14,4 V)
600 W RMS (50 Hz, 1,0 % THD + N,
à 2 Ω)
330 W RMS (20 Hz – 200 Hz, 1,0 %
THD + N, à 4 Ω)
Rapport S/B 65 dBA (référence 1 W dans 4 )
Réponse en fréquence 10 – 300 Hz (
dB)
Distorsion harmonique 0,1 % ou inférieure (à 50 Hz, 4 )
Plage de réglage du niveau d’entrée
0,3 – 6,0 V (prises à broches RCA)
6,5 – 16,0 V (entrée haut niveau)
Filtre subsonique 6 – 70 Hz, 12 dB/oct
Filtre passe-bas 50 – 300 Hz, 12 dB/oct
Amplification de basses fréquences
0 – 10 dB (40 Hz)
Alimentation Batterie de voiture, courant continu
12 V (masse négative)
Tension d’alimentation 10,5 – 16 V
Courant À la sortie nominale : 60 A (à 2 )
Entrée de télécommande : 1 mA
Dimensions Environ 356,8 × 55 × 276,8 mm
(14
1
/
8
× 2
1
/
4
× 11 po) (l/h/p) parties
saillantes et commandes non
comprises
Poids Environ 2,9 kg (6 lb 7 oz) sans les
accessoires
Accessoires fournis Vis de montage (4)
Cordon d’entrée haut niveau (1)
Cache de protection (1)
La conception et les spécifications sont sujettes à modification
sans préavis.
Du papier est utilisé pour les cales d’emballage.
Aucun retardateur de flamme halogéné n’est utilisé dans la composition des coques.
Aucun retardateur de flamme halogéné n’est utilisé dans la composition des circuits imprimés.
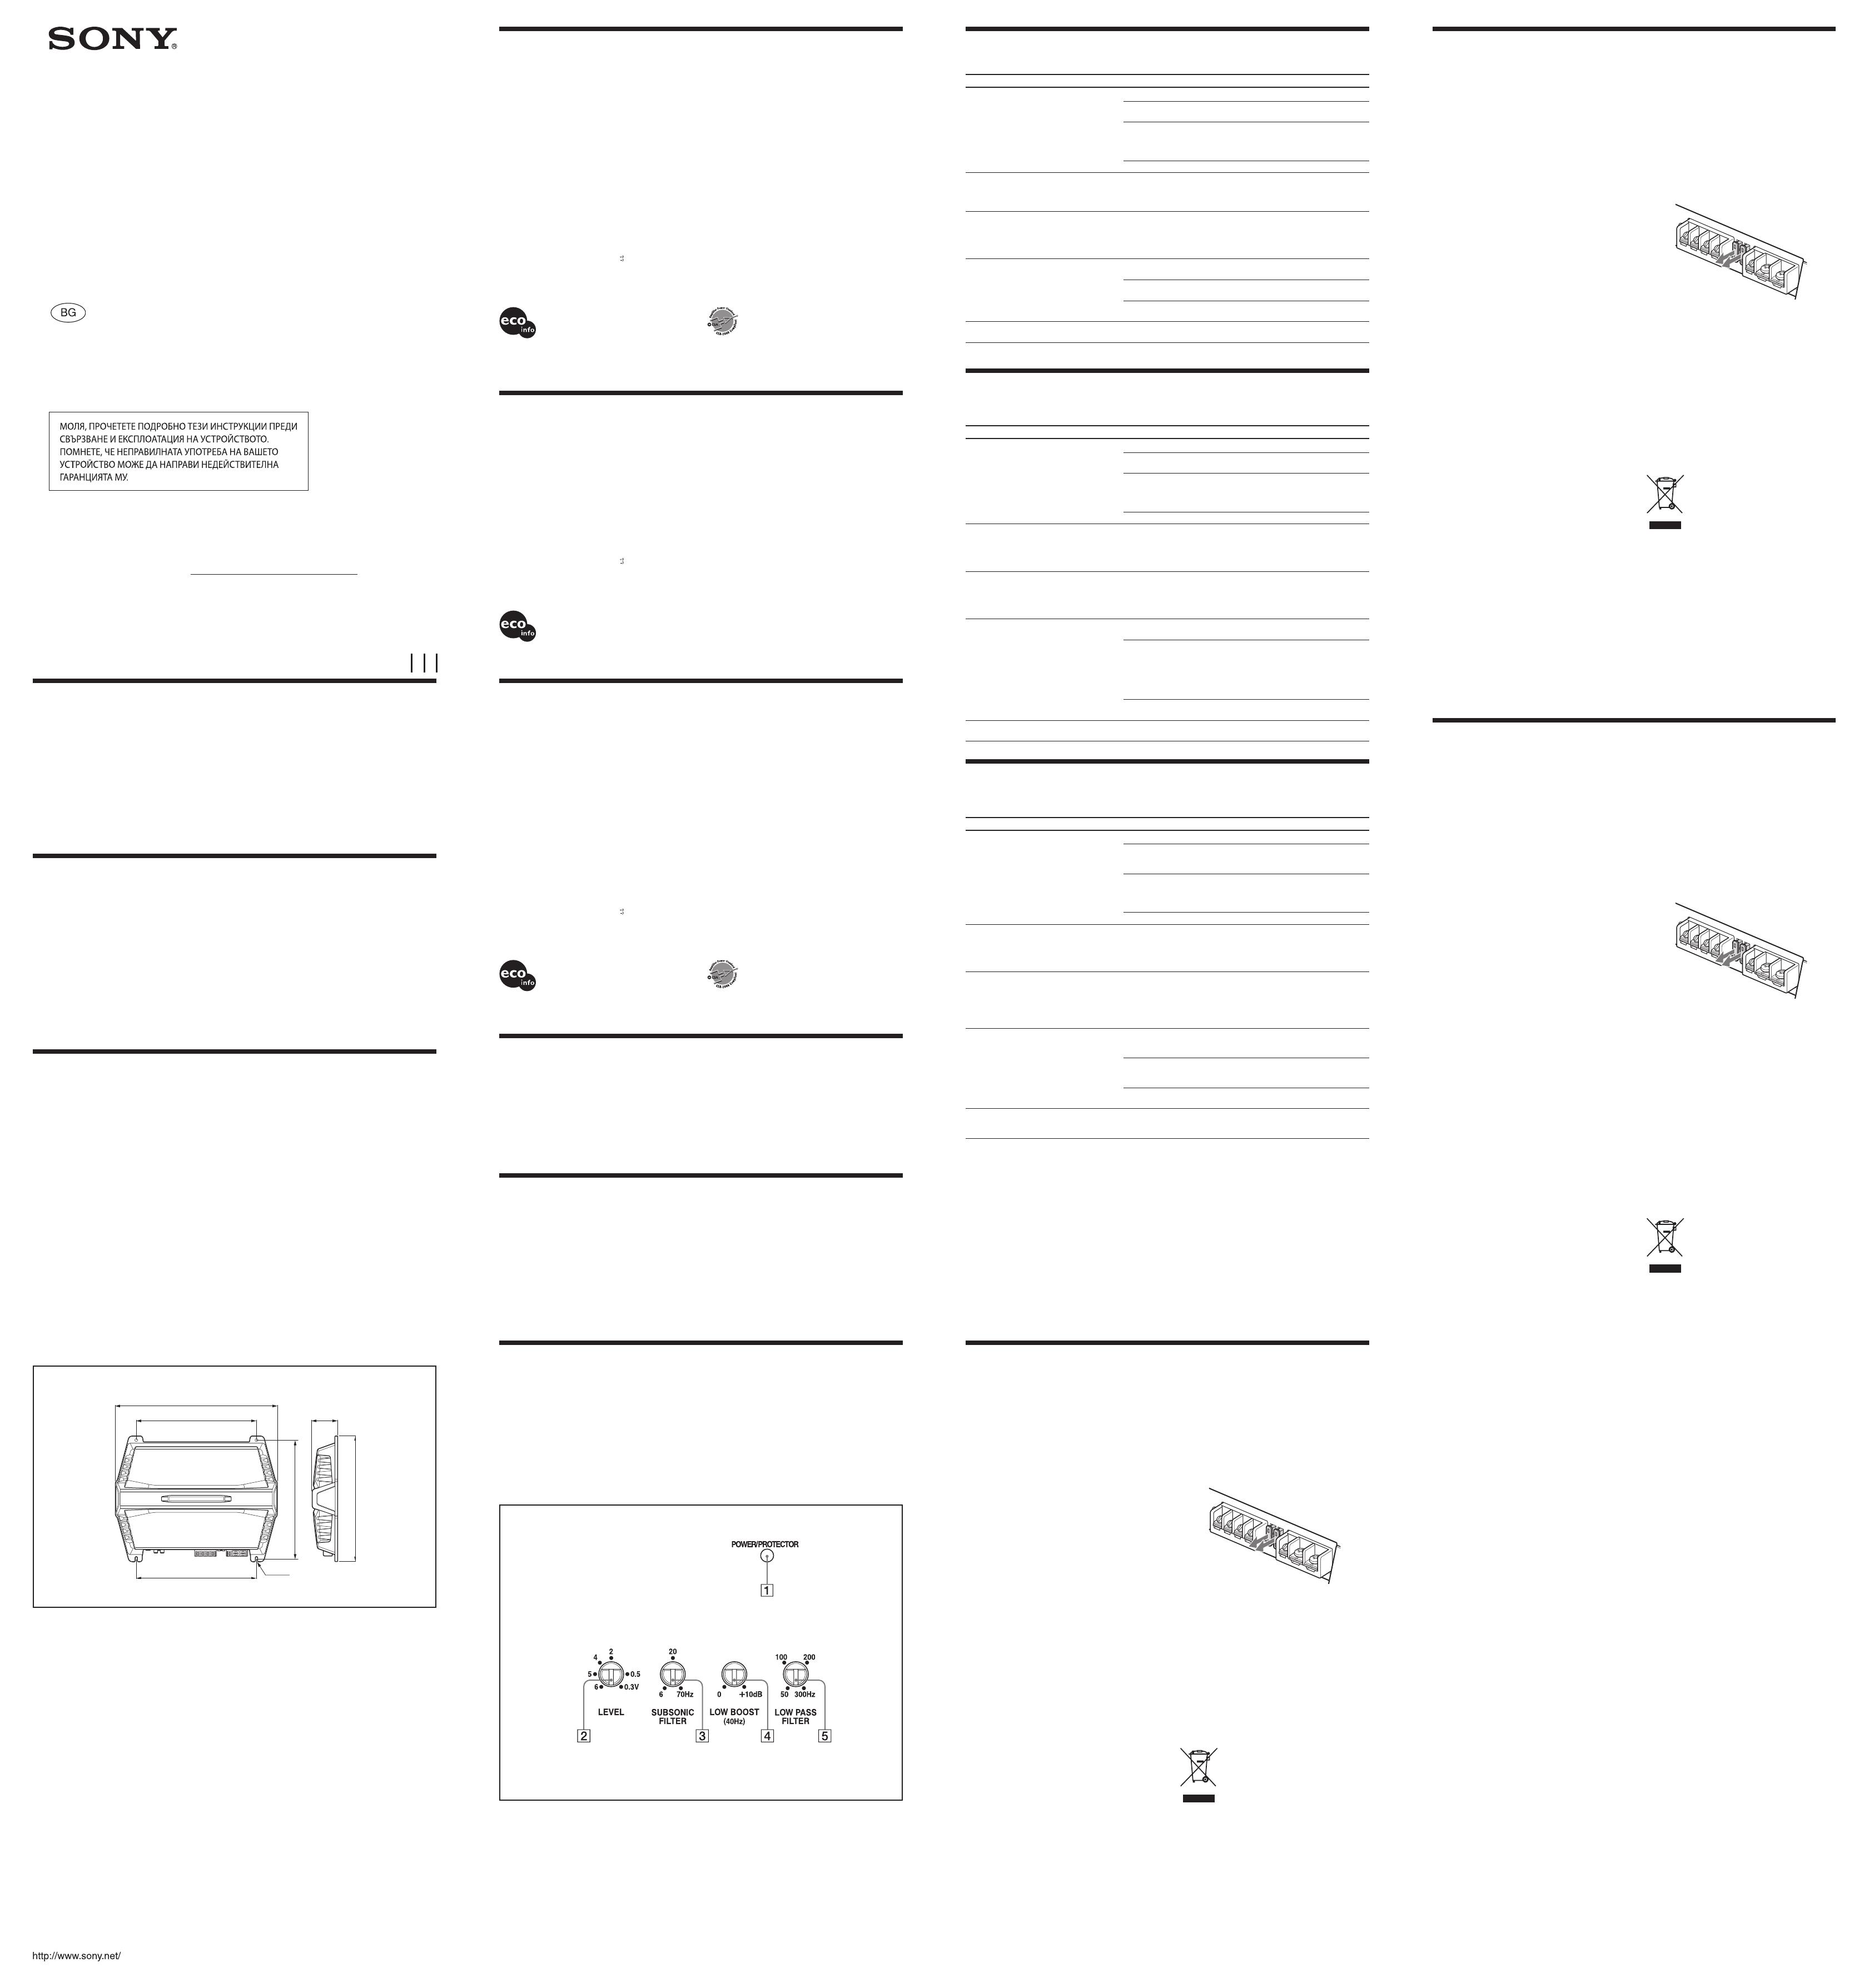
Location and Function of Controls
POWER/PROTECTOR indicator
Lights up in green during operation.
When the PROTECTOR is activated the indicator will
change from green to red.
When the PROTECTOR is activated refer to the
Troubleshooting Guide.
LEVEL adjustment control
The input level can be adjusted with this control. Turn it
in the clockwise direction when the output level of the car
audio unit seems low.
SUBSONIC FILTER Frequency adjustment
control
Sets the cut-off frequency (6 – 70 Hz) for the subsonic
filter.
LOW BOOST level control
Turn this control to boost the frequencies around 40 Hz
to a maximum of 10 dB.
LOW PASS FILTER Cut-off Frequency
adjustment control
Sets the cut-off frequency (50 – 300 Hz) for the low pass
filters.
Местоположение и функции на бутоните
Индикатор POWER/PROTECTOR
Светва в зелено по време на операция. Когато
PROTECTOR е включен, индикаторът ще промени
цвета си от зелен в червен.
Когато PROTECTOR е включен, вижте ръководството
за отстраняване на проблеми.
Контролен бутон за LEVEL настройка
С този бутон може да се регулира входното ниво.
Завъртете го по посока на часовниковата стрелка,
когато изходното ниво на автомобилната аудио
система изглежда ниско.
Бутон за регулиране на честотата SUBSONIC
FILTER
Задайте крайните честоти (6 – 70 Hz) за ниско-
скоростния филтър.
Бутон за LOW BOOST ниво
Завъртете този бутон, за да увеличите честотите
около 40 Hz до максималните 10 dB.
Бутон за регулиране на крайните честоти
LOW PASS FILTER
Задава крайните честоти (50 – 300 Hz) за
нискочестотните филтри.
Emplacement et fonction des commandes
Indicateur POWER/PROTECTOR
S’allume en vert en cours de fonctionnement.
Lorsque PROTECTOR est activé, l’indicateur passe du
vert au rouge.
Lorsque PROTECTOR est activé, reportez-vous au Guide
de dépannage.
Commande de réglage LEVEL
Le niveau d’entrée peut se régler avec cette commande.
Tournez cette commande dans le sens des aiguilles d’une
montre lorsque le niveau de sortie de l’autoradio semble
faible.
Commande de réglage de la fréquence du
SUBSONIC FILTER
Règle la fréquence de coupure (6 – 70 Hz) pour le filtre
subsonique.
Commande de niveau LOW BOOST
Tournez cette commande pour amplifier les fréquences
autour de 40 Hz à un maximum de 10 dB.
Commandes de réglage de la fréquence de
coupure du LOW PASS FILTER
Règle la fréquence de coupure (50 – 300 Hz) pour les
filtres passe-bas.
Troubleshooting Guide
The following checklist will assist in the correction of most problems which you may encounter with your unit.
Before going through the checklist below, refer to the connection and operating procedures.
Problem Cause/Solution
The POWER/PROTECTOR indicator or
illumination does not light up.
The fuse is blown. Replace both the fuses with a new one.
The ground wire is not securely connected.
Fasten the ground wire securely to a metal point of the car.
The voltage going into the remote terminal is too low.
The connected car audio unit is not turned on.
Turn on the car audio unit.
The system employs too many amplifiers. Use a relay.
Check the battery voltage (10.5 – 16 V).
The POWER/PROTECTOR indicator will
change from green to red.
Turn off the power switch. The speaker outputs are shorted.
Rectify the cause of the short.
Turn off the power switch. Make sure the speaker cord and ground wire are
securely connected.
The unit becomes abnormally hot.
The unit heats up abnormally.
Use speakers with suitable impedance.
2 – 8 Ω
Make sure to place the unit in a well ventilated location.
The thermal protector is activated. Reduce the volume.
The sound is interrupted.
Alternator noise is heard.
The power connecting wires are installed too close to the RCA pin cords.
Keep the power connecting wires away from the RCA pin cords.
The ground wire is not securely connected.
Fasten the ground wire securely to a metal point of the car.
Negative speaker wire is touching the car chassis.
Keep the wire away from the car chassis.
The sound is too low.
The LEVEL adjustment control is not appropriate. Turn the LEVEL adjustment
control in the clockwise direction.
Ръководство за отстраняване на проблеми
Следният списък ще ви помогне да се справите с повечето проблеми, с които може да се сблъскате, докато
работите с устройството.
Преди да прегледате списъка по-долу се обърнете към процедурите по свързване и работа.
Проблем Причина/Начин на отстраняване
Индикаторът POWER/PROTECTOR или
лампичката не светват.
Бушонът е изгорял. Сменете и двата бушона с нови.
Заземяващият кабел не е здраво свързан.
Свържете заземяващия кабел здраво към метална повърхност в
автомобила.
Волтажът към терминала за дистанционно управление е твърде нисък.
Свързаната аудио система на автомобила не е включена.
Включете аудио системата на автомобила.
Системата използва твърде много усилватели. Използвайте реле.
Проверете волтажа на батерията (10,5 – 16 V).
Индикаторът POWER/PROTECTOR ще
промени цвета си от зелен в червен.
Изключете ключа на захранването. Изходите на говорителя са дали на
късо.
Коригирайте причината за окъсяването.
Изключете захранващия ключ. Уверете се, че кабелът на говорителя и
заземяващият кабел са здраво свързани.
Устройството се нагорещява твърде
много.
Устройството се нагорещява твърде много.
Използвайте говорители с подходящ импеданс.
2 – 8 ома
Уверете се, че сте поставили устройството на място с добра
вентилация.
Термалната защита се е включила. Намалете силата на звука.
Звукът прекъсва.
Чува се шум от алтернатора.
Свързващите захранващи кабели са инсталирани твърде близо до
кабелите с RCA пинове.
Отдалечете свързващите кабели от кабелите с RCA пинове.
Заземяващият кабел не е здраво свързан.
Свържете заземяващия кабел здраво към метална повърхност в
автомобила.
Отрицателният кабел на говорителя се докосва до купето на автомобила.
Отдалечете кабела от купето на автомобила.
Звукът е твърде слаб.
Бутонът за настройка на нивото LEVEL не е зададен в подходяща
настройка. Завъртете бутона за настройка на нивото LEVEL по посока на
часовниковата стрелка.
Guide de dépannage
La liste suivante vous permettra de remédier à la plupart des problèmes que vous pourriez rencontrer dans le
cadre de l’utilisation de votre appareil.
Avant de passer en revue la liste ci-dessous, vérifiez les procédures de raccordement et d’utilisation.
Problème Cause/Solution
L’indicateur POWER/PROTECTOR ou
l’éclairage ne s’allume pas.
Le fusible est grillé. Remplacez les deux fusibles par des neufs.
Le fil de terre n’est pas connecté correctement.
Fixez correctement le fil de terre à un point métallique de la voiture.
La tension entrant sur la borne de commande à distance est trop faible.
L’autoradio raccordé n’est pas sous tension.
Mettez l’autoradio sous tension.
Le système utilise trop d’amplificateurs. Utilisez un relais.
Vérifiez la tension de la batterie (10,5 – 16 V).
L’indicateur POWER/PROTECTOR passe du
vert au rouge.
Coupez l’interrupteur d’alimentation. Les sorties de haut-parleur sont
court-circuitées.
Remédiez à la cause du court-circuit.
Coupez l’interrupteur d’alimentation. Assurez-vous que le cordon de
haut-parleur et le câble de masse sont correctement branchés.
L’appareil chauffe de façon anormale.
L’appareil chauffe anormalement.
Utilisez des haut-parleurs d’une impédance appropriée.
2 – 8 Ω
Installez l’appareil dans un endroit bien aéré.
Le protecteur thermique est activé. Réduisez le volume.
Le son est interrompu.
L’alternateur émet un bruit.
Les câbles d’alimentation sont installés trop près des câbles à broches RCA.
Éloignez les câbles d’alimentation des câbles à broches RCA.
Le fil de terre n’est pas connecté correctement.
Fixez correctement le fil de terre à un point métallique de la voiture.
Les fils négatifs des haut-parleurs touchent la carrosserie de la voiture.
Éloignez les fils de la carrosserie de la voiture.
Le son est trop faible.
La commande de réglage LEVEL est mal réglée. Tournez la commande de
réglage LEVEL dans le sens des aiguilles d’une montre.
Fuse Replacement
If the fuse blows, check the power connection and
replace both the fuses. If the fuse blows again after
replacement, there may be an internal malfunction.
In such a case, consult your nearest Sony dealer.
Warning
When replacing the fuse, be sure to use one matching
the amperage stated above the fuse holder. Never use
a fuse with an amperage rating exceeding the one
supplied with the unit as this could damage the unit.
* Protection circuit
This amplifier is provided with a protection circuit that
operates in the following cases:
− when the unit is overheated
− when a DC current is generated
− when the speaker terminals are short-circuited
The color of the POWER/PROTECTOR indicator will change
from green to red, and the unit will shut down.
If this happens, turn off the connected equipment, take out
the cassette tape or disc, and determine the cause of the
malfunction. If the amplifier has overheated, wait until the
unit cools down before use.
If you have any questions or problems concerning
your unit that are not covered in this manual, please
consult your nearest Sony dealer.
Disposal of Old Electrical & Electronic
Equipment (Applicable in the
European Union and other European
countries with separate collection
systems)
This symbol on the product or on its packaging indicates
that this product shall not be treated as household waste.
Instead it shall be handed over to the applicable collection
point for the recycling of electrical and electronic
equipment. By ensuring this product is disposed of
correctly, you will help prevent potential negative
consequences for the environment and human health,
which could otherwise be caused by inappropriate waste
handling of this product. The recycling of materials will
help to conserve natural resources. For more detailed
information about recycling of this product, please
contact your local Civic Office, your household waste
disposal service or the shop where you purchased the
product.
Precautions
This unit is designed for negative ground 12 V DC
operation only.
Use speakers with suitable impedance.
− 2 – 8 Ω
Do not connect any active speakers (with built-in
amplifiers) to the speaker terminals of the unit.
Doing so may damage the amplifier and active
speakers.
Avoid installing the unit in areas subject to:
− high temperatures such as from direct sunlight
or hot air from the heater
− rain or moisture
− dust or dirt
If your car is parked in direct sunlight and there is
a considerable rise in temperature inside the car,
allow the unit to cool down before use.
When installing the unit horizontally, be sure not
to cover the fins with the floor carpet etc.
If this unit is placed too close to the car audio unit
or antenna, interference may occur. In this case,
relocate the amplifier away from the car audio unit
or antenna.
If no power is being supplied to the car audio unit,
check the connections.
This power amplifier employs a protection circuit*
to protect the transistors and speakers if the
amplifier malfunctions. Do not attempt to test the
protection circuits by covering the heat sink or
connecting improper loads.
Do not use the unit on a weak battery as its
optimum performance depends on a good power
supply.
For safety reasons, keep your car audio unit volume
moderate so that you can still hear sounds outside
your car.
Notice for customers: the following
information is only applicable to
equipment sold in countries applying EU
directives
The manufacturer of this product is Sony Corporation, 1-7-1
Konan, Minato-ku, Tokyo, Japan. The Authorized
Representative for EMC and product safety is Sony
Deutschland GmbH, Hedelfinger Strasse 61, 70327 Stuttgart,
Germany. For any service or guarantee matters please refer to
the addresses given in separate service or guarantee documents.
ø 6 (
1
/
4
)
260 (10
1
/
4
)
356.8 (14
1
/
8
)
266 (10
1
/
2
)
55
(2
1
/
4
)
266 (10
1
/
2
)
276.8 (11)
Remplacement du fusible
Si le fusible grille, vérifiez le branchement de
l’alimentation et remplacez les deux fusibles. Si le
fusible grille de nouveau après avoir été remplacé,
il est possible qu’il y ait un dysfonctionnement
interne. Dans ce cas, adressez-vous à votre détaillant
Sony le plus proche.
Avertissement
Lors du remplacement du fusible, veillez à respecter
l’ampérage indiqué au-dessus du logement du fusible.
N’utilisez jamais un fusible d’ampérage supérieur à
celui fourni avec l’appareil, car cela pourrait
endommager l’appareil.
* Circuit de protection
Cet amplificateur est équipé d’un circuit de protection qui
s’active dans les cas suivants :
− en cas de surchauffe de l’appareil,
− en cas de génération d’un courant continu,
− lorsque les bornes de haut-parleurs sont courtcircuitées.
L’indicateur POWER/PROTECTOR s’allume en rouge et
l’appareil s’arrête.
Dans ce cas, éteignez tout équipement raccordé, retirez la
cassette ou le disque et déterminez la cause du problème
de fonctionnement. Si l’amplificateur a surchauffé,
attendez que l’appareil refroidisse avant de le réutiliser.
Si vous avez des questions ou des problèmes
concernant votre appareil qui ne sont pas abordés
dans ce mode d’emploi, adressez-vous à votre
détaillant Sony le plus proche.
Traitement des appareils électriques
et électroniques en fin de vie
(Applicable dans les pays de l’Union
Européenne et aux autres pays
européens disposant de systèmes de
collecte sélective)
Ce symbole, apposé sur le produit ou sur son
emballage, indique que ce produit ne doit pas être
traité avec les déchets ménagers. Il doit être remis à
un point de collecte approprié pour le recyclage des
équipements électriques et électroniques. En
s’assurant que ce produit est bien mis au rebut de
manière appropriée, vous aiderez à prévenir les
conséquences négatives potentielles pour
l’environnement et la santé humaine. Le recyclage des
matériaux aidera à préserver les ressources
naturelles. Pour toute information supplémentaire au
Précautions
Cet appareil est conçu uniquement pour fonctionner
sur un courant continu 12 V à masse négative.
Utilisez des haut-parleurs d’une impédance
appropriée.
− 2 – 8
Ne raccordez pas de haut-parleurs actifs (avec
amplificateurs intégrés) aux bornes de haut-parleurs
de cet appareil. Cela risquerait en effet d’endommager
l’amplificateur et les haut-parleurs actifs.
N’installez pas l’appareil dans des endroits exposés à :
− des températures élevées, par exemple soumis au
rayonnement direct du soleil ou près d’un
conduit de chauffage,
− la pluie ou à l’humidité,
− de la poussière ou à des saletés.
Si votre voiture est garée en plein soleil et que la
température à l’intérieur de l’habitacle a
considérablement augmenté, laissez refroidir l’appareil
avant de l’utiliser.
Lorsque vous installez l’appareil à l’horizontale, veillez
à ne pas recouvrir la grille d’aération avec le tapis, etc.
Si cet appareil est placé trop près de l’autoradio ou de
l’antenne, il se peut que des interférences se
produisent. Dans ce cas, éloignez l’amplificateur de
l’autoradio ou de l’antenne.
Si l’autoradio n’est pas alimenté, vérifiez les
connexions.
Cet amplificateur de puissance utilise un circuit de
protection* visant à protéger les transistors et les haut-
parleurs en cas de problème de fonctionnement de
l’amplificateur. Ne tentez pas de tester les circuits de
protection en couvrant l’accumulateur de chaleur ou
en branchant des charges inadéquates.
N’utilisez pas cet appareil avec une batterie faible car
les performances optimales de l’appareil dépendent
d’une bonne alimentation électrique.
Pour des raisons de sécurité, gardez le volume de votre
installation audio de voiture à un niveau permettant la
perception des bruits extérieurs.
Avis à l’intention des clients : les
informations suivantes s’appliquent
uniquement aux appareils vendus
dans des pays qui appliquent les
directives de l’Union Européenne
Le fabriquant de ce produit est Sony Corporation, 1-7-1
Konan, Minatoku, Tokyo, Japon. Le représentant agréé en
matière de normes CEM et de sécurité des produits est
Sony Deutschland GmbH, Hedelfinger Strasse 61, 70327
Stuttgart, Allemagne. Pour toute demande d’entretien ou
de garantie, veuillez écrire aux adresses spécifiées dans les
documents d’entretien ou de garantie séparés.
Смяна на бушона
Ако бушонът изгори, проверете връзките на
захранването и сменете и двата бушона. Ако
бушонът отново изгори дори след като сте го
сменили, възможно е във вътрешността на
устройството да се е получила повреда. В този
случай се консултирайте с най-близкия сервиз на
Sony.
Предупреждение
Когато сменяте бушона, уверете се, че използвате
бушон, който отговаря на ампреажа, указан на
оригиналния бушон. Никога не използвайте бушон с
ампераж, по-голям от този на приложения бушон,
защото това може да повреди устройството.
* Защитна верига
Този усилвател притежава защитна верига, която
сработва в следните случаи:
− когато устройството прегрее.
− когато се генерира променлив ток.
− когато терминалите на високоговорителите
окъсят.
Цветът на индикатора POWER/PROTECTOR ще се
промени от зелен в червен и устройството ще
изключи.
Ако това се случи, изключете свързаното
оборудване, извадете касетата или диска и
определете причината за повредата. Ако
усилвателят е прегрял, изчакайте, докато
устройството се охлади преди отново да го
използвате.
Ако имате въпроси или проблеми, свързани с
устройството, които това ръководство не
покрива, консултирайте се с най-близкия сервиз
на Sony.
Изхвърляне на стари електрически
и електронни уреди (Приложимо
за страните от Европейския съюз и
други европейски страни,
използващи система за разделно
събиране на отпадъци)
Този символ на устройството или на
неговата опаковка показва, че този продукт не
трябва да се третира като домашен отпадък.
Вместо това, той трябва да бъде предаден в
Предпазни мерки
Това устройство е проектирано за работа само с
отрицателно заземяване 12 V DC.
Използвайте говорители с подходящ импеданс
− 2 до 8 ома.
Не свързвайте активни говорители (с вграден
усилвател) към терминалите за говорителите на
устройството. Ако го направите, това може да
повреди усилвателя и активните говорители.
Избягвайте инсталирането на устройството на
места, изложени на:
− високи температури, като например
директна слънчева светлина или гореща
въздушна струя от климатик
− дъжд или влага
− прах или мръсотия
Ако вашият автомобил е паркиран на директна
слънчева светлина и ако температурата във
вътрешността на автомобила значително се
повиши, оставете устройството да се охлади
преди да започнете работа с него.
Когато инсталирате устройството
хоризонтално, уверете се че не сте покрили
ребрата с подовата настилка и др.
Ако устройството бъде поставено в близост до
автомобилна аудио система или антена,
възможно е да се получат смущения. В този
случай поставете усилвателя на разстояние от
аудио системата или антената.
Ако към автомобилната аудио система не
достига захранване, проверете връзките.
Този усилвател притежава защитна верига*,
която защитава транзисторите и
високоговорителите в случай на повреда на
усилвателя. Не се опитвайте да тествате
защитната верига, като покривате
вентилационните отвори или като свързвате
устройства с неправилни заряди.
Не използвайте това устройство със слабо
захранване, защото оптималната му работа
зависи от доброто захранване.
За ваша безопасност поддържайте нивото на
силата на звука на автомобилната аудио
система в средно ниво, така че да чувате
звуците около вас и автомобила.
Забележка за потребители от
страните, които попадат под
директивите на Европейския съюз
Производителят на този продукт е Sony
Corporation, 1-7-1 Konan, Minato-ku, Токио,
Япония. Оторизираният представител а ЕМС и
безопасност на продукта е Sony Германия GmbH,
Hedelfinger Strasse 61, 70327 Щутгарт, Германия.
Относно сервизирането и при проблеми с
гаранцията, моля, обръщайте се към адресите,
които са указани в отделните сервизни книжни и
гаранционни карти.
sujet du recyclage de ce produit, vous pouvez
contacter votre municipalité, votre déchetterie ou le
magasin où vous avez acheté le produit.
съответните пунктове за рециклиране на
електрически и електронни уреди. Изхвърляйки
този продукт на правилното място, вие
предотвратявате потенциални негативни
последици за околната среда и човешкото здраве,
които в противен случай, при неправилното
изхвърляне на продукта, могат да се случат.
Рециклирането на материалите ще помогне за
запазването на естествените ресурси. За
по-подробна информация относно
рециклирането на този продукт, моля, свържете
се с общинската служба във вашия град, със
службата за изхвърляне на отпадъци или с
магазина, от който сте закупили продукта.
Опаковъчните материали са изработени от хартия.
При изработката на кутиите не са използвани халогенни
забавители на пламъка.
При изработката на печатните платки не са използвани
халогенни забавители на пламъка.
CEA2006 стандарт
Мощност: 330 вата RMS при 4 ома < 1% THD+N
SN съотношение: 65 dBA (справка: 1 ват при 4 ома)

