OLIMPUS c-360 zoom Le manuel du propriétaire
- Taper
- Le manuel du propriétaire

DIGITAL CAMERA
APPAREIL PHOTO NUM
ÉRIQUE
DIGITALKAMERA
CÁMARA DIGITAL
D-575ZOOM
C-360ZOOM
X-350
BASIC MANUAL
MANUEL DE BASE
EINFACHE ANLEITUNG
MANUAL BÁSICO
ENGLISH
FRANÇAIS
DEUTSCH
ESPAÑOL
x215_Basic.book 1 ページ 2003年12月11日 木曜日 午前9時16分

2 En
En
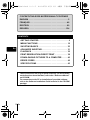
CONTENTS/TABLE DES MATIÉRES/INHALT/CONTENIDO
ENGLISH . . . . . . . . . . . . . . . . . . . . . . . . . . . . . . . . . . . . . .2
FRANÇAIS. . . . . . . . . . . . . . . . . . . . . . . . . . . . . . . . . . . . 46
DEUTSCH . . . . . . . . . . . . . . . . . . . . . . . . . . . . . . . . . . . . 90
ESPAÑOL . . . . . . . . . . . . . . . . . . . . . . . . . . . . . . . . . . . 134
CONTENTS
GETTING STARTED . . . . . . . . . . . . . . . . . . . . . . . . . . . . 4
MENU FUNCTIONS . . . . . . . . . . . . . . . . . . . . . . . . . . . . 16
SHOOTING BASICS . . . . . . . . . . . . . . . . . . . . . . . . . . . 23
ADVANCED SHOOTING . . . . . . . . . . . . . . . . . . . . . . . . 31
PLAYBACK . . . . . . . . . . . . . . . . . . . . . . . . . . . . . . . . . . 32
PRINT RESERVATION /DIRECT PRINT . . . . . . . . . . . . 38
DOWNLOADING PICTURES TO A COMPUTER . . . . . 40
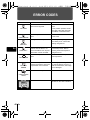
ERROR CODES . . . . . . . . . . . . . . . . . . . . . . . . . . . . . . . 42
SPECIFICATIONS . . . . . . . . . . . . . . . . . . . . . . . . . . . . . 43
These instructions are only for quick reference. For more details
on the functions described here, refer to the “Reference Manual”
on CD-ROM.
For connection to the PC or installation of provided software,
refer to the Software Installation Guide included in the CD-ROM
package.
x215_Basic.book 2 ページ 2003年12月11日 木曜日 午前9時16分
La page charge ...

4 En
En
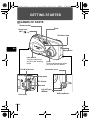
GETTING STARTED
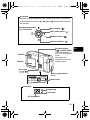
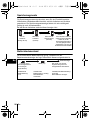
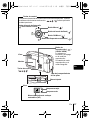
J NAMES OF PARTS
Lens barrier
Turns the camera on
and off in the shooting
mode.
Shutter button
Flash
Self-timer lamp
Connector cover
DC-IN jack
USB connector
Lens
Extends automatically when
you open the lens barrier.
Zoom lever
(W/T• )
Card cover
A/V OUT jack
(MONO)
Strap eyelet
DC-IN jack cover
Card slot
Microphone
x215_Basic.book 4 ページ 2003年12月11日 木曜日 午前9時16分
La page charge ...

6 En
En
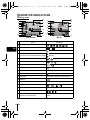
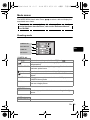
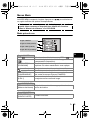
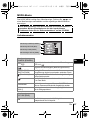
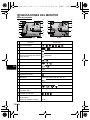
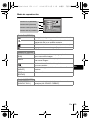
J MONITOR INDICATIONS
Shooting mode
Items Indications
1 Shooting mode , , , , , ,
2 Battery check ,
3 Green lamp
4 Flash standby
Camera movement warning/Flash charge
(Lit)
(Blinks)
5 Macro mode ,
6 Flash mode , ,
7 Sequential shooting ,
8Self-timer
9 Record mode SHQ, HQ, SQ1, SQ2
10 Sound record
11 Resolution 2048×1536, 1600×1200, 640×480, etc.
12 Metering
13 Exposure compensation
-2.0, -1.5, -1.0, -0.5, +0.5, +1.0, +1.5, +2.0
14 White balance , , ,
15 AF target mark [ ]
16 Memory gauge , , ,
17 Number of storable still pictures
Remaining recording time
15
00:36
2
1
12
14
5
13
14
13
17
5
7
9
16
15
1
Still picture Movie
2
3
4
6
11
10
8
6
8
12
17
15
10
9
x215_Basic.book 6 ページ 2003年12月11日 木曜日 午前9時16分

En 7
En
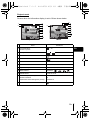
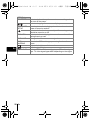
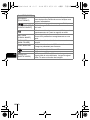
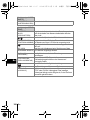
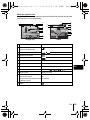
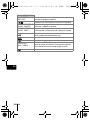
Playback mode
Screens when the Information display is set to ON are shown below.
Items Indications
1 Print reservation,
Number of prints
× 10
2 Battery check ,
3 Sound record
4Protect
5 Record mode SHQ, HQ, SQ1, SQ2
6 Resolution
2048
×
1536, 1600
×
1200, 640
×
480, etc
7 Exposure compensation
-2.0, -1.5, -1.0, -0.5, +0.5, +1.0, +1.5, +2.0
8 White balance WB AUTO, , , ,
9 Date and time '04.02.10 12:30
10 File number (still picture),
Number of frames
Elapsed time
/Total recording time (movie)
100-0016,
16
00:00/00:15
11 Movie
2
1
5
7
2
8
9
10
5
6
6
10
8
9
3
Still picture Movie
4
4
3
11
x215_Basic.book 7 ページ 2003年12月11日 木曜日 午前9時16分
La page charge ...
La page charge ...
La page charge ...
La page charge ...
La page charge ...
La page charge ...
La page charge ...
La page charge ...

16 En
En
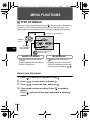
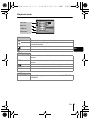
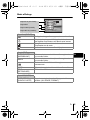
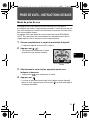
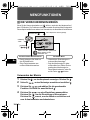
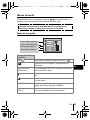
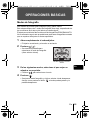
MENU FUNCTIONS
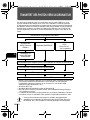
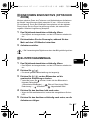
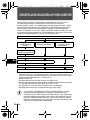
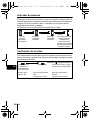
J TYPE OF MENUS
When you turn on the camera and press , the top menu is displayed on
the monitor. The functions of this camera are set from the menus. This
chapter explains how the menus work, using the shooting mode screens.
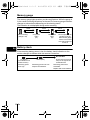
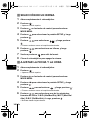
How to use the menus
1 Press to display the top menu. Press .
2 Press to select a tab, and press .
3 Press to select an item, and press .
4 Press to select a setting. Press to complete
setting.
Press again to exit the menu and return to shooting
status.
• Take you directly to the setting
screens.
• Display operational buttons at the
bottom of the screen.
• Categorizes the settings into
tabs.
• Displays the tabs of each menu.
Select the desired tab on the left
of the screen by pressing .
Select a menu using
the arrow pad.
Press .
MODE MENUS
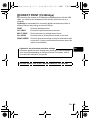
SHORTCUT MENUS
The top menu is displayed.
Arrow pad
()
OK/Menu
button
x215_Basic.book 16 ページ 2003年12月11日 木曜日 午前9時16分

En 17
En
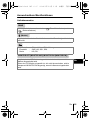
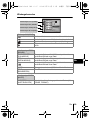
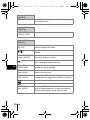
Shortcut menus
Shooting mode
Selects a shooting mode from (Single-frame shooting) and
(Sequential shooting).
Selects whether to record sound when shooting a movie.
Sets the image quality and resolution.
Still picture : SHQ, HQ, SQ1, SQ2
Movie : HQ, SQ
Sets whether or not the monitor is turned on when the camera is turned on.
If the monitor is set not to turn on, the top menu displays MONITOR ON
when the camera is turned on.
DRIVE
(movies)
MONITOR OFF (MONITOR ON)
x215_Basic.book 17 ページ 2003年12月11日 木曜日 午前9時16分
La page charge ...
La page charge ...
La page charge ...

En 21
En
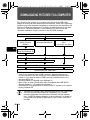
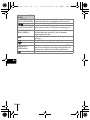
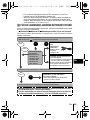
Playback mode
PLAY tab
Protects pictures from accidental erasure.
Rotates pictures 90 degrees clockwise or
counterclockwise.
Stores print reservation information on the card.
Adds sound to a still picture already taken.
EDIT tab
BLACK&WHITE Creates a black and white picture and saves it as a new
picture.
SEPIA Creates a sepia-toned picture and saves it as a new
picture.
Makes the file size smaller and saves it as a new file.
INDEX Creates an index picture of a movie in 9 frames.
EDIT Edits a movie.
CARD tab
CARD SETUP Erases all image data stored on the card. (ALL ERASE,
FORMAT)
PLAY tab
EDIT tab
CARD tab
SETUP tab
CARDSEt EDIt
PLAY
x215_Basic.book 21 ページ 2003年12月11日 木曜日 午前9時16分
La page charge ...

En 23
En
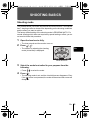
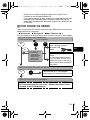
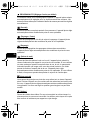
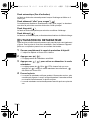
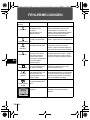
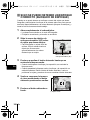
SHOOTING BASICS
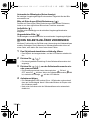
Shooting mode
This camera allows you to take still pictures and record movies. This camera
has 7 shooting modes to choose from depending on the shooting conditions
and the effect you want to achieve.
The factory default setting of the shooting mode is PROGRAM AUTO. For
normal shooting which does not require any special setting or effect, you do
not need to follow this procedure.
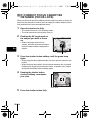
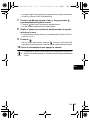
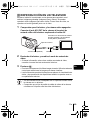
1 Open the lens barrier fully.
• The lens extends and the monitor turns on.
2 Press ( ).
• The screen for selecting the shooting
mode (virtual dial) is displayed.
3 Select the mode best suited to your purpose from the
following.
• Press to select the mode.
4 Press .
• The shooting mode is set, and the virtual dial screen disappears. Even
if the button is not pressed, the mode will be set and the screen will
disappear.
Virtual dial screen
x215_Basic.book 23 ページ 2003年12月11日 木曜日 午前9時16分
La page charge ...
La page charge ...
La page charge ...
La page charge ...
La page charge ...

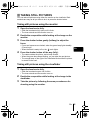
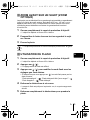
En 29
En
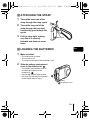
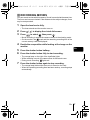
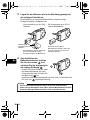
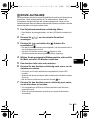
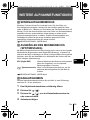
J ZOOMING IN ON A SUBJECT (OPTICAL
ZOOM)
Telephoto and wide-angle shooting are possible at 3× magnification (the
optical zoom limit, equivalent to 35 mm - 105 mm on a 35 mm camera). By
combining the optical zoom with the digital zoom, zoom magnification can be
increased to a maximum of approximately 10×.
1 Open the lens barrier fully.
• The lens extends and the monitor turns on.
2 Push/pull the zoom lever while observing the subject in
the monitor.
3 Take the picture.
• Pictures taken with the digital zoom may appear grainy.
J USING THE FLASH
1
Open the lens barrier fully.
• The lens extends and the monitor turns on.
2 Press ( ).
• The current flash setting is displayed.
3
Press ( ) to change the flash mode to your desired setting.
• Each time you press , the flash mode changes in the following
sequence: AUTO - - - .
4 Press the shutter button halfway.
• When the flash is set to fire, the orange lamp remains lit.
5 Press the shutter button fully to take the picture.
Note
x215_Basic.book 29 ページ 2003年12月11日 木曜日 午前9時16分
La page charge ...
La page charge ...
La page charge ...
La page charge ...
La page charge ...
La page charge ...
La page charge ...
La page charge ...
La page charge ...
La page charge ...
La page charge ...
La page charge ...
La page charge ...

En 43
En
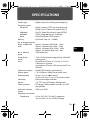
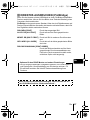
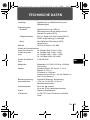
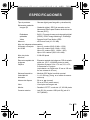
SPECIFICATIONS
Product type : Digital camera (for shooting and displaying)
Recording system
Still picture : Digital recording, JPEG (in accordance with
Design rule for Camera File system (DCF))
Applicable
standards
: Exif 2.2, Digital Print Order Format (DPOF),
PRINT Image Matching II, PictBridge
Movie : QuickTime Motion JPEG support
Memory : xD-Picture Card (16
– 512MB)
No. of storable pictures
When a 16MB card
used
: Approx. 6 frames (SHQ: 2048 × 1536)
Approx. 20 frames (HQ: 2048 × 1536)
Approx. 32 frames (SQ1: 1600 × 1200)
Approx. 165 frames (SQ2: 640 × 480)
No. of effective
pixels
: 3,200,000 pixels
Image pickup
device
: 1/2.5" CCD solid-state image pickup, 4,230,000
pixels (gross)
Lens : Olympus lens 5.8 mm to 17.4 mm, f3.1 to 5.2,
5 elements in 3 groups
(equivalent to 35 mm to 105 mm lens on 35 mm
camera)
Photometric system : Digital ESP metering, spot metering
Shutter speed : 1 to 1/1000 sec. (Night Scene mode: 2sec)
Shooting range : 50 cm (1.6 ft.) to (normal)
20 cm to 50 cm (0.7 ft. to 1.6 ft.) (macro mode)
Viewfinder : Optical real image viewfinder
Monitor : 1.8" TFT color LCD display, 85,000 pixels
Outer connector : DC-IN jack, USB connector (mini-B), A/V OUT
jack (MONO)
Automatic calendar
system
: 2000 up to 2099
Operating environment
Temperature : 0°C to 40°C (32°F to 104°F) (operation)
-20°C to 60°C (-4°F to 140°F) (storage)
x215_Basic.book 43 ページ 2003年12月11日 木曜日 午前9時16分
La page charge ...

En 45
En
x215_Basic.book 45 ページ 2003年12月11日 木曜日 午前9時16分

46 Fr
Fr
TABLE DES MATIÈRES
GUIDE RAPIDE DE DÉMARRAGE . . . . . . . . . . . . . . . . 48
FONCTIONS DU MENU . . . . . . . . . . . . . . . . . . . . . . . . . 60
PRISE DE VUES – INSTRUCTIONS DE BASE . . . . . . 67
PRISE DE VUE ÉLABORÉE . . . . . . . . . . . . . . . . . . . . . 75
AFFICHAGE . . . . . . . . . . . . . . . . . . . . . . . . . . . . . . . . . . 76
RÉSERVATION D’IMPRESSION/
IMPRESSION DIRECTE. . . . . . . . . . . . . . . . . . . . . . . . . 82
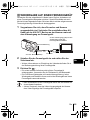
TRANSFERT DES PHOTOS VERS UN ORDINATEUR
. . . . 84
CODES D’ERREUR . . . . . . . . . . . . . . . . . . . . . . . . . . . . 86
CARACTÉRISTIQUES . . . . . . . . . . . . . . . . . . . . . . . . . . 87
Ces instructions sont uniquement destinées à une prise en main
rapide. Vous trouverez un descriptif plus détaillé des fonctions
dans le “Manuel de référence” sur le CD-ROM. Pour le
raccordement à un ordinateur ou l’installation du logiciel fourni,
reportez-vous au Guide d’installation du logiciel sur le CD-ROM.
x215_Basic.book 46 ページ 2003年12月11日 木曜日 午前9時16分

Fr 47
Fr
J Lisez soigneusement ce manuel avant d’utiliser votre appareil photo afin de garantir un
usage correct.
J Nous vous conseillons d’effectuer quelques prises de vue d’essai pour vous familiariser
avec votre appareil avant de prendre des photographies importantes.
J Ce manuel contient uniquement des instructions de base. Vous trouverez un descriptif
plus détaillé des fonctions dans le Manuel de référence sur le CD-ROM.
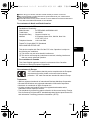
Pour les utilisateurs en Amérique du Nord et du Sud
Pour les utilisateurs aux États-Unis
Déclaration de conformité
Numéro de modèle : D-575ZOOM/C-360ZOOM/X-350
Marque : OLYMPUS
Organisme responsable : Olympus America Inc.
Adresse : 2 Corporate Center Drive, Melville, New York
11747-3157 U.S.A.
Numéro de téléphone : 1-631-844-5000
Testé pour être en conformité avec la réglementation FCC
POUR L’UTILISATION A LA MAISON OU AU BUREAU
Cet appareil est conforme aux normes de la Section 15 des directives FCC.
Son utilisation est soumise aux deux conditions suivantes:
(1) Cet appareil ne doit pas causer de brouillage radioélectrique.
(2) Cet appareil doit pouvoir résister à toutes les interférences, y compris
celles susceptibles d’entraver son bon fonctionnement.
Pour les utilisateurs au Canada
Cet appareil numérique de la catégorie B est conforme à la législation
canadienne sur les appareils générateurs de parasites.
Pour les utilisateurs en Europe
Marques déposées
• IBM est une marque déposée de la société International Business Machines
Corporation.
• Microsoft et Windows sont des marques déposées de la société Microsoft
Corporation.
• Macintosh est une marque de Apple Computer Inc.
• Tous les autres noms de sociétés et appellations de produits sont des marques,
déposées ou non, des propriétaires respectifs.
• Les normes pour les systèmes de fichiers d’appareil photo indiquées dans ce
manuel sont les normes “Design Rule for Camera File System/DCF” stipulées par
l’association JEITA (Japan Electronics and Information Technology Industries
Association).
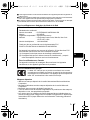
Le label “CE” indique que ce produit est conforme aux normes
européennes en matière de sécurité, de santé, d’environnement et
de protection du consommateur. Les appareils photo comportant le
label “CE” sont destinés à être vendus en Europe.
x215_Basic.book 47 ページ 2003年12月11日 木曜日 午前9時16分

48 Fr
Fr
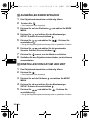
GUIDE RAPIDE DE
DÉ
MARRAGE
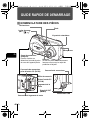
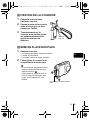
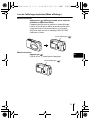
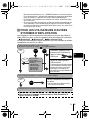
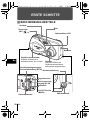
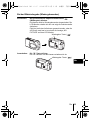
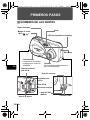
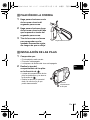
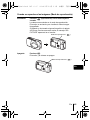
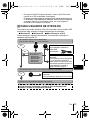
J NOMENCLATURE DES PIÈCES
Capot de protection
d’objectif
Permet d’activer ou
désactiver le mode de prise
de vues de l’appareil photo.
Déclencheur
Flash
Voyant du retardateur
Couvercle de connecteur
prise d’entrée CC (DC-IN)
Prise d’entrée CC
(DC-IN)
Connecteur USB
Objectif
Se met en place automatiquement
lorsque vous ouvrez le capot de
protection d’objectif.
Levier de zoom
(W/T• )
Œillet de courroie
Couvercle du logement de carte
Couvercle de connecteur
Prise A/V OUT
(MONO)
Logement de la
carte
Microphon
e
x215_Basic.book 48 ページ 2003年12月11日 木曜日 午前9時16分

Fr 49
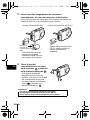
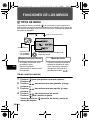
Fr
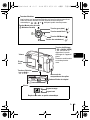
Voyant orange
Voyant vert
Repères de mise au point automatique
Touche d’affichage
( ) (QUICK VIEW)
Permet d’activer ou
désactiver le mode
affichage de l’appareil
photo.
Passe en mode lecture
en mode prise de
vues.
Touche du retardateur ( )
Écran
ACL
Touche gros plan ( )
Embase filetée de trépied
Touche mode flash ( )
Touches fléchées
()
Viseur
Touches fléchées
Touche OK/Menu ( )
Couvercle du
compartiment des piles
Viseur
Les boutons sur les touches fléchées ont leurs fonctions respectives.
Elles sont aussi utilisées comme touches de mise au point
automatique. , , et indiquent quelle touche presser.
Touche Mode prise de vues
( :Molette virtuelle)
x215_Basic.book 49 ページ 2003年12月11日 木曜日 午前9時16分

50 Fr
Fr
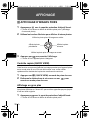
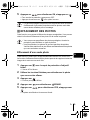
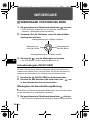
J
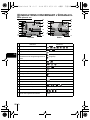
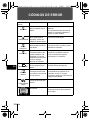
INDICATIONS CONCERNANT L’ÉCRAN ACL
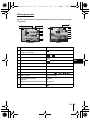
Mode prise de vue
Éléments Indications
1 Mode prise de vue , , , , , ,
2 Contrôle des piles ,
3Voyant vert
4 Flash en attente
Avertissement de bougé/Chargement du
flash
(Allumé)
(Clignote)
5 Mode gros plan ,
6 Mode de flash , ,
7 Mode d’entraînement ,
8 Retardateur
9 Mode d’enregistrement SHQ, HQ, SQ1, SQ2
10 Enregistrement du son
11 Résolution 2048×1536, 1600×1200, 640×480, etc.
12 Mesure
13 Compensation d’exposition
-2.0, -1.5, -1.0, -0.5, +0.5, +1.0, +1.5, +2.0
14 Balance des blancs , , ,
15 Repères de mise au point automatique [ ]
16 Bloc mémoire , , ,
17 Nombre de vues enregistrables
Durée d’enregistrement restante
15
00:36
2
1
12
14
5
13
14
13
17
5
7
9
16
15
1
Vue fixe Vidéo
2
3
4
6
11
10
8
6
8
12
17
15
10
9
x215_Basic.book 50 ページ 2003年12月11日 木曜日 午前9時16分

Fr 51
Fr
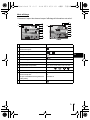
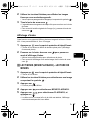
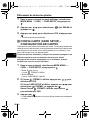
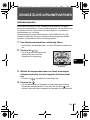
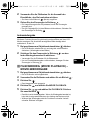
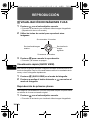
Mode affichage
Ci-dessous l’aspect des écrans lorsque l’affichage d’informations est activé.
Éléments Indications
1 Réservation d’impression,
Nombre de copies
× 10
2 Contrôle des piles ,
3 Enregistrement du son
4 Protection
5 Mode d’enregistrement SHQ, HQ, SQ1, SQ2
6 Résolution 2048×1536, 1600×1200, 640×480, etc.
7 Compensation d’exposition
-2.0, -1.5, -1.0, -0.5, +0.5, +1.0, +1.5, +2.0
8 Balance des blancs WB AUTO, , , ,
9 Date et heure ’04.02.10 12:30
10 Numéro de fichier (vue fixe),
Nombre de photos
Temps écoulé/Durée d’enregistrement
totale (vidéo)
100-0016,
16
00:00/00:15
11 Vidéo
2
1
5
7
2
8
9
10
5
6
6
10
8
9
3
Vue fixe Vidéo
4
4
3
11
x215_Basic.book 51 ページ 2003年12月11日 木曜日 午前9時16分

52 Fr
Fr
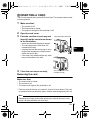
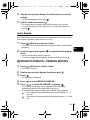
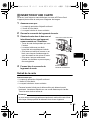
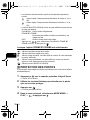
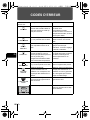
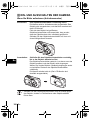
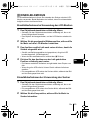
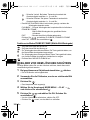
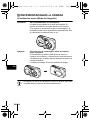
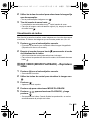
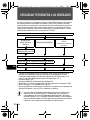
Bloc mémoire
Le bloc mémoire d’image s’allume lorsque vous effectuez une prise de vue
fixe. L’appareil photo enregistre la photo sur la carte pendant que le bloc est
allumé. L’indication du bloc mémoire change comme indiqué ci-dessous en
fonction de la situation de prise de vue.
L’indication ne s’affiche pas pendant l’enregistrement d’une vidéo.
Contrôle des piles
Si les piles sont faibles, le voyant de contrôle sur l’écran prend l’aspect
indiqué ci-dessous tant que l’alimentation de l’appareil photo est en marche.
Avant la prise de
vues
(Le bloc mémoire
d’image est éteint)
Plus aucune autre photo ne
peut être prise
(Complètement allumé).
Attendez que le bloc mémoire
reprenne l’aspect à gauche
pour prendre la photo
suivante.
Une photo est prise
(Allumé)
Plusieurs photos
sont prises
(Allumé)
Prise de vues Prise de vues Prise de vues
Attente
Allume (Vert)
(Le voyant s’éteint après
quelques instants)
Energie restante :
élevée.
Le voyant vert et le voyant orange
à côté du viseur clignotent.
Énergie restante : épuisée.
Remplacer par des piles neuves.
Clignote (Rouge)
Energie restante : faible.
Préparez des piles
neuves.
Aucune indication
x215_Basic.book 52 ページ 2003年12月11日 木曜日 午前9時16分

Fr 53
Fr
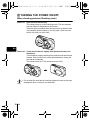
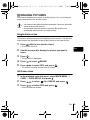
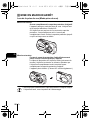
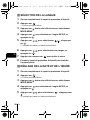
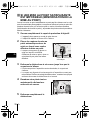
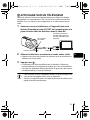
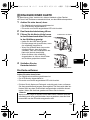
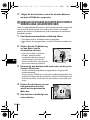
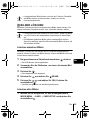
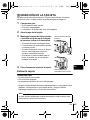
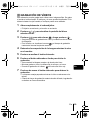
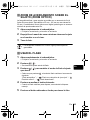
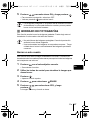
J FIXATION DE LA COURROIE
1
Passez la courroie dans
l’œillet de courroie.
2 Passez le reste de la courroie
dans la boucle qui est déjà
passée par l’œillet.
3 Tirez fermement sur la
courroie, puis vérifiez qu’elle
est solidement attachée et
qu’elle ne peut pas se
détacher.
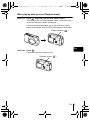
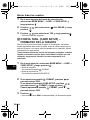
J MISE EN PLACE DES PILES
1
Assurez-vous que:
• Le capot de protection d’objectif est fermé.
• L’écran ACL est éteint.
• Le voyant à droite du viseur est éteint.
2 Faites glisser le couvercle du
compartiment des piles vers
.
• Le couvercle du compartiment de la
batterie est déverrouillé et s’ouvre
dans la direction
.
• Faites glisser le couvercle avec le
bout du doigt. N’utilisez pas votre
ongle, vous risqueriez de vous
blesser.
Œillet de
courroie
Couvercle du compartiment des
piles
x215_Basic.book 53 ページ 2003年12月11日 木曜日 午前9時16分
La page charge ...
La page charge ...
La page charge ...
La page charge ...
La page charge ...
La page charge ...
La page charge ...
La page charge ...
La page charge ...
La page charge ...
La page charge ...
La page charge ...
La page charge ...
La page charge ...
La page charge ...
La page charge ...
La page charge ...
La page charge ...
La page charge ...
La page charge ...
La page charge ...
La page charge ...
La page charge ...
La page charge ...
La page charge ...
La page charge ...
La page charge ...
La page charge ...
La page charge ...
La page charge ...
La page charge ...
La page charge ...
La page charge ...
La page charge ...
La page charge ...
La page charge ...
La page charge ...
La page charge ...
La page charge ...
La page charge ...
La page charge ...
La page charge ...
La page charge ...
La page charge ...
La page charge ...
La page charge ...
La page charge ...
La page charge ...
La page charge ...
La page charge ...
La page charge ...
La page charge ...
La page charge ...
La page charge ...
La page charge ...
La page charge ...
La page charge ...
La page charge ...
La page charge ...
La page charge ...
La page charge ...
La page charge ...
La page charge ...
La page charge ...
La page charge ...
La page charge ...
La page charge ...
La page charge ...
La page charge ...
La page charge ...
La page charge ...
La page charge ...
La page charge ...
La page charge ...
La page charge ...
La page charge ...
La page charge ...
La page charge ...
La page charge ...
La page charge ...
La page charge ...
La page charge ...
La page charge ...
La page charge ...
La page charge ...
La page charge ...
La page charge ...
La page charge ...
La page charge ...
La page charge ...
La page charge ...
La page charge ...
La page charge ...
La page charge ...
La page charge ...
La page charge ...
La page charge ...
La page charge ...
La page charge ...
La page charge ...
La page charge ...
La page charge ...
La page charge ...
La page charge ...
La page charge ...
La page charge ...
La page charge ...
La page charge ...
La page charge ...
La page charge ...
La page charge ...
La page charge ...
La page charge ...
La page charge ...
La page charge ...
La page charge ...
La page charge ...
La page charge ...
La page charge ...
La page charge ...
La page charge ...
La page charge ...
La page charge ...
La page charge ...
La page charge ...
La page charge ...
La page charge ...
-
 1
1
-
 2
2
-
 3
3
-
 4
4
-
 5
5
-
 6
6
-
 7
7
-
 8
8
-
 9
9
-
 10
10
-
 11
11
-
 12
12
-
 13
13
-
 14
14
-
 15
15
-
 16
16
-
 17
17
-
 18
18
-
 19
19
-
 20
20
-
 21
21
-
 22
22
-
 23
23
-
 24
24
-
 25
25
-
 26
26
-
 27
27
-
 28
28
-
 29
29
-
 30
30
-
 31
31
-
 32
32
-
 33
33
-
 34
34
-
 35
35
-
 36
36
-
 37
37
-
 38
38
-
 39
39
-
 40
40
-
 41
41
-
 42
42
-
 43
43
-
 44
44
-
 45
45
-
 46
46
-
 47
47
-
 48
48
-
 49
49
-
 50
50
-
 51
51
-
 52
52
-
 53
53
-
 54
54
-
 55
55
-
 56
56
-
 57
57
-
 58
58
-
 59
59
-
 60
60
-
 61
61
-
 62
62
-
 63
63
-
 64
64
-
 65
65
-
 66
66
-
 67
67
-
 68
68
-
 69
69
-
 70
70
-
 71
71
-
 72
72
-
 73
73
-
 74
74
-
 75
75
-
 76
76
-
 77
77
-
 78
78
-
 79
79
-
 80
80
-
 81
81
-
 82
82
-
 83
83
-
 84
84
-
 85
85
-
 86
86
-
 87
87
-
 88
88
-
 89
89
-
 90
90
-
 91
91
-
 92
92
-
 93
93
-
 94
94
-
 95
95
-
 96
96
-
 97
97
-
 98
98
-
 99
99
-
 100
100
-
 101
101
-
 102
102
-
 103
103
-
 104
104
-
 105
105
-
 106
106
-
 107
107
-
 108
108
-
 109
109
-
 110
110
-
 111
111
-
 112
112
-
 113
113
-
 114
114
-
 115
115
-
 116
116
-
 117
117
-
 118
118
-
 119
119
-
 120
120
-
 121
121
-
 122
122
-
 123
123
-
 124
124
-
 125
125
-
 126
126
-
 127
127
-
 128
128
-
 129
129
-
 130
130
-
 131
131
-
 132
132
-
 133
133
-
 134
134
-
 135
135
-
 136
136
-
 137
137
-
 138
138
-
 139
139
-
 140
140
-
 141
141
-
 142
142
-
 143
143
-
 144
144
-
 145
145
-
 146
146
-
 147
147
-
 148
148
-
 149
149
-
 150
150
-
 151
151
-
 152
152
-
 153
153
-
 154
154
-
 155
155
-
 156
156
-
 157
157
-
 158
158
-
 159
159
-
 160
160
-
 161
161
-
 162
162
-
 163
163
-
 164
164
-
 165
165
-
 166
166
-
 167
167
-
 168
168
-
 169
169
-
 170
170
-
 171
171
-
 172
172
-
 173
173
-
 174
174
-
 175
175
-
 176
176
-
 177
177
-
 178
178
-
 179
179
-
 180
180


OLIMPUS c-360 zoom Le manuel du propriétaire
- Taper
- Le manuel du propriétaire
dans d''autres langues
- English: OLIMPUS c-360 zoom Owner's manual
- español: OLIMPUS c-360 zoom El manual del propietario
- Deutsch: OLIMPUS c-360 zoom Bedienungsanleitung
Autres documents
-
Olympus Camedia X-400 Manuel utilisateur
-
-
-
-
-
Panasonic PVGS70 Le manuel du propriétaire
-
-