
KWK884520M
KWE884520M
KWK884520B
KWK884520T
USER
MANUAL
EN User Manual 2
Wine Cellar
FR Manuel Utilisateur 16
Cave à vin
DE Bedienungsanleitung 30
Weinkeller
IT Manuale dell’utente 44
Cantina per vini

2
CONTENTS
CUSTOMER CARE AND SERVICE
1. SAFETY INFORMATION .............................................................................................3
2. SAFETY INSTRUCTIONS ...........................................................................................5
3. PRODUCT DESCRIPTION ..........................................................................................7
4. CONTROL PANEL .......................................................................................................8
5. USE ................................................................................................................................9
6. HINTS AND TIPS ........................................................................................................ 11
7. INSTALLATION ..........................................................................................................12
8. CARE AND MAINTENANCE .....................................................................................13
9. TROUBLE SHOOTING GUIDE .................................................................................14
10. TECHNICAL INFORMATION ....................................................................................15
11. INFORMATION FOR TEST INSTITUTES ................................................................15
12. ENVIRONMENTAL CONCERNS ..............................................................................15
www.aeg.com
Thank you for choosing this AEG product. We have created it to give you impeccable per-
formance for many years, with innovative technologies that help make life simpler – features
you might not nd on ordinary appliances. Please spend a few minutes reading to get the
very best from it.
Visit our website for:
Get usage advice, brochures, trouble shooter, service information:
www.aeg.com
Register your product for better service:
www.registeraeg.com
Buy Accessories, Consumables and Original spare parts for your appliance:
www.aeg.com/shop
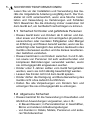
FOR PERFECT RESULTS
We recommend the use of original spare parts.
When contacting Service, ensure that you have the following data available.
The information can be found on the rating plate. Model, PNC, Serial Number.
Warning / Caution-Safety information.
General information and tips.
Environmental information.
Subject to change without notice.

3ENGLISH
Before the installation and use of the appliance, carefully
read the supplied instructions. The manufacturer is not
responsible if an incorrect installation and use causes
injuries and damages. Always keep the instructions with
the appliance for future reference.
1.1 Children and vulnerable people safety
• This appliance can be used by children aged from 8
years and above and persons with reduced physical,
sensory or mental capabilities or lack of experience and
knowledge if they have been given supervision or in-
struction concerning use of the appliance in a safe way
and understand the hazards involved.
• This appliance may be used by children between 3 and
8 years of age and persons with very extensive and
complex disabilities, if they have been properly instruct-
ed.
• Children of less than 3 years of age should be kept away
from the appliance unless continuously supervised.
• Do not let children play with the appliance.
• Children shall not carry out cleaning and user mainte-
nance of the appliance without supervision.
• Keep all packaging away from children and dispose of it
appropriately.
1.2 General Safety
• This appliance is intended to be used in household and
similar applications such as:
- Farm houses; sta kitchen areas in shops, oces
and other working environments
- By clients in hotels, motels, bed and breakfast and
other residential type environments
• Use this appliance for storage of wine only.
• WARNING: Keep ventilation openings, in the appliance
enclosure or in the built-in structure, clear of obstruction.
1. SAFETY INFORMATION

4
• WARNING: Do not use mechanical devices or other
means to accelerate the defrosting process, other than
those recommended by the manufacturer.
• WARNING: Do not damage the refrigerant circuit.
• WARNING: Do not use electrical appliances inside the
food storage compartments of the appliance, unless
they are of the type recommended by the manufacturer.
• Do not use water spray and steam to clean the appli-
ance.
• Clean the appliance with a moist soft cloth. Only use
neutral detergents. Do not use abrasive products, abra-
sive cleaning pads, solvents or metal objects.
• Do not store explosive substances such as aerosol
cans with a ammable propellant in this appliance.
• If the supply cord is damaged, it must be replaced by
the manufacturer, its service agent or similarly qualied
persons in order to avoid a hazard.
• This appliance is not intended for professional and
commercial use
www.aeg.com

5ENGLISH
2. SAFETY INSTRUCTIONS
2.1 Service
• To repair the appliance contact an Au-
thorised Service Centre. Use original
spare parts only.
• Please note that self-repair or non-pro-
fessional repair can have safety con-
sequences and might void the guaran-
tee.
• The following spare parts will be
available for 7 years after the model
has been discontinued: thermostats,
temperature sensors, printed circuit
boards, light sources, door handles,
door hinges, trays and baskets. Please
note that some of these spare parts
are only available to professional re-
pairers, and that not all spare parts are
relevant for all models.
• Door gaskets will be available for 10
years after the model has been discon-
tinued.
2.2 Installation
WARNING! Only a qualied per-
son must install this appliance.
• Remove all the packaging.
• Do not install or use a damaged appli-
ance.
• Obey the installation instruction sup-
plied with the appliance.
• Always be careful when you move the
appliance because it is heavy. Always
wear safety gloves.
• Make sure the air can circulate around
the appliance.
• Wait at least 4 hours before connect-
ing the appliance to the power supply.
This is to allow the oil to ow back in the
compressor.
• Do not install the appliance close to ra-
diators or cookers, oven or hobs.
• The rear of the appliance must stand
against the wall.
• Do not install the appliance where there
is direct sunlight.
• Do not install this appliance in areas
that are too humid or too colds, such as
the construction appendices, garages
or wine cellars.
• When you move the appliance, lift it by
the front edge to avoid scratching the
oor.
2.3 Electrical connection
WARNING! Risk of re and electri-
cal shock.
WARNING! When positioning the
appliance, ensure the supply cord
is not trapped or damaged.
WARNING! Do not use multi-plug
adapters and extension cables.
• The appliance must be earthed.
• All electrical connections should be
made by a qualied electrician.
• Make sure that the electrical informa-
tion on the rating plate agrees with the
power supply. If not, contact an elec-
trician.
• Always use a correctly installed shock-
proof socket.
• Do not use multi-plug adapters and ex-
tension cables.
• Make sure not to cause damage to
the electrical components (e.g. mains
plug, mains cable, compressor). Con-
tact the Service or an electrician to
change the electrical components.
• The mains cable must stay below the
level of the mains plug.
• Connect the mains plug to the mains
socket only at the end of the installa-
tion. Make sure that there is access to
the mains plug after the installation.
• Do not pull the mains cable to discon-
nect the appliance. Always pull the
mains plug.
• When positioning the appliance, en-
sure the supply cord is not trapped or
damaged.
• Do not locate multiple portable sock-
etoutlets or portable power supplies at
the rear of the appliance.

6
2.4 Use
WARNING! Risk of injury, burns,
electrical shock or re.
The appliance contains ammable
gas, isobutane (R600a), a natural
gas with a high level of environmen-
tal compatibility. Be careful not to
cause damage to the refrigerant cir-
cuit containing isobutane.
• Do not change the specication of this
• appliance.
• Do not put electrical appliances (e.g.
ice cream makers) in the appliance un-
less they are stated applicable by the
manufacturer.
• If damage occurs to the refrigerant
circuit, make sure that there are no
ames and sources of ignition in the
room. Ventilate the room.
• Do not let hot items to touch the plastic
parts of the appliance.
• Do not put soft drinks in the freezer
compartment. This will create pressure
on the drink container.
• Do not store ammable gas and liquid
in the appliance.
• Do not put ammable products or items
that are wet with ammable products
in, near or on the appliance.
• Do not touch the compressor or the
condenser. They are hot.
2.5 Internal light
WARNING! Risk of electric shock
• Concerning the lamp(s) inside this
product and spare part lamps sold
separately: These lamps are intended
to withstand extreme physical condi-
tions in household appliances, such as
temperature, vibration, humidity, or are
intended to signal information about
the operational status of the appliance.
They are not intended to be used in
other applications and are not suitable
for household room illumination.
2.6 Care and cleaning
WARNING! Risk of injury or dam-
age to the appliance.
• Before maintenance, deactivate the
appliance and disconnect the mains
plug from the mains socket.
• This appliance contains hydrocarbons
in the cooling unit. Only a qualied per-
son must do the maintenance and the
recharging of the unit.
• Regularly examine the drain of the ap-
pliance and if necessary, clean it. If the
drain is blocked, defrosted water col-
lects in the bottom of the appliance.
• Dusts behind the wine cellar and on
the ground shall be timely cleaned to
improve the cooling eect and energy
saving.
• The interior of the wine cellar should
be cleaned regularly to avoid odor.
• Check the door gasket regularly to
make sure there are no debris.
• Please turn o the power before clean-
ing, remove all food, shelves, drawers,
etc.
• Clean the door gasket with mild soap
and water.
• Use a soft cloth or sponge to clean the
inside of the wine cellar, with two table-
spoons of baking soda and a quart of
warm water. Then rinse with water and
wipe clean, and open the door and dry
it naturally before the power is turned
on.
• For areas that are dicult to clean in
the wine cellar(such as narrow sand-
wiches, gaps or corners), it is recom-
mended to wipe them regularly with a
soft rag, soft brush, etc. and when nec-
essary, combined with some auxiliary
tools (such as thin sticks) to ensure
no contaminant accumulation in these
areas.
• Do not use soap, detergent, scrub
powder, spray cleaner, etc., as these
may cause odors in the interior of the
wine cellar.
• Clean the bottle frame, shelves and
drawers with a mild detergent and dry
with a soft cloth.
www.aeg.com

7ENGLISH
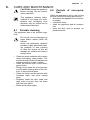
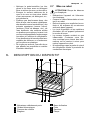
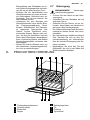
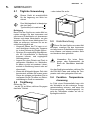
3. PRODUCT DESCRIPTION
1
Door Release Mechanism
2
Telescopic runners
3
Control panel
4
Shelves
5
Fastening bar
6
Door
7
Gasket
8
Rating plate
1 2 3 4 5
678
• Wipe the outer surface of the wine
cellar with a soft cloth dampened with
soapy water, detergent, etc., and then
wipe dry.
• Do not use hard brushes, clean steel-
balls, wire brushes, abrasives, such as
toothpastes, organic solvents (such
as alcohol, acetone, banana oil, etc.),
boiling water, acid or alkaline items
clean wine cellar considering that this
may damage the fridge surface and in-
terior. Boiling water and benzene may
deform or damage plastic parts.
• Do not rinse with water so as not to af-
fect the electrical insulation properties.
2.7 Disposal
WARNING! Risk of injury or suo-
cation.
• Disconnect the appliance from the
mains supply.
• Cut o the mains cable and discard it.
• Remove the lid to prevent children and
pets to be closed inside of the appli-
ance.
• The refrigerant circuit and the insu-
lation materials of this appliance are
ozone-friendly.
• The insulation foam contains am-
mable gas. Contact your municipal
authority for information on how to dis-
card the appliance correctly.
• Do not cause damage to the part of
the cooling unit that is near the heat
exchanger.

8
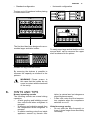
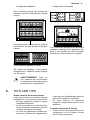
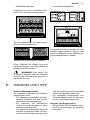
4. CONTROL PANEL
1
ON/OFF key
2
Light key
3
Display
4
Temperature colder key
5
Temperature warmer key
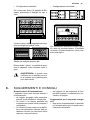
4.1 On/Oswitchand
temperature setting
To switch on the appliance press the ON/
OFF key.
The display shows the set default tem-
perature (12°C).
The temperature can be adjusted from 5°
to 20°C (with steps of 1°C) by touching
the -/+ key.
To switch o the appliance press the ON/
OFF key for 5 seconds.
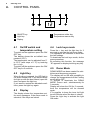
4.2 Light Key
When the door is opened, the LED light is
on, when closed is o. If you want to keep
the light on with the door closed, open the
door, and press the light key.
If you want to restore the standard condi-
tions, press the light key again.
4.3 Display
The display shows the temperature set,
the error messages, if the demo mode is
selected, if the keys are locked.
4.4 Lock keys mode
Press the + key and the light key for 3
seconds to activate the lock keys mode.
The appliance will continue to work with
the last settings.
To deactivate the lock keys mode, do the
same procedure.
By selecting this function, the message
“bl” appears on display touching any key.
4.5 Demo Mode
DEMO MODE has been created for exhi-
bitions and showroom purposes.
The display will be ON with possibility to
change the temperatures but the Cooling
motor will be OFF.
To activate or deactivate the DEMO
MODE, Press + and – simultaneously for
3 seconds.
Display will show the ON for 5 seconds,
then the temperature will be showed
again.
It Is possible to keep the inner led light
turned ON also when the door is closed.
Press the Light key to activate the light
ON mode.
1 2 3 4 5
www.aeg.com

9ENGLISH
5. USE
5.1 Daily Use
This appliance is intended to be
used exclusively for the storage of
wine
Wine storage compartment is the
one marked
(on rating plate) with
Cleaning
Before using the appliance for the rst
time, wash the interior and all internal
accessories with lukewarm water and
some neutral soap in order to remove
the typical smell of a brand-new product,
then dry thoroughly.
• Opening the door for long periods can
cause a signicant increase of the
temperature in the compartments of
the appliance.
• Clean regularly surfaces that can
come in contact with food and acces-
sible drainage systems.
• Store raw meat and sh in suitable
containers in the wine cellar, so that it
is not in contact with or drip onto other
food.
• If the refrigerating appliance is left
empty for long periods, switch o, de-
frost, clean, dry, and leave the door
open to prevent mould developing
within the appliance.
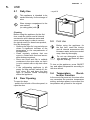
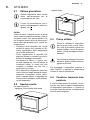
5.2 Door Opening
To open the door:
- push in the left side of the door panel, to
open the door
- or pull it
5.3 First Use
Before using the appliance for
the rst time, wash the interior
and all internal accessories with
lukewarm water and some neutral
soap, then dry thoroughly.
Do not use detergents or abra-
sive powders, as these will dam-
age the nishing.
To turn on the appliance, press ON/OFF
key and adjust temperature according to
the wine stored.
5.4 Temperature Recol-
lection Function
In the event of a power cut, the wine cellar
can remember the previous temperature
setting, and when power is recovered, the
temperature will go back to the original.

10
5.5 Wine Storage
The storage time for wine depends on
ageing, the type of grapes, alcoholic con-
tent and level of fructose and tannin con-
tained in it. At the time of purchase,check
if the wine is already aged or if it will im-
prove over time.
Preservation temperature suggested:
- Champagne/Prosecco and Sparkling
wines +6 to +8°C
- White Wines +10 to +12°C
- Rosé wines +12 to +16°C
- Red Wines +14 to +18°C
(for 750 ml Bordeaux bottles)
Total: 18 bottles
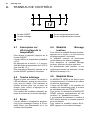
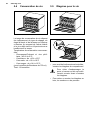
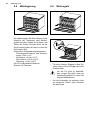
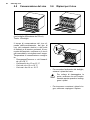
5.6 Wine Shelves
• To remove or t the wooden shelves lift
or push the shelf.
• For easy access to the bottles, pull the
shelves out of the rail compartment.
To prevent damaging the door,
make sure that the door is fully
opened when pulling shelves out.
www.aeg.com

11ENGLISH
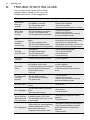
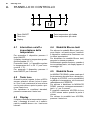
• Standard conguration
To store up to 18 bordeaux bottles placing
6 bottles each level.
• Horizontal conguration
Suitable for large and tall bottles.
To easily store large and tall bottles on the
second shelf, can be removed the upper
shelf as showed in the picture.
The rst level has been designed to acco-
modate larger and taller bottles.
By removing the shelves is possible to
increase the capacity as showed in the
pictures.
WARNING! Please ensure in
this case that the bottles do not
come in contact with the backwall
of the cavity.
6. HINTS AND TIPS
Normal operating sounds
The following sounds are normal during
operation:
• A faint gurgling and bubbling sound
from coils sound when refrigerant is
pumped.
• A whirring and pulsating sound from
the compressor when refrigerant is
pumped.
• A sudden cracking noise from inside
appliance caused by thermic dila-
tation (a natural and not dangerous
physical phenomenon).
• A faint click noise from the tempera-
ture regulator when the compressor
switches on or o.
Hints for energy saving
• Do not open the door frequently or
leave it open longer than absolutely
necessary.

12
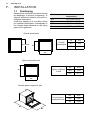
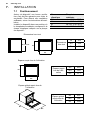
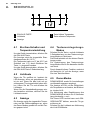
7. INSTALLATION
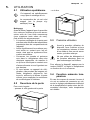
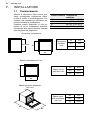
7.1 Positioning
Adequate air ventilation should be around
the appliance, to prevent overheating. To
achieve sucient ventilation follow the in-
stallation instructions.
Install this appliance at a location where
the ambient temperature corresponds to
the climate class indicated on the rating
plate of the appliance:
Climate class Ambient
temperature
SN +10 °C to +32 °C
N +16 °C to +32 °C
ST +16 °C to +38 °C
T +16 °C to +43 °C
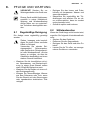
D1
W1
Overall
dimensions
H1
455
W1
596
D1 566
Space required
in use
H2
455
W2
596
D2 571
Overall space
required in use
H3
455
W3
596
D3 1026
Overall dimensions
Space required in use
Overall space required in use
H1 / H2 / H3
D2
W2
D3
W3
www.aeg.com

13ENGLISH
8. CARE AND MAINTENANCE
8.2 Periods of non-opera-
tion
When the appliance is not in use for long
periods, take the following precautions:
• disconnect the appliance from electric-
ity supply.
• remove all items.
• clean the appliance and all accesso-
ries.
• leave the door open to prevent un-
pleasant smells.
CAUTION! Unplug the appliance
before carrying out any mainte-
nance operation.
This appliance contains hydro-
carbons in its cooling unit; main-
tenance and recharging must
therefore only be carried out by
authorized technicians.
8.1 Periodic cleaning
The equipment has to be cleaned regu-
larly:
Do not pull, move or damage any
pipes and/or cables inside the
cabinet.
Never use detergents, abrasive
powders, highly perfumed clean-
ing products or wax polishes
to clean the interior as this will
damage the surface and leave a
strong odour.
• Clean the inside surfaces with a warm
water and baking soda solution. The
solution should be about 2 tablespoons
of baking soda to a quart of water.
• Clean the shelves with a mild deter-
gent solution.
• Wring excess water out of the sponge
or cloth when cleaning area of the con-
trols, or any electrical parts.
• Clean the inside and accessories with
lukewarm water and some neutral
soap.
• Regularly check the door seals and
wipe clean to ensure they are clean
and free from debris.
• Rinse and dry thoroughly.

14
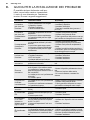
9. TROUBLE SHOOTING GUIDE
You can solve many common Wine cellar
problems easily, saving you the cost of a
possible service call. Try the suggestions.
Problem Possible cause Solution
Wine cellar
does not
operate.
• Not plugged in.
• The appliance is turned o.
• The circuit breaker tripped.
• Demo Mode is active.
• Please connect the appliance.
• Please turn ON the appliance.
• Turn on the circuit breaker.
• Deactivate the Demo mode (press +/- for 3sec.).
Wine cellar
is not cool
enough.
• Check the temperature control setting.
• The door is not completely closed.
• The door gasket does not seal properly.
• Verify the set temperature.
• Verify the closure of the door.
• Clean the door gasket with a humid sponge
using neutral detergent and water.
The
compressor
operates
continuously.
• The room temperature is hotter than
normal.
• The door is opened too often.
• The door is not completely closed.
• The door gasket does not seal properly.
• Verify the room temperature.
• Do not keep the door open longer than necessary.
• Verify that the door is completely closed.
• Verify the gasket condition and in case clean it with
a humid sponge using neutral detergent and water.
The light
does not work.
• Not plugged in.
• The circuit breaker tripped.
• The LED has burned out.
• The light button is not operating.
• Please connnect the appliance.
• Turn on the circuit breaker.
• Contact the service.
• Contact the service.
Too much
vibration.
• Check that the wine cellar is levelled. • Level the appliance.
Too much
noise.
• The rattling noise may co me from the ow
of the refrigerant, which is normal.
•
Contraction and expansion of the inside walls
may cause popping and crackling noises.
• The wine cellar is not level.
• Fan is dirty.
• Level the appliance.
• Clean the fan from powder.
• If the noises become louder contact the
service.
The door does
not close
properly.
• The wine cellar is not level.
• The door was xed not properly.
• The gasket is dirty.
• Level the appliance.
• Verify the closure of the door.
• Clean the door gasket with a humid sponge
using neutral detergent and water.
Acoustic alarm
• The door is not closed (the alarm lasts
30 min).
• Close the door.
E3 is displayed
• The door was left open for more than
30 min.
• Door reed switch is broken.
• Close the door.
• Contact the service.
E1 is displayed
and an acoustic
alarm will sound
every 5 minutes.
• The temperature inside the wine cellar
is outside the range of -20°C +60°C
• The temperature sensor is out of order
or disconnected.
• Verify absence of heating from nearest
appliances.
• Contact the service.
E2 is displayed
• Warm coming from nearest appliances.
• Ambient temperature is out of the
product climate class Range.
• Compressor or fan are out of order.
• Verify absence of heating from nearest appliances.
• Verify if the product is installed in a place with
ambient temperature within declared product
climate class.
• Contact the service.
www.aeg.com

15ENGLISH
10. TECHNICAL INFORMATION
11. INFORMATION FOR TEST INSTITUTES
12. ENVIRONMENTAL CONCERNS
Technical data
The technical information is situated in
the rating plate on the internal side of the
appliance and on the energy label.
The QR code on the energy label sup-
plied with the appliance provides a web
link to the information related to the
performance of the appliance in the EU
EPREL database. Keep the energy label
for reference together with the user ma-
nual and all other documents provided
with this appliance.
Installation and preparation of the ap-
pliance for any EcoDesign verication
shall be compliant with EN 62552.
Ventilation requirements, recess dimen-
sions and minimum rear clearances shall
be as stated in this User Manual at Chap-
ter 6. Please contact the manufacturer for
any other further information, including
loading plans.
It is also possible to nd the same infor-
mation in EPREL using the link https://
eprel.ec.europa.eu and the model name
and product number that you nd on the
rating plate of the appliance. See the link
www.theenergylabel.eu for detailed infor-
mation about the energy label.
The technical information are situated in
the rating plate, on the external or internal
side of the appliance and in the energy
label.
The symbol
on the product or on its
packaging indicates that this product may
not be treated as household waste.
Instead it should be taken to the appro-
priate collection point for the recycling of
electrical and electronic equipment.
By ensuring this product is disposed of
correctly, you will help prevent potential
negative consequences for the environ-
ment and human health, which could
otherwise be caused by inappropriate wa-
ste handling of this product.
For more detailed information about
recycling of this product, please contact
your local council, your household waste
disposal service or the shop where you
purchased the product.
Packaging materials
The materials with the symbol
are
recyclable. Dispose of the packaging in
suitable collection containers to recycle it.

16
TABLE DES MATIÈRES
SOIN ET ENTRETIEN DE LA PART DU CLIENT
1. INFORMATIONS DE SÉCURITÉ ..............................................................................17
2. CONSIGNES DE SÉCURITÉ ....................................................................................19
3. DESCRIPTION DU DISPOSITIF ...............................................................................21
4. PANNEAU DE CONTRÔLE .......................................................................................22
5. UTILISATION ..............................................................................................................23
6. HITS AND TIPS ..........................................................................................................25
7. INSTALLATION ..........................................................................................................26
8. SOIN ET ENTRETIEN ................................................................................................27
9. GUIDE POUR LA RÉSOLUTION DES PROBLÈMES ............................................28
10. CARACTÉRISTIQUES TECHNIQUES .....................................................................29
11. INFORMATIONS POUR LES INSTITUTS DE TEST ...............................................29
12. EN MATIÈRE DE PROTECTION DE L’ENVIRONNEMENT ...................................29
www.aeg.com
Nous vous remercions d’avoir choisi un produit AEG. Le produit a été conçu pour garantir
de hautes performances pendant de nombreuses années, grâce à des technologies inno-
vantes qui simplient la vie, caractéristiques que ne garantissent pas tous les dispositifs or-
dinaires. Quelques minutes susent pour lire les instructions et obtenir un fonctionnement
optimal du dispositif.
Visiter le site du fabricant pour :
Obtenir conseils utiles, brochures, guides de résolution des problèmes et informa-
tions sur les services :
www.aeg.com
Enregistrer le produit pour une meilleure assistance :
www.registeraeg.com
Acheter des accessoires, des consommables et des pièces détachées d’origine
pour le dispositif :
www.aeg.com/shop
Il est recommandé d’utiliser des pièces détachées d’origine.
Avant de contacter l’assistance, veiller à disposer des données suivantes.
Sur la plaque, gurent les informations suivantes : modèle, code article et numéro de série.
Avertissement / Attention - Informations de sécurité.
Informations générales et conseils.
Informations écologiques.
Sujet à modications sans préavis.
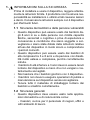
POUR DES RÉSULTATS PARFAITS

17FRANÇAIS
Avant d’installer et d’utiliser cet appareil, lisez soigneuse-
ment les instructions fournies. Le fabricant ne pourra être
tenu pour responsable en cas de dommages dus à une
installation incorrecte ou une utilisation non conforme.
Conservez toujours cette notice avec votre appareil pour
vous y référer ultérieurement.
1.1 Sécurité des enfants et des personnes vulné-
rables
• Cet appareil n’est pas destiné à être utilisé par des en-
fants ou des personnes dont les capacités physiques,
sensorielles ou mentales, ou le manque d’expérience et
de connaissance les empêchent d’utiliser l’appareil sans
risque lorsqu’ils sont sans surveillance ouen l’absence
d’instruction d’une personne responsable qui puisse leur
assurer une utilisation de l’appareil sans danger.
• Cet appareil peut être utilisé par des enfants entre 3
et 8 ans et des personnes ayant un handicap très im-
portant et complexe à condition d’avoir reçu de bonnes
instructions.
• Les enfants de moins de 3 ans doivent être tenus à l’écart
de l’appareil, à moins d’être surveillés en permanence.
• Les enfants ne doivent pas jouer avec l’appareil.
• Les enfants ne doivent pas nettoyer ni entreprendre une
opération de maintenance sur l’appareil sans surveillance.
• Ne laissez pas les emballages à la portée des enfants
et jetez-les convenablement.
1.2 Sécurité générale
• Cet appareil est conçu pour un usage domestique et
des applications équivalentes, telles que:
- Dans des fermes, des coins cuisines réservés au
personnel dans des magasins, bureaux et autres
- L’utilisation par les clients des hôtels, motels, des en-
vironnements du type chambres d’hôtes et autres en-
1. INFORMATIONS DE SÉCURITÉ

18
vironnements à caractère résidentiel
• AVERTISSEMENT : Veillez à ce que les orices de
ventilation, situés dans l’enceinte de l’appareil ou la
structure intégrée, ne soient pas obstrués.
• AVERTISSEMENT : N’utilisez aucun autre dispositif
mécanique ou autre pour accélérer le processus de dé-
givrage que ceux recommandés par le fabricant.
• AVERTISSEMENT : N’endommagez pas le circuit de
réfrigération.
• AVERTISSEMENT : N’utilisez pas d’appareils élec-
triques à l’intérieur des compartiments de conservation
des aliments de l’appareil, sauf s’ils sont du type re-
commandé par le fabricant.
• Ne pulvérisez pas d’eau ni de vapeur pour nettoyer
l’appareil.
• Nettoyez l’appareil avec un chion doux humide. Utili-
sez uniquement un détergent neutre. N’utilisez pas de
produits abrasifs, de tampons à récurer, de solvants ni
d’objets métalliques.
• Ne pas stocker dans cet appareil des substances ex-
plosives telles que des aérosols contenant des gaz pro-
pulseurs inammables.
• Si le câble d’alimentation est endommagé, il doit être
remplacé par le fabricant, son atelier d’entretien ou un
technicien qualié an d’éviter tout danger.
• Ce dispositif n’est prévu ni pour un usage professionnel
ni pour un usage commercial
www.aeg.com

19FRANÇAIS
2. CONSIGNES DE SÉCURITÉ
2.1 Maintenance
• Pour réparer l’appareil, contactez un ser-
vice après-vente agréé. Utilisez exclusive-
ment des pièces d’origine.
• Veuillez noter qu’une autoréparation
ou une réparation non professionnelle
peuvent avoir des conséquences sur la
sécurité et annuler la garantie.
• Les pièces d’origine suivantes seront dis-
ponibles pendant 7 ans après l’arrêt du
modèle : thermostats, capteurs de tempé-
rature, cartes circuits imprimées, sources
lumineuses, poignées de portes, char-
nières de portes, plaques et balconnets.
Veuillez noter que certaines de ces pièces
de rechange ne sont disponibles qu’au-
près de réparateurs professionnels et que
toutes les pièces de rechange ne sont pas
adaptées à tous les modèles.
• Les joints de portes seront disponibles
pendant 10 ans après l’arrêt du modèle.
2.2 Instructions d’installation
ATTENTION! L’appareil doit être
installé uniquement par un profes-
sionnel qualié.
• Retirez l’intégralité de l’emballage.
• N’installez pas et ne branchez pas un
appareil endommagé.
• Suivez scrupuleusement les instructions
d’installation fournies avec l’appareil.
• L’appareil est lourd, soyez toujours
prudent lorsque vous le déplacez. Por-
tez toujours des gants de sécurité.
• Assurez-vous que l’air circule autour
de l’appareil.
• Attendez au moins 4 heures avant de
raccorder l’appareil à l’alimentation
électrique. Ceci permet à l’huile de re-
venir dans le compresseur.
• N’installez pas l’appareil à proximité
des radiateurs, des cuisinières, des
fours ou des plaques de cuisson.
• L’arrière de l’appareil doit s’appuyer
contre le mur.
• N’installez pas l’appareil dans un endroit
exposé à la lumière directe du soleil.
• N’installez pas cet appareil dans des
zones trop humides ou trop froides,
telles que les cabines de chantier, les
garages ou les celliers à vin.
• Lorsque vous déplacez l’appareil, veil-
lez à le soulever par l’avant pour éviter
de rayer le sol.
2.3 Connexion électrique
ATTENTION! Risque d’incendie
ou d’électrocution.
ATTENTION! Lorsque vous instal-
lez l’appareil, assurez-vous que le
câble d’alimentation n’est pas coin-
cé ou endommagé.
ATTENTION! L’appareil ne doit
pas être raccordé à l’aide d’une ral-
longe ou d’une prise multiple.
• L’appareil doit être relié à la terre.
• L’ensemble des branchements élec-
triques doit être eectué par un tech-
nicien qualié.
• Vériez que les données électriques -
gurant sur la plaque signalétique corres-
pondent à celles de votre réseau. Si ce
n’est pas le cas, contactez un électricien.
• Branchez toujours la prise principale
dans une prise correctement installée,
protégée contre les chocs.
• N’utilisez pas d’adaptateurs multi-
prises ni de rallonges.
• Veillez à ne pas endommager les com-
posants électriques tels que la che
secteur, le câble d’alimentation ou le
compresseur. Contactez le service
après-vente ou un électricien pour
changer les composants électriques.
• Le câble d’alimentation doit rester en
dessous du niveau de la che secteur.
• Ne branchez la che d’alimentation à la
prise de courant qu’à la n de l’installation.
Assurez-vous que la prise de courant est
accessible une fois l’appareil installé.
• Pour débrancher l’appareil, ne tirez
jamais sur le câble d’alimentation élec-
trique. Tirez toujours sur la che pour
la débrancher de la prise secteur.
• Lorsque vous installez l’appareil, as-
surez-vous que le câble d’alimentation
n’est pas coincé ou endommagé.
• Ne placez pas des multiprises por-
tables or ou des prises d’alimentation
portables à l’arrière de l’appareil.

20
2.4 Utilisation
ATTENTION! Risque de bles-
sures, de brûlures, d’électrocution
ou d’incendie.
L’appareil contient du gaz inam-
mable, l’isobutane (R600a), un gaz
naturel très respectueux de l’envi-
ronnement. Veillez à ne pas en-
dommager le circuit de réfrigération
contenant de l’isobutane.
• Ne modiez pas les caractéristiques
de cet appareil.
• Ne placez aucun appareil électrique
(sorbetière, etc.) dans l’appareil, en
l’absence d’indications du fabricant.
• Si le circuit frigorique est endom-
magé, assurez-vous de l’absence de
ammes et de sources d’ignition dans
la pièce. Aérez la pièce.
• Évitez tout contact d’éléments chauds
avec les parties en plastique de l’appareil.
• Ne placez jamais de boissons ga-
zeuses dans le congélateur. Cela
engendrerait une pression sur le réci-
pient de la boisson.
• Ne stockez jamais de gaz ou de liquide
inammable dans l’appareil.
• Ne placez pas de produits inam-
mables ou d’éléments imbibés de pro-
duits inammables à l’intérieur ou à
proximité de l’appareil, ni sur celui-ci.
• Ne touchez pas le compresseur ni le
condenseur. Ils sont chauds.
2.5 Éclairage interne
AVERTISSEMENT!
Risque d’électrocution !
• Concernant la/les lampe(s) à l’inté-
rieur de ce produit et les lampes de
rechange vendues séparément : Ces
lampes sont conçues pour résister à
des conditions physiques extrêmes
dans les appareils électroménagers,
telles que la température, les vibra-
tions, l’humidité, ou sont conçues
pour signaler des informations sur le
statut opérationnel de l’appareil. Elles
ne sont pas prévues pour être utili-
sées dans d’autres applications et ne
conviennent pas pour l’éclairage des
pièces d’une maison.
2.6 Entretien et nettoyage
ATTENTION! Risque de blessure
corporelle ou de dommages maté-
riels.
• Avant toute opération d’entretien, étei-
gnez l’appareil et débranchez la prise
secteur.
• Cet appareil contient des hydrocar-
bures dans son circuit de réfrigération.
L’entretien et la recharge du circuit de
réfrigération doivent être eectués par
un professionnel qualié.
• Examinez régulièrement l’écoulement
de l’appareil et si nécessaire, net-
toyez-le. Si l’orice est bouché, l’eau
provenant du dégivrage s’écoulera en
bas de l’appareil.
• La poussière présente derrière le réfri-
gérateur et sur le sol doit être régulière-
ment nettoyée pour améliorer l’eet de la
réfrigération et les économies d’énergie.
• L’intérieur de la cave à vin doit être net-
toyé régulièrement pour éviter les odeurs.
• Vériez régulièrement le joint d’étan-
chéité de la porte pour contrôler l’ab-
sence de débris.
• Avant de procéder au nettoyage, veuil-
lez débrancher l’alimentation, retirer tous
les aliments, les étagères, les bacs, etc.
• Nettoyez le joint d’étanchéité de la
porte avec un savon doux et de l’eau.
• Utilisez un tissu doux ou une éponge
pour nettoyer l’intérieur de la cave à vin
avec deux cuillères à soupe de bicarbo-
nate de soude et un litre d’eau chaude.
Rincez ensuite à l’eau et essuyez. Ou-
vrez la porte et laissez sécher à l’air
libre avant de rebrancher l’alimentation.
• Pour les zones de la cave à vin qui
sont diciles à nettoyer (comme les
espaces, les sandwiches étroits ou
les coins), il est recommandé de les
essuyer régulièrement avec un chion
doux, une brosse souple, etc. et, si né-
cessaire, d’y associer certains outils
auxiliaires (comme des tiges nes) pour
s’assurer de l’absence d’accumulation
de contaminants dans ces zones.
• N’utilisez pas de savon, de détergent,
de poudre à récurer, d’agent nettoyant
en spray, etc., car ils peuvent provo-
quer l’apparition d’odeurs à l’intérieur
de la cave à vin.
www.aeg.com
La page charge ...
La page charge ...
La page charge ...
La page charge ...
La page charge ...
La page charge ...
La page charge ...
La page charge ...
La page charge ...
La page charge ...
La page charge ...
La page charge ...
La page charge ...
La page charge ...
La page charge ...
La page charge ...
La page charge ...
La page charge ...
La page charge ...
La page charge ...
La page charge ...
La page charge ...
La page charge ...
La page charge ...
La page charge ...
La page charge ...
La page charge ...
La page charge ...
La page charge ...
La page charge ...
La page charge ...
La page charge ...
La page charge ...
La page charge ...
La page charge ...
La page charge ...
La page charge ...
La page charge ...
La page charge ...
La page charge ...
-
 1
1
-
 2
2
-
 3
3
-
 4
4
-
 5
5
-
 6
6
-
 7
7
-
 8
8
-
 9
9
-
 10
10
-
 11
11
-
 12
12
-
 13
13
-
 14
14
-
 15
15
-
 16
16
-
 17
17
-
 18
18
-
 19
19
-
 20
20
-
 21
21
-
 22
22
-
 23
23
-
 24
24
-
 25
25
-
 26
26
-
 27
27
-
 28
28
-
 29
29
-
 30
30
-
 31
31
-
 32
32
-
 33
33
-
 34
34
-
 35
35
-
 36
36
-
 37
37
-
 38
38
-
 39
39
-
 40
40
-
 41
41
-
 42
42
-
 43
43
-
 44
44
-
 45
45
-
 46
46
-
 47
47
-
 48
48
-
 49
49
-
 50
50
-
 51
51
-
 52
52
-
 53
53
-
 54
54
-
 55
55
-
 56
56
-
 57
57
-
 58
58
-
 59
59
-
 60
60


dans d''autres langues
- italiano: AEG KWK884520T Manuale utente
- English: AEG KWK884520T User manual
- Deutsch: AEG KWK884520T Benutzerhandbuch
Documents connexes
Autres documents
-
Electrolux WK4PL10SP Manuel utilisateur
-
Electrolux WK4PL10CN Manuel utilisateur
-
-
-
Electrolux KBW5X Manuel utilisateur
-
Haier WS137GDNFI Manuel utilisateur
-
Haier WS190GA Manuel utilisateur
-
Haier WS105GA Manuel utilisateur
-
Fulgor Milano F7IBW24O2-L Manuel utilisateur