SPM1702SB Notebook muis met
aansluitkabel
Let op:
De optische technologie kan de muisbeweging nauwkeurig detecteren op de
meeste oppervlakken. Vermijdt het gebruik van de notebook muis op
reflecterende en transparant metallieke oppervlakken en oppervlakken met
een druk patroon.
NL
SPM1702SB Rato com Fio para
Computador Portátil
Nota:
A tecnologia óptica pode detectar com precisão o movimento do rato na
maior parte das superfícies. Evite usar o rato para computador portátil em
qualquer superfície reflectiva, transparente e metálica ou com padrões
complexos.
P
SPM1702SB Mouse con filo per Notebook
Nota:
La tecnologia ottica può individuare il movimento del mouse sulla maggior
parte delle superfici. Evitare di utilizzare il mouse per notebook su superfici
riflettenti, metalliche e trasparenti o complesse.
I
SPM1702SB Bærbar mus med ledning
Note:
Den optiske teknologi kan præcist opfange musens bevægelser på de fleste
overflader. Undgå at bruge bærbar musen på hvilken som helst reflektive,
gennemsigtige metalliske eller overflader med inviklede mønstre.
DK
SPM1702SB Wired Notebook Mouse
Note:
The optical technology can precisely detect the mouse motion on most
surfaces. Avoid using the notebook mouse on any reflective, transparent
metallic or complex-pattern surface.
GB
SPM1702SB Notebook Kabel-Maus
Anmerkung:
Die Lasertechnologie kann die Bewegung der Maus auf den meisten
Oberflächen präzise erfassen. Benutzen Sie die Notebook-Maus möglichst
nicht auf reflektierenden, durchsichtigen oder metallischen Oberflächen, oder
Oberflächen mit komplexen Mustern.
D
SPM1702SB Souris Câblée Pour Notebook
Remarque:
La technologie optique peut détecter avec précision les mouvements de la
souris sur la plupart des surfaces.Veuillez éviter d’utiliser la souris pour
notebook sur toute surface réfléchissante, transparente d’aspect métallique ou
au motif compliqué.
F
SPM1702SB Ratón con cable para portátil
Advertencia:
La tecnología óptica del ratón detecta sus movimientos en casi cualquier
superficie. Evite usar el ratón para portátil sobre una superficie reflectante,
transparente, metálica o con estampados intrincados.
E
SPM1702SB Langallinen hiiri
kannettavalle tietokoneelle
Huomaa:
Optisen teknologian avulla hiiren liikuttaminen useimmilla pinnoilla on erittäin
täsmällistä. Vältä kannettavan tietokoneen hiiren käyttämistä millään
heijastavalla, metallisen läpikuultavalla tai monimuotoisella pinnalla.
FIN
SCO5300/10_QSG_aw_back 11 April 2008_06 Fold size: H105mm x W148.5mm Materiel size: H420mm x W519.75mm
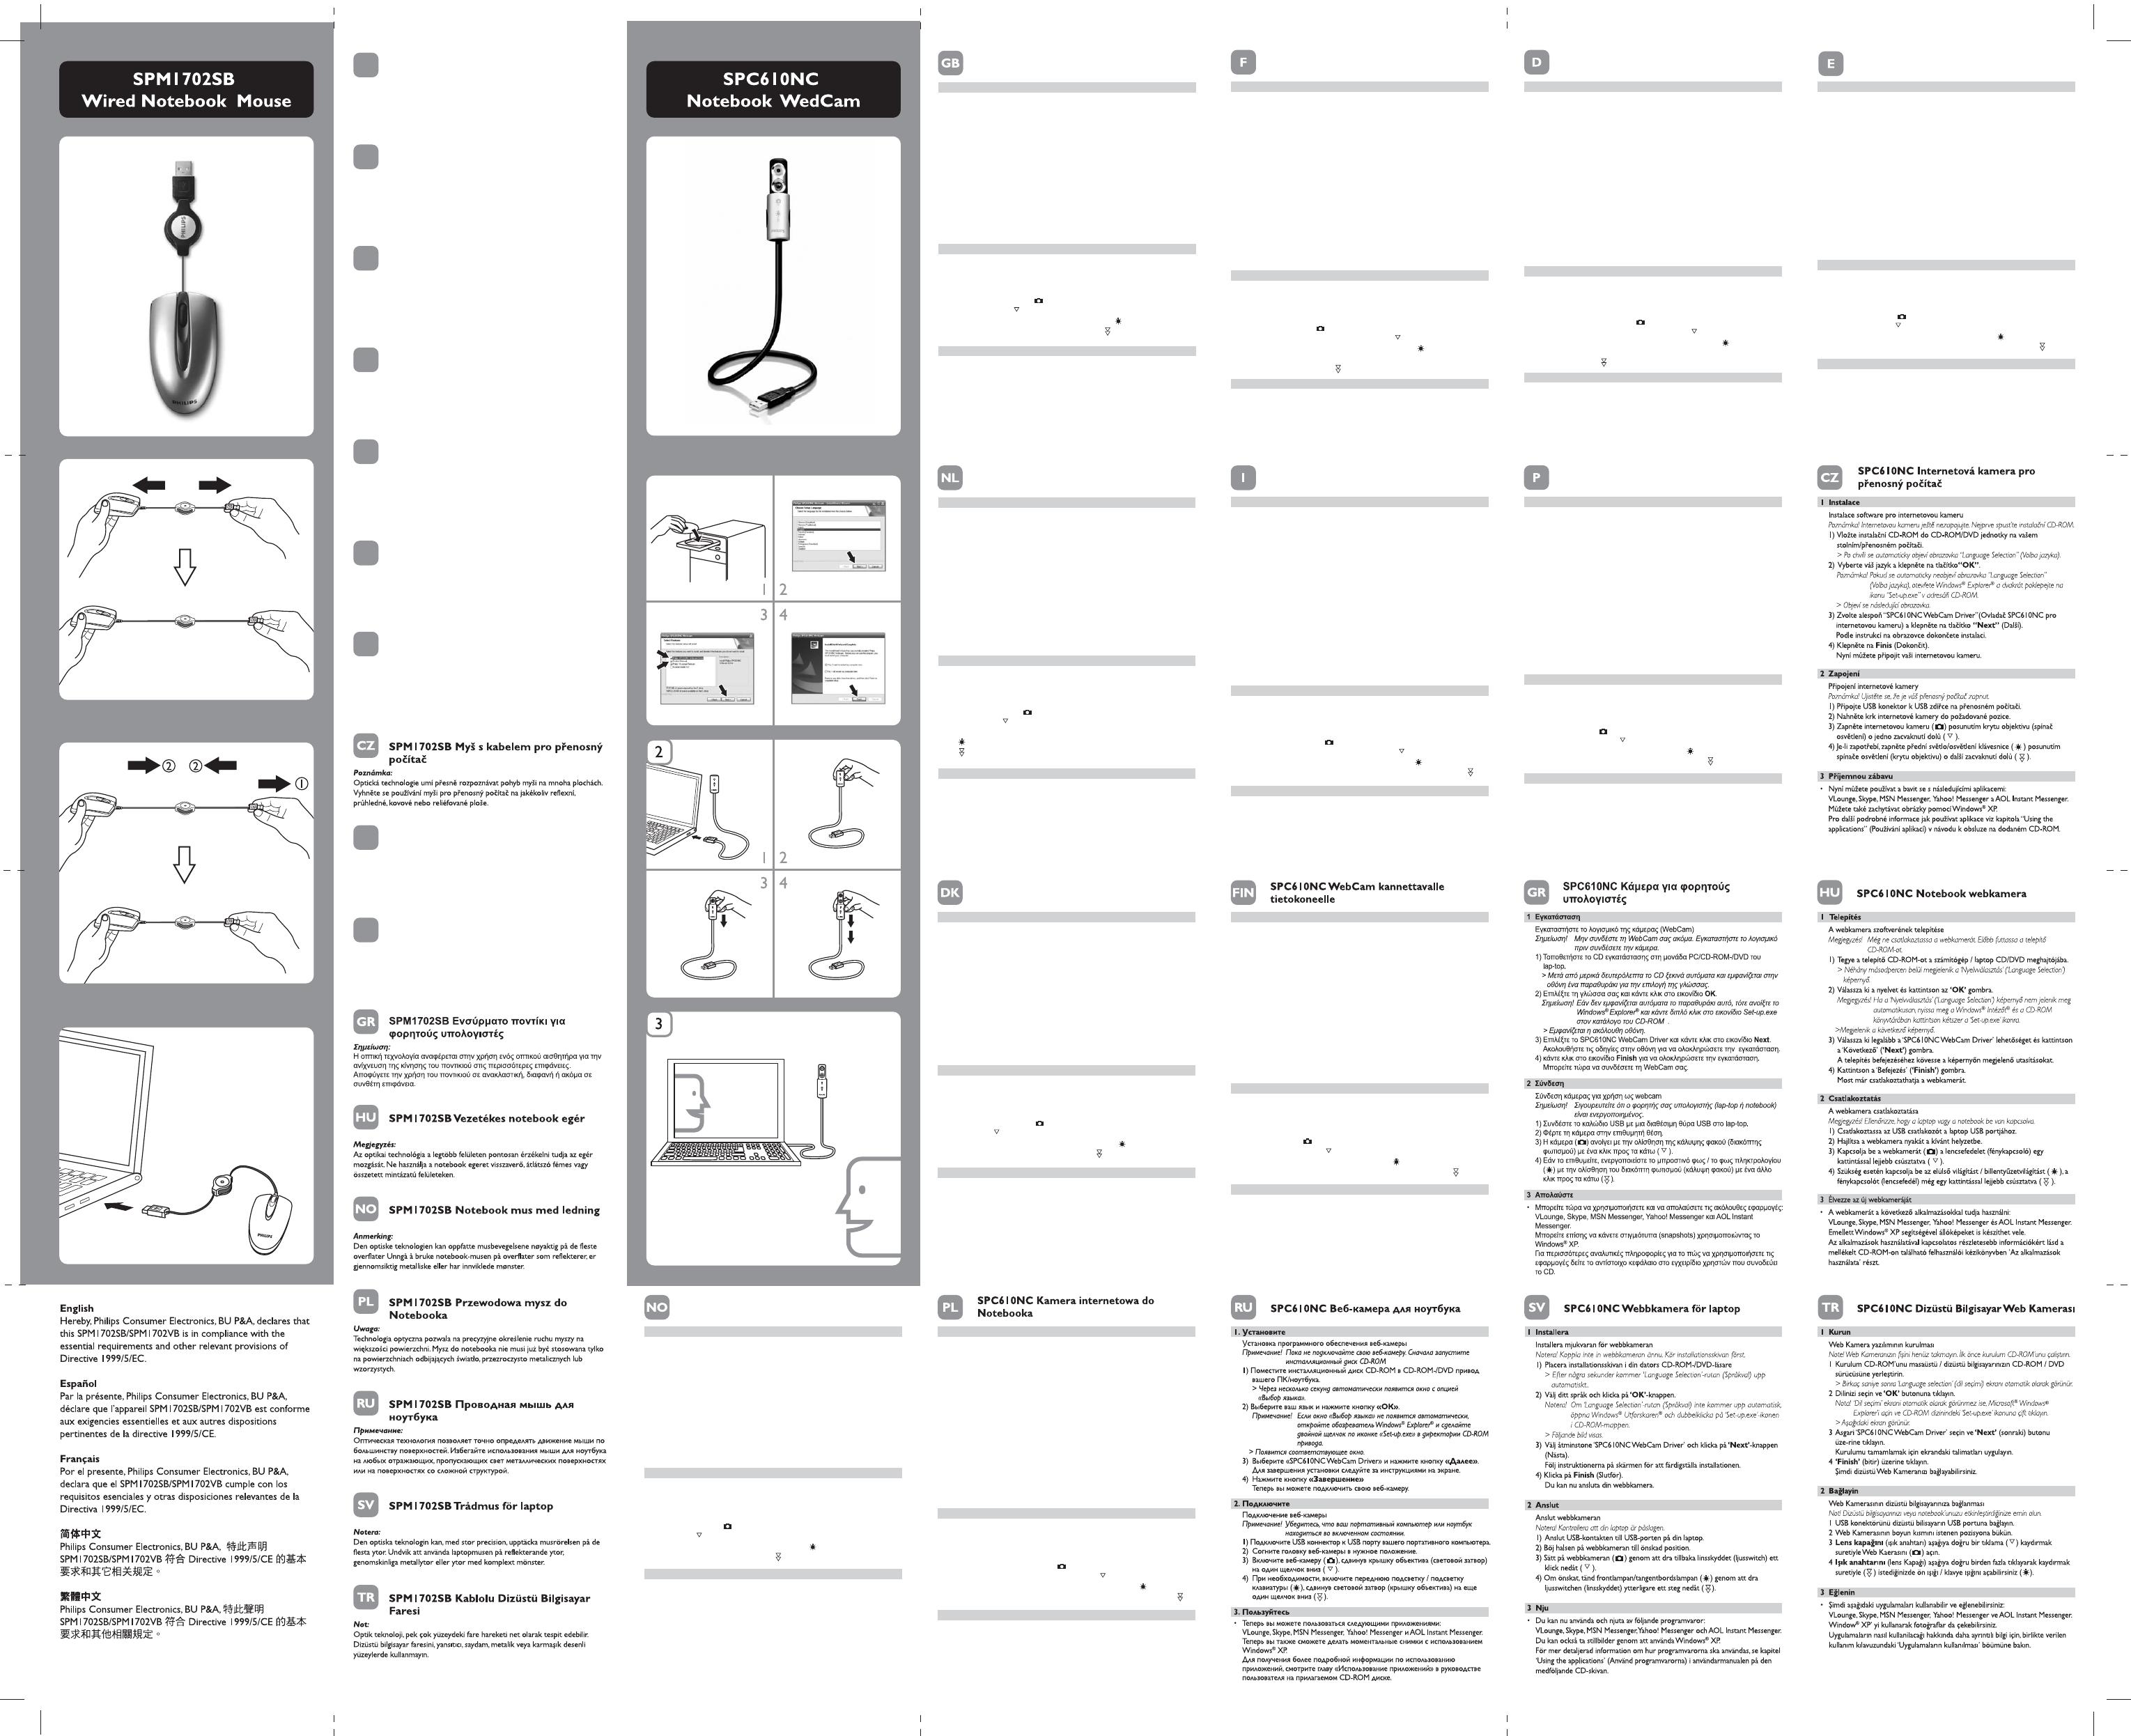
SPC610NC Notebook WebCam
1 Install
Install the WebCam software
Note! Do not plug in your WebCam yet. Run the Installation CD-ROM first.
1 Place the installation CD-ROM in your PC’s / laptop’s CD-ROM-/DVD drive.
> After a couple of seconds the ‘Language Selection’ screen appears automatically.
2 Select your language and click on the ‘OK’ button.
Note! If the ‘Language Selection’ screen does not appear automatically, open
Windows
®
Explorer
®
and double-click the ‘Set-up.exe’icon in the CD-ROM
directory.
>The following screen appears.
3 Select at least the ‘SPC610NC WebCam Driver’ and click on the ‘Next’
button.
Follow the instructions on the screen to complete the installation.
4 Click on Finish.
You can now connect your WebCam.
2 Connect
Connecting the WebCam
Note! Be sure your laptop or notebook is activated.
1 Connect the USB connector to the USB port of the laptop.
2 Bend the WebCam neck into the desired position.
3 Switch on the WebCam ( ) by sliding the lens cover (light switch) one
click downwards ( ).
4 If desired, switch on the front light / keyboard light ( ) by sliding the light
switch (lens cover) one more click downwards ( ).
3 Enjoy
• You can now use and enjoy the following applications:
VLounge, Skype, MSN Messenger, Yahoo! Messenger and AOL Instant
Messenger.
You can also make snap snapshots using Windows
®
XP.
For more detailed information on how to use the applications see chapter
‘Using the applications’in the user manual on the CD-ROM supplied.
SPC610NC Notebook WebCam
1 Installation
Installation du logiciel de la WebCam
Remarque! Ne branchez pas encore la WebCam. Exécutez tout d’abord le
CD-ROM d’installation.
1 Insérez le CD-ROM d’installation dans le lecteur de CD-ROM/DVD de votre
PC/ordinateur portable.
> Au bout de quelques secondes, l’écran de ‘sélection de la langue’ s’ouvre
automatiquement.
2 Sélectionnez la langue de votre choix et cliquez sur le bouton ‘OK’.
Remarque! Si l’écran de ‘sélection de la langue’ ne s’affiche pas
automatiquement, ouvrez I’Explorateur Microsoft
®
Window
®
et cliquez
deux fois sur l’icône ‘Set-up.exe’ située dans le repertoire CD-ROM.
> L’écran suivant s’ouvre.
3 Sélectionnez au moins le ‘SPC610NC WebCam Driver’ et cliquez sur le
bouton Next (suivant).
Suivez les instructions qui apparaissent à l’écran pour effectuer l’installation.
4 Cliquez sur Finish (terminer)
Vous pouvez alors connecter votre WebCam pour ordinateur portable.
2 Connexion
Connexion de la WebCam
Remarque: Vérifiez que votre ordinateur portable ou notebook est activé
1 Raccordez le connecteur USB au port USB de l’ordinateur portable.
2 Orientez le support de la WebCam vers l’angle souhaité.
3 Allumez la WebCam ( ) en faisant glisser le couvercle de l’objectif
(interrupteur de la lampe) d’un clic vers le bas ( ).
4 Si vous le souhaitez, allumez la lampe frontale / clavier ( ) en faisant glisser
l’interrupteur de la lampe (couvercle de l’objectif) d’un clic
supplémentaire vers le bas ( ).
3 Plaisir
• Vous pouvez maintenant utiliser et apprécier les applications suivantes:
VLounge, Skype, MSN Messenger, Yahoo! Messenger et AOL Instant Messenger.
Vous pouvez aussi prendre des instantanés avec Windows
®
XP.
Pour en savoir plus sur l’utilisation des applications, consultez le chapitre
Utilisation des applications du manuel d’utilisation, sur le CD-ROM fourni.
SPC610NC Notebook WebCam
1 Anschluss
Installieren der WebCam-software
Hinweis! Schließen Sie die WebCam noch nicht an. Legen Sie zuerst die
Installations-CD-ROM ein und führen Sie das Installationsprogramm aus..
1 Legen Sie die Installations-CD-ROM in das CD-ROM-/DVD-Laufwerk Ihres
Computers/Laptops ein.
> Nach einigen Sekunden erscheint automatisch die Sprachenauswahl.
2 Wählen Sie die gewünschte Sprache und klicken Sie dann auf ‘OK’.
Hinweis! Iwenn der Bildschirm für die Sprachenauswahl nicht automatisch erscheint,
öffnen Sie den Windows
®
Explorer
®
und doppelklicken dann im
CD-ROM-Verzeichnis auf das Symbol ‘Set-up.exe.’.
> Daraufhin erscheint der folgende Bildschirm.
3 Wählen Sie mindestens den ‘SPC610NC WebCam-Driver’und klicken Sie auf
den Button Next (Weiter).
Folgen Sie den Anweisungen auf dem Bildschirm, um die Installation
abzuschließen.
4 Klicken Sie auf Finish (Beenden).
Jetzt können Sie Ihre Laptop-WebCam anschließen.
2 Anschluss
Anschluss der WebCam
Achtung! Vergewissern Sie sich, dass Ihr Laptop oder Notebook aktiviert ist.
1 Schließen Sie den USB-Verbinder an den USB-Port des Laptops an.
2 Biegen Sie den Schwanenhals der WebCam in die gewünschte Position.
3 Schalten Sie die WebCam ein ( ), indem Sie den Objektivdeckel
(Lichtschalter) einen Klick nach unten schieben ( ).
4 Wenn Sie wollen, können Sie das Frontlicht / Tastaturlicht ( ) durch Schieben
des Lichtschalters (Objektivdeckels) einen Klick oder mehrere Klicks nach
unten einschalten ( ).
3 Los geht’s!
• Jetzt können Sie die folgenden Anwendungen nutzen und genießen:
VLounge, Skype, MSN Messenger, Yahoo! Messenger und AOL Instant Messenger.
Sie können auch Schnappschüsse mit Windows
®
XP anfertigen.
Für ausführlichere Informationen darüber, wie die Anwendungen benutzt
warden, siehe Kapitel, Benutzen der Anwendungen’ in der Bedienungsanleitung
auf der mitgelieferten CD-ROM.
SPC610NC Notebook WebCam
1 Installeren
WebCam software installeren
Let op! Sluit uw WebCam nog niet aan. Start eerst de installatie-cd-rom.
1 Leg de installatie-cd-rom in het cd-rom-/dvd-station van uw computer/laptop.
> Enkele seconden later verschijnt automatisch het taalkeuzescherm (‘Language
selection’).
2 Kies uw taal en klik op ‘OK’.
Let op! Als het taalkeuzescherm (‘Language selection’) niet automatisch verschijnt,
open dan Microsoft
®
Windows
®
Explorer en dubbelklik op het pictogram
‘Set-up.exe’ in de cd-rom-directory.
> Op uw monitor verschijnt het volgende scherm.
3 Kies in elk geval ‘SPC610NC WebCam Driver’ en klik op Next (Volgende).
Volg de instructies op het scherm om het installeren af te ronden.
4 Klik op finish (Afsluiten).
U kunt nu wu laptop-WebCam aansluiten.
2 Aansluiten
Aansluiten van de WebCam
Let op! Zorg ervoor dat uw laptop of notebook ingeschakeld is.
1 Sluit de USB-connector aan op de USB-poort van de laptop.
2 Buig de nek van de WebCam in de gewenste stand.
3 Schakel de WebCam ( ) in door het lenskapje (lichtschakelaar) één klik
naar beneden ( ) te schuiven.
4 Indien gewenst, kunt u het lampje aam de voorkant / de toetsenbordverlichting
( ) inschakelen door de lichtschakelaar (lenskapje) één klik naar beneden
( ) te schuiven.
3 Genieten
• U kunt nu van de volgende programma’s gebruik maken en genieten:
VLounge, Skype, MSN Messenger, Yahoo! Messenger en AOL Instant Messenger.
U kunt ook foto’s maken met Windows
®
XP.
Voor meer details over het gebruik van deze toepassingen, zie het hoofdstuk
‘Toepassingen gebruiken’ in de gebruiksaanwijzing op de bijgeleverde cd-rom.
SPC610NC WebCam per Notebook
1 Installare
Installare il software della WebCam
Nota! Non collegate ancora la WebCam.
Prima, eseguite il CD d’installazione.
1 Inserite il CD di installazione nell’unità CD/DVD-ROM del
computer/notebook.
> Dopo alcuni secondi, appare automaticamente lo schermo ‘Language selection’
(Selezione lingua).
2 Selezionate la lingua e fate clic sul pulsante ‘OK’.
Nota! Se lo schermo per la selezione della lingua ‘Lanugage selection’ non compare
automaticamente, aprite Esplora risorse di Microsoft
®
Window
®
e fate doppio
clic sull’icona ‘Set-up.exe’ nella cartella del CD.
> Viene visualizzato il seguente schermo.
3 Selezionare ‘SPC610NC WebCam Driver’ (Driver WebCam SPC610NC) e
fare clic sul tasto Next (Avant).
Seguite le istruzioni su schermo per terminare l’installazione.
4 Fare clic su Finish (Fine).
È quindi possibile collegare la WebCam per laptop.
2 Collegare
Collegare della WebCam
Nota! Assicurarsi Che il laptop o il notebook sia acceso.
1 Collegare il connettore USB alla porta USB del laptop.
2 Inclinare il collo della WebCam nella posizione desiderata.
3 Accendere la WebCam ( ) facendo scorrere il coperchio della lente
(interruttore della luce) di un clic verso il basso ( ).
4 Se necessario, accendere la luce frontale/luce tastiera ( ) facendo scorrere
l’interruttore della luce (coperchio della lente) di un clic verso il basso ( ).
3 Gustare
• È quindi possibile utilizzare e mettere in funzione le seguenti applicazioni:
VLounge, Skype, MSN Messenger, Yahoo! Messenger ed AOL Instant Messenger.
È inoltre possible eseguire delle fotografie dello schermo con Windows
®
XP.
Per ulteriori informazioni sull’utilizzo delle applicazioni, consultate il capitolo ‘Uso
delle applicazioni’ nel manuale di istruzioni del CD-ROM fornito in dotazione.
SPC610NC Bærbar WebCam
1 Installere
Installere softwaren til WebCam.
Obs! Tilslutte ikke WebCam endnu. Køre først installationen på CD-rommen.
1) Placere installations CD-rommen i din PC/bærbar CD-Rom drev.
> Efter nogle få sekunder vises “Sprogvalgs” skærmen automatisk
2) Vælge dit sprog og klikke på “OK” knappen.
Obs! Såfremt “Sprogvalgs” skærmen ikke vises automatisk, skal du åbne
Windows
®
Explorer
®
og dobbelt-klikke på “Set-up.exe” ikonet i CD-Rom
mappen.
> Følgende skærm vises.
3) Vælge i det mindset “SPC610NC WebCam Driver” og klikke på “Næste”
Følge vejledningen på skærmen for at fuldføre installationen.
4) Klikke på “Afslut”.
Du kan nu tilslutte dit WebCam.
2 Forbindelse
Forbindelse af WebCammet.
Obs! Sikre at din bærbar er tændt.
1) Tilslutte USB kablet til USB Porten af bærbaren.
2) Bøje WebCam nakken til den ønskede position.
3) Tænd for WebCammet ( ) ved at skubbe lenscoveret (lys-kontakten) et
klik nedaf ( ).
4) Såfremt det ønskes, tænd for frontlys / tastatur lys ( ) ved at skubbe
lys-kontakten (lenscoveret) et til klik nedaf ( ).
3 Nyd
• Du kan nu anvende og nyde følgende programmer:
VLounge, Skype, MSN Messenger, Yahoo! Messenger og AOL Instant Messenger.
Du kan også tage billeder ved brug af Windows
®
XP.
For mere detaljeret information på hvorledes at bruge programmerne, se
kapitlen “Brug af programmer” i brugervejledningen på CD-Rommen.
1 Asenna
Asenna WebCam -ohjelmisto
Huomaa! Älä kytke WebCamia vielä päälle. Aja koneelle ensin asennus-CD-ROM.
1) Aseta asennus-CD-ROM tietokoneesi / kannettavan tietokoneesi
CD-ROM-/DVD-levyasemalle.
> Muutaman sekunnin kuluttua näytölle ilmestyy automaattisesti "Kielivalinta".
2) Valitse kieli ja napsauta OK-painiketta.
Huomaa! Jos "Kielivalinta" ei ilmesty näytölle automaattisesti, avaa Windows
®
Explorer
®
ja kaksoisnapsauta "Set-up.exe"-kuvaketta CD-ROM-
hakemistosta.
> Ilmestyy seuraava näyttö.
3) Valitse ainakin "SPC610NC WebCam Driver" ja napsauta "Seuraava"
-painiketta.
Suorita asennus loppuun seuraamalla näytöllä olevia ohjeita.
4) Napsauta lopeta.
Voit nyt kytkeä WebCamin päälle.
2 Kytke päälle
Kytke WebCam päälle.
Huomaa! Varmista, että kannettava tietokoneesi on päällä.
1) Liitä USB-liitin kannettavan tietokoneesi USB-porttiin.
2) Taivuta WebCam haluamaasi asentoon.
3) Kytke WebCam ( ) päälle liu'uttamalla linssinsuojusta (valokytkin) yhdellä
napsautuksella alaspäin ( ).
4) Halutessasi kytke etuvalo / näppäimistön valo ( ) päälle liu'uttamalla
valokytkintä (linssinsuojusta) toisen napsautuksen verran alaspäin ( ).
3 Nauti
• Voit nyt käyttää ja nauttia seuraavista sovelluksista:
VLounge, Skype, MSN Messenger, Yahoo! Messenger ja AOL Instant Messenger.
Voit myös ottaa kuvia Windows
®
XP-käyttöjärjestelmän avulla.
Saat lisätietoja sovelluksista mukana toimitetun CD-ROM-levyn käyttöoppaan
kappaleesta "Using the applications".
SPC610NC Notebook Webkamera
1 Installasjon
Installer WebCam programvaren
OBS! Du må ikke koble til din WebCam enda. Kjør installasjons CD-ROM først.
1) Sett installasjons CD-ROM i PC/ laptop driveren for CD-ROM-/DVD disker.
> Etter noen sekunder vil du få opp automatisk vinduet for “Språk valg”.
2) Velg ditt språk og klikk på “OK”.
OBS! Hvis “Språk valg” vinduet ikke viser seg automatiske, må du åpne Windows
®
Explorer
®
og dobbelklikke på ikonet “set-up.exe” i CD-ROM mappen.
> Følgende skjerm vises.
3) Velg følgende driver “SPC610NC WebCam Driver” og klikk på “neste”.
Følg instruksene på skjermen for å fullføre installasjonen.
4) Klikk på avslutt.
Nå kan du koble til ditt WebCam.
2 Koble til
Koble til WebCam
OBS! Kontroller at laptop/ notebook er aktivert.
1) Koble USB pluggen til USB porten i din laptop.
2) Bøy WebCam foten i ønsket posisjon.
3) Skru på WebCam ( ) ved å skyve linsedekselet (lysbryteren) et klikk
nedover ( ).
4) Hvis ønskelig, skru på frontlyset / tastaturlyset ( ) ved å skylve lysbryteren
(linsedekselet ) et klikk til nedover ( ).
3 Bruk
• Nå kan du ta i bruk og nyte fordelene av følgende applikasjoner:
VLounge, Skype, MSN Messenger, Yahoo! Messenger og AOL Instant Messenger.
Du kan også lage bilder ved hjelp av Windows
®
XP.
For mer informasjon om bruk av applikasjonen, se kapittel “Bruke
applikasjonene” i brukermanualen som du finner på medfølgende CD-ROM.
1. Instalacja
Instalacja oprogramowania kamerki internetowej
Uwaga! Nie wkładać jeszcze wtyku kamerki internetowej do komputera. Wpierw
uruchomić proces instalacyjny z płyty CD-ROM.
1) Włożyć płytę instalacyjną CD-ROM do napędu CD-ROM/DVD komputera
osobistego/laptopa.
> Po kilku sekundach pojawi się automatycznie ekran ‘Wybór języka’.
2) Wybrać język i kliknąć przycisk ‘OK’.
Uwaga! Jeśli ekran ‘Wybór języka’ nie pojawi się automatycznie, otworzyć
Windows
®
Explorer
®
i dwa razy kliknąć na ikonę pliku ‘Set-up.exe’ w
folderze CD-ROM.
> Pojawia się następujący ekran.
3) Wybrać przynajmniej ‘SPC610NC WebCam Driver’ i kliknąć na przycisk
‘Dalej’.
Wykonywać instrukcje ekranowe w celu dokończenia instalacji.
4) Kliknąć na Zakończ.
Teraz można podłączyć kamerkę internetową.
2. Połączyć
Podłączanie kamerki internetowej
Uwaga! Sprawdzić czy laptop lub notebook są włączone.
1) Połączyć wtyk USB z gniazdem USB laptopa.
2) Przygiąć szyjkę kamerki internetowej we właściwym kierunku.
3) Włączyć kamerkę internetową ( ) przesuwając osłonę soczewki
(przełącznik światła) o jedno kliknięcie w dół ( ).
4) Na życzenie, włączyć światło przednie / światło klawiatury ( ) przesuwając
przełącznik światła (osłona soczewek) o jeszcze jedno kliknięcie w dół ( ).
3. Korzystaj i baw się
• Możesz teraz korzystać z kamerki i cieszyć się nią w następujących programach:
VLounge, Skype, MSN Messenger, Yahoo! Messenger i AOL Instant Messenger.
Możesz także robić zdjęcia korzystając z systemu operacyjnego Windows
®
XP.
Dokładniejsze informacje o korzystaniu z programów znajdują się w rozdziale
‘Korzystanie z programów’ w podręczniku użytkownika dostarczonym na płycie
CD-ROM.
SPC610NC WebCam para Computador Portátil
1 Instalar
Instalar o software da WebCam
Notas! Não ligue ainda a WebCam. Introduza primeiro o CD-ROM de instalação.
1 Coloque o CD-ROM de instalação na unidade de CD-ROM/DVD do seu
computador de secretária ou portátil.
> Após alguns segundos aparece automaticamente o ‘Language selection screen’
(Ecrã de selecção do idioma).
2 Seleccione o seu idioma e faça clique sobre o botão ‘OK’.
Notas! Se o ecrã de ‘Language selection’ (Selecção de idioma) não aparecer
automaticamente, abra o Explorador do Microsoft
®
Windows
®
e faça duplo
clique sobre o ícone ‘Set-up.exe’ no directório do CD-ROM.
> Aparece o seguinte ecrã
3 Seleccione pelo menos a opção ‘SPC610NC WebCam Driver’ e clique no
botão Next (Seguinte).
Siga as instruções dadas no ecrã para completer a instalação.
4 Clique em Finish (Concluir).
Pode agora ligar a sua WebCam ao computador portátil.
2 Ligar
Ligação da WebCam
Nota! Certifique-se de que o seu computador portátil esteja activado.
1 Introduza a ficha USB numa porta USB do computador portátil.
2 Dobre a haste da WebCam para a colocar na posição desejada.
3 Ligue a WebCam ( ) deslocando a tampa da lente (interruptor de luz)
uma posição para baixo ( ).
4 Se desejado, ligue a luz frontal / luz do teclado ( ) deslocando o interruptor
de luz (tampa da lente) mais uma posição para baixo ( ).
3 Desfrutar
• Pode agora usar e desfrutar das seguintes aplicações:
VLounge, Skype, MSN Messenger, Yahoo! Messenger and AOL Instant Messenger.
Também pode tirar fotografias usando o Windows
®
XP.
Para obter informação mais detalhada sobre como usar a aplicação, consulte o
capítulo sobre a Utilização das aplicações, no manual do utilizador contido no
CD-ROM fornecido.
SPC610NC Cámara web para portátil
1 Instale
Instalación del software de la WebCan
Notas! No enchufe todavía la WebCam. Ejecute primero el CD-ROM de instalación.
1 Coloque el CD-ROM de instalación en la unidad de CDROM-/DVD del
ordenador / laptop.
> Tras un par de segundos aparecerá automáticamente la ‘Pantalla de selección de
idioma’.
2 Seleccione su idioma y haga clic en el botón ‘OK’.
Notas! Si la pantalla de ‘Selección de idioma’ no aparece automáticamente, abra el
Explorador de Microsoft
®
Windows
®
y haga doble clic en el icono ‘Autorun.exe’
en el directorio del CD-ROM.
> Aparecerá la siguiente pantalla.
3 Seleccione por lo menos el ‘SPC610NC WebCam Driver’ y haga clic en el
botón Next (siguiente).
Sign las instrucciones en pantalla para finalizar la instalación.
4 Haga clic en Finish (terminar).
Ahora puede conectar su WebCam para portátil.
2 Concecte
Conexióde de la WebCam
¡Nota! Asegúrese de que su portátil o notebook está activado.
1 Concecte el conector USB al Puerto USB del portátil.
2 Doble el cuello de la WebCam en la posición deseada.
3 Active la WebCam ( ) deslizando la cubierta de la lente (interruptor de luz)
un clic hacia abajo ( ).
4 Si lo desea, encienda la luz delantera /luz de teclado ( ) deslizando el
interruptor de la luz (cubierta de la lente) un clic más hacia abajo ( ).
3 Disfrute
• Ahora puede utilizar y disfrutar de las applicaciones siguientes:
VLounge, Skype, MSN Messenger, Yahoo! Messenger y AOL Instant Messenger.
También puede tomar instantáneas utilizando Windows
®
XP.
Para obtener información más detallada sobre cómo utilizar las aplicaciones,
consulte el capitulo ‘Utilización de las aplicaciones’ en el manual del usuario del
CD-ROM suministrado.

