HoMedics Deep Sleep Revitalize White Noise Sleep Sound Machine Le manuel du propriétaire
- Catégorie
- Réveils
- Taper
- Le manuel du propriétaire
Ce manuel convient également à

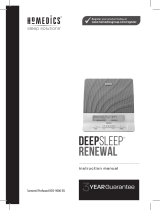
INSTRUCTION MANUAL AND WARRANTY INFORMATION
1-YEAR LIMITED WARRANTY
HDS-3000

2
IMPORTANT SAFEGUARDS:
WHEN USING AN ELECTRICAL PRODUCT, BASIC PRECAUTIONS SHOULD ALWAYS BE FOLLOWED, INCLUDING
THE FOLLOWING:
READ ALL INSTRUCTIONS BEFORE USING.
WARNING –
DO NOT PLACE SPEAKER TOO CLOSE TO EARS. MAY CAUSE DAMAGE
TO EARDRUMS, ESPECIALLY IN YOUNG CHILDREN:
• Close supervision is necessary when this product is used by, on, or near children, invalids, or
disabled persons.
• Use this product only for its intended use as described in this manual. Do not use attach-
ments not recommended by HoMedics.
• DO NOT place or store this product where it can fall or be dropped into a tub or sink.
• DO NOT place or drop into water or any other liquid.
• Not for use by children. THIS IS NOT A TOY.
• NEVER operate this product if it has a damaged cord, plug, cable, or housing.
• Keep away from heated surfaces.
• Only set on dry surfaces. Do not place on surface wet from water or cleaning solvents.
SAVE THESE INSTRUCTIONS
CAUTION
– PLEASE READ ALL INSTRUCTIONS CAREFULLY BEFORE OPERATING.
• NEVER leave the product unattended, especially if children are present.
• NEVER cover the product when it is in operation.
• This unit should not be used by children without adult supervision.
• Always keep the product away from high temperature and fire.

3
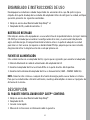
ASSEMBLY AND INSTRUCTIONS FOR USE
Unpack the unit carefully. Remove all the accessories from the carton. Do not remove any labels or
stickers on the bottom of the unit or adapter. Before setting up the unit, verify that the following
contents are present:
• Deep Sleep
®
Revitalize Dual Alarm Clock x 1
• AC adapter and power cord x 1
BACKUP BATTERY
This alarm clock is equipped with a battery backup feature (1 CR-2032 battery included
and installed) to keep the clock time and alarm settings during a power outage. The battery
compartment is located on the bottom of the unit for easy access (a small Phillips-head screwdriver
is required, not included). Please be sure to remove the pull tab before first use.
POWER SOURCE
This unit is supplied with an AC adapter; take the following steps to connect the adapter:
1. Unwind the power cord of the AC adapter to its full length.
2. Connect the AC adapter to the DC5v input on the back of the device.
3. Plug the other end of the AC adapter into an outlet (100V – 240VAC 50/60 Hz).
NOTE: Connecting this system to any other power source may cause damage to the system. For
sufficient ventilation, keep other objects at least 4 inches away from the unit.
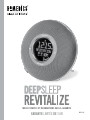
OVERVIEW
DEEP SLEEP
®
REVITALIZE PACKAGE CONTAINS:
• Deep Sleep
®
Revitalize Dual Alarm Clock
• AC Adapter
• Welcome Card
• Instruction Manual and Warranty Information

4
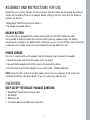
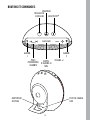
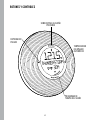
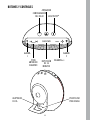
BUTTONS & CONTROLS
PLAY/PAUSE
SELECT
SLEEP SOUNDS
AUTO-OFF TIMER
SELECT SLEEP
THERAPY
PROGRAMS

5
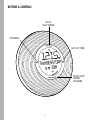
AC ADAPTER
USB CHARGING
PORT
BUTTONS & CONTROLS
CLOCK
TRACK
SNOOZE
TRACK
CLOCK
SET
ALARM
1
PREVIOUS/
NEXT
TRACK
10-MIN
SNOOZE
VOLUME +/-
ALARM
2
DIMMER
BLUETOOTH
®

6
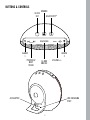
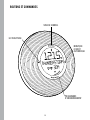
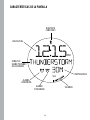
1 2
PM
Vol
BLUETOOTH
CONNECTED
CURRENT TIME
ALARM
1 ON
VOLUME
AUTO-OFF
TIMER
ALARM
2 ON
SELECTED
SLEEP SOUND
DISPLAY FEATURES

7
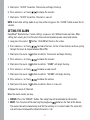
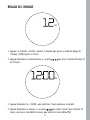
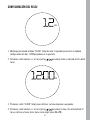
SETTING THE CLOCK
1. Long press the “CLOCK” button for 3 seconds to enter the clock setting mode. 12 PM will flash
on the screen.
2. Short press volume +/- or track
/
to choose between a 12- or 24-hour time format.
3. Short press “CLOCK” to confirm. The hour will begin flashing.
4. Short press volume +/- or track
/
to choose the hour. (In the 12-hour format, continue
cycling through the hours to choose between AM or PM hours.)
PM
PM

8
5. Short press “CLOCK” to confirm. The minutes will begin flashing.
6. Press volume +/- or track
/
to choose the minutes.
7. Short press “CLOCK” to confirm. The clock is now set.
NOTE: To exit clock setting mode at any time, either long press the “CLOCK” button or wait for 10
seconds.
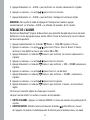
SETTING THE ALARM
Deep Sleep
®
Revitalize has 2 alarm settings so you can set 2 different wake-up times. When
setting each alarm, you’ll set the alarm time and corresponding wake sound and volume.
1. Long press the alarm 1
button. 12:00 AM will flash on the screen.
2. Press volume +/- or track
/
to choose the hour. (In the 12-hour format, continue cycling
through the hours to choose between AM or PM.)
3. Short press the alarm 1
button to confirm. The minutes will begin flashing.
4. Press volume +/- or track
/
to choose the minutes.
5. Short press the alarm 1
button to confirm. “SOUND” will begin flashing.
6. Press volume +/- or track
/
to choose a wake sound.
7. Short press the alarm 1
button to confirm. “VOLUME” will begin flashing.
8. Press volume +/- or track
/
to choose the volume.
9. Short press the alarm 1
button to confirm. Alarm 1 is now set.
10. Repeat for alarm 2 if desired.
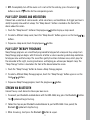
When the alarm sounds you may:
• SNOOZE: Press the “SNOOZE” button. Your sleep time will be extended by 10 minutes.
• RESET: Turn the alarm off by touching the play/pause
button on the front of the device.
The alarm clock will automatically reset for the next day in its current mode. The alarm bell
icon will remain displayed to indicate the alarm is set.

9
• OFF: To completely turn off the alarm so it is not set for the next day, press the alarm 1
button or alarm 2
button for the corresponding alarm.
PLAY SLEEP SOUNDS AND MEDITATION
Choose from a selection of nature sounds, white noise tones, and meditations to trigger your brain’s
ability to quickly relax and fall asleep. The “Sleep Sounds” button is located on the front of the
device above the screen.
1. Touch the “Sleep Sounds” button or the play/pause
button to play a sleep sound.
2. To select a different sleep sound, touch the “Sleep Sounds” button again or use the track
/
buttons.
3. To pause a sleep sound, touch the play/pause
button.
PLAY SLEEP THERAPY PROGRAMS
Sleep Therapy programs are scientifically engineered to help you fall asleep and stay asleep. Each
Sleep Therapy program begins with 20 minutes of either a nature sound or guided sleep meditation
to help you relax and fall asleep. The sound then gently transitions to brown noise, which plays for
the remainder of the night, masking loud noises and helping you achieve your deepest sleep. The
“Sleep Therapy” button is located on the front of the device below the screen.
1. Touch the “Sleep Therapy” button to choose a Sleep Therapy program.
2. To select a different Sleep Therapy program, touch the “Sleep Therapy” button again or use the
track
/
buttons.
3. To pause a Sleep Therapy program, touch the play/pause
button.
STREAM VIA BLUETOOTH
Connect to any smart device to stream your own music.
1. To connect your Bluetooth-enabled device with the HDS-3000, long press the Bluetooth
button.
The
symbol will begin flashing.
2. Follow the steps on your Bluetooth-enabled device to pair to HDS-3000. Once paired, the
Bluetooth
symbol will stop flashing.
3. While streaming, short press the Bluetooth
button to unpair.

10
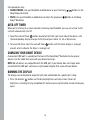
Once paired you may:
• CHANGE TRACKS: Use your Bluetooth-enabled device or push the track
/
buttons on the
Deep Sleep
®
Revitalize.
• PAUSE: Use your Bluetooth-enabled device or touch the play/pause
button on the Deep
Sleep
®
Revitalize.
AUTO-OFF TIMER
When you’re listening to a nature sound or streaming over Bluetooth, you may set a timer so the
unit will automatically turn off.
1. Touch the auto-off timer
button, located on the front right-hand side of the device, until
the corresponding display changes to the time of your choice: 15, 30, or 60 minutes.
2. To cancel the timer, touch the auto-off timer
button until the timer display is no longer
present, which indicates the timer is no longer set.
CHARGING YOUR SMART DEVICE
A convenient USB port is available on the back of the Deep Sleep
®
Revitalize to charge your
devices. Use the cable that came with your device to charge.
NOTE: Not all devices are compatible with the USB port. If your device does not charge when
connected to the USB port, continue using the power adapter that came with your device.
DIMMING THE DISPLAY
The display can be dimmed to make the light more comfortable for a good night’s sleep.
1. Press the dimmer
button and the display brightness will adjust over 4 levels of
brightness, including turning completely off. Continue pressing the button to view the display
again.

11
MAINTENANCE
TO STORE: You may leave the unit on display, or you can store it in a cool, dry place.
TO CLEAN: Use only a soft, dry cloth to clean the enclosure of the unit. NEVER use liquids or
abrasive cleaners to clean.
FCC DISCLAIMER
This equipment complies with FCC radiation exposure limits set forth for an uncontrolled
environment. This transmitter must not be co-located or operating in conjunction with any other
antenna or transmitter. This equipment should be installed and operated with minimum distance
20cm between the radiator& your body.
This device complies with Part 15 of the FCC Rules. Operation is subject to the following two
conditions: (1) This device may not cause harmful interference, and (2) this device must accept any
interference received, including interference that may cause undesired operation.
This equipment has been tested and found to comply with the limits for a Class B digital device,
pursuant to Part 15 of the FCC Rules. These limits are designed to provide reasonable protection
against harmful interference in a residential installation. This equipment generates, uses, and can
radiate radio frequency energy and, if not installed and used in accordance with the instructions,
may cause harmful interference to radio communications. However, there is no guarantee that
interference will not occur in a particular installation. If this equipment does cause harmful
interference to radio or television reception, which can be determined by turning the equipment
off and on, the user is encouraged to try to correct the interference by one or more of the following
measures:
• Reorient or relocate the receiving antenna.
• Increase the separation between the equipment and receiver.
• Connect the equipment into an outlet on a circuit different from that to which the receiver is
connected.
• Consult the dealer or an experienced radio/TV technician for help.
Changes or modifications not expressly approved by HoMedics could void the user’s authority to
operate the equipment. The device has been evaluated to meet general RF exposure requirement.
The device can be used in portable exposure condition without restriction.

12
IC CAUTION ICID: RSS-GEN ISSUE 4 NOVEMBER 2014
This device complies with Innovation, Science, and Economic Development ISEDC license-exempt
RSS standard(s). Operation is subject to the following conditions: (1) This device may not cause
interference, and (2) This device must accept any interference, including any that may cause
undesired operation of the device.
This device complies with RF exposure guidelines, users can obtain Canadian information on
RF exposure and compliance. The equipment should be installed and operated with minimum
distance 20cm between the radiator & your body.
This Class B digital apparatus complies with Canadian ICES-003.

13
CAUTION
This product contains a coin / button cell battery. If the coin / button cell battery is swallowed, it
can cause severe internal burns in just 2 hours and can lead to death.
Keep new and used batteries away from children.
If the battery compartment does not close securely, stop using the product and keep it away from
children.
If you think batteries might have been swallowed or placed inside any part of the body, seek
immediate medical attention.
Maximum radio-frequency power: 2.66dBm
Bluetooth Frequency range: 2.402GHz-2.480GHz

HoMedics sells its products with the intent that they are free of defects in manufacture and workmanship for a period
of one year from the date of original purchase, except as noted below. HoMedics warrants that its products will be free
of defects in material and workmanship under normal use and service. This warranty extends only to consumers and
does not extend to Retailers.
To obtain warranty service on your HoMedics product, contact a Consumer Relations representative for assistance.
Please make sure to have the model number of the product available.
HoMedics does not authorize anyone, including but not limited to Retailers, the subsequent consumer purchaser of the
product from a Retailer, or remote purchasers, to obligate HoMedics in any way beyond the terms set forth herein. This
warranty does not cover damage caused by misuse or abuse; accident; the attachment of any unauthorized accessory;
alteration to the product; improper installation; unauthorized repairs or modifications; improper use of electrical/
power supply; loss of power; dropped product; malfunction or damage of an operating part from failure to provide
manufacturer’s recommended maintenance; transportation damage; theft; neglect; vandalism; or environmental
conditions; loss of use during the period the product is at a repair facility or otherwise awaiting parts or repair; or any
other conditions whatsoever that are beyond the control of HoMedics.
This warranty is effective only if the product is purchased and operated in the country in which the product is
purchased. A product that requires modifications or adoption to enable it to operate in any other country than the
country for which it was designed, manufactured, approved, and/or authorized, or repair of products damaged by these
modifications is not covered under this warranty.
THE WARRANTY PROVIDED HEREIN SHALL BE THE SOLE AND EXCLUSIVE WARRANTY. THERE SHALL BE NO OTHER WAR-
RANTIES EXPRESS OR IMPLIED, INCLUDING ANY IMPLIED WARRANTY OF MERCHANTABILITY OR FITNESS OR ANY OTHER
OBLIGATION ON THE PART OF THE COMPANY WITH RESPECT TO PRODUCTS COVERED BY THIS WARRANTY. HOMEDICS
SHALL HAVE NO LIABILITY FOR ANY INCIDENTAL, CONSEQUENTIAL, OR SPECIAL DAMAGES. IN NO EVENT SHALL THIS
WARRANTY REQUIRE MORE THAN THE REPAIR OR REPLACEMENT OF ANY PART OR PARTS THAT ARE FOUND TO BE
DEFECTIVE WITHIN THE EFFECTIVE PERIOD OF THE WARRANTY. NO REFUNDS WILL BE GIVEN. IF REPLACEMENT PARTS
FOR DEFECTIVE MATERIALS ARE NOT AVAILABLE, HOMEDICS RESERVES THE RIGHT TO MAKE PRODUCT SUBSTITUTIONS
IN LIEU OF REPAIR OR REPLACEMENT.
This warranty does not extend to the purchase of opened, used, repaired, repackaged, and/or resealed products,
including but not limited to sale of such products on internet auction sites and/or sales of such products by surplus or
bulk resellers. Any and all warranties or guarantees shall immediately cease and terminate as to any products or parts
thereof that are repaired, replaced, altered, or modified, without the prior express and written consent of HoMedics.
This warranty provides you with specific legal rights. You may have additional rights that may vary from state to
state and country to country. Because of individual state and country regulations, some of the above limitations and
exclusions may not apply to you.
For more information regarding our product line in the USA, please visit www.homedics.com. For Canada, please visit
www.homedics.ca.
1-YEAR LIMITED WARRANTY
FOR SERVICE IN THE USA:
Email: [email protected]
8:30am–7:00pm EST Monday–Friday
1-800-466-3342
FOR SERVICE IN CANADA:
Email: [email protected]
8:30am–5:00pm EST Monday–Friday
1-888-225-7378
©2018 HoMedics, LLC. HoMedics and SoundSpa are registered trademarks of HoMedics, LLC. All
rights reserved. Sleep Solutions is a trademark of HoMedics, LLC.
IB-HDS3000
Made in China

MODE D’EMPLOI ET INFORMATIONS SUR LA GARANTIE
GARANTIE LIMITÉE DE 1 AN
HDS-3000

16
MISES EN GARDE IMPORTANTES :
LORS DE L’UTILISATION D’APPAREILS ÉLECTRIQUES, DES MESURES DE SÉCURITÉ DE BASE DOIVENT
TOUJOURS ÊTRE SUIVIES, DONT LES SUIVANTES :
LIRE TOUTES LES INSTRUCTIONS AVANT L’UTILISATION.
AVERTISSEMENT –
NE PAS PLACER LE HAUT-PARLEUR TROP PRÈS DES
OREILLES. PEUT CAUSER DES DOMMAGES AUX TYMPANS, SURTOUT CHEZ LES JEUNES
ENFANTS :
• Une surveillance attentive est requise lorsque ce produit est utilisé par des enfants ou des
personnes invalides ou handicapées, à proximité de ces personnes ou sur elles.
• Ce produit ne doit être utilisé qu’aux fins décrites dans ce manuel. Ne pas utiliser d’acces-
soires non recommandés par HoMedics,
• NE PAS placer ni ne ranger ce produit à un endroit d’où il pourrait chuter ou tomber dans un
évier ou une baignoire.
• NE PAS placer le produit ni l’immerger dans de l’eau ou un autre liquide.
• Ce produit ne doit pas être utilisé par les enfants. CE PRODUIT N’EST PAS UN JOUET.
• NE JAMAIS utiliser ce produit si le cordon, la fiche, le câble ou le boîtier sont endommagés.
• Éloigner le produit des surfaces chaudes.
• NE POSER le produit que sur des surfaces sèches. Ne pas placer le produit sur des surfaces
mouillées d’eau ou de solvants de nettoyage.
CONSERVER CES INSTRUCTIONS
ATTENTION
– LIRE ATTENTIVEMENT TOUTES LES INSTRUCTIONS AVANT L’UTILISATION.
• NE JAMAIS laisser le produit sans surveillance, surtout si des enfants sont présents.
• NE JAMAIS couvrir le produit pendant son fonctionnement.
• Ce produit ne doit pas être utilisé par des enfants sans la surveillance d’un adulte.
• Toujours garder le produit à l’écart des sources de température élevée et des flammes.

17
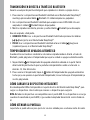
ASSEMBLAGE ET MODE D’EMPLOI
Déballer soigneusement l’appareil. Retirer tous les accessoires du carton. Ne pas retirer les éti-
quettes ou les autocollants sur la partie inférieure de l’appareil ou l’adaptateur. Avant de configurer
l’appareil, vérifier que les éléments suivants sont présents :
• Réveil à deux alarmes Revitalisant Deep Sleep
®
x 1
• Adaptateur secteur et cordon d’alimentation x 1
PILE DE SAUVEGARDE
Ce réveil est équipé d’une fonction de sauvegarde par pile (1 pile CR-2032 incluse et déjà installée)
pour conserver l’heure et les réglages de l’alarme pendant une panne de courant. Le compartiment
de la pile est situé en bas de l’appareil pour un accès facile (un petit tournevis cruciforme, non
fourni, est requis). Veiller à retirer la languette avant la première utilisation.
SOURCE D’ALIMENTATION
Cet appareil est fourni avec un adaptateur secteur ; suivre les étapes suivantes pour brancher
l’adaptateur :
1. Dérouler le cordon d’alimentation de l’adaptateur secteur sur toute sa longueur.
2. Brancher l’adaptateur secteur sur la prise DC 5 V à l’arrière de l’appareil.
3. Brancher l’autre extrémité de l’adaptateur secteur sur une prise électrique (100 V - 240 V CA
50/60 Hz).
REMARQUE : Le branchement de ce système à toute autre source d’alimentation peut endommager
le système. Pour assurer une ventilation suffisante, garder les objets avoisinants à moins 4 cm de
l’appareil.
PRÉSENTATION
L’EMBALLAGE DU REVITALISANT DEEP SLEEP
®
CONTIENT :
• Réveil à deux alarmes Revitalisant Deep Sleep®
• Adaptateur secteur
• Guide de démarrage rapide
• Mode d’emploi et informations sur la garantie

18
BOUTONS ET COMMANDES
LECTURE/PAUSE
SONS DE SOMMEIL
MINUTERIE
D’ARRÊT
AUTOMATIQUE
PROGRAMMES
D’ENDORMISSEMENT

19
ADAPTATEUR
SECTEUR
PORT DE CHARGE
USB
BOUTONS ET COMMANDES
CLOCK
TRACK
SNOOZE
TRACK
RÉGLAGE DE
L’HORLOGE
ALARME
1
PISTE
PRÉCÉDENTE/
SUIVANTE
RAPPEL
D’ALARME 10
MIN.
VOLUME +/-
ALARME
2
VARIATEUR
BLUETOOTH
®

20
1 2
PM
Vol
BLUETOOTH
CONNECTÉ
HEURE ACTUELLE
ALARME
1 ACTIVÉE
VOLUME
MINUTERIE
D’ARRÊT
AUTOMATIQUE
ALARME
2 ACTIVÉE
SON DE
SOMMEIL
SÉLECTIONNÉ
FONCTIONNALITÉS DE L’ÉCRAN
La page charge ...
La page charge ...
La page charge ...
La page charge ...
La page charge ...
La page charge ...
La page charge ...
La page charge ...
La page charge ...
La page charge ...
La page charge ...
La page charge ...
La page charge ...
La page charge ...
La page charge ...
La page charge ...
La page charge ...
La page charge ...
La page charge ...
La page charge ...
La page charge ...
La page charge ...
-
 1
1
-
 2
2
-
 3
3
-
 4
4
-
 5
5
-
 6
6
-
 7
7
-
 8
8
-
 9
9
-
 10
10
-
 11
11
-
 12
12
-
 13
13
-
 14
14
-
 15
15
-
 16
16
-
 17
17
-
 18
18
-
 19
19
-
 20
20
-
 21
21
-
 22
22
-
 23
23
-
 24
24
-
 25
25
-
 26
26
-
 27
27
-
 28
28
-
 29
29
-
 30
30
-
 31
31
-
 32
32
-
 33
33
-
 34
34
-
 35
35
-
 36
36
-
 37
37
-
 38
38
-
 39
39
-
 40
40
-
 41
41
-
 42
42


HoMedics Deep Sleep Revitalize White Noise Sleep Sound Machine Le manuel du propriétaire
- Catégorie
- Réveils
- Taper
- Le manuel du propriétaire
- Ce manuel convient également à
dans d''autres langues
Documents connexes
Autres documents
-
HMDX HX-PEM Instruction book
-
iHome iLW300 Foldable LED Lamp Mode d'emploi
-
Shu W0219 Manuel utilisateur
-
Sharper Image Tinnitus Therapy and Sleep Machine Le manuel du propriétaire
-
NATURE & DECOUVERTES 15215160 Mode d'emploi
-
 Sleep Therapy HM HDS-9000DIS Sommeil Profond Le manuel du propriétaire
-
Sony ICF-C8WM Manuel utilisateur
-
Sony ICF-CS10IP Mode d'emploi
-
Sony ICF-C7IP Mode d'emploi
-
Sony ICF-C11iP Mode d'emploi
