CONNEXIONS
Le connecteur de sortie du microphone est du type
Cannon XLR-3-12C. Raccorder la fiche du microphone
sur l’entrée de microphone d’un mixeur ou d’un
magnétophone. La longueur du câble du microphopne est
de 3 m (10 pieds).
On pourra utiliser un câble rallonge allant jusqu’à 200 m
(660 pieds) sans affecter la qualité et les performances
du son. Se servir d’un câble doté d’un connecteur
Cannon XLR-3-11C d’un côté et d’une fiche qui
convienne à l’équipement d’entrée de l’autre.
Remarque
Si le branchement d’un connecteur de câble est
nécessaire, tenir compte du fait qu’il en existe de deux
sortes, à savoir symétrique à la terre et asymétrique à la
terre. Effectuer soigneusement la soudure car des
ronflement pourra se produire si elle est défectueuse.
ALIMENTATION EXTERIEURE
Le microphone ECM-66B est conçu pour s’alimenter sur
une source extérieure (courant continu de 12 à 48 V) ou
sur une pile interne. Le circuit d’alimentation extérieure se
compose d’une source de courant continu, d’un câble de
microphone blindé à deux conducteurs standard et d’un
transformateur à prise médiane pour microphone. Utiliser
une alimentation extérieure disponible sur le marché.
Remarques
• Quand le connecteur de sortie est raccordé à une
alimentation extérieure, celle-ci assure
automatiquement l’alimentation même si une pile est
insérée et que le commutateur BATTERY est réglé à
ON.
La batterie interne peut servir d’alimentation de secours
en cas de panne de courant. Si l’alimentation de
secours est inutile, régler le commutateur BATTERY à
OFF ou retirer la pile du logement pile.
• En cas d’allonge du câble entre la source d’alimentation
et le microphone, se servir d’un câble de type
symétrique.
REMARQUES SUR L’UTILISATION
DU MICROPHONE
• Pour supprimer les effets du vent ou de la respiration,
protéger le microphone à l’aide du paravent fourni. Le
souffle sera ainsi réduit d’environ 20 dB.
• Les pinces de microphone, fournies, sont pratiques
pour fixer l’appareil sur un vêtement. Veiller à ne pas
couvrir la tête du microphone.
• Fixer le microphone à l’aide de ruban adhésif à
l’intérieur d’un instrument comme une guitare ou une
contrebasse pour obtenir un son de haute qualité.
Veiller à placer un coussinet de caoutchouc ou de
feutre entre le microphone et l’instrument.
SPECIFICATIONS
Données générales
Type Microphone condensateur à électret
Alimentation Pile: 1 de format AA (R6 ou LR6 selon la
désignation IEC)
Source extérieure: 24 à 48 V CC
Borne de sortie de microphone
De type Cannon XLR-3-12C
Câble de microphone
Env. 2,3 mm diam., 3 m long
(
3
/32 pouce diam., 10 pieds long)
Dimensions Microphone:
Env. 10,6 mm diam. × 24,2 mm
(
7
/16 diam. ×
31
/32 pouce)
Section alimentation:
Env.20 mm diam. × 163 mm
(
13
/16 diam. × 6
1
/2 pouces)
Poids Microphone:
Env. 7 g (0,247 once)
Section alimentation:
Env. 160 g (5,6 onces)
(le câble compris, sans la pile)
Finition En chrome noir (section de capsule)
En nickel satiné (section alimentation)
Accessoires fournis
Etui de transport (1)
Pince de microphone (2)
Paravent (1)
Mode d’emploi (1)
Brochure de garantie (1)
Performances
Gamme de fréquences
70–14.000 Hz
Directivité Unidirectionnelle large
Impédance de sortie
100 ohms ±20% (1 kHz), symétrique
Sensibilité (déviation ±2 dB)
Tension en circuit ouvert:
–50 dB (3,16 mV, 0 dB = 1 V/1 Pa, 1 kHz)
Niveau de sortie efficace:
–55,1 dBm (0 dBm = 1 mW/1 Pa, 1 kHz)
L’impédance de charge recommandée est
de plus de 3 kohms.
Rapport signal/bruit
Plus de 65 dB (1 kHz, 1 Pa)
Bruit inhérent Moins de 29 dB SPL (0 dB = 20µ Pa)
Bruit de vent*
1
Moins de 50 dB SPL (avec paravent)
Bruit d’induction du champ magnétique externe*
2
Moins de 5 dB SPL/1 × 10
-7
T
Niveau d’entrée de pression sonore maximum (à 1 kHz,
1%)*
3
130 dB SPL (63,1 Pa)
Plage dynamique
Plus de 101 dB
Température d’environnement
De –20°C à +60°C (de –4°F à +140°F)
pour l’entreposage
De 0°C à +60°C (de +32°F à +140°F)
pour le fonctionnement
*1Le bruit du vent est la valeur mesurée avec application
d’un vent d’une vélocité de 2 m/sec (6,6 pieds/sec)
dans le tous les sens. La valeur moyenne est prise et
convertie au niveau sonore d’entrée équivalent.
0 dB SPL = 20µ Pa
*2Le bruit d’induction du champ magnétique extérieur est
mesuré avec le microphone placé dans un champ
magnétique alternant de 50 Hz, 1 milligauss.
0 dB SPL = 20µ Pa
*3La valeur de bruit maximum est prise, puis convertie
au niveau sonore d’entrée équivalent.
0 dB SPL = 20µ Pa
Alimentation
Tension de fonctionnement normale
1,5 V CC en fonctionnement sur pile
Tension de fonctionnement minimale
1,1 V CC en fonctionnement sur pile
Alimentation extérieure
24 à 48 V CC
ConsommationMoins de 3,0 mA (1,5 V CC) (avec pile)
Moins de 2,0 mA (avec alimentation
extérieure)
Autonomie de la pile
Pile au manganèse R6: Env. 300 heures
Pile alcaline LR6: Env. 400 heures
Conception et spécifications sont sujettes à modification
sans préavis.
Deutsch
Für Kunden in Europa
Dieses Produkt besitzt die CE-Kennzeichnung und erfüllt
die EMV-Direktive (89/336/EEC) der EG-Kommission.
Die Erfüllung dieser Direktiven bedeutet Konformität für
die folgenden Europäischen Normen:
• EN55103-1: Elektromagnetische Interferenz (Emission)
• EN55103-2: Elektromagnetische Empfindlichkeit
(Immunität)
Dieses Produkt ist für den Einsatz unter folgenden
elektromagnetischen Bedingungen ausgelegt: E1
(Wohnbereich), E2 (kommerzieller und in beschränktem
Maße industrieller Bereich), E3 (Stadtbereich im Freien)
und E4 (kontrollierter EMV-Bereich, z.B. Fernsehstudio)
Achtung:
Elektromagnetische Felder an bestimmten Frequenzen
können die spezifischen Leistungspegel der analogen
Audiosignale beeinträchtigen.
MERKMALE
• Mikrofon mit breiter Keulencharakteristik und breitem
Übertragungsbereich (70–14.000 Hz).
• Zwei Möglichkeiten der Stromversorgung: durch
eingelegte Batterie oder Versorgung von außen.
• Ideal für professionelle Anwendungen in Radio-,
Fernsehstudios usw., da es sich durch höchste Leistung
und außerordentliche Kompaktheit auszeichnet.
• Praktischer Tragekasten.
ZUR BESONDEREN BEACHTUNG
• Lassen Sie das Mikrofon nie fallen und setzen Sie es
auch keinen Erschütterungen aus.
• Schützen Sie das Mikrofon vor extrem hohen
Temperaturen (über 60°C).
• Wenn das Mikrofon zu nahe an Lautsprecher gebracht
wird, kann ein Heulton (akustische Rückkopplung)
auftreten. In diesem Fall vermindern Sie die
Lautsprecher-Lautstärke, bis das Heulen aufhört.
• Mikrofone und Aufnahmegeräte sollten etwa 10 Minuten
vor tatsächlichem Gebrauch eingeschaltet werden.
Dadurch wird stabile Leistung von Mikrofonen und
Geräten gewährleistet.
BEZEICHNUNG DER TEILE
Mitgeliefertes Zubehör
Windschutz
Mikrofonhalter
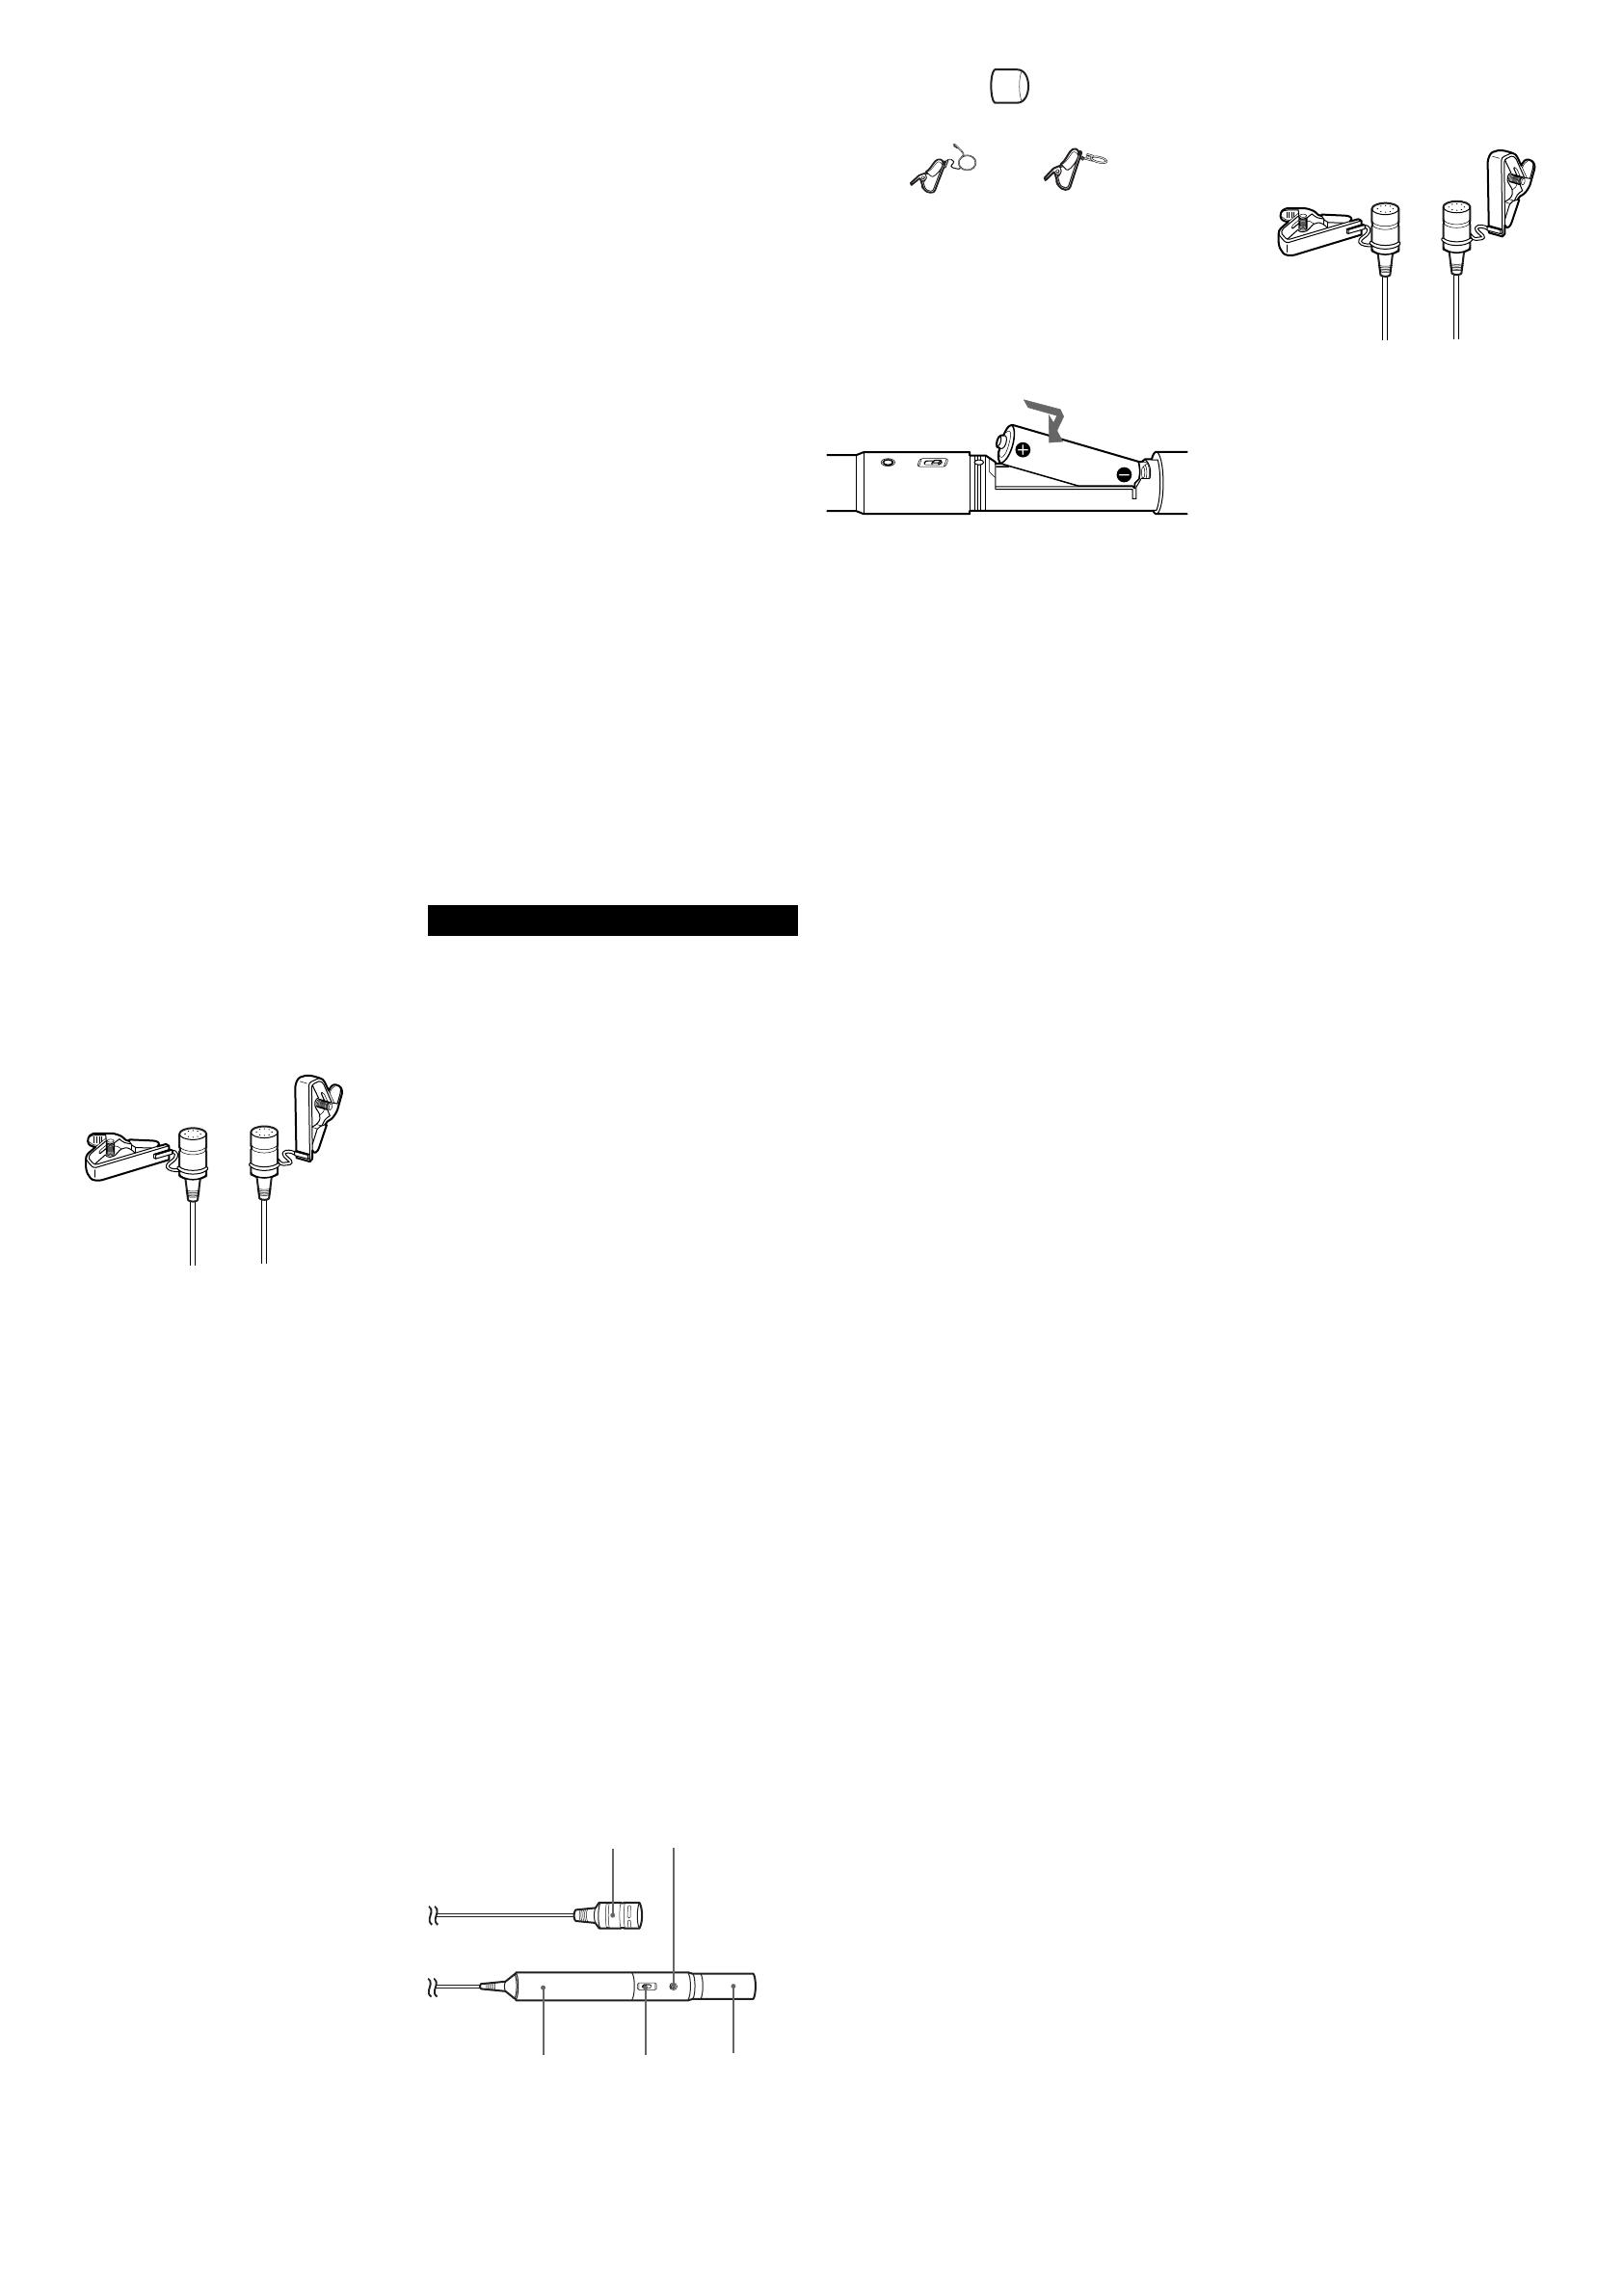
BATTERIEBETRIEB
1Öffnen Sie das Batteriefach durch Drehen der Hülse im
Gegenuhrzeigersinn.
2Setzen Sie eine Mignonzelle (IEC-Bezeichnung R6 oder
LR6) in das Batteriefach ein.
3Schließen Sie das Batteriefach durch Drehen der Hülse
im Uhrzeigersinn. Achten Sie darauf, dass das
Gehäuse einwandfrei geschlossen ist, da anderenfalls
Betriebsstörungen oder Geräusche verursacht werden
können.
4Stellen Sie den Batterieschalter (BATTERY) auf ON.
Die Batterieanzeige leuchtet kurz auf und erlischt dann.
Dies zeigt an, dass die Batteriespannung innerhalb des
Betriebsbereichs ist.
Zum Prüfen des Batteriezustands
Stellen Sie den Batterieschalter (BATTERY) auf OFF,
warten mindestens 5 Sekunden lang, und stellen Sie den
Schalter dann auf OFF und prüfen, ob die
Batterieanzeige aufleuchtet oder nicht. Wenn die Anzeige
nicht aufleuchtet, ist die Batterie verbraucht.
Hinweise
• Wenn das Mikrofon längere Zeit nicht benutzt wird,
entnehmen Sie die Batterie, um die Möglichkeit einer
Korrosion auszuschließen.
• Falls die Batterie ausgelaufen ist, beseitigen Sie die
Rückstände im Batteriefach vollständig.
• Die Lebensdauer der Batterie hängt vom verwendeten
Batterietyp ab. Siehe hierzu „Lebensdauer der Batterie“
unter „Technische Daten“ unten. Wenn die
Batteriespannung nachlässt, nimmt die Empfindlichkeit
des Mikrofons ab, und Klangverzerrungen treten auf. In
diesem Fall wechseln Sie die Batterie aus.
ANSCHLÜSSE
Das Mikrofon ist mit einem Cannon XLR-3-12C-
Ausgangsanschluss ausgestattet. Schließen Sie den
Mikrofonstecker an den Mikrofoneingang eines
Mischpults oder eines Cassettenrecorders an. Das
Mikrofonkabel ist 3 m lang.
Sie können auch ein Verlängerungskabel von bis zu 200
m verwenden, ohne dass dadurch die Klangqualität oder
Leistung des Mikrofons in irgendeiner Weise
beeinträchtigt wird. Verwenden Sie ein Kabel mit einem
Cannon XLR-3-11C-Anschluss an einem Ende und
einem entsprechenden Stecker am anderen Ende, der in
die Mikrofoneingangsbuchse des verwendeten Gerätes
passt.
Hinweis
Bei Anschluss eines Kabelsteckers ist darauf zu achten,
dass es zwei grundsätzlich verschiedene Typen gibt
(erdsymmetrisch und erdunsymmetrisch). Löten Sie die
Anschlüsse sorgfältig fest. Schlechte Lötstellen können
Brummen verursachen.
EXTERNE STROMVERSORGUNG
Das Mikrofon ECM-66B kann auch extern (12 bis 48 V
Gleichspannung) gespeist werden. Das externe
Speisungssystem besteht aus einer
Gleichspannungsquelle, einem abgeschirmten Standard-
Zweileiter-Mikrofonkabel und dem Mittelanzapfungs-
Transformator des Mikrofons. Verwenden Sie eine im
Fachhandel erhältliche Fremdstromversorgung.
Hinweise
• When the output connector is connected to the external
power supply unit, the power is automatically supplied
from the unit even if the battery is inserted and the
BATTERY switch is set to ON.
The internal battery can serve as a backup power
source in case of a power failure. If the backup power
source is unnecessary, set the BATTERY switch to OFF
or remove the battery from the battery compartment.
• Zur Verlängerung des Kabels zwischen
Stromversorgungssystem und Mikrofon verwenden Sie
ein symmetrisches Kabel.
TIPPS ZUM GEBRAUCH DES
MIKROFONS
• Um Wind- und Atemgeräusche zu vermeiden, decken
Sie das Mikrofon mit dem mitgelieferten Windschutz ab.
Hierdurch werden Wind- und Atemgeräusche um 20 dB
abgeschwächt.
• Mit den mitgelieferten Mikrofonhaltern kann das
Mikrofon praktisch an der Kleidung befestigt werden.
Achten Sie darauf, den Mikrofonkopf nicht abzudecken.
• Das Mikrofon kann auch mit Klebeband an der
Innenseite eines Instruments wie z.B. einer Gitarre usw.
befestigt werden, um qualitativ hochwertige Aufnahmen
zu erzielen. In diesem Fall bringen Sie ein Gummi- oder
Filzstück zwischen Mikrofon und Instrument an.
TECHNISCHE DATEN
Allgemeines
Typ Elektret-Kondensatormikrofon
Stromversorgung
Batterie: Mignonzelle (IEC-Bezeichnung
R6 oder LR6)
Externe Stromversorgung: 24 bis 48 V
Gleichspannung
Mikrofonausgangsanschluss
Cannon XLR-3-12C
Mikrofonkabel
ca. 2,3 mm φ, 3 m Länge
Abmessungen Mikrofon: ca. 10,6 mm φ × 24,2 mm
Spannungsversorgungsteil: ca. 20 mm φ
× 163 mm
Masse Mikrofon: ca. 7 g
Spannungsversorgungsteil:
ca. 160 g (einschließlich Kabel, ohne
Batterie)
Oberfläche Schwarzes Chrom-Finish
(Mikrofonkapselteil)
Samt-Nickel-Finish
(Spannungsversorgungsteil)
Mitgeliefertes Zubehör
Tragekasten (1)
Mikrofonhalter (2)
Windschutz (1)
Bedienungsanleitung (1)
Garantiekarte (1)
Kenndaten
Übertragungsbereich
70–14.000 Hz
Richtwirkung Breite Keulencharakteristik
Ausgangsimpedanz
100 Ohm ±20% (1 kHz), symmetrisch
Ausgangspegel (Abweichung ±2 dB)
Leerlaufspannung:
–50 dB (3,16 mV, 0 dB = 1 V/1 Pa, 1 kHz)
Effektiver Ausgangspegel:
–55,1 dBm (0 dBm = 1 mW/1 Pa, 1kHz)
Empfohlene Lastimpedanz: Über 3 kOhm
Signal-Rauschabstand
Über 65 dB (1 kHz, 1 Pa)
Eigenrauschen
Weniger als 29 dB SPL (0 dB = 20µPa)
Windgeräusche*
1
Weniger als 50 dB SPL (mit Windschutz)
Induktionsgeräusche von externem Magnetfeld*
2
Weniger als 5 dB SPL/1 × 10
-7
T
Maximaler Eingangsschallpegel (bei 1 kHz, 1%)*
3
130 dB SPL (63,1 Pa)
Dynamik Über 101 dB
Umgebungstemperaturen
–20°C bis +60°C für Aufbewahrung
0°C bis 60°C für Betrieb
*1Dieser Wert wurde bei einer Windgeschwindigkeit von
2 m/s von allen Richtungen auf das Mikrofon
gemessen. Der Durchschnittswert ist dann auf den
äquivalenten Eingangsschallpegel umgerechnet
worden.
0 dB SPL = 20µPa
*2Das durch ein externes Magnetfeld induzierte
Rauschen wurde bei Aufstellung des Mikrofons in
einem magnetischen Wechselfeld von 50 Hz. 1
Milligauß gemessen.
0 dB SPL = 20µPa
*3Der maximale Rauschpegel ist dann auf den
äquivalenten Eingangsschallpegel umgerechnet
worden.
0 dB SPL = 20µPa
Spannungsversorgung
Normale Betriebsspannung
1,5 V Gleichspannung bei Batteriebetrieb
Minimale Betriebsspannung
1,1 V Gleichspannung bei Batteriebetrieb
Externe Speisung
24 bis 48 V Gleichspannung
Stromaufnahme
Weniger als 3,0 mA (1,5 V
Gleichspannung) (mit Batterie)
Weniger als 2,0 mA (mit externer
Speisung)
Lebensdauer der Batterie
R6-Manganbatterie: ca. 300 Stunden
LR6-Alkalibatterie: ca. 400 Stunden
Änderungen, die dem technischen Fortschritt dienen,
bleiben vorbehalten.
Mikrofonkapsel
Stromversorgungsteil Ausgangsanschluß
Die Batterie
polaritätsrichtig
einsetzen.
Horizontaler
Mikrofonhalter
Vertikaler
Mikrofonhalter
Batterieanzeige
Batterie-
schalter
(BATTERY)


