Sony CDX-454XRF Operating Instructions Manual
- Catégorie
- Lecteur CD
- Taper
- Operating Instructions Manual
Ce manuel convient également à

SONY@
3-237-554-13 (2)
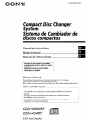
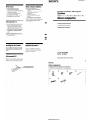
Compact Disc Changer
System
Sistema de Cambiador de.
discos compactos
Operating Instructions
Mode d’emploi
Manual de instrucciones
POR FAVOR LEA DETALLADAMENTE ESTE MANUAL
DE INSTRUCCIONES ANTES DE CONECTAR Y OPERAR
RECUERDE QUE UN MAL US0 DE SU APARATO
Owner’s Record
The model and serial numbers are located at the rear of the CD changer.
Record the serial number in the space provided below.
Refer to these numbers whenever you call upon your Sony dealer regarding this product.
Model No. CDX-454RF Serial No.
For installation and connections, see the supplied installation/connections
manual.
En ce qui concerne l’installation et les connexions, consulter le manuel
d’installation/connexions fourni.
Con respect0 a la instalaci6n y a las conexiones, cons&e el manual de
instalaci6n/conexiones suministrado.
CDX-454XRF
CDX-454RF
@TiFrg
DIGITALAUDIO
0 2001 Sony Corporation

For the customers in the USA
(CDX-454RF only)
This equipment has been tested and found to
comply with the limits for a Class B digital
device, pursuant to Part 15 of the FCC Rules.
These limits are designed to provide
reasonable protection against harmful
interference in a residential installation. This
equipment generates, uses, and can radiate
radio frequency energy and, if not installed
and used in accordance with the instructions,
may cause harmful interference to radio
communications. However, there is no
guarantee that interference will not occur in a
particular installation. If this equipment does
cause harmful interference to radio or
television reception, which can be determined
by turning the equipment off and on, the user
is encouraged to try to correct the interference
by one or more of the following measures:
- Reorient or relocate the receiving antenna.
- Increase the separation between the
equipment and receiver.
- Connect the equipment into an outlet on a
circuit different from that to which the
receiver is connected.
-
Consult the dealer or an experienced radio/
TV technician for help.
You are cautioned that any changes or
modifications not expressly approved in this
manual could void your authority to operate
this equipment.
CAUTION
The use of optical instruments with this
product will increase eye hazard.
Welcome!
Thank you for purchasing the Sony CD
changer system. This unit lets you enjoy CD
sound with the changer.
The CDX-454XRF/454RF is a compact disc
changer system comprised of the wired remote
commander, the relay box, and the CD
changer. The CD changer modulates the audio
signal into the RF (Radio Frequency) signal so
that it can be received by the existing FM tuner
of your car audio. Therefore you will be able to
enjoy CD play with your car audio even if it
has no input terminals for a compact disc
player.
l
Compact and space saving CD changer for
vertical, horizontal, suspended, or inclined
installation in your car.
l
Supplied wired remote enables you to
control the CD changer installed in the trunk
room of your car.
l
Repeat play function for playing a track or a
disc repeatedly.
l
Shuffle play function for playing tracks of
one disc or of all discs in random order.
l
D-BASS function for dynamic bass boot.
2

Table of contents
Getting Started
Resetting
the
unit .................................................
4
Preparing
the CD changer
..................................
4
Changing the transmitting frequency
...............
5
CD Changer
Listening to a
CD
. . . . . . . . . . . . . . . . . . . . . . . . . . . . . . ,.. . . . . . . . . . . . . . . . .
6
Playing tracks in random order
- Shuffle
Play
. . . . . . . . . . . . . . . . . . . . . . . . . . . . . . . . . . . . . . . . . . . . . . .
7
Playing tracks repeatedly
- Repeat Play
. . . . . . . . . . . . . . . . . . . . . . . . . . . . . . . . . . . . . . . . . . . . . . . . .
7
Boosting the bass sound
-
D-bass . . . . . . . . . . . . . . . . . . . . . . . . . . . . . . . . . . . . . . . . . . . . . . . . . . . . . . . . . .
7
Changing the
output level
. . . . . . . . . . . . . . . . . . . . . . . . . . . . . . . . . .
8
Additional Information
Precautions .
...........................................................
9
Notes
on handling discs
......................................
9
Maintenance
........................................................
10
Location of controls
...........................................
11
Specifications
......................................................
12
Troubleshooting
guide
...................................... 13
3

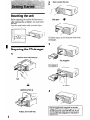
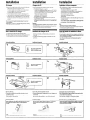
Resetting the unit
Before operating the unit for the first time or
after replacing the car battery, you must reset
the unit.
Press the reset button with a pointed object,
such as a ball-point pen, etc.
Reset button
I
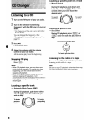
Preparing the CD changer
1
With the arrow side facing up
I
JI
Labelled surface up
10 discs, one in each tray
2
Push to unlock the door
Slide open
+
Note
To prevent injury, do not insert your hand in the
CD changer.
Disc magazine
& (EJECT)
4
disc magazine or the disc
magazine XA-250. The disc magazine XA-IOBI
XA-350 cannot be used with this unit. If you
use any other disc magazine, it may cause a
4

Note
You cannot play 8cm (3in.) CDs.
If the disc magazine does not lock properly
Take out the disc magazine, press A, and re-
insert it.
Use the unit with the door closed
completely
Otherwise, foreign matter may enter the unit
and
contaminate
the lenses inside the CD
changer.
Notes on the disc magazine
l
Do not leave the disc magazine in locations
with high temperature and high humidity,
such as on a car dashboard or in the rear
window where the disc magazine will be
subject to direct sunlight.
l
Do not place more than one disc at a time
onto a tray, otherwise the CD changer and
the discs may be damaged.
l
Do not drop the disc magazine or subject it to
a violent shock.
When the tray comes out
Normally, the trays will not come out of the
disc magazine. However, if they are pulled out
of the disc magazine, it is easy to re-insert
them.
With the cut-away portion of the tray facing you,
insert the right corner of the tray in the slot, then
push in the left corner until it clicks.
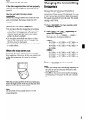
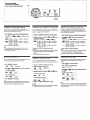
Changing the transmitting
frequency
Because this unit processes CD playback
sound through an FM tuner, there may be
interference noise during CD playback. In such
a case, change the frequency of the modulated
RF signal transmitted from the unit. The initial
setting is 88.3 MHz.
1
2
Press
( SHUF~REP)
for two seconds until
frequency appears.
Press (DISC+) or (Disc-) repeatedly to
select the frequency.
Each time you press (DISC+) or (DISC-),
the frequency changes as follows:
(DISC-) :
88.3
MHz + 89.9
MHz -+ 89.7 MHz
-+
89.5
MHz + 89.3
MHz --+ 89.1 MHz
--+
88.9
MHz -+ 88.7
MHz ---, 88.5 MHz
--.
88.3
MHz
(DISC+) :
88.3
MHz -+ 88.5
MHz --+ 88.7 MHz
+
88.9
MHz --+ 89.1
MHz --+ 89.3 MHz
--+
89.5
MHz -+ 89.7
MHz -+ 89.9 MHz
-+
88.3
MHz
3
Press
(SHUF~REP)
for two seconds.
Notes
l
When you change the transmitting frequency on
the unit, be sure to tune your FM tuner to the
newly selected one.
l
Press ,II on the wired remote before changing
the frequency if the power to the unit is turned
off.
Note
Do not insert the tray upside down or in the
wrong direction.
5

Listening to a CD
1
2
3
4
Turn on the FM tuner of your car audio.
Tune in the selected transmitting
frequency* with the FM tuner of your car
audio.
* The frequency of the unit is set to 88.3 MHz
at the factory.
You can change the frequency. (See
“Changing the transmitting frequency” on
page 5.)
Press )II.
CD playback starts.
Adjust the volume with the volume
control on your car audio.
All the tracks play from the beginning.
Stopping CD play
Press (OFF).
Notes
Note
Be sure to stop CD playback, otherwise there may
be some interference with radio reception.
l
When CD playback stops, you may hear some
noise from the speakers. To prevent this from
happening, turn the volume down before
stopping CD playback.
l
lfyou turn off the ignition switch of your car
without stopping CD playback, it will
automatically resume CD playback from where it
was stopped when you turn on the ignition
switch again.
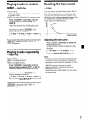
Locating a specific track
- Automatic Music Sensor (AMS)
During CD playback, push down either
side of (AMS) once for each track you
wish to skip.
Locating a specific point in a track
- Manual Search
During CD playback, push down and
hold either side of (AMS). Release the
control when you have found the
desired point.
To
search
backward
To
search
forward
Locating a specific disc
- Disc Select
During CD playback, press (DISC+) or
(DISC-] once for each disc you wish to
skip.
To
locate succeeding discs
To
locate previous discs
Listening to the radio or a tape
Be sure to stop CD playback before you start
listening to the radio or a tape.
To
locate
previous
tracks
To
locate
succeeding
tracks
6

Playing
tracks
in random
order
- Shuffle Play
Boosting the bass sound
- D-bass
You can select:
l
SHUF 1 to play the tracks on the current disc
in random order.
l
SHUF 2 to play all the discs in random order.
Press
(SHUFIREP)
repeatedly until the
desired setting appears (SHUF 1 or
SHUF 2).
After five seconds, the shuffle play starts.
Each time you press
(SHUFIREP),
the
display changes as follows:
SHUFl-bSHUF2-bREPl-bREP2
Cancel (SHUF off) 4
To go back to the normal playback mode, press
(SHUFIREP)
repeatedly until “SHUF” or
“REP” disappears.
Playing tracks repeatedly
- Repeat Play
You can select:
l
REP 1 to repeat the track.
l
REP 2 to repeat the disc.
Press (SHUNREP~ repeatedly until the
desired setting appears (REP 1 or REP 2).
After five seconds, the repeat play starts.
Each time you press
(SHUFIREP),
the
display changes as follows:
SHUFl+SHUF2+REPl+REP2
Cancel (REP off) d
To go back to the normal playback mode, press
(SHUF~REP)
repeatedly until “REP” or
“SHUT? disappears.
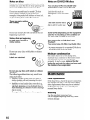
You can enjoy a powerful bass sound. The D-
bass function boosts the low frequency signal.
You can hear the bass line more clearly even
while the vocal volume remains the same. You
can emphasize and adjust the bass sound
easily with the D-BASS button.
Frequency (Hz)
Adjusting the bass curve
Press
(33ZiGZT) repeatedly to select the
desired bass curve.
As the D-BASS number increases so does
the effect.
D-BASS 1 - D-BASS 2
Cancel (D-BASS off) 4
Notes
l
Setting the output level from 4 to 5 while using
the D-bass function, the amount of bass boost
decreases to avoid distortion; however, it’s not a
malfunction.
Adjust the volume with your car audio.
* Selecting D-BASS 2, a distortion may occur
depending on your CD.
Should this occur, select D-BASS 7 or turn down
the output level.

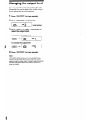
Changing the output level
You can select the output level from the unit.
Normally the unit is used in the initial output
level; change the level if necessary.
1
2
3
4
Press
(SHUWREP~
for two seconds.
Press
(s~uFiREp)
momentarily.
Press (DISCi) or (DISC-) repeatedly to
select the output level.
To decrease the output level
(DISC-) :
To increase the output level
(DISC+) :
.e3
““5
Press
(SHUFEIEP)
for two seconds.
Note
When you select level 4 or 5, the CD playback
sound may be distorted oryou may hear some
noise. In such a case, select a lower output level on
the unit and turn down the overall volume on
your car audio.
8

Precautions
l
This unit cannot be used with a car audio
without FM tuner.
. If your car was parked in direct sunlight
resulting in a considerable rise in
temperature inside the car, allow the unit to
cool off before operating it.
l
If no power is being supplied to the unit,
check the connections first. If everything is in
order, check the fuse.
l
Avoid installing the CD changer and wired
remote in places:
- subject to temperature exceeding 55°C
(131°F).
- subject to direct sunlight.
-
near heat sources (such as heaters).
-
exposed to rain or moisture.
-
exposed to excessive dust or dirt.
-
subject to excessive vibration.
If you have any questions or problems
concerning your unit that are not covered in
this manual, please consult your nearest
Sony
dealer.
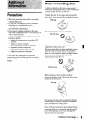
Notes on handling discs
A dirty or defective disc may cause sound
drop-outs during playback. To enjoy optimum
sound, handle the disc as follows.
Handle the disc by its edge, and to keep the
disc clean, do not touch the unlabelled surface.
This way
&
Do not stick paper or tape on the disc.
Not this way
Keep your discs in their cases or disc
magazines when not in use.
Do not expose discs to direct sunlight or heat
sources such as hot air-ducts. Do not leave
discs in a car parked in direct sunlight where
there can be a considerable rise in the
temperature inside the car.
Not this way
Before playing, clean the discs with
an
optional cleaning cloth. Wipe each disc in the
direction of the arrows.
This way
T-l
Do not use solvents such as benzine, thinner,
commercially available cleaners or antistatic
spray intended for analog discs.
Discs with special shapes (heart-shaped discs,
octagonal discs etc.) cannot be played on this
unit. Attempting to do so may damage the
unit. Do not use such discs.
Continue to next Daae 3
Q

Notes on discs
If you use the discs explained below, the sticky
residue can cause the disc to stop spinning and
may cause malfunction or ruin your discs.
Do not use second-hand or rental CDs that
have a sticky residue on the surface (for
example, from peeled-off stickers or from ink,
Notes on CD-R/CD-RW discs
You can play CD-Rs (recordable CDs)
designed for audio use on this unit.
Look for this mark to
distinguish CD-Rs for audio
use.
lmiz
DIGITAL AUDIO
or glue leaking from under the stickers).
B
There are paste residue.
Ink is sticky. This mark denotes that a
disc is not for audio use.
Do not use rental CDs with old labels that are
Some CD-Rs (depending on the equipment
beginning to peel off.
used for its recording or the condition of
the disc) may not play on this unit.
Stickers that are beginning
to peel away, leaving a
8
You cannot play a CD-R that is not
sticky residue.
finalized*.
69
You cannot play CD-RWs (rewritable CDs).
8
Do not use your discs with labels or stickers
attached.
* A process necessary for a recorded CD-R disc to
be played
on
the audio CD player.
Moisture condensation
Labels are attached.
On a rainy day or in a very damp area,
moisture may condense on the lenses inside
the unit, and the unit will not operate
properly. In such a case, remove the disc
magazine and wait for about an hour until
the moisture has evaporated.
Do not use any discs with labels or stickers
attached.
The following malfunctions may result from
Maintenance
using such discs:
- Inability to eject a disc (due to a label or
sticker peeling off and jamming the eject
mechanism).
- Inability to read audio data correctly (e.g.,
playback skipping, or no playback) due to
heat shrinking of a sticker or label causing a
disc to warp.
Fuse replacement
If the fuse blows, check the power connection
and replace the fuse. If the fuse blows again
after replacement, there may be an internal
malfunction. In such a case, consult your
nearest Sony dealer.
- Damage to-other discs in a disc magazine.
Warning
Use the specified amperage fuse.
Use of a higher amperage fuse may cause
serious damage.
IO

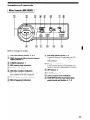
Location of controls
1 Wired remote (RM-X82RF) 1
Refer to the pages for details.
El
El
l3l
El
El
El
El
El
DISC (disc select) buttons 5, 6, 8
AMS (Automatic Music Sensor/manual
search) control 6
D-BASS indication 7
REP (repeat play) indication
SHUF (shuffle play) indication
DISC (disc number) indication
The indicated disc number matches the
disc number in the disc magazine.
TRACK (track number) indication
MHz (frequency) indication
WI (play/pause) button 5, 6
If pressed during CD playback, the CD
will pause. If pressed again, CD playback
will continue.
Play/pause indication
Turns around during CD playback and
flashes when the pause button is pressed.
OFF button 6
D-BASS button 7
LEVEL (output level) indication
SHUF/REP (shuffle play/repeat play/
control mode set) button 5, 7, 8
11

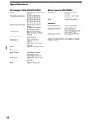
Specifications
CD changer (CDX-454XRF1454RF)
System
Transmitting frequency
Input/output terminals
Current drain
Operating temperature
Dimensions
Mass
Relay box
Input/output
Compact disc digital audio
system
88.3
MHz/88.5 MHz/
88.7
MHzi88.9 MHz/
89.1 MHz/89.3 MHz/
89.5 MHz/89.7 MHz/
89.9 MHz (switchable)
Wired remote control
(8 pin)
RF signal (FM) output
Power input (3 pin)
800 mA (at playback)
800 mA (at disc loading/
ejecting)
-10°C to +55”C
(14°F to 131°F)
Approx. 262 x 90 x
185 mm
(10
‘/8 X 3 ‘/8X 7 ‘/a in.)
(w/h/d)
Approx. 2.1 kg (4 lb. 10 oz.)
Dimensions
Aerial input terminal
Aerial output cord
CD changer input cord
Approx. 40 x 40 x 27 mm
(1 ‘/8 X 1 ‘/XX 1 ‘/8 ill.)
(w/h/d)
Mass
Approx. 140 g (5 oz.)
Wired remote (RM-X82RF)
Dimensions
Approx. 122 x 36.5 x
15.5 mm
Mass
(4 7/8x
1 7/ls x 5/x in.)
(w/h/d)
Approx. 255 g (9 oz.)
General
Power requirement
Supplied accessories
Optional accessories
12 V DC car battery
(negative ground)
Disc magazine (1)
Parts for installation and
connections (1 set)
Disc magazine XA-250
Design and specifications are subject to change
without notice.
12

Troubleshooting guide
The following checklist will assist in the correction of most problems which you may encounter
with your unit.
Before going through the checklist below, refer to the connection and operating procedures.
Genera I
Problem Cause/Solution
The unit does not function.
l
The built-in micro computer has malfunctioned.
-+ Press the reset button of the CD changer.
l
The connecting cords are not connected properly.
The sound skips.
l
The CD changer is installed in an unstable location.
-+ Re-install it in a stable location.
l
The CD is dirty or defective.
--, Clean or replace it.
The disc magazine is not locked
Take out the disc magazine, press ;??, and re-insert the disc
in the CD changer.
magazine until it is locked securely.
Error displays
The following indications will flash for about five seconds.
Display
Cause
Solution
E
-0 1
The disc magazine is not inserted in
Insert the disc magazine with CDs
the CD changer. into the CD changer.
E - CIZ
No CD is inserted in the disc Take out the disc magazine and insert
magazine.
CDs.
E-L.?Y
The CD is dirty.
Clean the CD.
The CD is inserted upside down. Insert the CD correctly.
E-99
The CD changer cannot be operated
Press the reset button of the CD
because of some problem.
changer.
If the solutions mentioned above do not help to improve the situation, consult your nearest Sony
dealer.
13

Sony Corporation
Printed in Thailand
http:/Avww.sony.net/

SONY.
3-237-555-11 (2)
installing the wired remote Instalackn del mando a
Compact Disc Changer
System
Sistema de Cambiador de
discos compactos
Installation/Connections
InstallatiorKonnexions
Instalaci6nlConexiones
CDX-454XRF
CDX-454RF

Installation
Installation
Horizontal installation
Installation horizontale
Instalacib horizontal
Inclined installation
I<
I!
Installation in&be
&ffer installing the unit, align the dials with one of the marks
10 that the arrow comes as close to a vertical position as
possible.
Instalaci6n sohre una superficie inclinada
I
Despu& de instalar la untdad, alinaa 10s diates con una de las
marcas, de forma qua la ftecha quede orientada en posfci6n
vertical tanto coma sea porible.

Wired remote MM-XBZRF)
TOl&ommande B fii (RM-X82RF)
Mando a distancia alembrico (RM-X82RF)
DISC +!-
i
t
SHUi/REP
m ‘88.3 MHr - 69.9 MHz - 89.7 MHr --. 89.5 MHz --+
x9.3 Mkb - w.1 HL b - xfi.9 Mk li: -a fix.7 Mf-lz --+
8R.S MHz - 8R.3 MHL
3 Appuyer sur :SH.EEEP; pendant deux secondes
3 Appuyer plusieurs fois de suite sur m ou m pour
s6lectionner la niveau de sortie.
3
Pulse m 0 m varias veces para seleccionar el nivel
de salida.

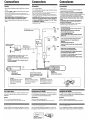
Connections Connexions Conexiones
* Cuando finalice todar la6 conexiones, pulse el botcin de
reporicibn del cambiador de CD. (ConsuIte “Bot4n de
rertauraci6n’ mbs adelante.)
9,
10 a meta, point on the car
First connect the black ground lead, the” connect the yelbw
and red power input kadr.
me
Yellow -
F”Sibk
Ja”“e
F”Sibk
*marNo
.Srn
to the +t* V power terminal which k powered when the
ignition witch ir in the acceswy p&don
Be sure to connect the black ground lead first.
--Sm
Remplacement du fusible
Si le fusible saute, vPrifie7 la connruion d’ahmentotion et remplacer-
le. Si k fusible saute d n~wve~u quand VOIL’ vent de le rempkacer, il
c’agit peut Ptre d’un mawais fonctionnement interne.
Avertirsement
Sustitucibn del fusible
9i *I fusible se funde, rerifique la conexi6n de alimentaci6n y
wstituyalo. Si ma vex sustituido vuelve a fundiae, puede deberse a
un funcionamiento interno defechwxw.
Precauci6n
Reset button Touche de Mnitialisation

SONY@
Do not use any discs with labels or
stickers attached
The following malfunctions may result from
using such discs:
l Inability to eject a disc (due to a label or sticker
peeling off and jamming the eject mechanism)
l Inability to read audio data correctly (e.g.,
playback skipping, or no playback) due to heat
shrinking of a sticker or label causing a disc to
warp
l Damage to other discs in a disc magazine
N’utilisez pas de disques comportant
des Ctiquettes ou des autocollants.
Dans le cas contraire, les dysfonctionnements
suivants peuvent se produire :
l Impossible d’ejecter un disque (a cause dune
etiquette ou d’un autocollant qui se decolle et qui
bloque le mecanisme d’ejection)
l Impossible de lire des don&es audio
correctement (par ex. : saut de lecture ou pas de
lecture), le disque est voile en raison du
retrecissement d’un autocollant ou d’une
etiquette sous l’effet de la chaleur
l Endommagement des autres disques dans un
chargeur
No utilice discos que tengan etiquetas o
pegatinas adheridas.
Si 10s utiliza, se pueden provocar 10s fallos de
funcionamiento siguientes:
l No es posible extraer un disco (provocado por una
etiqueta o pegatina que se desengancha y atasca el
mecanismo de extraction)
l No es posible leer datos de audio correctamente (por
ejemplo, saltos en la reproduction o imposibilidad de
reproducir) debido a que la etiqueta o la pegatina se
encogen por la accidn de1 calor y hacen que el disco se
deforme
l DaAos a otros discos de un cargador de discos
Sony Corporation
02001 Printed in Thailand
3-240-320-01 (1)

4-557-152-01 (Tl) F
SONY@
LIMITED WARRANTY
Sony Electronics Inc. (“Sony”) warrants this Product (including any accessories) against defects in material or
workmanship as follows:
1. LABOR: For a period of one (I) year from the date of purchase, if this Product is determined to be defective,
Sony will repair or replace the Product, at its option, at no charge, or pay the labor charges to any Sony autho-
rized service facility. After the Warranty Period, you must pay for all labor charges.
2. PARTS: In addition, Sony will supply, at no charge, new or rebuilt replacements in exchange for defective
parts for a period of one (I) year. After the warranty period, you must pay for all parts costs.
3. ACCESSORIES: Parts and labor for all accessories are for one (I) year.
To obtain warranty service, you must take the Product, or deliver the Prociuct freight prepaid, in either its original
packaging or packaging affording an equal degree of protection, to any authorized Sony service facility.
This warranty does not cover customer instruction, installation, set up adjusrments or signal reception prob-
lems.
This warranty does not cover cosmetic damage or damage due to acts of God, accident, misuse, abuse, negli-
gence, commercial use, or modification of, or to any part of the Product, including the antenna. This warranty
does not cover damage due to improper operation or maintenance, connection to improper voltage supply, or
attempted repair by anyone other than a facility authorized by Sony to service the Product. This warranty does
not cover Products sold AS IS or WITH ALL FAULTS, or consumables (such as fuses or batteries). This warranw
isvalid only in the United States.
Proof of purchase in the form of a bill of sale or receipted invoice which is evidence that the unit is within the
Warranty period must be presented to obtain warranty service.
This warranty is invalid if the factory applied serial number has been altered or removed from the Product.
REPAIR OR REPLACEMENT AS PROVIDED UNDER THIS WARRANTY IS THE EXCLUSIVE REMEDY OF THE
CONSUMER. SONY SHALL NOT BE LIABLE FOR ANY INCIDENTAL OR CONSEQUENTIAL DAMAGES FOR
BREACH OF ANY EXPRESS OR IMPLIED WARRANTY ON THIS PRODUCT. EXCEPT TO THE EXTENT PROHIB-
ITED BY APPLICABLE LAW, ANY IMPLIED WARRANTY OF MERCHANTABILITY OR FITNESS FOR A PARTICU-
LAR PURPOSE ON THIS PRODUCT IS LIMITED IN DURATION TO THE DURATION OF THIS WARRANTY.
Some states do not allowthe exclusion or limitation of incidental or consequential damages, or allow limitations
on how long an implied warranty lasts, so the above limitations or exclusions may not apply to you. In addition,
if you enter into a service contract with the Sony Partnership within 90 days of the date of sale, the limitation on
how long an implied warranty lasts does not apply to you. This warranty gives you specific legal rights, and you
may have other rights which vary from state to state.
For your convenience, Sony Electronics Inc. has established telephone numbers for frequently asked questions:
To locate the servicer or dealer nearest you, or for service assistance or resolution of a service problem, or for
product information or operation, call:
Sony Direct Response Center
l-(800)-222-7669
or write to:
Sony Direct Response Center
12451 Gateway Blvd.
Fort Myers, FL 33913
For an accessory or part not available from your authorized dealer, call:
I-(800)-488~SONY (7669)
Printed in Thailand
_
-.__
-
 1
1
-
 2
2
-
 3
3
-
 4
4
-
 5
5
-
 6
6
-
 7
7
-
 8
8
-
 9
9
-
 10
10
-
 11
11
-
 12
12
-
 13
13
-
 14
14
-
 15
15
-
 16
16
-
 17
17
-
 18
18
-
 19
19
-
 20
20


Sony CDX-454XRF Operating Instructions Manual
- Catégorie
- Lecteur CD
- Taper
- Operating Instructions Manual
- Ce manuel convient également à
dans d''autres langues
- English: Sony CDX-454XRF