
All products are trademarks of Nostalgia Products LLC.
Worldwide design & utility patented or patents pending.
© 2014 Nostalgia Products LLC.
www.nostalgiaproducts.com
(rev. 11/05/14)

SSIC320
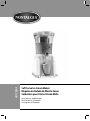
Soft Serve Ice Cream Maker
Máquina de Helado de Mezcla Suave
Sorbetière pour Crème Glacée Molle
Instructions and Recipes
Instrucciones y Recetas
Consignes et Recettes


ENGLISH
2
Make every day a party!
Visit www.nostalgiaproducts.com for more fun products.
CONTENTS
IMPORTANT PRECAUTIONS . . . . . . . . . . . . . . . . . . . . . . . . . . . . . 3
IMPORTANT SAFEGUARDS . . . . . . . . . . . . . . . . . . . . . . . . . . . . . 3
INTRODUCTION . . . . . . . . . . . . . . . . . . . . . . . . . . . . . . . . . . . . 4
PARTS & ASSEMBLY . . . . . . . . . . . . . . . . . . . . . . . . . . . . . . . . . . 5
HOW TO OPERATE . . . . . . . . . . . . . . . . . . . . . . . . . . . . . . . . . . 6
HELPFUL TIPS . . . . . . . . . . . . . . . . . . . . . . . . . . . . . . . . . . . . . 7
CLEANING & MAINTENANCE . . . . . . . . . . . . . . . . . . . . . . . . . . . . 7
RECIPES . . . . . . . . . . . . . . . . . . . . . . . . . . . . . . . . . . . . . . . . . 8
RETURNS & WARRANTY . . . . . . . . . . . . . . . . . . . . . . . . . . . . . . . 9
SAFETY
Appliance Specications:
120 Volts, 60 Hz
20 Watts, ETL Approved
Your safety and the safety of others is very important.
We have provided many important safety messages in this manual and
on your appliance. Always read and obey all safety messages.
This is the safety alert symbol.
This symbol alerts you to potential hazards that
can kill or hurt you and others.
All safety messages will follow the safety alert symbol.
All safety messages will tell you what the potential hazard is, tell you how to reduce the
chance of injury, and tell you what can happen if the instructions are not followed.

ENGLISH
3
IMPORTANT PRECAUTIONS
1. NEVER immerse the base or cord in water.
2. NEVER use near water.
3. NEVER leave unit unattended if used near children.
4. NEVER use a scouring pad on the appliance.
5. NEVER use an abrasive sponge or harsh cleaning products on or inside of the appliance.
6. NEVER use for anything other than what this item was originally intended.
7. Avoid contact with moving parts.
8. DO NOT operate this appliance with a damaged cord or plug,
or in the event the appliance ever malfunctions.
9. DO NOT place parts in dishwasher.
10. Keep out of reach of children.
11. Unplug appliance from electrical outlet when not in use and before
cleaning. Remove plug by gripping the plug body and pulling out
of the outlet. Never yank or twist cord to unplug the unit.
12. This appliance is NOT A TOY.
13. This appliance is not intended for use by young children or
cognitively challenged individuals without supervision.
IMPORTANT SAFEGUARDS
When using electrical appliances, basic safety precautions should always be followed,
including:
1. Read all instructions before operating this appliance.
2. NEVER put ngers or utensils into feed or discharge areas.
3. Keep hands and utensils out of container while blending to reduce
the risk of severe personal injury or damage to the appliance.
4. To protect against electrical shock do not immerse cord,
plug or main unit in water or other liquids.
5. Close supervision is necessary when any appliance is used by or near children.
6. Unplug from outlet when not in use and before removing parts for cleaning.
7. DO NOT operate any appliance with a damaged cord or plug or if the
appliance has been damaged in any manner. Return the appliance
to the nearest repair shop for examination or repair.
8. The manufacturer does not recommend the use of accessory
attachments. Use of attachments may cause injuries.
9. Blades are sharp. DO NOT touch.
10. DO NOT remove Lid when in use.
11. DO NOT let the cord touch hot surfaces.

ENGLISH
4
12. DO NOT place on or near a hot gas or electric burner, or in a heated oven.
13. Extreme caution must be used when moving this appliance with liquids inside.
14. This unit must be on a level surface to operate properly.
15. DO NOT use this appliance for other than its intended use.
16. DO NOT leave unit unattended while in use or when plugged into an outlet.
17. Check inside of the Blending Chamber for foreign objects prior to use.
18. A short power supply cord is provided to reduce the risk resulting
from becoming entangled or tripping over a long cord.
19. Extension cord can be used if care is exercised in use.
20. The marked electrical rating of an extension cord should be at
least as great as the electrical rating of the appliance.
21. This appliance has a polarized plug (one blade is wider than the other). To reduce the
risk of electrical shock, this plug is intended to t into a polarized outlet only one way.
If the plug does not t fully into the outlet, reverse the plug. If it still does not t,
contact a qualied electrician. Do not attempt to modify the plug in any way.
22. Do not attempt to service this appliance yourself, as opening or
removing covers may expose you to dangerous voltage or other
hazards. Refer all servicing to qualied service personnel.
23. Always operate the appliance with cover in place.
24. Make sure the Blending Chamber is properly attached to the base before turning on unit.
SAVE THESE INSTRUCTIONS!
INTRODUCTION
Thank you for purchasing the SOFT SERVE ICE CREAM MAKER from
Nostalgia™! This unit makes a generous, one quart (32-ounce) helping of
delicious soft serve ice cream! Ideal for small groups or parties!
Features include:
• Tank detaches from base for easy cleanup
• Cup rest also catches drips
• Easy pour spout & convenient cord storage

ENGLISH
5
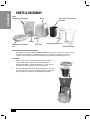
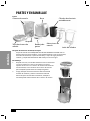
PARTS & ASSEMBLY
Parts
After Taking the Unit Out of the Box
Wipe down the SOFT SERVE ICE CREAM MAKER exterior with a clean, non-abrasive cloth
or sponge. Thoroughly wash Blending Chamber, Aluminum Cylinder, Cylinder Cage
and Lid in warm, sudsy water and thoroughly dry. DO NOT put the Base in water.
Assembly
1. After drying, rmly attach Blending Chamber to Base
by placing the Blending Chamber on top of Base. If
Blending Chamber is attached properly, it will be aligned
with Base so that the Spout is over the Drip Tray.
2. Next, put Mixing Mechanism inside of Aluminum Cylinder
and put Aluminum Cylinder inside of Cylinder Cage. Then
place Cylinder assembly inside of Blending Chamber.
Blending Chamber
Drip Tray
Base
Blending Chamber
Lid
Spout
Non-Stick Aluminum
Cylinder
Cylinder Cage
Mixing Mechanism

ENGLISH
6
HOW TO OPERATE
PREPARATION:
1. First, nd a stable, waterproof surface near an electrical outlet before starting. Make
sure the cord is away from any water source. DO NOT place the SOFT SERVE ICE
CREAM MAKER near the edge of a table or countertop.
2. Remove the Blending Chamber Lid by lifting the back latch
and lifting up on the Lid and carefully unhinging the front.
3. Fill the Aluminum Cylinder halfway with ice through the opening
labeled ICE AND SALT. Follow with a layer of salt, then another
layer of ice, then a nal layer of salt. Add ½ cup of water to speed
up ice melt.
NOTE: You can continually add ice and salt to the unit as
you are creating soft serve by dropping ice and salt into
the ICE AND SALT opening. DO NOT ll the Aluminum
Cylinder beyond1 inch from the top as there is a risk that
the mixture will become contaminated with salt.
4. Return the Lid to Blending Chamber, making sure it is aligned
properly over the mixing mechanism and latched down securely.
5. Slide the ON/OFF switch to FREEZE to turn the unit on.
TO MAKE SOFT SERVE ICE CREAM:
1. Pour your ice cream mixture directly into the unit
through the square indention on the top of the
unit. DO NOT ll beyond the MAX FILL line (approximately 4 cups of liquid).
The mixture will expand as it freezes. DO NOT use alcohol, sugar-free
mixtures or plain water in the machine, as it could damage the unit.
2. Allow the mixture to blend for up to 15 minutes, then dispense.
3. Place cup under Spout and slide the ON/OFF switch forward to DISPENSE. Turn the
dispenser handle to the right to dispense ice cream. Keep unit running until all of the
mixture has been dispensed. Be sure to turn handle back to CLOSE after lling each cup.
Non-Stick Aluminum
Cylinder

ENGLISH
7
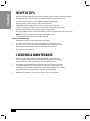
HELPFUL TIPS
• Add more liquid to Blending Chamber if vacuum occurs around Cylinder during use.
• Blending Chamber must be rmly attached to Base or unit will not turn on.
• A towel placed under your SOFT SERVE ICE CREAM MAKER, will
help with clean-up. You should expect some dripping.
• REMINDER: Creating soft serve ice cream incorporates air into the
mixture, causing it to expand. If ice cream mixture runs over into canister,
dispense some of the mixture to lower the level in the unit.
• If making another batch, remove Aluminum Cylinder and rell with ice and salt layers.
• NOTE: If mixture gets too thick, or does not dispense well,
add more liquid to the mixing chamber opening.
Mixture is Not Freezing
Possible reasons for mixture not chilling or freezing:
1. The Aluminum Cylinder was not cold enough. Try adding more ice
and salt. Salt is a critical part of the freezing process and you will need
plenty of salt added to the ice for the slush to freeze properly.
2. The mixture was too warm.
CLEANING & MAINTENANCE
1. After using your SOFT SERVE ICE CREAM MAKER , disconnect from
electrical outlet. Remove plug by gripping the plug body and pulling
out of the outlet. Never yank or twist cord to unplug the unit.
2. Thoroughly wash the Blending Chamber, Aluminum Cylinder, Cylinder
Cage, Mixing Mechanism, Lid and Drip Tray in warm, sudsy water and
thoroughly dry. DO NOT put the Base in water. When needed, use a damp,
non-abrasive cloth to wipe exterior and then dry thoroughly.
3. NEVER immerse Base in water or put any parts in the dishwasher.

ENGLISH
8
RECIPES
Use your imagination to create many dierent soft serve ice creams with your SOFT
SERVE ICE CREAM MAKER. This unit has the capacity for 32 oz. of ice cream, so if
you have a recipe made for one remember to adjust your recipes accordingly.
The basic liquid combination for soft serve ice cream before adding other
ingredients is 4 cups: 4 cups of whole milk OR 4 cups of half and half OR 2
cups of each. Using skim or 2% milk will result in a thinner consistency.
For each recipe below, layer the Aluminum Cylinder with ice and
salt up to the max ll line. DO NOT exceed the max ll line as salt-
ice mixture should not contaminate ice cream mixture.
CLASSIC VANILLA ICE CREAM
• 2 cups half and half
• 2 cups whole milk
• ½ Cup sugar
• 2 Tbsp. vanilla
• (Dry ingredients can
be substituted for 6-8
oz. of ice cream mix)
Dispense after 15 minutes
Serves six
STRAWBERRIES & CREAM ICE CREAM
• 4 cups half and half
• ½ Cup sugar
• 2 Tbsp. Strawberry
Syrup
• (Dry ingredients can
be substituted for 6-8
oz. of ice cream mix)
Dispense after 15 minutes
Serves six
WHOLESOME CHOCOLATE ICE CREAM
• 4 cups whole milk
• ½ Cup sugar
• 2 Tbsp. Chocolate
Syrup
• (Dry ingredients can
be substituted for 6-8
oz. of ice cream mix)
Dispense after 15 minutes
Serves six

ENGLISH
9
RETURNS & WARRANTY
SHOULD YOUR UNIT NOT WORK OR IF DAMAGED WHEN YOU FIRST TAKE IT OUT OF
THE BOX, PLEASE RETURN IT TO THE PLACE OF PURCHASE IMMEDIATELY.
SOFT SERVE ICE CREAM MAKER / SSIC320
Should you have any questions, please contact us via email or at the customer service number listed
below between the hours of 8:00 AM and 5:00 PM, Monday through Friday, Central Standard Time.
Distributed by:
Nostalgia Products LLC
1471 Partnership Dr.
Green Bay, WI 54304-5685
Customer Service
Phone: (920) 347-9122
Web: www.nostalgiaproducts.com
Customer Service Inquiry
To submit a Customer Service inquiry, go to www.nostalgiaproducts.com and ll
out the Customer Service Inquiry form and click the Submit button.
A representative will contact you as soon as possible.
Product Warranty Terms
Nostalgia Products LLC (the “Company”) hereby warrants that for a period of one (1) year from the
date of original purchase, this product will be free of defects in material and workmanship under
normal home use, provided that the product is operated and maintained in accordance with the
operating instructions. As the sole and exclusive remedy under this warranty, the Company will
at its discretion either repair or replace the product found to be defective, or issue a refund on the
product during the warranty period. This warranty is only available to the original retail purchaser of
the product from the date of initial retail purchase, and is only valid with the original sales receipt, as
proof of purchase date is required to obtain warranty benets. All warranty claims must be brought
to the attention of the Company within the warranty period and no later than 30 days of the failure
to perform. This warranty does not cover normal wear or damage caused by shipping, mishandling,
misuse, accident, alteration, improper replacement parts, or other than ordinary household use.
You may be required to return the product (with shipping prepaid by you) for inspection and
evaluation. Return shipping costs are not refundable. The Company is not responsible for returns
damaged or lost in transit. Unless otherwise specically permitted by the operating instructions, this
warranty applies to indoor household use only. In order to obtain service under this warranty, please
contact the Company at the telephone number listed above or by lling out the Customer Service
Inquiry Form located at www.nostalgiaproducts.com. Warranty valid only in USA and Canada.
This warranty is in lieu of all other warranties, expressed or implied, including warranties of
merchantability and tness for a particular purpose, which are hereby excluded to the extent
permitted by law. In no event shall the Company be liable for any indirect, incidental, consequential,
or special damages arising out of or in connection with this product or the use thereof. Some
states, provinces or jurisdictions do not permit the exclusion or limitation of incidental or
consequential damages, so the foregoing exclusion or limitation may not apply to you.
This warranty does not apply to re-manufactured merchandise.
Please read the operating instructions carefully. Failure to comply
with the operating instructions will void this warranty.
For more information, visit us online at www.nostalgiaproducts.com.
Like us on Facebook at www.facebook.com/NostalgiaElectrics.
Follow our boards on Pinterest at www.pinterest.com/nostalgiaelctrx.
Tweet along with us on Twitter at www.twitter.com/NostalgiaElctrx.

10
ESPAÑOL
10
¡Haga de cada día una esta!
Visite www.nostalgiaproducts.com para
ver más productos divertidos.
CONTENIDO
PRECAUCIONES IMPORTANTES . . . . . . . . . . . . . . . . . . . . . . . . . . 11
MEDIDAS DE SEGURIDAD IMPORTANTES . . . . . . . . . . . . . . . . . . . . 11
INTRODUCCIÓN . . . . . . . . . . . . . . . . . . . . . . . . . . . . . . . . . . . . 12
PARTES Y ENSAMBLAJE . . . . . . . . . . . . . . . . . . . . . . . . . . . . . . . 13
FUNCIONAMIENTO . . . . . . . . . . . . . . . . . . . . . . . . . . . . . . . . . . 14
CONSEJOS ÚTILES . . . . . . . . . . . . . . . . . . . . . . . . . . . . . . . . . . . 15
LIMPIEZA Y MANTENIMIENTO . . . . . . . . . . . . . . . . . . . . . . . . . . . 15
RECETAS . . . . . . . . . . . . . . . . . . . . . . . . . . . . . . . . . . . . . . . . . 16
DEVOLUCIONES Y GARANTÍA . . . . . . . . . . . . . . . . . . . . . . . . . . . 17
SEGURIDAD
Especicaciones del electrodoméstico:
120 Voltios, 60 Hertz
20 Watts, aprobado por ETL
Su seguridad y la de otras personas es muy importante.
Hemos proporcionado numerosos mensajes de seguridad importantes en este manual
y en su electrodoméstico. Siempre lea y obedezca todos los mensajes de seguridad.
Este es el símbolo de alerta de seguridad.
Este símbolo le avisa de peligros potenciales que podrá
causar la muerte o lesionarle a usted y a otros.
Todos los mensajes de seguridad estarán antecedidos por el símbolo de alerta.
Todos los mensajes de seguridad le dirán de qué peligro potencial se trata, cómo reducir
la posibilidad de lesiones y qué puede ocurrir si no se obedecen las instrucciones.

11
ESPAÑOL
11
PRECAUCIONES IMPORTANTES
1. No sumerja NUNCA la base o el cable en agua.
2. No lo utilice NUNCA cerca del agua.
3. NUNCA deje la unidad desatendida si se utiliza cerca de los niños.
4. No utilice NUNCA un estropajo en el aparato.
5. NUNCA utilice una esponja abrasiva o productos de
limpieza fuertes en el interior del aparato.
6. NUNCA lo utilice para otra cosa que no sea para lo que fue diseñado originalmente.
7. Evite el contacto con partes en movimiento.
8. NO opere este aparato con un cable o enchufe dañados,
o en caso de que funcione incorrectamente.
9. NO introduzca partes en el lavavajillas.
10. Manténgalo fuera del alcance de los niños.
11. Desenchufe el aparato de la toma eléctrica cuando no lo esté utilizando y antes
de limpiarlo. Retire el enchufe al agarrar el cuerpo del enchufe y halarlo de la
toma de corriente. Nunca tire o tuerza el cable para desenchufar la unidad.
12. Este aparato NO ES UN JUGUETE.
13. Este aparato no se ha diseñado para que lo utilicen los niños ni
personas con dicultades de aprendizaje sin supervisión.
MEDIDAS DE SEGURIDAD IMPORTANTES
Cuando utiliza aparatos eléctricos, siempre se deben seguir algunas medidas básicas de
seguridad que incluyen las siguientes:
1. Lea todas las instrucciones antes de utilizar este aparato.
2. NUNCA ponga los dedos ni coloque utensilios en las áreas de alimentación o descarga.
3. Mantenga las manos y los utensilios del recipiente mientras bate para
reducir el riesgo de lesiones graves o daños en el aparato.
4. Como medida de protección contra el riesgo de descarga eléctrica, no sumerja
el cable, los enchufes o la unidad principal en agua ni en otros líquidos.
5. Es necesaria una supervisión estricta cuando los niños utilicen
el aparato o cuando se encuentren a su alrededor.
6. Desenchufe el aparato de la red cuando no lo esté utilizando
y antes de desmontarlo para limpiarlo.
7. NO utilice ningún aparato con el cable o el enchufe dañados, ni si el
aparato se ha dañado de cualquier manera. Devuelva el aparato al
taller de reparación más cercano para su examen o reparación.
8. El fabricante no recomienda el uso de implementos accesorios.
El uso de implementos puede provocar lesiones.
9. Las cuchillas están aladas. NO las toque.

12
ESPAÑOL
12
10. NO retire la tapa cuando esté en uso.
11. NO permita que el cable toque supercies calientes.
12. NO coloque el aparato sobre o cerca de un fogón de gas
o eléctrico o dentro de un horno caliente.
13. Debe tenerse extrema precaución cuando se mueva este aparato con líquidos adentro.
14. Esta unidad debe estar en una supercie nivelada para que funcione bien.
15. NO utilice este aparato para otro uso que no sea el cual para el que está destinado.
16. NO deje la unidad desatendida mientras esté en uso o
cuando esté enchufada a una toma de corriente.
17. Revise dentro de la cámara de mezclas para ver si tiene objetos extraños antes del uso.
18. Se proporciona un cable de alimentación corto para reducir el
riesgo de enredarse o tropezar con un cable más largo.
19. Un cable de extensión se puede utilizar si se tiene cuidado con su uso.
20. Las características nominales del cable de extensión
deben ser al menos iguales a las del aparato.
21. Este aparato tiene un enchufe polarizado (una clavija es más ancha que la otra). Para
reducir el riesgo de descarga eléctrica, este enchufe se ha diseñado para introducirse
en una toma de corriente polarizada solo en una posición. Si el enchufe no entra
bien en la toma de corriente, déle la vuelta. Si aún no encaja, contacte a un
electricista calicado. No intente modicar el enchufe de ninguna forma.
22. No intente revisar este aparato usted mismo, ya que abrirlo o retirar las
cubiertas podría estar expuesto a tensiones peligrosas u otros peligros. Solicite
al personal de servicio calicado que realice las tareas de servicio.
23. Siempre haga funcionar el aparato con la tapa en su lugar.
24. Asegúrese de que la cámara de mezcla está correctamente
conectada a la base antes de encender la unidad.
¡GUARDE ESTAS INSTRUCCIONES!
INTRODUCCIÓN
¡Gracias por comprar MÁQUINA DE HELADO DE MEZCLA SUAVE de Nostalgia
Electrics™! ¡Esta unidad hace una generosa cantidad, un cuarto de galón (32 onzas)
de delicioso helado de servicio suave! ¡Ideal para grupos pequeños o estas!
Las características incluyen:
• El tanque se separa de la base para una limpieza fácil
• El resto de la taza también captura gotas
• Surtido de vertido Fácil y almacenamiento del cable conveniente

13
ESPAÑOL
13
PARTES Y ENSAMBLAJE
Partes
Después de retirar la unidad de la cajeta
Limpie el exterior de la MÁQUINA DE HELADO DE MEZCLA SUAVE con un
paño no abrasivo o una esponja. Lave completamente la cámara de mezcla,
el cilindro de aluminio, la jaula del cilindro y la tapa con agua jabonosa
caliente, y seque todo totalmente. NO sumerja la base en agua.
Ensamblaje
1. Después de secar, instale rmemente la cámara de mezcla
a la base al colocar la cámara de mezcla en la parte
superior de la base. Si la cámara de mezcla está instalada
correctamente, estará alineada con la base de manera
que la boquilla quede sobre la bandeja de goteo.
2. Luego, coloque el mecanismo de mezcla dentro del
cilindro de aluminio y sitúe el cilindro de aluminio
dentro de jaula del cilindro. Finalmente, coloque el
ensamblaje del cilindro dentro de la cámara de mezcla.
Cámara de mezcla
Bandeja de
goteo
Base
Tapa de cámara de
mezcla
Boquilla
Cilindro de aluminio
antiadherente
Jaula del cilindro
Mecanismo de
mezcla

14
ESPAÑOL
14
FUNCIONAMIENTO
PREPARACIÓN:
1. Primero, encuentre una supercie estable e impermeable cerca de una toma de
corriente. Asegúrese de que el cable esté alejado de cualquier fuente de agua.
NO coloque la MÁQUINA DE HELADO DE MEZCLA
SUAVE cerca del borde de una mesa o encimera.
2. Retire la tapa de la cámara de mezcla al levanta la
parte posterior del seguro trasero y levantar la tapa
con cuidado de no desencajar la parte delantera.
3. Llene el cilindro de aluminio a la mitad con hielo a través de la
abertura etiquetada HIELO Y SAL. Siga con una capa de sal, luego
otra capa de hielo y nalmente una capa nal de sal. Añada una
taza V2 de agua para acelerar la fusión del hielo.
NOTA: Puede agregar hielo y sal a la unidad a medida
que crea una mezcla suave al dejar caer hielo y sal en la
abertura de HIELO Y SAL. NO llene el cilindro de aluminio
más arriba de 1 pulgada de la parte superior ya que existe
el riesgo de que la mezcla se contamine con sal.
4. Devuelva la tapa a la cámara de mezcla, asegurándose
de que esté alineada correctamente con el
mecanismo de mezcla y cerrada con seguridad.
5. Mueva el interruptor de encendido/apagado
a FREEZE para encender la unidad.
PARA HACER EL HELADO DE MEZCLA SUAVE:
1. Vierta la mezcla de helado directamente a la unidad a través de la hendidura cuadrada
en la parte superior de la unidad. NO llene más allá de la línea del llenado máximo (casi
4 tazas de líquido). La mezcla se expandirá cuando se congele. NO utilice alcohol,
mezclas sin azúcar o agua normal en la máquina, ya que podría dañar la unidad.
2. Permita que la mezcla se mezcle durante 15 minutos y luego sirva.
3. Coloque la taza debajo de la boquilla y mueve el interruptor de encendido/apagado hacia
DISPENSE. Gire la palanca del dispensador a la derecha para servir helado. Mantenga la
unidad funcionando hasta que se haya servido toda la mezcla. Asegúrese de girar la palanca
hacia CLOSE después de llenar cada taza.
Cilindro de aluminio
antiadherente

15
ESPAÑOL
15
CONSEJOS ÚTILES
• Añada más líquido a la cámara de mezcla si se produce un
vacío alrededor del cilindro durante su uso.
• La cámara de mezcla debe jarse rmemente a la base o la unidad encenderá.
• Una toalla suave bajo la MÁQUINA DE HELADO DE MEZCLA SUAVE,
ayudará con las labores de limpieza. Debe esperarse algo de goteo.
• RECORDATORIO: Crear un helado de mezcla suave incorpora aire a la
mezcla, lo que provoca que se expanda. Si mezcla de helado se verterá en
un frasco, sirva algo de la mezcla para reducir el nivel de la unidad.
• Si piensa hacer otro lote, retire el cilindro de aluminio y llénelo con hielo y capas de sal.
• NOTA: Si la mezcla se vuelve muy espesa o no se sirve bien,
añada más líquido a la cámara de mezcla.
La mezcla no se está congelando
Las posibles razones de porqué una mezcla no se está enfriando o congelando:
1. El cilindro de aluminio no estuvo lo bastante frío. Trate de añadir más hielo y
sal. La sal es una parte crítica del proceso de congelación y usted tendrá que
añadir bastante sal al hielo para que la mezcla se congele correctamente.
2. La mezcla estuvo muy tibia.
LIMPIEZA Y MANTENIMIENTO
1. Después de utilizar la MÁQUINA DE HELADO DE MEZCLA SUAVE, desconéctela de
la toma eléctrica. Retire el enchufe al agarrar el cuerpo del enchufe y halarlo de la
toma de corriente. Nunca tire o tuerza el cable para desenchufar la unidad.
2. Lave completamente la cámara de mezcla, el cilindro de aluminio, la jaula del cilindro,
el mecanismo de mezcla, la tapa y la bandeja de goteo con agua jabonosa caliente, y
seque todo totalmente. NO sumerja la base en agua. Cuando sea necesario, utilice un
paño húmedo, que no sea abrasivo para limpiar el exterior y luego séquelo bien.
3. NUNCA sumerja la base en agua ni coloque ninguna parte en el lavavajillas.

16
ESPAÑOL
16
RECETAS
Utilice su imaginación para crear diferentes helados de mezcla suave con la MÁQUINA DE
HELADO DE MEZCLA SUAVE. Esta unidad tiene la capacidad de 32 onzas de helado, así que
si usted tiene una receta hecha para una, recuerde ajustar sus recetas como corresponde.
La combinación de líquido para un helado de mezcla suave antes de añadir otros
ingredientes es 4 tazas: 4 tazas de leche entera O 4 tazas de mitad y mitad O 2 tazas de cada
uno. Utilizar leche descremada o leche al 2% producirá una consistencia más delgada.
Para cada receta abajo, cubra el cilindro de aluminio con hielo y sal hasta
la línea de llenado máximo. NO exceda la línea de llenado máximo ya que
la mezcla de sal y hielo no debe contaminar mezcla de helado.
HELADO DE VAINILLA CLÁSICO
• 2 tazas mitad y mitad
• 2 tazas de leche
entera
• 1/2 Taza azúcar
• 2 cucharadas
de vainilla
• (Los ingredientes
secos pueden
sustituirse por 6 a 8
onzas de helado)
Sirva después de 15 minutos.
Da seis porciones.
HELADO DE FRESAS Y CREMA
• 4 tazas mitad y mitad
• 1/2 Taza azúcar
• 2 cucharadas de
sirope de fresas
• (Los ingredientes
secos pueden
sustituirse por 6 a 8
onzas de helado)
Sirva después de 15 minutos.
Da seis porciones.
HELADO DE CHOCOLATE ENTERO
• 4 tazas de leche
entera
• 1/2 Taza azúcar
• 2 cucharadas de
sirope de chocolate
• (Los ingredientes
secos pueden
sustituirse por 6 a 8
onzas de helado)
Sirva después de 15 minutos.
Da seis porciones.

17
ESPAÑOL
17
DEVOLUCIONES Y GARANTÍA
SI LA UNIDAD NO FUNCIONA O ESTÁ DAÑADA AL SACARLA POR PRIMERA VEZ
DE LA CAJA, DEVUÉLVALA AL LUGAR DE COMPRA INMEDIATAMENTE.
MÁQUINA DE HELADO DE MEZCLA SUAVE / SSIC320
Si tiene preguntas, contacte con nosotros por correo electrónico o por el número
telefónico de servicio al cliente que aparece a continuación en el horario de
8:00 AM a 5:00 PM, de lunes a viernes, Hora Estándar del Este.
Distribuida por:
Nostalgia Products LLC
1471 Partnership Dr.
Green Bay, WI 54304-5685
Servicio al cliente
Teléfono: (920) 347-9122
Web: www.nostalgiaproducts.com
Solicitud de servicio al cliente
Para enviar una solicitud al Servicio al Cliente, vaya a www.nostalgiaproducts.com, llene
el formulario de Solicitud de Servicio al Cliente y haga clic en el botón Enviar.
Un representante le contactará tan pronto como sea posible.
Términos de garantía del producto
Po este medio, Nostalgia Products LLC (la “Compañía”) garantiza que por un período de un (1) año a
partir de la fecha de compra original, este producto estará sin defectos en cuanto a materiales y mano
de obra en uso normal en casa, siempre que el producto se maneje y mantenga de acuerdo con las
instrucciones de manejo. Como único y exclusivo remedio en virtud de esta garantía, la Compañía, a
su discreción, podrá optar por reparar o sustituir el producto que se encuentre defectuoso, o emitir un
reembolso por el producto durante el período de garantía. Esta garantía sólo está disponible para el
comprador original minorista del producto a partir de la fecha inicial de compra al por menor, y sólo es
válida con el recibo de compra original, y como prueba de la fecha de compra, es necesario obtener los
benecios de la garantía. Todos los reclamos de garantía deben hacerse a la atención de la Compañía
dentro del período de garantía y no más tarde que 30 días desde la imposibilidad de realizarlo. Esta
garantía no cubre el desgaste normal o daños ocasionados por el embarque, malos manejos, mal uso,
accidentes, alteración, piezas de cambio incorrectas, o algo distinto al uso doméstico normal. Es posible
que deba devolver el producto (con los gastos de envío pagados por usted) para inspección y evaluación.
Los costos de envío no son reembolsables. La empresa no se hace responsable por devoluciones
dañadas o perdidas en tránsito. A menos que se indique lo contrario especícamente permitido por
las instrucciones de manejo, esta garantía sólo se aplica al uso en interiores de las viviendas. Para
realizar una reparación bajo esta garantía, comuníquese con la Compañía mediante el número de
teléfono indicado anteriormente o al llenar el formulario de consulta para el servicio de Atención al
Cliente en www.nostalgiaproduct s.com. El período de garantía sólo es válido en EE.UU. y Canadá.
Esta garantía está en lugar de cualquier otra garantía, expresa o implícita, incluso las garantías de
comerciabilidad y conveniencia para un propósito en particular, que quedan excluidas en la medida
permitida por la ley. En ningún caso la compañía será responsable de cualquier daño indirecto, incidental,
consecuente, especial o daños que surjan o estén relacionados con este producto o la utilización del
mismo. Algunos estados, provincias o corregimientos no permiten la exclusión o la limitación de daños
incidentales o consecuentes, por lo que la exclusión o la limitación anterior quizás no se aplique a usted.
Esta garantía no se aplica a mercancía reelaborada.
Lea las instrucciones de manejo cuidadosamente. El incumplimiento
de las instrucciones de manejo anulará esta garantía.
Para obtener más información, visítenos en línea en www.nostalgiaproducts.com.
Me Gusta en Facebook en www.facebook.com / NostalgiaElectrics.
Siga nuestros consejos sobre Pinterest en www.pinterest.com / nostalgiaelctrx.
Tweet con nosotros en Twitter en www.twitter.com / NostalgiaElctrx.

18
FRANÇAIS
18
Faites de chaque jour une fête!
Visiter le site Web www.nostalgiaproducts.
com pour d'autres produits amusants.
TABLE DES MATIÈRES
IMPORTANTES MESURES DE PRÉCAUTION . . . . . . . . . . . . . . . . . . . 19
IMPORTANTES MISES EN GARDE . . . . . . . . . . . . . . . . . . . . . . . . . 19
INTRODUCTION . . . . . . . . . . . . . . . . . . . . . . . . . . . . . . . . . . . . 20
PIÈCES ET ASSEMBLAGE . . . . . . . . . . . . . . . . . . . . . . . . . . . . . . . 21
MODE DE FONCTIONNEMENT . . . . . . . . . . . . . . . . . . . . . . . . . . . 22
CONSEILS UTILES . . . . . . . . . . . . . . . . . . . . . . . . . . . . . . . . . . . 23
NETTOYAGE ET ENTRETIEN . . . . . . . . . . . . . . . . . . . . . . . . . . . . . 23
RECETTES . . . . . . . . . . . . . . . . . . . . . . . . . . . . . . . . . . . . . . . . 24
RETOURS ET GARANTIE . . . . . . . . . . . . . . . . . . . . . . . . . . . . . . . 25
SÉCURITÉ
Fiche technique de l'appareil :
120 V, 60 Hz
20 W, homologué par ETL
Votre sécurité et celle des autres sont très importantes.
De nombreux messages importants de sécurité se trouvent dans le présent manuel
et sur votre appareil. Toujours lire et respecter toutes les consignes de sécurité.
Ceci est le symbole d'avertissement de sécurité.
Ce symbole avertit des risques potentiels qui présente
un danger pour votre vie et celle des autres.
Tous les messages de sécurité suivront le symbole d'avertissement de sécurité.
Tous les messages de sécurité indiqueront le danger potentiel et la façon de réduire
le risque de blessure et ce qui peut arriver si les consignes ne sont pas suivies.
La page est en cours de chargement...
La page est en cours de chargement...
La page est en cours de chargement...
La page est en cours de chargement...
La page est en cours de chargement...
La page est en cours de chargement...
La page est en cours de chargement...
La page est en cours de chargement...
-
 1
1
-
 2
2
-
 3
3
-
 4
4
-
 5
5
-
 6
6
-
 7
7
-
 8
8
-
 9
9
-
 10
10
-
 11
11
-
 12
12
-
 13
13
-
 14
14
-
 15
15
-
 16
16
-
 17
17
-
 18
18
-
 19
19
-
 20
20
-
 21
21
-
 22
22
-
 23
23
-
 24
24
-
 25
25
-
 26
26
-
 27
27
-
 28
28


dans d''autres langues
- English: Nostalgia SSIC320 User guide
- español: Nostalgia SSIC320 Guía del usuario
Documents connexes
-
Nostalgia CICM2AS Manuel utilisateur
-
Nostalgia RSM650 Manuel utilisateur
-
-
-
Nostalgia Electrics RSM-650 Mode d'emploi
-
-
-