Hobart Spiral Mixers Manuel utilisateur
- Catégorie
- Mélangeurs
- Taper
- Manuel utilisateur

701 S. RIDGE AVENUE
TROY, OHIO 45373
937 332-3000
www.hobartcorp.com
INSTRUCTION
MANUAL
MODELS
HSL130 ML-141241
HSL180 ML-134446
HSL220 ML-134447
HSL300 ML-134448
HSU440 ML-141041
F37235 Rev. J (June 2023)

– 2 –
© HOBART, 2023
TABLE OF CONTENTS
GENERAL ..............................................................................................................................................................3
INSTALLATION .....................................................................................................................................................4
Unpacking ........................................................................................................................................................4
Location ...........................................................................................................................................................4
Leveling ............................................................................................................................................................4
Electrical Connections .....................................................................................................................................4
Verify Correct Rotation .....................................................................................................................................4
OPERATION .........................................................................................................................................................5
Controls ............................................................................................................................................................5
Using the Mixer ................................................................................................................................................6
Mixer Capacity Chart .......................................................................................................................................6
CLEANING ............................................................................................................................................................7
MAINTENANCE ....................................................................................................................................................7
Service .............................................................................................................................................................7
TROUBLESHOOTING .........................................................................................................................................8

– 3 –
Installation, Operation and Care of
MODEL HSL & HSU SERIES SPIRAL MIXERS
SAVE THESE INSTRUCTIONS
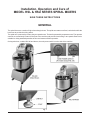
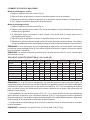
GENERAL
The spiral mixers are a series of high-volume dough mixers. The spiral arm rotates on a xed, vertical axis while the
bowl turns to provide the mixing action.
The spiral arm is powered by a heavy-duty two-speed motor. The bowl is powered by a separate motor. The operator
controls are conveniently located on the front of the machine and provide timed mixing in two speeds. Bowl size is
suitable for mixing standard quantities of our and ensures ecient operation.
On larger devices, models HSL180 and above, the main power switch is on the side of the machine.
Fig. 1

– 4 –
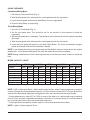
ELECTRICAL DATA
Model Volts Hertz Phase Amps
HSL130 208 60 3 17
HSL180 208 60 3 34
HSL220 208 60 3 34
HSL300 208 60 3 34
HSU440 208 60 3 42
INSTALLATION
UNPACKING
This mixer was inspected before leaving the factory. The carrier assumes full responsiblity for the safe
delivery upon acceptance of the shipment. Check for possible shipping damage immediately after receipt.
If the mixer is found to be damaged, complete the following steps:
1. Carrier must be notied within 5 business days of receipt.
2. Carrier's local terminal must be notied immediately upon discovery (note time, date, and who was
spoken to), and follow up and conrm with written or electronic communication.
3. All original packing materials must be kept for inspection purposes.
4. The mixer cannot have been moved, installed, or modied.
5. Notify Hobart customer care at (800) 333-7447.
Prior to installation, verify that the electrical service agrees with the specications on the data plate located
at the rear of the machine.
LOCATION
Place the mixer in its operating location. Allow adequate space around the mixer for operation of controls
and to add ingredients to the bowl. The area above and beside the mixer should allow for the bowl guard to
be raised above the machine and for the side service panel to be opened for servicing of the machine.
LEVELING
The spiral mixer should be positioned in a reasonably level area.
After positioning, screw down the stabilizing
feet (Fig. 1) on the front corners; then tighten the jam nuts before starting.
ELECTRICAL CONNECTIONS
Electrical and grounding connections must comply with the applicable portion of
the National Electrical Code and/or other local electrical codes.
A thru hole for 1" trade size conduit is located on the back of the mixer. Make electrical connections per
the wiring diagram located inside the electrical box on the side of the machine.
VERIFY CORRECT ROTATION
Check the rotation of the agitator to make sure it moves in a counterclockwise direction looking down into
the bowl. If the rotation is incorrect, disconnect power supply to mixer and interchange any two of the three
ungrounded (hot) power supply lead wires. Then, verify that the rotation is correct.

– 5 –
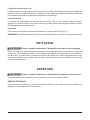
OPERATION
Moving beater and moving bowl. Keep hands, clothing, and utensils out while in
operation. Do not use without interlocked guard.
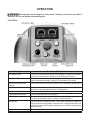
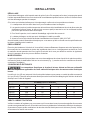
CONTROLS
Fig. 2
Description Functions Controlled
Low Speed Timer Turn dial to set time mixer will run on low speed. This speed is typically
used to blend ingredients. Range is 30 seconds to 20 minutes.
High Speed Timer Turn dial to set time mixer will run on high speed. This speed is typically
used to develop the dough. Range is 30 seconds to 20 minutes.
Manual/Automatic Mode
Selector
Turn to set the mixer to manual (continuous) or automatic (timed) mode.
Bowl Direction Selector Set the direction the bowl will rotate when the mixer is running. The bowl
will only run counterclockwise when on high speed.
Low Speed Start Button Press to start the mixer in low speed.
High Speed Start Button Press to start the mixer in high speed.
Bowl Jog Button Push and hold this button to rotate bowl without turning on agitator motor.
The bowl guard can be down or raised to rotate the bowl.
Stop Button Push this button to stop the mixer. Turn button clockwise to release. If
using continuous mixing mode, mixer will stop. If using timed mixing, the
timer will go back to the original starting time; to continue mixing, press
the start button.
Main Power Switch This switch (Fig. 1) supplies power to the control panel.

– 6 –
USING THE MIXER
Continuous Mixing Mode
1. Set mixer to Continuous Mode (Fig. 2).
2. With the bowl guard in the raised position, load ingredients into the mixer bowl.
3. Lower the bowl guard and press the Start Button for low or high speed.
4. Press the Stop Button to stop mixing.
Timed Mixing Mode
1. Set mixer to Timed Mode (Fig. 2).
2. Set the low speed timer. This should be set for the amount of time required to blend the
ingredients.
3. Set the high speed timer, if necessary. This should be set for the amount of time required to develop
the dough.
4. With the bowl guard in the raised position, load ingredients into the mixer bowl.
5. Lower the bowl guard and press the Low Speed Start Button. The mixer automatically changes
speed at the preset time and shuts o when complete.
NOTE: If you interrupt the mixing cycle by pressing the Stop Button, the timer will go back to the original
starting time. If you raise the bowl guard, the mixer will restart where the timer stopped.
NOTE: Adding a small amount of oil to the dough near the end of the cycle makes it easier to unload the
bowl.
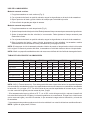
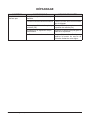
MIXER CAPACITY CHART
NOTE: % AR (% Absorption Ratio) - Water weight divided by our weight. Capacity depends on moisture
content of dough. Above capacities are based on 12% our moisture content and 70°F water. Bread our
was used for bread dough capacities and high gluten our was used for pizza and bagel doughs.
* If water temperature is under 55°F or if 25% or more of the water is ice, reduce batch size by reducing
our by 25 lbs. and other ingredients accordingly. Cold water or ice causes dough to be sti and hard to
mix, increasing the load on the mixer transmission and motor.
** Pie dough can be successfully mixed in speed 1 with counterclockwise bowl rotation.
NOTE: 1 gallon of water weighs 8.33 lbs.
Capacity Chart HSL130 HSL180 HSL220 HSL300 HSU440
Product Flour Batch Flour Batch Flour Batch Flour Batch Flour Batch
Bread 60% AR 75 lb. 130 lb.* 100 lb. 180 lb.* 120 lb. 220 lb.* 165 lb. 290 lb.* 240 lb. 440 lb.*
Whole Wheat 75 lb. 130 lb.* 100 lb. 190 lb.* 120 lb. 232 lb.* 150 lb. 290 lb.* 220 lb. 440 lb.*
Thin Pizza 40% AR 40 lb. 60 lb.* 62 lb. 90 lb.* 75 lb. 110 lb.* 100 lb. 145 lb.* 140 lb. 220 lb.*
Med. Pizza 50% AR 50 lb. 75 lb.* 80 lb. 125 lb.* 100 lb. 155 lb.* 130 lb. 190 lb.* 190 lb. 290 lb.*
Light Pizza 60% AR 75 lb. 120 lb.* 100 lb. 140 lb.* 120 lb. 170 lb.* 175 lb. 250 lb.* 240 lb. 350 lb.*
Pie Dough - 40 lb. ** - 60 lb. ** - 75 lb. ** - 100 lb. ** - 140 lb. **
Bagel 50% AR 40 lb. 60 lb.* 90 lb. 140 lb.* 85 lb. 130 lb.* 100 lb. 165 lb.* 160 lb. 240 lb.*

– 7 –
Bowl Guard
The mixer is equipped with a bowl guard. The guard must be down for the mixer to run. Lifting the guard
will stop the mixer. Lower the bowl guard and press the start button to resume mixing functions.
Stop Button
The control panel has a stop button (Fig. 2). To stop the mixer, press the stop button. To release the stop
button, turn the mushroom head clockwise.
Shutdown
Turn the main power switch o (Fig. 1).
NOTE: Model HSL130 mixers are not equipped with a main power switch.
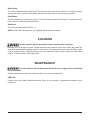
CLEANING
Turn the machine o and disconnect electrical power before cleaning.
Because this is a dough only mixer, residue should be at a minimum. At the end of each day, wash the
mixer bowl and agitator thoroughly with hot water and a mild soap solution and rinse with either a mild
soda or vinegar solution. Rinse thoroughly with clear water and wipe dry with a soft clean cloth. Wipe
exterior of machine with a clean damp cloth.
MAINTENANCE
Turn the machine o and disconnect electrical power supply before performing
any maintenance.
Routinely inspect the machine to make sure that it is in proper working order.
SERVICE
Contact your local Hobart authorized service oce for any repairs or adjustments needed on this
equipment.

– 8 –
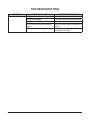
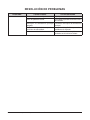
TROUBLESHOOTING
SYMPTOM POSSIBLE CAUSE SUGGESTED ACTION
Mixer will not start. Bowl guard not lowered. Lower the bowl guard.
Stop button engaged. Turn stop button clockwise to release.
Main power switch turned o. Turn main power switch on.
Fuse or circuit breaker interrupting
power.
Check for blown fuses or reset circuit
breaker.
Broken wire or connection. Disconnect power and call your local
Hobart Service Oce.
FORM 37235 Rev. J (June 2023) PRINTED IN USA

701 S. RIDGE AVENUE
TROY, OHIO 45373
937 332-3000
www.hobartcorp.com
MANUAL DE
INSTRUCCIONES
MODELOS
HSL130 ML-141241
HSL180 ML-134446
HSL220 ML-134447
HSL300 ML-134448
HSU440 ML-141041
F37235 Rev. J (junio de 2023)

– 2 –
© HOBART, 2023
TABLA DE CONTENIDO
GENERAL .......................................................................................................................................................................3
INSTALACIÓN ...............................................................................................................................................................4
Desembalaje .............................................................................................................................................................4
Ubicación .................................................................................................................................................................. 4
Nivelado ....................................................................................................................................................................4
Conexiones eléctricas...............................................................................................................................................4
OPERACIÓN ..................................................................................................................................................................5
Controles ..................................................................................................................................................................5
Uso de la amasadora................................................................................................................................................6
Tabla de capacidad de la amasadora ....................................................................................................................... 6
LIMPIEZA .......................................................................................................................................................................7
MANTENIMIENTO ......................................................................................................................................................... 7
Servicio ..................................................................................................................................................................... 7
RESOLUCIÓN DE PROBLEMAS .................................................................................................................................8

– 3 –
Instalación, funcionamiento y cuidado de las
AMASADORAS DE ESPIRAL SERIE MODELOS HSL Y HSU
CONSERVE ESTAS INSTRUCCIONES
GENERAL
Las amasadoras de espiral son una serie de amasadoras de gran volumen. El brazo en espiral gira sobre un eje vertical
jo mientras el tazón gira para proporcionar la acción de amasado.
El brazo en espiral está accionado por un motor de dos velocidades para trabajos pesados. El tazón funciona con un
motor independiente. Los mandos del operador están convenientemente situados en la parte delantera de la máquina y
proporcionan un amasado temporizado con dos velocidades. El tamaño del tazón es adecuado para amasar cantidades
estándar de harina y garantiza un funcionamiento ecaz.
En los aparatos más grandes, modelos HSL180 y superiores, el interruptor principal de alimentación está en el lateral de
la máquina.
Fig. 1

– 4 –
DATOS ELÉCTRICOS
Modelo Voltios Herzios Fase Amperios
HSL130 208 60 3 17
HSL180 208 60 3 34
HSL220 208 60 3 34
HSL300 208 60 3 34
HSU440 208 60 3 42
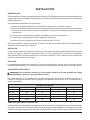
INSTALACIÓN
DESEMBALAJE
Esta amasadora fue inspeccionada antes de salir de fábrica. El transportista asume total responsabilidad por la
entrega segura una vez aceptado el cargamento. Compruebe que no haya daños al cargamento inmediatamente
después de recibirlo.
Si la amasadora está dañada, siga estos pasos:
1. Noticar al transportista dentro de los 5 días hábiles siguientes a la fecha de recepción.
2. Noticar de inmediato a la terminal local del transportista tras el descubrimiento (anotar la hora, la fecha y
la persona con quien se habló) y hacer un seguimiento y conrmación mediante comunicaciones escritas
o electrónicas.
3. Conservar todos los materiales originales del embalaje por motivos de inspección.
4. La amasadora no debe haberse movido, instalado o modicado.
5. Noticar al Servicio de Atención al Cliente de Hobart al (800) 333-7447.
Antes de la instalación, verique que el servicio eléctrico coincide con las especicaciones de la placa de datos
situada en la parte trasera de la máquina.
UBICACIÓN
Coloque la amasadora en su lugar de funcionamiento. Deje espacio suciente alrededor de la amasadora para
accionar los mandos y añadir los ingredientes al tazón. La zona situada encima y al lado de la amasadora
debe permitir elevar el protector del tazón por encima de la máquina y abrir el panel de servicio lateral para
realizar el mantenimiento de la máquina.
NIVELADO
La amasadora de espiral debe colocarse en una zona razonablemente nivelada.
Una vez colocada, atornille
las patas estabilizadoras (g. 1) en las esquinas delanteras; después apriete las contratuercas antes de empezar.
CONEXIONES ELÉCTRICAS
ADVERTENCIA
Las conexiones eléctricas y a tierra deben cumplir con la parte aplicable del Código
Eléctrico Nacional o de otros códigos eléctricos locales.
En la parte posterior de la amasadora hay un oricio pasante para conductos de tamaño comercial de 1".
Realice las conexiones eléctricas según el diagrama de cableado situado dentro de la caja eléctrica en el
lateral de la máquina.
VERIFICAR LA CORRECTA ROTACIÓN
Compruebe la rotación del agitador para asegurarse de que se mueve en sentido antihorario mirando hacia abajo
en el tazón. Si la rotación es incorrecta, desconecte la alimentación de la amasadora e intercambie dos de los tres
cables no conectados a tierra (que se energizan) de la alimentación. Luego, verique que la rotación sea correcta.

– 5 –
OPERACIÓN
ADVERTENCIA
Batidor móvil y tazón móvil. Deberá mantener las manos, la ropa y los utensilios alejados
mientras está en funcionamiento. No utilice la amasadora sin el protector interbloqueado.
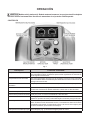
CONTROLES
Fig. 2
Descripción Funciones controladas
Temporizador de baja velocidad Gire el dial para ajustar el tiempo que la amasadora funcionará a baja velocidad.
Esta velocidad se utiliza normalmente para mezclar ingredientes. El intervalo es
de 30 segundos a 20 minutos.
Temporizador de alta velocidad Gire el dial para ajustar el tiempo que la amasadora funcionará a alta velocidad.
Esta velocidad se utiliza normalmente para desarrollar la masa. El intervalo es de
30 segundos a 20 minutos.
Selector de modo manual/
automático
Gire para poner la amasadora en modo manual (continuo) o automático (temporizado).
Selector de dirección del tazón Ajuste la dirección en la que girará el tazón cuando la amasadora esté en marcha.
El tazón solo funcionará en sentido antihorario cuando esté en alta velocidad.
Botón de arranque a baja velocidad Pulse para poner en marcha la amasadora a baja velocidad.
Botón de arranque de alta velocidad Pulse para poner en marcha la amasadora a alta velocidad.
Botón de avance del tazón Mantenga pulsado este botón para hacer girar el tazón sin encender el motor del
agitador. El protector del tazón puede estar bajado o levantado para girar el tazón.
Botón de parada Pulse este botón para detener la amasadora. Gire el botón en sentido horario para
soltar. Si utiliza el modo de amasado continuo, la amasadora se detendrá. Si utiliza
el amasado temporizado, el temporizador volverá a la hora de inicio original; para
continuar amasando, pulse el botón de arranque.
Interruptor de encendido principal Este interruptor (Fig. 1) suministra energía al panel de control.

– 6 –
USO DE LA AMASADORA
Modo de amasado continuo
1. Ponga la amasadora en modo continuo (Fig. 2).
2. Con el protector del tazón en posición elevada, cargue los ingredientes en el tazón de la amasadora.
3. Baje el protector del tazón y pulse el botón de arranque para velocidad baja o alta.
4. Pulse el botón de parada para dejar de amasar.
Modo de amasado temporizado
1. Ponga la amasadora en modo temporizado (Fig. 2).
2. Ajuste el temporizador de baja velocidad. Debe ajustarse al tiempo necesario para amasar los ingredientes.
3. Ajuste el temporizador de alta velocidad, si es necesario. Debe ajustarse al tiempo necesario para
desarrollar la masa.
4. Con el protector del tazón en posición elevada, cargue los ingredientes en el tazón de la amasadora.
5. Baje el protector del tazón y pulse el botón de arranque a baja velocidad. La amasadora cambia
automáticamente de velocidad a la hora preestablecida y se apaga al terminar.
NOTA: Si interrumpe el ciclo de amasado pulsando el botón de parada, el temporizador volverá a la hora de
inicio original. Si levanta el protector del tazón, la amasadora se reiniciará donde se detuvo el temporizador.
NOTA: Añadir una pequeña cantidad de aceite a la masa cerca del nal del ciclo facilita la descarga del tazón.
TABLA DE CAPACIDAD DE LA AMASADORA
NOTA: %AR (% Tasa de absorción) - Peso del agua dividido entre el peso de la harina. La capacidad depende
del contenido de humedad de la masa. Las capacidades anteriores se basan en un contenido de humedad de
la harina del 12% y el agua a 70 °F. Se utilizó harina de pan para las capacidades de la masa de pan y harina
con alto contenido de gluten para las masas de pizza y bagel.
* Si la temperatura del agua es inferior a 55 °F o si el 25% o más del agua es hielo, reduzca el tamaño del
lote reduciendo la harina en 25 libras y los demás ingredientes en consecuencia. El agua fría o el hielo hacen
que la masa esté rígida y sea difícil de mezclar, lo que aumenta la carga sobre la transmisión y el motor de
la amasadora.
** La masa para tortas puede mezclarse con éxito en la velocidad 1 con rotación del tazón en sentido antihorario.
NOTA: 1 galón de agua pesa 8,33 libras.
Tabla de capacidad HSL130 HSL180 HSL220 HSL300 HSU440
Producto Harina Lote Harina Lote Harina Lote Harina Lote Harina Lote
Pan 60% AR 75 lb. 130 lb.* 100 lb. 180 lb.* 120 lb. 220 lb.* 165 lb. 290 lb.* 240 lb. 440 lb.*
Trigo integral 75 lb. 130 lb.* 100 lb. 190 lb.* 120 lb. 232 lb.* 150 lb. 290 lb.* 220 lb. 440 lb.*
Pizza masa na 40% AR 40 lb. 60 lb.* 62 lb. 90 lb.* 75 lb. 110 lb.* 100 lb. 145 lb.* 140 lb. 220 lb.*
Pizza masa media 50%
AR
50 lb. 75 lb.* 80 lb. 125 lb.* 100 lb. 155 lb.* 130 lb. 190 lb.* 190 lb. 290 lb.*
Pizza ligera 60% AR 75 lb. 120 lb.* 100 lb. 140 lb.* 120 lb. 170 lb.* 175 lb. 250 lb.* 240 lb. 350 lb.*
Masa para tortas - 40 lb. ** - 60 lb. ** - 75 lb. ** - 100 lb. ** - 140 lb. **
Bagel 50% AR 40 lb. 60 lb.* 90 lb. 140 lb.* 85 lb. 130 lb.* 100 lb. 165 lb.* 160 lb. 240 lb.*

– 7 –
Protector del tazón
La amasadora está equipada con un protector del tazón. El protector debe estar bajado para que la amasadora
funcione. Al levantar el protector, la amasadora se detendrá. Baje el protector del tazón y pulse el botón de
arranque para reanudar las funciones de amasado.
Botón de parada
El panel de control dispone de un botón de parada (Fig. 2). Para detener la amasadora, pulse el botón de
parada. Para soltar el botón de parada, gire el cabezal de seta en sentido horario.
Apagado
Apague el interruptor de alimentación principal (Fig. 1).
NOTA: Las amasadoras modelo HSL130 no están equipadas con un interruptor de alimentación principal.
LIMPIEZA
ADVERTENCIA
Apague la máquina y desconecte la corriente eléctrica antes de limpiarla.
Dado que se trata de una amasadora solo para masa, los residuos deben ser mínimos. Al nal de cada jornada,
lave a fondo el tazón de la amasadora y el agitador con agua caliente y una solución jabonosa suave y aclárelos
con una solución suave de sosa o vinagre. Aclare a fondo con agua clara y seque con un paño suave y limpio.
Limpie el exterior de la máquina con un paño limpio y húmedo.
MANTENIMIENTO
ADVERTENCIA
Apague la máquina y desconecte la alimentación eléctrica antes de realizar cualquier
tarea de mantenimiento.
Inspeccione la máquina en forma periódica para garantizar que esté en condiciones de funcionamiento adecuadas.
SERVICIO
Comuníquese con la ocina de servicio local autorizada por Hobart para solicitar cualquier tipo de reparaciones
o ajustes a su equipo.

– 8 –
RESOLUCIÓN DE PROBLEMAS
PROBLEMA CAUSA POSIBLE ACCIÓN SUGERIDA
La amasadora no arranca. Protector del tazón no bajado. Baje el protector del tazón.
Botón de parada activado. Gire el botón de parada en sentido horario
para soltarlo.
Interruptor de alimentación principal
apagado.
Encienda el interruptor de alimentación
principal.
Un fusible o disyuntor interrumpe el
suministro de electricidad.
Compruebe si hay fusibles quemados o
restablezca el disyuntor.
Cable o conexión dañados. Desconecte la corriente y llame a su
ocina de servicio técnico Hobart.
FORMULARIO 37235 Rev. J (Junio de 2023) IMPRESO EN EE. UU.

701 S. RIDGE AVENUE
TROY, OHIO 45373
937 332-3000
www.hobartcorp.com
MODE
D'EMPLOI
MODELS
HSL130 ML-141241
HSL180 ML-134446
HSL220 ML-134447
HSL300 ML-134448
HSU440 ML-141041
F37235 Rév. J (juin 2023)

– 2 –
© HOBART, 2023
TABLE DES MATIÈRES
INFORMATIONS GÉNÉRALES ...........................................................................................................................3
INSTALLATION .....................................................................................................................................................4
Déballage .........................................................................................................................................................4
Emplacement ...................................................................................................................................................4
Mise de niveau .................................................................................................................................................4
Connexions électriques .................................................................................................................................... 4
Vérication de la rotation .................................................................................................................................4
FONCTIONNEMENT ............................................................................................................................................5
Les commandes ...............................................................................................................................................5
Comment utiliser le malaxeur ..........................................................................................................................6
Grille de capacité des pétrins ........................................................................................................................... 6
NETTOYAGE.........................................................................................................................................................7
ENTRETIEN ..........................................................................................................................................................7
Service technique ............................................................................................................................................7
DÉPANNAGE ........................................................................................................................................................8

– 3 –
Installation, mode d’emploi et entretien des
PÉTRINS À SPIRALE, DE LA GAMME HSL & HSU
CONSERVEZ CES INSTRUCTIONS
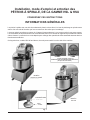
INFORMATIONS GÉNÉRALES
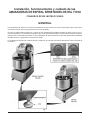
Les pétrins à spirale sont une série de malaxeurs à pâtes à volume élevé. Le bras de pétrissage en spirale tourne
autour d’un axe vertical xe alors que la cuve tourne sur elle-même pour le malaxage.
Le bras en spirale est mû par un moteur de 2 vitesses à haut rendement. La cuve tourne grâce à son propre moteur.
Les commandes de fonctionnement sont commodément xées sur le devant de l’appareil et permettent de malaxer
à deux vitesses. La taille de la cuve est adaptée pour mélanger des quantités de farine standards assurant ainsi un
fonctionnement ecient.
On larger devices, models HSL180 and above, the main power switch is on the side of the machine.
Fig. 1
MARCHE
INTERRUPYEUR D'ALIMENTATION PRINCIPAL
(Except HSL130 Model)
ARRÊT
CONTRE-ÉCROU MODÈLE
HSL130
MODÈLE
HSL220 ILLUSTRÉ
PIED

– 4 –
DONNÉES ÉLECTRIQUES
Modèle Tension Hertz Phase A
HSL130 208 60 3 17
HSL180 208 60 3 34
HSL220 208 60 3 34
HSL300 208 60 3 34
HSU440 208 60 3 42
INSTALLATION
DÉBALLAGE
Cette batteur/mélangeur a été inspecté avant de quitter l’usine. En acceptant sa livraison, le transporteur prend
l’entière responsabilité de le livrer en toute sécurité. Immédiatement après la livraison, vériez s’il a eectivement
subi des dommages pendant le transport.
S’il s’avère que le batteur/mélangeur a été endommagé, veuillez suivre les procédures suivantes:
1. Le transporteur doit être averti dans les 5 jours ouvrables suivant la réception.
2. Les gens du terminus local du transporteur doivent être avisés immédiatement lors de la découverte des
dommages (indiquez l’heure, la date et à qui vous avez parlé) et assurez le suivi en conrmant les faits
par écrit ou par communication électronique.
3. Pour ns d’inspection, tout le matériel d’emballage original doit être conservé.
4. Le batteur/mélangeur ne doit pas avoir été déplacé, installé ou modié.
5. Avisez le Service à la clientèle de Hobart immédiatement en faisant le (800) 333-7447.
Avant d'installer, testez l'alimentation électrique pour vous assurer qu'elle concorde avec les spécications de
la plaque signalétique de la machine.
EMPLACEMENT
Placez le pétrin/malaxeur à l’endroit où il sera utilisé. Laissez susamment d’espace autour de l’appareil pour
bien manipuler les commandes et ajouter des ingrédients dans la cuve. Le dégagement au-dessus et à côté
du malaxeur devrait permettre de lever la grille de sécurité de la cuve par dessus la machine et également
d’ouvrir le panneau de service pour en eectuer l’entretien.
MISE DE NIVEAU
Le pétrin à spirale devrait être posé dans une zone raisonnablement de niveau. Après l’avoir placé en position,
dévissez les pieds de stabilisation xés sur les coins avant (Fig. 1); ensuite serrez les contreécrous avant de
commencer l’installation.
CONNEXIONS ÉLECTRIQUES
Les connexions électriques et de mise à la terre doivent se faire en conformité
avec les dispositions applicables du Code national électrique et/ou des autres codes électriques
locaux.
Un orice de 1 po (25 mm) est percé à l’arrière du pétrin/malaxeur pour passer un conduit de câble commercial
de 1 po (25 mm). Faites les raccordements électriques selon le schéma de câblage logé à l’intérieur de la boîte
électrique sur le côté de l’appareil.
VERIFY CORRECT ROTATION
Vériez la rotation de l’agitateur pour vous assurer qu’il tourne dans le sens inverse des aiguilles d’une montre
quand vous regardez dans la cuve. Si la rotation est incorrecte, débranchez l’alimentation électrique du malaxeur
et permutez n’importe quelle combinaison de deux des trois ls électriques non mis à la terre (vivants). Vériez
de nouveau si la rotation est correcte.
La page est en cours de chargement...
La page est en cours de chargement...
La page est en cours de chargement...
La page est en cours de chargement...
-
 1
1
-
 2
2
-
 3
3
-
 4
4
-
 5
5
-
 6
6
-
 7
7
-
 8
8
-
 9
9
-
 10
10
-
 11
11
-
 12
12
-
 13
13
-
 14
14
-
 15
15
-
 16
16
-
 17
17
-
 18
18
-
 19
19
-
 20
20
-
 21
21
-
 22
22
-
 23
23
-
 24
24


Hobart Spiral Mixers Manuel utilisateur
- Catégorie
- Mélangeurs
- Taper
- Manuel utilisateur
dans d''autres langues
- English: Hobart Spiral Mixers User manual
- español: Hobart Spiral Mixers Manual de usuario
- português: Hobart Spiral Mixers Manual do usuário
Documents connexes
Autres documents
-
Casselin CPSTCF25 Manuel utilisateur
-
 Centerline HMM10 Mixer Manuel utilisateur
-
Sunbeam 2366 Manuel utilisateur
-
-
-
Philips HR1552/12 Manuel utilisateur
-
Philips HR1565/63 Manuel utilisateur
-
Philips hr 1571 01 Manuel utilisateur
-
Sammic SME Manuel utilisateur
-
Bartscher 101866 Mode d'emploi
