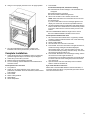
JennAir W11654409A Le manuel du propriétaire
- Catégorie
- Fours
- Taper
- Le manuel du propriétaire

W11654409A
IMPORTANT:
Save for local electrical inspector's use.
IMPORTANT :
À conserver pour consultation par l'inspecteur local des installations électriques.
Table of Contents/Table des matières
BUILT-IN MICROWAVE/OVEN COMBO SAFETY ...................2
Built-In Microwave/Oven Combo Safety ..............................2
MICROWAVE OVEN MAINTENANCE AND CARE..................5
General Cleaning...........................................................5
Self-Cleaning Cycle........................................................6
Steam Clean (on some models) ........................................7
INSTALLATION INSTRUCTIONS ........................................7
..................................................................................7
REQUIREMENTS.............................................................7
Tools and Parts .............................................................7
Location Requirement.....................................................7
Electrical Requirements ..................................................9
INSTALLATIONS ........................................................... 10
Prepare Built-In Oven ................................................... 10
Remove Oven Door(s) .................................................. 10
Replace Oven Door(s) .................................................. 11
Make Electrical Connection............................................ 11
Install Oven ................................................................ 12
Complete Installation .................................................... 15
SÉCURITÉ DE L’ENSEMBLE FOUR ÉLECTRIQUE/FOUR À
MICRO-ONDES ENCASTRÉ ............................................ 16
Sécurité de l’ensemble four électrique/four à micro-
ondes encastré............................................................ 16
ENTRETIEN ET RÉPARATION DU FOUR À MICRO-
ONDES ........................................................................ 20
Nettoyage général........................................................ 20
Programme d’autonettoyage .......................................... 21
Steam Clean (nettoyage à la vapeur) (sur certains
modèles).................................................................... 22
INSTRUCTIONS D’INSTALLATION ................................... 23
................................................................................ 23
REQUIREMENTS........................................................... 23
Outils et pièces............................................................ 23
Exigences d’emplacement ............................................. 23
Spécifications électriques .............................................. 25
INSTALLATIONS ........................................................... 25
Préparer le four encastré ............................................... 25
Enlever la/les porte(s) du four ......................................... 26
Réinstallation de la/des porte(s) du four ............................ 26
Effectuer le raccordement électrique ................................ 27
Installer le four ............................................................ 29
Achever l’installation..................................................... 32
BUILT-IN ELECTRIC OVEN AND MICROWAVE OVEN
COMBINATION OWNER'S MANUAL
ENSEMBLE FOUR ÉLECTRIQUE/FOUR À MICRO-
ONDES ENCASTRÉ MANUEL DU PROPRIÉTAIRE

2
BUILT-IN MICROWAVE/OVEN COMBINATION SAFETY
Your safety and the safety of others are very important.
We have provided many important safety messages in this manual and on your appliance. Always read and obey all safety
messages.
This is the safety alert symbol.
This symbol alerts you to potential hazards that can kill or hurt you and others.
All safety messages will follow the safety alert symbol and either the word “DANGER” or “WARNING.” These
words mean:
DANGER You can be killed or seriously injured if you don't
immediately follow instructions.
WARNING You can be killed or seriously injured if you don’t follow
instructions.
All safety messages will tell you what the potential hazard is, tell you how to reduce the chance of injury, and tell you what can
happen if the instructions are not followed.
IMPORTANT SAFETY INSTRUCTIONS
WARNING: To reduce the risk of fire, electric shock, or injury to persons when using the appliance, follow basic precautions,
including the following:
�Proper Installation - The appliance, when installed, must be
electrically grounded in accordance with local codes, or in
the absence of local codes, with the National Electrical
Code, ANSI/NFPA 70 or the Canadian Electrical Code,
CSA C22.1-02. In Canada, the appliance must be
electrically grounded in accordance with Canadian
Electrical Code. Be sure your appliance is properly installed
and grounded by a qualified technician.
�Never Use Your Appliance for Warming or Heating the
Room.
�Do Not Leave Children Alone - Children should not be left
alone or unattended in area where appliance is in use.
They should never be allowed to sit or stand on any part of
the appliance.
�Wear Proper Apparel – Loose-fitting or hanging garments
should never be worn while using the appliance.
�User Servicing – Do not repair or replace any part of the
appliance unless specifically recommended in the manual.
All other servicing should be referred to a qualified
technician.
�Storage in or on Appliance – Flammable materials should
not be stored in an oven or near surface units.
�This appliance is not intended for storage.
�Do Not Use Water on Grease Fires – Smother fire or flame
or use dry chemical or foam-type extinguisher.
�Do not use replacement parts that have not been
recommended by the manufacturer (e.g. parts made at
home using a 3D printer).
�Use Only Dry Potholders – Moist or damp potholders on hot
surfaces may result in burns from steam. Do not let
potholder touch hot heating elements. Do not use a towel or
other bulky cloth.
�Use Care When Opening Door – Let hot air or steam
escape before removing or replacing food.
�DO NOT TOUCH HEATING ELEMENTS OR INTERIOR
SURFACES OF OVEN – Heating elements may be hot
even though they are dark in color. Interior surfaces of an
oven become hot enough to cause burns. During and after
use, do not touch, or let clothing or other flammable
materials contact heating elements or interior surfaces of
oven until they have had sufficient time to cool. Other
surfaces of the appliance may become hot enough to cause
burns – among these surfaces are the coil and cooktop
elements, oven vent openings and surfaces near these
openings, oven doors, and windows of oven doors.
�Do Not Heat Unopened Food Containers – Build-up of
pressure may cause container to burst and result in injury.
�Keep Oven Vent Ducts Unobstructed.
SAVE THESE INSTRUCTIONS

3
IMPORTANT SAFETY INSTRUCTIONS
WARNING: To reduce the risk of fire, electric shock, or injury to persons when using the appliance, follow basic precautions,
including the following:
�Placement of Oven Racks – Always place oven racks in
desired location while oven is cool. If rack must be moved
while oven is hot, do not let potholder contact hot heating
element in oven.
For self-cleaning ovens:
�CAUTION: DO NOT LEAVE FOOD OR COOKING
UTENSILS, ETC., IN OVEN DURING THE PYROLYTIC
SELF-CLEANING MODE OF OPERATION.
�Do Not Clean Door Gasket – The door gasket is essential
for a good seal. Care should be taken not to rub, damage,
or move the gasket.
�Do not use a protective coating to line the oven and do not
use commercial oven cleaner unless Certified for use in a
self-cleaning oven.
�Clean Only Parts Listed.
�Before Self-Cleaning the Oven – Remove broiler pan and
other utensils, and wipe off all excessive spillage.
For smart enabled ranges and ovens:
�Remote Operation – This appliance is configurable to allow
remote operation at any time. Do not store any flammable
materials or temperature sensitive items inside, on top or
near surface units of the appliance.
SAVE THESE INSTRUCTIONS
IMPORTANT SAFETY INSTRUCTIONS
When using electrical appliances basic safety precautions should be followed, including the following:
WARNING: To reduce the risk of burns, electric shock, fire, injury to persons, or exposure to excessive microwave energy:
�Read all instructions before using the appliance.
�Read and follow the specific “PRECAUTIONS TO AVOID
POSSIBLE EXPOSURE TO EXCESSIVE MICROWAVE
ENERGY” found in this manual.
�This appliance must be grounded. Connect only to properly
grounded outlet. See “GROUNDING INSTRUCTIONS”
found in this section.
�Install or locate this appliance only in accordance with the
provided Installation Instructions.
�Some products such as whole eggs and sealed containers -
for example, closed glass jars - are able to explode and
should not be heated in this oven.
�Use this appliance only for its intended use as described in
the manual. Do not use corrosive chemicals or vapors in
this appliance. This type of oven is specifically designed to
heat, cook, or dry food. It is not designed for industrial or
laboratory use.
�As with any appliance, close supervision is necessary when
used by children.
�Do not operate this appliance if it has a damaged cord or
plug, if it is not working properly, or if it has been damaged
or dropped.
�This appliance should be serviced only by qualified service
personnel. Contact nearest authorized service facility for
examination, repair, or adjustment.
�Do not cover or block any openings on the appliance.
�Do not store this appliance outdoors. Do not use this
product near water – for example, near a kitchen sink, in a
wet basement, near a swimming pool, or similar locations.
�Do not immerse cord or plug in water.
�Keep cord away from heated surfaces.
�Do not let cord hang over edge of table or counter.
�Do not use replacement parts that have not been
recommended by the manufacturer (e.g. parts made at
home using a 3D printer).
�See door surface cleaning instructions in the Microwave
Oven and Maintenance Care section.
�To reduce the risk of fire in the oven cavity:
• Do not overcook food. Carefully attend appliance when
paper, plastic, or other combustible materials are placed
inside the oven to facilitate cooking.
• Remove wire twist-ties from paper or plastic bags before
placing bag in oven.
• If materials inside the oven ignite, keep oven door
closed, turn oven off, and disconnect the power cord, or
shut off power at the fuse or circuit breaker panel.
• Do not use the cavity for storage purposes. Do not leave
paper products, cooking utensils, or food in the cavity
when not in use.
�Liquids, such as water, coffee, or tea are able to be
overheated beyond the boiling point without appearing to
be boiling. Visible bubbling or boiling when the container is
removed from the microwave oven is not always present.
THIS COULD RESULT IN VERY HOT LIQUIDS
SUDDENLY BOILING OVER WHEN THE CONTAINER IS
DISTURBED OR A UTENSIL IS INSERTED INTO THE
LIQUID.
For microwave ovens not intended for use above another
heating appliance:
�Do not operate any heating or cooking appliance beneath
this appliance.
�Do not mount unit over or near any portion of a heating or
cooking appliance.
�Do not mount over a sink.
�Do not store anything directly on top of the appliance
surface when the appliance is in operation.
SAVE THESE INSTRUCTIONS

4
PRECAUTIONS TO AVOID POSSIBLE EXPOSURE TO
EXCESSIVE MICROWAVE ENERGY
(a) Do not attempt to operate this oven with the door open since
open-door operation can result in harmful exposure to
microwave energy. It is important not to defeat or tamper with
the safety interlocks.
(b) Do not place any object between the oven front face and the
door or allow soil or cleaner residue to accumulate on sealing
surfaces.
(c) Do not operate the oven if it is damaged. It is particularly
important that the oven door close properly and that there is
no damage to the:
(1) Door (bent),
(2) Hinges and latches (broken or loosened),
(3) Door seals and sealing surfaces
(d) The oven should not be adjusted or repaired by anyone
except properly qualified service personnel.
Internet Connectivity Guide for Connected Appliances Only
IMPORTANT: Proper installation of your appliance prior to use is your responsibility. Be sure to read and follow the installation
instructions that came with your appliance.
Connectivity requires Wi-Fi and account creation. App features and functionality are subject to change. Data rates may apply. Once
installed, launch the app. You will be guided through the steps to set up a user account and to connect your appliance.
You Will Need:
�A home wireless router supporting Wi-Fi, 2.4 Ghz with WPA2 security. If you are unsure of your router’s capabilities, refer to the router
manufacturer’s instructions.
�The router to be on and have a live internet connection.
�The 10–character SAID code for your appliance. The SAID code is either printed on a label on the appliance or found on the LCD
screen.
Federal Communications Commission (FCC) Compliance Notice
This device complies with Part 15 of the FCC Rules. Operation is subject to the following two conditions:
1. This device may not cause harmful interference, and
2. This device must accept any interference received, including interference that may cause undesired operation.
Changes or modifications not expressly approved by the party responsible for compliance could void the user’s authority to operate the
equipment.
Industry Canada (IC) Compliance Notice
This Device complies with Industry Canada License-exempt RSS standard(s). Operation is subject to the following two conditions:
1. This device may not cause interference.
2. This device must accept any interference, including interference that may cause undesired operation of the device.
Under Industry Canada regulations, this radio transmitter may only operate using an antenna of a type and maximum (or lesser) gain
approved for the transmitter by Industry Canada. To reduce potential radio interference to other users, the antenna type and its gain
should be so chosen that the equivalent isotropically radiated power (e.i.r.p.) is not more than that necessary for successful
communication.
To comply with FCC and Industry Canada RF radiation exposure limits for general population, antenna(s) used for this transmitter must
be installed such that a minimum separation distance of 20 cm is maintained between the radiator (antenna) and all persons at all times
and must not be co-located or operating in conjunction with any other antenna or transmitter.
If this equipment does cause harmful interference to radio or television reception, which can be determined by turning the equipment off
and on, the user is encouraged to try to correct the interference by one of the following measures:
�Reorient or relocate the receiving antenna.
�Increase the separation between the equipment and receiver.
�Connect the equipment into an outlet on a circuit different from
that to which the receiver is connected.
�Consult the dealer or an experienced radio/TV technician for
help.

5
MICROWAVE OVEN
MAINTENANCE AND CARE
General Cleaning
IMPORTANT: Before cleaning, make sure all controls are off and
the oven and cooktop are cool. Always follow label instructions on
cleaning products.
Soap, water, and a soft cloth or sponge are suggested first, unless
otherwise noted.
STAINLESS STEEL
NOTE: To avoid damage to stainless steel surfaces, do not use
soap-filled scouring pads, abrasive cleaners, Cooktop Cleaner,
steel-wool pads, gritty washcloths or abrasive paper towels.
Damage may occur to stainless steel surfaces, even with one-time
or limited use.
Rub in direction of grain to avoid damaging.
Cleaning Method:
�Affresh®Stainless Steel Cleaner Part Number W10355016
(not included) or affresh®Stainless Steel Cleaning Wipes Part
Number W10355049 (not included):
See the Quick Start Guide for ordering information.
�All-purpose cleaner: Rinse with clean water and dry with soft,
lint-free cloth.
�Vinegar for hard water spots.
MICROWAVE OVEN DOOR AND EXTERIOR
The area where the oven door and frame touch when closed
should be kept clean.
Cleaning Method:
�Mild, nonabrasive soaps and detergents:
Rinse with clean water, and dry with soft, lint-free cloth.
�Glass cleaner and paper towels or nonabrasive plastic
scrubbing pad:
Apply glass cleaner to towel, not directly to surface.
CONTROL PANEL AND OVEN DOOR EXTERIOR
To avoid damage to the control panel, do not use abrasive
cleaners, steel-wool pads, gritty washcloths or abrasive paper
towels.
The area where the oven door and frame touch when closed
should be kept clean.
Cleaning Method:
�Glass cleaner and a soft cloth or sponge or nonabrasive
plastic scrubbing pad:
Apply glass cleaner to soft cloth or sponge, not directly on
panel/Surface.
�Affresh®Kitchen and Appliance Cleaner Part Number
W10355010 (not included):
See the Quick Start Guide for ordering information.
OVEN DOOR INTERIOR
Cleaning Method:
�Self-Cleaning cycle:
For optimal door cleaning result, wipe away any deposits with
a damp sponge before running cycle.
OVEN CAVITY
Do not use oven cleaners.
Food spills should be cleaned when oven cools. At high
temperatures, foods react with porcelain and staining, etching,
pitting or faint white spots can result.
Cleaning Method:
�Self-Cleaning cycle:
See “Self-Cleaning Cycle” first. Remove racks or they will
discolor and become harder to slide. If this happens, a light
coating of vegetable oil applied to the rack guides will help
them slide.
MICROWAVE OVEN CAVITY
To avoid damage to microwave oven cavity, do not use soap-filled
scouring pads, abrasive cleaners, steel-wool pads, gritty
washcloths, or some paper towels.
On stainless steel models, rub in direction of grain to avoid
damaging.
The area where the oven door and frame touch when closed
should be kept clean.
Cleaning Method:
Average Soil
�Mild, nonabrasive soaps and detergents:
Rinse with clean water and dry with soft, lint-free cloth.
Heavy Soil
�Mild, nonabrasive soaps and detergents:
Heat 1 cup (250 mL) of water for 2 to 5 minutes in oven. Steam
will soften soil. Rinse with clean water and dry with soft,
lint-free cloth.
Odors
�Lemon juice or vinegar:
�Heat 1 cup (250 mL) of water with 1 tablespoon (15 mL) of
either lemon juice or vinegar for 2 to 5 minutes in oven.
OVEN RACKS
�Steel-wool pad
�Dishwasher
�For racks that have discolored and are harder to slide, a light
coating of vegetable oil applied to the rack guides will help
them slide.
MICROWAVE OVEN CEILING
The broil element does not need cleaning since the intense heat
will burn off any food spatters. However, the ceiling above the broil
element may need regular cleaning.
Cleaning Method:
�Warm water, mild detergent, and a sponge.
To Clean:
1. Push the fastening thread gently towards the back of the
ceiling and then lower it to release the broil element.
2. Lower the front of the broil element to access the ceiling for
cleaning.
3. Raise broil element back up and return the fastening thread
back to its original location.

6
Always return the broil element to the cooking position after
cleaning.
Self-Cleaning Cycle
WARNING
Burn Hazard
Do not touch the oven during the Self-Cleaning cycle.
Keep children away from the oven during Self-Cleaning
cycle.
Failure to follow these instructions can result in burns.
IMPORTANT: The health of some birds is extremely sensitive to
the fumes given off during the Self-Cleaning cycle. Exposure to
the fumes may result in death to certain birds. Always move birds
to another closed and well-ventilated room.
Self-clean the oven before it becomes heavily soiled. Heavy soil
results in longer cleaning and more smoke.
Keep the kitchen well-ventilated during the Self-Cleaning cycle to
help get rid of heat, odors, and smoke.
Do not block the oven vent(s) during the Self-Cleaning cycle. Air
must be able to move freely. See the “Oven Vents” section in the
Quick Start Guide.
Do not clean, rub, damage, or move the oven door gasket. The
door gasket is essential for a good seal.
Prepare Oven
�Remove the broiler pan, grid, cookware and bakeware, and,
on some models, the temperature probe from the oven.
�Remove oven racks to keep them shiny and easy to slide. See
“General Cleaning” section for more information.
�Remove any foil from the oven because it may burn or melt,
damaging the oven.
�Hand clean inside door edge and the 11/2" (3.8 cm) area
around the inside oven cavity frame, being certain not to move
or bend the gasket. This area does not get hot enough during
self-cleaning to remove soil. Do not let water, cleaner, etc.,
enter slots on door frame. Use a damp cloth to clean this area.
�Wipe out any loose soil to reduce smoke and avoid damage.
At high temperatures, foods react with porcelain. Staining,
etching, pitting or faint white spots can result. This is normal
and will not affect cooking performance.
How the Cycle Works
IMPORTANT:
The heating and cooling of porcelain on steel in the oven may
result in discoloring, loss of gloss, hairline cracks and popping
sounds.
The Self-Cleaning Cycle uses very high temperatures, burning
soil to a powdery ash.
Suggested clean times are 3 hours for light soil, 4 hours for
medium soil, and 5 hours for heavy soil (includes a 30 minute
cool-down time).
Once the oven has completely cooled, remove ash with a damp
cloth. To avoid breaking the glass, do not apply a cool damp cloth
to the inner door glass before it has completely cooled.
The oven lights will not work during the Self-Cleaning cycle.
On double-oven models, only one oven can self-clean at a time.
If one oven is self-cleaning, the other oven cannot be set or
turned on.
NOTE: The oven has a two-speed cooling fan motor. During the
Self-Cleaning cycle, the fan(s) will operate at its highest speed to
increase airflow to better exhaust the hotter air through the oven
vent(s). An increase in noise may be noticeable during and after
the Self-Cleaning cycle until the oven cools.
To Start Self-Cleaning
Before Self-Cleaning, make sure the door is closed completely or
it will not lock and the cycle will not begin. When the oven is
locked, the doors of the oven cannot be opened. To avoid damage
to the doors, do not force the doors open when the oven is locked.
1. Touch the Tools keypad.
2. Select the Self Clean icon.
(On double-oven models): Select Upper Cavity or Lower
Cavity.
3. Select type of Self-Cleaning:
Steam: 1 hour: Clean up after everyday light spills using lower
heat and 11/4cups (295.74 mL) of water.
High temp: 4 hours: 3 hour cycle and 1 hour cooling.
High temp: 5 hours: 4 hour cycle and 1 hour cooling.
High temp: 6 hours: 5 hour cycle and 1 hour cooling.
4. Follow the prompts on the oven display to prepare the oven.
5. Select START to begin the cleaning process.
OR
Select DELAY START to set a delayed Self-Cleaning cycle.
See the “To Delay Start Self-Cleaning Cycle” Section.
The oven doors will automatically lock.
NOTE: It may take a couple moments for the oven door to
automatically lock after starting the Self-Clean Cycle.
When the self cleaning cycle is complete and the oven cools,
the oven doors will unlock.
6. When the oven is completely cooled, remove ash with a damp
cloth.
To Delay Start of Self-Cleaning
Follow steps 1 through 4 above, then:
1. Select DELAY START or DELAY.
2. Select the start time of when the Self-Cleaning cycle should
begin by scrolling from left to right.
3. Select START DELAY.
The oven doors will automatically lock after the Delay Start
countdown.
When the Self-Cleaning cycle is complete and the oven cools,
the oven doors will unlock.
4. When the oven is completely cooled, remove ash with a damp
cloth.
To Stop Self-Cleaning anytime
Touch the Oven Cancel Keypad for single oven models, or the
keypads for double oven models. If the oven temperature is too
high, the door will remain locked. It will not unlock until the oven
cools.

7
Steam Clean (on some models)
The Steam Clean feature is designed for light oven cavity bottom
cleaning on models that have hidden bake in the oven.
Do not use oven cleaners.
Allow the oven to cool to room temperature before using the
Steam Clean feature. If your oven cavity is above 200°F (93°C),
the Steam Clean feature will not activate until it cools down.
Remove all racks and accessories from the oven cavity.
For best results, use 10 oz (295.7 mL) of distilled or filtered water.
The Steam Clean feature will take approximately 1 hour. A tone
will sound at the end of the cycle.
IMPORTANT: Because the water in the oven bottom is hot, do not
open the oven door during the Steam Clean cycle.
Touch the Oven Cancel keypad for single oven models and the
Upper/Lower keypads for double oven models at any time to end
the cycle. The display will return to the time of day.
Helpful Hints
�Once the Steam Clean cycle is complete and the oven is
completely cooled, remove all remaining water in the bottom of
the oven with a sponge or cloth.
�Wipe any remaining moisture from the oven door interior, oven
cavity interior sides, and cooktop.
�Use a soft brush or nylon scrubber to wipe the oven interior.
This may help with more stubborn stains.
�It is recommended to use distilled or filtered water, as tap
water may leave mineral deposits on the oven bottom. Use a
cloth soaked with vinegar or lemon juice to remove any
mineral deposits that may be left after the Steam Clean cycle.
�If the oven is heavily soiled, use the Self-Cleaning cycle. The
Steam Clean cycle may be used first to eliminate most of the
debris, resulting in a more effective self-cleaning.
To Steam Clean:
1. Open the oven door of the selected oven and remove all racks
and accessories from the oven cavity.
2. Pour 10 oz (295.7 mL) of distilled or filtered water into the
oven bottom. Then close the oven door.
3. Touch the Tools keypad.
On double-oven models: Select Upper Cavity or Lower Cavity.
4. Select STEAM CLEAN.
5. Select START.
6. After approximately 1 hour, a tone will sound to signal the end
of the cycle. Touch the Oven Cancel keypad for single oven
models and the Upper/Lower keypad for double oven models
to clear the display.
7. When the oven is completely cooled, remove any excess
water with a sponge or cloth and wipe down oven interior. If
needed, use a non-scratch copper scrubbing pad to remove
stubborn soils.
INSTALLATION INSTRUCTIONS
REQUIREMENTS
Tools and Parts
Gather the required tools and parts before starting
installation. Read and follow the instructions provided
with any tools listed here
Tools Needed
�Phillips screwdriver
�Measuring tape
�Hand or electric drill (for wall cabinet installations)
�1" (2.5 cm) drill bit (for wall cabinet installations)
�Level
�Flat-blade screwdriver
Parts Supplied
�#8-18 x 3/4" (1.9 cm) screws (2)
�#8-18 x 3/8" (9.5 mm) screws - bottom vent (2)
�#8-18 x 3/8" (9.5 mm) screws - bottom vent shield (2)
�#8-18 x 3/8" (9.5 mm) screws - bottom vent trim (2)
�Rear feet (2)
�Front feet (2)
�Bottom vent and shield
Check local codes. Check existing electrical supply. See the
“Electrical Requirements” section.
It is recommended that all electrical connections be made by a
licensed, qualified electrical installer
NOTE: Be sure to purchase only JennAir factory-certified parts
and accessories for your appliance. Your installation may require
additional parts. To order, refer to the contact information
referenced in your Quick Start Guide.
Location Requirements
IMPORTANT: Observe all governing codes and ordinances.
�Cabinet opening dimensions that are shown must be used.
Given dimensions provide minimum clearance with oven.
�Recessed installation area must provide complete enclosure
around the recessed portion of the oven.
�Grounded electrical supply is required. See “Electrical
Requirements” section.
�Electrical supply junction box should be located 3" (7.6 cm)
maximum below the support surface when the oven is installed
in a wall cabinet. A 1" (2.5 cm) minimum diameter hole should
have been drilled in the right rear or left rear corner of the
support surface to pass the appliance cable through to the
junction box.
�Oven support surface must be solid, level and flush with
bottom of cabinet cutout. Floor must be able to support a total
weight (microwave and built-in oven) of 235 lbs (101 kg) for
27" (68.6 cm) models or 262 lbs (119 kg) for 30" (76.2 cm)
models.
IMPORTANT: To avoid damage to your cabinets, check with
your builder or cabinet supplier to make sure that the materials
used will not discolor, delaminate or sustain other damage.
This oven has been designed in accordance with the
requirements of UL and CSA International and complies with
the maximum allowable wood cabinet temperatures of 194°F
(90°C).

8
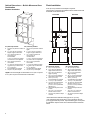
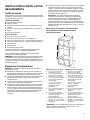
Cabinet Dimensions — Built-in Microwave/Oven
Combination
Standard Installation
F
E
A
D
G
B
C
27" (68.6 cm) models
A. 27" (68.6 cm) minimum cabinet
width
B. 21/4" (5.7 cm) top of cutout to
bottom of upper cabinet door
C. 191/4" (48.9 cm) bottom of
cutout to floor is
recommended.
7"-191/4" (17.8-48.9 cm) bottom
of cutout to floor is acceptable.
D. 251/2" (64.8 cm) minimum
cutout width
E. 11/2" (3.8 cm) minimum bottom
of cutout to top of cabinet door
F. 415/16" (105 cm)*
recommended cutout height
G. 24" (60.7 cm) cutout depth
30" (76.2 cm) models
A. 30" (76.2 cm) minimum cabinet
width
B. 21/4" (5.7 cm) top of cutout to
bottom of upper cabinet door
C. 191/4" (48.9 cm) bottom of
cutout to floor is
recommended.
7"-191/4" (17.8-48.9 cm) bottom
of cutout to floor is acceptable.
D. 281/2" (72.4 cm) minimum
cutout width
E. 11/2" (3.8 cm) minimum bottom
of cutout to top of cabinet door
F. 415/16" (105 cm)*
recommended cutout height
G. 24" (60.7 cm) cutout depth
*NOTE: The cutout height can be between 411/8" (104.5 cm) and
417/8" (106.3 cm) for microwave/oven combination.
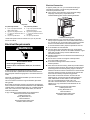
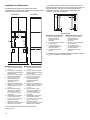
Flush Installation
A 25" (63.5 cm) minimum cutout depth is required.
The front face of the cleats and platform will be visible and should
be treated as a finished surface.
Front View Side View
A
BC
D
EF
F
I
HHJ
GG
27" (68.6 cm) models
A. 3/4" (1.9 cm) top cleat*
B. 271/4" (69.2 cm) minimum
width of flush inset cutout*
C. 257/8" (65.7 cm) minimum
width of opening
D. 445/16" (112.5 cm) minimum
height of flush inset cutout
E. 439/16" (110.6 cm)
recommended cutout height
F. 11/16" (1.7 cm) side cleat*
G. 1/4" (0.6 cm) recommended
with foot. 15/16" to 15/16"
(2.3 cm to 3.5 cm) allowable
without foot.**
H. Recommended junction box
location
I. 45/8"-191/4" (11.7-48.9 cm)
bottom of cutout to floor
J. 25" (63.5 cm) minimum depth
of cutout
30" (76.2 cm) models
A. 3/4" (1.9 cm) top cleat*
B. 301/4" (76.8 cm) minimum
width of flush inset cutout*
C. 287/8" (73.3 cm) minimum
width of opening
D. 445/16" (112.5 cm) minimum
height of flush inset cutout
E. 439/16" (110.6 cm)
recommended cutout height
F. 11/16" (1.7 cm) side cleat*
G. 1/4" (0.6 cm) recommended
with foot. 15/16" to 15/16"
(2.3 cm to 3.5 cm) allowable
without foot.**
H. Recommended junction box
location
I. 45/8"-191/4" (11.7-48.9 cm)
bottom of cutout to floor
J. 25" (63.5 cm) minimum depth
of cutout
*These dimensions will lead to side gaps of 1/4" (0.6 cm).
**Top and bottom gaps will be 3/8" (0.9 cm) gap above the 1/8"
(0.3 cm) gap below the product. Top and bottom gaps not required
for Installation. Expose areas of the cabinet should be finished to
match.

9
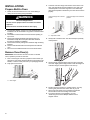
B
A A
D
D
C
Top View
27" (68.6 cm) models
A. 2" (5.1 cm) spacer the entire
depth of the cutout*
B. 25" (63.5 cm) depth of cutout
C. 11/2" (3.5 cm) recess from front
of cabinet
D. 7/8" (2.2 cm) side cleat*
30" (76.2 cm) models
A. 2" (5.1 cm) spacer the entire
depth of the cutout*
B. 25" (63.5 cm) depth of cutout
C. 11/2" (3.5 cm) recess from front
of cabinet
D. 7/8" (2.2 cm) side cleat*
*Cleats and spacers must be recessed 13/8" (3.5 cm) from the
front of the cabinet.
Electrical Requirements
WARNING
Electrical Shock Hazard
Electrically ground appliance.
Failure to do so could result in death, fire, or electrical
shock.
If codes permit and a separate ground wire is used, it is
recommended that a qualified electrical installer determine that
the ground path and the wire gauge are in accordance with local
codes.
Check with a qualified electrical installer if you are not sure the
oven is properly grounded.
This oven must be connected to a grounded metal, permanent
wiring system.
Be sure that the electrical connection and wire size are adequate
and in conformance with the National Electrical Code, ANSI/NFPA
70-latest edition or CSA Standards C22.1-94, Canadian Electrical
Code, Part 1 and C22.2 No. O-M91-latest edition, and all local
codes and ordinances.
A copy of the above code standards can be obtained from:
National Fire Protection Association
1 Batterymarch Park
Quincy, MA 02169-7471
CSA International
8501 East Pleasant Valley Road
Cleveland, OH 44131-5575
Electrical Connection
To properly install your oven, you must determine the type
of electrical connection you will be using and follow the
instructions provided for it here.
�Oven must be connected to the proper electrical voltage,
amperage, and frequency as specified on the
model/serial/rating plate. See the following illustration.
A
A. Model/serial/rating plate
�Models rated from 7.3 to 9.6 kW at 240 V (6.3 to 8.3 kW at
208 V) require a separate 40 A circuit. Models rated from 4.9
to 7.2 kW at 240 V (4.3 to 6.2 kW at 208 V) require a separate
30 A circuit. Models rated at 4.8 kW and below at 240 V
(4.2 kW and below at 208 V) require a separate 20 A circuit.
�A circuit breaker is recommended.
�Connect directly to the fused disconnect (or circuit breaker
box) through flexible, armored or nonmetallic sheathed, copper
cable (with grounding wire). See the “Make Electrical
Connection” section.
�Flexible conduit from the oven should be connected directly to
the junction box.
�Do not cut the conduit. The length of conduit provided
is for serviceability of the oven.
�A UL listed or CSA approved conduit connector
must be provided.
�If the house has aluminum wiring, follow the procedure below:
Connect the aluminum wiring using special connectors and/or
tools designed and UL listed for joining copper to aluminum.
Follow the electrical connector manufacturer’s recommended
procedure. Aluminum/copper connection must conform with
local codes and industry accepted wiring practices.
Be sure that the electrical connection and wire size are
adequate and in conformance with the National Electrical
Code, ANSI/ NFPA 70-latest edition or CSA Standards
C22.1-94, Canadian Electrical Code, Part 1 and
C22.2 No. O-M91-latest edition, and all local codes and
ordinances. A copy of the above code standards can be
obtained from:
National Fire Protection Association
1 Batterymarch Park
Quincy, MA 02169-7471
CSA International
8501 East Pleasant Valley Road
Cleveland, OH 44131-5575

10
INSTALLATIONS
Prepare Built-In Oven
1. Decide on the final location for the oven. Avoid drilling or
cutting into house wiring during installation.
WARNING
Excessive Weight Hazard
Use two or more people to move and install or uninstall
appliance.
Failure to do so can result in back or other injury.
2. To avoid floor damage, set the oven onto cardboard prior to
installation. Do not use handle or any portion of the front frame
for lifting.
3. Remember to remove bottom vent from the foam packing on
top of oven.
4. Remove the shipping materials and tape from the oven.
Remember to keep the corner posts and other materials
that may be needed for installation.
5. Remove the hardware package from inside the bag containing
literature.
6. Remove and set aside racks and other parts from inside the
oven.
7. Move oven and cardboard close to the oven’s final location.
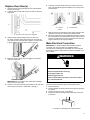
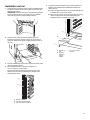
Remove Oven Door(s)
IMPORTANT: Use 2 hands to remove oven door. For double
ovens, repeat the process for each door.
1. Prior to removing the oven door, prepare a surface where you
will place it. This surface should be flat and covered with a soft
blanket, or use the corner posts from your packaging material.
2. Fully open the oven door.
A. Door hinges
3. Locate the oven door hinge locks in both corners of the oven
door, and rotate the hinge locks toward the oven door to the
unlocked position. If the door hinge lock is not rotated fully
(see unlocked position in illustration), the door will not remove
properly.
Oven door hinge lock in locked
position
Oven door hinge lock in unlocked
position
A. Grip here to rotate
4. Gently start to close the door. The door will stop at a partially
closed position.
5. Using 2 hands, grasp the edges of the oven door. Close the
oven door slightly past the stop position to take the weight off
of the door hinges, and then pull the oven door up.
6. Pull the oven door toward you, and then remove. You may
need to gently shift door from side to side as you pull.
7. Set the oven door aside on the prepared covered work
surface with the oven door resting on its handle.
8. To continue with the oven installation, go to the
“Positioning Oven Feet for Multiple Cabinet Cutout
Heights” section.

11
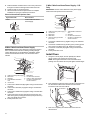
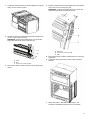
Replace Oven Door(s)
1. Using two hands, grasp side edges of door at the midpoint.
Face the oven cavity.
2. Locate the slots on each side of the oven cavity for the door
hinge locks.
A. Slot in the oven cavity for door hinge lock
3. Using 2 hands, grasp the edges of the oven door. At a
45° angle, insert the hinges at the same time, and push the
oven door into the oven cavity slot to replace. You may need
to gently shift the door from side to side as you push.
4. Make sure the door hinge notch is engaged on the bottom
of the oven cavity slot.
IMPORTANT: Do not close the door at this step or damage
may occur to the door hinge.
5. Lower the oven door to the fully open position. If the oven door
does not open to a full 90°, repeat steps 1 through 3.
6. Locate the oven door hinge locks in the corners of the oven
door, and rotate the hinge locks toward the oven cavity to the
locked position.
A. Unlocked
position
B. Locked position
7. After the door hinges have been locked, gently swing the door
upward to close. The door should not be forced closed.
8. When the hinges are properly installed and the door is closed,
there should be an even gap between the door and the control
panel. If one side of the oven door is lower than the other, the
hinge on that side is not properly installed.
Make Electrical Connection
IMPORTANT: For Flush installation before making electrical
connection, the oven feet need to be installed to allow a
microwave/oven combination to be installed in a recommended
cutout height. Please contact service for feet to be shipped to you
free of charge.
WARNING
Electrical Shock Hazard
Disconnect power before servicing.
Use 8 gauge copper wire.
Electrically ground oven.
Failure to follow these instructions can result in death,
fire, or electrical shock.
This oven is manufactured with a neutral (white) power supply
wire and a cabinet-connected green (or bare) ground wire.
1. Disconnect power.
2. Feed the flexible conduit from the oven through the opening in
the cabinet.
3. Remove junction box cover, if it is present.
4. Install a UL listed or CSA approved conduit connector to the
junction box.
A
A. UL listed or CSA approved conduit connector

12
5. Route the flexible conduit from the oven to the junction box
through a UL listed or CSA approved conduit connector.
6. Tighten screws on conduit connector.
7. See “Electrical Connection Options Chart” to complete
installation for your type of electrical connection.
Electrical Connection Options Chart
If your home has: Go to section:
4-wire
1/2"
(1.3 cm)
4-Wire Cable from Home
Power Supply
3-wire
1/2"
(1.3 cm)
3-Wire Cable from Home
Power Supply
4-Wire Cable from Home Power Supply
IMPORTANT: Use the 4-wire cable from home power supply in
the U.S. where local codes do not allow grounding through
neutral, New Branch circuit installations (1996 NEC), mobile
homes and recreational vehicles, new construction and in
Canada.
A
D
F
H
B
C
E
G
I
A. Cable from home power supply
B. Black wires
C. Red wires
D. 4-wire flexible conduit from
oven
E. Junction box
F. White wires
G. UL listed wire connectors
H. Green (or bare) ground wires
I. UL listed or CSA approved
conduit connector
1. Connect the 2 black wires (B) together using a UL listed wire
connector.
2. Connect the 2 red wires (C) together using a UL listed wire
connector.
3. Connect the 2 white wires (F) together using a UL listed wire
connector.
4. Connect the green (or bare) ground wire (H) from the oven
cable to the green (or bare) ground wire (in the junction box)
using a UL listed wire connector.
5. Install junction box cover.
3-Wire Cable from Home Power Supply – U.S.
Only
IMPORTANT: Use the 3-wire cable from home power supply
where local codes permit a 3-wire connection.
B
C
D
E
F
H
G
A
I
A. Cable from home power supply
B. Junction box
C. Black wires
D. White wires
E. Green (or bare) ground wire
(from oven)
F. 4-wire flexible conduit from
oven
G. Red wires
H. UL listed wire connectors
I. UL listed or CSA approved
conduit connector
1. Connect the 2 black wires (C) together using a UL listed wire
connector.
2. Connect the 2 white wires (D) and the green (or bare) ground
wire (of the oven cable) using a UL listed wire connector.
3. Connect the 2 red wires (G) together using a UL listed wire
connector.
4. Install junction box cover.
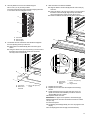
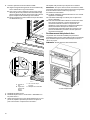
Install Oven
1. Using two or more people, lift oven partially into cabinet
cutout. Use the oven opening as an area to grip.
NOTE: Push against seal area of oven front frame when
pushing oven into cabinet. Do not push against outside edges.
2. Push against the seal area of the front frame to push the oven
into the cabinet until the back surface of the front frame
touches the front wall of the cabinet.
3. Push oven completely into cabinet and center oven into
cabinet cutout.

13
4. Securely fasten the oven to the cabinet using the
#8-14 x 3/4" (1.9 cm) screws provided.
Insert the screws through hole in black trim aligning with hole
in oven frame. Do not overtighten screws.
A. Oven frame
B. Side trim hole
C. Side trim piece
5. The bottom vent trim and bottom vent shield are shipped in
the foam packing at the top of the oven.
�Align bottom vent shield tab (B) with oven frame (A) as
shown.
�Using one #8-18 x 3/8" (9.5 mm) screw (C) on each side of
the bottom vent shield tab (B), fasten the vent shield
securely to the oven frame (A).
A. Oven frame
B. Bottom vent
shield tab
C. #8-18 x 3/8" (9.5 mm)
screws
6. After the bottom vent shield is installed.
�Align the bottom vent trim tab (B) with the oven frame (A)
as shown.
�Using one #8-18 x 3/8" (9.5 mm) screw (C) on each side of
the bottom vent trim tab (B), align the top of the bottom
vent trim tab (B) to the Hinge receiver (D) as shown.
�Fasten the bottom vent trim securely to the oven frame (A).
A. Oven frame
B. Bottom vent
trim tab
C. #8-18 x 3/8" (9.5 mm)
screw
D. Hinge receiver
7. Replace the oven racks.
8. Replace the oven door. See the “Replace Oven Door(s)”
section.
9. Check that the door is free to open and close. If it is not,
repeat the removal and installation procedures. See the
“Prepare Built-In Oven” section.
10. Repeat for lower oven door.
IMPORTANT: For proper oven operation, check that the gap
between bottom trim of the door and bottom vent trim is at least
1/4" (6.4 mm).
11. Reconnect power.
12. The display panel will light briefly, and “PF” may appear in the
display.
13. If the display panel does not light, refer the Warranty.
A
B
C
C
B
A
A
C
B
D
B

14
14. If F9E0 error code is encountered upon powering up the unit,
the appliance is wired incorrectly at the Junction Box or
Electrical Panel. Contact a qualified electrician to verify the
home electrical supply and the hardwire connection at the
Junction Box or Electrical Panel (See the Electrical
Connection Options section).
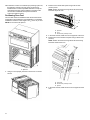
Positioning Oven Feet
The oven feet need to be installed to allow the microwave/oven
combination to be installed in a Flush Installation or in Standard
Installations where the cutout height is 421/2" (107.9 cm) or more.
NOTE: Do not remove the spacers.
A. Spacers
1. Using 2 or more people, place the on its back on a covered
surface.
2. Install a foot on the left rear spacer using a #8-18 x 3/8"
(9.5 mm) screw.
NOTE: Position the foot so the long side of the foot is facing
toward the top of the oven.
A
B
C
A. Spacers
B. Foot
C. #8-18 x 3/8" (9.5 mm) screw.
3. In the same manner, install a foot on the right rear of the oven.
4. Install a front foot on the left front spacer using a #8-18 x 3/8"
(9.5 mm)
NOTE: Position the foot so the long side of the foot is facing
toward the inside of the oven.
A. Front foot
B. #8-18 x 3/8" (9.5 mm) screw.
C. Spacer
5. In the same manner, install a front foot on the right front of the
oven.

15
6. Using 2 or more people, place the oven in its upright position.
7. Go to the “Make Electrical Connection” section in the
Installation Instructions provided with your built-in oven.
Complete Installation
1. Check that all parts are now installed. If there is an extra part,
go back through the steps to see which step was skipped.
2. Check that you have all of your tools.
3. Dispose of/recycle all packaging materials.
4. For oven cleaning, read the “Microwave Oven Maintenance
and Care” section.
Check Operation of Lower Oven
1. Turn power on.
2. At first use, set up the languages, clock, and any other
preferences, if available. For more information, read the online
Control Guide.
3. Press OVEN.
4. Select Cooking Method.
5. Select BROIL.
6. Set the temperature.
7. Press START.
If Oven Does Not Operate, Check the Following:
�Household fuse is intact and tight; or circuit breaker has
not tripped.
�Electrical supply is connected.
�See the Online Troubleshooting section.
8. When oven has been on for 5 minutes, feel for heat.
NOTE: Odors and smoke are normal when the oven is used
the first few times.
If you do not feel heat or if an error message appears in the
display, turn off the oven and contact a qualified technician.
9. (On Some Models) Place the SatinGlide™Roll-Out Extension
Rack for Smart Oven+ Attachments in the lowest rack position
in the unit to make sure the correct accessory rack is on the
bottom
10. Press OVEN/CANCEL OVEN on single ovens to cancel.
�Press UPPER/LOWER on double ovens to cancel.
Check Operation of Microwave Oven
1. Fill a microwave-safe container with 1 cup (250 mL) of water
and place container inside microwave oven. Close door firmly.
2. Press MICROWAVE.
3. Select Cooking Method.
4. Set microwave oven cook time to 2 minutes.
5. Press START. The interior microwave oven light should be on,
and the remaining cooking time should be displayed.
When display reads “1:00”, open microwave oven door. The
microwave should stop cooking. Close door firmly. The interior
microwave oven light should turn off.
6. Press START. Microwave oven should begin cooking, and the
microwave oven interior light should be on.
Let microwave oven complete cooking time. A tone will sound
four times at the end of the cooking time, and the microwave
oven will shut off.
7. Open microwave oven door and slowly remove container.
Water in container should be hot.
If you need Assistance or Service:
Please refer to the Quick Start Guide for contact information, or
contact the dealer from whom you purchased your built-in electric
ovens and microwave ovens.

16
SÉCURITÉ DE L’ENSEMBLE FOUR ÉLECTRIQUE/FOUR À
MICRO-ONDES ENCASTRÉ
Votre sécurité et celle des autres sont très importantes.
Nous donnons de nombreux messages de sécurité importants dans ce manuel et sur votre appareil. Assurez-vous de toujours lire
tous les messages de sécurité et de vous y conformer.
Voici le symbole d’alerte de sécurité.
Ce symbole d’alerte de sécurité vous signale les dangers potentiels de décès et de blessures graves.
Tous les messages de sécurité suivront le symbole d’alerte de sécurité et le mot « DANGER » ou
« AVERTISSEMENT ». Ces mots signifient :
DANGER Risque possible de décès ou de blessure grave si vous ne
suivez pas immédiatement les instructions.
AVERTISSEMENT Risque possible de décès ou de blessure grave si vous ne
suivez pas les instructions.
Tous les messages de sécurité vous diront quel est le danger potentiel, comment réduire le risque de blessure et ce qui peut se
produire en cas de non-respect des instructions.
INSTRUCTIONS IMPORTANTES DE SÉCURITÉ
AVERTISSEMENT : Afin de réduire le risque d’incendie, de décharge électrique ou de blessures lors de l’utilisation de l’appareil,
il convient d’observer certaines précautions fondamentales, notamment :
�Bonne installation – l’appareil, lorsqu’il est installé, doit être
relié à la terre conformément aux codes locaux, ou en
l’absence de codes locaux, au National Electrical Code,
ANSI/NFPA 70 ou au Code canadien de l’électricité
CSA C22.1-02. Au Canada, l’appareil doit être relié à la
terre en respectant le Code canadien de l’électricité.
S’assurer que l’appareil est bien installé et que la mise à la
terre est réalisée par un technicien qualifié.
�Ne jamais utiliser l’appareil pour chauffer ou réchauffer la
pièce.
�Ne pas laisser les enfants seuls – Les enfants ne doivent
pas être laissés seuls ou sans surveillance dans la zone où
l’appareil est utilisé. Ils ne doivent jamais être autorisés à
s’asseoir ou à se tenir debout sur une partie quelconque de
l’appareil.
�Porter des vêtements adaptés – Les vêtements pendants
ou non ajustés ne doivent jamais être portés lorsqu’on
utilise l’appareil.
�Entretien par l’utilisateur – Ne pas réparer ou remplacer
une quelconque pièce de l’appareil sans recommandation
spécifique du manuel. Toutes les autres tâches d’entretien
doivent être effectuées par un technicien qualifié.
�Entreposage dans ou sur l’appareil – Les matières
inflammables ne doivent pas être entreposées dans un four
ou près de la surface de la table.
�Cet appareil n’est pas conçu pour servir d’espace de
rangement.
�Ne pas utiliser d’eau sur les feux de friture – Étouffer le feu
ou la flamme ou utiliser un extincteur avec agent chimique
sec ou mousseux.
�Ne pas utiliser de pièces de remplacement qui n’ont pas
été recommandées par le fabricant (c.-à-d., pièces
fabriquées à la maison à l’aide d’une imprimante 3D).
�Utiliser uniquement des maniques sèches – Les maniques
humides ou trempées sur les surfaces chaudes peuvent
provoquer des brûlures dues à la vapeur. Ne pas laisser les
maniques toucher des éléments chauffants et chauds. Ne
pas utiliser un chiffon ou tout autre tissu encombrant.
�Ouvrir la porte lentement – Laisser la chaleur ou la vapeur
s’échapper avant de retirer ou de remettre en place un plat.
�NE PAS TOUCHER LES ÉLÉMENTS CHAUFFANTS OU
LES SURFACES INTÉRIEURES DU FOUR – Les
éléments chauffants peuvent être chauds même s’ils sont
de couleur foncée. Les surfaces intérieures du four peuvent
être suffisamment chaudes pour provoquer des brûlures.
Pendant et après l’utilisation, ne pas toucher ou laisser des
vêtements ou d’autres matériaux inflammables en contact
avec les éléments chauffants ou les surfaces intérieures
tant qu’ils n’ont pas suffisamment refroidi. Les autres
surfaces de l’appareil peuvent devenir suffisamment
chaudes pour causer des brûlures – les serpentins et
éléments de cuissons, les ouvertures de ventilation et les
surfaces autour de ces ouvertures, les portes du four et les
hublots de portes font partie de ces surfaces.
�Ne pas faire chauffer un contenant qui n’a pas été ouvert
– L’accumulation de pression pourrait faire éclater le
contenant et causer des blessures.
�Garder dégagés les conduits de ventilation du four.
CONSERVER CES INSTRUCTIONS

17
INSTRUCTIONS IMPORTANTES DE SÉCURITÉ
AVERTISSEMENT : Afin de réduire le risque d’incendie, de décharge électrique ou de blessures lors de l’utilisation de l’appareil,
il convient d’observer certaines précautions fondamentales, notamment :
�Position des grilles du four – toujours placer les grilles à la
position souhaitée lorsque le four est froid. Si une grille doit
être déplacée pendant que le four est chaud, ne pas laisser
la poignée entrer en contact avec l’élément chaud du four.
Pour les fours autonettoyants :
�AVERTISSEMENT : NE PAS LAISSER D’ALIMENTS,
D’USTENSILES DE CUISSON, ETC. DANS LE FOUR
PENDANT L’UTILISATION DU MODE DE NETTOYAGE
PYROLYTIC.
�Ne pas nettoyer le joint de la porte – Le joint de la porte est
essentiel pour une bonne étanchéité. Faire attention à ne
pas frotter, endommager ou déplacer le joint.
�Ne pas utiliser de revêtement de protection pour recouvrir
le four et ne pas utiliser de nettoyant commercial pour four,
sauf s’il est certifié pour une utilisation dans les fours
autonettoyants.
�Ne nettoyer que les pièces indiquées.
�Avant d’effectuer l’autonettoyage du four – Retirer la
lèchefrite et les autres ustensiles, puis essuyer tous les
excès de déversement.
Pour les cuisinières et fours intelligents :
�Utilisation à distance – cet appareil peut être configuré pour
permettre l’utilisation à distance en tout temps. Ne pas
ranger de matériaux inflammables ou sensibles à la
température sur le dessus ou près de la surface de
l’appareil.
CONSERVER CES INSTRUCTIONS
INSTRUCTIONS IMPORTANTES DE SÉCURITÉ
Lors de l’utilisation d’appareils électriques, il faut toujours observer certaines précautions élémentaires de sécurité, y compris les
suivantes :
AVERTISSEMENT : Pour réduire les risques de brûlure, de décharges électriques, d’incendie, de blessures ou d’exposition à un
rayonnement excessif de micro-ondes :
�Lire toutes les instructions avant d’utiliser l’appareil.
�Lire et respecter les « PRÉCAUTIONS POUR ÉVITER LES
EXPOSITIONS POSSIBLES À UN RAYONNEMENT
EXCESSIF AUX MICRO-ONDES » spécifiques de ce
manuel.
�Cet appareil doit être relié à la terre. Brancher uniquement
dans une prise reliée à la terre. Consulter le point
« INSTRUCTIONS DE LIAISON À LA TERRE » de cette
section.
�Installer ou placer cet appareil en respectant toutes les
instructions d’installation fournies.
�Certains produits comme les œufs entiers et les contenants
scellés, comme un pot en verre fermé, peuvent exploser et
ne devraient pas être chauffés dans ce four.
�Utiliser cet appareil uniquement dans le cadre de l’usage
auquel il se destine comme décrit dans le manuel. Ne pas
utiliser de produits chimiques corrosifs ou dégageant des
vapeurs dans cet appareil. Ce type de four est
spécialement conçu pour chauffer, cuire ou sécher des
aliments. Il n’est pas conçu pour une utilisation à des fins
industrielles ou en laboratoires.
�Comme pour tout appareil, une bonne supervision est
nécessaire lorsqu’un enfant utilise l’appareil.
�Ne pas utiliser ce produit si la fiche ou le cordon est
endommagé, s’il ne fonctionne pas correctement ou s’il a
subi une chute ou a été endommagé de quelque façon que
ce soit.
�Seule une personne qualifiée est habilitée à effectuer une
intervention d’entretien sur cet appareil. Communiquer
avec l’entreprise de service autorisé la plus près de chez
vous pour la vérification, la réparation et le réglage.
�Ne pas couvrir ou obstruer les ouvertures de l’appareil.
�Ne pas ranger l’appareil à l’extérieur. Ne pas utiliser cet
appareil près d’une source d’eau comme un évier de
cuisine, un sous-sol humide, une piscine ou tout autre
emplacement semblable.
�Ne pas immerger le cordon ou la fiche dans l’eau.
�Maintenir le cordon à l’écart de toute surface chaude.
�Ne pas laisser le cordon pendre par-dessus le bord d’une
table ou d’un comptoir.
�Ne pas utiliser de pièces de remplacement qui n’ont pas
été recommandées par le fabricant (c.-à-d., pièces
fabriquées à la maison à l’aide d’une imprimante 3D).
�Voir les instructions de nettoyage de la surface de la porte
dans la section « Entretien et réparation du four à micro-
ondes ».
�Pour réduire les risques d’incendie dans la cavité du four :
• Ne pas trop faire cuire les aliments. Surveiller
attentivement l’appareil lorsque du papier, du plastique
ou d’autres matériaux combustibles sont placés à
l’intérieur pour faciliter la cuisson.
• Retirer les attaches des sacs en papier ou en plastique
avant de placer le sac dans le four.
• Si des matériaux prennent en feu dans le four, garder la
porte du four fermée, éteindre le four et débrancher le
cordon d’alimentation ou fermer l’alimentation au fusible
ou disjoncteur.
• Ne pas utiliser la cavité comme remisage. Ne pas laisser
de produits en papier, d’ustensiles de cuisson ou
d’aliments dans la cavité lorsque l’appareil n’est pas
utilisé.
CONSERVER CES INSTRUCTIONS

18
INSTRUCTIONS IMPORTANTES DE SÉCURITÉ
Lors de l’utilisation d’appareils électriques, il faut toujours observer certaines précautions élémentaires de sécurité, y compris les
suivantes :
AVERTISSEMENT : Pour réduire les risques de brûlure, de décharges électriques, d’incendie, de blessures ou d’exposition à un
rayonnement excessif de micro-ondes :
�Les liquides, comme l’eau, le café ou le thé, peuvent être
chauffés au-delà du point d’ébullition sans pour autant avoir
l’air de bouillir. Des bulles ou une ébullition lorsque le
contenant est sorti du four à micro-ondes ne sont pas
toujours visibles. LE CONTENU LIQUIDE TRÈS CHAUD
PEUT AINSI SOUDAINEMENT BOUILLIR LORSQUE LE
CONTENANT EST DÉPLACÉ OU SI UN USTENSILE EST
INSÉRÉ DANS LE LIQUIDE.
Pour les fours à miro-ondes qui ne sont pas conçus pour
être utilisés au-dessus d’un autre appareil qui produit de
la chaleur :
�Ne pas utiliser un appareil de chauffage ou de cuisson sous
cet appareil.
�Ne pas fixer l’appareil au-dessus ou près d’un appareil de
chauffage ou de cuisson.
�Ne pas installer au-dessus d’un évier.
�Ne rien placer directement sur le dessus de l’appareil
lorsque ce dernier est utilisé.
CONSERVER CES INSTRUCTIONS
PRÉCAUTIONS POUR ÉVITER TOUTE EXPOSITION
ÉVENTUELLE AU RAYONNEMENT EXCESSIF DE MICRO-
ONDES ET UTILISER L’APPAREIL SANS DANGER
(a) Ne pas tenter de faire fonctionner ce four lorsque la porte est
ouverte puisque l’utilisation la porte ouverte peut entraîner
une exposition dangereuse au rayonnement des micro-
ondes. Il est important de ne pas modifier ou contourner le
verrouillage de sécurité.
(b) Ne placer aucun objet entre le devant du four à micro-ondes
et la porte ou ne pas permettre à de la saleté ou des résidus
de nettoyage de s’accumuler sur les surfaces des joints
d’étanchéité.
(c) Ne pas ouvrir le four à micro-ondes s’il est endommagé. Il est
très important que la porte du four ferme correctement et qu’il
n’y ait pas de dommage à :
(1) la porte (tordue);
(2) les charnières et loquets (brisées ou lâches);
(3) les joints d’étanchéité de la porte et leur surface.
(d) Le four ne doit pas être réglé ou réparé par une personne
autre qu’une personne d’entretien qualifiée.

19
Guide de connexion Internet pour appareils connectés seulement
IMPORTANT : Il est de la responsabilité de l’utilisateur de bien installer l’appareil avant de l’utiliser. Bien lire et suivre le guide
d’installation qui accompagne l’appareil.
La connectabilité nécessite un réseau Wi-Fi et la création d’un compte. Les fonctions de l’application peuvent changer. Des frais de
transfert de données peuvent s’appliquer. Une fois installée, lancer l’application. Suivre les étapes de configuration du compte
d’utilisateur et de connexion de l’appareil.
Il faut :
�Un routeur sans fil compatible Wi-Fi à 2,4 GHz avec sécurité WPA2. Pour vérifier les capacités du routeur, consulter le manuel
d’instructions du fabricant du routeur.
�Le routeur devra être en marche et connecté à Internet.
�Le numéro SAID à 10 caractères de votre appareil. Le numéro SAID est imprimé sur une étiquette collée sur l’appareil ou peut être
affiché à l’écran ACL.
Déclaration de conformité de la Commission fédérale des communications (FCC)
Cet appareil est conforme à la norme FCC, partie 15. Le bon fonctionnement de l’appareil est fonction de deux conditions :
1. Cet appareil ne doit pas produire de brouillage dommageable et
2. cet appareil doit accepter tout brouillage radioélectrique subi, même si le brouillage est susceptible d’en compromettre le
fonctionnement.
Tous changements ou toutes modifications n’ayant pas été expressément approuvés par la partie responsable de la conformité
pourraient annuler l’autorité de l’utilisateur à utiliser l’appareil.
Déclaration de conformité d’Industrie Canada (IC)
Cet appareil satisfait aux prescriptions des documents CNR/RSS d’Industrie Canada (utilisation sans licence). Le bon fonctionnement de
l’appareil est fonction de deux conditions :
1. Cet appareil ne doit pas produire de brouillage.
2. Cet appareil doit être compatible avec n’importe quelle interférence, y compris des interférences causées par l’utilisation involontaire
de l’appareil.
En vertu des règlements d’Industrie Canada, cet émetteur radio ne peut fonctionner qu’à l’aide d’une antenne d’un type et de gain
maximum (ou moins) approuvé pour l’émetteur par Industrie Canada. Pour réduire les interférences radio potentielles pour les autres
utilisateurs, le type d’antenne et son gain doivent être choisis de sorte que la puissance isotrope rayonnée équivalente (PIRE) ne
dépasse pas ce qui est nécessaire pour une communication réussie.
Pour satisfaire aux exigences de la FCC et d’Industrie Canada sur l’exposition aux radiations de radiodiffusion, les antennes utilisées
avec cet émetteur doivent être installées de telle sorte qu’il y ait une distance de 20 cm ou plus séparant la source de radiation (antenne)
et toute personne en tout temps et ne doit pas être co-utilisée ou fonctionner en même temps qu’une autre antenne ou qu’un émetteur.
Si cet appareil cause des interférences nuisibles à la réception radio ou télévision, pouvant être déterminées par le fait d’allumer et
d’éteindre l’appareil, l’utilisateur est encouragé à essayer de corriger les interférences en suivant l’un des conseils suivants :
�Réorienter ou déplacer l’antenne de réception.
�Augmenter la distance séparant l’appareil du récepteur.
�Brancher l’appareil sur un circuit différent de celui où le
récepteur est branché.
�Contacter un revendeur ou un technicien radio/télévision
qualifié pour obtenir de l’aide.

20
ENTRETIEN ET RÉPARATION DU
FOUR À MICRO-ONDES
Nettoyage général
IMPORTANT : Avant le nettoyage, s’assurer que toutes les
commandes sont éteintes et que le four et la table de cuisson sont
froids. Toujours suivre les instructions figurant sur les étiquettes
des produits de nettoyage.
L’usage de savon, d’eau et d’un chiffon doux ou d’une éponge est
suggéré en priorité, sauf indication contraire.
ACIER INOXYDABLE
REMARQUE : Afin d’éviter d’endommager les surfaces en acier
inoxydable, ne pas utiliser de tampons à récurer savonneux, de
nettoyants abrasifs, de crème à polir pour table de cuisson, de
tampons en laine d’acier, de chiffons de lavage rêches ou
d’essuie-tout abrasifs. Ils peuvent endommager les surfaces en
acier inoxydable, même après une seule ou quelques
applications.
Frotter dans la direction du grain pour éviter les dommages.
Méthode de nettoyage :
�Affresh®Nettoyant pour acier inoxydable affresh®– numéro de
pièce W10355016 (vendu séparément) ou chiffons pour acier
inoxydable affresh®– numéro de pièce W10355049 (vendu
séparément) :
Consulter le Guide de démarrage rapide pour les informations
de commande.
�Nettoyant tout-usage : Rincer à l’eau propre et sécher avec un
chiffon doux sans charpie.
�Vinaigre pour les taches d’eau dure.
EXTÉRIEUR ET PORTE DU FOUR À MICRO-
ONDES
La zone de contact de la porte et du cadre du four, quand la porte
est fermée, doit être maintenue propre.
Méthode de nettoyage :
�Savons et détergents doux, non abrasifs :
Rincer à l’eau propre et sécher avec un chiffon doux sans
charpie.
�Nettoyant à vitre et serviette de papier ou tampon à récurer
non abrasif en plastique :
Vaporiser du nettoyant à vitre sur la serviette, pas directement
sur la surface.
TABLEAU DE COMMANDE ET EXTÉRIEUR DE LA
PORTE DU FOUR
Afin d’éviter d’endommager le tableau de commande, ne pas
utiliser de nettoyants abrasifs, de tampons en laine d’acier, de
chiffons de lavage rêches ou d’essuie-tout abrasifs.
La zone de contact de la porte et du cadre du four, quand la porte
est fermée, doit être maintenue propre.
Méthode de nettoyage :
�Nettoyant à vitre et chiffon doux ou éponge ou tampon à
récurer non abrasif en plastique :
Appliquer le nettoyant à vitre sur un chiffon doux ou une
éponge et non directement sur le tableau.
�Nettoyant affresh®pour cuisine et appareils ménagers –
numéro de pièce W10355010 (vendu séparément) :
Consulter le Guide de démarrage rapide pour les informations
de commande.
INTÉRIEUR DE LA PORTE DU FOUR
Méthode de nettoyage :
�Programme d’autonettoyage :
Pour un nettoyage optimal de la porte, essuyer tout dépôt avec
une éponge humide avant de lancer le programme.
CAVITÉ DU FOUR
Ne pas utiliser de nettoyants à four.
Les éclaboussures alimentaires doivent être nettoyées lorsque le
four a refroidi. À haute température, les aliments réagissent avec
l’émail et peuvent provoquer la formation de taches, une attaque
acide, des piqûres ou des décolorations blanchâtres.
Méthode de nettoyage :
�Programme d’autonettoyage :
Voir d’abord « Programme d’autonettoyage ». Retirer les
grilles pour qu’elles ne décolorent pas et qu’elles ne
deviennent pas difficiles à faire glisser. Le cas échéant, une
légère couche d’huile végétale appliquée sur les glissières
facilitera le glissement des grilles.
CAVITÉ DU FOUR À MICRO-ONDES
Afin d’éviter d’endommager la cavité du four à micro-ondes, ne
pas utiliser de tampons à récurer savonneux, de nettoyants
abrasifs, de tampons en laine d’acier, de chiffons de lavage
rêches ou certains essuie-tout.
Sur les modèles en acier inoxydable, frotter dans le sens du grain
pour éviter d’endommager le fini.
La zone de contact de la porte et du cadre du four, quand la porte
est fermée, doit être maintenue propre.
Méthode de nettoyage :
Saleté moyenne
�Savons et détergents doux, non abrasifs :
Rincer à l’eau propre et sécher avec un chiffon doux sans
charpie.
Saleté intense
�Savons et détergents doux, non abrasifs :
Faire chauffer une tasse (250 ml) d’eau pendant 2 à 5 minutes
dans le four. La vapeur amollira la saleté. Rincer à l’eau propre
et sécher avec un
chiffon doux sans charpie.
Odeurs
�Jus de citron ou vinaigre :
�Faire chauffer une tasse (250 ml) d’eau avec 1 c. à soupe
(15 ml) de jus de citron ou de vinaigre pendant 2 à 5 minutes
dans le four.
GRILLES DU FOUR
�Tampon en laine d’acier
�Lave-vaisselle
�Pour les grilles ternies qui glissent difficilement, enduire
légèrement les glissières d’huile végétale; cela facilitera leur
glissement.
PLAFOND DU FOUR À MICRO-ONDES
L’élément de cuisson au gril ne nécessite pas un nettoyage
sachant que la chaleur intense brûle toute projection de
nourriture. Cependant, la paroi supérieure au-dessus de l’élément
de cuisson au gril nécessite un nettoyage régulier.
Méthode de nettoyage :
�Eau tiède, détergent doux et éponge.
La page est en cours de chargement...
La page est en cours de chargement...
La page est en cours de chargement...
La page est en cours de chargement...
La page est en cours de chargement...
La page est en cours de chargement...
La page est en cours de chargement...
La page est en cours de chargement...
La page est en cours de chargement...
La page est en cours de chargement...
La page est en cours de chargement...
La page est en cours de chargement...
-
 1
1
-
 2
2
-
 3
3
-
 4
4
-
 5
5
-
 6
6
-
 7
7
-
 8
8
-
 9
9
-
 10
10
-
 11
11
-
 12
12
-
 13
13
-
 14
14
-
 15
15
-
 16
16
-
 17
17
-
 18
18
-
 19
19
-
 20
20
-
 21
21
-
 22
22
-
 23
23
-
 24
24
-
 25
25
-
 26
26
-
 27
27
-
 28
28
-
 29
29
-
 30
30
-
 31
31
-
 32
32


JennAir W11654409A Le manuel du propriétaire
- Catégorie
- Fours
- Taper
- Le manuel du propriétaire
dans d''autres langues
- English: JennAir W11654409A Owner's manual