Intellinet Gigabit SATA NAS 4 TB Quick Installation Guide
- Catégorie
- Les routeurs
- Taper
- Quick Installation Guide
Ce manuel convient également à

GIGABIT SATA NAS
QUICK INSTALL
GUIDE
MODEL 505895
INT-505895-QIG-ML1-0110-04
ENGLISH • DEUTSCH
ESPAÑOL • FRANÇAIS
POLSKI • ITALIANO

2
ENGLISH
Thank you for purchasing the INTELLINET NETWORK SOLUTIONS
™
Gigabit SATA NAS,
Model 505895. This guide presents the basic steps to set up and operate this device.
For detailed instructions and specications, refer to the user manual on the CD
enclosed with this product or at www.intellinet-network.com.
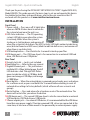
INSTALLATION
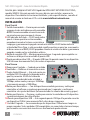
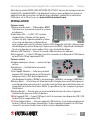
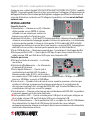
Front Panel
1 Power switch — Press on or o; it lights blue
when on. NOTE: It takes about a minute for
the system to boot once the unit is on.
2 LED status indicators — The OS (operating
system) LED lights green when the system
is on/ready; blinks when the system is
starting or is shutting down; and remains o
when the system has shut down. The HDD (activity) LED lights amber to indicate an
error (disk not found or a RAID error); blinks to indicate data access; and remains o
when there is no disk activity.
3 USB backup button — Press/hold in for 4 seconds to back up your les.
4 USB device port — This USB type-A port is for connection to an external USB hard
drive, USB ash drive or USB printer.
Rear Panel
5 Security lock slot — Lock is not included.
6 Ventilation fan — Refer to the user manual.
7 Gigabit Ethernet port — This jack features
multiple LEDs. When lighted green, the left
LED indicates a link. The right LED ashes
green to indicate activity at 10 Mbps; both
green and orange at 100 Mbps; and orange
at 1000 Mbps.
8 Reset button — When the network drive is powered up and ready, press and release
for a software reset; or press and hold it for 5 seconds before releasing to reset all
network drive settings to factory defaults (which will erase all user accounts and
groups).
9 Restart button — Press and release for a hardware reset of the network drive. The
device will restart after you release the button.
10 USB device port — This second USB type-A port is also for connection to an external
USB hard drive, USB ash drive or USB printer.
11 Power adapter jack — For external USB devices, it’s recommended that the USB drives
have their own power supply. If two bus-powered USB .drives are connected at the
same time, at least one of them needs to be powered by an external power supply.
Gigabit SATA NAS • Quick Install Guide English
11
1
2
3
4
5
6
7
8 9
10

ENGLISH
3
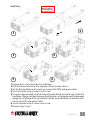
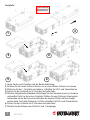
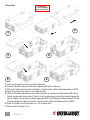
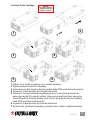
Hard Drive
1 Remove the 4 screws from the chassis bottom.
2 Push the inner enclosure out to separate it from the outer chassis.
3 Set the rst hard drive in the enclosure; connect the SATA and power cables.
4 Secure the drive using 2 screws on each side.
5 Using the tape provided, attach the thermal probe (black and white wire) to the rst
hard drive. Choose a location between the two drives so the probe won’t be damaged
during the installation of the second drive. Set the second hard drive in the enclosure;
connect the SATA and power cables.
6 Secure the drive using 2 screws on each side.
7 Reverse Steps 2 and 1.
1
2
3
4
5
6
CAUTION!
HANdle CArefUlly,
As sOme edges mAy
be sHArp Or rOUgH.

4
ENGLISH
CONNECTIONS & CONFIGURATION
For further details on each of the settings, refer to the user manual.
1. Install one or two hard drives. NOTE: Without installing and formatting a drive rst,
the other functions of the device won’t be available.
2. Connect the Ethernet cable from your network router or switch to the device.
3. When everything is connected, turn the NAS on by pressing the Power switch. Give
it about two minutes to boot up.
4. On the included installation CD, run the INTELLINET_nas.exe utility. If needed, refer
to the manual’s Section 3: System Setup / Logging In.
5. Access the Web conguration interface via your Web browser, then refer to Section
4: Web Conguration in the user manual.
6. Go to Section 4.2.5: Maintenance in the user manual and use the disk utility to format
the drive. If two identical drives are installed, you can also go to Section 4.2.5.2: RAID
Setting in the user manual and create your RAID array.
7. Once the drive is formatted, go to Section 4.1: Web Conguration / Basic in the user
manual and follow the quick setup wizard instructions. This will help you to set up
the IP conguration, add the rst user and prepare le sharing, after which you’ll be
ready to start sharing or downloading les. NOTE: Set the speed for your network
card to auto and not full or half speed.
POWER ON/OFF
To turn the power on, rst connect the power adapter to the NAS, then plug it into an
AC outlet. Press the Power switch. The blue backlight LED will turn on, and the unit will
start to boot up. It will take about a minute for the device to go online and be ready.
During bootup, the OS LED will blink.
To turn the power o, log in via your Web browser, stop all current downloads, go to
the “Turn O Server” screen (Section 4.2.3: System), and turn the server o or use the
Power switch. The OS LED will be blinking for about 5 seconds; the system will shut
down about 20 seconds later. NOTE: If the device is not in use for a longer period of
time, remove the power adapter from the AC outlet.
IMPORTANT: To protect your les and help prevent the loss of your data, it’s strongly
recommended that you keep two copies of your data: one copy on your Gigabit SATA
NAS and a second copy either on your internal drive or another storage media, such as
a CD, DVD, tape or additional external drive. Any loss or corruption of data while using
this Gigabit SATA NAS is the sole responsibility of the user, and under no circumstances
will INTELLINET NETWORK SOLUTIONS be held liable for compensation or the recovery
of this data.
Package Contents
• Gigabit SATA NAS
• Power adapter
• Quick install guide
• CD with user manual

DEUTSCH
5
Vielen Dank für den Kauf des INTELLINET NETWORK SOLUTIONS
™
Gigabit SATA NAS,
Modell 505895. Diese Kurzanleitung zeigt die grundlegenden Schritte zur Einrichtung
und Inbetriebnahme dieses Geräts. Für genauere Anweisungen nutzen Sie bitte das
beiliegende Handbuch auf CD oder auf www.intellinet-network.com.
INSTALLATION
Vorderseite
1 “Power”Taste — An oder aus; leuchtet blau
wenn aktiviert. HINWEIS: Es dauert nach dem
Einschalten ca. eine Minute bis das System
hochgefahren ist.
2
LED-Statusanzeigen — Die OS (Betriebssystem)-
LED leuchtet grün wenn das System
betriebsbereit ist; blinkt wenn es startet oder
herunterfährt und bleibt aus wenn es heruntergefahren ist. Die Festplatten (Aktivität)-
LED leuchtet rot, um einen Fehler anzuzeigen (Platte nicht gefunden oder RAID-Fehler);
blinkt bei Datenzugri und bleibt aus wenn keine Aktivität stattndet.
3 USB “Backup”-Taste — 4 Sekunden gedrückt halten, um Ihre Dateien zu sichern.
4 USB-Geräte-Port — Dieser USB Typ-A-Port dient dem Anschluss von externen USB-
Festplatten, USB-Flashlaufwerken oder USB-Druckern.
Rückseite
5 Slot für Sicherheitsschloss — Schloss ist nicht
im Lieferumfang enthalten.
6 Lüfter — Weitere Informationen im Handbuch.
7 Gigabit Ethernet Port — Diese Buchse
verfügt über mehrere LEDs. Mit Grün zeigt die
linke LED eine Verbindung an. Die rechte LED
leuchtet grün, bei Aktivität mit 10 MBit/s;
grün und orange mit 100 MBit/s und orange mit 1000 MBit/s.
8 Reset-Schalter — Ist das Netzwerklaufwerk mit Strom versorgt und betriebsbereit,
drücken Sie kurz für ein Software-Reset, oder halten Sie 5 Sekunden gedrückt, um
alle Netzwerklaufwerke auf die Werkseinstellungen zurückzusetzen (dies löscht alle
Benutzerkonten und -gruppen).
9 Restart-Schalter — Gedrückt halten für einen Hardware-Reset des Netzwerklaufwerks.
Das Gerät startet neu, sobald Sie den Schalter loslassen.
10 USB Geräte-Port — Dieser USB Typ-A-Port dient der Verbindung mit einer externen
USB-Festplatte, einem USB-Flashlaufwerk oder USB-Drucker.
11 Strombuchse — Für externe USB-Geräte wird eine eigene Stromversorgung empfohlen.
Wenn zwei Geräte mit Stromversorgung über USB angeschlossen sind, sollte
mindestens eins davon auch über ein externes Netzteil versorgt werden.
Gigabit SATA NAS • Kurzanleitung Deutsch
1
2
3
4
11
5
6
7
8 9
10

6
DEUTSCH
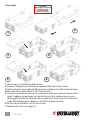
Festplatte
1 Lösen Sie die vier Schrauben von der Bodenabdeckung.
2 Drücken Sie das innere Gehäuse heraus, um es vom äußeren Gehäuse zu trennen.
3 Platzieren Sie die 1. Festplatte im Gehäuse; schließen Sie SATA- und Stromkabel an.
4 Sichern Sie das Laufwerk mit 2 Schrauben auf jeder Seite.
5 Mit dem mitgelieferten Klebeband, befestigen Sie den Temperatursensor (schwarzer
und weißer Draht) an der ersten Festplatte. Wählen Sie eine Stelle zwischen beiden
Laufwerken, an der der Sensor beim Einbau der zweiten Platte nicht beschädigt
werden kann. Nach dem Einbau der 2. Platte schließen Sie SATA- und Stromkabel an.
6 Sichern Sie das Laufwerk mit 2 Schrauben auf jeder Seite.
7 Machen Sie die Aktionen der Schritte 2 und 1 rückgängig.
1
2
3
4
5
6
ACHTUNg!
VOrsICHTIg eINseTzeN,
geräTe köNNeN rAUe
kANTeN eNTHAlTeN.

DEUTSCH
7
ANSCHLÜSSE & KONFIGURATION
Weitere Informationen zu jeder Einstellung nden Sie im Handbuch.
1. Installieren Sie eine oder zwei Festplatten. HINWEIS: Ohne die vorherige Installation
und Formatierung eines Laufwerks, sind einige Funktionen nicht verfügbar.
2. Verbinden Sie das Ethernet-Kabel Ihres Netzwerkrouters/-Switches mit dem Gerät.
3. Sind alle Verbindungen vorhanden, schalten Sie das NAS an, indem Sie die “Power”-
Taste drücken. Das Hochfahren dauert ca. zwei Minuten.
4. Starten Sie die Software “INTELLINET_nas.exe” auf der beiliegenden Installations-CD.
Falls nötig, lesen Sie Abschnitt 3 im Handbuch: “System Setup / Logging In”.
5. Loggen Sie sich mit Ihrem Browser in das Webinterface ein, folgen Sie dann Abschnitt
4 im Handbuch: “Web Conguration”.
6. Lesen Sie Abschnitt 4.2.5: “Maintenance” im Handbuch und formatieren Sie das Laufwerk
mit der Software auf CD. Sind zwei identische Laufwerke installiert, können Sie mit Hilfe
des Abschnitt 4.2.5.2: “RAID Setting” des Handbuchs einen RAID-Verbund erstellen.
7. Sobald das Laufwerk formatiert ist, fahren Sie fort mit Handbuchabschnitt 4.1: “Web
Conguration / Basic” fort und folgen Sie den Kurzanweisungen. Diese helfen Ihnen bei
der IP-Konguration, fügen den ersten Nutzer hinzu und bereiten den Dateiaustausch
vor. Danach können Sie Dateien austauschen und herunterladen. HINWEIS: Setzen
Sie die Geschwindigkeit Ihrer Netzwerkkarte auf “Auto”, nicht Full oder Half Speed.
STROMVERSORGUNG
Um das Gerät einzuschalten, schließen Sie das Netzteil zuerst an den NAS, dann an eine
Steckdose an. Drücken Sie die “Power”-Taste. Die blaue LED wird aktiviert und das Gerät
hochgefahren. Es dauert ungefähr eine Minute bis das Gerät verbunden und einsatzbereit
ist. Während des Hochfahrens, blinkt die “OS”-LED.
Um das Netzwerklaufwerk auszuschalten, loggen Sie sich über ihren Webbrowser ein,
brechen sie alle aktuellen Downloads ab, gehen sie zum “Turn o server”-Bildschirm
(Abschnitt 4.2.3: System) und schalten sie den Server ab oder nutzen Sie die “Power”-
Taste. Die “OS”-LED blinkt ca. 5 Sekunden; das System fährt ca. 20 Sekunden später
herunter. HINWEIS: Wird das Gerät danach für einen längeren Zeitraum nicht genutzt,
trennen Sie das Netzteil von der Steckdose.
WICHTIG: Um Ihre Dateien zu schützen und Datenverlust vorzubeugen, empfehlen
wir zwei Sicherheitskopien zu machen, eine auf Ihrem Gigabit SATA NAS und eine
weitere auf Ihrer internen Festplatte oder einem anderen Speichermedium z. B. einer
CD oder DVD. Alle Verluste oder Beschädigungen von Daten liegen in der alleinigen
Verantwortung des Benutzers, INTELLINET NETWORK SOLUTIONS haftet unter keinen
Umständen bei Schadenersatzforderungen oder Kosten für Datenwiederherstellung.
Lieferumfang
• Gigabit SATA NAS
• Netzteil
• Kurzanleitung
• CD mit Handbuch

8
ESPAÑOL
Gracias por comprar el NAS SATA Gigabit de INTELLINET NETWORK SOLUTIONS
™
,
modelo 505895. Esta guía presenta los pasos básicos para instalar y operar este
dispositivo. Para obtener instrucciones detalladas y más especicaciones, consulte el
manual de usuario incluido en el CD o visite www.intellinet-network.com.
INSTALACIÓN
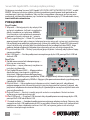
Panel Frontal
1
Switch de encendido — Presione para encender
o apagar; el color azul indica que está encendido
.
NOTA: Una vez encendido se necesita cerca de
un minuto para que arranque el sistema.
2
LED Indicador de Estado — El LED verde indica
que el sistema operativo está encendido;
parpadeará cuando el sistema se inicialice o
se apague y permanecerá apagado cuando este inactivo. El LED ámbar indica la
actividad del Disco Duro, si está encendido signica que hay un error (no se encuentra
el disco o error en el RAID); El LED parpadea cuando se accede a los datos y permanece
apagado cuando no hay actividad en el disco.
3 Botón de respaldo USB— Mantenga presionado por 4 segundos para respaldar sus
archivos en el dispositvo conectado al puerto USB.
4 Puerto para dispositivo USB — El puerto USB tipo A le permite conectar un dispositivo
USB tal como una memoria ash, disco duro o impresora.
Panel Trasero
5 Ranura para Candado — Candado no incluido.
6 Ventilador — Reérase al manual de usuario.
7
Puerto Gigabit Ethernet — Este jack cuenta con
múltiples LED. El verde de la izquierda indica
que hay conexión. El LED de la derecha
parpadea en verde indicando actividad a
10 Mbps; ambos verde y naranja a 100 Mbps;
y únicamente naranja a 1000 Mbps.
8 Botón para Reinicializar — Con el dispositivo encendido, presione y suelte para
reinicializar el software; o mantenga presionado por 5 segundos y suelte para
reinicializar a los ajustes de fábrica (se borrarán todas las cuentas de usuario y grupos).
9 Botón para Reiniciar — Presione y suelte para reiniciar la unidad de red. El dispositivo
se reiniciará después de soltar el botón.
10 Puerto para dispositivos USB — Este segundo puerto USB tipo A le permite conectar
un dispositivo USB tal como memoria ash, disco duro o impresora.
11 Jack del Cargador — Se recomienda que los dispositivos USB externos tengan su
propio cargador. Si dos unidades USB energizables son conectadas al mismo tiempo,
por lo menos una necesitará conectarse a una fuente de poder externa.
NAS SATA Gigabit • Guía de Instalación Rápida Español
1
2
3
4
11
5
6
7
8 9
10

ESPAÑOL
9
Disco Duro
1 Retire los 4 tornillos del fondo del gabinete.
2 Presione el interior para separarlo de la parte exterior del gabinete.
3 Fije el primer disco duro en el espacio interior; conecte los cables de energía y datos.
4 Asegure el disco usando 2 tornillos en cada lado.
5 Usando la cinta incluida, sujete el sensor térmico (cable blanco y negro) al primer disco
duro. Escoja un lugar entre las dos unidades para que el sensor no se dañe durante la
instalación del segundo disco. Fije el segundo disco duro en el espacio interior; conecte
los cables de energia y datos.
6 Asegure el disco usando 2 tornillos en cada lado.
7 Revierta los pasos 2 y 1.
1
2
3
4
5
6
¡preCAUCIÓN!
mANejese CON CUIdAdO,
AlgUNOs bOrdes pUedeN
esTAr AfIlAdOsO AsperOs.

10
ESPAÑOL
CONEXIONES Y CONFIGURACIÓN
Para más detalles en los ajustes, reérase al manual de usuario.
1. Instalar uno o dos discos duros. NOTA: Es necesario instalar y formatear antes el disco
duro ya que de lo contrario las otras funciones del dispositivo no estarán disponibles.
2. Conecte el cable Ethernet del router o switch al dispositivo.
3. Cuando todo esté conectado, presione el switch para encender el NAS. Espere
alrededor de dos minutos para que nalice el arranque.
4. Del CD adjunto, instale la utilidad INTELLINET_nas.exe. Si lo necesita, consulte su
manual en la sección 3: Conguración del Sistema / Inicio de sesión.
5. Ingrese a la conguración Web mediante su navegador de internet, consulte la
sección 4: Conguración Web en el manual de usuario.
6. Diríjase a la sección 4.2.5: Mantenimiento, en el manual y use el disco de utilidades
para formatear el disco. Si se instalan dos discos idénticos, puede dirigirse a la sección
4.2.5.2: Ajustes RAID, en el manual de usuario y congurar su arreglo RAID.
7. Una vez que el disco este formateado, vaya a la sección: 4.1: Conguración Web /
Básicos en el manual de usuario y siga las instrucciones del asistente. Le ayudará a
congurar la dirección IP, agregar usuarios y preparar la compartición de archivos,
con ello todo estará listo para compartir o descargar archivos. NOTA: Ajuste la
velocidad de su tarjeta de red en automático.
ENCENDER / APAGAR
Para encender el dispositivo, primero conecte el cargador al NAS, después conecte el
adaptador a una toma de corriente. Presione el switch de encendido. El LED en la parte
trasera encenderá en azul, y la unidad arrancará. Esto tomará cerca de un minuto para
que el dispositivo esté listo y en línea. Durante el arranque, el LED verde del sistema
operativo parpadeará.
Para apagar, ingrese vía navegador Web, detenga todas las descargas, vaya a la pantalla
“Apagar Servidor” (Sección 4.2.3: Sistema), y apáguelo o utilice el switch de encendido.
El LED del sistema operativo parpadeará por 5 segundos; el sistema se apagará 20
segundos después. NOTA: Si el dispositivo no se va a usar por un largo periodo de
tiempo, retire el cargador de la toma de corriente.
IMPORTANTE: Para proteger sus archivos y prevenir la pérdida de datos, se recomienda
tener respaldos de los datos: una copia en su NAS SATA Gigabit y una segunda en su
disco duro interno u otro medio de almacenamiento, como CD, DVD, cintas o unidades
externas. Cualquier pérdida o corrupción de datos mientras se usa el NAS es
responsabilidad del usuario, y bajo ninguna circunstancia INTELLINET NETWORK
SOLUTIONS se hará cargo de la compensación o recuperación de la información.
Contenido del paquete
• NAS SATA Gigabit de 3 TB
• Adaptador de corriente
• Manual del usuario
• CD de instalación

FRANÇAIS
11
Serveur de stockage en réseau Gigabit SATA • Guide d’installation rapide Français
1
2
3
4
11
5
6
7
8 9
10
Merci d’avoir acheté l’INTELLINET NETWORK SOLUTIONS
™
Serveur de stockage en réseau
Gigabit SATA, modèle 505895. Ce guide décrit les bases pour congurer et opérer cet
appareil. Pour des instructions et spécications détailées, veuillez lire le manuel de
l’utilisateur sur le CD inclus ou sur www.intellinet-network.com.
INSTALLATION
Panneau avant
1 Bouton marche-arrêt — S’allume bleu. NOTE:
Cela dure env. une minute jusqu’à le système
est démarré.
2 Indicateurs DEL — Le DEL “OS” (système
d’exploitation) s’allume vert dès que le
système est prêt; clignote quand le système
est en train de démarrer ou d’éteindre et
reste sombre après que le système a éteint. Le DEL disque dur (activité) s’allume rouge
an d’indiquer un erreur (disque pas trouvé ou erreur RAID); clignote an d’indiquer
l’accès aux données et reste sombre s’il n’y a pas d’activité de disque.
3 Bouton USB “backup” — Pressez 4 secondes an d’archiver vos données.
4 Port appareil — Ce port USB type A sert à la connexion à un disque dur USB externe,
lecteur ash USB ou imprimante USB.
Panneau arrière
5 Emplacement pour serrure — serrure n’est pas
incluse.
6 Ventilateur — Veuillez lire le manuel de
l’utilisateur.
7 Port Gigabit Ethernet — Cette prise contient
plusieurs DEL. Quand allumé vert, le DEL gauche
indique un lien. Le DEL droite clignote vert
an d’indiquer l’activité à 10 Mbit/s; vert et orange à 100 Mbit/s; et orange à 1000 Mbit/s.
8 Bouton Reset — Si le lecteur est alimenté et prêt à l’emploi, pressez et lâchez pour un
reset de logiciel ou pressez pour 5 secondes avant le lâcher pour réinitialiser tous les
paramètres du lecteur de réseau à défaut (ce qui eace tous les comptes et groupes
d’utilisateur).
9 Bouton Restart — Pressez pour un reset matériel du lecteur de réseau. L’appareil
réinitialise dès que vous lâchez le bouton.
10 Port appareil USB — Ce port USB type A sert à la connexion à un disque dur USB, USB
lecteur ash ou imprimante USB.
11 Fiche d’alimentation — Pour des appareils USB externes, il est recommandé que les
lecteurs USB ont leur propre alimentation. Si deux appareils alimentés via USB sont
connectés, au moins un doit avoir un bloc secteur complémentaire.

12
FRANÇAIS
Disque dur
1 Dévissez les quatre vis du couvercle inférieur.
2 Sortez le boîtier intérieur an de le séparer du boîtier extérieur.
3 Placez le 1er disque dur dans le boîtier; connectez les câbles d’alimentation et SATA.
4 Fixez le lecteur avec deux vis sur chaque côté.
5 Utilisez la bande adhésive incluse pour attacher le capteur de température (l noir et
blanc) au premier disque dur. Choisissez un emplacement entre les deux disquesan
que le capteur ne sera pas endommagé pendant l’installation du 2ème disque. Placez
le 2ème disque dur dans le boîtier; connectez les câbles d’alimentation et SATA.
6 Fixez le lecteur en utilisant deux vis sur chaque côté.
7 Renversez les étapes 2 et 1.
1
2
3
4
5
6
ATTeNTION!
INsTAllez prUdemmeNT,
ArêTes VIVes pOssIbles.

FRANÇAIS
13
CONNEXIONS & CONFIGURATION
Pour les détails sur la conguration, veuillez lire le manuel de l’utilisateur.
1. Installez un ou deux disques durs. NOTE: Sans installer et formater un disque dur
avant l’utilisation, les autres fonctions de l’appareil ne seront pas disponibles.
2. Connectez le câble Ethernet de votre routeur ou commutateur réseau à l’appareil.
3. Dès que tout est connecté, démarrez le NAS en appuyant sur le bouton marche-arrêt.
Cela dure environ deux minutes.
4. Sur le CD d’installation inclus, démarrez le logiciel INTELLINET_nas.exe. Si nécessaire,
veuillez lire le chapitre 3 du manuel: “System Setup / Logging In”.
5. Accédez l’interface Web de conguration via votre navigateur Web, veuillez lire le
chapitre 4 “Web Conguration” du manuel de l’utilisateur.
6. Lisez le chapitre 4.2.5: “Maintenance” dans le manuel de l’utilisateur et utilisez le logiciel
an de formater le disque dur. Si deux disques identiques sont installés, vous pouvez
aussi lire le chapitre 4.2.5.2: “RAID Setting” dans le manuel et établir votre partition
RAID.
7. Dès que le disque est formaté, lisez chapitre 4.1: “Web Conguration / Basic” dans le
manuel de l’utilisateur et suivez les instructions de l’assistant d’installation. Il vous
aide à congurer les paramètres IP, ajouter le premier utilisateur et préparer le
partage de chiers. L’après vous pouvez commencer à partager ou télécharger des
chiers. NOTE: Ajustez votre carte de réseau à la vitesse “auto”, pas “full” ou “half”.
DÉMARRER/ÉTEINDRE
An de démarrer le NAS, connectez le bloc secteur à l’appareil, puis branchez-le à une
prise de courant. Appuyez sur le bouton marche-arrêt. Le DEL bleu s’allume et l’appareil
commence à démarrer. Cela dure environ une minute jusqu’à l’appareil est connecté
et prêt à l’emploi. Pendant ce processus, le DEL clignote.
An d’éteindre le lecteur de réseau, connectez-vous via votre navigateur Web, arrêtez
tous téléchargements, accédez l’écran “Turn O Server” (cf. chapitre 4.2.3: “System”) et
éteignez le serveur ou utilisez le bouton marche-arrêt. Le DEL “OS” clignote environ 5
secondes; le système s’éteint environ 20 secondes après. NOTE: Si l’appareil n’est pas
utilisé plus longtemps, débranchez le bloc secteur de la prise de courant.
IMPORTANT: An de protéger vos chiers et empêcher la perte de vos données, nous
vous recommandons fortement de sauvegarder deux copies de vos données: une copie
sur votre NAS Gigabit SATA et une deuxième sur votre disque dur interne ou un autre
support d’enregistrement comme CD ou DVD. La perte ou détérioration de données
pendant l’emploi du NAS Gigabit SATA sont sous la seule responsabilité de l’utilisateur
et en aucune circonstance, INTELLINET NETWORK SOLUTIONS ne sera responsable pour
aucun dommage ou préjudice résultant de la perte ou détérioration de vos données.
Contenu de l’emballage
• Gigabit SATA NAS
• Bloc secteur
• Guide d’installation
rapide
• CD avec manuel de
l’utilisateur

14
POLSKI
Dziękujemy za zakup Serwera NAS Gigabit SATA INTELLINET NETWORK SOLUTIONS
™
, model
505895. Niniejsza instrukcja szybkiej instalacji przedstawia podstawowe kroki potrzebne do
uruchomienia i obsługi urządzenia. Aby uzyskać szczegółowe informacje techniczne oraz
podręcznik użytkownika zapoznaj się z zawartością dołączonej płyty CD lub odwiedź stronę
www.intellinet-network.com.
PODŁĄCZENIE
Panel Przedni
1 Włącznik — Wciśnij przycisk, aby włączyć lub
wyłączyć urządzenie. Jeśli pali się niebieska
dioda, urządzenie jest włączone. UWAGA:
Uruchamianie się urządzenie do momentu
gotowości do pracy zajmuje ok. 1 minutę.
2 Diody sygnalizacyjne — Dioda OS (systemu
operacyjnego) świeci, gdy system jest włączony/pracuje; miga, gdy system jest uruchamiany
lub wyłączany oraz pozostaje wyłączona, gdy system jest nieaktywny. Dioda HDD (aktywność)
świeci na żółto, aby wskazać błąd (nie znaleziono dysku twardego lub błąd RAID), miga
podczas dostępu do danych lub pozostaje wyłączona, gdy nie ma aktywnego dysku.
3 Przycisk backupu USB — Wciśnij i przytrzymaj przycisk przez 4 sekundy, aby wykonać kopię
zapasową plików.
4 Port USB typu A — Port do podłączenia zewnętrznego dysku USB, pamięci ash USB lub
drukarki USB.
Panel Tylni
5 Slot do zamocowania linki zabezpieczającej —
linki nie ma w zestawie.
6 Wentylator — więcej informacji znajdziesz w
instrukcji użytkownika.
7
Port Gigabit Ethernet (RJ45) — Migająca zielona
dioda po lewej stronie portu sygnalizuje
aktywność. Migająca zielona dioda po prawej
stronie portu sygnalizuje pracę z prędkością 10 Mb/s. Migające diody zielona oraz pomarańczowa
sygnalizują pracę z prędkością 100 Mb/s. Migająca tylko pomarańczowa dioda sygnalizuje pracę
z prędkością 1000 Mb/s.
8 Przycisk Reset — Gdy urządzenie jest włączone, wciśnij i zwolnij przycisk, aby dokonać
programowego restartu lub naciśnij przycisk i przytrzymaj przez co najmniej 5 sekund, aby
przywrócić urządzenie do ustawień domyślnych (spowoduje to usunięcie wszystkich kont oraz
grup użytkowników).
9 Przycisk Restart — Naciśnij i zwolnij przycisk restartu na urządzeniu. Restart zostanie
wykonany po zwolnieniu przycisku.
10 Port USB typu A — Drugi port USB również służy do podłączenie zewnętrznego dysku USB,
pamięci ash USB lub drukarki USB.
11 Gniazdo zasilania — Gniazdo do podłączenia zewnętrznego adaptera zasilania. Zaleca się, aby
zewnętrzne dyski USB podłączane do NAS-a posiadały własne zasilanie. Jeśli jednocześnie
podłączone są dwa urządzenie zasilane z linii USB, co najmniej jedno z nich musi być
zasilone z zewnętrznego zasilacza.
Serwer NAS Gigabit SATA • Instrukcja szybkiej instalacji Polski
1
2
3
4
11
5
6
7
8 9
10

POLSKI
15
Instalacja Dysku Twardego
1 Wykręć cztery śrubki znajdujące się na spodzie obudowy.
2 Wyjmij wewnętrzną kieszeń z obudowy.
3 Umieść pierwszy dysk twardy w kieszeni, podłącz kabel SATA oraz kabel zasilania dysku.
4 Za pomocą śrubek przykręć dysk twardy do kieszeni.
5 Za pomocą taśmy przytwierdź czujnik temperatury (czarno-biały przewód) do
pierwszego dysku. Dla czujnika wybierz takie miejsce między dyskami, aby go nie
uszkodzić podczas instalacji drugiej sztuki. Umieść drugi dysk w kieszeni i podłącz
kabel SATA oraz kabel zasilania dysku.
6 Za pomocą śrubek przykręć dysk twardy do kieszeni.
7 Wsuń kieszeń z dyskami do obudowy, przykręć cztery śrubki na spodzie obudowy.
1
2
3
4
5
6
UWAgA!
zACHOWAj OsTrOżNOść,
krAWędzIe mOgą być
OsTre lUb szOrsTkIe.

16
POLSKI
PODŁĄCZENIE & KONFIGURACJA
Więcej szczegółów na temat ustawień konguracyjnych znajdziesz w instrukcji
użytkownika.
1. Podłącz jeden lub dwa dyski twarde. UWAGA: Bez podłączonego oraz sformatowanego
dysku część funkcji będzie niedostępna.
2. Podłącz kabel Ethernet z routera lub przełącznika sieciowego do NAS-a.
3. Gdy wszystko jest połączone, włącz NAS-a wciskając włącznik na
panelu przednim. Pozwól, aby urządzenie się uruchomiło — zajmuje to około dwóch
minut.
4. Z załączonej płyty CD uruchom program INTELLINET_nas.exe. W razie potrzeby
skorzystaj z instrukcji użytkownika, sekcja 3: System Setup / Logging In.
5. Uzyskaj dostęp do urządzenia poprzez przeglądarkę internetową, a następnie w
instrukcji użytkownika zapoznaj się z sekcją 4: Web Conguration.
6. Zapoznaj się z sekcją 4.2.5: Maintenance w instrukcji użytkownika,
aby uzyskać informacje na temat formatowania dysku. Jeśli zastosowane są dwa takie
same dyski twarde, możliwe jest stworzenie struktury RAID. Szczegółowe informacje
znajdziesz w sekcji 4.2.5.2: RAID Setting w instrukcji użytkownika.
7. Po sformatowaniu dysku twardego, zapoznaj się z sekcją 4.1: Web Conguration /
Basic w instrukcji użytkownika, aby uzyskać informacje na temat kreatora szybkiej
konguracji. Kreator będzie pomocny przy konguracji ustawień IP, tworzenia
pierwszego użytkownika oraz udostępnionego folderu. Po wykonaniu powyższych
czynności urządzenie będzie gotowe do udostępniania i pobierania plików. UWAGA:
Ustaw szybkość karty sieciowej komputera na „auto” (nie na full lub half).
WŁĄCZANIE / WYŁĄCZANIE
Aby włączyć urządzenie, najpierw podłącz do niego zasilacz, a następnie wciśnij włącznik
na panelu przednim. Zaświeci się niebieska dioda. Urządzenie jest gotowe do pracy po
około dwóch minutach od momentu włączenia. Podczas uruchamiania systemu dioda
OS będzie migać.
Aby wyłączyć urządzenie, zaloguj się do niego, zatrzymaj wszystkie pobierane pliki,
przejdź na zakładkę „Turn O Server (sekcja 4.2.3: System w instrukcji użytkownika),
wyłącz urządzenie lub użyj włącznika na przednim panelu. Dioda OS będzie migać
przez 5 sekund, a po 20 sekundach system zostanie zatrzymany. UWAGA: Jeśli
urządzenie nie jest używane przez dłuższy, czas zaleca się zyczne odłączenie zasilania.
WAŻNE: Aby chronić swoje pliki i zapobiec utracie danych, zaleca się wykonywać kopię
zapasową plików znajdujących się na dysku w urządzeniu i przechowywać jest na
odrębnych nośnikach pamięci, takich jak zewnętrzne dyski, pamięci ash, płyty CD/DVD
itp. Producent nie będzie ponosił żadnej odpowiedzialności w przypadku uszkodzenia
lub utraty plików znajdujących się na dysku zainstalowanym w NAS-ie.
Zawartość Opakowania
• Serwer NAS Gigabit SATA
• Adapter zasilania
• Instrukcja szybkiej
instalacji
• Płyta CD z instrukcją
użytkownika

ITALIANO
17
Grazie per aver scelto il Gigabit SATA NAS INTELLINET NETWORK SOLUTIONS
™
, modello
505895. La presente guida fornisce le basi essenziali per il settaggio e il funzionamento
dell’apparecchiatura. Per istruzioni più dettagliate e maggiori speciche, far riferimento al
manuale d’istruzioni contenuto nel CD allegato al prodotto o visitare www.intellinet-
network.com.
INSTALLAZIONE
Pannello frontale
1 Alimentatore — Premere on o o; si illumina
di blu quando acceso. NOTA: Il sistema
richiede circa un minuto per mettersi in
funzione una volta che l’unità è accesa.
2 Indicatori LED di stato — Il LED dell’OS (sistema operativo) si illumina di verde quando il
sistema è acceso/pronto; lampeggia quando il sistema sta partendo o si sta chiudendo;
e rimane spento quando il sistema è stato spento. Il LED ambra dell’ HDD (attività)
lampeggia per indicare un errore (disco non trovato o un errore RAID); lampeggia per
indicare un accesso dati; e rimane spento quando non c’è attività del disco.
3 Tasto USB di backup — Mantenere premuto per 4 secondi per il salvataggio dei le.
4 Porta per periferica USB — Questa porta USB tipo A è per connessione di un disco
rigido esterno USB, una ash drive USB o per una stampante USB.
Pannello posteriore
5 Slot per lucchetto di sicurezza — Lucchetto
non incluso.
6 Ventola di rareddamento — Far riferimento
al manuale d’istruzione.
7 Porta Gigabit Ethernet — Questo jack è
caratterizzato da multipli LED. Quando si
illumina quello verde, il LED a sinistra indica
una connessione. Il LED a destra in verde ad indicare attività a 10 Mbps; sia verde che
arancio a 100 Mbps; e arancio a 1000 Mbps.
8 Tasto di reset — Quando il disco di rete è acceso e pronto, premere e rilasciare per
resettare il software; o premere ed mantenere premuto per 5 secondi prima di
rilasciare per resettare tutti i settaggi del SATA NAS agli standard di fabbrica (che
cancelleranno tutti gli user account e i gruppi).
9 Tasto di riavvio — Premere e rilasciare per un reset hardware del SATA NAS. La periferica
si riavvierà appena verrà rilasciato il pulsante.
10 Porta periferica USB — Questa seconda porta USB tipo A è anche per collegare un
disco rigido esterno USB, una ash drive USB o una stampante USB.
11 Jack di alimentazione — Per le periferiche USB, si consiglia che i dischi USB abbiano
i loro alimentatori. Se due dischi USB alimentati tramite bus sono collegati
contemporaneamente, almeno uno di questi dovrà necessariamente essere alimentato
tramite una alimentatore esterno.
Gigabit SATA NAS • Guida rapida all’installazione Italiano
1
2
3
4
11
5
6
7
8 9
10

18
ITALIANO
Disco rigido
1 Rimuovere le 4 viti dal fondo dello chassis.
2 Premere l’ alloggiamento interno per separarlo dallo chassis più esterno.
3
Collocare il primo disco rigido nell’alloggiamento; collegare i cavi SATA e l’alimentazione.
4 Bloccare il disco utilizzando le 2 viti su ciascun lato.
5 Usando il nastro fornito, attaccare la sonda termica (lo nero e bianco) al primo disco
rigido. Scegliere una posizione tra i due dischi così che la sonda non possa venir
danneggiata durante l’installazione del secondo disco. Posizionare il secondo disco
rigido nell’alloggiamento; collegare i cavi SATA e di alimentazione.
6 Fissare il disco usando le 2 viti su ciascun lato.
7 Ripetere all’inverso i passaggi 2 e 1.
1
2
3
4
5
6
CAUTelA!
mANeggIAre CON ATTeNzIONe
pOICHé AlCUNI bOrdI
pOTrebberO essere
IrregOlArI O TAglIeNTI.

ITALIANO
19
CONNESSIONI & CONFIGURAZIONE
Per ulteriori dettagli su ciascuno dei settaggi, fare riferimento al manuale d’istruzione.
1. Installare uno o due dischi rigidi. NOTA: Senza che venga prima eettuata
l’installazione e la formattazione di un disco, le altre funzioni non saranno disponibili.
2. Collegare il cavo di rete dal router o dallo switch di rete alla periferica.
3. Quando tutto è collegato, accendere il NAS collegandolo all’alimentatore. Attendere
circa due minuti per dare la possibilità all’apparecchio di avviarsi.
4. Sul CD di installazione incluso, avviare l’utility INTELLINET_nas.exe. Se necessario, far
riferimento al manuale d’istruzione Sezione 3: Settaggio del sistema / Collegamento.
5. Accedere all’interfaccia di congurazione Web tramite Web browser, quindi fare
riferimento alla Sezione 4: Congurazione Web nel manuale d’istruzione.
6. Andare alla Sezione 4.2.5: Maintenance del manuale d’istruzione e usare disk utility
per formattare il disco. Se vengono installati due dischi identici, si può anche andare
alla Sezione 4.2.5.2: Settaggio RAID nel manuale d’istruzione e creazione della vostra
disposizione RAID.
7. Appena il disco è formattato, andare alla Sezione 4.1: Web Conguration / Basic del
manuale d’istruzione e seguire le istruzioni della procedura di settaggio guidata.
Questa vi aiuterà a settare la congurazione IP, aggiungere il primo utente e
preparare la condivisione le, dopodiché sarete pronti a condividere o scaricare le.
NOTA: Settare la velocità della scheda di rete in auto e non full o half speed.
ACCENSIONE/SPEGNIMENTO
Per accendere, prima collegare l’alimentatore al NAS, quindi collegarlo alla presa di
corrente. Premere l’interruttore. Il LED blu si accenderà e l’unità inizierà la fase di avvio.
Questa richiede qualche minuto perché la periferica vada online e sia pronta. Durante
l’avvio, l’ OSLED lampeggerà.
Per spegnere, collegarsi al Web browser, terminare qualsiasi download corrente, andare
alla schermata “Spegnimento Server” (Sezione 4.2.3: Sistema), e spegnere il server o
usare l’interruttore. L’OSLED lampeggerà per circa 5 secondi; il sistema si chiuderà circa
20 secondi più tardi NOTA: Se la periferica non viene utilizzata per un lungo periodo di
tempo, scollegare l’alimentatore dalla presa di corrente.
IMPORTANTE: Per proteggere i vostri le e prevenire perdite di dati, è caldamente
raccomandato di tenere due copie dei vostri dati: una copia sul vostro Gigabit SATA NAS
e una seconda copia o sul vostro disco interno o su altri supporti di memorizzazione
come CD, DVD, nastro o su un disco esterno addizionale. Qualsiasi perdita o alterazione
dei dati durante l’utilizzo di questo Gigabit SATANAS sono da considerarsi unicamente
sotto la responsabilità dell’utente, non ci sono pertanto le condizioni per cui INTELLINET
NETWORK SOLUTIONS possa essere considerata responsabile e chiamata a risarcire o a
recuperare i dati smarriti.
Contenuto della confezione
• Gigabit SATA NAS
• Alimentatore
• Guida rapida
all’installazione
• CD con manuale
d’istruzione

20
WASTE ELECTRICAL & ELECTRONIC EQUIPMENT
Disposal of Electric and Electronic Equipment
(applicable in the European Union and other European countries with separate collection systems)
ENGLISH
This symbol on the product or its packaging indicates that this product shall not be treated as household waste.
Instead, it should be taken to an applicable collection point for the recycling of electrical and
electronic equipment. By ensuring this product is disposed of correctly, you will help prevent
potential negative consequences to the environment and human health, which could otherwise
be caused by inappropriate waste handling of this product. If your equipment contains easily
removable batteries or accumulators, dispose of these separately according to your local
requirements. The recycling of materials will help to conserve natural resources. For more
detailed information about recycling of this product, contact your local city oce, your household waste
disposal service or the shop where you purchased this product. In countries outside of the EU: If you wish
to discard this product, contact your local authorities and ask for the correct manner of disposal.
DEUTSCH
Dieses auf dem Produkt oder der Verpackung angebrachte Symbol zeigt an, dass dieses Produkt nicht mit
dem Hausmüll entsorgt werden darf. In Übereinstimmung mit der Richtlinie 2002/96/EG des Europäischen
Parlaments und des Rates über Elektro- und Elektronik-Altgeräte (WEEE) darf dieses Elektrogerät nicht
im normalen Hausmüll oder dem Gelben Sack entsorgt werden. Wenn Sie dieses Produkt entsorgen
möchten, bringen Sie es bitte zur Verkaufsstelle zurück oder zum Recycling-Sammelpunkt Ihrer Gemeinde.
ESPAÑOL
Este símbolo en el producto o su embalaje indica que el producto no debe tratarse como residuo doméstico.
De conformidad con la Directiva 2002/96/CE de la UE sobre residuos de aparatos eléctricos y electrónicos
(RAEE), este producto eléctrico no puede desecha se con el resto de residuos no clasicados. Deshágase
de este producto devolviéndolo a su punto de venta o a un punto de recolección municipal para su
reciclaje.
FRANÇAIS
Ce symbole sur Ie produit ou son emballage signie que ce produit ne doit pas être traité comme un
déchet ménager. Conformément à la Directive 2002/96/EC sur les déchets d’équipements électriques
et électroniques (DEEE), ce produit électrique ne doit en aucun cas être mis au rebut sous forme de
déchet municipal non trié. Veuillez vous débarrasser de ce produit en Ie renvoyant à son point
de vente ou au point de ramassage local dans votre municipalité, à des ns de recyclage.
ITALIANO
Questo simbolo sui prodotto o sulla relativa confezione indica che il prodotto non va trattato come un riuto
domestico. In ottemperanza alla Direttiva UE 2002/96/EC sui riuti di apparecchiature elettriche ed
elettroniche (RAEE), questa prodotto elettrico non deve essere smaltito come riuto municipale misto. Si
prega di smaltire il prodotto riportandolo al punto vendita o al punto di raccolta municipale locale per un
opportuno riciclaggio.
POLSKI
Jeśli na produkcie lub jego opakowaniu umieszczono ten symbol, wówczas w czasie utylizacji nie wolno
wyrzucać tego produktu wraz z odpadami komunalnymi. Zgodnie z Dyrektywą Nr 2002/96/WE w sprawie
zużytego sprzętu elektrycznego i elektronicznego (WEEE), niniejszego produktu elektrycznego nie wolno
usuwać jako nie posortowanego odpadu komunalnego. Prosimy o usuniecie niniejszego produktu
poprzez jego zwrot do punktu zakupu lub oddanie do miejscowego komunalnego punktu zbiórki
odpadów przeznaczonych do recyklingu.
La page charge ...
La page charge ...
La page charge ...
La page charge ...
-
 1
1
-
 2
2
-
 3
3
-
 4
4
-
 5
5
-
 6
6
-
 7
7
-
 8
8
-
 9
9
-
 10
10
-
 11
11
-
 12
12
-
 13
13
-
 14
14
-
 15
15
-
 16
16
-
 17
17
-
 18
18
-
 19
19
-
 20
20
-
 21
21
-
 22
22
-
 23
23
-
 24
24


Intellinet Gigabit SATA NAS 4 TB Quick Installation Guide
- Catégorie
- Les routeurs
- Taper
- Quick Installation Guide
- Ce manuel convient également à
dans d''autres langues
- italiano: Intellinet Gigabit SATA NAS 4 TB
- English: Intellinet Gigabit SATA NAS 4 TB
- español: Intellinet Gigabit SATA NAS 4 TB
- Deutsch: Intellinet Gigabit SATA NAS 4 TB
- polski: Intellinet Gigabit SATA NAS 4 TB