
IMPORTANT SAFETY
INSTRUCTIONS
WHEN USING AN ELECTRICAL FURNISHING, BASIC
PRECAUTIONS SHOULD ALWAYS BE FOLLOWED,
INCLUDING THE FOLLOWING:
READ ALL INSTRUCTIONS
BEFORE USING THIS
FURNISHING
DANGER – TO REDUCE THE RISK
OF ELECTRIC SHOCK: ALWAYS UNPLUG THIS
FURNISHING FROM THE ELECTRICAL OUTLET
BEFORE CLEANING.
WARNING – TO REDUCE THE RISK
OF BURNS, FIRE, ELECTRIC SHOCK OR INJURY
TO PERSONS:
1. Unplug from outlet before putting on or taking
off parts.
2. Close supervision is necessary when this
furnishing is used by or near children, or
individuals with certain disabilities.
3. Use this furnishing only for its intended use
as described in these instructions. Do not
use attachments not recommended by the
manufacturer.
4. Never operate this furnishing if it has a
damaged cord or plug, if it is not working
properly, if it has been dropped or damaged,
or dropped into water. Return the furnishing
to a service center for examination and repair.
5. Keep the cord away from heated surfaces.
6. Never drop or insert any object into any opening.
7. Do not use outdoors.
8. Do not operate where aerosol (spray) products
are being used or where oxygen is being
administered.
9. Never operate the furnishing with the air openings
blocked, keep the air openings free of lint, hair,
and the like.
10. To disconnect, turn all controls to the OFF/0
position, then remove plug from outlet.
11. Be sure mirror is not in a position where it can
reflect sunlight; reflected sunlight can cause fire.
12. Do not use on a soft surface such as a bed,
where openings may be blocked.
13. Turn switch to OFF/0 position, allow unit to cool
and unplug cord before replacing light bulbs.
14. Do not place or store this furnishing where it can
fall or be pulled into a tub or sink.
15. If this furnishing falls into water, unplug it
immediately. Do not reach into the water.
16. Never use while sleeping.
17. Do not use fluorescent tube lamp greater than
13 watts. See “REPLACING FLUORESCENT TUBE
LAMP.” Use in any 120 volt, 60 hertz AC electric
outlet (ordinary house current). Do not use it in
any other electrical outlet.
18. To protect against electrical hazards, do not use
while bathing or in the shower.
19. Unplug the furnishing from outlet before cleaning.
Do not leave furnishing unattended when it is
plugged in.
FOR HOUSEHOLD USE ONLY
SAVE THESE
INSTRUCTIONS
INSTALLATION INSTRUCTIONS
Wall Mount Mirror
1. Remove mounting bracket from base of mirror. Leave
long screws in bracket.
2. Using
3
/
8
in. size drill, drill two holes in wall the same
distance apart as two opposite slots in bracket.
Screw into wall stud if possible. If drilling into
stud, use
1
/
8
in. size drill. Otherwise, insert two wall
anchors in holes.
CAUTION: Do not drill into electrical wiring through
wall. Check with electrician if necessary.
3. Screw bracket onto wall, into the anchors.
4. Attach mirror to bracket by placing long screws
through the two holes in mirror’s base. Secure with
knurled nuts. Cord should be facing floor.
OPERATING
INSTRUCTIONS
To reduce the risk of electric shock, this mirror
has a polarized plug (one blade is wider than the
other). This plug will fit in a polarized outlet only
one way. If the plug does not fit fully in the out-
let, reverse the plug. If the plug still does not fit,
contact a qualified electrician to install the proper
outlet. Never use with an extension cord unless
plug can be fully inserted. Do not change the plug
in any way.
1. Your lighted makeup mirror will adjust to many
different angles. Simply tilt the neck or head backward
or forward to adjust to the desired angle. Your mirror
will also swivel so that you can use either the normal,
flat mirror or the magnifying mirror located on the
opposite side.
2. Plug into any standard wall outlet (120 volt AC).
Turn the rotary switch clockwise to the
ON/1 position.
3. After use, turn switch clockwise to the
OFF/0 position.
REPLACING FLUORESCENT
TUBE LAMP
CAUTION: TURN OFF POWER AND UNPLUG MIRROR.
ALLOW TO COOL AT LEAST THREE MINUTES
BEFORE REPLACING FLUORESCENT TUBE LAMP.
REPLACE TUBE LAMP ONLY WITH TUBE LAMP OF
SAME WATTAGE RATING. REMOVE TUBE LAMP
WITH CARE TO AVOID BREAKAGE.
1. This mirror uses a 13W maximum 120V type
plug-in fluorescent tube lamp. Contact a Conair
service center at 1-800-3-CONAIR for replacement
bulb. Ask for bulb RP66. Bulbs are $9.99 each.
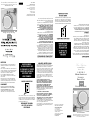
2. Remove screws form left and right sides of mirror.
(See Figure 1.)
3. Carefully lift off the removable housing from the
half that is affixed to the stand.
4. A cable tie is used to protect the fluorescent
tube lamp during transportation. To replace the
fluorescent tube lamp, you must cut the cable tie
first. While holding the socket, pull the fluorescent
tube lamp out of the socket with care to avoid
breakage. (See Figure 2.) Align the metal pins on
the fluorescent tube lamp with the holes in the
socket and push gently to secure. (See Figure 3.)
After the fluorescent tube lamp is replaced, there is
no need to replace the cable tie.
5. Carefully replace the removable half of the mirror
after locating and aligning the screw holes to the
fixed half.
6. Insert screws into screw holes and tighten.
Figure 3
Figure 2
Figure 1
CAUTION: TO PREVENT ELECTRIC SHOCK,
MATCH WIDE BLADE OF PLUG TO WIDE SLOT,
FULLY INSERT.
CAUTION: RISK OF
FIRE, USE ONLY 13 WATTS
MAXIMUM 120 VOLT; TYPE
PL FLUORESCENT TUBE
LAMP G24d-1.
CAUTION: TAKE OUT
THE FLUORESCENT TUBE
LAMP WITH CARE TO AVOID
BREAKAGE DURING LAMP
REPLACEMENT.
DISCONNECT FROM THE
SUPPLY CIRCUIT BEFORE
SERVICING OR CLEANING.
DO NOT SUBMERSE.
MODEL: BE6WMX
RATING: 120V AC 60Hz 13W
DATE CODE:
Fig. 3
Fig. 2
Fig. 1
IMPORTANTES
CONSIGNES DE
SÉCURITÉ
L’UTILISATION D’APPAREILS ÉLECTRIQUES REQUIERT
LA PRISE DE PRÉCAUTIONS ÉLÉMENTAIRES, PARMI
LESQUELLES LES SUIVANTES:
LIRE TOUTES LES
INSTRUCTIONS AVANT
D’UTILISER LE MIROIR
PELIGRO – AFIN DE RÉDUIRE LE
RISQUE DE CHOC ÉLECTRIQUE: DÉBRANCHER LE
MIROIR AVANT DE LE NETTOYER.
AVERTISSEMENT –
AFIN DE RÉDUIRE LE RISQUE DE BRÛLURES,
D’ÉLECTROCUTION, D’INCENDIE OU DE
BLESSURES:
1. Débrancher avant toute manipulation ou
entretien.
2. Il convient d’exercer une surveillance étroite
lorsque ce miroir est utilisé par, sur ou près
d’enfants ou de personnes souffrant d’un certain
handicap.
3. Utiliser aux fins indiquées dans ce manuel
uniquement. Utiliser uniquement les accessoires
recommandés par le fabricant.
4. Ne pas utiliser le miroir si le cordon
d’alimentation ou la fiche sont endommagés,
s’il ne fonctionne pas correctement, s’il est
abîmé ou après qu’il soit tombé à l’eau. Le
renvoyer à un service après-vente autorisé afin
qu’il soit inspecté et réparé.
5. Garder le cordon d’alimentation éloigné des
surfaces chaudes.
6. Ne pas introduire ou laisser tomber d’objets dans
les ouvertures.
7. Ne pas l’utiliser à l’air libre.
8. Ne pas utiliser dans des endroits où l’on
utilise des produits aérosols (spray) ou où l’on
administre de l’oxygène.
9. Ne pas obstruer les ouvertures et vérifier que
les entrées d’air ne sont pas obstruées par des
peluches, cheveux ou autres débris.
10. Toujours éteindre (OFF/O) le miroir avant de le
débrancher.
11. Ne pas exposer à la lumière directe du soleil.
Cela pourrait provoquer un incendie.
12. Ne pas placer l’appareil sur une surface molle
telle qu’un lit, où les ouvertures pourraient se
boucher.
13. Éteindre (OFF/O), débrancher et laisser refroidir le
miroir avant de changer l’ampoule.
14. Ne pas placer ou ranger le miroir dans un endroit
où il peut tomber ou être entraîné dans une
baignoire ou un lavabo.
15. Si le miroir tombe dans l’eau, le débrancher
immédiatement. Ne pas tenter de le prendre.
16. Ne pas utiliser l’appareil en dormant ou
somnolant.
17. Ne pas utiliser d’ampoule fluorescente de plus
de 13 watts. Voir la section “REMPLACEMENT
DE L’AMPOULE FLUORESCENTE.” L’appareil doit
fonctionner sur courant alternatif de 120V (60 Hz)
uniquement. Ne pas le brancher dans une prise
de courant non compatible avec les spécifications
électriques.
18. Ne pas utiliser dans le bain ou la douche.
19. Débrancher le miroir avant de le nettoyer. Ne pas
laisser le miroir sans surveillance pendant qu’il
est branché.
POUR USAGE DOMESTIQUE
UNIQUEMENT
GARDER CES
INSTRUCTIONS
NOTICE D’INSTALLATION
Miroir mural
1. Retirer la base du support de fixation murale. Laisser
les deux longs goujons en place dans le support.
2. Mesurer l’espace entre les deux trous de vis et percer
deux trous dans le mur à la même distance, si possible
dans un poteau mural. Utiliser un foret de 9.5 mm (
3
/
8
po.) pour percer une cloison, ou de 3 mm (
1
/
8
po.) pour
percer un poteau mural. Utiliser des chevilles ou des
douilles à expansion pour fixer le support à une cloison.
ATTENTION : Éviter les installations électriques.
Demander l'avis d'un électricien au besoin.
3. Visser la base du support de fixation au mur.
4. Fixer le miroir au support, en passant les longs
goujons dans les trous. Bien serrer les écrous
moletés. Le cordon devrait pendre vers le bas.
DIRECTIVES
D’UTILISATION
Cet appareil est doté d’une fiche polarisée (une
broche est plus large que l’autre). Par mesure de
sécurité, cette fiche s’insèrera dans la prise de
courant d’une seule façon. Si la fiche ne s’insère
pas bien, la renverser. Si elle ne s’insère toujours
pas, contacter un électricien. Ne pas utiliser de
rallonge, à moins de pouvoir y connecter la fiche
correctement. Ne pas modifier la fiche.
1. Orienter le miroir à l’angle désiré, en étendant/
repliant le bras et en faisant pivoter le cadre de
droite à gauche. Choisir la face désirée, normale ou
grossissante, en faisant pivoter le miroir sur lui-même.
2. Brancher le cordon dans une prise de courant alterna-
tif de 120V. Tourner l’interrupteur rotatif dans le sens
des aiguilles d’une montre jusqu’à la position ON/I.
3. Pour éteindre, tourner à nouveau l’interrupteur rotatif
dans le sens des aiguilles d’une montre jusqu’à la
position OFF/O.
REMPLACEMENT DE L'AMPOULE
FLUORESCENTE
ATTENTION : ÉTEINDRE ET DÉBRANCHER L’APPAREIL.
LAISSER REFROIDIR PENDANT AU MOINS 3 MINUTES
AVANT DE REMPLACER L’AMPOULE.
REMPLACER L’AMPOULE PAR UNE AMPOULE
IDENTIQUE, AYANT LA MÊME PUISSANCE NOMINALE.
RETIRER L’AMPOULE AVEC SOIN POUR ÉVITER
QU’ELLE NE CASSE.
1. Ce miroir utilise une ampoule fluorescente de
13W/120V (max). Pour commander des ampoules
de rechange, contacter notre service d’assistance
aux consommateurs au 1-800-3-CONAIR. Modèle:
RP66. Prix à l’unité: US$9.99.
2. Dévisser les vis se trouvant de chaque côté du
miroir (Fig. 1).
3. Soulever la partie supérieure du cadre (la partie
inférieure est fixée au bras).
4. Un collier de serrage maintient l’ampoule en place.
Pour la remplacer, vous devrez d’abord couper le
collier. Tenir la douille et retirer délicatement l’ampoule
de son support. (Fig. 2). Aligner les bornes en métal de
l’ampoule avec les orifices dans la douille et pousser
doucement pour engager l’ampoule (Fig. 3). Il n’est
pas nécessaire de réinstaller le collier de serrage.
5. Remettre la partie supérieure du cadre en place, en
alignant les trous des vis.
6. Introduire les vis dans les trous et serrer à la main.
MISE EN GARDE: AFIN DE RÉDUIRE LE
RISQUE DE CHOC ÉLECTRIQUE, INSÉRER LA FICHE
COMPLÈTEMENT DANS LA PRISE DE COURANT, LA
BROCHE LARGE DANS LA FENTE LARGE.
MISE EN GARDE:
RISQUE D’INCENDIE. UTILISER
UNE AMPOULE FLUORESCENTE
DE 13 WATTS/120V (MAX) DE
TYPE G24d-1 UNIQUEMENT.
MISE EN GARDE:
RETIRER L’AMPOULE
FLUORESCENTE AVEC SOIN
POUR ÉVITER QU’ELLE NE
CASSE.
DÉBRANCHER LE MIROIR
AVANT DE LE RÉPARER OU DE
LE NETTOYER.
NE PAS LE PLONGER DANS
L’EAU.
MODÈLE: BE6WMX
SPÉCIFICATIONS ÉLECTRIQUES:
120V AC 60Hz 13W
CODE DATE:

MAINTENANCE
Your lighted mirror is designed for household use and
is virtually maintenance-free. No lubrication is needed.
If cleaning becomes necessary, disconnect the
appliance from the power source, allow to cool and
wipe exterior with a cloth. Clean mirror surfaces with a
glass cleaner. Do not light until you are certain mirror is
completely dry, to protect against electrical hazards.
If any abnormal condition occurs, unplug the lighted
mirror, allow it to cool, and return it to an authorized
service center for repair.
Handle cord carefully to prolong its life; do not jerk
or strain at plug connections, or wrap cord around
mirror for storage. This could cause damage to the
cord and the mirror could short circuit. To store mirror,
coil cord loosely.
STORAGE
Disconnect from electrical outlet. BE SURE DIRECT
SUNLIGHT DOES NOT STRIKE MIRROR WHEN LEFT
UNATTENDED; REFLECTED SUNLIGHT CAN CAUSE
FIRE. Allow to cool to room temperature before stor-
ing. Place in cool, dry area out of reach of children,
where mirror will not be damaged.
WARNING:
IF YOU THINK
THE POWER IS
OFF WHEN THE
SWITCH IS OFF,
YOU’RE WRONG.
KEEP AWAY FROM WATER
Everybody knows that electricity and water are a dan-
gerous combination. But did you know that an electri-
cal appliance is still electrically live even if the switch
is off? If the plug is in, the power is on. So when you
are not using your appliances, keep them unplugged.
ALWAYS UNPLUG
SMALL APPLIANCES
LIMITED ONE-YEAR WARRANTY
Conair will repair or replace (at our option) your unit free
of charge for 12 months from the date of purchase if the
appliance is defective in workmanship or materials.
To obtain service under this warranty, return the defec-
tive product to the service center listed below, with your
purchase receipt and $3.00 for postage and handling.
California residents need only provide proof of purchase
and should call 1-800-3-CONAIR for shipping instructions.
In the absence of a purchase receipt, the warranty period
shall be 12 months from the date of manufacture.
ANY IMPLIED WARRANTIES, OBLIGATIONS,
OR LIABILITIES, INCLUDING BUT NOT
LIMITED TO THE IMPLIED WARRANTY OF
MERCHANTABILITY AND FITNESS FOR
A PARTICULAR PURPOSE, SHALL BE
LIMITED IN DURATION TO THE 12-MONTH
DURATION OF THIS WRITTEN, LIMITED
WARRANTY. Some states do not allow limitations on
how long an implied warranty lasts, so the above limita-
tions may not apply to you.
IN NO EVENT SHALL CONAIR BE LIABLE
FOR ANY SPECIAL, INCIDENTAL, OR
CONSEQUENTIAL DAMAGES FOR BREACH
OF THIS OR ANY OTHER WARRANTY,
EXPRESS OR IMPLIED, WHATSOEVER. Some
states do not allow the exclusion or limitation of special,
incidental, or consequential damages, so the above limi-
tation may not apply to you.
This warranty gives you specific legal rights, and you may
also have other rights, which vary from state to state.
Mo d e l B e 6 W M X
For your safety and continued enjoyment of this product,
always read the instruction book carefully before using.
MAGNIFICATION
7x /1x
BRUSHED NICKEL FINISH
ENTRETIEN
Votre miroir lumineux est à usage domestique et
demande peu d’entretien. Il n’est pas nécessaire
de le lubrifier.
Pour le nettoyer, le débrancher, le laisser refroidir et
essuyer le boîtier avec un torchon. Nettoyer la glace
à l'aide d'une nettoyant à vitres. S'assurer que le
miroir est bien sec avant de le rallumer.
En cas de problème, débrancher le miroir, le
laisser refroidir et le renvoyer à un service après-
vente autorisé.
Ne pas tirer ou plier le cordon, particulièrement
au niveau de la fiche, et ne pas l'enrouler autour
du miroir. Cela pourrait provoquer un court-circuit.
Enrouler le cordon sans serrer autour du miroir.
RANGEMENT
Débrancher l'appareil. NE PAS EXPOSER À LA
LUMIÈRE DIRECTE DU SOLEIL. CELA POURRAIT
PROVOQUER UN INCENDIE. Laisser l'appareil
refroidir avant de le ranger. Garder dans un
endroit frais et sec, hors de portée des enfants.
AVERTISSEMENT:
SI VOUS PENSEZ QUE
LE COURANT EST COUPÉ
PARCE QUE L’APPAREIL
EST ÉTEINT, VOUS
VOUS TROMPEZ.
GARDER LOIN DE L’EAU
Tout le monde sait que l’eau et l’électricité ne font
pas bon ménage, mais saviez-vous qu’un appareil est
toujours sous tension, même lorsqu’il est éteint? S’il
est branché, il est sous tension. Alors, si vous n’utilisez
pas l’appareil, débranchez-le.
DÉBRANCHEZ TOUJOURS
LES PETITS APPAREILS
ÉLECTRIQUES
GARANTIE LIMITÉE D'UN AN
Conair réparera ou remplacera (à sa discrétion) votre
appareil sans frais, si au cours des 12 mois suivant la date
d’achat, il affiche un vice de matière ou de fabrication.
Pour un service au titre de la garantie, renvoyez le produit
défectueux au service après-vente ci-dessous, accompa-
gné du reçu de caisse et d’un chèque ou mandat-carte
de US$3,00 pour couvrir les frais de port et manutention.
Les résidents de la Californie devront produire une preuve
d’achat et appeler le 1-800-3-CONAIR pour obtenir des
directives d’envoi. En l’absence du reçu de caisse, la
période de garantie sera de 12 mois à compter de la date
de fabrication.
TOUTE GARANTIE, OBLIGATION OU
RESPONSABILITÉ IMPLICITE, Y COMPRIS,
MAIS SANS Y ÊTRE LIMITÉ, LA GARANTI
IMPLICITE DE QUALITÉ MARCHANDE ET
D’APTITUDE À PRODUIRE UNE TÂCHE
PARTICULIÈRE, SERA LIMITÉE À LA
PÉRIODE DE 12 MOIS DE CETTE GARANTIE
ÉCRITE. Certains États ne permettent pas la limite de
durée d’une garantie implicite ; cette limite peut donc ne
pas s’appliquer dans votre cas.
CONAIR NE POURRA ÊTRE TENU
RESPONSABLE DE QUELQUE DOMMAGE
PARTICULIER, CONSÉCUTIF OU INDIRECT,
QUE CE SOIT POUR BRIS DE CETTE
GARANTIE OU DE TOUT AUTRE, EXPRESSE
OU IMPLICITE. Certains États ne permettent pas
l’exclusion ni la limitation des dommages particuliers,
consécutifs ou indirects ; les limites précédentes peuvent
donc ne pas s’appliquer dans votre cas.
Cette garantie vous accorde des droits particuliers et vous
pouvez également bénéficier d’autres droits qui varient
d’un État à l’autre.
Modèle Be6WMX
Afin que votre appareil vous procure en toute sécurité
beaucoup de satisfaction, lisez toujours soigneusement
les directives avant de l’utiliser.
ÉCLAIRAGE FLUORESCENT BLANC
7x /1x
GROSSISSEMENT
Luxe Suprême
ACCESSOIRES DE STYLE
Collection “Hôtel ”
MIRoIR GRoSSISSANT
lUMINeUX
doUBle FACe
FINITIoN NICKelÉe
Pour inscrire ce produit, visitez
www.conair.com/registration.
SERVICE APRÈS-VENTE
Conair Corporation
Service Department
7475 North Glen Harbor Blvd.
Glendale, AZ 85307
©2012 Conair Corporation
Modèle BE6WMX
12PM133788
IB-7469E
Please register this product at:
www.conair.com/registration.
Service Center
Conair Corporation
Service Department
7475 North Glen Harbor Blvd.
Glendale, AZ 85307
©2012 Conair Corporation
Model BE6WMX
12PM133788
IB-7469E
-
 1
1
-
 2
2


