Monogram ZV830SMSS Le manuel du propriétaire
- Catégorie
- Hottes
- Taper
- Le manuel du propriétaire
Ce manuel convient également à

OWNER’S
MANUAL
30" Chimney Vent Hood
ENGLISH/FRANÇAIS/ESPAÑOL
Monogram.com

2 49-80513-4
Consumer Information
Chimney Hood
Contents
Before
using your
chimney
hood
Introduction
Read this manual carefully. It is intended
to help you operate and maintain your new
chimney hood properly.
Keep it handy for answers to your questions.
If you don’t understand something or need
more help, there is a list of toll-free consumer
service numbers included in the back section
of this manual.
OR
Visit our Website at: Monogram.com
Your new Monogram chimney hood makes an eloquent statement of style and design. Whether
you chose it for its purity of design, assiduous attention to detail—or for both of these reasons—
you’ll find that your Monogram chimney hood’s superior blend of form and function will delight
you for years to come.
Your Monogram chimney hood was designed to be elegant, yet provide the venting performance
you need when cooking. Its sleek design can be beautifully integrated into the kitchen.
The information on the following pages will help you operate and maintain your chimney hood
properly.
Write down
the model
& serial
numbers
You’ll find them on a label on the hood.
These numbers are also on the Consumer
Product Ownership Registration Card packed
separately with your hood.
Visit Monogram.com and click on “Register
Your Appliance” to register your chimney hood.
Before sending in this card, please write
these numbers here:
Model Number
Serial Number
Use these numbers in any correspondence or
service calls concerning your hood.
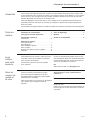
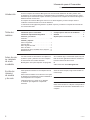
Consumer Information ................2
Safety Information ....................4
Controls and Features
Controls .............................6
Care and Cleaning
For your safety .......................7
Filter panel ........................... 7
Metal grease filter ..................... 7
Charcoal filter ........................8
Stainless steel hood surfaces ............8
Light bulbs ...........................8
Troubleshooting Tips ................. 9
Warranty ...........................11
Consumer Support ..................12

49-80513-4 3
Consumer Information
Chimney Hood
If you
received a
damaged
hood
Immediately contact the dealer (or builder)
that sold you the hood.
Save time
& money
Before you request service, check the Problem
Solver in the back of this manual.
It lists causes of minor operating problems that
you can correct yourself.
If you need
service
To obtain service, see the Consumer Services
page in the back of this manual.
We’re proud of our service and want you to be
pleased. If for some reason you are not happy
with the service you receive, here are some
steps to follow for further help.
FIRST, contact the people who serviced your
appliance. Explain why you are not pleased. In
most cases, this will solve the problem.
NEXT, if you are still not pleased, write all the
details—including your phone number—to:
Manager, Customer Relations
Monogram
Appliance Park
Louisville, KY 40225

4 49-80513-4
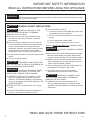
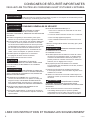
IMPORTANT SAFETY INFORMATION
READ ALL INSTRUCTIONS BEFORE USING THE APPLIANCE
READ AND SAVE THESE INSTRUCTIONS
WARNING
Read all safety instructions before using the product. Failure to follow these instructions may result
in fire, electrical shock, serious injury or death.
WARNING
GENERAL SAFETY INSTRUCTIONS
WARNING
TO REDUCE THE RISK OF FIRE,
ELECTRIC SHOCK OR INJURY TO PERSONS,
OBSERVE THE FOLLOWING:
A. Use this unit only in the manner intended by the
manufacturer. If you have questions, contact the
manufacturer.
B. Before servicing or cleaning unit, switch power off
at service panel and lock the service disconnecting
means to prevent power from being switched on
accidentally. When the service disconnecting means
cannot be locked, securely fasten a prominent
warning device, such as a tag, to the service panel.
C. Do not use this unit with any solid-state speed control
device.
D. This unit must be grounded.
CAUTION
FOR GENERAL VENTILATING USE
ONLY. DO NOT USE TO EXHAUST HAZARDOUS OR
EXPLOSIVE MATERIALS AND VAPORS.
WARNING
TO REDUCE THE RISK OF INJURY
TO PERSONS IN THE EVENT OF A RANGE TOP
GREASE FIRE, OBSERVE THE FOLLOWING*:
A. SMOTHER FLAMES with a close-fitting lid, cookie
sheet or metal tray, then turn off the burner. BE
CAREFUL TO PREVENT BURNS. If the flames do
not go out immediately, EVACUATE AND CALL THE
FIRE DEPARTMENT.
B. NEVER PICK UP A FLAMING PAN—You may be
burned.
C. DO NOT USE WATER, including wet dishcloths or
towels—a violent steam explosion will result.
D. Use an extinguisher ONLY if:
1. You know you have a Class ABC extinguisher, and
you already know how to operate it.
2. The fire is small and contained in the area where it
started.
3. The fire department is being called.
4. You can fight the fire with your back to an exit.
* Based on “Kitchen Firesafety Tips” published by NFPA.
WARNING
TO REDUCE THE RISK OF A RANGE
TOP GREASE FIRE:
A. Never leave surface units unattended at high settings.
Boilovers cause smoking and greasy spillovers that
may ignite. Heat oils slowly on low or medium settings.
B. Always turn hood ON when cooking at high heat or
when flambéing food (i.e. Crepes Suzette, Cherries
Jubilee, Peppercorn Beef Flambé).
C. Clean ventilating fans frequently. Grease should not
be allowed to accumulate on fan or filter.
D. Use proper pan size. Always use cookware
appropriate for the size of the surface element.
WARNING
TO REDUCE THE RISK OF FIRE,
ELECTRIC SHOCK OR INJURY TO PERSONS,
OBSERVE THE FOLLOWING:
A. Installation work and electrical wiring must be
done by qualified person(s) in accordance with all
applicable codes and standards, including fire-related
construction.

49-80513-4 5
IMPORTANT SAFETY INFORMATION
READ ALL INSTRUCTIONS BEFORE USING THE APPLIANCE
READ AND SAVE THESE INSTRUCTIONS
WARNING
GENERAL SAFETY INSTRUCTIONS (Cont.)
B. Sufficient air is needed for proper combustion and
exhausting of gases through the flue (chimney) of fuel
burning equipment to prevent back drafting. Follow
the heating equipment manufacturer’s guidelines
and safety standards such as those published by
the National Fire Protection Association (NFPA), and
the American Society for Heating, Refrigeration and
Air Conditioning Engineers (ASHRAE), and the local
code authorities. When applicable, install any makeup
(replacement) air system in accordance with local
building code requirements. Visit Monogram.com for
available makeup air solutions.
C. When cutting or drilling into wall or ceiling, do not
damage electrical wiring and other hidden utilities.
D. Ducted fans must always be vented to the outdoors.
WARNING
TO REDUCE THE RISK OF FIRE,
USE ONLY METAL DUCTWORK.
Ŷ'RQRWDWWHPSWWRUHSDLURUUHSODFHDQ\SDUWRI\RXU
hood unless it is specifically recommended in this
manual. All other servicing should be referred to a
qualified technician.
CAUTION
AUTOMATICALLY OPERATED
DEVICE. TO REDUCE THE RISK OF INJURY,
DISCONNECT FROM POWER SUPPLY BEFORE
SERVICING. THE UNIT IS EQUIPPED WITH AN
INTEGRAL DISCONNECTING SWITCH LOCATED
INSIDE THE BLOWER HOUSING.

6 49-80513-4
Controls and Features
Chimney Hood
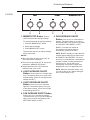
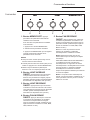
Controls
1. MEMORY/OFF Button. Press to
recall memorized fan and light settings.
To memorize desired fan and light settings:
1. Press the MEMORY/OFF button.
2. Select desired settings.
3. Press MEMORY/OFF to save.
The hood will now turn off and the settings
will be memorized.
NOTES:
Ŷ:KHQDQ\EXWWRQLVDFWLYHWXUQHGRQDOO
outer rings will be illuminated.
Ŷ7KHKRRGFDQEHWXUQHG2))DWDQ\WLPHE\
pressing the MEMORY/OFF button.
Ŷ$OZD\VGHDFWLYDWHWXUQRIIWKHEXWWRQV
when the hood is not in use.
2. LIGHT INCREASE ON/OFF
Button. Press to turn on or increase light
level. The buttons allow you to cycle to the
desired setting. (There are four light levels/
settings and OFF.)
3. LIGHT DECREASE ON/OFF
Button. Press to turn on or decrease
light level. The buttons allow you to cycle
to the desired setting. (There are four light
levels/settings and OFF.)
4. FAN INCREASE ON/OFF Button.
Press to turn on or increase fan settings.
The buttons allow you to cycle to the desired
setting. (Use to set the fan speed to LOW,
MED, HIGH, BOOST or OFF.)
5. FAN DECREASE ON/OFF
Button. Press to turn on or decrease fan
settings. The buttons allow you to cycle to
the desired setting. (Use to set the fan speed
to LOW, MED, HIGH, BOOST or OFF.)
BOOST—Provides five minutes at
the maximum fan setting and then
automatically resets fan to HIGH.
NOTE: BOOST can stay on longer than five
minutes when activated by the auto sensor.
AUTOMATIC FAN FEATURE—The hood
fan will turn on automatically or automatically
increase in speed if cooking temperatures
become too hot. The fan will turn off
automatically or decrease in speed when
temperatures cool to an appropriate level.
NOTE: When the automatic feature is on,
you can set the fan to a higher setting but
not to a lower setting or off.
FAN
LIGHT MEMORY/OFF
5 4 3 2 1

49-80513-4 7
For your
safety
Before servicing or cleaning the unit, switch
power off at the service panel and lock the
service panel to prevent power from being
switched on accidentally. If the service panel
cannot be locked, fasten a tag or prominent
warning label to the panel.
Care and Cleaning
Chimney Hood
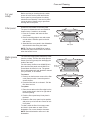
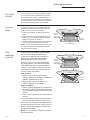
Filter panel
Metal grease
filter
Grease will accumulate on the filter panel.
The panel is dishwasher-safe and should be
cleaned every 6 months or as needed.
1. Press in to release and lower the filter
cover panel.
2. Remove the hinge barrel nuts and screws
on both sides. Shift filter panel to the left
and remove.
3. Stand the filter cover panel in the dishwasher
with the drain holes facing the bottom.
NOTE: The filter must ALWAYS be in place
and the filter panel must ALWAYS be closed
when the hood is in use.
The metal filter traps grease released by foods
from the cooktop. The filter also helps prevent
flames (from food, grease) from damaging the
inside of the hood.
For this reason, the filter must ALWAYS be in
place and the filter panel must ALWAYS be
closed when the hood is in use. The grease
filter is dishwasher-safe and should be cleaned
every 6 months, or as needed.
To remove:
1. Press up on the front two corners of the filter
cover panel to unlock. Lower the panel to
access the filter.
2. Press the filter latch in to release it. Pull the
filter down and out.
To replace:
1. Place the two tabs on the filter edge into the
lower locating slots in the left or right side of
the hood opening.
2. Push the filter up and snap it into place in
the hood.
3. Rotate the filter cover panel up into position
and press up on its front two corners to lock
it into place.
To clean, swish the filter in hot soapy water
and rinse in clean water or wash it in the
dishwasher. Do not use abrasive cleansers.
NOTE: Some discoloration will occur in the
dishwasher.
Barrel
nut (2)
Press corners
to unlock
Filter panel
Press corners
to unlock
Filter
latch

8 49-80513-4
Care and Cleaning
Chimney Hood
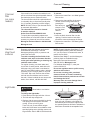
Charcoal
filter
(on some
models)
If the model is not vented to the outside, the air
will be recirculated through a disposable charcoal
filter that helps remove smoke and odors.
The charcoal filter should be replaced when it
is noticeably dirty or discolored (usually after
6 to 12 months, depending on hood usage).
NOTE: DO NOT rinse, or put charcoal filter in
an automatic dishwasher.
The charcoal filter cannot be cleaned.
It must be replaced.
Order Charcoal Filter WB02X11348.
To inquire about purchasing replacement
charcoal filters or to find the location of a dealer
nearest you, please call our toll-free number:
Monogram Preferred Service: 800.444.1845
Monogram.com
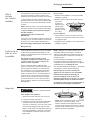
To remove:
1. Remove the metal filter—see Metal grease
filter section.
2. Remove the charcoal filter in the same
manner as the metal grease filter by
pressing the
filter latch in to
release it. Pull
the filter down
and out.
To replace:
1. Insert the black charcoal filter into the
opening. Push the latch on both sides
toward the center and engage the flange.
2. Replace the metal filter—see Metal grease
filter section.
Stainless
steel hood
surfaces
Light bulbs
Regularly polish the stainless steel exterior
with Stainless Steel Magic™ and the
Monogram polishing cloth, to preserve and
protect the fine finish.
To avoid scratching the fine finish of the
stainless steel, wipe in the same direction
as the grain when polishing or cleaning any
stainless steel surface.
For regular cleaning, use clean water and
a soft cloth. If stains persist, wash with mild
dish soap using a soft cloth or nonabrasive
pad. For more difficult stains, make a solution
consisting of 25% vinegar (white or red) and
75% water. Dip a soft cloth into the solution
and rub onto the stainless steel to remove
the stain. If these methods do not remove the
stains, dirt or debris, call 800.444.1845.
NOTE: Reapply Stainless Steel Magic™ with
the Monogram polishing cloth after cleaning
or if your unit comes in contact with water, to
protect the fine finish.
Stainless Steel Magic™ and the Monogram
polishing cloth are available through
Monogram Parts and Accessories,
800.444.1845 or Monogram.com.
For Stainless Steel Magic™, order part
number WX10X15.
Do not use appliance wax or polish on any
stainless steel surface.
Do not use scouring pads, powdered
cleaners, bleach or cleaners containing
bleach because these products can scratch
and damage the finish.
Warranty does not cover damage due to
improper cleaning methods.
CAUTION
Allow bulbs to cool before
touching.
To change the light bulbs:
1. Press and turn the light bulb face 1/4 turn.
2. The bulb will drop straight out.
3. Replace with the same size bulb by placing
bulb prongs into the keyhole slots and
turning 1/4 turn to lock in place.
These 120 volt, 50 watt, MR16 halogen
bulbs with GU10 bases are available at most
specialty lighting stores, building centers and
large retailers. Ask for MR16 GU10 base bulb.
NOTE: Do not replace with bulbs greater
than 120 volts, 50 watts, or the lights will
automatically shut off and the rings around
the operating buttons will flash to indicate the
bulbs have exceeded the acceptable limits.

49-80513-4 9
Before you
call for
service
Save time and money! Review the charts on the following pages first and you may not need to
call for service.
Troubleshooting Tips
Chimney Hood
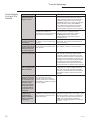
Problem Possible Causes What To Do
Fan automatically
turns on or increases
in speed and can
QRWEHWXUQHGRႇRU
lowered in speed
The hood fan will turn on automatically
or automatically increase in speed if
cooking temperatures become too hot.
7KHIDQZLOOWXUQRႇDXWRPDWLFDOO\RU
decrease in speed when temperatures
cool to an appropriate level. Fan will
also turn on automatically when the
hood electronics are too hot.
NOTE: When the automatic fan feature
is on, you can set the fan to a higher
VHWWLQJEXWQRWWRDORZHUVHWWLQJRURႇ
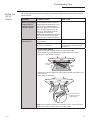
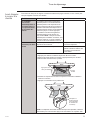
Fan does not operate
when turned on
A fuse may be blown or a circuit
breaker tripped.
Replace fuse or reset circuit breaker.
The power disconnect switch inside the
KRRGPD\EHVZLWFKHGRႇ
5HPRYHWKHPHWDOJUHDVH¿OWHUDQG
WKHFKDUFRDO¿OWHULISUHVHQWDQGÀLS
the switch on.
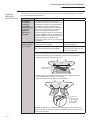
LOCATE ON/OFF SWITCH.
3UHVVLQWRUHOHDVHDQGORZHUWKH¿OWHUFRYHUSDQHODWWKHIURQW
3XVKWKH¿OWHUODWFKWRZDUGWKHRSHQLQJDQGSXOOGRZQZDUGWRUHPRYH
5HPRYHWKHFKDUFRDO¿OWHULISUHVHQW
4. Reach into the motor compartment and locate the ON/OFF switch at the front
of the opening.
5. Press switch to ON position.
NOTE: If the hood blower needs to be removed for service, use the disconnect
switch for your safety. Press the switch to the OFF position.
Filter
latch
Press corners
to unlock
Push-button switch
horizontal view from
inside opening)

10 49-80513-4
Before you
call for
service
Troubleshooting Tips
Chimney Hood
Problem Possible Causes What To Do
Fan fails to circulate
air or moves air
slower than normal
&KHFNWREHVXUHWKHPHWDOJUHDVH¿OWHUDQG
WKHFKDUFRDO¿OWHULISUHVHQWDUHFOHDQ&OHDQ
WKHPHWDOJUHDVH¿OWHUVHHWKH0HWDOJUHDVH
¿OWHUVHFWLRQDQGLIWKHKRRGLVUHFLUFXODWHG
(not vented to the outside), replace the
FKDUFRDO¿OWHUVHHWKH&KDUFRDO¿OWHU
VHFWLRQ,IFOHDQLQJDQGUHSODFLQJWKH¿OWHUV
does not correct the problem, call for service.
6XႈFLHQWPDNHXSUHSODFHPHQW
air is required for exhausting
appliances to operate to rating.
Check with local building codes, which may
require or strongly advise the use of makeup
air. Visit Monogram.com for available
makeup air solutions.
)DQNHHSVJRLQJRႇ
and on
The motor is probably
RYHUKHDWLQJDQGWXUQLQJLWVHOIRႇ
This can be harmful to the motor.
&KHFNWREHVXUHWKH¿OWHULVFOHDQDQGFKHFN
GXFWZRUNIRUEORFNDJH,IRႇDQGRQF\FOLQJ
continues, call for service.
Lights will not work
and rings around the
operating buttons
DUHÀDVKLQJ
Light(s) were replaced with
bulbs with greater than the 120
volt, 50 watt limit.
Replace with the correct type and size bulb.
See the Light bulbs section.
Light will not stay on
high setting
Use 120 volt, 50 watt, MR16 halogen bulbs
with a GU10 base and make sure they
are inserted securely. It is important to
replace with bulbs that do not exceed the
recommended wattage. Higher wattage bulbs
will cause the outer rings to blink, and the
lights will not function at the highest levels.
See the Light bulbs section.
The hood controls
are not operating
correctly
Disconnect power to the hood by turning the
FLUFXLWEUHDNHURႇRUE\UHPRYLQJWKHIXVHLQ
the home fuse box. Wait 30 seconds to allow
the hood controls to reset and then replace
the fuse or move the circuit breaker back on.
Sequential presses
of the light or fan
buttons will change
the setting from the
lowest setting to
RႇWRWKHKLJKHVW
setting, or from the
KLJKHVWVHWWLQJWRRႇ
to the lowest setting
So that you can easily set the
controls to the desired setting,
the hood is designed for the light
and fan buttons to cycle through
the settings.
This is normal
When pressing the
0HPRU\2ႇEXWWRQ
to turn on the light,
the fan comes on
instead
For your convenience, it is
normal for the lights and fan
to remember their last setting
ZKHQ\RXSUHVVWKH0HPRU\2ႇ
button.
If you want only the lights on, press the “FAN
´RUWKH³)$1±´EXWWRQWRWXUQWKHIDQRႇ
When you power the hood up next time, only
the lights will function. NOTE: You may turn
WKHIDQDQGOLJKWVRႇRURQVHSDUDWHO\XVLQJ
the “+” or “–” buttons.

49-80513-4 11
Warranty
Chimney Hood
EXCLUSION OF IMPLIED WARRANTIES
Your sole and exclusive remedy is product repair as provided in this Limited Warranty. Any implied
warranties, including the implied warranties of merchantability or fitness for a particular purpose, are
limited to one year or the shortest period allowed by law.
WHAT IS
COVERED
From the Date
of the Original
Purchase
LIMITED TWO-YEAR WARRANTY
For two years from date of original purchase, we will provide, free of charge, parts and service labor in your
home to repair or replace any part of the vent hood that fails because of a manufacturing defect.
This warranty is extended to the original purchaser and any succeeding owner for products purchased for
ordinary home use in the 48 mainland states, Hawaii, Washington, D.C. or Canada. If the product is located
in an area where service by a Monogram Authorized Servicer is not available, you may be responsible for
a trip charge or you may be required to bring the product to an Authorized Monogram Service location for
service. In Alaska the warranty is the same except that it is LIMITED because you must pay to ship the
product to the service shop or for the service technician’s travel costs to your home.
All warranty service will be provided by our Factory Service Centers or by our authorized Customer Care
®
servicers during normal working hours.
Should your appliance need service, during warranty period or beyond, in the USA call 800.444.1845. In
Canada: 888.880.3030. Please have your serial number and model number available when calling for service.
Some states do not allow the exclusion or limitation of incidental or consequential damages, so the above
limitation or exclusion may not apply to you. This warranty gives you specific legal rights, and you may also
have other rights which vary from state to state.
To know what your legal rights are in your state, consult your local or state consumer affairs office or your
state’s Attorney General.
Warrantor: GE Appliances, a Haier company
Warrantor in Canada: MC COMMERCIAL INC, Burlington, ON, L7R 5B6
WHAT IS NOT
COVERED
Ŷ Service trips to your home to teach you how to
use the product.
Ŷ Replacement of house fuses or resetting of
circuit breakers.
Ŷ Incidental or consequential damage caused by
possible defects with this appliance.
Ŷ Replacement of the replaceable filters.
Ŷ Damage to the product caused by accident,
fire, floods or acts of God.
Ŷ Damage caused after delivery.
Ŷ Failure of the product if it is used for
other than its intended purpose or used
commercially.
Ŷ,PSURSHULQVWDOODWLRQ,I\RXKDYHDQLQVWDOODWLRQ
problem, contact your dealer or installer.
You are responsible for providing adequate
electrical, gas, exhausting and other connecting
facilities as described in the Installation
Instructions provided with the product.
Ŷ3URGXFWQRWDFFHVVLEOHWRSURYLGHUHTXLUHG
service.
Ŷ,QVWDOODWLRQRUVHUYLFHIRUDPDNHXS
(replacement) air system.
YOUR MONOGRAM HOOD WARRANTY
Staple sales slip or cancelled check here. Proof of original purchase date
is needed to obtain service under warranty.

12 49-80513-4
With the purchase of your new Monogram appliance, receive the
assurance that if you ever need information or assistance from
Monogram, we will be there. All you have to do is call!
Register Your
Appliance
Register your new appliance on-line at your convenience! Timely product registration will allow for
enhanced communication and prompt service under the terms of your warranty, should the need
arise. You may also mail in the pre-printed registration card included in the packing material.
In the US: Monogram.com
In Canada: Prodsupport.mabe.ca/crm/Products/ProductRegistration.aspx
Schedule Service
Expert Monogram repair service is only one step away from your door. Get on-line and schedule
your service at your convenience any day of the year.
In the US: Monogram.com
or call 800.444.1845 during normal business hours.
In Canada: GEAppliances.ca/en/support/service-request or call 888.880.3030
Extended
Warranties
Remote
Connectivity
Parts and
Accessories
Purchase a Monogram extended warranty and learn about special discounts that are available while
your warranty is still in effect.
In the US: Monogram.com
or call 800.444.1845 during normal business hours.
In Canada: GEAppliances.ca/en/support/purchase-extended-warranty or call 888.880.3030
For assistance with wireless network connectivity (for models with remote enable),
visit our website at
Monogram.com
or call
800.444.1845
in the US only.
Individuals qualified to service their own appliances can have parts or accessories sent directly to
their homes (VISA, MasterCard and Discover cards are accepted). Order on-line today 24 hours
every day.
In the US: Monogram.com or by phone at 800.444.1845 during normal business hours.
Instructions contained in this manual cover procedures to be performed by any user. Other
servicing generally should be referred to qualified service personnel. Caution must be
exercised, since improper servicing may cause unsafe operation.
Customers in Canada should consult the yellow pages for the nearest MC Commercial service center,
visit our website at GEAppliances.ca/en/products/parts-filters-accessories or call 888.880.3030.
49-80513-4
02-18 GEA
Printed in Mexico
Consumer Support
Chimney Hood

MANUEL DU
PROPRIÉTAIRE
30" (76,2 cm) Hotte aspirante
Monogram.com

2 49-80513-4
Information de consommateur
Hotte aspirante
Table des
matières
Avant
d’utiliser
votre hotte
aspirante
Introduction
Lisez attentivement ce manuel. Il a été conçu pour
vous aider à utiliser et à entretenir correctement
votre nouvelle hotte aspirante.
Conservez-le à portée de main pour répondre
à vos questions.
Si vous ne comprenez pas quelque chose ou que
vous avez besoin d’aide, vous trouverez la liste des
numéros d’appel gratuit du service après-vente au
verso de la couverture de ce manuel.
OU
Visitez notre site web sur : Monogram.com
Votre nouvelle hotte aspirante Monogram constitue une démonstration éloquente du style et dessin. Que
vous la choisissiez pour la pureté de son design, pour l’attention soignée de ses détails—ou pour ces deux
raisons à la fois—vous vous apercevrez que la fusion supérieure de forme et de fonction de votre hotte
aspirante Monogram vous ravira pour les années à venir.
Votre hotte Monogram a été conçue dans un souci d’élégance, tout en garantissant les performances
d’aspiration dont vous avez besoin pour cuisiner. Son design aux lignes pures s’intégrera parfaitement
dans votre cuisine.
Les informations des pages suivantes vous aideront à utiliser et à entretenir correctement votre hotte aspirante.
Notez les
numéros de
modèle et
de série
Vous les trouverez sur l’étiquette de la hotte.
Ces numéros figurent également sur la carte
d’enregistrement de propriété du produit emballé
séparément avec votre hotte.
Allez sur Monogram.com et cliquez sur “Enregistrez
votre appareil” pour enregistrer votre hotte
aspirante.
Avant d’envoyer la carte, veuillez noter les
numéros ici :
Numéro de modèle
Numéro de série
Utilisez ces numéros dans toute correspondance ou
pour tout appel au service après-vente, concernant
votre hotte.
Information de consommateur ...............2
Consignes de sécurité importantes ..........4
Commandes et fonctions
Commandes ..............................6
Nettoyage et entretien
Pour votre sécurité .........................7
Panneau filtrant ............................7
Filtre métallique à graisse ....................7
Filtre à charbon ............................8
Surfaces de la hotte en acier inoxydable ........8
Ampoules. . . . . . . . . . . . . . . . . . . . . . . . . . . . . . . . .8
Trucs de dépannage .......................9
Garantie ................................11
Soutien au consommateur .................12

49-80513-4 3
Information de consommateur
Hotte aspirante
Si vous
recevez
une hotte
endommagée
Contactez immédiatement le revendeur (ou le
constructeur) qui vous a vendu la hotte.
Économisez
du temps et
de l’argent
Avant de demander l’assistance, reportez-vous
au résolveur de problème figurant au dos de ce
manuel.
Il répertorie les causes des dysfonctionnements
mineurs que vous pouvez corriger par vos propres
moyens.
En cas
de besoin
d’assistance
Pour utiliser le service, consultez la page du service
au verso de la couverture de ce manuel.
Nous sommes fiers de notre service et nous
voulons que vous en soyez satisfait. Si, pour une
quelconque raison, vous êtes mécontent du service
fourni, voici la procédure à suivre pour obtenir une
aide supplémentaire.
PREMIÈREMENT, contactez la personne qui a
réparé votre appareil. Expliquez-lui les raisons de
votre mécontentement. Dans la plupart des cas,
cela résoudra le problème.
ENSUITE, si vous êtes toujours mécontent, écrivez
tous les détails—y compris votre numéro de
téléphone—à :
Manager, Customer Relations
Monogram
Appliance Park
Louisville, KY 40225

4 49-80513-4
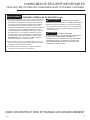
CONSIGNES DE SÉCURITÉ IMPORTANTES
VEUILLEZ LIRE TOUTES LES CONSIGNES AVANT D’UTILISER L’APPAREIL
LISEZ CES INSTRUCTIONS ET RANGEZ-LES SOIGNEUSEMENT
AVERTISSEMENT
Veuillez lire toutes les consignes avant d’utiliser ce produit. Le non-respect de ces instructions pourrait
entraîner un incendie, un choc électrique, une blessure grave voire la mort.
AVERTISSEMENT
CONSIGNES GÉNÉRALES DE SÉCURITÉ
AVERTISSEMENT
POUR RÉDUIRE LE RISQUE
D’INCENDIE, DE SECOUSSE ÉLECTRIQUE OU DE
BLESSURE CORPORELLE, OBSERVEZ LES PRÉCAUTIONS
SUIVANTES :
A. N’utilisez cet appareil que de la manière prévue par le
fabricant. Si vous avez des questions, appelez le fabricant.
B. Avant de réparer ou de nettoyer votre appareil, débranchez
le courant au niveau du panneau de service et verrouillez
les mécanismes de débranchement de service pour éviter
tout branchement accidentel au courant. Si vous ne pouvez
pas verrouiller les mécanismes de débranchement de
service, attachez soigneusement un avertissement bien
visible, comme une étiquette, au panneau de service.
C. N’utilisez jamais cet appareil avec un mécanisme
de réglage de la vitesse à semi-conducteurs.
D. Cet appareil doit être bien mis à la terre.
ATTENTION
UNIQUEMENT À USAGE DE
VENTILATION GÉNÉRALE. N’UTILISEZ JAMAIS POUR
L’ÉCHAPPEMENT DE MATIÈRES ET DE VAPEURS
EXPLOSIVES.
AVERTISSEMENT
POUR RÉDUIRE LE RISQUE DE
BLESSURE CORPORELLE SI DE LA GRAISSE PREND FEU
SUR LA SURFACE DE CUISSON DU FOUR, SUIVEZ LES
INSTRUCTIONS SUIVANTES* :
A. ÉTOUFFEZ LES FLAMMES avec un couvercle qui
convient, une tôle à biscuits ou un plateau en métal, puis
éteignez le brûleur. FAITES BIEN ATTENTION DE NE
PAS VOUS BRÛLER. Si les flammes ne s’éteignent pas
immédiatement, SORTEZ ET APPELEZ LES POMPIERS.
B. NE DÉPLACEZ JAMAIS UNE CASSEROLLE QUI
FLAMBE—Vous pouvez vous brûler.
C. N’UTILISEZ JAMAIS D’EAU, en particulier de serviette ou
de chiffon mouillé—il se produira une explosion violente de
vapeur brûlante.
D. N’UTILISEZ UN EXTINCTEUR que si :
1. Vous avez un extincteur de classe ABC et vous savez
comment l’utiliser;
2. Le feu est réduit et confiné à l’endroit où il a commencé;
3. Vous avez déjà appelé les pompiers;
4. Vous combattez les flammes en tournant le dos à une
sortie.
* Basé sur l’ouvrage intitulé «Kitchen Fire Safety Tips» publié
par la NFPA.
AVERTISSEMENT
RÉDUISEZ LE RISQUE D’UN FEU
DE GRAISSE SUR LA SURFACE
DE CUISSON DU FOUR :
A. Ne laissez jamais sans surveillance les unités de cuisson
de surface à une température élevée. Le bouillonnement
occasionne des débordements fumants et graisseux qui
peuvent prendre feu. Chauffez à feu doux les substances
huileuses, avec un réglage bas ou moyen.
B. Ne préparez pas des mets flambés sur la cuisinière.
Si vous préparez des mets flambés sous la hotte, mettez le
ventilateur en marche.
C. Nettoyez les mécanismes de ventilation fréquemment.
Il ne faut pas permettre une accumulation de graisse sur le
ventilateur ou sur le filtre.
D. Utilisez une casserole de bonne taille. Utilisez toujours un
ustensile de cuisine qui convienne au diamètre de l’élément
de cuisson.
AVERTISSEMENT
POUR RÉDUIRE LE RISQUE
D’INCENDIE, DE SECOUSSE ÉLECTRIQUE OU DE
BLESSURE CORPORELLE, OBSERVEZ LES PRÉCAUTIONS
SUIVANTES :
A. Vous devez faire exécuter tous les travaux d’installation
et de câblage électrique par une personne qualifiée,
conformément à tous les codes et les normes en vigueur,
en particulier ceux de construction relatifs aux incendies.

49-80513-4 5
CONSIGNES DE SÉCURITÉ IMPORTANTES
VEUILLEZ LIRE TOUTES LES CONSIGNES AVANT D’UTILISER L’APPAREIL
LISEZ CES INSTRUCTIONS ET RANGEZ-LES SOIGNEUSEMENT
AVERTISSEMENT
CONSIGNES GÉNÉRALES DE SÉCURITÉ (suite)
B. Vous devez assez d’air pour avoir une bonne combustion et
permettre l’évacuation des gaz par le conduit de cheminée
du matériel de combustion du carburant, afin d’éviter tout
retour d’air. Suivez les directives du fabricant de matériel
de combustion et les normes de sécurité comme celles
publiées par la National Fire Protection Association (NFPA)
et l’American Society for Heating, Refrigeration and Air
Conditioning Engineers (ASHRAE), ainsi que les modalités
des codes locaux. Le cas échéant, installez un système
de compensation d’air (remplacement) conformément aux
conditions des codes locaux du bâtiment. Visitez le site
Monogram.com pour connaître les solutions offertes en
matière de système de compensation d’air.
C. Si vous faites un trou ou une ouverture dans un mur ou un
plafond, n’endommagez pas les fils électriques et les autres
installations cachées de service public.
D. Vous devez toujours alimenter les ventilateurs dans les
conduits en air en provenance de l’extérieur.
AVERTISSEMENT
POUR RÉDUIRE LE RISQUE
D’INCENDIE, N’UTILISEZ QUE DES CONDUITS EN MÉTAL.
Ŷ1¶HVVD\H]MDPDLVGHUHPSODFHURXGHUpSDUHUXQpOpPHQW
de votre hotte si le présent manuel ne le recommande pas
expressément. Tout autre entretien doit être effectué par un
technicien qualifié.
ATTENTION
APPAREIL COMMANDÉ
AUTOMATIQUEMENT. AFIN DE RÉDUIRE LES RISQUES
DE BLESSURE, DÉBRANCHEZ L’APPAREIL DE
L’ALIMENTATION ÉLECTRIQUE AVANT DE PROCÉDER
À UNE RÉPARATION. L’APPAREIL EST ÉQUIPÉ D’UN
SECTIONNEUR INTÉGRAL SITUÉ À L’INTÉRIEUR DU
LOGEMENT DU VENTILATEUR.

6 49-80513-4
Commandes et fonctions
Hotte aspirante
Commandes
1. Bouton MEMORY/OFF. Appuyez
pour afficher les paramètres mémorisés de
ventilateur et de luminosité.
Pour mémoriser les paramètres de ventilateur
et de luminosité :
1. Appuyez sur le bouton MEMORY/OFF.
2. Sélectionnez les paramètres souhaités.
3. Appuyez sur MEMORY/OFF pour enregistrer.
La hotte va désormais s’éteindre et les
paramètres seront conservés.
NOTES:
Ŷ/RUVTX¶XQERXWRQHVWDFWLIHQFOHQFKpWRXVOHV
anneaux externes seront allumés.
Ŷ/DKRWWHSHXWrWUHPLVHVRXVWHQVLRQ2))jWRXW
instant en appuyant sur le bouton MEMORY/OFF.
Ŷ9HLOOH]jWRXMRXUVGpVDFWLYHUpWHLQGUHOHV
boutons si vous ne comptez pas utiliser la hotte.
2. Bouton LIGHT INCREASE
ON/OFF. Appuyez dessus pour enclencher
ou augmenter le niveau de luminosité. Les
boutons vous permettent de naviguer jusqu’au
paramètre souhaité. (Quatre niveaux/paramètres
de luminosité sont disponibles ainsi que OFF.)
3. Bouton LIGHT DECREASE
ON/OFF. Appuyez dessus pour enclencher
ou baisser le niveau de luminosité. Les boutons
vous permettent de naviguer jusqu’au paramètre
souhaité. (Quatre niveaux/paramètres de
luminosité sont disponibles ainsi que OFF.)
4. Bouton FAN INCREASE
ON/OFF. Appuyez dessus pour enclencher
ou augmenter les paramètres du ventilateur.
Les boutons vous permettent de naviguer
jusqu’au paramètre souhaité. (Utilisez-les pour
régler la vitesse du ventilateur sur LOW, MED,
HIGH, BOOST ou OFF.)
5. Bouton FAN DECREASE
ON/OFF. Appuyez dessus pour enclencher
ou baisser les paramètres du ventilateur. Les
boutons vous permettent de naviguer jusqu’au
paramètre souhaité. (Utilisez-les pour régler la
vitesse du ventilateur sur LOW, MED, HIGH,
BOOST ou OFF.)
BOOST—Fournit cinq minutes au niveau
maximum du ventilateur et redémarre
automatiquement le ventilateur sur HIGH.
NOTE : BOOST peut rester plus de cinq
minutes dès lors qu’il est activé par le capteur
automatique.
FONCTION VENTILATEUR AUTOMATIQUE—
Le ventilateur de la hotte s’enclenchera
automatiquement ou augmentera sa vitesse
automatiquement si les températures de cuisson
sont trop élevées. Le ventilateur s’éteindra
Automatiquement ou baissera sa vitesse
lorsque les températures baissent pour atteindre
un niveau acceptable.
NOTE : Lorsque la fonction automatique est
activée, vous pouvez régler le ventilateur sur un
niveau plus élevé mais non pas sur un niveau
inférieur ou sur OFF.
FAN
LIGHT MEMORY/OFF
5 4 3 2 1

49-80513-4 7
Nettoyage et entretien
Hotte aspirante
Pour votre
sécurité
Avant de réparer ou de nettoyer l’appareil, mettez-
le hors service à l’aide du tableau de commande
et verrouillez-le afin d’éviter que l’alimentation ne
s’enclenchement par inadvertance. Si le tableau ne
peut être verrouillé, fixez une étiquette ou étiquette
d’avertissement bien apparente sur le tableau.
Panneau
filtrant
Filtre
métallique
à graisse
La graisse s’accumulera sur le panneau filtrant. Le
panneau est lavable au lave-vaisselle et doit être
nettoyé tous les 6 ou selon les besoins.
1. Appuez pour relâcher ou abaisser le panneau
filtrant.
2. Retirez les écrous à barillets articulés et les vis
situés aux deux extrémités. Placez le panneau
filtrant sur la gauche et retirez-le.
3. Installez le panneau filtrant dans le lave-vaisselle
avec les orifices de purge situés vers le bas.
NOTE : Le filtre doit TOUJOURS être bien en place
et le panneau filtrant doit TOUJOURS être fermé
lorsque la hotte est utilisée.
Le filtre métallique attrape la graisse laissée
par les aliments de la table de cuisson.
Le filtre perme également d’éviter que les
flammes (provenant des aliments, de la
graisse) abîment l’intérieur de la hotte.
Pour cette raison, le filtre doit TOUJOURS
être bien en place et le panneau filtrant doit
TOUJOURS être fermé lorsque la hotte est
utilisée. Le filtre à graisse peut être lavé au
lave-vaisselle et il doit être nettoyé tous les
6 mois ou selon les besoins.
Pour le retirer :
1. Appuyez sur les deux coins avant du
panneau filtrant pour débloquer. Abaissez le
panneau pour accéder au filtre.
2. Appuyez sur le loquet du filtre pour le
relâcher. Rabattez et tirez le filtre.
Pour le remplacer :
1. Placez les deux languettes de l’extrémité du
filtre dans les fentes de montage inférieures
sur le côté droit ou gauche de l’ouverture de
la hotte.
2. Tirez le filtre et placez-le correctement dans
la hotte.
3. Pivotez le panneau filtrant dans sa position et
enfoncez ses deux coins avant pour le fixer.
Pour le nettoyer, trempez le filtre dans de l’eau
chaude savonneuse et rincez à l’eau froide ou
lavez-le dans le lave-vaisselle. N’utilisez pas
de nettoyants abrasifs.
NOTE : Le lave-vaisselle risque de provoquer
des décolorations.
Écrou à
baillet (2)
Appuyez
sur les
coins pour
débloquer
Panneau filtrant
Appuyez
sur les
coins pour
débloquer
Loquet
du filtre

8 49-80513-4
Nettoyage et entretien
Hotte aspirante
Filtre à
charbon
(sur certains
modèles)
Si le modèle n’est pas ventilé vers l’extérieur, l’air
sera renvoyé à travers un filtre à charbon actif
jetable qui permet d’évacuer la fumée et les odeurs.
Le filtre à charbon doit être remplacé lorsqu’il est
particulièrement sale ou décoloré (en général après
6 à 12 mois, en fonction de l’utilisation qui est faite
du filtre).
NOTE : NE rincez PAS, ou NE mettez PAS le filtre
à charbon actif dans un lave-vaisselle automatique.
Le filtre à charbon actif ne peut être nettoyé. Il
doit être remplacé.
Commander un filtre à charbon actif
WB02X11348.
Pour savoir où commander des filtres à charbon de
rechange ou pour connaître l’adresse du revendeur
le plus proche, veuillez appeler gratuitement le :
Service privilégié de Monogram : 800.444.1845
Monogram.com
Pour le retirer :
1. Retirez le filtre métallique—voir le section Filtre
métallique à graisse.
2. Retirez le filtre à charbon de la même manière
que le filtre
à graisse en
appuyant sur le
loquet du filtre
pour le relâcher.
Rabattez ou tirez
sur le filtre.
Pour le remplacer :
1. Insérez le filtre à charbon noir dans l’ouverture.
Poussez le verrou des deux côtés vers le centre
et engagez le bride.
2. Replacez le filtre métallique—voir le section Filtre
métallique à graisse.
Surfaces de la
hotte en acier
inoxydable
Ampoules
Cirez régulièrement l’extérieur en acier inoxydable
à l’aide du produit Stainless Steel Magic™ et du
chiffon de cirage Monogram afin de préserver et de
protéger la finition.
Afin d’éviter de rayer la finition en acier
inoxydable, essuyez dans le même sens que
le grain lorsque vous cirez ou nettoyez une
surface en acier inoxydable.
Pour un nettoyage régulier, utilisez de l’eau
propre et un tissu doux. Si la tâche persiste, lavez
avec du liquide de vaisselle non corrosif à l’aide
d’un chiffon doux ou d’une lingette non abrasive.
Pour les tâches les plus difficiles, élaborez une
solution composée de 25 % de vinaigre (blanc ou
rouge) et de 75 % d’eau. Plongez un tissu doux
dans la solution et grattez sur l’acier inoxydable
pour retirer la tâche. Si vous ne parvenez pas à
retirer les tâches, saletés ou les résidus, appelez
888.880.3030.
NOTE : Appliquez à nouveau le produit pour acier
inoxydable Stainless Steel Magic™ à l’aide du
chiffon de cirage Monogram après nettoyage ou si
votre appareil entre en contact avec l’eau afin de
protéger la finition.
Le produit Stainless Steel Magic™ et le chiffon
de cirage Monogram sont disponibles parmi les
composants et accessoires Monogram, en appelant
le 888.880.3030 ou sur Monogram.com.
Pour le produit Stainless Steel Magic™, commandez
en indiquant le numéro de pièce WX10X15.
N’utilisez pas de cire ou de lustrant pour
appareil sur une surface en acier inoxydable.
N’utilisez pas de lingettes de décapage, de
poussière nettoyante, d’eau de Javel ou de
nettoyants contenant de l’eau de Javel, ces produits
étant susceptibles de rayer ou d’abîmer la finition.
La garantie ne couvre pas les dommages dus à
des méthodes de nettoyage inappropriées.
ATTENTION
Laissez les ampoules refroidir
avant de les toucher.
Pour remplacer les ampoules :
1. Appuyez et pivotez l’ampoule d’un 1/4 de tour.
2. L’ampoule tombera d’elle-même.
3. Remplacez-la par une ampoule de la même taille
en plaçant les broches de l’ampoule dans les
orifices et en pivotant d’un 1/4 de tour pour la fixer.
Ces ampoules halogènes 120 volts, 50 watts,
MR16 à culots GU10 sont disponibles auprès de
boutiques spécialisées, centres de construction
et de détaillants. Demandez l’ampoule à culot
MR16 GU10.
NOTE : Ne les remplacez pas par des ampoules
supérieures à 120 volts, 50 watts, ou les
lampes s’éteindront automatiquement et les
anneaux autour des boutons de mise en marche
clignoteront afin d’indiquer que les ampoules ont
dépassé les limites acceptables.
La page charge ...
La page charge ...
La page charge ...
La page charge ...
La page charge ...
La page charge ...
La page charge ...
La page charge ...
La page charge ...
La page charge ...
La page charge ...
La page charge ...
La page charge ...
La page charge ...
La page charge ...
La page charge ...
-
 1
1
-
 2
2
-
 3
3
-
 4
4
-
 5
5
-
 6
6
-
 7
7
-
 8
8
-
 9
9
-
 10
10
-
 11
11
-
 12
12
-
 13
13
-
 14
14
-
 15
15
-
 16
16
-
 17
17
-
 18
18
-
 19
19
-
 20
20
-
 21
21
-
 22
22
-
 23
23
-
 24
24
-
 25
25
-
 26
26
-
 27
27
-
 28
28
-
 29
29
-
 30
30
-
 31
31
-
 32
32
-
 33
33
-
 34
34
-
 35
35
-
 36
36


Monogram ZV830SMSS Le manuel du propriétaire
- Catégorie
- Hottes
- Taper
- Le manuel du propriétaire
- Ce manuel convient également à
dans d''autres langues
Documents connexes
-
Monogram ZV800SJSS Le manuel du propriétaire
-
GE ZV800BJBB Le manuel du propriétaire
-
-
-
GE ZV830 Manuel utilisateur
-
 GE Monogram ZV855SPSS Le manuel du propriétaire
-
-
-
GE ZV850SPSS Manuel utilisateur
-
GE ZV36SSJSS Le manuel du propriétaire


