Yamaha DX200 Le manuel du propriétaire
- Catégorie
- Synthétiseur
- Taper
- Le manuel du propriétaire

Important Notices
The DX200 Editor is a comprehensive editing software program specially designed for
the DX200 Desktop Control Synthesizer - providing an easy, intuitive way to edit and
create your own original DX200 patterns for the DX200 Desktop Control Synthesizer.
IMPORTANT:
• Do not use any of the panel controls on an external synthesizer while editing the Patterns
with the DX200 Editor, since this may inadvertently change the settings of the DX200.
Copyright Notices
• The software and this owner's manual are the exclusive copyrights of Yamaha Corporation.
• Copying of the software or reproduction of this manual in whole or in part by any means is
expressly forbidden without the written consent of the manufacturer.
• Copying of the commercially available music sequence data and/or digital audio files is
strictly prohibited except for your personal use.
Trade Marks and Registered Trade Marks
• OMS
®
and are trademarks of Opcode Systems, Inc.
• The company names and product names in this Owner's Manual are the trademarks or regis-
tered trademarks of their respective companies.
Notices
• Yamaha makes no representations or warranties with regard to the use of the software and
documentation and cannot be held responsible for the results of the use of this manual and
the software.
• The windows and illustrations in this manual are for instructional purposes only, and may be
slightly different from the ones shown on your software.
Copyright (c) 2001 Yamaha Corporation. All rights reserved.
January, 2001
YAMAHA CORPORATION
DX200 Editor
Manual

2
About the DX200 Editor
The DX200 Editor is a full-featured editing software program for the DX200 Desktop
Control Synthesizer, providing an exceptionally simple and convenient way to edit and
control all of the parameters on the DX200 Desktop Control Synthesizer --- even provid-
ing the same control format as used on the original DX7.
DX200 Editor lets you store your edits as an original pattern and save up to 64 patterns
directly to the DX200. Naturally, you can save additional sets of 128 patterns to floppy
disks or your hard disk drive as DX200 Files. The DX200 Editor also features a conve-
nient, easy-to-use DX Librarian that lets you organize your patterns.
Generally, editing on the DX200 Editor is done from the Main window (the window that
automatically appears when you call up the Editor). However, you can also use a sec-
ond window (the DX7 Edit Panel) to edit the Patterns. This lets you perform all edits just
as if you were using an actual DX7 synthesizer.
For general instructions and explanations on how to use the DX200 Editor, see Setting
and Changing Parameter Values and Toolbar. For information on specific, commonly
used operations, see Operations.

3
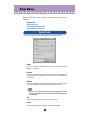
Operations
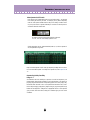
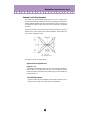
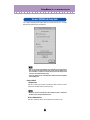
Selecting a DX200 pattern is the important first step in editing. Once you've edited a
pattern you can store it to the DX200 or save it to a floppy disk/hard disk drive with other
patterns as a DX200 File.
• Make sure to store your edits to a pattern before selecting another pattern. If you've edited
the DX200 Editor parameters and then select a different pattern, all your edited parameters
will be replaced by those of the newly selected pattern.
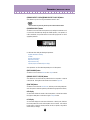
z
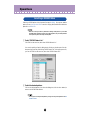
Select "DX200 Pattern List."
Click "Edit" on the menu bar, then select "DX200 Pattern List."
You can also quickly call up this dialog box by clicking any inactive part of the win-
dow pressing control key and clicking "DX200 Pattern List" in the pop-up menu. Or,
you can click "Edit" on the menu bar, then select "DX200 Pattern List."
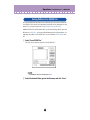
x
Select the desired pattern.
Click on the desired pattern, then close the dialog box (click the close button) to
return to the DX200 Editor window.
• You can play the currently selected pattern by clicking on the keys of the keyboard in the DX7
Simulator window.
Selecting a DX200 Pattern

4
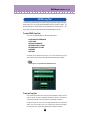
Operations /
Opening the Various Windows
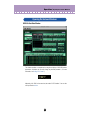
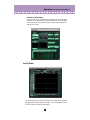
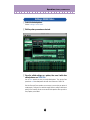
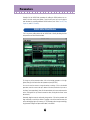
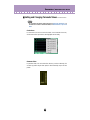
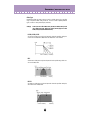
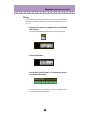
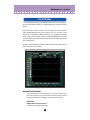
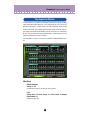
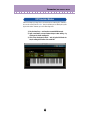
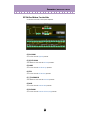
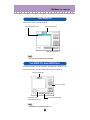
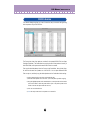
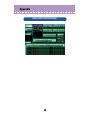
DX200 Editor Main Window
This window provides a comprehensive, at-a-glance display of all DX200 pattern
parameters, and allows you to easily change any desired parameter. (For more
information, see Editing a DX Pattern.)
Alternately, click "Edit" on the menu bar, then select "DX7 Simulator." You can also
call it up from the toolbar.
Opening the Various Windows

5
Operations /
Opening the Various Windows
• About the [<= DETAIL] button
Clicking this button lets you toggle between the full editing display (with all parameters
shown) and a smaller editing display (with a limited parameter set). The smaller display
leaves out many of the more detailed parameters, making the editing display less clut-
tered and easier to handle.
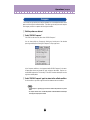
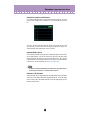
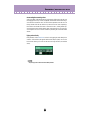
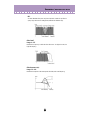
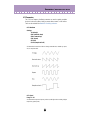
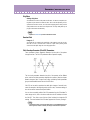
Free EG Window
This window contains the versatile Free EG function, which gives you four tracks for
recording complex real-time parameter changes. To call up the window, click the
"FREE EG" button at the top of the Main window.

6
Operations /
Opening the Various Windows
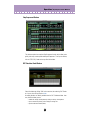
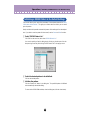
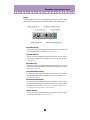
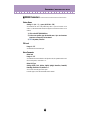
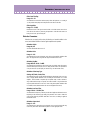
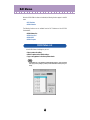
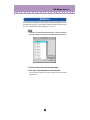
Step Sequencer Window
This window contains the convenient Step Sequencer function, which allows you to
quickly and easily create sophisticated looped Sequences. To call up the window,
click the "STEP SEQ." button at the top of the Main window.
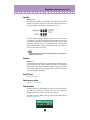
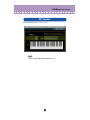
DX7 Simulator Panel Window
Select this window by clicking "Edit" on the menu bar, then selecting "DX7 Simula-
tor." You can also call it up from the toolbar.
No editing functions are directly available from the DX7 Simulator window. How-
ever, from this window you can:
• Audition the currently selected pattern by clicking on the keys of the keyboard.
• Open a DX200 File by clicking on the cartridge or cartridge slot.
• Open the Edit Panel windows (below).

7
Operations /
Opening the Various Windows
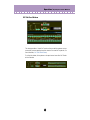
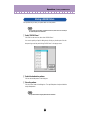
DX7 Edit Panel Window
This window provides a "virtual" DX7 panel, and lets you edit the patterns much as
you would if you were operating the panel controls of an actual DX7 keyboard. (For
more information, DX7 Edit Panel Window.)
To call up this window, click anywhere on the panel control area of the DX7 Simula-
tor Panel window.

8
Operations /
Opening the Various Windows
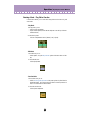
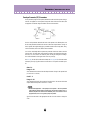
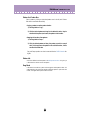
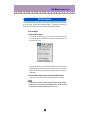
Selecting a Mode – Play, Edit or Function
In the Edit Panel window, you can select from among the three main modes: Play, Edit
and Function.
• Play Mode
In the play mode, you can:
• Select one of the 128 patterns.
• Play the selected pattern (from the DX200's keyboard or from the keys in the DX7
Simulator window).
To select the Play mode:
Click one of the [MEMORY SELECT] buttons: [1-32] or [33-64].
•Edit Mode
In the Edit mode, you can:
• Edit the pattern, using the Edit parameters (printed in lavender above each but-
ton).
To select the Edit mode:
Click the [EDIT] button.
• Function Mode
In the Function mode, you can:
• Edit the Function (global) parameters of the pattern (printed in yellow below the
appropriate buttons). These include other miscellaneous Function parameters as
well, such as Edit Recall and Pattern Initialize.
To select the Function mode:
Click the [FUNCTION] button.

9
Operations /
Editing a DX200 Pattern
z
Select the desired pattern.
Refer to Selecting a DX200 Pattern.
x
Edit the pattern parameters as desired.
c
Store the edited settings as a pattern, then save it with other
edited patterns as a DX200 File.
Use the Store operation to store your newly edited pattern. Then use the Save
operation to save that edited pattern with other User Patterns to a DX200 File.
Both the Store and Save operations are necessary to ensure that your pattern is
saved properly. Failing to do so would be roughly similar to writing a letter but not
putting it in an envelope. Make sure to execute both operations when you wish to
keep a pattern you've edited.
Editing a DX200 Pattern

10
Operations /
Compare
This function lets you switch back and forth between the current edited condition of the
pattern and its original un-edited condition. This allows you to easily hear and compare
the changes you make to a pattern with its original condition.
z
Edit the pattern as desired.
x
Select "DX200 Compare."
Click "Edit" on the menu bar, then select "DX200 Compare."
You can also quickly use Compare by clicking any inactive part of the window
pressing control key and clicking "DX Compare" in the pop-up menu.
In the Compare condition, a check appears beside "DX200 Compare" in the menu.
All parameter values are ghosted (in gray) and cannot be edited. Play the con-
nected MIDI keyboard (or click the keys in the DX7 Simulator window) to hear the
original un-edited pattern.
c
Select "DX200 Compare" again to return to the edited condition.
Do this as often as you wish to go back and forth between the two conditions.
• "DX200 Compare" is ghosted (gray) and cannot be selected if the pattern has not yet been
edited.
• The Compare function can be used with the parameter in the Main Window and with Tempo
and Swing in the Step Sequencer window.
Compare

11
Operations /
Initializing a DX200 Pattern to the Default Settings
This function allows you to reset all the parameters of the selected pattern to the factory
"initial pattern default values". This gives you a "blank slate" from which you can create
your own pattern.
Keep in mind that this operation automatically erases all the settings of the selected pat-
tern. If you wish to save the pattern for future recall, use the Store and Save functions.
z
Select "DX200 Pattern List."
Click "Edit" on the menu bar, then select "DX200 Pattern List."
You can also quickly call up this dialog box by clicking any inactive part of the win-
dow pressing control key and clicking "DX200 Pattern List" in the pop-up menu.
x
Select the desired pattern to be initialized.
Click on the desired pattern.
c
Initialize the pattern.
Click the "Pattern Init." button in the dialog box. The specified pattern is initialized
and automatically selected for editing.
To return to the DX200 Editor window, close the dialog box (click the close button).
Initializing a DX200 Pattern to the Default Settings

12
Operations /
Storing a DX200 Pattern
This operation lets you store your pattern edits as a User pattern.
• To ensure that your new pattern is available for future recall, make sure to also save the pat-
tern (with other patterns) to a DX200 File.
z
Select "DX200 Store."
Click "Edit" on the menu bar, then select "DX200 Store."
You can also quickly call up this dialog box by clicking any inactive part of the win-
dow pressing control key and clicking "DX200 Store" in the pop-up menu.
x
Select the destination pattern.
Click on the desired pattern in the dialog box.
c
Store the pattern.
Click the "Store" button in the dialog box. The specified pattern is replaced with the
newly edited pattern.
• This operation deletes the original pattern data at the destination.
Storing a DX200 Pattern

13
Operations /
Saving Patterns to a DX200 File
Once you've edited a DX200 pattern to your satisfaction you can save it to a DX200 File.
Each DX200 File can contain up to 64 patterns, and these can be called up at any time
with the Open command. (Also see Calling Up Patterns from a DX200 File.)
Additional DX200 Files of 128 patterns each can be saved to floppy disks or your hard
disk drive as DX200 Files --- giving you unlimited storage for your original patterns. For
organizing the patterns in the DX200 Files, use the convenient DX200 Librarian func-
tion.
z
Select "Save DX200 File."
Click "File" on the menu bar, then select "Save DX200 File."
• "Save DX200 File" can also be selected from the toolbar.
x
Select the desired folder, type in the file name, and click "Save."
Saving Patterns to a DX200 File

14
Operations /
Calling Up Patterns from a DX200 File (Open)
Once you've saved a set of User patterns to one or more DX200 Files (see Saving Pat-
terns), you can instantly call up the desired patterns with this command.
To create a new DX200 File, use the New DX200 File command.
z
Select "Open DX200 File."
Click "File" on the menu bar, then select "Open DX200 File."
x
Select the desired folder and file name, then click "Open."
• "Open DX200 File" can also be selected by clicking on the cartridge slot in the DX7 Simulator
window. (When a DX200 File has been opened, a cartridge is shown in the slot.)
Calling Up Patterns from a DX200 File (Open)

15
Operations /
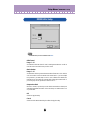
Receiving Pattern/Voice Data from a DX200/DX7 Series Instrument
This operation lets you transfer pattern data from an instrument of the DX7 Series. A
single pattern or 128 patterns can be received. (See Receive DX200 Bulk Dump Data).
z
Select "Receive DX200 Bulk Dump Data" from the Setup menu.
x
Select the desired Receive Method ("1 Voice/Pattern" or "All Pat-
terns/Voices") and Machine (DX200 or DX7 Series).
c
Click "Start." The "Start" button changes to "Stop" and the
operation is set to standby (waiting for incoming data).
v
Transmit the data from the DX200 or other instrument. (See the
owner's manual of the instrument for instructions.)
• Make sure that the MIDI connections and settings are appropriate. (This includes the "DX200
Editor Setup.")
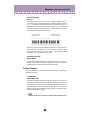
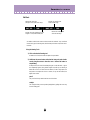
b
As soon as the DX200 Editor starts receiving data, the progress
bar moves, indicating the amount of data received. When the
bar is completely filled, the operation is complete.
To cancel the operation, click "Stop."
n
Click "OK" to exit the operation.
Receiving Pattern/Voice Data from a DX200/DX7 Series Instrument

16
Parameters
Virtually all of the DX200 Editor parameters for editing the DX200 patterns are con-
tained in the Main control panel window. From this main panel, you can also jump to
other windows for controlling additional DX200 functions (such as the Free EG, Step
Sequencer, and DX7 Simulator).
This is the primary editing window for the DX200 Editor. Virtually all editing functions
and operations are done from this window.
To change any of the parameter values, click on the desired parameter so it is high-
lighted, then type in the value from the keyboard and press [ENTER].
You can also use the mouse to change the values or settings. Click on the desired
parameter, move the cursor to the top or bottom of the box (to select the "up" arrow or
the "down" arrow, respectively), then click the mouse button to increase or decrease the
value. (Clicking with the "up" arrow increases the value; clicking with the "down" arrow
decreases it.)
Alternately, drag the mouse to continuously change values. Click on the parameter and
drag horizontally or vertically as desired. Dragging to the left or down decreases the
value, and dragging right or up increases it. The parameter value changes accordingly.
Any parameter changes are output as MIDI data, to the DX200.
DX200 Editor Main Window

17
Parameters /
DX200 Editor Main Window
• About the EG combo box and EG window
Also contained in the Main window is a special EG window, from which you can use the
mouse to "draw" envelopes for each Operator's EG, as well as the Pitch EG and Filter
EG.
To use this, click on the down arrow above the window, and select the EG you wish to
edit. Then, click on one of the box "joints" and drag it to change the EG settings. The
current relevant EG values appear at the cursor as you drag it.
• About the DX200 Copy Tool
This convenient function lets you copy the various settings (including EG) from one Oper-
ator to another Operator. Click on any inactive part of the panel in the Main window
pressing control key and select "DX Copy Tool" from the pop-up menu. Then, from the
Copy Tool window, click and drag the Operator or EG you want to copy to the destination
Operator or EG. (For more information, see [DX200 Copy Tool] dialog.)
• The Pitch EG is displayed in the DX200 Copy Tool window only for viewing the EG shape. It
cannot be copied to an Operator, nor can an Operator EG be copied to it.
• About the [<= DETAIL] button
Clicking this button lets you toggle between the full editing display (with all parameters
shown) and a smaller editing display (with a limited parameter set). The smaller display
leaves out many of the more detailed parameters, making the editing display less clut-
tered and easier to handle.

18
Parameters /
DX200 Editor Main Window
• Toolbar
The toolbar gives you quick access to some important functions and controls. These
buttons let you easily execute the desired function without having to select a menu.
Open DX200 Editor File
This is the same as the corresponding command in the File menu. It lets you select and
open an existing DX200 File. (See File Menus, Open DX200 File.)
Save DX200 Editor File
This is the same as the corresponding command in the File menu. It lets you save the
current set of User patterns as a DX200 Editor File for future recall. (See File Menus,
Save DX200 File.)
DX200 Editor Setup
This is the same as the corresponding command in the Setup menu. It lets you make
various important settings for configuring the DX200 Editor with the DX200. (See Setup
Menus, DX200 Editor Setup.)
Transmit DX200 Bulk Dump Data
This is the same as the corresponding command in the Setup menu. It lets you transmit
the current DX200 Editor settings as MIDI data to the DX200. (See Setup Menus, Trans-
mit DX200 Bulk Dump Data.)
Receive DX200 Bulk Dump Data
This is the same as the corresponding command in the Setup menu. It lets you receive
the current DX200 Editor settings as MIDI data from a DX7, DX7II or other DX-compati-
ble instrument. (See Setup Menus, Receive DX200 Bulk Dump Data. Also see Receiv-
ing Pattern/Voice Data from a DX200/DX7 Series Instrument)
Open DX7 Simulator
This is the same as the corresponding command in the Edit menu. It lets you open the
DX7 Simulator. (See Edit Menus, Open DX7 Simulator.)

19
Parameters /
DX200 Editor Main Window
■
Setting and Changing Parameter Values ...................
• The conventions described here pertain primarily to the DX200 Editor Main Window. For
information on the controls in the Edit Panel window, see Edit Panel Window / Play and Edit
Modes.
• Combo boxes
For combo boxes (such as the EG select box in Main, or Track Parameter in Free EG),
click the down arrow to expand the box, then highlight the desired setting.
• Parameter sliders
For parameter sliders, click and hold the slider, then drag as desired. Alternately, click
and hold any position along the slider path; the slider automatically snaps to the new
position.

20
Parameters /
DX200 Editor Main Window
• Incrementing/decrementing values
Values and settings in the Main window can be changed by clicking on the value box, and
then dragging the cursor up or down (or right/left), in the direction of the desired change.
To increment or decrement a value, click on the desired parameter, move the cursor to
the top or bottom of the box (to select the "up" arrow or the "down" arrow, respectively),
then click the mouse button to increase or decrease the value. (Clicking with the "up"
arrow increases the value; clicking with the "down" arrow decreases it.) The cursor keys
on the keyboard can be used to move around the parameter grid of the DX200 Editor
window.
• Typing values directly
Most parameters in the Main Window can also be set by typing the value directly in the
value box. Click on the box, then type the desired value and press [enter]. Once a value
box has been selected, you can also use the mouse to change the value (as described
above).
• The [enter] key have no effect in the Pattern Name parameter.
La page est en cours de chargement...
La page est en cours de chargement...
La page est en cours de chargement...
La page est en cours de chargement...
La page est en cours de chargement...
La page est en cours de chargement...
La page est en cours de chargement...
La page est en cours de chargement...
La page est en cours de chargement...
La page est en cours de chargement...
La page est en cours de chargement...
La page est en cours de chargement...
La page est en cours de chargement...
La page est en cours de chargement...
La page est en cours de chargement...
La page est en cours de chargement...
La page est en cours de chargement...
La page est en cours de chargement...
La page est en cours de chargement...
La page est en cours de chargement...
La page est en cours de chargement...
La page est en cours de chargement...
La page est en cours de chargement...
La page est en cours de chargement...
La page est en cours de chargement...
La page est en cours de chargement...
La page est en cours de chargement...
La page est en cours de chargement...
La page est en cours de chargement...
La page est en cours de chargement...
La page est en cours de chargement...
La page est en cours de chargement...
La page est en cours de chargement...
La page est en cours de chargement...
La page est en cours de chargement...
La page est en cours de chargement...
La page est en cours de chargement...
La page est en cours de chargement...
La page est en cours de chargement...
La page est en cours de chargement...
La page est en cours de chargement...
La page est en cours de chargement...
La page est en cours de chargement...
La page est en cours de chargement...
La page est en cours de chargement...
La page est en cours de chargement...
La page est en cours de chargement...
La page est en cours de chargement...
La page est en cours de chargement...
La page est en cours de chargement...
La page est en cours de chargement...
La page est en cours de chargement...
La page est en cours de chargement...
La page est en cours de chargement...
La page est en cours de chargement...
La page est en cours de chargement...
La page est en cours de chargement...
La page est en cours de chargement...
La page est en cours de chargement...
La page est en cours de chargement...
La page est en cours de chargement...
La page est en cours de chargement...
-
 1
1
-
 2
2
-
 3
3
-
 4
4
-
 5
5
-
 6
6
-
 7
7
-
 8
8
-
 9
9
-
 10
10
-
 11
11
-
 12
12
-
 13
13
-
 14
14
-
 15
15
-
 16
16
-
 17
17
-
 18
18
-
 19
19
-
 20
20
-
 21
21
-
 22
22
-
 23
23
-
 24
24
-
 25
25
-
 26
26
-
 27
27
-
 28
28
-
 29
29
-
 30
30
-
 31
31
-
 32
32
-
 33
33
-
 34
34
-
 35
35
-
 36
36
-
 37
37
-
 38
38
-
 39
39
-
 40
40
-
 41
41
-
 42
42
-
 43
43
-
 44
44
-
 45
45
-
 46
46
-
 47
47
-
 48
48
-
 49
49
-
 50
50
-
 51
51
-
 52
52
-
 53
53
-
 54
54
-
 55
55
-
 56
56
-
 57
57
-
 58
58
-
 59
59
-
 60
60
-
 61
61
-
 62
62
-
 63
63
-
 64
64
-
 65
65
-
 66
66
-
 67
67
-
 68
68
-
 69
69
-
 70
70
-
 71
71
-
 72
72
-
 73
73
-
 74
74
-
 75
75
-
 76
76
-
 77
77
-
 78
78
-
 79
79
-
 80
80
-
 81
81
-
 82
82


Yamaha DX200 Le manuel du propriétaire
- Catégorie
- Synthétiseur
- Taper
- Le manuel du propriétaire
dans d''autres langues
- italiano: Yamaha DX200 Manuale del proprietario
- English: Yamaha DX200 Owner's manual
- español: Yamaha DX200 El manual del propietario
- Deutsch: Yamaha DX200 Bedienungsanleitung
- русский: Yamaha DX200 Инструкция по применению
- Nederlands: Yamaha DX200 de handleiding
- português: Yamaha DX200 Manual do proprietário
- dansk: Yamaha DX200 Brugervejledning
- polski: Yamaha DX200 Instrukcja obsługi
- čeština: Yamaha DX200 Návod k obsluze
- svenska: Yamaha DX200 Bruksanvisning
- Türkçe: Yamaha DX200 El kitabı
- suomi: Yamaha DX200 Omistajan opas
- română: Yamaha DX200 Manualul proprietarului
Documents connexes
Autres documents
-
Korg opsix SE Guide de démarrage rapide
-
Kawai DX300 Le manuel du propriétaire
-
 Lamello Tanga DX200 Operating Instructions Manual
-
APPLIED ENERGY CF 20T Manuel utilisateur
-
Xpelair Premier DX200T and Installation And Operating Instructions Manual
-
Kicker DX400.4 Le manuel du propriétaire
-
Samsung VP-DX2050 Manuel utilisateur
