Waring Commercial CB15 Mode d'emploi
- Catégorie
- Mélangeurs
- Taper
- Mode d'emploi
Ce manuel convient également à

1 GALLON BLENDERS
LICUADORAS DE 4 L
MÉLANGEURS DE 4 L
120 V
For your safety and continued enjoyment of this product,
always read the instruction book carefully before using.
Para su seguridad y para disfrutar plenamente de este producto,
siempre lea cuidadosamente las instrucciones antes del uso.
Afin que cet appareil vous procure en toute sécurité beaucoup de
satisfaction, lire attentivement le mode d’emploi avant de l’utiliser.
CB15 Series

2
IMPORTANT SAFEGUARDS
When using electrical appliances, basic safety precautions
should always be taken, including the following:
1. READ ALL INSTRUCTIONS.
2. Unplug from outlet when not in use, before putting
on or taking off parts, and before cleaning.
3. To protect against electrical hazards, do not immerse
the blender base in water or other liquids.
4. Avoid coming into contact with moving parts.
5. Do not operate any appliance with a damaged cord or
plug, or after the appliance malfunctions or is dropped
or damaged in any manner. Return appliance to the
nearest authorized service facility for examination, repair
or electrical or mechanical adjustment.
6. The use of attachments, including canning jars, not
recommended by the appliance manufacturer may
cause hazards.
7. Do not use outdoors.
8. Do not let cord hang over edge of table or counter, or
touch hot surfaces.
9. Keep hands and utensils out of container while blending
to prevent the possibility of severe personal injury and/or
damage to the blender. A rubber scraper may be used,
but only when the blender is not running.
10. Blades are sharp. Handle carefully.
11. Always operate blender with cover in place.
12. When blending hot liquids, completely remove the
stopper in the cover before turning on the blender.
See Hot Blending Instructions, page 9.
13. This appliance is not intended for use by persons
(including children) with reduced physical, sensory
or mental capabilities, or lack of experience and
knowledge.

3
14. Children should be supervised to ensure that they do not
play with the appliance.
15. DO NOT use carbonated liquids in the blender jar or
any blending container. Using carbonated liquids in the
included blender jar or any other compatible blender jar
may result in injury.
16. DO NOT blend oil or oil-based products as peanut butter
for greater than 5 minutes.
17. Never remove blender jar from base unit until the blade
and coupling have stopped.
18. Spigot assembly must be handwashed only. Do not run
the spigot through the dishwasher.
19. The contents of the blender cannot reach beyond 140° F
when operating with a spigot. Note that when blending
the temperature of the contents will increase due to the
friction of the blade.
SAVE THESE INSTRUCTIONS
SPECIFICATIONS
• Capacity: 4-liter working capacity
• Rating: 120 Volts–60HZ–Single Phase AC –15.0 Amps.
(U.S. models only)
• Base: Die-cast – gray coating
• Container: Stainless steel or copolyester containter with
stainless steel blades – rubber clamp-on lid
• Bearing: High performance ball bearing
• Cord: 7 feet (2.44 m) – 3-conductor ground cord with strain
relief in base
• Overall Height: 26 inches (66 cm)
• Weight: 38 pounds (17.2 kg) net – Shipping Weight: 41
pounds (18.6 kg)
• cETLus, NSF Listed
• Operating Cycle: 3 min. ON/1 min. OFF

4
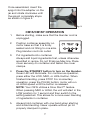
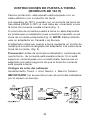
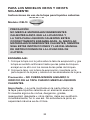
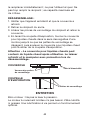
120V GROUNDING INSTRUCTIONS
For your protection, this appliance is equipped with a
3-conductor cord set.
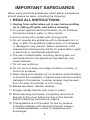
120-volt units are supplied with a molded 3-prong
grounding-type plug (NEMA 5-15P) and should be used
in combination with a properly connected grounding type
outlet, as shown in Figure 1.
If a grounding type outlet is not available, an adapter, shown
in Figure 2, may be utilized to enable a 2-slot wall outlet to
be used with a 3-prong plug. (NOTE: Use of an adapter is
not permitted in Canada and Europe.)
The adapter must be grounded by attaching its grounding
lug under the screw of the outlet cover plate. See gure 3.
Caution: Before using an adapter, it must be determined
that the outlet cover-plate screw is properly grounded. If in
doubt, consult a licensed electrician. Never use an adapter
unless you are sure it is properly grounded.
Wiring Color Codes
Green/Yellow: Earth Ground • Blue: Neutral • Brown: Live
NOTE: User-installed cord set plugs are not permitted
in Europe.

5
1
2
3
4
8
7
6
5
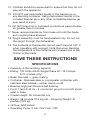
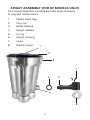
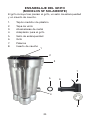
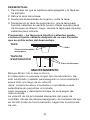
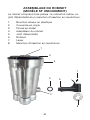
SPIGOT ASSEMBLY (FOR SF MODELS ONLY)
Your spigot assembly includes the main spigot housing,
O-ring and rubber insert.
1. Plastic Feed Cap
2. Vinyl Lid
3. Metal Clamps
4. Spigot Adapter
5. O-ring
6. Spigot housing
7. Lever
8. Rubber Insert

6
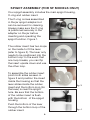
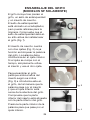
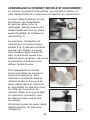
SPIGOT ASSEMBLY (FOR SF MODELS ONLY)
Your spigot assembly includes the main spigot housing,
O-ring and rubber insert.
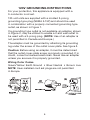
The O-ring comes assembled
in the jar spigot adapter but
can be removed for cleaning.
Always make sure the O-ring
is positioned securely in the
adapter on the jar before
inserting and operating the
spigot function. Figure 1.
The rubber insert has two loops
on the inside to t the lever
(refer to gure 2). The lever only
needs to be positioned into the
bottom loop. In the event that
one loop breaks, you can ip
the insert upside down and use
the other loop.
To assemble the rubber insert
pinch both sides as seen in
gure 3 and position the insert
inside the housing so that the
lever slides inside the rubber
insert and the bottom loop (for
the lever) is near the spigot
hole. Be sure that the bottom
of the rubber insert is ush
with the bottom of the spigot
housing.
Push the bottom of the lever
through the bottom loop of the
rubber insert.
g. 1
g. 2
g. 3
g. 4

7
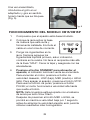
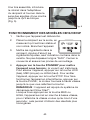
CB15/CB15P OPERATION
1. Before starting, make sure that the blender cord is
unplugged.
2. Position container assembly on
motor base so that it is rmly
seated and not tilting to one side.
Plug blender cord into outlet.
3. Put ingredients into container.
Always add liquid ingredients rst, unless otherwise
specied in recipe. Do not ll above Max line. Place
cover securely on container and fasten the cover
clamps.
4. Press the STANDBY button to turn on the blender.
Green LED will illuminate. For continuous operation,
press either the LOW, MED, or HIGH button. When
nished blending, press STOP. For momentary
operation, press the PULSE button; motor will run
on HIGH speed until the button is released.
NOTE: Your CB15 utilizes a Slow Start™ feature.
When pressing MED or HIGH, the unit will start in the
LOW position for 1 second and then switch to the
setting selected. This allows for a more even blending
of ingredients in container.
5. Always hold container with one hand when starting
and while blending. Never operate without jar lid
properly clamped in place.
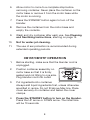
Once assembled, insert the
spigot into the adapter on the
jar and rotate clockwise until
the spigot completely stops
as shown in gure 5.
g. 5

8
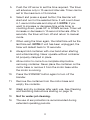
6. Allow motor to come to a complete stop before
removing container. Never place the container on the
motor base or remove it from the motor base while
the motor is running.
7. Press the STANDBY button again to turn off the
blender.
8. Remove the container from the motor base and
empty the contents.
9. Wash and dry container after each use. See Cleaning
and Sanitizing Instructions, starting on page 14.
10. Not for water-jet cleaning.
11. The use of ear protection is recommended during
extended operating periods.
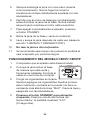
CB15T/CB15TP OPERATION
1. Before starting, make sure that the blender cord is
unplugged.
2. Position container assembly on
motor base so that it is rmly
seated and not tilting to one side.
Plug blender cord into outlet.
3. Put ingredients into container.
Always add liquid ingredients rst, unless otherwise
specied in recipe. Do not ll above Max line. Place
cover securely on container and fasten the cover
clamps.
4. Press the STANDBY button to turn on the blender.
Press the UP arrow or DOWN arrow. The initial time
will be 10 seconds.

9
5. Push the UP arrow to set the time required. The timer
will advance only in 10-second intervals. Timer can be
set to the maximum of 3 minutes.
6. Select and press a speed button; the blender will
start and run for the selected time. It will count down
in 1-second intervals and stop at 0. NOTE: If you
want to increase or decrease time while timer is
counting down, press UP or DOWN arrows. Timer will
increase or decrease in 10-second intervals. After 5
seconds, the timer will turn off and return to manual
mode.
7. When using the timer again, the initial time will be the
last time set. NOTE: If unit has been unplugged, the
timer will default back to 10 seconds.
8. Always hold container with one hand when starting
and while blending. Never operate without container
lid properly clamped in place.
9. Allow motor to come to a complete stop before
removing container. Never place the container on the
motor base or remove it from the motor base while
the motor is running.
10. Press the STANDBY button again to turn off the
blender.
11. Remove the container from the motor base and
empty the contents.
12. Wash and dry container after each use. See Cleaning
and Sanitizing Instructions starting on page 14.
13. Not for water-jet cleaning.
14. The use of ear protection is recommended during
extended operating periods.

10
CB15V/CB15VP OPERATION
1. Before starting, make sure that the blender cord is
unplugged.
2. Position container assembly
on motor base so that it is
rmly seated and not tilting
to one side. Plug blender cord
into outlet.
3. Put ingredients into container. Always add liquid
ingredients rst, unless otherwise specied in recipe.
Do not ll above Max line. Place cover securely on
container and fasten the cover clamps.
4. Press the green STANDBY button to turn on the
blender. Green LED will illuminate and remain steady.
Select the desired speed with the variable speed
control knob. Press the red START/STOP button to
begin blending. You may change the speed with the
variable speed control knob anytime during blending.
When nished blending, press START/STOP button.
For momentary operation, press the gray PULSE
button; motor will run on HIGH speed until the button
is released. The green LED will blink during operation.
5. Always hold container with one hand when starting
and while blending. Never operate without container
lid properly clamped in place.
6. Allow motor to come to a complete stop before
removing container. Never place the container on the
motor base or remove it from the motor base while
the motor is running.
7. Press the STANDBY button again to turn off the
blender.
8. Remove the container from the motor base and
empty the contents.

11
9. Wash and dry container after each use. See Cleaning
and Sanitizing Instructions starting on page 14.
10. Not for water-jet cleaning.
11. The use of ear protection is recommended during
extended operating periods.
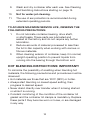
TO ACHIEVE MAXIMUM SERVICE LIFE, OBSERVE THE
FOLLOWING PRECAUTIONS:
1. Do not lubricate container bearing, drive shaft,
or shaft seals. These parts are lubricated and
sealed at the factory and do not require any further
lubrication.
2. Reduce amounts of material processed to less than
the full 4-liter capacity when working with viscous or
brous materials.
3. When cleaning exterior of container, keep it in normal,
upright operating position to prevent liquids from
running into the bearing through the bottom end.
HOT BLENDING INSTRUCTIONS: IMPORTANT!
To minimize the possibility of scalding when blending hot
materials, the following precautions and procedures must be
observed:
• Hot materials are those that are 100˚F (38˚C) or hotter.
• Always start blending on lowest speed setting, then
progress to desired speed.
• Never stand directly over blender when it is being started
or while it is running.
• Constant monitoring of the condition of the container lid
gasket and the container lid clamps is mandatory. Replace
these parts if they become worn or loose, or are damaged
in any way.

12
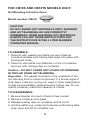
FOR CB15S AND CB15TS MODELS ONLY:
Hot Blending Lid Instructions
Model number: CBL10
CAUTION
DO NOT BLEND HOT MATERIALS UNTIL BLENDER
AND HOT BLENDING LID ARE CORRECTLY
ASSEMBLED. WHEN BLENDING HOT MATERIALS
ALWAYS FOLLOW THESE INSTRUCTIONS AND
THE INSTRUCTIONS IN THE 4 LITER BLENDER
OPERATING MANUAL.
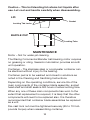
TO ASSEMBLE:
1. Place lid with gasket over bafe cup and rotate lid
counterclockwise until locking tabs snap into place with
locking tab locks.
2. Place lid, with bafe cup attached, on top of container
and lock with locking clips on container.
Caution – DO NOT COVER ANY HOLES OR OPENINGS
IN THIS LID WHEN HOT BLENDING.
Important – The gasket mounted on the underside of the
hot blending lid is a critical component. If it shows signs of
cuts, tears, cracking, drying out, wear or other deterioration,
it must be immediately replaced before further use. Do not
overll container; maximum capacity is 4 liters.
TO DISASSEMBLE:
1. Be sure blender is turned off and lid has cooled.
2. Remove container from base.
3. Release locking clips on container and lift lid off.
4. Holding bafe cup, rotate lid clockwise until locking tabs
snap open and lift lid off bafe cup.

13
Caution – This hot blending lid retains hot liquids after
use. Let cool and handle carefully when disassembling.
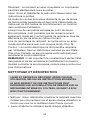
MAINTENANCE
Motor – Not for water-jet cleaning.
The Waring Commercial Blender ball-bearing motor requires
no greasing or oiling. Sealed-in lubrication provides smooth
unit operation.
Container – The stainless steel or copolyester container can
be sterilized without injury to the bearing.
Container pad is to be washed and rinsed in solutions as
noted in the Cleaning and Sanitizing Instructions.
Depending on the operating conditions, service life of the
main components of the container blade assembly, socket
head shaft and shaft seals is 500 hours of actual running time.
When any one of these main components has worn to the
extent that replacement is required, it is likely that the other
components will need to be replaced also. It is therefore
recommended that container blade assemblies be replaced
as a unit.
Die-cast lock nut must be tightened securely (65 to 70 foot-
pounds torque) when reassembling container.
LID
Gasket
Locking Tabs
BAFFLE CUP
Locking Tab Locks

14
Power Supply Cord – The power supply cord should not be
replaced by the end user. The power supply cord should be
replaced only by the manufacturer’s authorized importer
(or, in the United States and Canada, by an authorized
service center).
NOTE: All parts require constant monitoring for conditions
requiring replacement. For assistance, contact your nearest
service center.
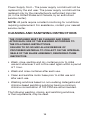
CLEANING AND SANITIZING INSTRUCTIONS
THE CONTAINER MUST BE CLEANED AND DRIED
AFTER EACH USE OF THE BLENDER ACCORDING TO
THE FOLLOWING INSTRUCTIONS.
FAILURE TO DO SO MAY ALLOW RESIDUE OF
PROCESSED MATERIAL TO COLLECT ON THE INTERNAL
SEALS OF THE BLADE ASSEMBLY, RENDERING THEM
INEFFECTIVE.
• Wash, rinse, sanitize and dry container prior to initial
use and whenever it will not be used again within a period
of 1 hour.
• Wash and rinse container after each use.
• Clean and sanitize motor base prior to initial use and
after each use.
• Washing solutions based on non-sudsing detergents and
chlorine-based sanitizing solutions having a minimum
chlorine concentration of 100 PPM are recommended.
The following washing, rinsing, and sanitizing solutions,
or their equivalents, may be used.

15
• In repetitive batch-processing applications, frequent
cleaning of the container will prolong the life of the blade
assembly. In no case should actual running time between
cleanings exceed one-half hour.
• Do not use container to store processed foods or
beverages.
TO WASH AND RINSE CONTAINER
1. REMOVE CONTAINER FROM MOTOR BASE.
Remove lid. Rinse container interior and lid under
running water. Add washing solution to container.
Scrub and ush out the container interior and lid to
dislodge and remove as much food residue as
possible. Empty container.
2. Wipe down exterior of container with a soft cloth or
sponge dampened with washing solution. Wash lid
and lid insert in fresh washing solution. Fill container
one-quarter full with fresh washing solution, cover
(with lid only), place on motor base and run on HI
speed for two (2) minutes. Empty container.
3. Repeat step 2 using clean rinse water in place of
washing solution.
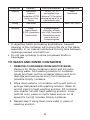
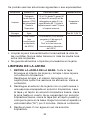
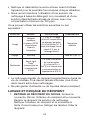
SOLUTION PRODUCT DILUTION IN WATER TEMPERATURE
Washing International
Products
Corporation LF2100
Liquid Low-Foam
Cleaner
1%–2%: 1¼ – 2¾
ounce/gallon (lower
dilution of 1% for normal
cleaning and up to 2% for
more stubborn soils)
Room
Temperature
Rinsing Plain Water Warm – 95˚F (35˚C)
Sanitizing Clorox®
Regular Bleach
(8.25% Hypochlorite
Concentration)
2 teaspoons/gallon
(Alternately, a bleach
with 5.25% Hypochlorite
Concentration can be
used at dilution of
3 teaspoons/gallon)

16
IMPORTANT
NOTE: IN ORDER TO MINIMIZE POSSIBILITY OF SCALDING,
TEMPERATURE OF WASHING SOLUTION AND RINSE WATER
MUST NOT EXCEED 115˚F (46˚C), AND QUANTITY USED MUST
NOT EXCEED ONE-QUARTER CONTAINER FULL.
TO SANITIZE AND DRY CONTAINER
1. Wipe down exterior of container with a soft cloth or
sponge dampened with sanitizing solution.
2. Fill container with sanitizing solution, cover, place on
motor base, and run on HI speed for one (1) minute.
Empty container. Dislodge any residual moisture from
blade assembly by placing empty container on motor
base and running on HI speed for two (2) seconds.
3. Sanitize lid and lid insert by immersing in sanitizing
solution for two (2) minutes.
4. Do not rinse container, lid, or lid insert after sanitizing
is completed. Allow parts to air-dry.
TO CLEAN AND SANITIZE MOTOR BASE
1. UNPLUG POWER CORD. Wipe down exterior surfaces
of motor base with a soft cloth or sponge dampened
with washing solution, rinse water, and sanitizing
solution. Prevent liquid from running into motor base by
wringing all excess moisture from the cloth or sponge
before using it.
DO NOT IMMERSE MOTOR BASE IN WASHING
SOLUTION, RINSE WATER OR SANITIZING SOLUTION.
2. Allow motor base to air-dry before using.
FOR LABORATORY AND INDUSTRIAL APPLICATIONS
For laboratory and industrial applications, a cleaning/rinsing/
sanitizing/drying schedule similar to that given above for
foodservice applications should be followed, except that
the cleaning, rinsing and sanitizing media used must be
modied as required to be consistent with the materials
being processed.

17
For some applications involving the processing of aqueous
mixtures, a water-soluble cleaner, a water rinse, and a
water-soluble sanitizer may be adequate. In general,
however, suitable cleaning, rinsing, and sanitizing media
will have to be determined empirically, particularly for those
applications involving non-aqueous systems materials not
readily soluble in water.
In order to be effective, the cleaning solution used must
be capable of breaking up any residues left in the container
after use, either by dissolving them, emulsifying them,
reacting chemically with them, or by some other mechanism.
In order to allow complete removal of the mixture of
broken-up residue and cleaning solution, this mixture must,
in turn, be either soluble in the rinse medium, or easily
suspended by it.
In applications where sanitization of the container is required
after cleaning, the sanitizing solution must mix compatibly
with any trace liquid that remains after rinsing.
IF YOUR APPLICATION INVOLVES THE PROCESSING
OF BIOLOGICALLY ACTIVE MATERIALS, AND SHOULD
SERVICE ON YOUR UNIT EVER BE NEEDED, WE
REQUEST THAT ANY PARTS OR ASSEMBLIES BEING
RETURNED BE STERILIZED BY AUTOCLAVING BEFORE
BEING SHIPPED. IN ADDITION, ALL SUCH PARTS
MUST BE CLEARLY IDENTIFIED AS HAVING BEEN
AUTOCLAVED BOTH BY A TAG OR LABEL ON THE PART
ITSELF, AND BY A STATEMENT IN THE ACCOMPANYING
CORRESPONDENCE.
THE DISTRIBUTOR WILL NOT ACCEPT DELIVERY OF
SUCH PARTS UNLESS THEY ARE SO IDENTIFIED.

18
LIMITED THREE-YEAR MOTOR WARRANTY
LIMITED TWO-YEAR WARRANTY
Waring warrants every new Waring® Commercial Blender
to be free from defects in material and workmanship for a
period of two years from the date of purchase when used
with foodstuffs, nonabrasive liquids (other than detergents)
and nonabrasive semiliquids, providing it has not been
subject to loads in excess of the indicated rating. In addition,
the motor in this appliance has a full three-year warranty.
Under this warranty, Waring, during the warranty period,
will repair or replace any part that, upon our examination, is
defective in materials or workmanship, provided the product
is delivered prepaid to the Waring Service Center at:
314 Ella T. Grasso Ave., Torrington, CT 06790, or any
Factory Approved Service Center. This warranty does not:
a) apply to any product that has become worn, defective,
damaged or broken due to misuse or due to repairs or
servicing by other than the Waring Service Center or a
Factory Approved Service Center, or due to abuse,misuse,
overloading or tampering; or b) cover incidental or
consequential damages of any kind.
The two-year warranty is applicable only to appliances
used in the United States or Canada; this supersedes all
other express product warranty or warranty statements.
For Waring products sold outside of the U.S. and Canada,
the warranty is the responsibility of the local importer
or distributor. This warranty may vary according to local
regulations.
Warning: This warranty is void if appliance is used on
Direct Current (DC).

19
SERVICE
Should service on this product in the USA or Canada be
required at any time, call or write to:
Waring Service Center
314 Ella T. Grasso Ave.
Torrington, CT 06790
Tel. 800-492-7464 • Fax 860-496-9017
or nearest Authorized Service Center.
Replacement parts for Waring out-of-warranty repairs are
obtainable at the above address.
NOTE: If your application involves the processing of
biologically active materials, any items returned for service
must be sterilized before being shipped. Such items must
be clearly identied as having been sterilized, both by a tag
on the item itself and by a statement in the accompanying
correspondence. Waring will not accept delivery of any
returns unless they are so identied.

20
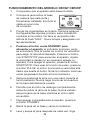
MEDIDAS DE SEGURIDAD
IMPORTANTES
Al usar aparatos eléctricos, siempre se deben tomar
precauciones básicas de seguridad, entre ellas las
siguientes:
1. LEA TODAS LAS INSTRUCCIONES.
2. Desenchufe el aparato cuando no esté en uso, antes
de instalar/sacar piezas y antes de limpiarlo.
3. Para evitar los riesgos eléctricos, no sumerja el aparato
en agua ni en ningún otro líquido.
4. Evite el contacto con las piezas móviles.
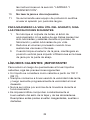
5. No use este aparato si el cable o el enchufe están
dañados, después de un mal funcionamiento, después
de que se haya caído, o si está dañado; devuélvalo
a un centro de servicio autorizado para su revisión,
reparación o ajuste.
6. El uso de accesorios/aditamentos no recomendados por
el fabricante, incluso frascos para conservas, presenta
un peligro.
7. No lo use en exteriores.
8. No permita que el cable cuelgue del borde de la
encimera o de la mesa, ni que tenga contacto con
superficies calientes.
9. Para reducir el riesgo de lesiones personales graves o
de daño al aparato, mantenga las manos y los utensilios
fuera de la jarra durante el funcionamiento. Se puede
usar una espátula de goma, siempre que el aparato esté
apagado.
10. Las cuchillas son muy afiladas; manipúlela con cuidado.
11. No encienda el aparato a menos que la tapa esté
puesta.
La page charge ...
La page charge ...
La page charge ...
La page charge ...
La page charge ...
La page charge ...
La page charge ...
La page charge ...
La page charge ...
La page charge ...
La page charge ...
La page charge ...
La page charge ...
La page charge ...
La page charge ...
La page charge ...
La page charge ...
La page charge ...
La page charge ...
La page charge ...
La page charge ...
La page charge ...
La page charge ...
La page charge ...
La page charge ...
La page charge ...
La page charge ...
La page charge ...
La page charge ...
La page charge ...
La page charge ...
La page charge ...
La page charge ...
La page charge ...
La page charge ...
La page charge ...
-
 1
1
-
 2
2
-
 3
3
-
 4
4
-
 5
5
-
 6
6
-
 7
7
-
 8
8
-
 9
9
-
 10
10
-
 11
11
-
 12
12
-
 13
13
-
 14
14
-
 15
15
-
 16
16
-
 17
17
-
 18
18
-
 19
19
-
 20
20
-
 21
21
-
 22
22
-
 23
23
-
 24
24
-
 25
25
-
 26
26
-
 27
27
-
 28
28
-
 29
29
-
 30
30
-
 31
31
-
 32
32
-
 33
33
-
 34
34
-
 35
35
-
 36
36
-
 37
37
-
 38
38
-
 39
39
-
 40
40
-
 41
41
-
 42
42
-
 43
43
-
 44
44
-
 45
45
-
 46
46
-
 47
47
-
 48
48
-
 49
49
-
 50
50
-
 51
51
-
 52
52
-
 53
53
-
 54
54
-
 55
55
-
 56
56


Waring Commercial CB15 Mode d'emploi
- Catégorie
- Mélangeurs
- Taper
- Mode d'emploi
- Ce manuel convient également à