Place the pads on the SSD Pads auf der SSD platzieren Placer les pastilles sur le SSD
Mounting the SSD & cooler Montage der SSD und des Kühlers Montage du SSD et du refroidisseur
EN DE FR
EN DE FR
EN DE FR
If the SSD has memory chips on both sides, use the 1
mm thermal pad on the top and the 0.5 mm pad on the
bottom side of the SSD. If the memory chips are only on
the top side, use the 1 mm thermal pad on the top and 1
mm + 0.5 mm pad on the bottom side of the SSD.
Wenn die SSD auf beiden Seiten mit Speicherchips
bestückt ist, verwenden Sie das 1 mm-Wärmeleitpad
auf der Oberseite und das 0,5 mm-Pad auf der
Unterseite der SSD. Wenn die Speicherchips nur auf
der Oberseite vorhanden sind, verwenden Sie das 1
mm Wärmeleitpad auf der Oberseite und das 1 mm +
0,5 mm Pad auf der Unterseite der SSD.
Si le SSD est équipé de puces de mémoire des deux
côtés, utilisez le pad thermique de 1 mm sur le dessus
et le pad de 0,5 mm sur le dessous du SSD. Si les puces
mémoire ne sont présentes que sur la face supérieure,
utilisez le pad thermique de 1 mm sur la face
supérieure et le pad de 1 mm + 0,5 mm sur la face
inférieure du SSD.
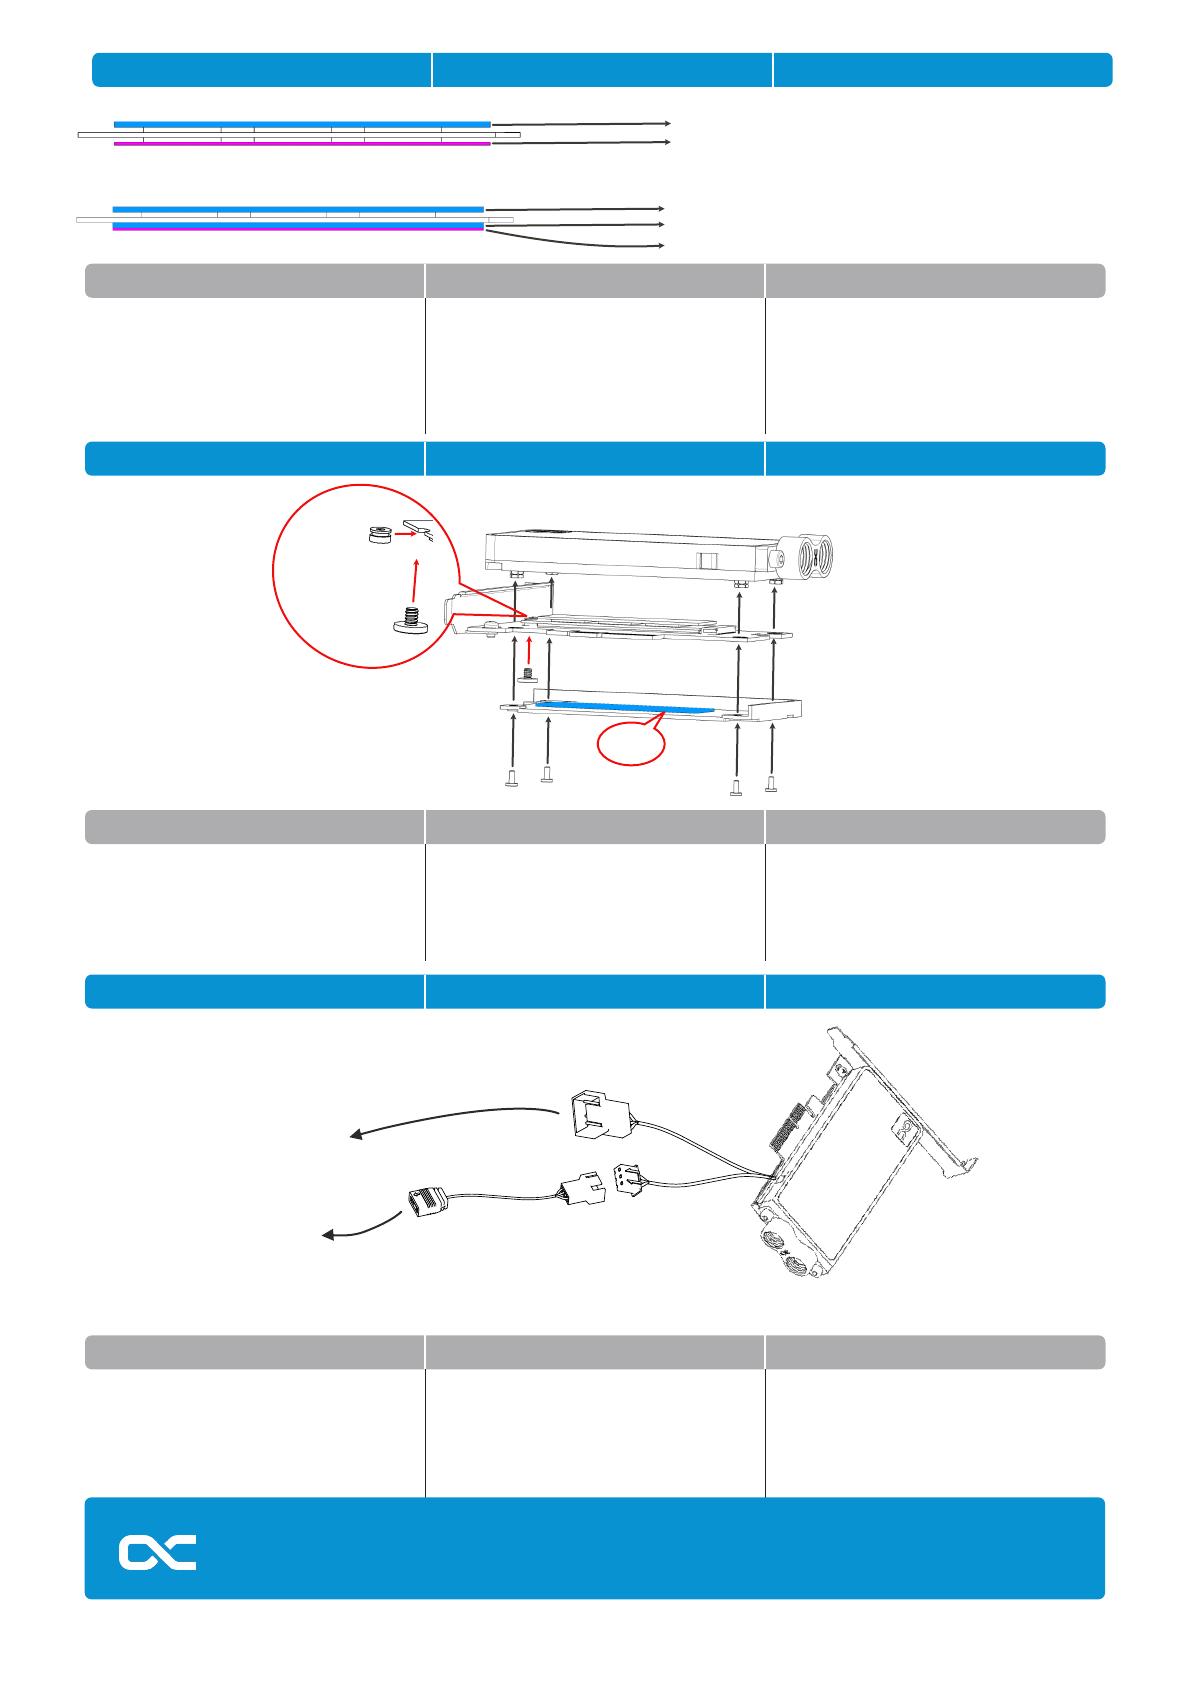
Once the thermal pads are installed on the SSD, secure
the SSD to the PCB with the nut and M3x4 screw as
shown. Place the 1 mm pad under the PCB and attach
the cooling block to the PCB and backplate with 4 x
M2x5 as shown in the drawing.
Sobald die Wärmeleitpads auf der SSD installiert sind,
befestigen Sie die SSD wie gezeigt mit der Mutter und
der M3x4-Schraube an der Leiterplatte. Platzieren Sie
das 1 mm Pad unter der Platine und befestigen Sie
den Kühlblock mit der Platine und der Backplate mit 4
x M2x5 wie es auf der Zeichnung dargestellt ist.
Une fois que les pads thermiques sont installés sur le
SSD, xez le SSD au circuit imprimé avec l'écrou et la
vis M3x4 comme indiqué. Placez le pad de 1 mm sous le
circuit imprimé et xez le bloc de refroidissement avec
le circuit imprimé et la plaque arrière avec 4 x M2x5
comme indiqué sur le dessin.
To control the digital - RGB lighting, connect the
included adapter to the 3 - pin female connector and
plug it to a digital - RGB controller (e.g. Alphacool
Aurora Eiscontrol, Art.: 15360, not included). You can
connect additional digital - RGB LEDs to the remaining 3
- pin male connector.
Um die Digital - RGB Beleuchtung zu steuern,
schließen Sie den beiliegenden Adapter an den 3-Pin
female Stecker an und verbinden Sie diesen mit
einem Digital - RGB Controller (z.B. Alphacool Aurora
Eiscontrol, Art.: 15360, nicht im Lieferumfang
enthalten). An den übrigen 3-Pin male Stecker können
Sie zusätzliche Digital - RGB LEDs anschließen
Pour contrôler l'éclairage Digital - RGB, connectez
l'adaptateur fourni au connecteur femelle 3 broches et
branchez-le à un contrôleur Digital - RGB (par ex.
Alphacool Aurora Eiscontrol, Art. 15360, non fourni).
Vous pouvez connecter des LEDs Digital - RGB
supplémentaires au connecteur mâle 3 broches restant.
1 mm pad
1 mm pad
1 mm pad
0.5 mm pad
0.5 mm pad
1 mm pad
SSD Mounting nut
SSD Mounting screw
Alphacool International GmbH
Marienberger Str. 1
D-38122 Braunschweig
Germany
Support: +49 (0) 531 28874 - 0
Fax: +49 (0) 531 28874 - 22
E-mail: info@alphacool.com
https://www.alphacool.com
V.1.00-03.2022
LED connection LED-Anschluss Connexion LED
Digital RGB Controller
Add more Digital RGB LEDs

