EVERSPRING SP201 Manuel utilisateur
- Catégorie
- Détecteurs de mouvement
- Taper
- Manuel utilisateur

1
SP201
PIR Motion Detector
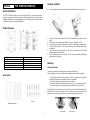
General Introduction
The SP201 PIR Motion Detector is uses a Passive Infra-Red (PIR) sensor to detect motion,
along with a temperature & humidity sensor to fulfill the needs of home security and home
automation applications. Its great compatibility with our U-Net family security products makes
it suitable for smart home cloud based platforms.
Product Overview
A. LED indicator
G. Screw mounting hole
B. PIR sensor
H. vent
C. Slot
I Battery
D. Battery mylar
J Learning button
E. Backplate
K Tamper
F. corner mount surface
Accessories
Pairing to controller
1. Use a screwdriver to open the back plate and insert 4 AAA batteries as shown below.
2. Log into the VIAS account from the APP, and enter the gateway to system main control
page.
3. Select Menu List>System Setup>ADD DEVICE>choose “Installation” on PIR.
4. Please follow and complete the instruction on the APP to binding with central gateway.
5. Locate the learning button “J” (see Product Overview). Do not activate pairing on the
controller yet.
6. Press and hold the learning button for more than 3 seconds until the LED flashes
moderately then release the button.
7. Quickly activate pairing on the controller. The LED should stop blinking indicating the
pairing process is complete.
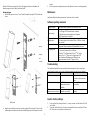
Mounting
Choosing a location
The detector is suitable for mounting indoor in dry interior locations only.
When considering a location for the detector the following points should be considered:
- Do not locate the detector facing a window or where it is exposed to or facing direct
sunlight. PIR detectors are not suitable for use in conservatories.
- Do not locate the detector where it is exposed to ventilators.
- Do not locate the detector directly above a heat source, (e.g. fire, radiator, boiler, etc).
- Do not locate the detector in a position where it is subject to excessive vibration.
Where possible, mount the detector in the corner of the room so that the logical path of an
intruder would cut across the detection zone. PIR detectors respond more effectively to
movement across the detection area than to movement directly towards the sensor.
Good Sensitivity
Bad Sensitivity
More Sensitive Less Sensitive
3M wall mount tapes
Screws

2
Mount the PIR detector at height of 1.8m. At this height, the detector will optimize the
detection range of up to 8m with a field of view of 90°.
Mounting by tape:
1. Stick the 3M tapes on surface “F” (see Product Overview) then align SP201 onto the wall
corner.
2. Use the controller’s smartphone app to test the detector to ensure it is working properly.
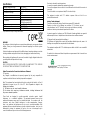
Mounting by screw:
1. Using the back plate as a template, mark the positions of the fixing holes, according to
whether the unit is mounted in a corner or against a flat wall.
2. Drill out the required mounting holes (diameter:5mm, depth:25mm) in the rear cover
3. Secure the back plate with the screws provided. (Do not over-tighten the fixing screws
as this may distort or damage the back plate.)
4. Align the top of the detector to clip it onto the top edge of the back plate. Then push the
bottom edge of the detector into place and refit the fixing screw at the bottom secure into
position
5. Use the controller’s smartphone app to test the detector to ensure it is working properly.
.
Maintenance
Low Battery: When the battery becomes low, it will report to the controller
Software reporting commands
Battery condition
Auto report battery condition to controller every hour.
Status change
1. PIR trigger: SP201 would report to controller.
2. Sudden change of temperature over 2 degrees:
SP201 would report to controller.
Temperature and
Humidity report
SP201 will detect every 5 minutes and report every 30 minutes.
The report period can be set from 300 sec~ 3600 sec. through
the controller.
Operation mode
PI Warm up time is 1 minute, LED would flash 3secs/time during
the period. When it’s ready, the LED would flash for 5 secs.
PIR trigger period
1. Can be set between 30sec to 3600 sec.
2.Default: 1st Re-Trigger time is 30 sec, 2nd Re-Trigger
time is 60 sec , 3rd and so on Re-Trigger time is 120
sec, If there’s no PIR trigger over 120sec,then the
trigger time would return to 1st trigger of 30 sec.
Troubleshooting
The troubleshooting table lists some possible causes and solutions. Please contact your
original retailer or nearest service center if the below solutions cannot solve your problem.
Symptom
Possible Cause
Recommendation
LED cannot be displayed
No power.
Check if batteries are inserted
correctly or replace with new
ones.
The detector is not working
The PIR detector cannot
communicate with the
controller.
Place the PIR detector closer to
the controller.
LED does illuminate,
appliance does not respond
Binding with controller did not
complete successfully.
Bind again using manual
binding
Reset to Factory Settings
1. Press and hold the learning button for 3 or more seconds, and the detector LED will
start to flash.
2. Press and hold the link key for 6 or more seconds within 30 seconds until the LED turns
off. The device is now reset back to factory mode
Corner mount Wall mount

3
Specifications
Operating temperature range
-10°C to 40°C
Operating humidity
85% RH at 30°C
PIR Detection Coverage
Up to 8m x 90° (at 1.8m mounting height & below
25°C)
Battery type
AAA alkaline 1.5V *4
Warm Up Time
About 1 minute
RF Frequency
868 MHz Band range (EU)
923 MHz Band range (US)
RF transmission range
Up to 800m (Open space)
FCC ID
FU5SP201-2
IC
23210-SP2012
** Specifications are subject to change without notice.
WARNING:
Do not dispose of electrical appliances as unsorted municipal waste, use separate collection
facilities. Contact your local government for information regarding the collection systems
available.
If electrical appliances are disposed of in landfills or dumps, hazardous substances can leak
into the groundwater and get into the food chain, damaging your health and well-being.
When replacing old appliances with new ones, the retailer is legally obligated to take back
your old appliance for disposal free of charge.
CAUTION:
RISK OF EXPLOSION IF BATTERY IS REPLACED BY AN INCORRECT TYPE. DISPOSE
OF USED BATTERIES ACCORDING TO THE INSTRUCTIONS
Federal Communication Commission Interference Statement
FCC warning:
Any Changes or modifications not expressly approved by the party responsible for
compliance could void the user's authority to operate the equipment.
Note: This equipment has been tested and found to comply with the limits for a Class B
digital device, pursuant to part 15 of the FCC Rules. Operation is subject to the
following two conditions:
(1) This device may not cause harmful interference,
(2) this device must accept any interference received, including interference that
may cause undesired operation.
These limits are designed to provide reasonable protection against harmful
interference in a residential installation. This equipment generates uses and can
radiate radio frequency energy and, if not installed and used in accordance with the
instructions, may cause harmful interference to radio communications. However,
there is no guarantee that interference will not occur in a particular installation. If this
equipment does cause harmful interference to radio or television reception, which can be
determined by turning the equipment off and on, the user is encouraged to try to
correct the interference by one or more of the following measures:
-Reorient or relocate the receiving antenna.
-Increase the separation between the equipment and receiver.
-Connect the equipment into an outlet on a circuit different from that to which the receiver is
connected.
-Consult the dealer or an experienced radio/TV technician for help.
This equipment complies with FCC radiation exposure limits set forth for an
uncontrolled environment.
Industry Canada statement:
This device complies with Industry Canada licence-exempt RSS standard(s).
Operation is subject to the following two conditions: (1) This device may not
cause interference, and (2) This device must accept any interference, including
interference that may cause undesired operation of the device.
Le present appareil est conforme aux CNR d'Industrie Canada applicables aux appareils
radio exempts de licence. L'exploitation est autorisée aux deux conditions suivantes:
(1) l'appareil ne doit pas produire de brouillage, et
(2) l'utilisateur de l'appareil doit accepter tout brouillage radioélectrique subi, meme si le
brouillage est susceptible d'en compromettre le fonctionnement.
This equipment complies with IC RF radiation exposure limits set forth for an uncontrolled
environment.
Ce matériel est conforme aux limites d'exposition aux rayonnements rf de ic énoncés dans
un autre environnement.
www.everspring.com
50 Sect. 1 Zhonghua Rd Tucheng
NewTaipeiCity 236 Taiwan
-
 1
1
-
 2
2
-
 3
3


EVERSPRING SP201 Manuel utilisateur
- Catégorie
- Détecteurs de mouvement
- Taper
- Manuel utilisateur
dans d''autres langues
- English: EVERSPRING SP201 User manual
Documents connexes
Autres documents
-
LEEDARSON CAG1a100015W7P Manuel utilisateur
-
Extron OCS 100W Manuel utilisateur
-
Extron OCS 100C Manuel utilisateur
-
RemoteTech RD98 Manuel utilisateur
-
YOUTONG R53 Manuel utilisateur
-
 SKYPOINT Tiny-Plus Manuel utilisateur
-
koban KDP DUAL 03 Le manuel du propriétaire
-
Marmitek Gigavideo 40 Fiche technique
-
 DMP 1127C-W Wireless Wall Mount Curtain PIR Guide d'installation
-
DMP 1127W PIR Motion Detector Guide d'installation

