
0. Tutoriel vidéo
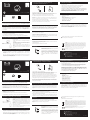
1. Installer le module d’éclairage
2. Associer le module avec une commande DiO 1.0
2.1 Associer le module avec une télécommande,
interrupteur ou détecteur DiO 1.0
2.2 Associer le module à la centrale DiO
5. Utilisation
5. Résolution de problèmes
Fonction On/O : Appuyer 1 x sur le bouton ‘I’ pour allumer
ou sur le bouton ‘O’ pour éteindre.
Le module peut être commandé individuellement ou en
combinaison avec d’autres récepteurs (ex. : un interrupteur
DiO ferme le volet lié à un module DiO et allume au même
temps la lampe branchée au module éclairage, et la
télécommande DiO allume et éteint individuellement la
lampe).
L’éclairage ne s’allume pas lors d’un appui sur la télécommande, interrupteur ou que le
détecteur est activé :
- Vériez que votre module est bien installé et connecté au courant électrique.
- Vériez la polarité et/ou l’épuisement de(s) pile(s) de votre commande.
- Assurez-vous que votre commande est associée à votre module.
Important : Une distance minimale d’1-2m est requise entre deux récepteurs DiO
(module, prise et/ou ampoule). La portée entre le module et la commande DiO peut
être diminuée par l’épaisseur des murs, ou un environnement sans l existant.
Attention : Ne pas utiliser dans un endroit humide.
CHACON déclare que l’appareil 54855 est conforme aux exigences et dispositions de la directive RED
2014/53/EU.
Le texte complet de la déclaration UE de conformité est disponible à l’adresse internet suivante :
www.chacon.be - Support - Téléchargements
Recyclage
Conformément aux directives européennes DEEE(2002/96/EC) et relative aux accumulateurs (2006/66/EC),
tout appareil électrique, électronique ou accumulateur doit être collecté séparément par un système local et
spécialisé de collecte des déchets. Ne jetez pas ces produits avec les déchets ordinaires. Consultez la
réglementation en vigueur. La marque en forme de poubelle indique que ce produit ne doit pas être jeté avec
les ordures ménagères dans aucun des pays de l’UE. An de prévenir tout risque sur l’environnement ou la
santé humaine lié à la mise au rebut incontrôlée, recyclez le produit de façon responsable an de promouvoir
l’utilisation durable des ressources matérielles. Pour renvoyer votre appareil usagé, utilisez les systèmes de
renvoi et collecte ou contactez le revendeur d’origine. Il se chargera du recyclage dans le respect des
dispositions règlementaires.
Enregistrer votre garantie
Pour enregistrer votre garantie, remplissez le formulaire en ligne sur www.getDiO.com/warranty
An de simplier la compréhension et l’installation de nos solutions, nous avons opté pour des
notices lmées : vous pouvez les visionner sur notre chaîne Youtube.com/c/dio-connected-home,
dans l’onglet playlists. Vous pouvez également les visionner via notre site www.getDiO.com dans
l’onglet support.
Hotline
BE http://www.getdio.com/contact
FR http://www.getdio.com/contact
ES + 34 91 481 63 97 (Precio Comunicación Nacional)
PT + 351 221 450 250 (Preço Comunicação Nacional)
IT +39 353 36 71 965 (Al prezzo di una telefonata nazionale) V1.1 190514
www.getDiO.com
54855
Module d’éclairage on/o
FR 6. Caractéristiques techniques
• Protocole : DiO 1.0
• Fréquence : 433,92 MHz
• EIRP : 3 mW
• Distance de transmission : 50 m (en champs libre)
• Max. 32 émetteurs associés
• Température de fonctionnement : 0 à 35°C
• Alimentation : 220 – 240 V ~ 50Hz
• Puissance Max. : 1000W / 5A
• Dimensions : 48 x 48 x 24,5 mm
7. Compléter votre installation
Complétez votre installation avec les solutions DiO pour contrôler votre chauage, votre
éclairage, vos volets roulants, votre jardin ou encore visualiser ce qui se passe chez vous avec
la vidéosurveillance. Facile, qualitatif, évolutif et économique, découvrez toutes les solutions
DiO connected home sur www.getDiO.com.
Utilisation intérieure (IP20), ne pas utiliser dans un environnement humide.
μ Micro-interrupteur on/o électronique.
Raccorder le module à votre éclairage
1x manuel1x 54855
3. Eacer une commande DiO 1.0
Ce produit est compatible avec l'ensemble des commandes DiO 1.0 : télécommande,
interrupteurs, détecteurs sans l et la centrale domotique DiO pour un contrôle via votre
smartphone.
Grâce à la centrale DiO, vous pouvez contrôler votre maison où que vous soyez via votre
smartphone et également rendre compatible votre module DiO 1.0 avec les commandes DiO 2.0.
Plus d'informations sur www.getDiO.com.
1. Brancher votre module au courant.
2. Approcher la commande DiO 1.0 du module et appuyer une fois sur le bouton
d’apprentissage du module, la Led du module commence à clignoter lentement.
3. Dans les 12 secondes, appuyer sur le bouton ‘ON’ ('I') de votre commande.
4. La LED du module clignote deux fois pour conrmer l’association et s'éteint.
Attention : Si vous n'appuyez pas sur le bouton 'ON' ('I') de votre commande dans les 12
secondes, le module sortira du mode apprentissage ; vous devez recommencer la
procédure an d’associer votre commande à votre module.
Le module peut être liée jusqu’à 32 commandes DiO diérentes. Si la mémoire est pleine,
l’ajout de la 33° commande eacera la 1ère commande ajoutée.
Associez votre module d’éclairage à votre centrale domotique DiO, pour commander
votre éclairage avec votre smartphone et créer vos scénarios, par exemple pour
allumer/éteindre votre luminaire à une heure précise ou simuler une présence durant
votre absence. Referez-vous au manuel de votre central pour l’ajout du module.
Si vous souhaitez eacer une commande :
1. Approcher la commande du module et appuyer sur le bouton d’apprentissage du
module, la Led commence à clignoter lentement.
2. Dans les 12 secondes, appuyer sur le bouton ‘OFF’('O') de la commande à eacer, la LED
du module clignote deux fois pour conrmer l’eacement.
4. Réinitialiser (reset)
Pour eacer toutes les commandes enregistrées :
1. Appuyer sur le bouton d’apprentissage du module durant 6 secondes, la Led commence
à clignoter rapidement.
2. Relâcher et appuyer une nouvelle fois sur le bouton.
1. 2.
1. Couper le courant.
2. Retirer la phase AC 230V et le neutre qui sont branchés à
votre lampe.
3. Raccorder le module au courant en branchant la phase AC
230V (brun/rouge) à la borne ‘L’, et le câble neutre (bleu) à la
borne ‘N’ extérieure du module.
4. Brancher la phase allant vers la lampe (brun/rouge) à la
borne ‘Lâ’ et le câble neutre (bleu) à la borne ‘N’ intérieure du
module.
5. Serrer bien les vis des 4 bornes du module et rebrancher le
courant.
!! Attention !!
Couper le courant avant toute manipulation.
En cas de doute sur votre installation, veuillez faire appel à votre électricien.
Vous pouvez utiliser les ampoules incandescentes, halogènes, LED ou ECO non dimmables.
OFF
ON
0. Videotutorial
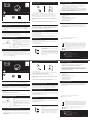
1. Installeren van de verlichtingsmodule
2. Koppelen van de module aan een DiO 1.0-bedieningselement
2.1 Koppelen van de module aan een DiO 1.0-
afstandsbediening, -schakelaar of -melder
2.1 Koppelen van de module aan de DiO-centrale
5. Gebruik
6. Verhelpen van problemen
ON/OFF-functie: Druk eenmaal op de aan-knop ("I") om de
module aan te zetten of op de uit-knop ("O") om de module
uit te zetten.
U kunt de module afzonderlijk of in combinatie met andere
ontvangers bedienen (bv. een DiO-schakelaar om het met
de DiO-module verbonden rolluik te sluiten en tegelijkertijd
een op de verlichtingsmodule aangesloten lamp in te
schakelen, en de DiO-afstandsbediening om de lamp
afzonderlijk in en uit te schakelen).
De verlichting gaat niet aan wanneer ik druk op de afstandsbediening/schakelaar of
wanneer de melder geactiveerd is:
- Controleer of de module goed geïnstalleerd is en op het elektriciteitsnet aangesloten is.
- Controleer de polariteit en/of de status van de batterij(en) van het bedieningselement.
- Controleer of het bedieningselement aan de module gekoppeld is.
Belangrijk: Er moet minstens 1 tot 2 meter afstand blijven tussen twee
DiO-ontvangers (module, stopcontact en/of lamp). Het bereik tussen de module en
het DiO-bedieningselement kan minder worden door dikke muren of door de
aanwezigheid van een bestaand draadloos netwerk.
Let op! Niet gebruiken in vochtige omgevingen.
Registreren van uw garantie
Vul om uw garantie te registreren het onlineformulier in op www.getDiO.com/warranty
Om het gebruik en de installatie van onze oplossingen nog eenvoudiger te maken, hebben we
instructievideo's voor u gemaakt. U kunt deze bekijken op ons kanaal Youtube.com/c/dio-
connected-home via de afspeellijst. U kunt ze ook bekijken op onze website www.getDiO.com
op het tabblad "Support".
Hotline
www.getDiO.com
54855
ON/OFF-verlichtingsmodule
NL
7. Technische gegevens
• Protocol: DiO 1.0
• Frequentie: 433,92 MHz
• EIRP: 3 mW
• Zendbereik: 50 m (in open ruimte)
• Max. 32 gekoppelde zenders
• Bedrijfstemperatuur: 0 tot 35°C
• Voeding: 220-240 V ~ 50 Hz
• Max. vermogen : 1000 W / 5 A
• Afmetingen: 48 x 48 x 24,5 mm
8. Uitbreiden van uw installatie
U kunt uw installatie uitbreiden met DiO-oplossingen voor het bedienen van uw
verwarming, verlichting, rolluiken en tuin of voor videobewaking om te bekijken wat er in
uw woning gebeurt.
De DiO connected home-oplossingen zijn gebruiksvriendelijk, van hoogwaardige kwaliteit,
uitbreidbaar en betaalbaar. U vindt ze op www.getDiO.com.
Voor gebruik binnenshuis (beschermingsgraad IP 20); niet geschikt voor vochtige
omgevingen.
μ Elektronische On/O microschakelaar.
Aansluiten van de module op uw verlichting
1x handleiding 1x 54855
3. Verwijderen een DiO 1.0-bedieningselement
Dit product is compatibel met alle DiO 1.0-bedieningselementen: afstandsbediening, draadloze
schakelaars en melders en de DiO-domoticacentrale voor bediening via uw smartphone.
Dankzij de DiO-centrale kunt u met uw smartphone alles in uw huis bedienen, waar u ook bent,
en ook de DiO 1.0-module compatibel maken met DiO 2.0-bedieningselementen. Meer
informatie is te vinden op www.getDiO.com.
1. Sluit de module aan op het elektriciteitsnet.
2. Plaats de DiO 1.0- bedieningselement dichter bij de module en druk eenmaal op de
leerknop van de module. De led van de module begint langzaam te knipperen.
3. Druk binnen 12 seconden op de aan-knop ("I") van de bedieningselementen.
4. De led van de module knippert tweemaal om de koppeling te bevestigen, en gaat uit.
Let op! Wanneer u niet binnen 12 seconden op de "ON"-knop van uw bedieningselement
drukt, wordt de leermodus van de module uitgeschakeld. U moet dan de procedure
volledig opnieuw beginnen om het bedieningselement aan de module te koppelen.
U kunt maximaal 32 verschillende DiO-bedieningselementen aan de module koppelen.
Als u het 33e bedieningselement toevoegt terwijl het geheugen vol is, wordt het eerste
bedieningselement verwijderd.
Koppel de verlichtingsmodule aan de DiO-domoticacentrale om de verlichting met uw
smartphone te bedienen en eigen scenario's te maken, bijvoorbeeld om de verlichting op
een bepaald tijdstip in of uit te schakelen of om een aanwezigheid te simuleren wanneer
u niet thuis bent. Raadpleeg de handleiding van de DiO-centrale om de module toe te
voegen.
Ga als volgt te werk om een bedieningselement te verwijderen:
1. Plaats het bedieningselement dichter bij de module en druk op de leerknop van de
module. De led begint langzaam te knipperen.
2. Druk binnen 12 seconden op de "OFF"-knop van het bedieningselement dat u wilt
verwijderen. De led van de module knippert tweemaal om de verwijdering te bevestigen.
4. Resetten
Ga als volgt te werk om alle geïnstalleerde bedieningselementen te verwijderen:
1. Houd de leerknop van de module 6 seconden ingedrukt. De led begint continu te
knipperen.
2. Laat de leerknop los en druk deze vervolgens opnieuw in.
1. 2.
1. Schakel de stroom uit.
2. Verwijder de op uw lamp aangesloten 230 VAC-fasedraad en
nulleider.
3. Sluit de module aan op het elektriciteitsnet door de 230
VAC-fasedraad (bruin/rood) te verbinden met de klem "L" en de
nulleider (blauw) met de klem "N" aan de buitenzijde van de
module.
4. Verbind de fasedraad (bruin/rood) die naar de lamp gaat met
de klem "Lâ" en de nulleider (blauw) met de klem "N" aan de
binnenzijde van de module.
5. Draai de schroeven van de vier klemmen op de module
stevig vast en schakel de stroom weer in.
!! Let op !!
Schakel de stroom uit vóór elke handeling.
Als u twijfels hebt over uw installatie, neemt u het best contact op met een elektricien.
U kunt gloeilampen, halogeenlampen, ledlampen of niet-dimbare spaarlampen gebruiken.
OFF
ON
CHACON verklaart dat het apparaat met de referentienummer 54855 voldoet aan de essentiële eisen en alle
andere relevante bepalingen van de richtlijn RED 2014/53/EU.
De volledige tekst van de EU-conformiteitsverklaring is te vinden op het volgende internetadres:
www.chacon.be - Support - downloads
Recycling
Overeenkomstig de Europese AEEA-richtlijn (2002/96/EG) en de Europese richtlijn inzake batterijen en accu's
(2006/66/EG) moeten alle afgedankte elektrische en elektronische apparaten, batterijen en accu's gescheiden
ingezameld worden door een lokale instantie die gespecialiseerd is in het inzamelen van afval. Gooi deze
producten niet bij het gewone huishoudafval. Raadpleeg de geldende regelgeving. Het symbool van de
doorgekruiste afvalcontainer geeft aan dat het in alle landen van de EU verboden is dit product weg te gooien
bij het huishoudafval. Om het milieu en de volksgezondheid niet in gevaar te brengen door ongecontroleerd
afdanken van producten, moet dit product op verantwoordelijke wijze gerecycled worden om het duurzame
gebruik van materialen te bevorderen. Voor het inleveren van uw afgedankte apparaat kunt u een beroep doen
op inlever- of inzamelinstanties of kunt u contact opnemen met uw oorspronkelijke verkoper. Deze zal instaan
voor de recycling overeenkomstig de reglementaire voorschriften.
BE http://www.getdio.com/contact
FR http://www.getdio.com/contact
ES + 34 91 481 63 97 (Precio Comunicación Nacional)
PT + 351 221 450 250 (Preço Comunicação Nacional)
IT +39 353 36 71 965 (Al prezzo di una telefonata nazionale) V1.1 190514

0. Tutorial de vídeo
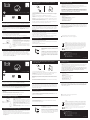
1. Instalar el módulo de iluminación
2. Asociar el módulo a un dispositivo DiO 1.0
2.1 Asociar el módulo a un mando a distancia, interruptor o
detector DiO 1.0
2.1 Asociar el módulo a la centralita DiO
5. Uso
6. Resolución de problemas
Función On/O: Pulse 1 vez el botón "I" para encender o el
botón "O" para apagar.
El módulo puede controlarse de forma individual o junto
con otros receptores (por ejemplo: un interruptor DiO cierra
la persiana asociada a un módulo DiO y enciende al mismo
tiempo la lámpara conectada al módulo de iluminación, y el
mando a distancia DiO enciende y apaga de forma
individual la lámpara).
La iluminación no se enciende al pulsar el mando a distancia o el interruptor, o el detector
está activado.
- Compruebe que el módulo esté bien instalado y conectado a la corriente eléctrica.
- Compruebe la polaridad y/o el estado de carga de la(s) pila(s) de su dispositivo.
- Asegúrese de que su dispositivo esté asociado al módulo.
Importante: Se requiere una distancia mínima de 1-2 m entre dos receptores DiO
(módulo, enchufe y/o bombilla). El alcance entre el módulo y el dispositivo DiO puede
verse reducido por el grosor de las paredes o por un entorno inalámbrico existente.
Atención: No se debe utilizar en un lugar húmedo.
CHACON declara que el aparato 54855 cumple con los requisitos y las disposiciones de la directiva RED
2014/53/UE.
El texto completo de la declaración UE de conformidad está disponible en la siguiente dirección:
www.chacon.be - Suporte - Descarga
Reciclaje
De conformidad con las directivas europeas DEEE (2002/96/EC) y sobre acumuladores (2006/66/EC), los
aparatos eléctricos, electrónicos o los acumuladores deberán ser objeto de una recogida selectiva por un
sistema local y especializado en la eliminación de residuos. No tire estos productos con los residuos
domésticos. Consulte la normativa vigente. La marca en forma de contenedor indica que este producto no
debe eliminarse con los residuos domésticos en ningún país de la UE. Para evitar riesgos en el medio ambiente
o la salud humana relativos a una eliminación incontrolada, recicle el producto de forma responsable para
promover el uso sostenible de los recursos materiales. Para devolver el aparato usado, utilice los sistemas de
reenvío y recogida o contacte con el distribuidor original. Éste se encargará del reciclaje en virtud de las
disposiciones reglamentarias.
Registrar la garantía
Para registrar la garantía, rellene el formulario en línea en www.getDiO.com/warranty
Para simplicar la comprensión y la instalación de nuestras soluciones, hemos optado por
instrucciones lmadas: puede verlas en nuestro canal de Youtube.com/c/dio-connected-home,
en la pestaña "playlists". Asimismo, puede verlas en nuestra página web www.getDiO.com en
la pestaña "support".
Hotline
www.getDiO.com
54855
Módulo de iluminación On/O
ES 7. Características técnicas
• Protocolo: DiO 1.0
• Frecuencia: 433,92 MHz
• EIRP : 3 mW
• Distancia de transmisión: 50 m (en campo abierto)
• Máx. 32 emisores asociados
• Temperatura de funcionamiento: 0 a 35 °C
• Alimentación: 220 – 240 V ~ 50 Hz
• Potencia máx.: 1000W / 5A
• Dimensiones: 48 x 48 x 24,5 mm
8. Completar la instalación
Complete la instalación con las soluciones DiO para controlar la calefacción, la iluminación,
las persianas, el jardín o para ver lo que ocurre en su casa con la videovigilancia.
Fácil, evolutivo, económico y de gran calidad: descubra todas las soluciones DiO connected
home en www.getDiO.com
Uso en interior (IP20), no utilizar en un entorno húmedo.
μ Micro-interruptor On/O electrónico.
Conectar el módulo a la iluminación
1x Manual 1x 54855
3. Eliminar un dispositivo DiO 1.0
Este producto es compatible con todos los dispositivos DiO 1.0: mando a distancia, interruptores,
detectores inalámbricos y centralita domótica DiO para un control mediante smartphone.
La centralita DiO le permite controlar su hogar donde quiera que usted se encuentre a través de
smartphone y también permite que el módulo DiO 1.0 sea compatible con los dispositivos DiO
2.0. Más información en www.getDiO.com.
1. Conecte el módulo a la corriente.
2. Acerque el interruptor o mando a distancia DiO 1.0 al módulo y pulse una vez el botón
de aprendizaje del módulo; el LED del módulo empezará a parpadear lentamente.
3. Antes de que transcurran 12 segundos, pulse el botón "I" del interruptor o mando a
distancia.
4. El LED del módulo parpadeará dos veces para conrmar la asociación y se apagará.
Atención: Si no pulsa el botón "ON" de su dispositivo antes de los 12 segundos, el módulo
saldrá del modo de aprendizaje; debe reiniciar el proceso para asociar su dispositivo al
módulo.
El módulo puede asociarse a 32 dispositivos DiO diferentes como máximo. Si la memoria
está llena, al añadir el 33° dispositivo se eliminará el 1º dispositivo añadido.
Asocie el módulo de iluminación a su centralita domótica DiO para controlar la
iluminación mediante smartphone y crear diferentes escenarios; por ejemplo, para
encender/apagar una luz a una hora determinada o simular una presencia durante su
ausencia. Consulte el manual de la centralita para añadir el módulo.
Si desea eliminar un dispositivo:
1. Acerque el dispositivo al módulo y pulse el botón de aprendizaje del módulo; el LED
empezará a parpadear lentamente.
2. Antes de que transcurran 12 segundos, pulse el botón "OFF" del dispositivo que desea
eliminar; el LED del módulo parpadeará dos veces para conrmar la eliminación.
4. Restablecer (reset)
Para eliminar todos los dispositivos registrados:
1. Pulse el botón de aprendizaje del módulo durante 6 segundos; el LED empezará a
parpadear de forma continua.
2. Suelte y pulse de nuevo el botón.
1. 2.
1. Corte el suministro eléctrico.
2. Retire la fase de 230 VCA y el neutro conectados a su
lámpara.
3. Conecte el módulo a la corriente conectando la fase de 230
VCA (marrón/rojo) al terminal "L" y el cable neutro (azul) al
terminal "N" exterior del módulo.
4. Conecte la fase que va hacia la lámpara (marrón/rojo) al
terminal "L" y el cable neutro (azul) al terminal "N" interior del
módulo.
5. Apriete los tornillos de los 4 terminales del módulo y vuelva
a conectar la corriente.
¡ Atención!
Corte la alimentación eléctrica antes de cualquier manipulación.
En caso de duda sobre la instalación, consulte con su electricista.
Puede utilizar bombillas incandescentes, halógenas, LED o ECO no regulables.
OFF
ON
0. Vídeo tutorial
1. Instalar o módulo de iluminação
2. Associar o módulo a um comando DiO 1.0
2.1 Associar o módulo com um telecomando, interruptor ou
sensor DiO 1.0
2.1 Associar o módulo à central DiO
5. Utilização
6. Resolução de problemas
Função On/O: Premir 1 x o botão “I” para ligar ou o botão
“O” para apagar.
O módulo pode ser controlado individualmente ou em
combinação com outros recetores (ex: um interruptor DiO
fecha a persiana ligada a um módulo DiO e liga ao mesmo
tempo a lâmpada ligada ao módulo de iluminação e o
telecomando DiO acende e apaga individualmente a
lâmpada).
A iluminação não se acende aquando da pressão no telecomando, interruptor ou se o
sensor estiver ativo:
- Certique-se de que o seu módulo está bem instalado e ligado à corrente elétrica.
- Verique a polaridade e/ou esgotamento da(s) pilha(s) do seu comando.
- Certique-se de que o seu comando está associado ao seu módulo.
Importante: É necessária uma distância mínima de 1-2 m entre dois recetores DiO
(módulo, tomada e/ou lâmpada). O alcance entre o módulo e o comando DiO pode ser
reduzido devido à espessura das paredes ou a um ambiente sem os existente.
Atenção: Não utilize em locais húmidos.
A CHACON declara que o aparelho 54855 esta em conformidade com as exigências e disposições da diretiva
RED 2014/53/UE.
O texto completo da declaração de conformidade da UE está disponível no website seguinte:
www.chacon.be - Suporte - Descarga
Reciclagem
Em conformidade com as diretivas europeias DEEE(2002/96/CE) e relativas aos acumuladores (2006/66/CE),
qualquer aparelho elétrico, eletrónico ou acumulador deve ser recolhido separadamente por um sistema local
e especializado de recolha de resíduos. Não elimine estes produtos com os resíduos comuns. Consulte os
regulamentos em vigor. A marca em forma de caixote do lixo indica que este produto não deve ser eliminado
com o lixo doméstico nos países da UE. De modo a prevenir qualquer risco no ambiente ou saúde humana
relacionado com a eliminação não controlada, reciclar o produto de forma responsável de modo a promover a
utilização sustentável dos recursos materiais. Para devolver o aparelho usado, utilizar os sistemas de devolução
e recolha ou contactar o fornecedor. Ele vai encarregar-se da reciclagem em conformidade com as disposições
regulamentares.
Registar a garantia
Para registar a garantia, preencha o formulário online em www.getDiO.com/warranty
Para simplicar a compreensão e a instalação das nossas soluções, optámos por instruções em
vídeo: pode visualizá-las no nosso canal Youtube.com/c/dio-connected-home, no separador Listas
de reprodução. Também pode visualizar os vídeos no nosso website www.getDiO.com no
separador Assistência.
Hotline
www.getDiO.com
54855
Módulo de iluminação On/O
PT 7. Características técnicas
• Protocolo: DiO 1.0
• Frequência: 433,92 MHz
• EIRP: 3 mW
• Distância de transmissão: 50 m (em campo aberto)
• Máx. 32 emissores associados
• Temperatura de funcionamento: 0 a 35°C
• Alimentação: 220 – 240 V ~ 50 Hz
• Potência máx.: 1000W/5A
• Dimensões: 48 x 48 x 24,5 mm
8. Concluir a sua instalação
Conclua a sua instalação com as soluções DiO para controlar o aquecimento, iluminação,
persianas, jardim ou até visualizar o que se passa em sua casa com a videovigilância.
Fácil, qualitativo, evolutivo e económico, descubra todas as soluções DiO connected home
em www.getDiO.com
Utilização interior (IP20), não utilizar num ambiente húmido.
μ Micro-interruptor on/o eletrônico.
Ligar o módulo à sua iluminação
1x Manual 1x 54855
3. Apagar um comando DiO 1.0
Este produto é compatível com o conjunto dos comandos DiO 1.0: telecomando, interruptores,
sensores sem os e a central domótica DiO para um controlo através do seu smartphone.
Graças à central DiO, pode controlar a sua casa onde quer que esteja através do seu smartphone
e também tornar o seu módulo DiO 1.0 compatível com os comandos DiO 2.0. Mais informações
em www.getDiO.com.
1. Ligar o módulo à corrente.
2. Aproximar o comando DiO 1.0 do módulo e premir uma vez o botão de memorização
do módulo, o LED do módulo começa a piscar lentamente.
3. No espaço de 12 segundos, premir o botão “I” do comando.
4. O LED do módulo pisca duas vezes para conrmar a associação e se apaga.
Atenção: Se não premir o botão “ON” do comando no espaço de 12 segundos, o módulo
vai sair do modo de memorização; deve reiniciar o procedimento para associar o seu
comando ao módulo.
O módulo pode ser ligado, no máximo, a 32 comandos DiO diferentes. Se a memória
estiver cheia, a adição do 33° comando vai apagar o 1º comando adicionado.
Associe o seu módulo de iluminação à sua central domótica DiO, para controlar a sua
iluminação com o seu smartphone e criar os seus cenários, por exemplo, para
acender/apagar a sua iluminação a uma determinada hora ou simule uma presença
durante a sua ausência. Consulte o manual da sua central para a adição do módulo.
Se pretender apagar um comando:
1. Aproximar o comando do módulo e premir o botão de memorização do módulo, o LED
começa a piscar lentamente.
2. No espaço de 12 segundos, premir o botão “OFF” do comando a apagar, o LED do
módulo pisca duas vezes para conrmar a eliminação.
4. Repor (reset)
Para eliminar todos os comandos registados:
1. Premir o botão de memorização do módulo durante 6 segundos, o LED começa a piscar
continuamente.
2. Soltar e premir novamente o botão.
1. 2.
1. Cortar a corrente.
2. Retirar a fase CA 230 V e o neutro que estão ligados à sua
lâmpada.
3. Ligar o módulo à corrente ligando a fase CA 230 V
(castanho/vermelho) ao terminal “L” e o cabo de neutro (azul)
ao terminal “N” exterior do módulo.
4. Ligar a fase que vai para a lâmpada (castanho/vermelho) ao
terminal “Lâ” e o cabo de neutro (azul) ao terminal “N” interior
do módulo.
5. Apertar bem os parafusos dos 4 terminais do módulo e
voltar a ligar a corrente.
!! Atenção!
Cortar a corrente antes de qualquer manuseamento.
Em caso de dúvidas na sua instalação, contacte um eletricista.
Pode utilizar as lâmpadas incandescentes, de halogéneo, LED ou ECO não reguláveis.
OFF
ON
BE http://www.getdio.com/contact
FR http://www.getdio.com/contact
ES + 34 91 481 63 97 (Precio Comunicación Nacional)
PT + 351 221 450 250 (Preço Comunicação Nacional)
IT +39 353 36 71 965 (Al prezzo di una telefonata nazionale) V1.1 190514
BE http://www.getdio.com/contact
FR http://www.getdio.com/contact
ES + 34 91 481 63 97 (Precio Comunicación Nacional)
PT + 351 221 450 250 (Preço Comunicação Nacional)
IT +39 353 36 71 965 (Al prezzo di una telefonata nazionale) V1.1 190514

0. Video tutorial
1. Installare il modulo di illuminazione
2. Associare il modulo a un dispositivo di controllo DiO 1.0
2.1 Associare il modulo a un telecomando, interruttore o
sensore DiO 1.0
2.1 Associare il modulo alla centralina DiO
5. Utilizzo
6. Risoluzione dei problemi
Funzione On/O: Per accendere il modulo premere una
volta il pulsante ‘I’; per spegnerlo, premere una volta il
pulsante ‘O’.
Il modulo può essere controllato singolarmente o in
combinazione con altri ricevitori (ad es.: un interruttore DiO
può essere utilizzato per chiudere la tapparella collegata a
un modulo DiO e contemporaneamente per accendere la
lampada collegata al modulo di illuminazione, mentre il
telecomando DiO accende e spegne singolarmente la
lampada).
Il dispositivo di illuminazione non si accende quando si premono i pulsanti del telecomando
o dell’interruttore, o con sensore attivato:
- Vericare che il modulo sia installato correttamente e collegato all’alimentazione.
- Vericare che la/le pila/e del dispositivo di controllo siano correttamente posizionate e non
siano scariche.
- Assicurarsi che il dispositivo di controllo sia associato al modulo.
Importante: È necessario mantenere una distanza minima di 1-2 m tra due ricevitori
DiO (modulo, presa e/o lampada). La portata tra il modulo e il dispositivo di controllo
DiO può essere ridotta dallo spessore dei muri o dalla presenza di una rete wireless
preesistente. Attenzione: Non utilizzare in un ambiente umido.
CHACON dichiara che il dispositivo 54855 è conforme ai requisiti e alle disposizioni della direttiva RED
2014/53/EU.
Il testo integrale della dichiarazione di conformità UE è disponibile al seguente indirizzo:
www.chacon.be - Suporte - Descarga
Riciclo
Conformemente alle direttive europee RAEE (2002/96/CE) e alla direttiva in materia di accumulatori
(2006/66/CE), tutte le apparecchiature elettriche, elettroniche o gli accumulatori devono essere raccolti
separatamente da un'impresa locale specializzata nello smaltimento dei riuti. Non smaltire questi prodotti
con i riuti ordinari. Fare riferimento alla regolamentazione in vigore. Il simbolo del contenitore per riuti indica
che questo prodotto non può essere smaltito con i riuti domestici in nessun paese dell'UE. Per evitare rischi
per l'ambiente o la salute umana derivanti da uno smaltimento incontrollato, riciclare il prodotto in modo
responsabile al ne di promuovere l'uso sostenibile dei materiali. Per restituire i dispositivi usati, utilizzare il
sistema di raccolta o contattare il rivenditore originale che si occuperà del riciclo nel rispetto della normativa
vigente.
Registra la garanzia
Per registrare la garanzia, completare il modulo online all'indirizzo www.getDiO.com/warranty
Per facilitare la comprensione et l’installazione delle soluzioni Chacon abbiamo creato una serie di
video tutorial: è possibile visionarli sul nostro canale Youtube.com/c/dio-connected-home, sezione
“playlists”. È inoltre possibile consultare i video sul sito internet www.getDiO.com nella sezione
“documento”.
Hotline
www.getDiO.com
54855
Modulo di illuminazione On/O
IT 7. Caratteristiche tecniche
• Protocollo: DiO 1.0
• Frequenza: 433,92 MHz
• EIRP : 3 mW
• Distanza di trasmissione: 50 m (in campo libero)
• Max. 32 trasmettitori associati
• Temperatura di esercizio: Da 0 a 35°C
• Alimentazione: 220 – 240 V ~ 50Hz
• Potenza massima: 1000W / 5A
• Dimensioni: 48 x 48 x 24,5 mm
8. Completare l'installazione
Completare l'installazione con le soluzioni DiO per controllare il riscaldamento, l'impianto di
illuminazione, le tapparelle, il giardino o per controllare tutto ciò che succede a casa vostra
grazie alla funzione di videosorveglianza.
Semplici, di qualità, all'avanguardia ed economiche, scopri tutte le soluzioni DiO - Connected
Home su www.getDiO.com
Uso interno (IP20), non usare in ambiente umido.
μ Interruttore elettronico di accensione / spegnimento.
Collegare il modulo al dispositivo di illuminazione
1x Manuale 1x 54855
3. Cancellare un dispositivo di controllo DiO 1.0
Questo prodotto è compatibile con tutti i dispositivi di controllo DiO 1.0: telecomando,
interruttori, sensori senza li e centralina domotica DiO per il controllo tramite smartphone.
La centralina DiO permette di controllare la propria casa da qualsiasi luogo tramite smartphone e
di rendere compatibile il modulo DiO 1.0 con i dispositivi di controllo DiO 2.0. Maggiori
informazioni disponibili su www.getDiO.com.
1. Collegare il modulo alla corrente.
2. Avvicinare l’interruttore o telecomando DiO 1.0 al modulo e premere una volta il
pulsante di apprendimento del modulo; il led del modulo inizierà a lampeggiare
lentamente.
3. Entro 12 secondi, premere il tasto ‘I’ dell’interruttore o telecomando.
4. Il led del modulo lampeggerà due volte a conferma dell’avvenuto collegamento e si
spegnerà.
Attenzione: Se non si preme il pulsante 'ON' del dispositivo di controllo entro 12 secondi,
il modulo uscirà dalla modalità di apprendimento e per eettuare l’associazione sarà
necessario ricominciare la procedura da capo.
È possibile collegare no a 32 dispositivi di controllo DiO al modulo. A memoria piena, il
33° dispositivo di controllo cancellerà il primo dispositivo associato.
Associare il modulo di illuminazione alla centralina domotica DiO permetterà di
controllare i dispositivi di illuminazione da smartphone e di creare scenari personalizzati,
per esempio per accendere/spegnere le luci a un'ora prestabilita o simulare la propria
presenza in casa quando si è fuori. Per associare il modulo, fare riferimento al manuale
della centralina.
Se si desidera cancellare un dispositivo di controllo:
1. Avvicinare il dispositivo di controllo al modulo e premere il pulsante di apprendimento
del modulo; il led inizierà a lampeggiare lentamente.
2. Entro 12 secondi, premere il pulsante ‘OFF’ del dispositivo che si desidera cancellare il
led del modulo lampeggerà due volte a conferma dell’avvenuta cancellazione.
4. Reinizializzare (reset)
Per cancellare tutti i dispositivi di controllo salvati:
1. Tenere premuto il pulsante di apprendimento del modulo per 6 secondi; il led inizierà a
lampeggiare velocemente.
2. Rilasciare il pulsante e premerlo nuovamente.
1. 2.
1. Interrompere l’alimentazione.
2. Rimuovere la fase AC 230V e il neutro collegati alla lampada.
3. Collegare il modulo all'alimentazione collegando la fase AC
230V (marrone/rossa) al morsetto ‘L’ e il cavo neutro (blu) al
morsetto ‘N’ esterno al modulo.
4. Collegare la fase rivolta verso la lampada (marrone/rossa) al
morsetto ‘Lâ’ e il cavo neutro (blu) al morsetto ‘N’ interno al
modulo.
5. Stringere bene le viti dei 4 morsetti del modulo e ricollegare
la corrente.
!! Attenzione!!
Interrompere l'alimentazione prima di manipolare il prodotto.
In caso di dubbi sul proprio impianto, consultare l'elettricista.
Si possono utilizzare lampadine a incandescenza, alogene, LED o ECO non dimmerabili.
OFF
ON
0. Video tutorial
1. Installing the lighting module
2. Linking the module with a DiO 1.0 device
2.1 Linking the module with a remote control, switch or
DiO 1.0 detector
2.1 Linking the module to the DiO hub
5. Use
6. Troubleshooting
On/O function: Press the 'I' button once to wireless switch
on or the 'O' button to switch o.
The module can be controlled individually or in conjunction
with other receivers (e.g.: a DiO switch closes the shutter
linked to a DiO module and at the same time turns on the
lamp connected to the lighting module, and the DiO remote
control turns the lamp on and o individually).
The lighting does not come on when pressing the remote control or switch, or when the
detector is activated:
- Check that the module has been installed correctly and that it is connected to the power
supply.
- Check the polarity of the battery (ies) in the device and/or that they are not depleted.
- Make sure that the device is linked to the module.
Important: A minimum distance of 1-2 m is necessary between two DiO receivers
(module, socket and/or bulb). The range between the module and the DiO device may
be reduced by the thickness of the walls or an existing wireless environment.
Warning: Do not use in a damp location.
CHACON declares that the device 54855 is conform with the requirements and provisions of Directive RED
2014/53/EU.
The complete text of the EU declaration of conformity is available at the following Internet address:
www.chacon.be - en - conformity
Recycling
In accordance with European WEEE directives (2002/96/EC) and directives concerning accumulators
(2006/66/EC), any electrical or electronic device or accumulator must be collected separately by a local system
specialising in the collection of such waste. Do not dispose of these products with ordinary waste. Check the
regulations in force. The logo shaped like a waste bin indicates that this product must not be disposed of with
household waste in any EU country. To prevent any risk to the environment or human health due to
uncontrolled scrapping, recycle the product in a responsible manner. This will promote the sustainable use of
material resources. To return your used device, use the return and collection systems, or contact the original
dealer. The dealer will recycle it in accordance with regulatory provisions.
Register your warranty
To register your warranty, ll in the online form at www.getDiO.com/warranty
We have produced a series of video tutorials to make it easier to understand and install our
solutions. You can see them on our Youtube.com/c/dio-connected-home channel, under Playlists.
You can also view them through our website www.getDiO.com in the Support tab.
Hotline
www.getDiO.com
54855
On/O lighting module
EN 7. Technical specications
• Protocol: DiO 1.0
• Frequency: 433.92 MHz
• EIRP : 3 mW
• Transmission range: 50 m (in free eld)
• Max. 32 associated transmitters
• Operating temperature: 0 to 35°C
• Power supply: 220 – 240 V ~ 50Hz
• Max. power : 1000W / 5A
• Dimensions: 48 x 48 x 24.5 mm
8. Supplementing your installation
Supplement your installation with DiO solutions to control your heating, lighting, roller
blinds, or garden, or to use video surveillance to keep an eye on what is happening at home.
Easy, high-quality, scalable and economical...learn about all of the DiO Connected Home
solutions at www.getDiO.com
Indoor use (IP20). Do not use in a damp environment.
μ Electronic on/o micro-switch.
Connect the module to your lighting
1x Manual 1x 54855
3. Deleting a DiO 1.0 device
This product is compatible with all DiO 1.0 devices: remote control, switches, wireless detectors
and the DiO Smart Home main unit for control using your smartphone.
Using the DiO main unit, you can control your home wherever you are through your smartphone
and also make your DiO 1.0 module compatible with DiO 2.0 devices. For more information, visit
www.getDiO.com.
1. Connect your module to the power supply.
2. Press the learn button of the DiO 1.0 switch module once; the LED of the module begins
to ash slowly.
3. Press the ‘l’ button of the wireless switch or remote control within 12 seconds.
4. The LED of the module ashes twice to conrm the link and turns o.
Warning: If you do not press the 'ON' button of the device within 12 seconds, the module
will exit learning mode. You must restart the procedure in order to link the device with the
module.
The module can be linked with up to 32 dierent DiO devices. If the memory is full, adding
the 33rd device will delete the 1st device added.
Link your lighting module to your DiO Smart Home hub to control your lighting with your
smartphone and create your scenarios, for example to turn your lights on/o at a specic
time or simulate someone being at home while you are away. Please refer to your main
unit manual to add the module.
If you want to delete a device:
1. Press the learn button of the module device; the LED begins to ash slowly.
2. Press the 'OFF' button of the device within 12 seconds to delete it. The module's LED
ashes twice to conrm the deletion.
4. Reset
To delete all registered devices:
1. Press the module learning button for 6 seconds. The LED starts to ash continuously.
2. Release the button and press it again.
1. 2.
1. Switch o the power supply.
2. Remove the 230V AC live and neutral wires connected to
your light.
3. Connect the module to the power supply by connecting the
230V AC live wire (brown/red) to terminal 'L', and the neutral
wire (blue) to terminal 'N' outside the module.
4. Connect the live wire going to the light (brown/red) to
terminal 'Lâ' and the neutral wire (blue) to terminal 'N' inside
the module.
5. Tighten the screws of the 4 terminals of the module and
reconnect the power supply.
!! Warning!!
Disconnect the power supply before carrying out any work.
Please contact your electrician if you have any doubts about your installation.
You can use non-dimmable incandescent, halogen, LED or ECO bulbs.
OFF
ON
BE http://www.getdio.com/contact
FR http://www.getdio.com/contact
ES + 34 91 481 63 97 (Precio Comunicación Nacional)
PT + 351 221 450 250 (Preço Comunicação Nacional)
IT +39 353 36 71 965 (Al prezzo di una telefonata nazionale) V1.1 190514
BE http://www.getdio.com/contact
FR http://www.getdio.com/contact
ES + 34 91 481 63 97 (Precio Comunicación Nacional)
PT + 351 221 450 250 (Preço Comunicação Nacional)
IT +39 353 36 71 965 (Al prezzo di una telefonata nazionale) V1.1 190514
-
 1
1
-
 2
2
-
 3
3


dans d''autres langues
- italiano: DIO 54855 Manuale utente
- English: DIO 54855 User manual
- español: DIO 54855 Manual de usuario
- Nederlands: DIO 54855 Handleiding
- português: DIO 54855 Manual do usuário

