
INSTRUCTION MANUAL
BEDIENUNGSANLEITUNG
MANUEL D'UTILISATION
FLAT DIGITAL TV
DIGITALER FLACHBILDFERNSEHER
TÉLÉVISEUR COULEUR
26H8L02-G
32H6C03-G
32H8S02-G
40H6L03-G

5
4
Quick Start Guide
ENGLISH
To switch the TV on (Depending on the model)
Starting Auto Setup Procedure
Note: Do not turn off the TV while initializing first time installation.
When the TV is operated for the first time, installation wizard will guide
you through the process. First, language selection screen will be
displayed.
After then, “First time Installation” menu will appear on
the screen, requiring you to set Country,Teletext Language, Scan
Encrypted and Active Antenna (optional) options:
After setting the options using the navigation buttons press OK button
to continue. The following message appears on the screen:
To start automatic search, select “Yes”, to cancel, select “No” and
press OK button. Afterwards, digital search type OSD will be
displayed on the screen.
If you select CABLE option, the following screen will be displayed:
By pressing or buttons highlight the language you want to set and
press “OK”.
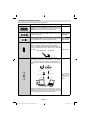
3
2
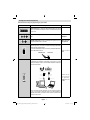
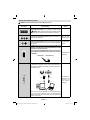
Insert the batteries into the handset
Connect the aerial straight to your TV
Connect the TV to the mains socket
1
Insert two AAA/R3 or equivalent type batteries inside.
Observe the correct polarity (+/-) when inserting batteries and
replace the battery cover.
REAR OF THE TV
Set Top Box
connection
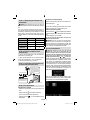
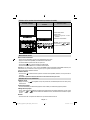
You can select frequency ranges from this screen. For highlighting
lines you see, use button. You can enter the frequency range
manually by using the numeric buttons on the remote control. Set
Start and Stop Frequency as desired by using numeric buttons on the
remote control.
After this operation, you can set Search Step as 8000 KHz or 1000
KHz. If you select 1000 KHz, the Tv will perform search process in a
detailed way. Searching duration will thus increase accordingly. When
finished, press OK button to start automatic search.
If you select AERIAL option from the Search Type screen, the
television will search for digital terrestrial TV broadcasts.
Note: You can press MENU button to cancel.
After all the available stations are stored, Channel List will be
displayed on the screen. If you like the sort channels, according to the
LCN, please select Yes and than press OK. Press OK button to quit
channel list and watch TV.
or
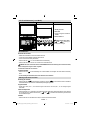
To select the HDMI input, press the “SOURCE” button on the remote
control. Each time it is pressed the on-screen menu confirms your
selection.
To HDMI connection on the device
6
HDMI to HDMI Cable Connection
7
HDMI input
insert plug...
•
•
•
•
•
Connect the power cord to the 220-240V AC 50 Hz.
Press STANDBY touch button. Then the standby
LED lights up.
To switch on the TV from standby mode either:
Press the " " button, P+/P- or a numeric button on
the remote control.
Press the -P/CH or P/CH+ touch button on the TV.
The TV will then switch on.
By either method the TV will switch on.
-or-
•
•
•
• CH CH
• , located
on the right
Connect the power cord to the 220-240V AC
50 Hz. Then the standby LED lights up (The
led will blink during the standby On/Off).
To switch on the TV from standby mode either:
Press the " “ button, or or a
numeric button on the remote control.
Press the middle of the control switch
side of the TV. The TV will then
switch on.
or
or
RC5100 RC1910
RC1910
RC5100

English - 2 -
Contents
Safety 2 - 3
Connections 4 - 5
Getting Started 6 - 11
Functions and Features 12 - 15
Preparation & Safety Precautions
For ventilation, leave a free space of at least 10 cm all around
the set. To prevent any fault and unsafe situations, please
do not place any objects on top of the set. Use this device in
moderate climates. Read the following recommended safety
precautions carefully for your safety.
Power Source: The TV set should be operated only from a
220-240 V AC, 50 Hz outlet. Ensure that you select the correct
voltage setting for your convenience.
Power Cord: Do not place the set, a piece of furniture, etc. on the
power cord (mains lead) or pinch the cord. Handle the power cord
by the plug. Do not unplug the appliance by pulling from the power
cord and never touch the power cord with wet hands as this could
cause a short circuit or electric shock. Never make a knot in the cord
or tie it with other cords. The power cords should be placed in such a
way that they are not likely to be stepped on. A damaged power cord
can cause fire or give you an electric shock. When it is damaged and
needs to be replaced, it should be done by qualified personnel.
This TV receiver is supplied with a moulded mains plug. The
mains plug must not be cut off, as it may contain a special radio
interference fi lter, the removal of which could lead to impaired
performance. If you wish to extend the lead, obtain an appropriate
safety approved extension lead or consult your dealer.
Observe the manufacturers instructions when connecting
extension leads to the set.
Moisture and Water: Do not use this device in a humid and
damp place (avoid the bathroom, the sink in the kitchen, and
near the washing machine). Do not expose this device to rain or
water, as this may be dangerous and do not place objects fi lled
with liquids, such as fl ower vases, on top. Avoid from dripping
or splashing. If any solid object or liquid falls into the cabinet,
unplug the TV and have it checked by qualifi ed personnel before
operating it any further.
Cleaning: Before cleaning, unplug the TV set from the wall
outlet. Do not use liquid or aerosol cleaners. Use soft and dry
cloth.
Ventilation: The slots and openings on the TV set are
intended for ventilation and to ensure reliable operation. To
prevent overheating, these openings must not be blocked or
covered in anyway.
Heat and Flames: The set should not be placed near to
open fl ames and sources of intense heat such as an electric
heater. Ensure that no open fl ame sources, such
as lighted candles, are placed on top of the TV.
Batteries should not be exposed to excessive heat
such as sunshine, fi re or the like.
Lightning: Before a storm and lightning or when going on
holiday, disconnect the power cord from the wall outlet.
Replacement Parts: When replacement parts are required, make
sure that the service technician has used replacement parts, which
are specified by the manufacturer or have the same specifications as
the original one. Unauthorized substitutions may result in fire, electrical
shock or other hazards.
Servicing: Please refer all servicing to qualifi ed personnel. Do
not remove the cover yourself as this may result in an electric
shock.
Waste Disposal:
Packaging and packaging aids are recyclable and should principally
be recycled. Packaging materials, such as foil bag, must be kept away
from children. Batteries, including those which are heavy metal-free,
should not be disposed of with household waste. Please dispose of
used batteries in an environmentally friendly manner. Find out about
the legal regulations which apply in your area.
• Don’t try to recharge batteries. Danger of explosion. Replace
batteries only with the same or equivalent type.
• The above mark is in compliance with the Waste Electrical and
Electronic Equipment Directive 2002/96/EC (WEEE). The mark
indicates the requirement NOT to dispose the equipment including
any spent or discarded batteries as unsorted municipal waste, but
use the return and collection systems available. If the batteries or
accumulators included with this equipment display the chemical
symbol Hg, Cd, or Pb, then it means that the battery has a heavy
metal content of more than 0.0005% Mercury, or more than 0.002%
Cadmium or more than, 0.004% Lead.
Disconnecting the Device: The mains plug is used to
disconnect TV set from the mains and therefore it must remain
readily operable.
Headphone Volume: Excessive sound pressure from
earphones and headphones can cause hearing loss.
Installation: To prevent injury, this device must be securely
attached to the wall in accordance with the installation
01_MB6X_[GB]_HITACHI_ORTAK_IB_50214635.indd 201_MB6X_[GB]_HITACHI_ORTAK_IB_50214635.indd 2 10.02.2012 17:52:4210.02.2012 17:52:42

English - 3 -
Functions and features may vary in
accordance with the model.
Please check this manual for available
functions.
instructions when mounted to the wall (if the option is
available).
LCD Screen
The LCD panel is a very high technology product with about
a million thin fi lm transistors, giving you fi ne picture details.
Occasionally, a few non-active pixels may appear on the
screen as a fi xed blue, green or red point. Please note that this
does not affect the performance of your product. To avoid this,
do not leave the screen in still picture for extended periods.
Warning! Do not leave your TV in standby or operating mode
when you leave your house.
Connection to a Television Distribution System (Cable TV etc.)
from Tuner: Device connected to the protective earthing of the
building installation through the mains connection or through other
apparatus with a connection to protective earthing-and to a television
distribution system using coaxial cable, may in some circumstances
create a fire hazard. Connection to a cable distribution system has
therefore to be provided through a device providing electrical isolation
below a certain frequency range (galvanic isolator, see EN 60728-11).
Electrical device not in the hands of children
Never let children use electrical device unsupervised. Children
can´t always recognize properly the possible dangers. Batteries
/ accumulators can be life threatening when swallowed. Store
batteries out of reach of small children. In case of swallowing
a battery medical aid has to be sought immediately. Also keep
the packaging foils away from children. There is danger of
suffocation.
01_MB6X_[GB]_HITACHI_ORTAK_IB_50214635.indd 301_MB6X_[GB]_HITACHI_ORTAK_IB_50214635.indd 3 10.02.2012 17:52:4310.02.2012 17:52:43

English - 4 -
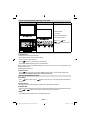
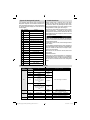
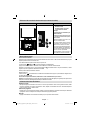
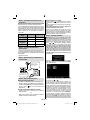
Viewing the Connections(Optional)
Note:Connections may vary depending on your model.
Connection Description Other Details
Scart socket• inputs or outputs for external devices. Note: If an external
device is connected via the SCART socket, the TV will automatically switch
to AV mode.
Component Video Inputs (YPbPr) are used for connecting component
video.
Green, Blue, Red; Rear
side, Optional
PC/YPbPr Audio Inputs are used for connecting audio signals of a PC or a
device that connects to the TV via YPbPr.
White, Red; Rear
side, Optional
HDMI Inputs are for connecting a device that has an HDMI socket (DVD
Player, Set-Top-Box vb). Your LCD TV is capable of displaying High Defi nition
pictures from the connected devices.
You can use side HDMI input of the TV to connect to an external HDMI device.
Use an HDMI cable to connect.
HDMI DEVICE SIDE VIEW
Rear and/or
Side
PC Input is for connecting a personal computer to the TV set.
For displaying your computer’s screen image on your LCD TV, you can
connect your computer to the TV set. Resolution information can be found
at the end of this booklet.
PC audio cable
(not supplied)
PC VGA cable
(not supplied)
Audio inputs of the TV
PC input of the TV
Audio output of the PC
Monitor output of the PC
Note: If your TV does not have YPbPr inputs, you can connect a YPbPr device
to your TV by using the PC Input with a YPbPr to PC cable (availability is
dependent on the model). Use Side AV audio connectors to enable sound
connection in such a case.
YPbPr to PC
connection
is optional,
depends on the
model.
01_MB6X_[GB]_HITACHI_ORTAK_IB_50214635.indd 401_MB6X_[GB]_HITACHI_ORTAK_IB_50214635.indd 4 10.02.2012 17:52:4310.02.2012 17:52:43

English - 5 -
Viewing the Connections - continued
Note: Connections may vary depending on your model.
Connection Description Other Details
Headphone jack is used for connecting an external headphone to the
system.
Side Video input is used for connecting video signals of a
camcorder or any other video device. Use Side Audio inputs to
enable sound connection.
Side, Yellow RCA
jack, optional.
Side Audio inputs are used for connecting audio signals of an
AV device.
Side, Red and White RCA
jacks, optional.
Side audio-video connection input is used for connecting video and
audio signals of external devices. Use the supplied AV connection
cable to enable Side AV connection. (depends of the models)
Use the YELLOW input to connect a video cable, use RED and WHITE
inputs to connect an audio cable. (Depending on the model)
Side, AV Phono jack,
optional. 1 X Video &
Audio Connection Cable
will be supplied if this
connector is available in
your model.
SPDIF Coaxial Out outputs digital audio signals of the currently watched
source. Use an appropriate SPDIF cable to enable sound connection via
SPDIF output of the TV.
Black, Rear side
RF Input connects to an aerial antenna system or a cable.
CI card allows you to view all the channels that you subscribe to.
USB input(s) Side
01_MB6X_[GB]_HITACHI_ORTAK_IB_50214635.indd 501_MB6X_[GB]_HITACHI_ORTAK_IB_50214635.indd 5 10.02.2012 17:52:4410.02.2012 17:52:44

English - 6 -
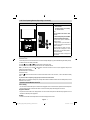
LCD TV and Operating Buttons (Depending on the model)
FRONT and REAR VIEW Control buttons VIEW Control Buttons
1. Standby/On button
2. TV/AV button
3. Programme Up/Down buttons
4. Volume Up/Down buttons
Note: Press “
” and “
” buttons at the same time to
view main menu.
Switching On/Off
To Switch the TV On
Connect the power cord to the 220-240V AC 50 Hz. •
Press STANDBY touch button. Then the standby LED lights up.•
To switch on the TV from standby mode either:•
Press the “•
” button, P+ / P- or a numeric button on the remote control.
Press the • -P/CH or P/CH+ touch button on the TV. The TV will then switch on.
Note: If you switch on your TV via PROGRAMME UP/DOWN buttons on the remote control or on the TV set, the programme that you were
watching last will be reselected.
By either method the TV will switch on.
To Switch the TV Off
Press the “• ” button on the remote control or press the STANDBY touch button on the TV, so the TV will switch to standby mode.
To power down the TV completely, unplug the power cord from the mains socket.•
Operation with the Buttons on the TV
Volume Setting
Press “• ” button to decrease volume or button to increase volume, so a volume level scale (slider) will be displayed on
the screen.
Programme Selection
Press “• P/CH +” button to select the next programme or “P/CH -” button to select the previous programme.
Viewing Main Menu
Press the “• V+”/”V-” button at the same time to view main menu. In the Main menu select sub-menu using “AV” button and set the sub-menu
using “
” or “ ” buttons. To learn the usage of the menus, refer to the menu system sections.
AV Mode
Press the “• AV” button in the control panel on the TV to switch between AV modes.
01_MB6X_[GB]_HITACHI_ORTAK_IB_50214635.indd 601_MB6X_[GB]_HITACHI_ORTAK_IB_50214635.indd 6 10.02.2012 17:52:4410.02.2012 17:52:44

English - 7 -
LCD TV and Operating Buttons (Depending on the model)
FRONT and REAR VIEW Control switch VIEW Control Switch
Up direction1.
Down direction2.
Programme/Volume / AV / Standby-3.
On selection switch
Note:
Press the middle of the switch to switch
on the TV.
To switch to standby mode, press the middle of
the switch and hold about a few seconds.
Move the switch, upward or downward to
change the volume.
To change channels, press the middle of
the switch once (Position 3) and then move
upward or downward.
Press the middle of the switch once more,
source OSD will be displayed. To select
desired source, move the switch upward or
downward and release.
Main menu OSD cannot be displayed via
control buttons.
Switching On/Off
To Switch the TV On
Connect the power cord to the 220-240V AC 50 Hz. Then the standby LED lights up (The led will blink during the standby On/Off).
To switch on the TV from standby mode either:
Press the “
” button, CH or CH or a numeric button on the remote control.
Press the middle of the control switch right side of the TV. The TV will then switch on.
Note: If you switch on your TV via CH
or CH buttons on the remote control or on the TV set, the programme that you were
watching last will be reselected.
By either method the TV will switch on.
To Switch the TV Off
Press the “
” button on the remote control or hold the control switch on the Tv until shut down , so the TV will switch to standby
mode.
To power down the TV completely, unplug the power cord from the mains socket.
Note: When the TV is switched to standby mode, standby LED can blink to indicate that features such as Standby Search, Over Air
Download or Timer is active.
Operation with the Buttons on the TV
Volume Setting
You can move the control switch upward or downward for changing the volume. To increase volume, please move the switch upward. •
Move the switch downward to decrease the volume. A volume level scale (slider) will be displayed on the screen.
Programme Selection
First press the control switch once to change channel. You can move the switch upward to select the next programme or move it •
downward to select the previous programme.
AV Mode
Press the control switch consecutively until the source OSD is displayed on the screen.•
01_MB6X_[GB]_HITACHI_ORTAK_IB_50214635.indd 701_MB6X_[GB]_HITACHI_ORTAK_IB_50214635.indd 7 10.02.2012 17:52:4510.02.2012 17:52:45

English - 8 -
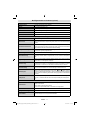
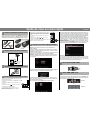
Step 1 - Checking the TV and Accessories
Note: You should check the accessories after purchasing. Make
sure that each accessory is included.
All models listed on the front cover are supplied with the following
items: Instruction Book, Quick Guide, Remote Control, 2 X AAA
Batteries and depending on which model you purchased, AV
connection Leads. Please refer to the table below to see which
leads are supplied for your model.
Model Number Side AV Lead YPbPr Lead
26H8L02-G
DD
32H6C03-G
UU
32H8S02-G
DU
40H6L03-G
DU
Step 2 - Installing the Batteries to the Remote
1. Lift the cover on the back of the remote upward gently.
2. Install two AAA batteries. Make sure to match the + and - ends
of the batteries in the battery compartment (observe the correct
polarity.
3. Replace the cover.
Step 3 - Connect Power and Antenna/Cable
insert plug...
REAR OF THE TV
or
Use 75 ohm round
antenna cable. You can
connect antenna or
satellite box antenna or
cable.
Make sure the power
plug is plugged securely
to the wall outlet.
Step 5 - Switching On/Off
To Switch the TV On
Connect the power cord to the 220-240V AC, 50 Hz. •
Press • button. Then the standby LED lights up.
To switch on the TV from standby mode either:•
Press the “•
” button, P+ / P- or a numeric button on the remote
control.
Control buttons on the TV( Optional)
Press the • -P/CH or P/CH+ button on the TV. The TV will then
switch on.
-or-
Press the middle of the control switch right side of the TV. The •
TV will then switch on.
To Switch the TV Off (Optional)
Press the “• ” button on the remote control or press the button
or hold the control switch on the Tv until shut down, so the TV
will switch to standby mode. (Depends model)
To power down the TV completely, unplug the power cord •
from the mains socket.
Note: When the TV is switched to standby mode, standby LED can
blink to indicate that features such as Standby Search, Over Air
Download or Timer is active. The LED can also blink when you switch
on the TV from standby mode.
Step 6 - First Time Installation
IMPORTANT: Ensure that the aerial is connected before
switching on the TV for the fi rst time installation. When the TV
is operated for the fi rst time, installation wizard will guide you through
the process. First, language selection screen will be displayed. Use
“
” or “ ” buttons to select your language and press OK button.
After selecting the language, “Welcome!” screen will be displayed,
requiring you to set Country, Teletext Language, Scan Encrypted
and Active Antenna (optional) options. Use navigation buttons to set
preferences. Note that Antenna power (optional) should be Off when
standard antenna is used instead of the active antenna. When fi nished,
press OK button on the remote control to continue and the following
message will be displayed on the screen:
Select YES and continue. Afterwards, search type OSD will be
displayed on the screen. If you select CABLE option, the following
screen will be displayed:
You can select frequency ranges from this screen. For highlighting
lines you see, use “ ” or “ ” button. You can enter the frequency
range manually by using the numeric buttons on the remote control.
Set Start and Stop Frequency as desired by using numeric buttons
on the remote control. After this operation, you can set Search
Step as 8000 KHz or 1000 KHz. If you select 1000 KHz, the Tv will
perform search process in a detailed way. Searching duration will
thus increase accordingly. When fi nished, press OK button to start
automatic search. If you select AERIAL option from the Search Type
screen, the television will search for digital terrestrial TV broadcasts.
You can press MENU button to cancel. After all the available stations are
stored, Channel List will be displayed on the screen. If you like the sort
channels, according to the LCN, please select Yes and than press OK.
Press OK button to quit channel list and watch TV.
01_MB6X_[GB]_HITACHI_ORTAK_IB_50214635.indd 801_MB6X_[GB]_HITACHI_ORTAK_IB_50214635.indd 8 10.02.2012 17:52:4810.02.2012 17:52:48

English - 9 -
Menu Operation
Press MENU button on your remote control to display main menu
screen. Use Left or Right button to select a menu tab and press
OK to enter. Use Left / Right / Up / Down to select or set an item.
Press RETURN/BACK or MENU button to quit a menu screen.
Input Selection
Once you have connected external systems to your TV, you can
switch to different input sources. Press SOURCE button on your
remote control consecutively to select the different sources.
Changing Channels and Volume
You can change the channel and adjust the volume by using the
V+/- and P+/- buttons on the remote. You can also change the
channels by pressing the buttons on the front panel of your TV.
Media Playback via USB Input
You can connect a USB hard disk drive or USB memory stick to
your TV by using the USB inputs of the TV. This feature allows
you to play fi les stored in a USB drive. 2.5” and 3.5” inch (hdd with
external power supply) external hard disk drives are supported.
IMPORTANT !You should back up your fi les before making any
connections to the TV set in order to avoid any possible data loss.
Note that manufacturer will not be responsible for any fi le damage
or data loss. It is possible that certain types of USB devices (e.g.
MP3 Players) or USB hard disk drives/memory sticks may not be
compatible with this TV. The TV supports FAT32 and NTFS disk
formatting. Note: While formatting a USB hard disk that has 1TB
(Tera Byte) or more fi le capacity, you can experience problems
with the formatting process. Quickly plugging and unplugging
USB devices, is a very hazardous operation. Especially, do not
repeatedly quickly plug and unplug the drive. This may cause
physical damage to the USB player and especially the USB device
itself. Do not pull out USB module while playing a fi le.
Media Browser Menu
You can play photo, music, and movie fi les stored on a USB disk
by connecting it to your TV and using the Media Browser screen.
To do this, perform the following: Connect a USB disk to the
USB input located on the side of the TV. Press MENU button and
select Media Browser tab by using Left/Right and OK buttons.
Main media browser screen will be displayed. You can display
the related content by selecting the Video, Music or Picture tab.
Follow the button indications under each on screen menu for
media playback features.
Changing Image Size: Picture Formats
Programmes can be watched in different picture formats, depending
on the transmission received. You can change the aspect ratio (image
size) of the TV for viewing the picture in different zoom modes. Press
SCREEN button repeatedly to change the image size.
Using the Channel List
The TV sorts all stored stations in the Channel List. You can edit
this channel list, set favourites or set active stations to be listed by
using the Channel List options. Press MENU button to view main
menu. Select Channel List item by using Left or Right button.
Press OK to view menu contents. Select Edit Channel List to
manage all stored channels. Use Up or Down and OK buttons
to select Edit Channel List. Press Up or Down button to select
the channel that will be processed. Press Left or Right button
to select a function on Channel List menu. Use P+/P- buttons to
move page up or down. Press MENU button to exit.
Defi nition of important terms - TV
Aspect Ratio
This refers to the ratio of the width to the height of a picture.
AVL
Automatic volume limiter.
Brightness
This defi nes the overall light level of the entire image.
Contrast
This will adjust the range of optical density and tone of the
complete picture.
Component Audio Inputs
Used for the standard analog audio for interconnection of
components.
Component Video Inputs (Y/Pb/Pr)
This video signal consist of colour differences and a luminance
signal.
DTV
Digital television broadcasts.
HDMI
High Defi nition Multimedia Interface. This connection provides
high-quality, uncompressed digital video and audio, combining
both audio and video signals via a single connection.
Multichannel audio
Means that the TV program is aired in several audio versions,
for example, in two different languages. This is possible if on
an analogue TV each of the two channels of the stereo tracks
for left and right channels are occupied with one audio track in
mono (single channel).In digital TV multiple audio streams can be
broadcasted and selected on the receiver side
NTSC
United States’ standard for scanning television signals that has
been adopted by some other countries.
LCN
LCN is the Logical Channel Number system that organizes
available broadcasts in accordance with a recognizable channel
sequence.
OSD
On Screen Display. Information, like channel number and volume
on the screen of a TV.
01_MB6X_[GB]_HITACHI_ORTAK_IB_50214635.indd 901_MB6X_[GB]_HITACHI_ORTAK_IB_50214635.indd 9 10.02.2012 17:52:4810.02.2012 17:52:48

English - 10 -
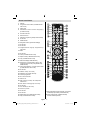
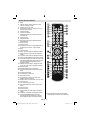
Remote Control Buttons
SLEEP
SCREEN
PRESETS
LANG.
FAV
EPG
SWAP
SOURCE
C
DISP.
SEARCH
MODE
INFO
CH
V
Standby1.
Image size / Zooms videos (in Media Browser 2.
video mode)
Sleep Timer3.
Mono/Stereo - Dual I-II / Currrent Language (*) 4.
(in DVB channels)
Favourite channels5.
Numeric buttons6.
Electronic programme guide(in DVB channels)7.
No function8.
Media Browser9.
Navigation buttons (Up/Down/Left/Right)10.
No function11.
No function12.
Programme Down / Page up - Programme Up / 13.
Page down
Mute14.
No function15.
Pause (in Media Browser mode)16.
Rapid reverse (in Media Browser mode)17.
Play (in Media Browser mode)18.
Red button/Stop(in Media Browser)19.
Green button / List Schedule (in EPG) / Tag/20.
Untag All(in favourite list) / Play-Slideshow(in
Media Browser)
Picture mode selecion. / Changes picture mode 21.
(in Media Browser video mode)
No function22.
Teletext / Mix (in TXT mode) 23.
Subtitle on-off (in DVB channels) 24.
Previous programme25.
AV / Source selection26.
Menu on-off27.
Okay (Confi rm) / Hold (in TXT mode)/ Edit 28.
Channel List
Exit / Return / Index page (in TXT mode)29.
No function30.
Info / Reveal (in TXT mode)31.
Volume Up / Down32.
No function 33.
No function34.
Rapid advance (in Media Browser mode)35.
Stop (in Media Browser mode)36.
Blue button/Edit Channel List/Filter (İn Favourite 37.
List&EPG)/Loop-Shuffl e (in Media Browser)
Yellow button/Pause (in Media Browser)/38.
Timeline Schedule(in EPG)
01_MB6X_[GB]_HITACHI_ORTAK_IB_50214635.indd 1001_MB6X_[GB]_HITACHI_ORTAK_IB_50214635.indd 10 10.02.2012 17:52:4810.02.2012 17:52:48

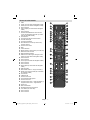
English - 11 -
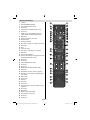
Remote Control Buttons
Standby1.
Pause (in Media Browser mode)2.
Stop (in Media Browser mode)3.
No function4.
Rapid advance (in Media Browser mode)5.
No function6.
Subtitle on-off / TXT subtitle (analogue TV 7.
mode) / Subtitle (in Media Browser mode)
Blue button8.
Yellow button: Active channel list9.
Numeric buttons10.
Previous programme 11.
OK / Select / Hold (in TXT mode) / Channel List12.
Cursor right13.
Mute14.
Volume up / down15.
Exit / Return / Index page (in TXT mode)16.
Sleep timer 17.
Favourite mode selection18.
Picture mode selection / Changes picture mode 19.
(in Media Browser video mode)
No function20.
No function21.
Play (in Media Browser mode)22.
No function23.
No function24.
Rapid reverse (in Media Browser mode)25.
Image size26.
Mono/Stereo - Dual I-II / Current Language27.
Red button / Zooms videos (in Media Browser 28.
video mode)
Green button29.
Teletext / Mix30.
Cursor up31.
Cursor left32.
Cursor down33.
Programme Down - Page up / Programme Up - 34.
Page down
AV / Source35.
Menu on/off36.
Electronic Programme Guide37.
Info / Reveal (in TXT mode)38.
No function39.
No function40.
1
2
3
4
5
6
7
8
9
0
SCREEN LANG SUBTITLE
ZOOM
REPEAT
ROOT
TITLE
TEXT
SWAP
OK
P/CH
MENU SOURCE RETURN
ANGLE
SEARCH
MODE
DISPLAY PRESETS
EPG INFO SLEEP FAV
PIP
01_MB6X_[GB]_HITACHI_ORTAK_IB_50214635.indd 1101_MB6X_[GB]_HITACHI_ORTAK_IB_50214635.indd 11 10.02.2012 17:52:4910.02.2012 17:52:49

English - 12 -
Menu Features and Functions (Optional)
Picture Menu Contents
Mode
For your viewing requirements, you can set the related mode option. Picture mode can
be set to one of these options: Cinema , Game , Dynamic and Natural .
Contrast Sets the lightness and darkness values of the screen.
Brightness Sets the brightness value for the screen.
Sharpness Sets the sharpness value for the objects displayed on the screen.
Colour Sets the colour value, adjusting the colours.
Colour Temp Sets the desired colour tone.
Noise Reduction
If the broadcast signal is weak and the picture is noisy, use Noise Reduction setting to reduce the
noise amount. Noise Reduction can be set to one of these options: Low, Medium, High or Off.
Game Mode
When Game Mode is set to On, specifi c game mode settings, which are optimized for better video
quality, will be loaded. Note: When Game Mode is on, some items in the Picture Settings menu
will be unavailable to be set.
Movie Sense
Use “
” or “ ” to set as Low, Med, High or Off. While Movie Sense is active, it will optimise
the TV’s video settings for motional images to acquire a better quality and readibility. When
Movie Sense option is set to Low, Med or High, Movie Sense demo option will be available. If
one of these options is selected and if you press OK button, then the demo mode starts. While
demo mode is active, the screen will be divided into two sections, one displaying the movie
sense activity, the other displaying the normal settings for TV screen.
Picture Zoom Sets the picture size to Auto,16:9, Subtitle,14:9, 14:9 Zoom, 4:3, Panoramic or Cinema.
Reset Resets the picture settings to factory default settings.
Autoposition (in PC mode) Automatically optimizes the display. Press OK to optimize.
H Position (in PC mode) This item shifts the image horizontally to right hand side or left hand side of the screen.
V Position (in PC mode) This item shifts the image vertically towards the top or bottom of the screen.
Dot Clock (in PC mode)
Dot Clock adjustments correct the interference that appear as vertical banding in dot
intensive presentations like spreadsheets or paragraphs or text in smaller fonts.
Phase (in PC mode)
Depending on the resolution and scan frequency that you input to the TV set, you may see a
hazy or noisy picture on the screen. In such a case you can use this item to get a clear picture
by trial and error method.
Sound Menu Contents
Volume Adjusts volume level.
Equalizer:
In equalizer menu, the preset can be changed to Music, Movie, Speech, Flat, Classic
and User. Press the MENU button to return to the previous menu. Equalizer menu settings
can be changed manually only when the Equalizer Mode is in User.
Balance This setting is used for emphasizing left or right speaker balance.
Headphone Sets headphone volume.
Sound Mode You can select Mono, Stereo, Dual I or Dual II mode, only if the selected channel supports that mode.
AVL
Automatic Volume Limiting (AVL) function sets the sound to obtain fi xed output level between
programmes (For instance, volume level of advertisements tend to be louder than programmes).
Dynamic Bass Dynamic Bass is used to increase bass effect of the TV set.
Surround Mode Surround mode can be change as On or Off.
Digital Out Sets digital out audio type.
01_MB6X_[GB]_HITACHI_ORTAK_IB_50214635.indd 1201_MB6X_[GB]_HITACHI_ORTAK_IB_50214635.indd 12 10.02.2012 17:52:4910.02.2012 17:52:49

English - 13 -
Menu Features and Functions (Optional)
Settings Menu Contents
Conditional Access Controls conditional access modules when available.
Language Confi gures language settings.
Parental Confi gures parental settings.
Timers Sets timers for selected programmes.
Date/Time Sets date and time.
Sources Enables or disables selected source options.
Other Settings: Displays other setting options of the TV set:
Menu Timeout Changes timeout duration for menu screens.
Active Antenna
This feature enables or disables the use of active antennas. When antenna power option
is set as On, +5V will be transmitted to the antenna output.
Scan Encrypted
When this setting is on, search process will locate the encrypted channels as well. If it is set
as Off, encrypted channels will not be located in automatic search or manual search.
Backlight
This setting controls the backlight level and it can be set to Maximum, Minimum, Medium
and Eco Mode (optional).
Blue Background Activates or deactivates blue background system when the signal is weak or absent.
Software Upgrade
To ensure that your TV always has the most update information, you can use this setting.
In order for the proper operation, please ensure that the TV is set to standby mode.
Hard of Hearing
If the broadcaster enables any special signal concerning the audio, you can set this setting
as On to receive such signals.
Audio Description
Audio description refers to an additional narration track for blind and visually impaired
viewers of visual media, including television and movies. You can use this feature, only
if the broadcaster supports that additional narration track.
Auto TV Off
You can set the timeout value of auto off feature.After the timeout value is reached and
the Tv is not operated for selected time , the TV will go off.
Broadcast Type
When you set the desired broadcast type by using “
” or “ ” button, the TV will display
the related channel list. If the related source has does not include any stored channels,
“No channels for this type have been found.” message will be displayed on the screen.
Standby Search
If you change Standby Search to Off, this function will be unavailable. To use Standby
search please make sure that you select Standby Search as On.
Installation Menu Contents
Auto Channel Scan
Displays automatic tuning options. Digital: Searches and stores aerial DVB stations.
Analogue: Searches and stores analog stations.
Full: Searches and stores both analog and aerial DVB stations
Manual Channel Scan This feature can be used for direct broadcast entry.
Analog Fine Tune You can use this setting for fi ne tuning analogue channels.
First Time Installation
Deletes all stored channels and settings, resets TV to factory settings and starts fi rst
time installation.
01_MB6X_[GB]_HITACHI_ORTAK_IB_50214635.indd 1301_MB6X_[GB]_HITACHI_ORTAK_IB_50214635.indd 13 10.02.2012 17:52:5010.02.2012 17:52:50

English - 14 -
Environmental Information
This television is designed to consume less energy to save
environment. You not only help to save the environment but
also you can save money by reducing electricity bills thanks
to the energy effi ciency feauture of this TV. To reduce energy
consumption, you should take the following steps:
You can use Power Save Mode setting, located in the Other
Settings menu. If you set Power Save Mode as On, the TV will
switch to energy-saving mode and luminance level of TV set will
be decreased to optimum level. Note that some picture settings
will be unavailable to be changed when the TV is in Power Save
Mode.
When the TV is not in use, please switch off or disconnect the TV
from the mains plug. This will also reduce energy consumption.
Disconnect power when going away for longer time.
It is highly recommended to activate Power Save Mode setting
to reduce your annual power consumption. And also it is
recommended to disconnect the TV from the mains plug to save
energy more when you do not use.
Please helps us to save environment by following these steps.
Repair Information
Please refer all servicing to qualifi ed personnel. Only qualifi ed
personnel must repair the TV. Please contact your local dealer,
where you have purchased this TV for further information.
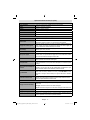
Supported File Formats for USB Mode (Optional)
Media
File
Extension
Format Remarks
Vi
deo
A
ud
i
o
(
M
a
xim
u
m r
eso
l
ut
i
o
n
/
Bi
t
r
ate
etc
.
)
Movie
.mpg
.mpeg
MPEG1,2
MPE
G
Layer
1
/
2
/3
MAX 1920x1080 @ 30P 20Mbit/sec
.dat MPEG1,2
MPEG2
.vob MPEG2
.mkv H.264, MPEG1,2,4
EA
C
3
/
A
C3
.mp4
MPEG4
Xvid 1.00,
Xvid 1.01, Xvid 1.02, Xvid
1.03, Xvid 1.10-beta1/2
H.264
PCM/MP3
.avi
MPEG2, MPEG4
Xvid 1.00,
Xvid 1.01, Xvid 1.02, Xvid
1.03, Xvid 1.10-beta1/2
H.264
PCM
Music .mp3 -
MPEG 1
Layer 1 / 2
(MP3)
32Kbps ~ 320Kbps(Bit rate)
32KHz ~ 48KHz(Sampling rate)
Photo
.jpg .jpeg Baseline JPEG - max WxH = 15360x8640 4147200bytes
. Progressive JPEG - max WxH = 9600x6400 3840000bytes
.bmp - - max WxH = 9600x6400 3840000bytes
Subtitle .sub .srt - - -
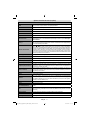
PC Typical Display Modes (Optional)
The following table is an illustration of some of the typical video
display modes. Your TV may not support all resolutions. Your TV
supports up to 1360x768 (for WXGA displays) or 1920x1080-1200
(for Full HD displays).
Index Resolution Frequency
1
640x350 85 Hz
2
640x400 70 Hz
3
640x480 60Hz-66Hz-72Hz -75Hz-85Hz
4
800x600 56Hz-60Hz-70Hz-72Hz -75Hz-85Hz
5
832x624 75 Hz
6
1024x768 60Hz-66Hz-70Hz-72Hz -75Hz
7
1152x864 60Hz-70Hz-75Hz -85 Hz
8
1280x768 60 HzA - 60 HzB-75Hz-85Hz
9
1280x960 60Hz-75Hz-85Hz
10
1280x1024 60Hz-75Hz-85Hz
11
1360x768 60 Hz
12
1400x1050 60 HzA-60 HzB
13
1400x1050 75Hz-85Hz
14
1400x900 65Hz - 75Hz
15
1600x1200 60 Hz
16
1680x1050 60 Hz
17
1920x1080 60 HzA - 60 HzB
18
1920x1200 60Hz - 60HzA
01_MB6X_[GB]_HITACHI_ORTAK_IB_50214635.indd 1401_MB6X_[GB]_HITACHI_ORTAK_IB_50214635.indd 14 10.02.2012 17:52:5010.02.2012 17:52:50

English - 15 -
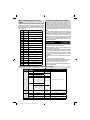
Specifi cations ( Depending on the model )
TV BROADCASTING
PAL/SECAM B/G D/K K’ I/I’ L/L’
RECEIVING CHANNELS
VHF (BAND I/III)
UHF (BAND U)
HYPERBAND
NUMBER OF PRESET CHANNELS
1000
CHANNEL INDICATOR
On Screen Display
RF AERIAL INPUT
75 Ohm (unbalanced)
OPERATING VOLTAGE
220-240V AC, 50 Hz.
AUDIO
German + Nicam Stereo
AUDIO OUTPUT POWER (W
RMS.
) (10% THD)
HITACHI 26H8L02-G 2 x 6
HITACHI 32H6C03-G 2 x 6
HITACHI 32H8S02-G 2 x 6
HITACHI 40H6L03-G 2 x 8
POWER CONSUMPTION (W)
HITACHI 26H8L02-G 65 W
(max) < 0.5 W (Standby)
HITACHI 32H6C03-G 150 W (max) < 0.5 W (Standby)
HITACHI 32H8S02-G 65 W (max) < 0.5 W (Standby)
HITACHI 40H6L03-G 150 W (max) < 0.5 W (Standby)
PANEL
HITACHI 26H8L02-G 16:9 display, 26” Screen Size
HITACHI 32H6C03-G 16:9 display, 32” Screen Size
HITACHI 32H8S02-G 16:9 display, 32” Screen Size
HITACHI 40H6L03-G 16:9 display, 40” Screen Size
VESA
HITACHI 26H8L02-G M4 - 100 x 100
HITACHI 32H6C03-G M5 - 200 x 200
HITACHI 32H8S02-G M4 - 200 x 100
HITACHI 40H6L03-G M8 - 400 x 400
DVB-T functionality information
This DVB receiver is only suitable for use in the country which it
was designed to be used in.
Although this DVB receiver conforms to the latest DVB
specifi cations at the time of manufacture, we cannot guarantee
compatibility with future DVB transmissions due to changes that
may be implemented in broadcast signals and technologies.
Some digital television functions may not be available in all
countries.
We continually strive to improve our products; therefore,
specifi cations may change without prior notice.
For advice on where to purchase accessories, please contact the
store where you purchased your equipment.
01_MB6X_[GB]_HITACHI_ORTAK_IB_50214635.indd 1501_MB6X_[GB]_HITACHI_ORTAK_IB_50214635.indd 15 10.02.2012 17:52:5010.02.2012 17:52:50

5
4
Kurzanleitung
Um das TV-Gerät aus (je nach Modell)
Starten des Autosetup-Verfahrens
Hinweis: Schalten Sie das Gerät während der ersten Installation
nicht ab.
Wird das TV-Gerät zum ersten Mal eingeschaltet, führt der
Installationsassistent Sie durch den Vorgang. Zuerst wird der
Bildschirm zur Länderauswahl angezeigt:
Markieren Sie mit den Tasten oder die gewünschte Sprache
und drücken Sie die Taste „OK”. Danach wird das Menü "Erste
Installation" eingeblendet, wo Sie die Optionen Land,
Teletextsprache, Verschlüsselte Kanäle und Aktive Antenne
(optional) durchsuchen einstellen müssen.
Stellen Sie die erforderlichen Optionen mit den Navigationstasten ein
und drücken Sie OK, um fortzusetzen. Auf dem Bildschirm wird
folgender Hinweis eingeblendet:
Wählen Sie "Ja", um den automatischen Suchlauf zu starten und
"Nein", um abzubrechen. Drücken Sie OK. Danach erscheint auf
dem Bildschirm die OSD Digitaler Suchtyp.
Wenn Sie Option KABEL (CABLE) wählen, wird der folgende
Bildschirm angezeigt:
3
2
Legen Sie die Batterien in die Fernbedienung ein
Schließen Sie die Antenne direkt an
Ihr TV-Gerät an.
Schließen Sie das TV-Gerät an die Steckdose an
1
Legen Sie zwei Batterien vom Typ AAA/R3 oder einem
gleichwertigen Typ ein. Achten Sie beim Einsetzen der
Batterien auf die richtige Polung (+/-) und schließen Sie die
Batteriefachabdeckung.
RÜCKSEITE DES
TV-GERÄTS
Settop-Box
Verbindung
In diesem Bildschirm können Sie die Frequenzbereiche wählen.
Zum Markieren einer Zeile verwenden Sie die Tasten oder .
Sie können auch manuell über die Zifferntasten auf der
Fernbedienung einen Frequenzbereich eingeben. Stellen Sie die
gewünschte Start- und Endfrequenz mit den Zifferntasten auf der
Fernbedienung ein.
Danach können Sie das Suchintervall (Search Step) auf 8000 kHz
oder 1000 kHz einstellen. Wenn Sie 1000 kHz wählen, führt das
TV-Gerät den Suchvorgang detaillierter durch. Die Dauer der
Suche verlängert sich dementsprechend. Wenn Sie fertig sind,
drücken Sie OK, um die automatische Suche zu starten.
Wenn Sie die Option ANTENNE aus dem Bildschirm Suchtyp
auswählen, sucht das DTV nach digitalen terrestrischen TV-
Sendern.
Hinweis: Sie können die Taste MENU drücken, um
abzubrechen.
Wenn alle Kanäle gespeichert sind, wird die Kanalliste auf dem
Bildschirm angezeigt. Wenn Sie die Kanäle nach LCN sortieren
wollen, wählen Sie Ja und drücken Sie dann OK. Drücken Sie die
Taste OK, um die Kanalliste zu schließen und fernzusehen.
Um den HDMI-Eingang auszuwählen, drücken Sie die Taste
“SOURCE” auf der Fernbedienung. Bei jedem Tastendruck wird
durch die Bildschirmeinblendung Ihre Auswahl bestätigt.
Zum HDMI-Anschluss am Gerät
6
HDMI-Kabelverbindung
7
HDMI-Eingang
Setzen Sie den
Stecker ein.
•
•
•
•
•
Schließen Sie das Netzkabel an ein 220-240V AC-
Netz mit 50 Hz an.
Drücken Sie die Taste STANDBY. Die Standby-
LED leuchtet auf.
Um das TV-Gerät aus dem Standby einzuschalten,
Drücken Sie die Taste " ", P+ / P- oder eine
Zifferntaste auf der Fernbedienung.
Drücken Sie die Berührungstaste -P/CH oder
P/CH+ am TV-Gerät. Das TV-Gerät schaltet sich ein.
In beiden Fällen schaltet sich das TV-Gerät ein.
-oder-
•
•
• CH oder CH
•
Schließen Sie das Netzkabel an ein 220-240V
AC-Netz mit 50 Hz an. Die Standby-LED
leuchtet auf. (Bei Standby Ein/Aus blinkt die
LED)
Um das TV-Gerät aus dem Standby
einzuschalten,
Drücken Sie die Taste " ",
oder eine Zifferntaste auf der Fernbedienung.
Drücken Sie auf die Mitte des Steuerschalters
auf der rechten Seite des TV-Geräts. Das TV-
Gerät schaltet sich ein.
Oder
oder
RC5100 RC1910
RC1910
RC5100
DEUTSCH

Deutsch - 2 -
Inhalt
Sicherheit 2 - 3
Anschlüsse 4 - 5
Erste Schritte 6 - 12
Funktionen und Eigenschaften 13 - 16
Symbole in dieser Bedienungsanleitung
Folgende Symbole werden in der Bedienungsanleitung als
Markierung für Einschränkungen und Vorsichtsmaßnahmen sowie
Sicherheitshinweise verwendet. Bitte beachten Sie solche Hinweise
aus Gründen der Sicherheit.
WARNUNG
Wenn Sie eine so gekennzeichnete Warnung nicht beachten,
können ernsthafte Verletzungen oder Tod die Folge sein. Bitte
beachten Sie diese Warnungen unbedingt, um den sicheren Betrieb
zu gewährleisten.
GEFAHR ELEKTRISCHER SCHLÄGE!
Mit dem Blitzsymbol in dem Dreieck soll der Benutzer vor
gefährlicher Hochspannung im Inneren des Gerätes gewarnt
werden. Diese kann so hoch sein, dass die Gefahr eines
elektrischen Schlages für Personen besteht!
VORSICHT
So wird eine Vorsichtsmaßnahme gekennzeichnet, die Sie
ergreifen oder beachten sollten, damit Sie sich nicht verletzen
oder Sachschaden entsteht. Bitte beachten Sie diese Hinweise
unbedingt, um den sicheren Betrieb zu gewährleisten.
WICHTIG
So werden Warnungen zur Bedienung und Einschränkungen
angezeigt. Bitte lesen Sie diese Hinweise unbedingt, damit Sie das
System richtig bedienen und Beschädigungen vermeiden.
HINWEIS
So sind Hinweise zur Bedienung und zusätzliche Erläuterungen
gekennzeichnet. Das Beachten solcher Hinweise ist
empfehlenswert, damit die Funktionen optimal genutzt werden
können.
Sicherheitshinweise
Lesen Sie bitte zu Ihrer eigenen Sicherheit die folgenden
Sicherheitshinweise sorgfältig durch.
Elektrische Geräte nicht in Kinderhand
WARNUNG:
Lassen Sie Personen (einschließlich Kinder) mit eingeschränkten
physischen, sensorischen oder geistigen Fähigkeiten oder
mangels Erfahrung und/oder mangels Wissen niemals
unbeaufsichtigt ein Elektrogerät verwenden!
Kinder können mögliche Gefahren nicht richtig erkennen! Das
Verschlucken von Batterien oder Akkus kann lebensgefährlich
sein. Bewahren Sie Batterien stets für kleine Kinder unerreichbar
auf. Wird eine Batterie verschluckt, müssen Sie sofort ärztliche
Hilfe suchen. Bewahren Sie auch Verpackungsfolien für Kinder
unerreichbar auf. Es besteht Erstickungsgefahr.
Netzkabel
Stellen Sie keine Gegenstände auf das Netzkabel (weder das
Gerät selbst, noch Möbel usw.) und klemmen Sie das Kabel nicht
ein. Das Netzkabel darf nur am Stecker gehandhabt werden.
Trennen Sie das Gerät niemals durch Ziehen am Kabel vom Netz
und berühren Sie das Netzkabel niemals mit nassen Händen, da
dies zu einem Kurzschluss oder zu einem Stromschlag führen
kann. Machen Sie niemals Knoten in das Kabel, und binden
Sie es nie mit anderen Kabeln zusammen. Das Netzkabel
muss so verlegt werden, dass niemand auf das Kabel treten
kann. Beschädigungen am Netzkabel können zu Bränden oder
Stromschlägen führen. Wenn das Netzkabel beschädigt ist und
ausgetauscht werden muss, darf dies nur durch qualifi zierte
Personen erfolgen.
Feuchtigkeit und Wasser
Verwenden Sie dieses Gerät nicht in feuchter
oder dunstiger Umgebung (vermeiden Sie das
Badezimmer, die Spüle in der Küche oder die
Umgebung der Waschmaschine). Achten Sie
darauf, dass dieses Gerät niemals Regen oder
Wasser ausgesetzt ist, und stellen Sie keine mit
Flüssigkeit gefüllten Gefäße, wie zum Beispiel
Blumenvasen, auf dem Gerät ab. Meiden
Sie Tropf- und Spritzwasser, da dies zu einem Kurzschluss,
Stromschlag oder Defekt des Gerätes führen kann.
Sollte ein harter Gegenstand auf das Gerät fallen oder Flüssigkeit
in das Gerät eindringen, müssen Sie das Gerät vom Netz trennen
und durch eine qualifi zierte Fachkraft überprüfen lassen, bevor
es wieder betrieben werden kann.
Servicearbeiten
Überlassen Sie alle Wartungs-arbeiten dem qualifi zierten
Kundendienstpersonal. Öffnen Sie das
Gehäuse nicht selbst, da dies einen
elektrischen Schlag nach sich ziehen kann.
Kopfhörer-Lautstärke
Zu hoher Schalldruck oder zu hohe
Lautstärken von Kopfhörern können zu
Gehörschäden führen.
Batterien
VORSICHT: Legen Sie Batterien stets
polrichtig ein. Versuchen Sie Batterien nicht wieder aufzuladen
und werfen Sie sie unter keinen Umständen ins Feuer.
Explosionsgefahr!
Wandmontage
Um Verletzungen zu vermeiden, muss dieses Gerät in
Übereinstimmung mit den Installationsanweisungen sicher an der
Wand befestigt werden (wenn diese Option verfügbar ist).
Ersatzteile
Falls Ihr Gerät ein Ersatzteil benötigt, stellen Sie sicher, dass die
Person, die die Reparatur vornimmt, Teile verwendet, die vom
Hersteller spezifi ziert wurden oder die gleiche Spezifi kation haben
wie das Originalteil. Nicht zugelassene Ersatzteile könnten Brand,
elektrische Schläge oder andere Gefahren verursachen.
Stromquelle
Das Gerät darf nur an einer Netzsteckdose mit
220-240 V Wechselspannung und einer Frequenz von 50 Hz
02_MB6X_[DE]_HITACHI_ORTAK_IB_50214635.indd 202_MB6X_[DE]_HITACHI_ORTAK_IB_50214635.indd 2 10.02.2012 17:51:5610.02.2012 17:51:56

Deutsch - 3 -
Die Funktionen und Eigenschaften können je
nach Modell varieeren.
Bitte sehen Sie in diesem Handbuch nach,
welche Funktionen verfügbar sind.
betrieben werden. Stellen Sie sicher, dass Sie die richtige
Spannung verwenden, da sonst das Gerät beschädigt werden
könnte.
Reinigung
Ziehen Sie vor der Reinigung des Geräts den
Netzstecker aus der Steckdose. Verwenden Sie
keine fl üssigen oder Sprühreiniger. Benutzen Sie
ein weiches und trockenes Tuch, da sonst das
Gerät beschädigt werden könnte.
Gewitter
Trennen Sie das Netzkabel von der Steckdose
und ziehen Sie das Antennenkabel ab, falls es
Sturm oder Gewitter gibt oder das Gerät längere
Zeit nicht benutzt wird (z. B., wenn Sie in den
Urlaub fahren), da sonst das Gerät beschädigt
werden könnte.
Hitze und offenes Feuer
Das Gerät darf weder offenem Feuer noch
anderen Quellen intensiver Hitzestrahlung, wie
elektrischen Radiatoren, ausgesetzt werden.
Kerzen und andere offene Flammen müssen zu
jeder Zeit von diesem Produkt ferngehalten weden, um das
Ausbreiten von Feuer zu verhindern. Batterien dürfen niemals
zu großer Hitze wie direkter Sonneneinstrahlung, Feuer od. dgl.
ausgesetzt werden.
Belüftung
Die Schlitze und Öffnungen des Empfängers dienen der Belüftung
und sollen einen reibungslosen Betrieb gewährleisten. Um eine
Überhitzung zu vermeiden, sollten diese Öffnungen niemals
blockiert oder abgedeckt werden, da sonst das Gerät beschädigt
werden könnte.
Standby / Netzschalter
VORSICHT: Lassen Sie das TV-Gerät nicht im Standby- oder
aktiven Modus, wenn Sie weggehen.
Mit dem Netzschalter kann das Gerät nicht vollständig vom
Netz getrennt werden. Außerdem verbraucht das Gerät auch
im Standby-Betrieb Strom. Um das Gerät vollständig vom Netz
zu trennen, muss der Netzstecker aus der Steckdose gezogen
werden. Aus diesem Grund muss das Gerät so aufgestellt werden,
dass der ungehinderte Zugang zur Steckdose garantiert ist, damit
im Notfall der Netzstecker sofort gezogen werden kann. Um
Brandgefahr auszuschließen, sollte das Netzkabel bei längerer
Nichtverwendung des Geräts, zum Beispiel im Urlaub, unbedingt
von der Steckdose getrennt werden.
Trennen des Geräts vom Netz
Der Netzstecker wird verwendet, um das TV-Gerät vom Netz zu
trennen und muss daher stets gut zugänglich sein.
LCD-Bildschirm
Das LCD-Panel ist ein Hochtechnologieprodukt mit mehreren
Millionen Dünnschicht-Transistoren, die selbst feine Bilddetails
auflösen. Gelegentlich können einige inaktive Pixel als
unveränderlich blaue, grüne oder rote Punkte erscheinen. Wir
möchten ausdrücklich darauf hinweisen, dass dies die Leistung
oder Funktionsfähigkeit Ihres Produkts aber in keiner Weise
beeinträchtigt.
Entsorgung
Hinweise zur Entsorgung:•
Verpackung und Verpackungshilfen sind recyclebar
und sollten grundsätzlich wiederverwertet werden.
Verpackungsmaterial, wie z.B. Plastiktüten, darf
nicht in die Reichweite von Kindern gelangen.
Batterien, auch solche die frei von Schwermetallen
sind, dürfen nicht mit dem normalen Haushaltsmüll
entsorgt werden.
Bitte entsorgen Sie gebrauchte Batterien auf umweltgerechte
Weise. Erkundigen Sie sich nach den gesetzlichen Vorschriften,
die in Ihrem Gebiet gültig sind.
Dieses Symbol auf der Verpackung zeigt an, dass das elektrische
oder elektronische Gerät am Ende seiner Lebensdauer getrennt
vom normalen Haushaltsmüll entsorgt werden muss. Innerhalb
der EU gibt es getrennte Sammel- und Recyclingsysteme. Für
weitere Informationen wenden Sie sich bitte an die örtlichen
Behörden oder an den Händler, bei dem Sie das Produkt gekauft
haben.
Anschluss an ein TV-Verteilersystem (Kabel-TV etc.) vom
Tuner aus:
Der Anschluss von Geräten, die über die Netzverbindung oder
andere Geräte an die Schutzerdung des Gebäudes und an
ein TV-Verteilersystem über Koaxialkabel angeschlossen sind,
können unter bestimmten Umständen eine mögliche Feuergefahr
darstellen.
Außer Betrieb nehmen und lagern
Ziehen Sie den Netzstecker aus der Steckdose und verpacken
Sie das TV-Gerät in einer geeigneten Kartonage. Entnehmen
Sie die Batterien aus der Fernbedienung.und packen Sie die
Fernbedienung zum TV-Gerät.
HINWEIS: Das TV-Gerät sollte in einem trockenen und
staubfreien Raum gelagert werden.
Anschluss an ein TV-Verteilersystem (Kabel-TV etc.)
über den Tuner:
Der Anschluss von Geräten, die über die Netzverbindung
oder andere Geräte an die Schutzerdung des Gebäudes
angeschlossen sind, über Koaxialkabel an ein TV-Verteilersystem
kann unter Umständen eine mögliche Feuergefahr darstellen.
Eine Verbindung über einen Kabelverteilersystem ist nur dann
zulässig, wenn die Vorrichtung eine Isolierung unterhalb eines
gewissen Frequenzbereichs liefert (Galvanische Isolation, siehe
EN 60728-11)
02_MB6X_[DE]_HITACHI_ORTAK_IB_50214635.indd 302_MB6X_[DE]_HITACHI_ORTAK_IB_50214635.indd 3 10.02.2012 17:51:5710.02.2012 17:51:57

Deutsch - 4 -
Ansicht der Anschlüsse (optional)
HINWEIS: Die Anschlüsse können je nach Modell variieren.
Anschluss Beschreibung
Weitere
Details
SCART-Buchseneingänge • und -ausgänge für externe Geräte.
HINWEIS: Wenn ein externes Gerät über den SCART-Anschluss
angeschlossen wird, schaltet das Gerät automatisch in den AV-Modus.
Die Component Video-Eingänge (YPbPr) dienen zum Anschluss von
Geräten mit Component-Video.
Grün, Blau, Rot,
Rückseite, optional
Die Audioeingänge PC/YPbPr werden zum Anschließen des Audiosignals
eines PCs oder für ein Gerät, das über YPbPr an das TV-Gerät angeschlossen
wird, verwendet.
Weiß, Rot, Rückseite,
optional
Die HDMI-Eingänge dienen zum Anschluss an ein Gerät mit HDMI-Buchse
(DVD-Player, Settop-Box vb). Ihr LCD-TV-Gerät kann HD-Bilder von daran
angeschlossenen Geräten wiedergeben.
Sie können den seitlichen HDMI-Eingang am TV-Gerät verwenden, um ein
externes HDMI-Gerät anzuschließen. Verwenden Sie für den Anschluss
ein HDMI-Kabel.
HDMI-GERÄT SEITENANSICHT
Rückseite und/
oder Seite
Der PC-Eingang dient zum Anschluss eines PCs an das TV-Gerät.
Zur Anzeige des Computerbilds auf Ihrem LCD-TV können Sie dieses an
einen Computer anschließen. Informationen zur Aufl ösung fi nden Sie am
Ende dieser Broschüre.
PC-Audiokabel
(nicht mitgeliefert)
PC-VGA-Kabel
(nicht mitgeliefert)
Audioeingänge des TV-Geräts
PC-Eingang des TV-Geräts
Audioausgang des PC
Monitorausgang des PC
Note: If your TV does not have YPbPr inputs, you can connect a YPbPr device
to your TV by using the PC Input with a YPbPr to PC cable (availability is
dependent on the model). Use Side AV audio connectors to enable sound
connection in such a case.
Der YPbPr-PC-
Anschluss ist
optional und
vom Modell
abhängig.
02_MB6X_[DE]_HITACHI_ORTAK_IB_50214635.indd 402_MB6X_[DE]_HITACHI_ORTAK_IB_50214635.indd 4 10.02.2012 17:51:5810.02.2012 17:51:58
La page charge ...
La page charge ...
La page charge ...
La page charge ...
La page charge ...
La page charge ...
La page charge ...
La page charge ...
La page charge ...
La page charge ...
La page charge ...
La page charge ...
La page charge ...
La page charge ...
La page charge ...
La page charge ...
La page charge ...
La page charge ...
La page charge ...
La page charge ...
La page charge ...
La page charge ...
La page charge ...
La page charge ...
La page charge ...
La page charge ...
La page charge ...
La page charge ...
-
 1
1
-
 2
2
-
 3
3
-
 4
4
-
 5
5
-
 6
6
-
 7
7
-
 8
8
-
 9
9
-
 10
10
-
 11
11
-
 12
12
-
 13
13
-
 14
14
-
 15
15
-
 16
16
-
 17
17
-
 18
18
-
 19
19
-
 20
20
-
 21
21
-
 22
22
-
 23
23
-
 24
24
-
 25
25
-
 26
26
-
 27
27
-
 28
28
-
 29
29
-
 30
30
-
 31
31
-
 32
32
-
 33
33
-
 34
34
-
 35
35
-
 36
36
-
 37
37
-
 38
38
-
 39
39
-
 40
40
-
 41
41
-
 42
42
-
 43
43
-
 44
44
-
 45
45
-
 46
46
-
 47
47
-
 48
48


Hitachi 26H8L02-G Instructions Manual
- Catégorie
- Téléviseurs LCD
- Taper
- Instructions Manual
dans d''autres langues
- English: Hitachi 26H8L02-G
- Deutsch: Hitachi 26H8L02-G
Autres documents
-
 Grandin LV32W10 Operating Instructions Manual
-
Techwood VL19TV1001 Operating Instructions Manual
-
 Grandin L19V99S Operating Instructions Manual
-
Telefunken L22F137D2 Manuel utilisateur
-
-
Sharp LC-40SH340E Le manuel du propriétaire
-
-
-
Dual 22970 LED Le manuel du propriétaire
-
Salora 19LED7000T Le manuel du propriétaire

