Philips HP4585/00 Manuel utilisateur
- Catégorie
- Coiffeurs
- Taper
- Manuel utilisateur

English
Congratulations on your purchase, and welcome to Philips!
To fully benet from the support that Philips oers, register
your product at www.philips.com/welcome.
1 Important
Read this user manual carefully before you use the
appliance and keep it for future reference.
• WARNING: Do not use this
appliance near water.
• Never immerse the brush body
in water or any other liquid, nor
rinse it under the tap.
• Always switch o the appliance
after use.
• This appliance can be used
by children aged from 8 years
and above and persons with
reduced physical, sensory or
mental capabilities or lack of
experience and knowledge
if they have been given
supervision or instruction
concerning use of the appliance
in a safe way and understand
the hazards involved.
• Children shall not play with the
appliance. Cleaning and user
maintenance shall not be made
by children without supervision.
• Always return the appliance to
a service centre authorized by
Philips for examination or repair.
Repair by unqualied people
could result in an extremely
hazardous situation for the user.
• Never use any accessories or
parts from other manufacturers
or that Philips does not
specically recommend. If
you use such accessories or
Register your product and get support at
www.philips.com/welcome
Specifications are subject to change without notice
© 2016 Koninklijke Philips N.V.
All rights reserved.
3140 035 41771
HP4585
NL Gebruiksaanwijzing
ZH-CN ⩕ᝤڹ
EN User manual
FR Mode d’emploi
IT Manuale utente
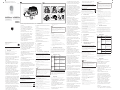
a
b
c
d
e
g
f
C
F
A
B
D
E
parts, your guarantee becomes
invalid.
• Do not use the appliance
for any other purpose than
described in this manual.
• Do not use the appliance on
articial hair.
• Never block the ion outlet.
• Do not insert metal objects
into the ion outlet to avoid
unexpected dangers.
• Do not use this ion brush
together with hairdryer for
styling purpose.
• Never rinse the brush body
under tap water.
• Do not expose the brush under
sunlight for long period of time.
The ultraviolet ray may lead to
aging in the brush, which the
product can break easily.
• Use and store the appliance at a
temperature between
15 °C and 35 °C.
• The appliance runs on one 1.5V
AAA alkaline battery.
• Open battery compartment in
order to install or remove the
battery.
• The bypack battery is not
rechargeable.
Non-rechargeable batteries are
not to be recharged.
• The rechargeable battery
must be removed out of the
appliance before being charged.
• Batteries are to be inserted with
the correct polarity.
• Exhausted batteries are to be
removed from the appliance
and safely disposed of.
• If the appliance is to be stored
unused for a long period, the
batteries should be removed.
• The supply terminals are not to
be short-circuited.
Electromagnetic elds (EMF)
This Philips appliance complies with all applicable
standards and regulations regarding exposure to
electromagnetic elds.
Environment
This symbol means that this product shall not be
disposed of with normal household waste
(2012/19/EU). Follow your country’s rules for the
separate collection of electrical and electronic
products. Correct disposal helps prevent negative
consequences for the environment and human health.
2 Introduction
The new Philips Ionic Styling Brush helps to make your hair
smooth and shiny anytime, anywhere with great brushing
experience.
• Ionic Care
This ionic styling brush has built-in ionizer, which generates
negative ions and neutralizes positive charge of static
electricity. It helps to reduce frizz and bring back shine and
smoothness to your hair instantly.
• Gentle Bristle
All bristles tips are seamless to avoid scrubbing damage on
scalp or hair trapping during usage. The special round ball
tip has bigger touching surface so that it’s more gentle to
vulnerable scalp.
• Optimal 3D Large Cushion
The optimally designed bristle cushion enables better force
distribution and follows the contours of the head naturally
for more convenience and comfort.
• Ergonomic Shape Brush
The seamless and ergonomically curved shell ts
in women’s hand perfectly, ensuring great handling
experience.
• Detachable Bristle Cushion
Bristle cushion can be easily detached so that you may
clean it with water regularly to keep bristle clean.
3 Overview
a Brush cushion
b Brush cushion release button
c Ion outlet
d Power-on indicator
e Brush body
f Power on/o switch
g Battery compartment
4 Use your ionic styling brush
Install and detach the brush cushion
1 ( Fig.C ) To remove the brush cushion ( a ), push the
release button (
b ) to detach it.
2 ( Fig.E ) To install the brush cushion ( a ), press it down
into the brush body, you will hear a “click” if it is installed
correctly.
Install and remove the battery
The ionic styling brush runs on one 1.5V AAA alkaline
battery. (Fig. D)
We provide with one 1.5V AAA battery.
1 To remove the battery compartment cover, pull it o the
appliance.
2 Put the battery in the battery holder or remove the
battery out of the compartment.
3 Push the battery compartment cover back onto the
appliance (‘click’).
Note
• Make sure that the + and - poles of the battery point in
the right direction.
• Make sure that your hands are dry when you insert the
battery.
• To avoid damage due to battery leakage. Remove the
battery if you are not going to use the appliance for a
month or more.
• Do not leave empty battery in the appliance.
Brush your hair ( Fig.B )
1 Turn on the ion styling brush by sliding the power on/o
switch (
f ) to .
» The power-on indicator (
d ) lights up.
» When the appliance is powered on, ions are
automatically and continuously released, reducing frizz
and providing additional shine.
» You may hear a sizzling sound. It’s common because it is
caused by the ion generator.
2 Brush softly your hair from the roots to the ends. Repeat
this step several times for smoother results.
3 Switch to to switch o the appliance.
» You may hear a sizzling sound. It’s common because the
ions are not released fully.
After use:
1 You can use a damp cloth to clean the brush body ( e ).
2 To clean the brush cushion ( a ):
• Use your ngers to remove the dust or hair on the brush.
• Detach the brush cushion from the brush body and rinse
it under tap water (Fig. F).
Note
• Make sure the brush cushion is completely dried
before re-attaching to the brush body.
• Never use corrosive liquid to clean the brush
cushion as it may cause damage to the product. It is
recommended to use household cleanser to clean the
brush cushion if needed.
3 Keep it in a safe and dry place or put it in your makeup
bag for daily use.
Tips & Tricks
1 The ionic brush performs better when the hair is
slightly wet.
2 If you wish to use the brush after washing your hair, dry
your hair until 70%-80% dry. Do not over dry your hair
because it may aect the result.
3 Comb your hair slowly and repeatedly from the root until
your hair is smooth. The time to comb varies according to
your hair type and length.
4 It is not easy to observe the eect if :
• You have short or natural curly hair.
• Your hair is easy to curl.
• Your hair condition is too dry or damaged.
• You have straightening perm within 3 to 4 months.
• You have some short newly grown hair.
5 Apply leave in hair conditioner to your hair after brushing
for best result.
5 Guarantee and service
If you need information e.g. about replacement of an
attachment or if you have a problem, please visit the Philips
website at www.philips.com/support or contact the Philips
Customer Care Centre in your country (you nd its phone
number in the worldwide guarantee leaet). If there is no
Consumer Care Centre in your country, go to your local
Philips dealer.
6 Troubleshooting
Problem Cause Solution
The
appliance
does not
work.
The battery is
exhausted.
Replace the battery.
You have not
placed the battery
in the battery
compartment
correctly.
Put the battery in
the compartment in
accordance with the +
and - indications in the
compartment.
You have
not attached
the battery
compartment
cover properly.
Push the battery
compartment cover onto
the appliance (‘click’).
The ion
indicator
does not
light up.
The battery
is installed
incorrectly.
Check if the battery is
installed with the right
pole.
The battery is
nearly empty.
Replace with a new
battery.
Français
Félicitations pour votre achat et bienvenue dans le monde
de Philips ! Pour proter pleinement de l’assistance oerte
par Philips, enregistrez votre appareil à l’adresse suivante :
www.philips.com/welcome.
1 Important
Lisez attentivement ce mode d’emploi avant d’utiliser
l’appareil et conservez-le pour un usage ultérieur.
• AVERTISSEMENT : n’utilisez pas
cet appareil à proximité d’une
source d’eau.
• Ne plongez jamais le corps
de la brosse dans l’eau ni
dans d’autres liquides et ne le
rincez pas.
• Éteignez toujours l’appareil
après utilisation.
• Cet appareil peut être utilisé
par des enfants âgés de 8 ans
ou plus, des personnes dont
les capacités physiques,
sensorielles ou intellectuelles
sont réduites ou des personnes
manquant d’expérience et de
connaissances, à condition
que ces enfants ou personnes
soient sous surveillance ou
qu’ils aient reçu des instructions
quant à l’utilisation sécurisée
de l’appareil et qu’ils aient
pris connaissance des
dangers encourus.
• Les enfants ne doivent pas
jouer avec l’appareil. Le
nettoyage et l’entretien ne
doivent pas être réalisés par des
enfants sans surveillance.
• Conez toujours l’appareil
à un Centre Service Agréé
Philips pour vérication ou
réparation. Toute réparation
par une personne non qualiée
peut s’avérer dangereuse
pour l’utilisateur.
• N’utilisez jamais d’accessoires
ou de pièces d’un autre
fabricant ou n’ayant pas été
spéciquement recommandés
par Philips. L’utilisation de
ce type d’accessoires ou de
pièces entraîne l’annulation de
la garantie.
• N’utilisez pas l’appareil dans
un autre but que celui qui est
indiqué dans ce manuel.
• N’utilisez pas l’appareil sur
cheveux articiels.
• N’obstruez jamais la sortie
des ions.
• N’insérez aucun objet
métallique dans la sortie des
ions pour éviter tout risque.
• N’utilisez jamais cette brosse
ionique avec un sèche-cheveux
pour vous coier.
• Ne rincez jamais le corps de la
brosse sous le robinet.
• N’exposez pas la brosse au
soleil pendant une période
prolongée. Les rayons
ultraviolets peuvent réduire
la durée de vie de la brosse
et fragiliser considérablement
le produit.
• Utilisez et conservez l’appareil à
une température comprise entre
15 °C et 35 °C.
• L’appareil fonctionne avec une
pile alcaline de type AAA 1,5 V.
• Ouvrez le compartiment à pile
pour installer ou enlever la pile.
• La pile fournie n’est pas
rechargeable. Ne rechargez pas
les piles non rechargeables.
• Retirez la pile rechargeable de
l’appareil avant de la recharger.
• Respectez la polarité des piles
lors de leur installation.
• Retirez les piles usagées de
l’appareil et mettez-les au rebut
en toute sécurité.
• Retirez les piles de l’appareil si
vous ne comptez pas vous en
servir pendant longtemps.
• Évitez tout court-circuit aux
bornes d’alimentation.
Champs électromagnétiques (CEM)
Cet appareil Philips est conforme à toutes les normes et à
tous les règlements applicables relatifs à l’exposition aux
champs électromagnétiques.
Environnement
Ce symbole signie que ce produit ne doit pas être
mis au rebut avec les ordures ménagères
(2012/19/UE). Respectez les règles en vigueur
dans votre pays pour la mise au rebut des produits
électriques et électroniques. Une mise au rebut correcte
contribue à préserver l’environnement et la santé.
2 Introduction
La nouvelle brosse ionique Philips vous permet d’avoir des
cheveux lisses et brillants en toutes circonstances tout en
protant d’un brossage exceptionnel.
• Fonction ionique
Cette brosse ionique possède un ioniseur intégré qui génère
des ions négatifs et neutralise ainsi la charge positive
d’électricité statique. Il permet de réduire les frisottis pour
des cheveux instantanément plus brillants et lisses.
• Brins doux
Les extrémités des brins sont arrondies pour éviter tout
frottement désagréable sur le cuir chevelu ou de se coincer
les cheveux pendant le brossage. Les extrémités spéciales
en forme de boule disposent d’une plus grande surface de
contact pour plus de douceur sur un cuir chevelu fragile.
• Grand coussin 3D idéal
Le coussin à brins d’excellente conception répartit mieux la
pression et suit naturellement les contours de la tête pour
une utilisation plus facile et confortable.
• Brosse ergonomique
Le boîtier ergonomique et homogène tient parfaitement
dans une main féminine, orant un maniement optimal.
• Coussin à brins amovible
Vous pouvez facilement détacher le coussin à brins pour le
nettoyer régulièrement à l’eau et maintenir les brins en état.
3 Présentation
a Coussin à brins
b Bouton de déverrouillage du coussin à brins
c Sortie des ions
d Voyant d’alimentation
e Corps de la brosse
f Interrupteur marche/arrêt
g Compartiment à piles
4 Utilisation de votre brosse
coiffante ionique
Installer et détacher le coussin à brins
1 ( Fig. C) Pour retirer le coussin à brins ( a ), appuyez sur
le bouton de déverrouillage (
b ) et détachez-le.
2 ( Fig. E) Pour installer le coussin à brins ( a ), pressez-le
sur le corps de la brosse. Vous entendrez un « clic » s’il
est installé correctement.
Installer et retirer la pile
La brosse coiante ionique fonctionne avec une pile
alcaline de type AAA 1,5 V. (Fig. D)
Elle est fournie avec une pile AAA 1,5 V.
1 Pour retirer le couvercle du compartiment à pile,
détachez-le de l’appareil.
2 Installez la pile dans le compartiment à pile ou retirez-la
de ce compartiment.
3 Replacez le couvercle du compartiment à pile sur
l’appareil en le faisant glisser jusqu’à ce qu’il s’enclenche
(« clic »).
Remarque
• Veillez à respecter la polarité des piles.
• Veillez à avoir les mains sèches avant d'insérer la pile.
• Pour éviter tout dommage dû à une fuite de la pile,
retirez la pile si vous n'allez pas utiliser l'appareil
pendant un mois ou plus.
• Retirez toujours la pile usagée de l'appareil.
Le brossage (Fig. B)
1 Allumez la brosse coiante ionique en faisant glisser le
bouton marche/arrêt (
f ) sur .
» Le voyant d’alimentation (
d ) s’allume.
» Lorsque l’appareil est sous tension, des ions sont
automatiquement et continuellement diusés pour
réduire les frisottis et orir plus de brillance.
» Vous entendrez peut-être un grésillement. Ce
phénomène est normal et causé par le diuseur d’ions.
2 Brossez délicatement vos cheveux des racines aux
pointes. Répétez cette étape plusieurs fois pour des
cheveux encore plus lisses.
3 Basculez l’interrupteur sur pour éteindre l’appareil.
» Vous entendrez peut-être un grésillement. Ce
phénomène est normal car les ions ne sont pas
complètement libérés.
Après utilisation :
1 Vous pouvez utiliser un chion humide pour nettoyer le
corps de la brosse (
e ).
2 Pour nettoyer le coussin à brins ( a ) :
• Enlevez la poussière et les cheveux de la brosse avec vos
doigts.
• Détachez le coussin à brins du corps de la brosse puis
rincez-le à l’eau du robinet (Fig. F).
Remarque
• Assurez-vous que le coussin à brins est complètement
sec avant de le réinstaller sur le corps de la brosse.
• N'utilisez jamais de produits corrosifs pour nettoyer le
coussin à brins car ils peuvent endommager le produit.
Si nécessaire, nous vous recommandons d'utiliser un
détergent ménager pour nettoyer le coussin à brins.
3 Conservez l’appareil dans un endroit sûr et sec ou
rangez-le dans votre trousse de maquillage pour une
utilisation quotidienne.
Trucs et astuces
1 Les performances de la brosse ionique sont meilleures
sur cheveux humides.
2 Si vous souhaitez utiliser la brosse après vous être lavé les
cheveux, séchez-vous les cheveux à 70 %-80%. Veillez à
ne pas trop sécher vos cheveux car cela pourrait aecter
le résultat.
3 Peignez délicatement vos cheveux à plusieurs reprises
en partant de la racine jusqu’à ce qu’ils soient lisses. Le
temps de brossage varie en fonction de votre longueur et
de votre type de cheveux.
4 Les eets seront peu visibles si :
• Vous avez les cheveux courts ou naturellement frisés.
• Vos cheveux bouclent facilement.
• Vos cheveux sont trop secs ou abîmés.
• Vous avez fait un lissage au cours des 3 à
4 derniers mois.
• Vous avez des mèches courtes.
5 Appliquez un soin revitalisant sans rinçage après avoir
brossé vos cheveux.
5 Garantie et service
Si vous souhaitez obtenir des informations supplémentaires,
par exemple sur le remplacement d’un accessoire, ou
si vous rencontrez un problème, visitez le site Web de
Philips à l’adresse www.philips.com/support ou contactez
le Service Consommateurs Philips de votre pays (vous
trouverez le numéro de téléphone correspondant sur le
dépliant de garantie internationale). S’il n’existe pas de
Service Consommateurs dans votre pays, adressez-vous à
votre revendeur Philips.
6 Dépannage
Problème Cause Solution
L'appareil ne
fonctionne
pas.
La pile est
épuisée.
Remplacez la pile.
La pile n'a pas
été placée
correctement
dans le
compartiment
à pile.
Placez la pile dans le
compartiment à pile
conformément à la
polarité indiquée dans
le compartiment.
Vous n'avez pas
correctement xé
le couvercle du
compartiment à
piles.
Positionnez le
couvercle du
compartiment à pile
sur l'appareil en le
faisant glisser jusqu'à
ce qu'il s'enclenche
(« clic »).
Le voyant de
la fonction
ionique ne
s'allume pas.
La pile n'est pas
correctement
installée.
Vériez que la polarité
des piles a bien été
respectée.
La pile est
presque vide.
Remplacez les piles.
Italiano
Congratulazioni per l’acquisto e benvenuti in Philips! Per
trarre il massimo vantaggio dall’assistenza fornita da Philips,
registrare il proprio prodotto sul sito
www.philips.com/welcome.
1 Importante
Leggere attentamente il presente manuale prima
di utilizzare l’apparecchio e conservarlo come
riferimento futuro.
• AVVERTENZA: non utilizzare
questo apparecchio in
prossimità di acqua.
• Non immergere mai il corpo
spazzola in acqua o in altri
liquidi e non risciacquarlo sotto
l’acqua corrente.
• Spegnere sempre l’apparecchio
dopo l’uso.
• Questo apparecchio può
essere usato da bambini a
partire dagli 8 anni in su e da
persone con capacità mentali,
siche o sensoriali ridotte, prive
di esperienza o conoscenze
adatte, a condizione che
abbiano ricevuto assistenza
o formazione per utilizzare
l’apparecchio in maniera
sicura e siano consapevoli dei
potenziali pericoli associati a
tale uso.
• Evitare che i bambini giochino
con l’apparecchio. Le operazioni

di pulizia e manutenzione non
devono essere eseguite da
bambini senza la supervisione
di un adulto.
• Per eventuali controlli o
riparazioni, rivolgersi sempre
a un centro servizi autorizzato
da Philips. La riparazione da
parte di persone non qualicate
potrebbe mettere in serio
pericolo l’incolumità dell’utente.
• Non utilizzare mai accessori o
parti di altri produttori oppure
componenti non consigliati in
modo specico da Philips. In
caso di utilizzo di tali accessori
o parti, la garanzia si annulla.
• Non utilizzare l’apparecchio per
scopi non descritti nel presente
manuale.
• Non utilizzare l’apparecchio su
capelli articiali.
• Non bloccare mai l’apertura di
ionizzazione.
• Per evitare pericoli imprevisti,
non inserire oggetti metallici
nell’apertura di ionizzazione.
• Non utilizzare questa spazzola
ionica insieme all’asciugacapelli
per eettuare la piega.
• Non esporre la spazzola
alla luce del sole per un
periodo di tempo prolungato.
I raggi ultravioletti possono
accelerare l’invecchiamento
dei componenti della spazzola,
facilitandone la rottura.
• Utilizzare e conservare
l’apparecchio a una
temperatura compresa tra 15 ºC
e 35 ºC.
• Per il funzionamento,
l’apparecchio richiede una
batteria alcalina AAA da 1,5 V.
• Aprire il vano batterie per
installare o rimuovere
la batteria.
• La batteria fornita non è
ricaricabile. Le batterie non
ricaricabili non devono
essere ricaricate.
• La batteria ricaricabile deve
essere rimossa dall’apparecchio
prima di essere caricata.
• Assicuratevi sempre di inserire
le batterie nel verso giusto.
• Le batterie esaurite devono
essere rimosse dall’apparecchio
e smaltite in modo sicuro.
• Se l’apparecchio è destinato
a rimanere inutilizzato per un
lungo periodo di tempo, le
batterie devono essere rimosse.
• Non mettete mai i terminali di
alimentazione in cortocircuito.
Campi elettromagnetici (EMF)
Questo apparecchio Philips è conforme a tutti gli standard e
alle norme relativi all’esposizione ai campi elettromagnetici.
Ambiente
- Questo simbolo indica che il prodotto non può
essere smaltito con i normali riuti domestici
(2012/19/UE).
- Ci sono due situazioni in cui potete restituire
gratuitamente il prodotto vecchio a un rivenditore:
1 Quando acquistate un prodotto nuovo, potete restituire
un prodotto simile al rivenditore.
2 Se non acquistate un prodotto nuovo, potete restituire
prodotti con dimensioni inferiori a 25 cm (lunghezza,
altezza e larghezza) ai rivenditori con supercie dedicata
alla vendita di prodotti elettrici ed elettronici superiore ai
400 m2.
In tutti gli altri casi, attenetevi alle normative di raccolta
dierenziata dei prodotti elettrici ed elettronici in vigore nel
vostro paese: un corretto smaltimento consente di evitare
conseguenze negative per l’ambiente e per la salute.
2 Introduzione
La nuova spazzola per lo styling agli ioni Philips aiuta
a rendere i capelli lisci e lucenti quando e dove vuoi tu.
Spazzolare i capelli non è mai stato così piacevole.
• Ionic Care
Lo ionizzatore integrato nella spazzola neutralizza la carica
positiva elettrostatica generando un usso di ioni negativi.
Contribuisce a ridurre l’eetto crespo e a ridonare subito
lucentezza e morbidezza ai capelli.
• Setole delicate
Le punte delle setole sono rivestite per evitare danni al
cuoio capelluto dovuti allo sfregamento o che i capelli
restino impigliati durante l’utilizzo. Le speciali punte
sferiche hanno una supercie più ampia per una maggiore
delicatezza, anche per il cuoio capelluto più sensibile.
• Grande cuscinetto dal design ottimale
Grazie al suo design ottimale, il cuscinetto delle setole
consente una distribuzione più uniforme della forza
assecondando il prolo della testa in modo naturale, per un
comfort e una praticità maggiori.
• Spazzola ergonomica
La forma arrotondata liscia ed ergonomica si adatta
perfettamente alla mano, consentendo un utilizzo ottimale.
• Cuscinetto delle setole rimovibile
Il cuscinetto delle setole può essere rimosso con semplicità
per una periodica pulizia con acqua, in modo da mantenere
le setole sempre pulite.
3 Panoramica
a Cuscinetto con spazzola
b Pulsante di rilascio del cuscinetto con spazzola
c Apertura di ionizzazione
d Spia di accensione
e Corpo spazzola
f Interruttore on/o
g Vano batterie
4 Utilizzo della spazzola per lo
styling agli ioni
Montaggio e smontaggio del cuscinetto
con spazzola
1 ( Fig. C ) Per rimuovere il cuscinetto con spazzola ( a ),
premere il pulsante di rilascio (
b ).
2 ( Fig. E ) Per ssare il cuscinetto con spazzola ( a ),
spingerlo verso il basso nel corpo della spazzola e
bloccarlo nché non scatta in posizione.
Installazione e rimozione della batteria
Per il funzionamento, la spazzola per lo styling agli ioni
richiede una batteria alcalina AAA da 1,5 V. ( Fig. D )
Viene fornita una batteria AAA da 1,5 V.
1 Per rimuovere il coperchio del vano batterie, estrarlo
dall’apparecchio.
2 Inserire la batteria nell’apposito supporto ( g ).
3 Far scorrere il coperchio del vano batterie
sull’apparecchio no a bloccarlo in posizione (clic).
Nota
• Controllare che la direzione dei poli +/- delle
batterie sia corretta.
• Assicurarsi di avere le mani perfettamente asciutte
quando si inserisce la batteria.
• Per evitare danni dovuti a perdite della batteria:
Togliere la batteria se si prevede di non usare
l'apparecchio per almeno un mese.
• Non lasciare la batteria scarica all'interno
dell'apparecchio.
Spazzolare i capelli ( Fig. B )
1 Accendere la spazzola per lo styling agli ioni facendo
scorrere l’interruttore on/o (
f ) su .
» La spia di accensione (
d ) si illumina.
» Quando l’apparecchio è acceso, gli ioni sono rilasciati
in maniera automatica e continua per ridurre l’eetto
crespo, orendo maggiore lucentezza.
» È possibile che si senta uno sfrigolio. Si tratta di un
fenomeno normale, causato dal generatore di ioni.
2 Spazzola delicatamente i capelli dalle radici no alle
punte. Ripetere l’operazione più volte per capelli ancora
più lisci.
3 Passare a per spegnere l’apparecchio.
» È possibile che si senta uno sfrigolio. Si tratta di un
fenomeno normale dovuto al mancato rilascio totale
degli ioni.
Dopo l’uso:
1 È possibile utilizzare un panno umido per pulire il corpo
della spazzola (
e ).
2 Per pulire il cuscinetto con spazzola ( a ).
3 Utilizzare le dita per rimuovere la polvere o i capelli
sulla spazzola.
4 Staccare il cuscinetto dal corpo della spazzola e
sciacquarlo sotto l’acqua corrente (Fig. F).
Nota
• Assicurarsi che il cuscinetto sia completamente
asciutto prima di rimontarlo sul corpo della spazzola.
• Non utilizzare mai liquidi corrosivi per pulire il
cuscinetto, poiché possono danneggiarlo. Si consiglia
di utilizzare del detergente domestico per pulire il
cuscinetto con spazzola, se necessario.
5 Conservare la spazzola in un luogo sicuro e asciutto o
metterla nella propria trousse per averla sempre a portata
di mano.
Consigli e suggerimenti:
1 La spazzola ionica fornisce risultati migliori con i capelli
leggermente umidi.
2 Se si desidera utilizzare la spazzola dopo aver lavato
i capelli, asciugarli al 70%-80%. Non asciugarli
completamente per evitare di compromettere i risultati.
3 Pettinare i capelli dalle radici lentamente e più volte
nché non risultano lisci. La durata dell’operazione varia
in base al tipo di capelli e alla loro lunghezza. L’eetto
non è evidente se:
• I capelli sono corti o naturalmente ricci.
• I capelli si arricciano facilmente.
• I capelli sono troppo secchi o danneggiati.
• È stato eettuato un trattamento lisciante permanente
3 o 4 mesi prima.
• È presente della ricrescita recente.
4 Applicare un balsamo sui capelli dopo averli spazzolati
per un risultato migliore.
5 Garanzia e assistenza
Per ricevere ulteriori informazioni (ad esempio, sulla
sostituzione di un accessorio) o per risolvere eventuali
problemi, visitare il sito Web Philips all’indirizzo
www.philips.com/support oppure contattare il Centro
Assistenza Clienti Philips di zona (il numero di telefono è
riportato nell’opuscolo della garanzia). Se nel proprio paese
non è presente alcun centro di assistenza clienti, rivolgersi al
proprio rivenditore Philips.
6 Risoluzione dei problemi
Problema Causa Soluzione
L'apparecchio
non funziona.
La batteria è
scarica.
Sostituire la batteria.
La batteria non è
stata posizionata
correttamente
nell'apposito vano.
Inserire la batteria
nell'apposito vano
rispettando le
indicazioni + e -.
Il coperchio del
vano batterie non
è stato posizionato
correttamente.
Far scorrere il
coperchio del
vano batterie
sull'apparecchio
no a bloccarlo in
posizione (clic).
L'indicatore
ionico non si
accende
La batteria non
è stata inserita
correttamente.
Vericare se la
batteria è stata
inserita con i poli nel
lato corretto.
La batteria è quasi
scarica.
Sostituire con una
nuova batteria.
Nederlands
Gefeliciteerd met uw aankoop en welkom bij Philips!
Registreer uw product op www.philips.com/welcome om
optimaal gebruik te kunnen maken van de door Philips
geboden ondersteuning.
1 Belangrijk
Lees deze gebruiksaanwijzing zorgvuldig door voordat u het
apparaat gaat gebruiken. Bewaar de gebruiksaanwijzing om
deze indien nodig te kunnen raadplegen.
• WAARSCHUWING: gebruik
dit apparaat niet in de buurt
van water.
• Dompel de borstel nooit in
water of een andere vloeistof
en spoel deze ook niet af onder
de kraan.
• Schakel het apparaat na gebruik
altijd uit.
• Dit apparaat kan worden
gebruikt door kinderen vanaf
8 jaar en door personen met
verminderde lichamelijke,
zintuiglijke of geestelijke
capaciteiten of weinig ervaring
en kennis, mits zij toezicht of
instructie hebben ontvangen
aangaande veilig gebruik van
het apparaat, en zij de gevaren
van het gebruik begrijpen.
• Kinderen mogen niet met het
apparaat spelen. Reiniging en
onderhoud dienen niet zonder
toezicht door kinderen te
worden uitgevoerd.
• Breng het apparaat altijd naar
een door Philips geautoriseerd
servicecentrum voor onderzoek
of reparatie. Reparatie door
een onbevoegde persoon
kan leiden tot een bijzonder
gevaarlijke situatie voor de
gebruiker.
• Gebruik nooit accessoires
of onderdelen van andere
fabrikanten of die niet speciek
zijn aanbevolen door Philips.
Als u dergelijke accessoires of
onderdelen gebruikt, vervalt de
garantie.
• Gebruik het apparaat niet
voor andere doeleinden
dan beschreven in deze
gebruiksaanwijzing.
• Gebruik het apparaat niet op
kunsthaar.
• Blokkeer nooit de
uitlaatopening voor ionen.
• Steek geen metalen voorwerpen
in de uitlaatopening voor ionen,
dit kan gevaarlijk zijn.
• Gebruik deze ionenborstel niet
samen met een föhn om uw
haar in model te brengen.
• Spoel de borstel nooit af onder
de kraan.
• Laat de borstel niet lang
in de volle zon liggen. De
ultraviolette straling kan leiden
tot veroudering, waardoor de
borstel gemakkelijk kan breken.
• Gebruik en bewaar het apparaat
bij een temperatuur tussen 15 °C
en 35 °C.
• Het apparaat werkt op één
AAA-alkalinebatterij van 1,5 V.
• Open het batterijcompartiment
om de batterij te plaatsen of te
verwijderen.
• De meegeleverde batterij is niet
oplaadbaar. Niet-oplaadbare
batterijen mogen nooit worden
opgeladen.
• De oplaadbare batterij moet uit
het apparaat worden verwijderd
voordat u de batterij oplaadt.
• Plaats de batterijen zo dat
de polen in de juiste richting
wijzen.
• Lege batterijen moeten uit het
apparaat worden verwijderd en
op een veilige manier worden
afgevoerd.
• Als het apparaat gedurende
een lange periode wordt
opgeborgen, moeten de
batterijen worden verwijderd.
• Sluit de contactpunten niet kort.
Elektromagnetische velden (EMV)
Dit Philips-apparaat voldoet aan alle normen en
voorschriften met betrekking tot blootstelling aan
elektromagnetische velden.
Milieu
Dit symbool betekent dat dit product niet bij
het gewone huishoudelijke afval mag worden
weggegooid (2012/19/EU). Volg de geldende
regels in uw land voor de gescheiden inzameling
van elektrische en elektronische producten. Als u correct
verwijdert, voorkomt u negatieve gevolgen voor het milieu
en de volksgezondheid.
2 Inleiding
De nieuwe ionenborstel van Philips helpt om uw haar altijd
en overal glad en glanzend te maken.
• Ionenverzorging
Deze ionenborstel heeft een ingebouwde ionisator, die
negatieve ionen voortbrengt en de positieve lading van
statische elektriciteit neutraliseert. De borstel vermindert
pluizigheid en maakt uw haar in een oogwenk weer glad en
glanzend.
• Zachte borstelharen
De toppen van de borstelharen zijn naadloos om
beschadiging van de hoofdhuid of in de knoop raken van
het haar te voorkomen. De speciale ronde top heeft een
groter oppervlak, waardoor de borstelharen zachter zijn voor
de kwetsbare hoofdhuid.
• Optimaal driedimensionaal kussen
Het optimaal ontworpen borstelkussen zorgt voor een
betere krachtverdeling en volgt de contouren van het hoofd
op natuurlijke wijze, voor meer gemak en comfort.
• Ergonomisch gevormde borstel
Het naadloze en ergonomisch gevormde handvat past
perfect in de hand, zodat het borstelen als vanzelf gaat.
• Afneembaar borstelkussen
Het borstelkussen kan eenvoudig worden verwijderd, zodat
u dit regelmatig met water kunt reinigen om de borstel
schoon te houden.
3 Overzicht
a Borstelkussen
b Ontgrendelknop borstelkussen
c Uitlaatopening voor ionen
d Aan-lampje
e Borstelbehuizing
f Aan-uitschakelaar
g Batterijvak
4 De ionenborstel gebruiken
Het borstelkussen bevestigen en
afnemen
1 ( Fig. C ) Om het borstelkussen ( a ) af te nemen, drukt u
op de ontgrendelknop (
b ).
2 ( Fig. E ) Om het borstelkussen ( a ) te bevestigen, drukt
u het in de borstel totdat u een klik hoort.
De batterij plaatsen en verwijderen
De ionenborstel werkt op één AAA-alkalinebatterij van
1,5 V. (Fig. D)
Eén AAA-alkalinebatterij van 1,5 V wordt meegeleverd.
1 Om het deksel van het batterijvak te verwijderen, trekt u
het van het apparaat af.
2 Plaats de batterij in de batterijhouder of verwijder de
batterij uit het batterijvak.
3 Duw het deksel van het batterijvak weer op het apparaat
(‘klik’).
Opmerking
• Zorg ervoor dat de + en - polen van de batterij in de
juiste richting wijzen.
• Zorg ervoor dat uw handen droog zijn wanneer u de
batterij plaatst.
• U kunt schade door lekkende batterijen als volgt
voorkomen: Verwijder de batterij als u het apparaat
een maand of langer niet gaat gebruiken.
• Laat nooit lege batterijen in het apparaat zitten.
Uw haar borstelen ( Fig. B )
1 Schakel de ionenborstel in door de aan-uitschakelaar
(
f ) naar te schuiven.
» De aan-indicator (
d ) gaat branden.
» Als het apparaat is ingeschakeld, worden voortdurend en
automatisch ionen uitgegeven voor minder pluizig haar
en meer glans.
» U kunt een knetterend of sissend geluid horen. Dit
is normaal. Het geluid wordt veroorzaakt door de
ionengenerator.
2 Borstel zachtjes uw haar vanaf de wortel tot de
punten. Herhaal deze stap meerdere keren voor een
gladder resultaat.
3 Zet de knop op om het apparaat uit te schakelen.
» U kunt een knetterend of sissend geluid horen.
Dit is normaal. Het komt omdat de ionen niet
volledig vrijkomen.
Na gebruik:
1 U kunt de borstelbehuizing ( e ) met een vochtige doek
reinigen.
2 Het borstelkussen ( a ) reinigen:
• Verwijder met uw vingers stof of haren van de borstel.
• Verwijder het borstelkussen van de borstel en spoel het
onder de kraan af (Fig. F).
Opmerking
• Zorg ervoor dat het borstelkussen volkomen droog is
voordat u het opnieuw op de borstel bevestigt.
• Gebruik nooit een bijtende vloeistof om het
borstelkussen te reinigen, want dit kan leiden
tot beschadiging van het product. Het verdient
aanbeveling om zo nodig gebruik te maken van een
huishoudelijk reinigingsmiddel voor het schoonmaken
van het borstelkussen.
3 Bewaar het product op een veilige en droge plaats of in
uw make-uptasje voor dagelijks gebruik.
Tips en trucs
1 De ionenborstel werkt beter op haar dat enigszins
vochtig is.
2 Als u de borstel wilt gebruiken nadat u uw haar hebt
gewassen, moet het haar voor 70%-80% droog zijn. Maak
het haar niet te droog, want dit kan van invloed zijn op
het resultaat.
3 Kam uw haar langzaam en herhaaldelijk vanaf de wortel
tot het haar glad is. De tijd die je nodig hebt voor het
kammen is afhankelijk van je haartype en -lengte.
4 Het is niet gemakkelijk om het eect te zien in de
volgende gevallen:
• U hebt kort of natuurlijk krullend haar.
• Uw haar krult gemakkelijk.
• Uw haar is te droog of beschadigd.
• U hebt 3 tot 4 maanden geleden uw haar laten
ontkrullen met een permanent.
• U hebt kort, pas uitgegroeid haar.
5 Behandel het haar na het borstelen met conditioner voor
het beste resultaat.
5 Garantie en service
Als u informatie nodig hebt (bijv. over het vervangen van
een opzetstuk) of als u een probleem hebt, bezoek dan
de Philips-website (www.philips.com/support) of neem
contact op met het Philips Customer Care Centre in uw land
(u vindt het telefoonnummer in het ‘worldwide guarantee’-
vouwblad). Als er geen Consumer Care Centre in uw land is,
ga dan naar uw Philips-dealer.
6 Problemen oplossen
Probleem Oorzaak Oplossing
Het apparaat
werkt niet.
De batterij is
leeg.
Vervang de batterij.
U hebt de
batterij niet
goed in het
batterijvak
geplaatst.
Plaats de batterij
in het batterijvak
volgens de + en -
aanduidingen in het
batterijvak.
U hebt het
deksel van het
batterijvak niet
goed bevestigd.
Duw het deksel van
het batterijvak op het
apparaat ('klik').
Het
indicatielampje
voor ionen gaat
niet branden.
De batterij is niet
juist geplaatst.
Controleer of de
batterij op de juiste
manier is geplaatst.
De batterij is
bijna leeg.
Plaats een nieuwe
batterij.
キҀ͚᪴
々嬈⾎䕪⿆杤潎㨈庴 ᴚ柄ℏ㱌潃ᴠᵬ⾎俣⃬ᶑ⊽柄ℏ㱌㊶ẁ
䕪㐕潎嫝☎YYYRJKNKRUEQOYGNEQOG㯎⾎䕪ᶍ⎧Ȥ
䛺㺮θ䶦
ṥ䐎ᶍ⎧ᴱℳ潎嫝ᶺ䶬擫嫡㘒䐎ㄝㄱ潎ⵜ⢋⑪ể䪇᷋ẁ㓋⋴
⊨仩Ȥ
• 婌⌰潜嫝⇥☎晆康㬚䕪☖㒟ṥ䐎㘒
ᶍ⎧Ȥ
• 婌⌰䨌⋝㯎悰潜䡧㩈䐎☎ㄹⷦ䕪㬚
湿⠚ᳱ廁圲㳫㯽Ȥ
• ᳳ塧⫬㞙ḹ㱞⁋㬚ᴓ潎ᵅᳳ塧☎僐
㙋㬚湿⠚ᳱₘ㯽Ȥ
• ṥ䐎⋴潎ↇ⺫⁙擓ᶍ⎧䐛㵶Ȥ
• 㘒ᶍ⎧廨⋮䐗⭧ー᷋ᳰⵚ湪䕪
‥䧋᷋⊰侈ḹᳳὋ⁎ȣ々墯ー䮤䡄
ᳰ㗯斂䝳ー丠ᴵ䗞⁙䶵楲⍲䛋媬䕪
ᶠ⟑ṥ䐎潎Ḭℳ㊶㔕㗯ᶠ⫟ᶼ᷒ṥ
䐎㘒ᶍ⎧廁圲䖷䙉ー⫢潎᷋䝔ể
ᶼ᷒⩯⁎ṥ䐎潎ⵜᳺ媏ᶼ᷒㓴䕣䗞
⁙䕪≗⪙Ȥ
• ᳳ媏‥䧋䊏仳㘒ᶍ⎧Ȥᳳ塧媏‥
䧋☎㓆ᶠ䖷䙉䕪⾫ₛᳱ廁圲㳫㯧⍲
ểȤ
• ᶍ⎧⋐俣廧№柄ℏ㱌㉮㘩䕪㗳ↇᴓ
⺩㞦ỔȤ䐗ᳳ⋮㜢ᶠ⌾廁圲Ổ䋬⋕
俣⫬䐎ㄝ乔ᵴ㙧ⶌ≗敏䕪❩☖Ȥ
• ⃭⇥ṥ䐎䐗⁜⩩ℜ弆䐅ᶍ䕪潎ー
㘐䶵柄ℏ㱌䅟ℑ㊎制䕪ᷡḻ攪ᷜー
忎ᷜȤ⡨㚂ṥ䐎㩊䭡攪ᷜー忎ᷜ潎
⾎䕪ểỔ⫬⠗㐮Ȥ
• 嫝⇥⫬㘒ᶍ⎧䐎ᵴ㘒ㄱᴓ嫚㓴᷋
⟼䕪ᷡḻ⁜⩩䐎建Ȥ
• 嫝⇥⫬ᶍ⎧䐎ᵴἭ⊷Ȥ
• 嫝⇥攡❄尅䢡⨶㉸⃠⋉Ȥ
• 嫝⇥⫬悷⭄䅏ḹ㊸⁋尅䢡⨶㉸⃠
⋉潎彥″⃠䊖⿵⟼≗敏Ȥ
• 嫝⇥⫬尅䢡⨶弆♱㞙᳴䐛⌟枴᳦屝
ṥ䐎廁圲乴⊷弆♱Ȥ
• 嫝⇥☎㬚湿⠚ᳱₘ㯽㞙ḹȤ
• 嫝⇥⫬弆♱㞙摥㓜據㗃㔸ᵴ
攙 ᳱȤ䰑⟼䶥⋕俣⫢僚弆♱㞙仧
⇼潎弆ヶᶍ⎧⪟㓹ㅾ㒓Ȥ
• ⷠ媔☎°C僙°Cᴱ據䕪㴏ⶌ
ᳱṥ䐎⍲⨾㐤ᶍ⎧Ȥ
• ᶍ⎧ṥ䐎᳦全8###䞗⼍䐛㭆
ⳋṂȤ
• ㄹⷦ䐛㭆䖼᷋⩯垫ー⊼⃠䐛㭆Ȥ
• 敵攪䕪䐛㭆ᴠ晄⋕䐛䐛㭆Ȥᳳ⋕
⫟晄⋕䐛䐛㭆廁圲䐛Ȥ
• 凋ṥ䐎⋕䐛䐛㭆䐛㭆䐛ℳ条
⫬⁜ᶴᶍ⎧ᴓ⊼⃠Ȥ
• ⩯垫䐛㭆㓜旦䝔ể㙧⼍㩉䝔Ȥ
• 䐛㭆䐛悵份⬣⋴⫬⁜ᶴᶍ⎧ᴓ
⊼⃠ⵜ⩯⁎☖ⷩ乔Ȥ
• 凋摥㘅ᳳṥ䐎㘒ᶍ⎧⫬䐛㭆
⊼⃠Ȥ
• ᶍ⎧䕪㩉尅㙧ᴱ據ᳳ⋕䛓峕Ȥ
⩢ⷮ౧&.'
㘒柄ℏ㱌ᶍ⎧䨌⋮ㄦ㗯㗯⁙㖚昘ᵴ䐛䞧☠䕪廨䐎㛭€⍲㮻墪Ȥ
⣜Ԋ
㩊䨌⋝坎䠠㘒ᶍ⎧ᳳ俣᳦᳴儒䕪䐅㰡♩☤᳦⋲ⷩ乔
'7Ȥ嫝彛⺐⾎ㄦ☎䕪◣⪜☖∠⁙ᵴ⃬䭡㐜斬
䐛⨶⍲䐛㫺ᶍ⎧䕪墪Ȥ㩉䝔ⷩ乔⫬㗯ᵴ彥″⫟䊕❩⍲
ᶠ䭡Ὃ弆ヶ尅晈⹗⎳Ȥ
キϸ
柄ℏ㱌⁎㒖ᳰ⳨䕪尅䢡⨶弆♱㞙俣⠅敵㓜敵☖ể⾎䕪䢦⊷杠㶷
㚺ᶔ潎⋲㓜ⴌ㙋⃠兘䕪ṥ䐎ḹ楲Ȥ
• 䉌⻨ၽڨ៑
嫋尅䢡⨶㞙乔䢡⨶⊷䐅╎潎⋕᷋ᶍ䐅尅䢡⨶潎ᴓ⍲昿䐛䕪㩉
䐛剝Ȥ㗯ᵴ₵⫷昿䐛ⴌ㙋䕪㫁嵧潎≙㓜悳䊖杠㶷㚺ᶔ䕪䢦⊷Ȥ
• ళ⋓ᷠ咬
ㄦ㗯㞙湥⫼䧕☭悭䐎◬㲌 㶷㓆七廄㊋潎彥″☎ṥ䐎庭䣱Ḋ⪙⠚
䖔ーㆯㅕ⠚⊷Ȥ䅟㩰䋩⹈杜䧕⁝㗯㗚⠍䕪㊋壌晈潎㗚幡㚺☖⍛ㆊ
俬⸗䕪⠚䖔Ȥ
• %ٲ⅁咬
䶵庭᷾⇼媤媇䕪㞙湥⚑俣⠅劝㗚⡣☖⃬㑉Ṃ䐎ↁ潎僐䀜尚⋮⠚
忎幔ⶹ潎䐎屝㙋㗚㒟ấ僸廨Ȥ
• ϧᕔࡃ⮱ᷠҀ䃫䃎
㜟㉔ᶠḹⳋ䣱⩌媤媇䕪⸍晈侲⟙俣⡣䕪尚⋮⡙⟑䕪ㄱ⹈潎䝔ể
⃠兘䕪㋇ḹ楲Ȥ
• ज៳ࢥᷠ咬
㞙湥⚑⋕幡㙤ㆬ≞潎ấᵴ䶵ⴞ䐎㬚㳫㯧潎᷊㞙湥⢱䶮㯧₦⡨㒖Ȥ
ắ䔝
a 㞙湥⚑
b 㞙湥⚑悰㐤掔
c 尅䢡⨶㉸⃠⋉
d ⌕䠠㽕
e 㞙ḹ
f 䐛㵶ⷦ⁙
g 䐛㭆ᶹ
Ҭ⩕䉌⻨ၽ䕍ಸᷠ
Ⴖ㷲হ៳ࢥᷠ咬
1 潊◤%潋塧ㆬᳱ㞙湥⚑a潎嫝㇯ᳱ悰㐤掔b⫬
⁜ㆬᳱȤ
2 潊◤'潋塧⩯垫㞙湥⚑a潎嫝⫬⁜⋷ᳱ㇯⁋㞙ḹ潎⩯垫
㩉䝔㓜Ḁ⌒№ć⍺⎸Ĉ᳦⟖Ȥ
Ⴖ㷲হ៳ࢥ⩢
尅䢡⨶弆♱㞙ṥ䐎᳦全᷵###䞗⼍䐛㭆ⳋṂȤ潊◤&潋
敵ᶍ⎧攪屆
1 ⊼ᳱ䐛㭆ᶹ䖼Ȥ
2 ⫬䐛㭆垫⁋䐛㭆ᶹーᶴ䐛㭆ᶹᴓ⊼⃠Ȥ
3 ⫬䐛㭆ᶹ䖼㇯◄ᶍ⎧ᳰ潊⋕⌒№ć⍺⎸Ĉ᳦⟖潋Ȥ
∕ᘼ
• 䝔ể䐛㭆䕪⍲㙧㒟⋷㩉䝔Ȥ
• 垫⁋䐛㭆ᴱ㓜潎⊲ㄱ塧ểⵘ䃋Ȥ
• ᴠᵬ攘㩈◆䐛㭆㷵㲘仲ⷻ屝䕪㉅☵Ȥ⡨㚂屫庭᳦ᴐ㗮ᳳṥ
䐎㘒ᶍ⎧潎嫝⊼⃠䐛㭆Ȥ
• 嫝⇥⫬䐛悵份⬣䕪䐛㭆䐿☎ᶍ⎧ᴓȤ
ᷠ⤳ࣾ喍ఫ#喎
1 ⫬䐛㵶ⷦ⁙f㶷僙 潎ⷦ⌕尅䢡⨶弆♱㞙Ȥ
» 䐛㵶䠠㽕
d⫬ᶔ屝Ȥ
» ᶍ⎧开䐛⋴潎Ḁ僐ᳺ䷓☖悰㐤尅䢡⨶潎᷊䢦⊷㗚ↆ杠
㶷ȣ㚺ᶔȤ
» ⋕俣Ḁ⌒№⎃⎃⟖Ȥ庿开ⴞ㔕䐗尅䢡⨶⊷䐅╎ⷻ屝䕪Ȥ
2 ᶴ⊷㜟⋷⊷㞈幡㚺㞙䋬⠚⊷Ȥ悳⟳嫋㩋榊㑖㨇潎Ḁ᷊䢦⊷㗚
杠㶷Ȥ
3 ⫬ⷦ⁙㶷僙 ᷋⁙擓ᶍ⎧Ȥ
» ⋕俣Ḁ⌒№⎃⎃⟖Ȥ庿㔕䐗ᵴ尅䢡⨶悰㐤ᳳ⩲⁎ⷻ屝䕪Ȥ
Ҭ⩕ऻ喟
1 ⾎⋕䐎㵥⳩㳫㯧㞙ḹeȤ
2 塧㳫㯧㞙湥⚑a潜
• 䐎ㄱ㳫䋬弆♱㞙ᳰ䕪㽖⫾ー㫁⊷Ȥ
• ⫬㞙湥⚑ᶴ㞙ḹᳰ≞ᳱ潎☎㬚湿⠚ᳱₘ㯽◤(Ȥ
∕ᘼ
• 䝔ể㞙湥⚑⩲⁎ⵘ䃋⋴垫◄㞙ḹȤ
• 嫝⇥ṥ䐎倶啦⼍㲘ḹ㳫㯧㞙湥⚑潎⌌⋕俣Ḁ㉅☵ᶍ⎧Ȥ
⺫塧㓜ⷠ媔ṥ䐎⪜䐎㳫㯧ℨ㳫㯧㞙湥⚑Ȥ
3 ⫬ᶍ⎧⨾㐤☎⩯⁎ȣⵘ䃋䕪☖㒟ー㐤⁋⇼⡬⇫ᴓ潎ấᵴ敵㓜
敵☖ṥ䐎Ȥ
হ䃭⾺
1 尅䢡⨶乴⊷㞙☎⠚⊷⺔㵥㓜㐮㚂㗚ṙȤ
2 ⡨㚂⾎塧☎㯽⊷⋴ṥ䐎嫋乴⊷㞙潎嫝⫬⠚⊷⌟僙ヶ僙ヶ
ⵘȤ嫝ᳳ塧庭ⶌ⌟ⵘ⠚⊷潎庿㜝Ḁ⹗⎳㐮㚂Ȥ
3 ᶴ⊷㜟䷹え悳⟳☖㞙䋬⠚⊷潎䗚僙⠚⊷杠㶷Ȥ㞙⊷㓜據◆⠚⊷
䭡♱⍲摥ⶌ仲ⷨȤ
4 ☎᷋ᳱ⾫ₛᳱᳳ⪟㓹䗱№㐮㚂潜
• ⠚⊷幩䛓ー僐䀜≝
• ⠚⊷⪟㓹≝㗘
• ⊷導⠐ⵘーⳘ⊽㉅
• ☎№ᴐ㗮ㆯ䗚庭≝⊷
• 㗯᳦ᶁ㒖摥⃠㙋䕪䛓⊷
5 㞙⊷⋴☎⠚⊷ᳰṥ䐎″㯽ㆊ⊷䰆᷋庤№㗚ṙ㐮㚂Ȥ
Ԋԛ̻ߎ
⡨㚂⾎旦塧ᵬ壉ệ⽕潊⡨㗚㉈攪ᷜ䕪䗞⁙ệ⽕潋ー㗯ᷡḻ䑷擔潎
嫝媥擔柄ℏ㱌丷䦿YYYRJKNKRUEQOUWRRQTVȤ⾎ᵅ⋕᷋᳴⾎ㄦ
☎☖䕪柄ℏ㱌⪈ㄝ㗳ↇᴓ⺩伺䯡潊⋕ᶴểỔ≇ᴓㅤ№⁜䐛嫃
⋝䛧潋Ȥ⡨㚂⾎ㄦ☎䕪◣⪜☖∠㮇㗯2JKNKRU⪈ㄝ㗳ↇᴓ⺩潎嫝
⋷⸹☖䕪2JKNKRU䶵揦㬨Ȥ
ᩲ䯉ᢿ䮑
䬛䷅ ࣌ 㼐۠∂
ᶍ⎧㓆㮻
ⳋṂȤ
䐛㭆䐛悵Ⳙ份⬣Ȥ 㗚㉈䐛㭆Ȥ
⾎㘐⫬䐛㭆㩉䝔㐤⁋
䐛㭆ᶹȤ
㇯䁍䐛㭆ᶹᴓ䕪⍲
䠠⫬䐛㭆垫⁋䐛㭆ᶹȤ
䐛㭆ᶹ䖼⩯垫
ᳳ㩉䝔Ȥ
⫬䐛㭆ᶹ䖼㇯◄ᶍ⎧ᳰ
潊⋕⌒№ć⍺⎸Ĉ᳦⟖潋Ȥ
尅䢡⨶
䠠㽕
ᳳᶔȤ
䐛㭆⩯垫ᳳ㩉䝔Ȥ 㞦㛋㔕⌌᷋㩉䝔㙧⼍垫⁋
䐛㭆Ȥ
䐛㭆䐛悵ᴴ份⬣Ȥ ㉈䐎㒖䐛㭆Ȥ
-
 1
1
-
 2
2


Philips HP4585/00 Manuel utilisateur
- Catégorie
- Coiffeurs
- Taper
- Manuel utilisateur
dans d''autres langues
- italiano: Philips HP4585/00 Manuale utente
- English: Philips HP4585/00 User manual
- Nederlands: Philips HP4585/00 Handleiding