GE 20622 Manuel utilisateur
- Catégorie
- Télécommandes
- Taper
- Manuel utilisateur
Ce manuel convient également à

Universal Remote
Instruction Manual
Control Remoto Universal
Manual de Instrucciones
20621
dvd/vcr
Télécommande universelle
Mode d'emploi
Control Remoto Universal
Manual de Instrucciones

2
Congratulations on your purchase of the GE Universal
Remote Control. The GE Universal Remote Control is
one of the most easy to use remote controls available
today. With the GE Universal Remote Control, juggling
multiple remote controls is a thing of the past!
Your GE Universal Remote Control controls multiple
devices, including the most popular brands of TV, VCR,
DVD, CBL, and SAT. The GE Universal Remote Control
is easy to use, easy to program, and it gives you total
control—at the touch of your fingertips!
IMPORTANT: SAVE THIS MANUAL AND CODE LIST
FOR FUTURE REFERENCE
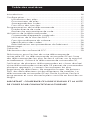
Introduction ..................................................................................... 2
Setup .................................................................................................. 3
Battery Installation ............................................................... 3
Battery Saver ........................................................................... 3
Code Saver ............................................................................... 3
Button Functions ................................................................... 4
Programming Your Remote ..................................................... 6
Direct Code Entry................................................................... 6
Auto Code Search ................................................................. 8
Using Your Remote ....................................................................10
Controlling Combo Devices ............................................10
Using SHIFT ............................................................................10
Master Volume Feature ....................................................11
Code Identification .............................................................12
Reset to Factory Settings .................................................12
Troubleshooting ..........................................................................13
Warranty ........................................................................................14
FCC Statement .............................................................................15
Table of Contents

3
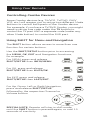
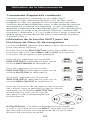
Your universal remote requires two (2) AAA
Alkaline batteries (not included).
To Install the Batteries
1. On the back of the remote, push down on the tab
and lift the cover off.
2. Match the (+) and (-) marks on the batteries to the
(+) and (-) marks inside the battery compartment,
then insert two (2) AAA Alkaline batteries. Be sure
to use fresh batteries.
3. Press the battery cover back into place.
NOTE: If your remote stops operating properly,
replace the batteries with new ones. The remote will
retain the codes you have programmed for up to 10
minutes after the batteries are removed.
Battery Precautions
• Do not mix old and new batteries.
• Do not mix alkaline, standard (carbon-zinc), or
rechargeable (Ni-Cd, Ni-MH, etc.) batteries.
• Always remove old, weak or worn-out batteries
promptly and recycle or dispose of them in
accordance with local and national regulations.
Battery Saver
Your remote automatically turns off if the buttons are
depressed more than 8 seconds. This will save your
batteries should your remote get stuck in a place
where the buttons remain depressed (e.g., between
the sofa cushions).
Code Saver
You will have up to 10 minutes to change the
batteries in your remote without losing codes you
have programmed. However, do not press any
buttons until batteries are installed in the remote. If
buttons are pressed without batteries in the remote,
all codes will be lost.
Setup

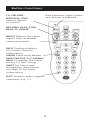
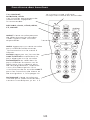
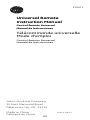
4
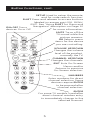
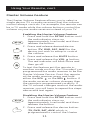
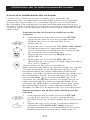
RECORD, PLAY, STOP,
REW, FF, PAUSE
TV, CBL/SAT,
DVR/AUX, DVD
Selects device
to control.
Red Indicator Lights when
any button is pressed.
INPUT Selects the video
inputs from available
viewing sources.
Button Functions
INFO Displays/selects
on-screen channel
information.
MENU Press and release
SHIFT/SETUP then MENU/
INFO to display the Menu
on the TV. See “Using
SHIFT for Menu and
Navigation” description
on Page 10 for more
information.
DOT: Used to select digital
channels, e.g., 2.3.

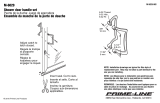
5
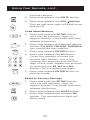
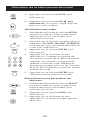
ENTER
For some TV models, used after
direct channel number entry
to immediately change to the
selected channel.
VOLUME UP/DOWN
Changes the volume
level of the product,
normally the TV.
NUMBERS
Enter numbers for direct
channel selection. Some
devices require ENTER
to be pressed after
channel selection.
ON•OFF Turns
devices On or Off.
CHANNEL UP/DOWN
Changes the channels.
Button Functions, cont.
SETUP Used to setup the remote,
and for code search function.
SHIFT Press and release to access buttons
labeled in reverse print (OK, MENU,
EXIT). See “Using SHIFT for Menu and
Navigation” description on Page 10
for more information.
MUTE Turns off the
TV sound while the
picture remains.
OK Selects menu
items for the device
you are controlling.
EXIT Exits On-Screen
Menus and/or
Returns to previous
On-Screen selection.

6
Programming Your Remote
Your GE universal remote control is designed to
control multiple audio/video devices such as TV,
DVD, DVR, satellite, cable and audio using only one
remote. To use this remote, you will need to program
it to control the devices of your choice. There are two
ways to program the remote - direct code entry or
auto code search.
Direct Code Entry (Recommended)
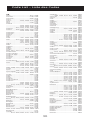
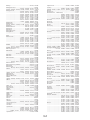
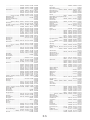
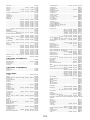
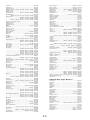
1. Locate the Remote Code List provided
in this manual. Find the DEVICE
CATEGORY you wish to program (for
example TV, DVD, CBL/SAT, DVR/
AUX) and then find the BRAND of that
device. Circle all the codes under that
brand. Example: For a GE TV, locate the
TV code section then circle all of the
GE TV codes.
2. Manually turn on the device you wish
to control.
3. Press and hold the SETUP button
until the red indicator light stays on
(approximately 4 seconds) and then
release the SETUP button.
4. Press and release the desired device
button on the remote (TV, DVD, CBL/
SAT, DVR/AUX). The red indicator will
blink once and then remain on.
5. Enter the first 4-digit code previously
found in the code list using the
number buttons on the remote. If the
code entered is a valid code, the red
indicator light will turn off. If the code
entered is not a valid code, the red
indicator light will flash and remain on
allowing you to re-enter the code.
Note: If no buttons are pressed for 10
seconds, the remote will exit the SETUP
mode and you will have to start over.

7
Programming Your Remote, cont.
6. Point the remote at the device. Press
the POWER button—if the device
turns off, no further programming is
required for that device. If the device
does not turn off, return to step 3
and use the next code found in the
code list. Continue this process until
a code for your device is found.
7. Repeat this process for each device
(for example TV, DVD, CBL/SAT, DVR/
AUX) in your home entertainment
system you wish to control. Three
devices can be programmed.
Programming Notes
• If your device does not respond to the remote
after trying all codes listed or your brand is not
listed in the code list, use the Auto Code Search
method to program your remote.
• Sometimes the first code that “works” with your
device may operate only a few functions of your
device. There may be another code in the code
list that performs more functions. Try other codes
from the code list for more functionality.
• With the Direct Code Entry method, you can
program any device button to control any device
in your home entertainment system.
For example, you can use the DVR/AUX device
button to control an audio receiver or a DVD, VCR,
satellite device, etc.
• For combination devices, you may have to enter a
code for each device. For example, for a VCR/DVD
device, you may have to enter a code for the DVD
under the DVD button and enter a code for the
VCR using a different device button on the remote.
• Write down the code found to operate your device
for future reference.

8
Programming Your Remote, cont.
Auto Code Search
The Auto Code Search searches automatically
through all of the codes stored in this remote. Read
all the following steps prior to starting the auto
search as you will need to be prepared to lock-in the
proper code when found.
1. Manually turn on the device you wish
to control.
2. Press and hold the SETUP button until
the red indicator light stays on
(approximately 4 seconds) and then
release the button.
3. Press and release the desired device
button on the remote (TV, DVD, CBL/
SAT, DVR/AUX). The red indicator will
blink once and then remain on.
4. Point the remote at the device and
press and release the POWER button
(for TV) or PLAY button (for DVD, VCR,
etc.) to start the search. The red
indicator will flash (approximately
every 2 seconds) as the remote
searches. Note: The remote must be
pointed at the device for the duration
of this search.
5. Place your finger on the #1 button so
you are prepared to lock-in the code.
6. When the device shuts off or begins
playing, press the #1 button to
lock-in the code. The red indicator
light will turn off. Note: You have
approximately two seconds after the
device shuts off or begins playing to
lock-in the code.
7. Point the remote at the device and
check to see if the remote operates
the device as desired. If it does, no
further programming is required
for that device. If it does not, return
to step 2 and start the auto search
again.

9
Programming Your Remote, cont.
8. Repeat this process for each device (for example
TV, DVD, SAT, AUX) in your home entertainment
system you wish to control. Three devices can
be programmed.
Programming Notes
• This process may take several minutes as the
remote contains many codes.
• When using the Auto Code Search programming
method, the device button corresponding to
the type of device you want to control must be
selected (for example, the TV device button must
be selected in step 3 if you want to control a TV,
the DVD device button for a DVD player, etc.)
• The SETUP button can be used during the search
process to reverse the direction of the search of
the remote codes. For example, if you miss the
code for your device and the remote is continuing
to search (as indicated by the blinking red light),
press the SETUP button and the code search will
reverse direction and return to the code.
• Sometimes the first code that “works” with your
device may operate only a few functions of your
device. There may be another code in the code
list that performs more functions. Continue the
auto code search as directed above until the best
code is found.

10
Using Your Remote
For MENU, press and release
SHIFT/SETUP then INFO/MENU.
For OK, press and release
SHIFT/SETUP then MUTE/OK.
For EXIT, press and release
SHIFT/SETUP then LAST/EXIT.
For Up, Down, Left or Right Navigation,
press and release SHIFT/SETUP
followed by the respective Channel or
Volume button.
SPECIAL NOTE: Remote will stay in shift mode
until the SHIFT button is pressed again, or until 10
seconds of inactivity.
Using SHIFT for Menu and Navigation
The SHIFT button allows access to more than one
function for certain buttons.
Use the SHIFT/SETUP button prior to accessing
the MENU, OK, EXIT and Navigation functions,
for example:
Controlling Combo Devices
Some Combo devices (e.g. TV/VCR, TV/DVD, DVD/
VCR, etc.) will require you to set up two different Mode
buttons to control both parts of the Combo device.
For example, if you have a TV/DVD Combo, you might
need to set up one code under the TV button to
control the TV part AND a separate code (under any
other Mode button) to control the DVD part.

11
Using Your Remote, cont.
Master Volume Feature
The Master Volume Feature allows you to select a
single device (TV or audio receiver) that the volume
control always controls. For example, the remote can
be in TV mode while the volume buttons control the
volume on your audio receiver instead of your TV.
Enabling the Master Volume Feature
1. Press and hold the SETUP button until
the red indicator stays on
(approximately 4 seconds) and then
release the button.
2. Press and release desired device
button (TV, DVD, SAT, AUX) for the
device you wish to setup to control
the volume.
3. Press and release the MUTE button.
4. Press and release the VOL button.
The red indicator will blink twice and
then go off.
To test the feature put the remote in
another mode such as the TV mode if you
programmed the audio receiver to be the
Master Volume Device. Point the remote
at the audio receiver, press and hold
either the VOL or the VOL button. If
the audio receiver volume changes then
the remote is programmed correctly. If
the TV volume changes and not the audio
receiver, you will have to repeat the steps
above and test again.
Disabling the Master Volume Feature
1. Press and hold the SETUP button until
the red indicator stays on
(approximately 4 seconds) and then
release the button.
2. Press and release the device button
(TV, DVD, SAT, AUX) which is
programmed to control the Master

12
Using Your Remote, cont.
Volume Feature.
3. Press and release the MUTE button.
4. Press and release the VOL button.
The red indicator light will blink twice
and go off.
Code Identification
1. Press and hold the SETUP button
until the red indicator stays on
(approximately 4 seconds) and then
release the button.
2. Press and release the desired device
button (TV, DVD, CBL/SAT, DVR/AUX)
you would like the code for.
3. Press and release ENTER button.
4. Press and release the #1 button.
Count the number of times the
remote light flashes. This is the
number corresponding to the first
digit of the code. Repeat the process
by pressing the #2, #3 and #4
buttons for the remaining digits.
5. Press and release ENTER button to
exit this mode.
Reset to Factory Settings
1. Press and hold the SETUP button
until the red indicator stays on
(approximately 4 seconds) and then
release the button.
2. Press and release the MUTE button.
3. Press and release the number #0
button. The red indicator light will
flash twice.

13
Remote does not operate your device.
• Press the device button of the device you
want to control.
• Program the remote with a new code.
• Install new batteries. (You might have to
reprogram your remote after installing new
batteries.)
• Remote may not be compatible with your device.
Remote does not operate some features of
your device.
• Sometimes a particular code might operate some
features but not all. Try programing remote with a
new code.
• Remote may not be able to operate all features of
your device or button names might be different
than your device.
Red Indicator blinks and stays on after you
program a product code.
• Remote did not accept the code.
• Try to program the code again or try a
different code.
Remote Code is not available for a combo device
(e.g. TV/VCR)
• See section for controlling combo devices.
Remote buttons are not operating properly
• Check to ensure the remote is not in shift mode.
Press and release the SETUP/SHIFT button and
see if the remote buttons operate properly. If this
does not help, press and release the SHIFT/SETUP
button again to exit the shift mode.
For additional troubleshooting information please
visit www.jascoproducts.com
Troubleshooting

14
Jasco Products Company warrants this product to be
free from manufacturing defects for a period of ninety
days from the original date of consumer purchase.
This warranty is limited to the repair or replacement
of this product only and does not extend to
consequential or incidental damage to other products
that may be used with this unit. This warranty is in
lieu of all other warranties express or implied. Some
states do not allow limitations on how long an implied
warranty lasts or permit the exclusion or limitation of
incidental or consequential damages, so the above
limitations may not apply to you. This warranty gives
you specific rights, and you may also have other
rights which vary from state to state. If unit should
prove defective within the warranty period, return
prepaid with dated proof of purchase to:
Jasco Products Company
10 East Memorial Road
Oklahoma City, OK 73114
www.jascoproducts.com
90 Day Limited Warranty

15
This device complies with part 15 of the FCC rules.
Operation is subject to the following two conditions:
(1) this device may not cause harmful interference,
and (2) this device must accept any interference
received, including interference that may cause
undesired operation.
FCC NOTE: The manufacturer is not responsible for
any radio or TV interference caused by unauthorized
modifications to this equipment. Such modifications
could void the user’s authority to operate the
equipment.
NOTE: This equipment has been tested and found
to comply with the limits for a Class B digital device,
pursuant to Part 15 of the FCC Rules. These limits are
designed to provide reasonable protection against
harmful interference in a residential installation. This
equipment generates, uses and can radiate radio
frequency energy and, if not installed and used in
accordance with the instructions may cause harmful
interference to radio communications. However, there
is no guarantee that interference will not occur in a
particular installation. If this equipment does cause
harmful interference to radio or television reception,
which can be determined by turning the equipment
off and on, the user is encourage to try to correct
the interference by one or more of the following
measures:
• Reorient or relocate the receiving antenna.
• Increase the separation between the equipment
and receiver.
• Connect the equipment into an outlet on a
circuit different from that to which the receiver is
connected.
• Consult the dealer or an experienced radio/TV
technician for help.
This Class B digital apparatus complies with Canadian
ICES-003.
Cet appareil numérique de la classe B est conforme á
la norme NMB-003 du Canada
FCC Statement

16
Félicitations pour l'achat de votre télécommande
universelle GE. La télécommande universelle GE est l'une
des télécommandes les plus faciles à utiliser sur le marché
actuellement. Grâce à la télécommande universelle GE,
l'utilisation de plusieurs télécommandes est chose révolue!
Votre télécommande universelle GE permet de commander
plusieurs appareils, y compris les marques les plus
populaires de téléviseurs, de magnétoscopes, de lecteurs
DVD, de câblosélecteurs et de récepteurs de satellite. La
télécommande universelle GE est facile à utiliser, facile à
programmer et vous donne le plein contrôle au bout de vos
doigts!
IMPORTANT : CONSERVER CE MODE D'EMPLOI ET LA LISTE
DE CODES POUR CONSULTATION ULTÉRIEURE
Introduction ............................................................................................... 16
Configuration............................................................................................ 17
Installation des piles ...................................................................... 17
Économiseur de piles .................................................................... 17
Sauvegarde des codes ................................................................. 17
Fonctions des touches ................................................................. 18
Programmation de la télécommande .......................................... 20
Entrée directe de code ................................................................. 20
Recherche automatique de code ........................................... 22
Utilisation de la télécommande ....................................................... 24
Commande d'appareils combinés.......................................... 24
Utilisation de la touche SHIFT ................................................... 25
Fonction maîtresse du volume ................................................. 25
Identification des codes .............................................................. 26
Réinitialisation aux paramètres du fabricant .................... 26
Dépannage ................................................................................................ 27
Garantie ...................................................................................................... 28
Déclaration de conformité FCC........................................................ 29
Table des matières

17
La télécommande universelle requiert deux (2) piles
alcalines AAA (non comprises).
Installation des piles
1. Au dos du boîtier de la télécommande, enfoncez la
languette et retirez le couvercle des piles.
2. Faites correspondre les marques (+) et (-) des piles avec
celles à l'intérieur du compartiment à piles, puis insérez
deux (2) piles alcalines AAA. Assurez-vous d'utiliser des
piles neuves.
3. Remettez le couvercle des piles en place.
NOTA : Si votre télécommande cesse de fonctionner,
remplacez les piles par des piles neuves. La télécommande
conservera les codes programmés jusqu'à 10 minutes après
le retrait des piles.
Précautions relatives aux piles
• Ne mélangez pas des piles neuves avec des piles
usagées.
• Ne mélangez pas des piles alcalines avec des piles
ordinaires (carbone-zinc) ou des piles rechargeables
(Ni-Cd, Ni-MH, etc.).
• Retirez toujours rapidement les piles usagées, les piles
faibles ou les piles mortes et recyclez-les ou éliminez-les
en respectant les règlements locaux et nationaux.
Économiseur de piles
La télécommande s'éteint automatiquement si les touches
sont enfoncées pendant plus de 8 secondes. De cette
façon, l'énergie de vos piles est sauvegardée si votre
télécommande reste coincée dans un endroit où les
touches restent enfoncées (entre les coussins d'un sofa, par
exemple).
Sauvegarde des codes
Vous avez jusqu'à 10 minutes pour remplacer les piles de
votre télécommande sans perdre les codes programmés.
Toutefois, n'appuyez sur aucune touche tant que les
piles ne sont pas installées dans la télécommande. Si des
touches sont enfoncées sans que les piles soient dans la
télécommande, tous les codes seront perdus.
Configuration

18
RECORD, PLAY, STOP, REW,
FF, PAUSE
TV, CBL/SAT,
DVR/AUX, DVD
Ces touches permettent de
sélectionner l'appareil
à commander.
Le voyant rouge s'allume
lorsqu'une touche est enfoncée.
INPUT Cette touche permet
de sélectionner les entrées
vidéo à partir des sources
disponibles.
Fonctions des touches
INFO Appuyez sur cette touche
pour afficher/sélectionner
l'information sur le canal à
l'écran.
MENU Appuyez sur la touche
SHIFT/SETUP et relâchez-la,
puis appuyez sur la touche
MENU/INFO et relâchez-la
pour afficher le menu sur le
téléviseur. Pour obtenir plus
de renseignements, reportez-
vous à la description sous
« Utilisation de la touche SHIFT
pour les fonctions de Menu et
de navigation », à la page 24.
DÉCIMALE Cette touche est
utilisée pour sélectionner des
canaux numériques, p. ex. 2.3.

19
ENTER
Sur certains modèles de téléviseurs,
cette touche est utilisée après
l'entrée directe d'un numéro de
canal pour accéder immédiatement
au canal choisi.
VOLUME UP/DOWN
Appuyez sur cette touche
pour régler le volume du
produit, habituellement le
téléviseur.
CHIFFRES
Entrez des chiffres pour
sélectionner directement un
canal. Dans le cas de certains
appareils, il faut appuyer sur
la touche ENTER après avoir
sélectionné le canal.
ON•OFF Cette
touche met les
appareils sous
tension ou hors
tension.
CHANNEL UP/DOWN
Appuyez sur cette touche
pour passer au canal suivant
ou précédent.
Fonctions des touches (suite)
SETUP Cette touche est utilisée pour configurer
la télécommande et pour la fonction de
recherche de code.
SHIFT Appuyez sur cette touche et relâchez-
la pour accéder aux touches étiquetées en
impression inversée (OK, MENU, EXIT). Pour
obtenir plus de renseignements, reportez-
vous à la description sous « Utilisation de la
touche SHIFT pour les fonctions de Menu et de
navigation », à la page 24.
MUTE Appuyez sur cette touche
pour couper le son du téléviseur;
l'image reste à l'écran.
OK Appuyez sur cette touche
pour sélectionner les éléments
de menu de l'appareil que vous
commandez.
EXIT Appuyez sur cette
touche pour quitter les
menus à l'écran et/ou
retourner à la sélection à
l'écran précédente.

20
Programmation de la télécommande
Votre télécommande universelle GE est conçue pour
commander plusieurs appareils audio/vidéo comme un
téléviseur, un lecteur DVD, un enregistreur vidéo numérique,
un récepteur de satellite, un câblosélecteur et un appareil
audio à l'aide d'une seule télécommande. Pour utiliser
cette télécommande, vous devez la programmer pour
commander les appareils que vous avez choisis. Il existe
deux façons de programmer la télécommande, soit par
entrée directe de code, soit par recherche automatique
de code.
Entrée directe de code (méthode
recommandée)
1. Repérez la liste de codes de la
télécommande fournie dans le présent
mode d'emploi. Trouvez la CATÉGORIE
D'APPAREIL que vous souhaitez
programmer (par exemple TV, DVD,
CBL/SAT, DVR/AUX), puis trouvez la
MARQUE de cet appareil. Encerclez tous
les codes figurant sous cette marque.
Exemple : Pour un téléviseur GE, repérez
la section des codes de téléviseur, puis
encerclez tous les codes de téléviseur GE.
2. Allumez manuellement l'appareil que vous
souhaitez commander.
3. Maintenez enfoncée la touche SETUP
jusqu'à ce que le voyant rouge reste
allumé (environ 4 secondes), puis relâchez
la touche .
4. Sur la télécommande, appuyez sur la
touche correspondant à l'appareil voulu
(TV, DVD, CBL/SAT, DVR/AUX), puis
relâchez-la. Le voyant rouge clignote une
fois, puis reste allumé.
5. À l'aide des touches numériques de la
télécommande, entrez le premier code à
4 chiffres trouvé précédemment dans la
liste de codes. Si le code entré est un code
valide, le voyant rouge s'éteint. Si le code
entré n'est pas un code valide, le voyant
rouge clignote et reste allumé afin que
vous puissiez entrer le code de nouveau.
Nota : Si aucune touche n'est enfoncée
pendant 10 secondes, la télécommande
quitte le mode SETUP et vous devez
recommencer la programmation depuis
le début.
La page est en cours de chargement...
La page est en cours de chargement...
La page est en cours de chargement...
La page est en cours de chargement...
La page est en cours de chargement...
La page est en cours de chargement...
La page est en cours de chargement...
La page est en cours de chargement...
La page est en cours de chargement...
La page est en cours de chargement...
La page est en cours de chargement...
La page est en cours de chargement...
La page est en cours de chargement...
La page est en cours de chargement...
La page est en cours de chargement...
La page est en cours de chargement...
La page est en cours de chargement...
La page est en cours de chargement...
La page est en cours de chargement...
La page est en cours de chargement...
La page est en cours de chargement...
La page est en cours de chargement...
La page est en cours de chargement...
La page est en cours de chargement...
-
 1
1
-
 2
2
-
 3
3
-
 4
4
-
 5
5
-
 6
6
-
 7
7
-
 8
8
-
 9
9
-
 10
10
-
 11
11
-
 12
12
-
 13
13
-
 14
14
-
 15
15
-
 16
16
-
 17
17
-
 18
18
-
 19
19
-
 20
20
-
 21
21
-
 22
22
-
 23
23
-
 24
24
-
 25
25
-
 26
26
-
 27
27
-
 28
28
-
 29
29
-
 30
30
-
 31
31
-
 32
32
-
 33
33
-
 34
34
-
 35
35
-
 36
36
-
 37
37
-
 38
38
-
 39
39
-
 40
40
-
 41
41
-
 42
42
-
 43
43
-
 44
44


GE 20622 Manuel utilisateur
- Catégorie
- Télécommandes
- Taper
- Manuel utilisateur
- Ce manuel convient également à
Autres documents
-
Philips SRU4040 Le manuel du propriétaire
-
Philips SRU5100 Le manuel du propriétaire
-
-
Philips SRU4050 Manuel utilisateur
-
Zenith ZP505 Le manuel du propriétaire
-
QFX REM-8 Manuel utilisateur
-
-
-
-
 Prime-Line M 6029 Guide d'installation
