0180_Jan20_5in1 P.1
5 In 1 Multi-Functional Molding
Installation Instructions
5 IN 1 Multi-Functional Molding | English
The 5 in 1 molding oers an easy solution for the perfect nishing of your oor. You can use
the prole in 5 ways: 1) as an expansion prole/T-molding, 2) an adaptor prole/hard surface
reducer, 3) an end prole/square nose, 4) a carpet transition strip and 5) to nish o your stairs.
WHY AN EXPANSION GAP?
This oor is primarily made of wood. Because the humidity level in the room can vary, for
example between summer and winter, it is necessary that the oor has room to expand and
contract along all sides. This is why an expansion gap is needed around the perimeter of the
oor.
INSTRUCTIONS FOR USE SLITTER
CAUTION: Always wear gloves - the edge of the prole and the blade are sharp. Read the
instructions carefully before use.
1. The slitter can be used to cut away one or two pieces of the prole to obtain a
T-molding, hard surface reducer, end prole, or carpet transition.
2. When cutting the prole, always lay it horizontally on a stable surface.
3. Place the cutting tool on top of the prole, so that the blade underneath ts
into the narrow slit in the prole.
4. Press down on the cutting tool and slide it gently in the direction of the arrow.
5. Take o the piece to be removed. Remove any unevenness on the edge of the
prole by again moving the side of the slitter (sandpaper) along the prole.

0180_Jan20_5in1 P.2
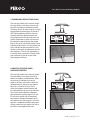
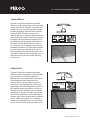
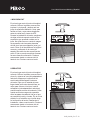
1 EXPANSION PROFILE/T-MOLDING
First cut the prole to the correct length.
Use the slitter to cut away piece A and
piece B to obtain an expansion prole/
Tmolding. Note: for easy cutting, cut both
lengths before removing the 2 pieces of
HDF. While installing the oor, be sure
to allow sucient space between the
two surfaces that will be joined with the
prole. Remember to take into account
the expansion gap between the raised
legs of the rail (in which the prole will be
inserted) and the oor. Cut the plastic rail
to the correct length and place it in the
middle of the open area between the two
oor surfaces. The rail can be attached
in several ways, see below. Gently press
from one side of the rail to the other.
Press against the oor.
2 ADAPTOR PROFILE/HARD
SURFACE REDUCER
First cut the prole to the correct length.
Use the slitter to cut away piece A to
obtain an adaptor prole/reducer. Mark
the ground to indicate how far the
edge of the oor will extend. Allow the
underlayment to extend to just before
this line; it is better to t the rail (in
which the adaptor prole/reducer will
be clamped) later on top of the suboor.
There must be a sucient expansion
gap between the raised legs of the rail
(in which the prole will be clamped)
and the oor. Attach the plastic rail to
the suboor with the long lip in the oor
direction. Installation details: see below.
Gently press from one side of the rail to
the other. Press against the oor.
5 IN 1 Multi-Functional Molding | English

0180_Jan20_5in1 P.3
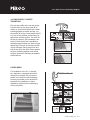
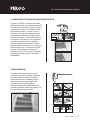
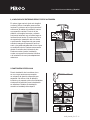
END PROFILE
TRANSITION
PROFILE
!
2
4
6
1
3
5
5 STAIR NOSE
For installation of the 5 in 1 molding
as a stairnose, a separate aluminium
subprole is needed. Do not use the
plastic rail included in this packaging,
but ask your dealer for the aluminium
subprole for installation on stairs.
Installation details: see the packaging
of that subprole.
3, 4 END PROFILE / CARPET
TRANSITION
First cut the prole to the correct length.
Use the slitter to cut away piece B to
obtain an end prole/square nose. When
installing against a vertical surface: cut
the plastic rail to the correct length and t
it on top of the suboor with the long lip
against the vertical surface. The short lip
serves as a spacer. Rail installation: see
below. Ensure that there is a sucient
expansion gap between the oor and the
raised legs of the rail in which the prole
will be clamped. Gently press from one
side of the rail to the other. Press against
the oor. Installing against a horizontal
surface: identical to installing an adaptor
prole/reducer.
5 IN 1 Multi-Functional Molding | English

0180_Jan20_5in1 P.4
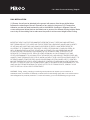
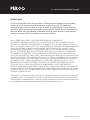
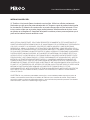
(1) Screws: the rail can be attached to the ground with screws. Use the pre-drilled holes
between the raised legs of the rail. Be aware of any piping in the ground. (2) Construction
Adhesive can also be used to attach the rail to the suboor. As shown in diagram 5 the rail
comes with several shims that can be folded over to account for dierent ooring heights. Make
sure to dry t the molding rst to make sure the prole is at the correct height before cutting.
RAIL INSTALLATION
IMPORTANT HEALTH NOTICE FOR MINNESOTA RESIDENTS ONLY: THESE BUILDING MATERIALS
EMIT FORMALDEHYDE. EYE, NOSE, AND THROAT IRRITATION, HEADACHE, NAUSEA AND A VARIETY
OF ASTHMA-LIKE SYMPTOMS, INCLUDING SHORTNESS OF BREATH, HAVE BEEN REPORTED
AS A RESULT OF FORMALDEHYDE EXPOSURE. ELDERLY PERSONS AND YOUNG CHILDREN, AS
WELL AS ANYONE WITH A HISTORY OF ASTHMA, ALLERGIES, OR LUNG PROBLEMS, MAY BE
AT GREATER RISK. RESEARCH IS CONTINUING ON THE POSSIBLE LONG-TERM EFFECTS OF
EXPOSURE TO FORMALDEHYDE. REDUCED VENTILATION MAY ALLOW FORMALDEHYDE AND
OTHER CONTAMINANTS TO ACCUMULATE IN THE INDOOR AIR. HIGH INDOOR TEMPERATURES AND
HUMIDITY RAISE FORMALDEHYDE LEVELS. WHEN A HOME IS TO BE LOCATED IN AREAS SUBJECT TO
EXTREME SUMMER TEMPERATURES, AN AIR-CONDITIONING SYSTEM CAN BE USED TO CONTROL
INDOOR TEMPERATURE LEVELS. OTHER MEANS OF CONTROLLED MECHANICAL VENTILATION CAN
BE USED TO REDUCE LEVELS OF FORMALDEHYDE AND OTHER INDOOR AIR CONTAMINANTS. IF YOU
HAVE ANY QUESTIONS REGARDING THE HEALTH EFFECTS OF FORMALDEHYDE, CONSULT YOUR
DOCTOR OR CALL LOCAL HEALTH DEPARTMENT.
WARNING: Drilling, sawing, sanding or machining wood products can expose you to wood dust, a
substance known to the state of California to cause cancer. Avoid inhaling wood dust or use a dust mask or
other safeguards for personal protection. For more information, go to www.P65Warnings.ca.gov/wood.
5 IN 1 Multi-Functional Molding | English

0180_Jan20_5in1 P.5
5 In 1 Multi-Functional Molding
Instructions Pour L’installation
5 In 1 Multi-Functional Molding | Français
La moulure cinq en un constitue une solution aisée pour assurer une nition parfaite de votre
sol. Vous pouvez utiliser ce prolé de 5 manière diérentes: 1 comme prolé de dilatation, 2
prolé d’adaptation, 3 prolé denition/ nez de marche carré, 4 prolé de transition moquette
et 5 prolé de nition pour vos escaliers.
POURQUOI UN JOINT DE DILATATION?
Le sol est principalement fabriqué en bois. Comme le taux d’humidité dans la pièce peut varier,
par exemple entre l’été et l’hiver, il est nécessaire que le sol dispose de susamment d’espace
pour s’étendre et se contracter le long de tous les côtés. C’est la raison pour laquelle un joint
de dilatation est nécessaire autour du périmètre du sol.
MODE D’EMPLOI DÉCOUPER
AVERTISSEMENT: Portez toujours des gants - le bord du prolé et la lame sont coupants.
Veuillez prendre connaissance des instructions suivantes avant de l’utiliser.
1. Le découpeur peut être utilisé pour couper une ou deux pièces du prolé pour
obtenir une moulure en T, un réducteur, une moulure de transition ou un réducteur
de tapis.
2. Pour couper le prolé, posez-le toujours horizontalement sur une surface stable.
3. Placez le petit couteau audessus du prolé, de sorte que la lame située en dessous,
s’insère dans la fente étroite du prolé.
4. Appuyez sur le petit couteau et faites-le glisser lentement dans le sens de la èche.
5. Enlevez la pièce dont vous ne vous servez pas pour l’instant. Égalisez le bord
du prolé en déplaçant de nouveau la partie latérale du petit couteau, (papier abrasif)
le long deprolé.

0180_Jan20_5in1 P.6
1 MOULURE EN T
Coupez le prolé à la longueur souhaitée.
Utilisez le petit couteau pour enlever la partie
A et la partie B an d’obtenir un moulure en T.
Remarque: pour une découpe aisée, coupez
les deux longueurs avant d’enlever les deux
parties de HDF. Pendant la pose du sol,
veillez à réserver un espace susant entre les
deux surfaces qui seront reliées par le prolé.
N’oubliez pas de prendre en compte le joint
de dilatation entre les pattes surélevées du
rail (dans lequel le prolé sera inséré) et le
sol. Coupez le rail en plastique à la longueur
souhaitée et placez-le au centre de la surface
libre entre les deux surfaces de sol. Le rail
peut être attaché de diverses manières: voir
ci-dessous. Appuyez avec précaution sur l’un
des côtés du rail, puis sur l’autre. Appuyez
contre le sol.
2 RÉDUCTEUR
Coupez le prolé à la longueur souhaitée.
Utilisez le petit couteau pour enlever la partie
A an d’obtenir un prolé d’adaptation.
Marquez sur le sol l’emplacement du niveau
de prolongement de la bordure du sol.
Laissez la sous-couche aeurer à peine
cette ligne; il est préférable de poser le rail
(dans lequel le prolé d’adaptation sera xé)
plus tard au-dessus du support. Le joint de
dilatation doit être susant entre les pattes
surélevées du rail (dans lequel le prolé sera
xé) et le sol. Attachez le rail en plastique au
support avec la lèvre longue dans la direction
du sol. Détails de la pose: voir ci dessous.
Appuyez avec précaution sur l’un des côtés
du rail, puis sur l’autre. Appuyez contre le sol.
5 In 1 Multi-Functional Molding | Français

0180_Jan20_5in1 P.7
Coupez le prolé à la longueur souhaitée.
Utilisez le découper pour enlever la partie B
an d’obtenir un prolé de nition / nez de
marche carré. Lors de l’installation contre
une surface verticale : coupez le rail en
plastique à la longueur souhaitée et xez-
le au support avec la lèvre longue contre
la surface verticale. La lèvre courte servira
d’entretoise. Pose du rail: voir ci-dessous.
Le joint de dilatation doit être susant
entre les pattes surélevées du rail (dans
lequel le prolé sera xé) et le sol. Appuyez
avec précaution sur l’un des côtés du rail,
puis sur l’autre. Appuyez contre le sol.
Installation contre une surface horizontale:
procédure identique à celle d’un prolé
d’adaptation.
5 NEZ DE MARCHE
L’installation de la moulure cinq en un
comme nez de march requiert l’utilisation
d’un sousprolé en aluminium séparé.
N’utilisez pas le rail en plastique fourni
dans le colis, mais demandez à votre
concessionnaire le sousprolé en
aluminium destiné à l’installation sur les
marches d’escalier. Détails de la pose: voir
sur l’emballage du sous-prolé.
END PROFILE
TRANSITION
PROFILE
!
2
4
6
1
3
5
5 In 1 Multi-Functional Molding | Français
3, 4 MOULURE DE TRANSITION/ RÉDUCTEUR DE TAPIS

0180_Jan20_5in1 P.8
POSE DU RAIL
(1) Vis: le rail peut être xé au sol avec des vis. Utilisez les trous prépercés entre les pattes
surélevées du rail. Assurez-vous de l’absence de tuyaux dans le sol. (2) L’adhésif de
construction peut aussi être utilisé pour xer la rampe au sousplancher. Comme l’illustre la
gure 5, la rampe comprend plusieurs cales qui peuvent être repliées an de compenser tout
écart de hauteur entre les diérents revêtements. Avant la coupe, assurez-vous d’ajuster la
moulure à sec pour vérier si le prolé est à la hauteur désirée.
AVIS DE SANTÉ IMPORTANT À L’ATTENTION DES RÉSIDENTS DU MINNESOTA :
CERTAINS DES MATÉRIAUX UTILISÉS POUR LA CONSTRUCTION DE CETTE DEMEURE (OU CES
MATÉRIAUX DE CONSTRUCTION) ÉMETTENT DU FORMALDÉHYDE. DES IRRITATIONS AUX YEUX, AU
NEZ ET À LA GORGE, DES MAUX DE TÊTE, DES NAUSÉES ET DIFFÉRENTS SYMPTÔMES SEMBLABLES
À CEUX DE L’ASTHME, COMME L’ESSOUFFLEMENT, ONT ÉTÉ RAPPORTÉS À LA SUITE D’UNE
EXPOSITION AU FORMALDÉHYDE. LES PERSONNES ÂGÉES ET LES JEUNES ENFANTS, DE MÊME
QUE TOUTE PERSONNE AVEC DES ANTÉCÉDENTS D’ASTHME, D’ALLERGIES OU DE PROBLÈMES
PULMONAIRES, PEUVENT ÊTRE PLUS VULNÉRABLES. LES RECHERCHES SE POURSUIVENT SUR
LES EFFETS POTENTIELS À LONG TERME D’UNE EXPOSITION AU FORMALDÉHYDE.UNE VENTILATION
RÉDUITE PEUT PERMETTRE AU FORMALDÉHYDE ET À D’AUTRES CONTAMINANTS DE S’ACCUMULER
DANS L’AIR INTÉRIEUR. LES TEMPÉRATURES ÉLEVÉES À L’INTÉRIEUR AUGMENTENT LES NIVEAUX
DE FORMALDÉHYDE. LORSQU’UNE MAISON EST SITUÉE DANS UNE RÉGION SUJETTE À DES
TEMPÉRATURES ESTIVALES EXTRÊMES, LES NIVEAUX DE TEMPÉRATURE INTÉRIEURE PEUVENT
ÊTRE CONTRÔLÉS À L’AIDE D’UN SYSTÈME DE CLIMATISATION. D’AUTRES MÉTHODES DE
VENTILATION MÉCANIQUE CONTRÔLÉE PEUVENT ÊTRE UTILISÉES POUR RÉDUIRE LES NIVEAUX DE
FORMALDÉHYDE ET D’AUTRES CONTAMINANTS DE L’AIR INTÉRIEUR.SI VOUS AVEZ DES QUESTIONS
À PROPOS DES EFFETS DU FORMALDÉHYDE SUR LA SANTÉ, CONSULTEZ VOTRE MÉDECIN OU LES
SERVICES DE SANTÉ LOCAUX.
Avertissement : Le perçage, le sciage, le ponçage et l’usinage des produits en bois peuvent vous exposer à
la poussière de bois, une substance reconnue par l’État de la Californie comme étant la cause de cancers.
Évitez d’inhaler la poussière de bois ou utilisez un appareil respiratoire ou d’autres mesures de sécurité pour
vous protéger. Pour plus d’informations, allez à www.P65Warnings.ca.gov/wood.
5 In 1 Multi-Functional Molding | Français

0180_Jan20_5in1 P.9
5 In 1 Multi-Functional Molding
Instrucciones de Instalación
La moldura cinco en uno ofrece unasolución sencilla para lograr un acabado perfectodel suelo.
Puede utilizar la junta de 5 maneras: 1 como junta de expansión junta de dilatación, 2 como
junta adaptadora/reductora, 3 como junta terminal cantonera, 4 como junta de transición para
moquetas y 5 como acabado para escaleras.
¿POR QUÉ UN MARGEN DE EXPANSIÓN?
El suelo está compuesto principalmente de madera. Debido a que el nivel de humedad de
una habitación puede variar, por ejemplo entre verano e invierno, es necesario que el suelo
disponga de espacio para expandirse y contraerse por todos los lados. Es por ello que es
necesario dejar un margen de expansión en todo el perímetro del suelo.
INSTRUCCIONES DE USO CORTADOR
PRECAUCIÓN: Utilice siempre guantes; la junta y la hoja tienen bordes alados. Lea
detenidamente las instrucciones antes del uso.
1. La cortadora se puede usar para cortar una o dos piezas del perl a n de obtener
una moldura en T, un reductor, una moldura de extremo o un reductor alfombra.
2. Para cortar la junta, apóyela siempre horizontalmente sobre una supercie estable.
3. Coloque la herramienta de corte sobre la junta, de modo que la hoja de debajo
encaje en la pequeña hendidura de la junta.
4. Ejerza presión sobre la herramienta de corte y deslícela suavemente en la dirección
de la echa.
5. Retire la pieza que no vaya a utilizar. Elimine cualquier irregularidad del borde de la
junta pasando nuevamente el lateral del cortador (papel de lija) a lo largo de la junta.
5 In 1 Multi-Functional Molding | Español

0180_Jan20_5in1 P.10
1 MOLDURA EN T
En primer lugar corte la junta a la longitud
correcta. Utilice el cortador para recortar
la pieza A y la pieza B y obtener así una
junta de expansión/dilatación. Nota: para
facilitar el corte, corte ambas longitudes
antes de retirar las 2 piezas de HDF.
Durante la instalación del suelo, asegúrese
de dejar suciente espacio entre las dos
supercies que quedarán unidas con la
junta. No olvide tener en cuenta el margen
de expansión entre las patas elevadas
del riel (en el que se encajará la junta) y el
suelo. Corte el riel de plástico a la longitud
correcta y colóquelo en el centro del
espacio libre entre las dos supercies de
suelo. El riel se puede montar de diversas
formas: véase a continuación. Presione
suavemente desde un extremo del riel
hasta el otro. Presione contra el suelo.
2 REDUCTOR
En primer lugar corte la junta a la longitud
correcta. Utilice el cortador para recortar la
pieza A y obtener así una junta adaptadora/
reductora. Marque en la supercie del
suelo hasta dónde llegará el extremo
del suelo. Deje que el material de base
llegue hasta justo antes de esta línea; es
mejor para colocar el riel (en el cual irá
encajada la junta adaptadora/ reductora)
posteriormente encima del subsuelo. Debe
quedar suciente margen de expansión
entre las patas elevadas del riel (en el que
se encajará la junta) y el suelo. Fije el riel de
plástico en el subsuelo con el borde largo
en la dirección del suelo. Detalles de la
instalación: véase a continuación. Presione
suavemente desde un\ extremo del riel
hasta el otro. Presione contra el suelo.
5 In 1 Multi-Functional Molding | Español

0180_Jan20_5in1 P.11
5 CANTONERA DE ESCALÓN
Para la instalación de la moldura cinco
en uno como cantonera se necesita
un subperl de aluminio disponible por
separado. No utilice el riel de plástico
incluido en el paquete; pida a su distribuidor
el subperl de aluminio para la instalación
en escaleras. Detalles de instalación:
consulte el embalaje del subperl.
TRANSITION
PROFILE
END PROFILE
!
2
4
6
1
3
5
En primer lugar corte la junta a la longitud
correcta. Utilice el cortador para recortar
la pieza B y obtener así una junta terminal/
cantonera. Al realizar la instalación contra
una supercie vertical: Corte el riel de
plástico a la longitud correcta y móntelo
encima del subsuelo con el borde largo en
la dirección del suelo. El borde corto sirve
de espaciador. Instalación del riel: véase
a continuación. Asegúrese de que quede
suciente margen de expansión entre el
suelo y las patas elevadas del riel en el que
se encajará la junta. Presione suavemente
desde un extremo del riel hasta el otro.
Presione contra el suelo. Instalación
contra una supercie horizontal: idéntica
a la instalación de una junta adaptadora/
reductora.
5 In 1 Multi-Functional Molding | Español
3, 4 MOLDURA DE EXTREMO/REDUCTOR DE ALFOMBRA

0180_Jan20_5in1 P.12
INSTALACIÓN DEL RIEL
(1) Tornillos: el riel puede jarse al subsuelo con tornillos. Utilice los oricios previamente
perforados que hay entre las patas elevadas del riel. Tenga en cuenta la presencia de tuberías
en el subsuelo. El adhesivo de construcción se puede usar para jar el riel al subsuelo. El riel
incluye varias cuñas que se pueden plegar para ajustarse a diferentes alturas de piso, como
se muestra en el diagrama 5. Asegúrese de ajustar la moldura primero para comprobar que el
perl está a la altura correcta antes de cortar.
AVISO DE SALUD IMPORTANTE, SÓLO PARA RESIDENTES DE MINNESOTA: ESTOS MATERIALES DE
CONSTRUCCIÓN EMITEN FORMALDEHIDOS. SE HA INFORMADO DE LA PRESENCIA DE IRRITACIÓN EN
LOS OJOS, LA NARIZ Y LA GARGANTA, DOLORES DE CABEZA, NÁUSEAS Y VARIOS SÍNTOMAS
PARECIDOS AL ASMA, LO QUE INCLUYE DIFICULTADES PARA RESPIRAR, COMO RESULTADO DE LA
EXPOSICIÓN A LOS FORMALDEHIDOS. LAS PERSONAS MAYORES Y LOS NIÑOS PEQUEÑOS, ADEMÁS
DE CUALQUIER PERSONA CON ANTECEDENTES DE ASMA, ALERGIAS O PROBLEMAS PULMONARES,
PUEDEN CORRER UN MAYOR RIESGO. ACTUALMENTE SE INVESTIGAN LOS POSIBLES EFECTOS A
LARGO PLAZO DE LA EXPOSICIÓN A LOS FORMALDEHIDOS. UNA VENTILACIÓN DEFICIENTE PUEDE
PROVOCAR QUE LOS FORMALDEHIDOS Y OTROS CONTAMINANTES SE ACUMULEN EN EL AIRE DEL
INTERIOR. LAS TEMPERATURAS INTERIORES ALTAS Y LA HUMEDAD AUMENTAN LOS NIVELES DE
FORMALDEHIDOS. EN EL CASO DE LAS CASAS UBICADAS EN ÁREAS SUJETAS A TEMPERATURAS
VERANIEGAS EXTREMAS, SE PUEDE USAR UN SISTEMA DE AIRE ACONDICIONADO PARA CONTROLAR
EL NIVEL DE LA TEMPERATURA DEL INTERIOR. SE PUEDEN USAR OTROS MÉTODOS DE VENTILACIÓN
MECÁNICA CONTROLADA PARA DISMINUIR LOS NIVELES DE FORMALDEHIDOS Y OTROS
CONTAMINANTES DEL AIRE DEL INTERIOR. SI TIENE ALGUNA PREGUNTA ACERCA DE LOS EFECTOS
EN LA SALUD DE LOS FORMALDEHIDOS, CONSULTE A SU MÉDICO O LLAME AL DEPARTAMENTO
LOCAL DE SALUD.
ADVERTENCIA: Los productos para taladrar, aserrar, lijar o cortar madera pueden exponerlo al polvo de
madera, una sustancia reconocida por el estado de California como causante de cáncer. Evite inhalar el
polvo de la madera o utilice una mascarilla antipolvo u otros artículos de protección personal. Para obtener
más información, visite www. P65Warnings.ca.gov/wood.
5 In 1 Multi-Functional Molding | Español
-
 1
1
-
 2
2
-
 3
3
-
 4
4
-
 5
5
-
 6
6
-
 7
7
-
 8
8
-
 9
9
-
 10
10
-
 11
11
-
 12
12


Pergo MG001865 Guide d'installation
- Taper
- Guide d'installation
dans d''autres langues
- English: Pergo MG001865 Installation guide
- español: Pergo MG001865 Guía de instalación