GE Appliances IND523 Guide d'installation
- Taper
- Guide d'installation

Installation Guide
IND523
Lumination® LED Luminaire
Diuser Replacement
(RPL Series)
BEFORE YOU BEGIN
Read these instructions completely and carefully.
WARNING / AVERTISSEMENT
RISK OF ELECTRIC SHOCK
• Turn power o before inspection, installation or removal.
• Properly ground electrical enclosure.
RISK OF FIRE
• Follow all NEC and local codes.
• Use only UL approved wire for input/output connections.
Only use size 18 AWG (0.75mm2).
Tools and Components Required
RISQUES DE DÉCHARGES ÉLECTRIQUES
• Coupez l’alimentation avant d’inspecter, installer ou déplacer le luminaire.
• Assurez-vous de correctement mettre à la terre le boîtier d’alimentation
électrique.
RISQUES D’INCENDIE
• Respectez tous les codes NEC et codes locaux.
• N’utilisez que des ls approuvés par UL pour les entrées/sorties de
connexion. Taille minimum
18 AWG (0.75mm2).
Save These Instructions
Use only in the manner intended by the manufacturer. If you have any questions, contact the manufacturer.
Description Code Corresponding Luminaires
RPL22A Replacement diuser RPL22 series
RPL24A Replacement diuser RPL24 series

Lumination® (RPL - Series) Installation Guide
2
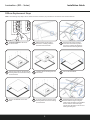
NOTE: The following steps depict the 22 Series luminaire. However, the procedure is the same for the 24 Series xtures.
Diuser Replacement Steps
TURN OFF POWER at the source
to the luminaire.
1
Release latches on the end of
the xture. Carefully pull down
the xture from latch side.
2
Disconnect the quick connector
for AC line and screw for ground
wire. Then carefully take down the
xture from the mounting bracket.
3
Remove the screws on the back of the
housing which connected the housing
and front bezel.
4
Carefully pull the housing from the
front bezel.
5
Pull out the old diuser.
6
Put the new diuser on the front
bezel.
7
Fix all the screws on the back of the
housing which connect the housing
and front bezel.
8
Attach the xture to the LED panel
bracket with the hinges. Hang the
other end of the tether to the installed
bracket. Pull the tether lasso light.
Connect the LED driver to AC line and
install grounding wire.
9

www.gecurrent.com
© 2021 Current Lighting Solutions, LLC. All rights reserved. GE and the GE monogram are trademarks of the
General Electric Company and are used under license. Information provided is subject to change without
notice. All values are design or typical values when measured under laboratory conditions.
IND523 (Rev 04/02/2021)
Lumination® (RPL - Series) Installation Guide
These instructions do not purport to cover all details or variations in equipment nor to provide for every possible contingency to be met in connection with
installation, operation or maintenance. Should further information be desired or should particular problems arise which are not covered suciently for the
purchaser’s purposes, the matter should be referred to GE Current a Daintree Company
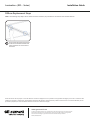
NOTE: The following steps depict the 22 Series luminaire. However, the procedure is the same for the 24 Series xtures.
Diuser Replacement Steps
Secure xture by locking latch found
on the end of the xture. Make sure
wires and tether are on the back of
the xture.
10
-
 1
1
-
 2
2
-
 3
3


GE Appliances IND523 Guide d'installation
- Taper
- Guide d'installation
dans d''autres langues
Documents connexes
Autres documents
-
Lumination LBR Series LED Luminaire Diff Guide d'installation
-
GE current IND673 Manuel utilisateur
-
-
-
-
-
-
-
-