Honeywell HZ-960 Manuel utilisateur
- Catégorie
- Chauffe-eau
- Taper
- Manuel utilisateur

IMPORTANT SAFETY
INSTRUCTIONS
WARNING – READ AND SAVE THESE
OPERATING AND SAFETY INSTRUCTIONS
BEFORE USING THIS HEATER. IF YOU DO
NOT UNDERSTAND THESE INSTRUCTIONS OR
PRODUCT LABELS PLEASE CALL
OUR CUSTOMER REPRESENTATIVES AT
(800) 477-0457 FOR ASSISTANCE BEFORE
USING THIS PRODUCT.
Warning – Failure to follow any of these safety
instructions could result in fire, injury or death.
YOUR RESPONSIBILITIES
Electrical appliances may expose people to
hazards that can cause severe injury as well
as death. The use of electrical products may
create hazards that include, but are not limited
to, injury, fire, electrical shock and electrical
system damage. These instructions are intended
to provide you with the information you need to
use the product and to avoid such hazards.
When using electrical appliances, basic
precautions should always be followed to
reduce risk of fire, electric shock, and injury to
persons including the following:
1. Warning – Read all instructions before using
this heater.
2. Warning – This heater is hot when in use.
To avoid burns, do not let bare skin touch
hot surfaces. Use handles when moving this
heater. Keep combustible materials, such as
furniture, pillows, bedding, papers, clothes,
and curtains at least 3 feet (0.9 m) from the
front of the heater and keep them away from
the sides and rear.
3. Warning – Extreme caution is necessary
when any heater is used by or near children
or invalids, and whenever the heater is left
operating and unattended.
4. Warning – Always unplug heater when not
in use.
5. Warning – Do not operate any heater with
a damaged cord or plug or after the heater
malfunctions, has been dropped or damaged
in any manner. Discard heater or return
heater to authorized service facility for
examination and/or repair.
6. Warning – For residential use only.
7. Warning – Do not use outdoors.
8. Warning – This heater is not intended for
use in bathrooms, laundry areas and similar
indoor locations. Never locate heater where
it may fall into a bathtub or other water
container.
9. Warning – Do not run cord under carpeting.
Do not cover cord with throw rugs, runners,
or similar coverings. Do not route cord
under furniture or appliances. Arrange cord
away from traffic area and where it will not
be tripped over.
Infrared Heater
Model HZ-960 SerIeS
Model HZ-970 SerIeS
Model HZ-980 SerIeS
The Honeywell Trademark is used by Kaz USA, Inc. under license from Honeywell International Inc.
Honeywell International Inc. makes no representation or warranties with respect to this product.

2
IMPORTANT SAFETY INSTRUCTIONS REGARDING THE PLUG ON YOUR PRODUCT
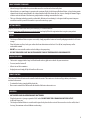
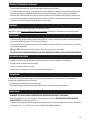
10. Warning – This heater is for use on 120
volts. The cord has a plug as shown in Fig.
1, and an adapter, as shown, is available
for connecting three-blade grounding-type
plugs to two-slot receptacles. The green
grounding lug extending from the adapter
must be connected to a permanent ground
such as a properly grounded outlet box.
The adapter should not be used if a three-
slot grounded receptacle is available. Do
not circumvent the safety features of the
grounding-type plug. Do not modify the
power cord.
11. Warning – This heater draws 12.5 amps
during operation. To prevent overloading a
circuit, do not plug the heater into a circuit
that already has other appliances working.
12. Warning – It is normal for the plug to feel
warm to the touch; however, a loose fit
between the AC outlet (receptacle) and plug
may cause overheating and distortion of
the plug. Contact a qualified electrician to
replace loose or worn outlet.
13. Warning – To disconnect the heater, first
turn off the product, then grip the plug body
and pull it from the wall outlet. Never pull by
the cord.
14. Warning – Do not insert or allow foreign
objects to enter any ventilation or exhaust
opening as this may cause an electric shock
or fire, or damage the heater.
15. Warning – To prevent a possible fire, do not
block air intakes or exhaust in any manner.
Do not use on soft surfaces, like a bed, or
where openings may become blocked.
16. Warning – A heater has hot and arcing or
sparking parts inside. Do not use it in areas
where gasoline, paint or flammable liquids
are used or stored.
17. Warning – Use this heater only as described
in this manual. Any other use not
recommended by the manufacturer may
cause fire, electric shock, or injury to persons.
18. Warning – Always plug heater directly into
a wall outlet/receptacle. Never use with an
extension cord or relocatable power tap
(outlet/power strip).
19. Warning – Never tamper with this product
or attempt to fix it. Any tampering with, or
modification of this product can result in
serious injury, death, or fire. Risk of electric
shock. Do not open. No user serviceable
parts inside.
20. Warning – Do not remove product labels
that contain warnings or safety instruction.
21. Caution – The output of this heater may vary
and its temperature may become intense
enough to burn exposed skin. Use of this
heater is not recommended for persons with
reduced sensitivity to heat or an inability to
react to avoid burns.
22. Caution – Before cleaning, or storage, or
when not in use, turn the product’s controls
to the OFF position and unplug the heater
from the electrical outlet and allow to cool.
23. Caution – Place the heater on a firm, level,
open surface free from obstructions and
at least 3 feet (0.9 m) away from any
combustible materials. DO NOT use on an
unstable surface such as bedding or deep
carpeting. Be sure the heater is not in a
position where it may be tripped over by
small children or pets.
24. Caution – If your home has aluminum
wiring have a licensed electrician check
your receptacle’s connections. When
using a 1500 watt heater, aluminum wire
connections can cause a safety issue.
25. SAVE THESE
INSTRUCTIONS
Product Specifications
This product is rated 12.5 Amps (1500 Watts) at
120 VAC, 60 Hz.
Fig. 1

3
ABOUT INFRARED TECHNOLOGY
SET UP
GETTING STARTED
MOVING THE HEATER
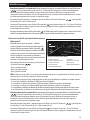
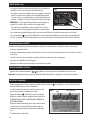
• Infrared energy is light within the spectrum that cannot be seen but can be detected by heat.
• Infrared heaters use quartz lamps to generate such spectrum of light. In the Honeywell Infrared Heater, six long-lasting quartz
elements heat the inner metal chamber. Air is drawn into the back of the heater by a fan, it passes through the warmed copper
reectors and out the front of the heater to gently introduce soothing, warm air into the room.
• This type of heating technology provides comfortable, ecient and even heating. It is designed with fan power to improve
convection in order to provide core comfort to you and in extra large spaces.
• The Honeywell Infrared Heater requires no assembly. Simply unpack the heater and save all packaging materials for o-season
storage.
• Place the heater on a rm, level, open surface free from obstructions and at least 3 feet (0.9m) away from any wall or
combustible material.
• DO NOT use on an unstable surface such as bedding or deep carpeting.
• BE SURE THE HEATER IS NOT IN A POSITION WHERE IT MAY BE TRIPPED OVER BY CHILDREN OR PETS.
Register your heater online and extend your warranty by six additional months.
Log on to www.honeywellheatsavings.com/registration/ and simply ll out the registration form to register your product.
• This heater is equipped with a large Cool Touch handle and easy glide caster wheels for your convenience.
• To move, turn the heater o.
• Allow it to cool for ten minutes.
• Unplug heater and simply lift by the handle or roll to move.
• NOTE: NEVER LEAVE AN OPERATING UNIT UNATTENDED
• Plug the heater into a 3 prong or grounded 120V outlet. DO NOT FORCE THE 3 PRONG PLUG INTO THE OUTLET;
it will only t one way.
• The Honeywell Infrared Heater is versatile and designed to be placed in the center of the room or closer to the wall (at least 3
feet way) for maximum safe and ecient room heating.
OPERATION
REMOTE CONTROL
The Honeywell Infrared Heater can be controlled with the remote. This remote uses a button cell type battery which comes
included in the remote.
• To activate the battery, simply pull the plastic tab.
• Place remote control in the holder under the handle of the heater when not in use.

4
OPERATION (continued)
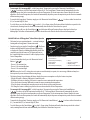
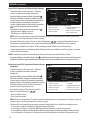
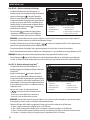
HZ-960 Series – Digital Infrared Heater Operation
• The heater has two operational modes – constant heating or
heating with a thermostat setting.
• Turn heater on by pressing the Power Button ( ). The Power
Indicator will light and the heater will begin Powering Up,
as displayed in Status by a blinking light until the heater has
warmed up and the fan comes on. The heater will start in
the Constant High heat mode ( ) and display the Current
Temperature in the room.
• To set a Constant Heat Setting, press ( ):
- Choose Low to use 1000 watts of power
- Choose High to use 1500 watts of power
NOTE: Because the Low setting does not require as much electricity to operate, it is more energy ecient and may be a better
option if you are concerned about saving energy.
• To set the Thermostat, press the Set Temp Buttons ( ) and choose your Desired Temperature. The Desired Temperature will
ash three times and then the Current Temperature in the room will display as a steady red.
• To scroll quickly through the Heat Settings, press and hold either Set Temp Button.
• When the Current Temperature in the room reaches the Desired Temperature, the heater will be “At Temp” and be displayed in Status
by a solid light.
NOTE: The fan may remain on for a short time to cool the quartz bulbs.
• To shut the heater o, press the Power Button ( ) and the heater will begin Powering Down, as displayed in Status by a blinking
light. The heater will automatically shut o in 60 seconds after the fan has cooled the internal components.
Model HZ-970 Series - EnergySmart® Infrared Heater Operation
• The heater has two operational modes – constant heating
or heating with an EnergySmart® thermostat control.
• Turn heater on by pressing the Power Button ( ). The Power
Indicator will light and the heater will begin Powering Up,
as displayed in Status by a blinking light until the heater has
warmed up and the fan comes on. The heater will start in
the Constant High Heat mode and L2 will be displayed as the
Desired Temperature.
• To set a Constant Heat Setting, press the Thermostat Control
Buttons ( ):
- Choose L1 for constant Low
- Choose L2 for constant High
NOTE: Because the Low (L1) setting does not require as much electricity to operate, it is more energy ecient and may be a
better option if you are concerned about saving energy.
• The Energy Usage Indicator will always display the power consumption used by the heater at any time:
- If High, the heater is drawing 1500 watts to warm the room
- If Low, the heater is drawing 1000 watts to warm the room or maintain the temperature
- If Fan, the heater is drawing only enough power to run the fan to cool the quartz elements
- If At Temp, the heater is drawing no power as the room has reached the Desired Temperature
1
2
3
4
5
6
7
8
1
2
3
4
5
6
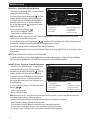
Fig. 2
Fig. 3
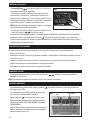
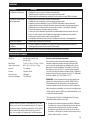
1. Status Indicators
2. Power Indicator
3. Power Button
4. Current Temperature/Desired
Temperature Display
5. Set Temp Buttons
6. Constant Heat Settings
Model HZ-960 User Interface Controls:
1. Status Indicators
2. Current Temperature Display
3. Power Indicator
4. Power Button
5. Timer
6. Desired Temperature Display
7. Energy Usage Indicator
8. Thermostat Control Buttons
Model HZ-970 User Interface Controls:

5
OPERATION (continued)
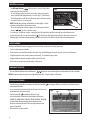
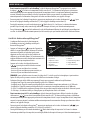
Model HZ-980 Series - MYEnergySmart™ Infrared Heater Operation
• The heater has two operational modes – constant heating or
heating with an EnergySmart® thermostat control.
• Turn heater on by pressing the Power Button ( ). The Power
Indicator will light and the heater will begin Powering Up,
as displayed in Status by a blinking light until the heater has
warmed up and the fan comes on. The heater will start in
the Constant High Heat mode and L3 will be displayed as the
Desired Temperature.
• To set a Constant Heat Level, press the Thermostat Control
Buttons ( ):
- Choose L1 for constant Low
- Choose L2 for constant Medium
- Choose L3 for constant High
NOTE: Because the Low (L1) setting does not require as much electricity to operate, it is more energy ecient and may be a
better option if you are concerned about saving energy.
• The Heating Energy Usage Indicator will always display the power consumption used by the heater at any time:
- If High, the heater is drawing 1500 watts to warm the room
- If Medium, the heater is drawing 1250 watts to warm the room or maintain the temperature
- If Low, the heater is drawing 1000 watts to warm the room or maintain the temperature
- If Fan, the heater is drawing only enough power to run the fan to cool the quartz elements
- If At Temp, the heater is drawing no power as the room has reached the Desired Temperature
• To save up to 35% in energy bills†, set the EnergySmart® thermostat by pressing the Thermostat Control Buttons
( ) to choose a Desired Temperature between 60-85°. The EnergySmart® thermostat will automatically select the
appropriate power level to best accommodate your Desired Temperature. As the air temperature (Current Temp) in the room
approaches the Desired Temperature, the heater will automatically adjust the power consumption to provide consistent warmth
without wasting energy.
• To override the EnergySmart® function, simply press The Thermostat Control Buttons ( ) to choose either Constant Low
(L1), Constant Med (L2) or Constant High (L3) Heat.
• To set the Timer, press the Timer Button ( ) to select 1-8 hour setting. The heater will run for that chosen period in the selected
mode, counting down the hours and automatically shut o after the desired time has passed.
• To save up to 25% in energy bills†, set the EnergySmart® thermostat by pressing the Thermostat Control Buttons
( ) and choose a Desired Temperature between 60-85°. The EnergySmart® thermostat will automatically select the
appropriate power level to best accommodate your Desired Temperature. As the air temperature (Current Temp) in the room
approaches the Desired Temperature, the heater will automatically adjust the power consumption to provide consistent warmth
without wasting energy.
• To override the EnergySmart® function, simply press the Thermostat Control Buttons ( ) to choose either Constant Low
(L1) or Constant High (L2) Heat.
• To set the Timer, press the Timer Button ( ) to select 2, 4, 6 or 8 hour setting. The heater will run for that chosen period in the
selected mode, counting down the hours and automatically shut o after the desired time has passed.
• To shut the heater o, press the Power Button ( ) and the heater will begin Powering Down as displayed in Status by a
blinking light. The heater will automatically shut o in about 60 seconds after the fan cools the internal components.
1
2
3
4
5
6
7
8
9
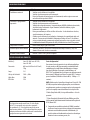
Fig. 4
1. Status Indicators
2. Current Temperature Display
3. Power Indicator
4. Power Button
5. Desired Temperature Display
6. Timer
7. Energy Usage Indicator
8. MyTemp Settings
9. Thermostat Control Buttons
Model HZ-980 User Interface Controls:

6
Fig. 5
SAFETY FEATURES
The Honeywell Infrared Heater is equipped with several devices and features for added protection:
• Cool to touch housing and handle.
• A four way tip-over switch that disables the heater if it is accidentally tipped in any front, back or side to side directions.
• A high temperature safety control prevents overheating. See troubleshooting section.
• Equipped with an overheat switch that will shut down the unit.
• This heater was created using a high quality safety plastic.
• Periodic cleaning of the lter is recommended. Turn the heater O ( ) and unplug it. Allow it to cool. Remove the Filter Cover and
clean/vacuum the Filter.
• It is recommended that the Infrared Heater be cleaned at least once a
month and before o-season storage.
• Turn the heater O ( ) and unplug it. Allow it to cool.
• Use a dry cloth only to clean the external surfaces of the heater.
DO NOT USE WATER, WAXES, POLISHES OR ANY CHEMICAL SOLUTION.
• Clean the Infrared Heater using the above-mentioned steps.
Wrap the cord around the unit. Place in its original box and store
it in a cool, dry place.
• This heater does not disassemble.
• Press and hold both Thermostat Control Buttons ( ) for three seconds to change between Fahrenheit and Celsius and back.
NOTE: The Remote will not change between Fahrenheit and Celsius - only the controls on the heater.
CLEANING AND STORAGE
FAHRENHEIT TO CELSIUS
OPERATION (continued)
• The MyTemp Settings ( ) allow you to pre-set two favorite heat
settings and the timer function.
- To set a MyTemp preference, choose any heater setting (heat and/or
timer) and hold a MyTemp button for 3 seconds (Fig. 5), until it beeps.
The MyTemp Button will ash then illuminate and your favorite setting
is stored. It can be re-set at any time.
NOTE: Both MyTemp Settings will default to Constant High (L3) at rst
operation until you choose your favorite setting.
- To exit from a MyTemp Setting, simply press any Thermostat Control
Button ( ) to choose another setting.
• To select a pre-set MyTemp Setting – simply press the MyTemp Button and the heater will run in that favorite mode.
• To shut the heater o, press the Power Button ( ) and the heater will begin Powering Down as displayed in Status by a
blinking light. The heater will automatically shut o in about 60 seconds after the fan cools the internal components.
Fig. 6 Filter Filter Cover

7
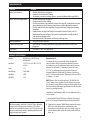
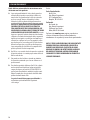
Model(s) HZ-960 Series, HZ-970 Series,
HZ-980 Series
Unit dims 15.875”H x 12.625”W x 15.25”D,
16.5 lbs
Amps 12.5
Unit Voltage 120V, 60Hz
Max Watts 1500
Max BTUs 5118
Operation Cost*
To estimate the cost to operate this heater, multiple the
watts used times .001 to convert into a kilowatts measure
and multiple by your local kilowatt electric rate for however
long you run the heater. For example, if your electric rate
is $.1196**per kilowatt hour and you ran this heater in
constant high mode (1500 watts) for 4 hours, it would cost
you $.71 cents to run the heater (1500 watts x 4 hours x.001) x
.1196kwp = .71 cents).
NOTE: Because the Low or EnergySmart® (HZ-970/HZ-980
Series) Settings do not require as much electricity to operate,
they are more energy ecient and may be better options if you
are concerned about the amperage draw on a circuit when the
heater is on the High setting.
*Calculation (Total Wattage x .001) x Cost per Kilowatt Hour =
Cost to operate
**Average Retail Price of Electricity to Ultimate Customer by
End-Use, US Energy Information Administration, March 2013.
† Compared to a standard 1500W heater. Amount of savings
will be based on various factors, including the room
temperature near the heater, room size, and the degree of
room insulation which can be affected by drafty windows,
doors, etc.
PRODUCT SPECIFICATIONS
TROUBLESHOOTING
This device complies with Part 15 of the FCC Rules. Operation
is subject to the following two conditions: (1) This device
may not cause harmful interference, and (2) This device must
accept any interference received, including interference that
may cause undesired operation.
Problem Solution
Heater does not turn on • Check to conrm heater is plugged in
• Conrm the electrical outlet is working
• Check battery in remote is working; replace as needed with lithium button type CR2025
Heater shuts o during operation • Check to conrm heater is plugged in
• Conrm electrical outlet is working
• Check for obstructions. If an obstruction is found, turn heater OFF, unplug, allow to cool and
remove obstruction. Wait 10 minutes, plug in heater and follow Operation Instructions.
• Check to conrm Filter is clear from debris. If clogged with debris, follow above Cleaning
Instructions.
• Conrm heater is not tipped and safety tip over switch is activated. If error code E1 is
illuminated in Temperature Display, the heater is in tipped position and will remain o
until moved into upright position.
• Room has met Desired Temperature and heater is in At Temp mode.
Airow is diminished • Check Filter, clean as necessary.
Liquid is spilled on heater • Shut heater OFF and unplug. Immediately wipe spill and allow to dry 24 hours before
plugging in.
Lost Remote • Call 1-800-477-0457 for a replacement.

8
3 YEAR LIMITED WARRANTY
You should rst read all instructions before attempting
to use this product.
A. This 3 year limited warranty applies to repair or
replacement of product found to be defective in
material or workmanship. This warranty does not
apply to damage resulting from commercial, abusive,
unreasonable use or supplemental damage. Defects
that are the result of normal wear and tear will not be
considered manufacturing defects under this warranty.
KAZ USA, INC. IS NOT LIABLE FOR INCIDENTAL
OR CONSEQUENTIAL DAMAGES OF ANY NATURE.
ANY IMPLIED WARRANTY OF MERCHANTABILITY
OR FITNESS FOR A PARTICULAR PURPOSE ON
THIS PRODUCT IS LIMITED IN DURATION TO THE
DURATION OF THIS WARRANTY. Some jurisdictions
do not allow the exclusion or limitation of incidental
or consequential damages or limitations on how long
an implied warranty lasts, so the above limitations or
exclusions may not apply to you. This warranty gives
you specic legal rights, and you also may have other
rights which vary from jurisdiction to jurisdiction. This
warranty applies only to the original purchaser of this
product from the original date of purchase.
B. At its option, Kaz USA, Inc. will repair or replace this
product if it is found to be defective in material or
workmanship.
C. This warranty does not cover damage resulting from any
unauthorized attempts to repair or from any use not in
accordance with the instruction manual.
D. Return defective product to Kaz USA, Inc. with a brief
description of the problem. Include proof of purchase
and a $10 US/$15.50 CAN check or money order for
handling, return packing and shipping charges. Please
include your name, address and a daytime phone
number.
You must prepay shipping charges. We suggest having
tracking or delivery conrmation.
Send to:
In U.S.: In Canada:
Kaz USA, Inc. Kaz Canada, Inc.
Attn: Returns Department Attn: Returns Department
4755 Southpoint Drive 510 Bronte Street South
Memphis, TN 38118 Milton, ON L9T 2X6
USA Canada
Mail questions or comments to:
Kaz USA, Inc.
Consumer Relations Dept.
250 Turnpike Road
Southborough, MA 01772
Call us toll-free at: 1-800-477-0457
E-mail: consumerrela[email protected]
Or visit our website at: www.kaz.com
Please be sure to specify a model number.
NOTE: IF YOU EXPERIENCE A PROBLEM, PLEASE CONTACT
CONSUMER RELATIONS FIRST OR SEE YOUR WARRANTY.
DO NOT RETURN THE HEATER TO THE ORIGINAL PLACE
OF PURCHASE. DO NOT ATTEMPT TO OPEN THE MOTOR
HOUSING YOURSELF, DOING SO MAY VOID YOUR
WARRANTY AND CAUSE DAMAGE TO THE PRODUCT OR
PERSONAL INJURY.

9
IMPORTANTES
INSTRUCCIONES DE
SEGURIDAD
ADVERTENCIA – LEA Y GUARDE ESTAS
INSTRUCCIONES DE OPERACIÓN Y DE
SEGURIDAD ANTES DE UTILIZAR ESTE
CALEFACTOR. SI NO ENTIENDE ESTAS
INSTRUCCIONES O ETIQUETAS DEL
PRODUCTO POR FAVOR LLAME A NUESTROS
REPRESENTANTES DE SERVICIO AL CLIENTE
AL (800) 477-0457 PARA ASISTENCIA ANTES
DE USAR ESTE PRODUCTO.
Advertencia – El incumplimiento de seguir
cualquiera de estas instrucciones de seguridad
puede resultar en incendio, heridas o la muerte.
SUS RESPONSABILIDADES
Los aparatos eléctricos pueden exponer a
las personas a peligros que pueden causar
heridas severas así como la muerte. El uso de
productos eléctricos pueden ocasionar peligros
que incluyen, pero no están limitados a, heridas,
incendio, descarga eléctrica y daño al sistema
eléctrico. Estas instrucciones están pensadas
para proporcionarle la información que necesita
para usar el producto y evitar tales riesgos.
Cuando utilice aparatos eléctricos, debe seguir
siempre las precauciones básicas para reducir
el riesgo de incendio, descarga eléctrica, y
heridas a personas incluyendo lo siguiente:
1. Advertencia – Lea todas las instrucciones
antes de usar este calefactor.
2. Advertencia – Este calefactor se
calienta cuando está en uso. Para evitar
quemaduras, no toque las superficies
calientes con la piel expuesta. Use las
manijas cuando mueva este calefactor.
Mantenga los materiales inflamables, como
los muebles, almohadas, sábanas, papeles,
ropa y cortinas alejados al menos 0.9 m
(3 pies) del frente del calefactor, de los
laterales y de la parte posterior.
3. Advertencia – Es necesaria precaución
extrema cuando cualquier calefactor
sea utilizado por o cerca de niños o
discapacitados, y siempre que el calefactor
se deje funcionando y sin supervisión.
4. Advertencia – Siempre desconecte el
calefactor cuando no esté en uso.
5. Advertencia – No opere ningún calefactor
con el cable o el enchufe dañados o después
de un malfuncionamiento, caída o daño
de cualquier tipo. Deseche el calefactor o
regréselo al centro de servicio autorizado
para revisión y/o reparación.
6. Advertencia – Sólo para uso residencial.
7. Advertencia – No use en exteriores.
8. Advertencia – Este calefactor no está
diseñado para usarse en baños, lavanderías
y áreas interiores similares. Nunca coloque
el calefactor donde pueda caer en la bañera
y otro contenedor de agua.
9. Advertencia – No pase el cable debajo de la
alfombra. No cubra el cable con alfombrillas,
tapetes, u otras cubiertas similares. No
pase el cable debajo de muebles o aparatos
eléctricos. Coloque el cable lejos del área de
tráfico y donde no cause tropiezos.
10. Advertencia – Este calefactor es para usarse
La marca registrada Honeywell es utilizada por Kaz USA, Inc. bajo licencia de Honeywell International Inc.
Honeywell International Inc. no formula declaración o garantía alguna con respecto a este producto.
CalefaCtor Infrarrojo
Modelo de laS SerIeS HZ-960
Modelo de laS SerIeS HZ-970
Modelo de laS SerIeS HZ-980

10
10. Advertencia – Este calefactor es para usarse
con 120 V~. El cable tiene un enchufe como se
muestra en la Fig. 1, y un adaptador, como se
muestra, está disponible para conectar enchufes
polarizados de tres clavijas a tomacorrientes de
dos ranuras. La terminal verde de puesta a tierra
que se extiende del adaptador, debe conectarse
a una tierra permanente como un tomacorriente
polarizado. El adaptador no debe usarse si
está disponible un tomacorriente polarizado de
tres ranuras. No ignore las características de
seguridad del enchufe polarizado. No modifique
el cable de corriente.
11. Advertencia – Este calefactor utiliza 12.5
amperes durante su operación. Para evitar una
sobrecarga, no enchufe el calefactor a un circuito
que ya tenga otros aparatos encendidos.
12. Advertencia – Es normal que el enchufe
se sienta caliente al tacto; sin embargo,
una conexión suelta entre la salida de CA
(tomacorriente) y el enchufe puede provocar
sobrecarga y deformación del enchufe. Pida
a un electricista capacitado que cambie el
tomacorriente flojo o defectuoso.
13. Advertencia – Para desconectar el calefactor,
primero apague el aparato, después sujete el
enchufe y sáquelo del tomacorriente. Nunca
tire del cable.
14. Advertencia – No introduzca ni permita que
entren objetos extraños por las aberturas
de ventilación o evacuación ya que puede
causar descarga eléctrica o incendio, o daño al
calefactor.
15. Advertencia – Para prevenir un posible
incendio, no tape de ninguna manera las
entradas o salidas de aire. No coloque en
superficies blandas, como la cama o donde las
aberturas puedan taparse.
16. Advertencia – Un calefactor contiene en su
interior piezas calientes que generan arcos
voltaicos o chispas. No utilice el aparato en
áreas donde se utilice o almacene gasolina,
pintura o líquidos inflamables.
17. Advertencia – Utilice el calefactor sólo como
se describe en este manual. Cualquier otro
uso no recomendado por el fabricante puede
causar incendio, descarga eléctrica o heridas
corporales.
18. Advertencia – Siempre conecte el calefactor
directamente en un tomacorriente/receptáculo.
Nunca utilice con un cable de extensión o
un tomacorriente móvil (enchufe/contacto
múltiple).
19. Advertencia – Nunca manipule este producto
o intente arreglarlo. Cualquier manipulación
con, o modificación de este producto puede
resultar en serias heridas, la muerte, o
incendio. Riesgo de descarga eléctrica. No lo
abra. No hay piezas útiles en el interior para el
usuario.
20. Advertencia – No quite las etiquetas del
producto que contengan advertencias o
instrucciones de seguridad.
21. Precaución – La cantidad de calor que emite
este calefactor es variable y su temperatura
puede llegar a ser lo suficientemente intensa
para quemar la piel expuesta. El uso de este
calefactor no es recomendable para personas
con menor sensibilidad al calor o incapaces de
reaccionar para evitar quemaduras.
22. Precaución – Antes de limpiar, o guardar, o
cuando no esté en uso, APAGUE los controles
del aparato y desconecte el calefactor del
tomacorriente y permita que se enfríe.
23. Precaución – Coloque el calefactor en una
superficie firme, plana y libre de obstáculos
y al menos 0.9 m (3 pies) de distancia de
cualquier material inflamable. NO utilice
en superficies inestables como la cama
o alfombras gruesas. Asegúrese que el
calefactor no esté en un lugar en donde
los niños pequeños o mascotas puedan
tropezarse con el.
24. Precaución – Si su hogar cuenta con cableado
de aluminio permita que un electricista
autorizado revise las conexiones de los
tomacorrientes. Cuando utilice un calefactor
de 1500 watts, las conexiones del cableado
de aluminio pueden causar problemas de
seguridad.
25. GUARDE ESTAS
INSTRUCCIONES
IMPORTANTES INSTRUCCIONES DE SEGURIDAD ACERCA DEL ENCHUFE EN SU PRODUCTO
Especificaciones del Producto
Este producto está clasificado en 12.5 Amps
(1500 Watts) en 120 V~, 60 Hz.
CLAVIJA
POLARIZADA
ADAPTADOR
POLARIZADO TERMINAL
POLARIZADA
TORNILLO DE METAL
CUBIERTA DEL
TOMACORRIENTE
POLARIZADO
Fig. 1

11
ACERCA DE LA TECNOLOGÍA INFRARROJA
INSTALACIÓN
INICIO
MOVER EL CALEFACTOR
• La energía infrarroja es luz dentro el espectro que no puede verse pero puede detectarse por el calor.
• Los calefactores infrarrojos utilizan lámparas de cuarzo para generar tal espectro de luz. En el Calefactor Infrarrojo de Honeywell,
seis elementos de cuarzo de larga duración calientan la cámara interior de metal. El aire es atraído a la parte posterior del
calefactor por un ventilador, pasa por los reectores de cobre calientes y sale por la parte delantera del calefactor para introducir
suavemente aire caliente y relajante en la habitación.
• Este tipo de tecnología de calefacción proporciona una calefacción uniforme, eciente y cómoda. Está diseñado con un potente
ventilador para mejorar la convección con el n de proporcionar comodidad para usted y en espacios más grandes.
• El Calefactor Infrarrojo de Honeywell no requiere ensamblaje. Simplemente desempaque el calefactor y guarde todos los
materiales de embalaje para almacenaje fuera de temporada.
• Coloque el calefactor sobre una supercie rme, nivelada y abierta, libre de obstrucciones y por lo menos a 0.9 m (3 pies) de
cualquier pared o materiales combustibles.
• NO use sobre una supercie inestable como la cama o alfombras profundas.
• ASEGÚRESE QUE EL CALEFACTOR NO ESTÉ EN UNA POSICIÓN DONDE PUEDA SER DERRIBADO POR NIÑOS O MASCOTAS.
Registre su calefactor enlínea y extienda su garantía por seis meses adicionales.
Conéctese a www.honeywellheatsavings.com/registration/ y simplemente llene la formulario de registro para registrar su producto.
• Este calefactor está equipado con un Asa Fría al Tacto grande y unas ruedas fáciles de deslizar para su conveniencia.
• Para moverlo, apague el calefactor.
• Permita que se enfríe durante 10 minutos.
• Desenchufe el calefactor y simplemente levante el asa o haga rodar para moverlo.
OPERACIÓN
CONTROL REMOTO
El Calefactor Infrarrojo de Honeywell puede controlarse con el control remoto. Este control remoto usa una batería de botón la cual
está incluida en el control remoto.
• Para activar la batería, simplemente jale la lengüeta de plástico.
• Coloque el control remoto en el soporte debajo del asa del calefactor cuando no esté en uso.
• NOTA: NUNCA DEJE DESATENDIDA UNA UNIDAD EN OPERACIÓN.
• Enchufe el calefactor en un tomacorriente polarizado o para 3 clavijas de 120 V~. NO FUERCE EL ENCHUFE DE 3 CLAVIJAS EN
EL TOMACORRIENTE; sólo entrará de una forma.
• El Calefactor Infrarrojo de Honeywell es versátil y diseñado para ser colocado en el centro de la habitación o más cerca de la
pared (al menos a 0.9 m) para máxima seguridad y calefacción eciente.

12
OPERACIÓN (continuación)
Series HZ-960 – Operación del Calefactor Digital Infrarrojo
• El calefactor tiene dos modos de operación – calefacción
constante o calefacción con un ajuste de termostato.
• Encienda el calefactor presionando el Botón de Encendido ( ).
El Indicador de Encendido se iluminará y el calefactor comenzará
a Cargarse, como se muestra en el Estado por una luz intermitente
hasta que el calefactor se haya calentado y el ventilador se
encienda. El calefactor iniciará en el modo de calor Constante Alto (
) y mostrará la Temperatura Actual en la habitación.
• Para establecer el Ajuste de Calor Constante, presione ( ):
- Elija Bajo para usar 1000 W de potencia
- Elija Alto para usar 1500 W de potencia
NOTA: Debido a que el ajuste Bajo no requiere tanta electricidad para operar, es energéticamente más eciente y puede ser una
mejor opción si usted está preocupado por el ahorro de energía.
• Para ajustar el Termostato, presione los Botones de Ajuste de Temperatura ( ) y seleccione la Temperatura Deseada. La
Temperatura Deseada parpadeará tres veces y luego mostrará la Temperatura Actual en la habitación con un rojo continuo.
• Para desplazarse rápidamente por los Ajustes de Calor, mantenga presionado el Botón de Ajuste de Temperatura.
• Cuando la Temperatura Actual en la habitación alcance la Temperatura Deseada, el calefactor estará “A Temperatura” y se mostrará
en el Estado con una luz continua.
NOTA: El ventilador puede permanecer encendido por un corto período de tiempo para enfriar los bulbos de cuarzo.
• Para apagar el calefactor, presione el Botón de Encendido ( ) y el calefactor comenzará a Descargarse, como se muestra en el Estado con una luz
parpadeante. El calefactor se apagará automáticamente en 60 segundos después de que el ventilador ha enfriado los componentes internos.
Modelo de las Series HZ-970 - Operación del Calefactor Infrarrojo
EnergySmart®
• El calefactor tiene dos modos de operación – calefacción
constante o calefacción con control de termostato
EnergySmart®.
• Encienda el calefactor presionando el Botón de Encendido ( ).
El Indicador de Encendido se iluminará y el calefactor comenzará
a Cargarse, como se muestra en el Estado por una luz intermitente
hasta que el calefactor se haya calentado y el ventilador se encienda.
El calefactor iniciará en el modo de Calor Constante Alto y se
mostrará L2 como la Temperatura Deseada.
• Para establecer el Ajuste de Calor Constante, presione los
Botones de Control del Termostato ( ):
- Elija L1 para Bajo constante
- Elija L2 para Alto constante
NOTA: Debido a que el ajuste Bajo (L1) no requiere tanta electricidad para operar, es energéticamente más eciente y puede ser
una mejor opción si usted está preocupado por el ahorro de energía.
• El Indicador de Uso de Energía siempre mostrará el consumo de energía utilizado por el calefactor en cualquier momento:
- Si está en Alto, el calefactor está utilizando 1500 W para calentar la habitación
- Si está en Bajo, el calefactor está utilizando 1000 W para calentar la habitación o mantener la temperatura
- Si está en Ventilador, el calefactor está utilizando sólo la suciente energía para operar el ventilador para enfriar los elementos de cuarzo
- Si está A Temperatura, el calefactor no está utilizando energía ya que la habitación ha alcanzado la Temperatura Deseada
1
2
3
4
5
6
7
8
1. Indicadores de Estado
2. Indicadores de Encendido
3. Botón de Encendido
4. Pantalla de Temperatura Actual/
Temperatura Deseada
5. Botones de Ajuste de Temperatura
6. Ajustes de Calor Constante
1
2
3
4
5
6
Fig. 2
Fig. 3
Controles de Interfaz de Usuario Modelo HZ-960:
1. Indicadores de Estado
2. Pantalla de Temperatura Actual
3. Indicador de Encendido
4. Botón de Encendido
5. Temporizador
6. Pantalla de Temperatura Deseada
7. Indicador de Uso de Energía
8. Botones de Control de Termostato
Controles de Interfaz del Usuario HZ-970:

13
OPERACIÓN (continuación)
Modelo de las Series HZ-980 - Operación del Calefactor Infrarrojo
MYEnergySmartMR
• El calefactor tiene dos modos de operación – calefacción
constante o calefacción con control de termostato EnergySmart®.
• Encienda el calefactor presionando el Botón de Encendido ( ).
El Indicador de Encendido se iluminará y el calefactor comenzará
a Cargarse, como se muestra en el Estado por una luz intermitente
hasta que el calefactor se haya calentado y el ventilador se
encienda. El calefactor iniciará en el modo de calor Constante Alto
y mostrará L3 como la Temperatura Deseada.
• Para establecer el Nivel de Calor Constante, presione los Botones
de Control del Termostato ( ):
- Elija L1 para Bajo constante
- Elija L2 para Medio constante
- Elija L3 para Alto constante
NOTA: Debido a que el ajuste Bajo (L1) no requiere tanta electricidad para operar, es energéticamente más eciente y puede ser
una mejor opción si usted está preocupado por el ahorro de energía.
• El Indicador de Uso de Energía de Calor siempre mostrará el consumo de energía utilizado por el calefactor en cualquier momento:
- Si está en Alto, el calefactor está utilizando 1500 W para calentar la habitación
- Si está en Medio, el calefactor está utilizando 1250 W para calentar la habitación o mantener la temperatura
- Si está en Bajo, el calefactor está utilizando 1000 W para calentar la habitación o mantener la temperatura
- Si está en Ventilador, el calefactor está utilizando sólo la suciente energía para operar el ventilador para enfriar los elementos de cuarzo
- Si está A Temperatura, el calefactor no está utilizando energía ya que la habitación ha alcanzado la Temperatura Deseada
• Para ahorrar hasta un 35% en el recibo de luz†, ajuste el termostato EnergySmart® presionando los Botones de Control del Termostato
( ) y elija una Temperatura Deseada entre 60-85°. El termostato The EnergySmart® seleccionará automáticamente
el nivel de potencia adecuado para adaptarse mejor a la Temperatura Deseada. A medida que la temperatura del aire en
la habitación se acerca a la Temperatura Deseada, el calefactor ajustará automáticamente el consumo de energía para
proporcionar calor constante sin desperdiciar energía.
• Para anular la función EnergySmart®, simplemente presione los Botones de Control del Termostato ( ) para elegir Calor
Constante Bajo (L1), Calor Constante Medio (L2) o Calor Constante Alto (L3).
• Para ajustar el Temporizador, presione el Botón del Temporizador ( ) para seleccionar el ajuste de 1-8 horas. El calefactor
operará por el período de tiempo elegido en el modo seleccionado, contando las horas y apagándose automáticamente después
de transcurrido el tiempo deseado.
1. Indicadores de Estado
2. Pantalla de Temperatura Actual
3. Indicador de Encendido
4. Botón de Encendido
5. Pantalla de Temperatura Deseada
6. Temporizador
7. Indicador de Uso de Energía
8. Ajustes MyTemp
9. Botones de Control de Termostato
• Para ahorrar hasta un 25% en el recibo de luz†, ajuste el termostato EnergySmart® presionando los Botones de Control del Termostato
( ) y elija una Temperatura Deseada entre 60-85°. El termostato The EnergySmart® seleccionará automáticamente
el nivel de potencia adecuado para adaptarse mejor a la Temperatura Deseada. A medida que la temperatura del aire
(Temperatura Actual) en la habitación se acerca a la Temperatura Deseada, el calefactor ajustará automáticamente el consumo
de energía para proporcionar calor constante sin desperdiciar energía.
• Para anular la función EnergySmart®, simplemente presione los Botones de Control del Termostato ( ) para elegir Calor
Constante Bajo (L1) o Calor Constante Alto (L2) .
• Para ajustar el Temporizador, presione el Botón del Temporizador ( ) para seleccionar el ajuste de 2, 4, 6 u 8 horas. El calefactor
operará por el período de tiempo elegido en el modo seleccionado, contando las horas y apagándose automáticamente después
de transcurrido el tiempo deseado.
• Para apagar el calefactor, presione el Botón de Encendido ( ) y el calefactor comenzará a Descargarse, como se muestra en el Estado. El
calefactor se apagará automáticamente en 60 segundos después de que el ventilador ha enfriado los componentes internos.
1
2
3
4
5
6
7
8
9
Fig. 4
Controles de Interfaz del Usuario HZ-980:

14
Fig. 5
CARACTERÍSTICAS DE SEGURIDAD
El Calefactor Infrarrojo de Honeywell está equipado con varios dispositivos y características para protección adicional:
• Cubierta y Asa Fría al tacto.
• Un interruptor anti caídas de cuatro vías que desactiva el calefactor si accidentalmente es derribado hacia adelante, hacia atrás o
hacia un lado o el otro.
• Un control de seguridad de temperatura alta evita el sobrecalentamiento. Consulte la sección de Solución de Problemas.
• Equipado con un interruptor de sobrecalentamiento, el cual apagará la unidad.
• Este calefactor fue creado usando un plástico de seguridad de alta calidad.
• Se recomienda limpieza periódica del ltro. Apague el calefactor ( ) y desconéctelo. Permita que se enfríe. Retire la Cubierta del
Filtro y limpie/aspire el Filtro.
• Se recomienda que limpie el Calefactor Infrarrojo al menos una vez
al mes y antes de almacenar al nal de la temporada.
• Apague el calefactor ( ) y desconéctelo. Permita que se enfríe.
• Utilice un paño suave para limpiar sólo las supercies externas del
calefactor. NO USE AGUA, CERAS, ABRILLANTADORES O CUALQUIER
SOLUCIÓN QUÍMICA.
• Limpie el Calefactor Infrarrojo siguiendo los pasos antes mencionados.
Enrolle el cable alrededor de la unidad. Coloque en su caja original y
almacene en un lugar fresco y seco.
• Presione y mantenga presionado los Botones de Control del Termostato ( ) durante tres segundos para cambiar entre
Fahrenheit y Celsius y viceversa.
NOTA: El Control Remoto no cambiará entre Fahrenheit y Celsius - sólo los controles en el calefactor.
LIMPIEZA Y ALMACENAJE
FAHRENHEIT A CELSIUS
OPERACIÓN (continuación)
• Los Ajustes MyTemp ( )le permite preestablecer los dos ajustes de
calor favoritos y la función del temporizador.
- Para establecer una preferencia MyTemp, elija cualquier ajuste del
calefactor (calor y/o temporizador) y mantenga presionado el botón
MyTemp durante 3 segundos (Fig. 5), hasta que emita un pitido. El Botón
MyTemp parpadeará, luego se iluminará y se almacenará su conguración
preferida. Puede volverla a establecer en cualquier momento.
NOTA: Ambos Ajustes MyTemp mostrarán Alto Constante (L3) en la primera
operación hasta que usted elija su ajuste favorito.
- Para salir del Ajuste MyTemp, simplemente presione cualquier Botón de
Control del Termostato ( ) para elegir otro ajuste.
• Para seleccionar un Ajuste MyTemp preestablecido – simplemente presione el Botón MyTemp y el calefactor operará en ese modo favorito.
• Para apagar el calefactor, presione el Botón de Encendido ( ) y el calefactor comenzará a Descargarse, como se muestra en el
Estado con una luz parpadeante. El calefactor se apagará automáticamente en aproximadamente 60 segundos después de que el
ventilador enfríe los componentes internos.
Fig. 6 Filtro Tapa del Filtro

15
Modelo(s) Series HZ-960, Series HZ-970,
Series HZ-980
Dimensión 40.32 cm A x32.07 cm A x 38.73 cm P,
7.5 kg
Amps 12.5
Voltaje de la Unidad 120V~, 60Hz
Watts Max 1500
BTUs Max 5118
Costo de Operación*
Para estimar el costo de operación de este calefactor, multiplique
los watts usados por .001 para convertirlos a medición kilowatts
y multiplique por su tarifa eléctrica local kilowatt por el tiempo
que opere el calefactor. Por ejemplo, su tarifa eléctrica es de
USD$.1196**por kilowatt hora y usted opera este calefactor en modo
alto constante (1500 watts) por 4 horas, le costará USD$.71 centavos
operar el calefactor (1500 watts x 4 horas x.001) x .1196kwp = .71
centavos).
NOTA: Debido a que los Ajustes Bajo o EnergySmart® (Series HZ-970/
HZ-980) no requieren tanta energía para operar, son más ecientes
energéticamente y pueden ser una mejor opción si está preocupado
por el uso de amperaje cuando el calefactor esté en el ajuste Alto.
*Cálculo (Vataje Total x .001) x Costo por Kilowatt Hora = Costo de
operación
**Precio Promedio de Electricidad de Venta al Público para el Uso
del Consumidor Final, Administración de Información Energética de
EE.UU., Marzo 2013.
† Comparado con un calefactor estándar de 1500W. La cantidad
de ahorro se basará en varios factores, incluyendo la temperatura
ambiente cerca del calefactor, tamaño de la habitación, y el
grado de aislante en la habitación el cual puede ser afectado por
corrientes de aire en ventanas, puertas, etc.
ESPECIFICACIONES DEL PRODUCTO
SOLUCIÓN DE PROBLEMAS
Este dispositivo cumple con la Parte 15 de las Reglas
de la FCC. La operación está sujeta a las siguientes
dos condiciones: (1) Este dispositivo no puede causar
interferencias dañinas, y (2) Este dispositivo debe aceptar
cualquier inteferencia recibida, incluyendo la interferencia
que pueda causar operación no deseada.
Problema Solución
El calefactor no enciende • Verique que el calefactor esté enchufado
• Verique que el tomacorriente esté funcionando
• Revise que la batería del control remoto esté funcionando; cambie según sea necesario
con batería de litio tipo botón CR2025
El calefactor se apaga durante • Verique que el calefactor esté enchufado
la operación • Verique que el tomacorriente esté funcionando
• Verique que no haya obstrucciones. Si encuentra alguna, APAGUE el calefactor, desconéctelo,
deje enfriar y retire la obstrucción. Espere 10 minutos; enchufe el calefactor y siga las
Instrucciones de Operación.
• Revise para conrmar que el ltro esté libre de desechos. Si está obstruido con desechos,
siga las Instrucciones de Limpieza.
• Conrme que el calefactor no esté inclinado y el interruptor de seguridad anti caídas esté
activado. Si se muestra en la Pantalla de Temperatura el código de error E1, el calefactor
está en posición inclinada y permanecerá apagado hasta que no estar en posición vertical.
• La habitación ha alcanzado la Temperatura Deseada y el Calefactor está en el modo A Temperatura.
El ujo de aire es reducido • Revise el Filtro, limpie según sea necesario.
Se derramó líquido sobre el calefactor • APAGUE el calefactor y desconéctelo. Inmediatamente limpie el derrame y deje secar
durante 24 horas antes de volver a conectarlo.
Se extravió el control remoto • Llame al 1-800-477-0457 para un reemplazo.

16
3 YEAR LIMITED WARRANTY
Usted debe leer primero todas las instrucciones antes
de intentar usar este producto.
A.
La presente garantía limitada de 3 años cubre la reparación o
sustitución de todo producto con un defecto de fábrica o de
mano de obra. Esta garantía excluye los defectos ocasionados
por el uso comercial, abusivo o desrazonable y los daños
adicionales. Los fallos resultantes del desgaste normal no se
consideran defectos de fábrica en virtud de la presente garantía.
KAZ USA, INC. QUEDA EXENTA DE TODA RESPONSABILIDAD
POR DAÑOS FORTUITOS O INDIRECTOS DE TODO TIPO.
TODA GARANTÍA IMPLÍCITA DE CALIDAD COMERCIAL O DE
CONVENIENCIA RELACIONADA CON ESTE PRODUCTO TENDRÁ
LA MISMA VIGENCIA QUE LA PRESENTE GARANTÍA.
En ciertos
lugares no se permite la exclusión o limitación a daños fortuitos
o indirectos, ni los límites de duración aplicables a una garantía
implícita, por consiguiente, es posible que estas limitaciones o
exclusiones no se apliquen en su caso. Esta garantía le confiere
unos derechos precisos, reconocidos por la ley. Dichos derechos
difieren de un lugar a otro y es posible que usted tenga otros.
La presente garantía sólo será válida con la compra inicial del
producto a partir de la fecha de compra inicial.
B.
Kaz USA, Inc. se reserva todo derecho de reparación o sustitución
del presente producto si se constata que presenta un defecto de
fábrica o mano de obra.
C.
Esta garantía no cubre los daños ocasionados por tentativas
de reparación no autorizadas o por el uso no conforme con el
presente manual.
D.
Para devolver un producto defectuoso a Kaz USA, Inc., adjunte
una descripción breve del problema. Incluya una prueba de
compra y un cheque o giro postal de US$10.00 /CAD$15.50
para los gastos de manutención, embalaje de vuelta y reenvío.
Indique su nombre, dirección y un número de teléfono donde
podamos localizarle durante el día.
Los gastos de envío deben pagarse por adelantado. Le
recomendamos pedir confirmación del seguimiento
o de la entrega.
Enviar a:
En los Estados Unidos:
Kaz USA, Inc.
Attn: Returns Department
4755 Southpoint Drive
Memphis, TN 38118 USA
En Canadá:
Kaz Canada, Inc.
Attn: Returns Department
510 Bronte Street South
Milton, ON L9T 2X6 Canada
Por favor visite www.kaz.com y registre su producto en
el Centro de Atención al Cliente y reciba información y
actualizaciones de su producto y nuevas ofertas promocionales.
NOTA: SI TIENE ALGÚN PROBLEMA, POR FAVOR CONTACTE
PRIMERO SERVICIO AL CONSUMIDOR O CONSULTE LA
GARANTÍA. NO DEVUELVA EL CALEFACTOR AL LUGAR
ORIGINAL DE COMPRA. NO INTENTE ABRIR LA CARCASA
DEL MOTOR USTED MISMO, HACERLO PUEDE ANULAR
SU GARANTÍA Y PUEDE CAUSAR DAÑOS AL PRODUCTO O
LESIONES PERSONALES.

17
Kaz USA, Inc. utilise la marque de commerce Honeywell avec l’autorisation de Honeywell International Inc.
Honeywell International Inc. ne fait aucune assertion et n’offre aucune garantie en ce qui concerne ce produit.
CONSIGNES
DE SÉCURITÉ
IMPORTANTES
AVERTISSEMENT – LISEZ CES CONSIGNES
D’EMPLOI ET DE SÉCURITÉ AVANT D’UTILISER
LE RADIATEUR ET GARDEZ-LES. SI VOUS NE
COMPRENEZ PAS LES INSTRUCTIONS OU
LES ÉTIQUETTES APPOSÉES, APPELEZ NOTRE
SERVICE À LA CLIENTÈLE AU (800) 477-0457
POUR OBTENIR DES EXPLICATIONS ET CECI,
AVANT DE VOUS SERVIR DE L’APPAREIL.
Avertissement – L’inobservation de ces
consignes de sécurité pourrait résulter en un
incendie, des blessures, voire la mort.
VOS RESPONSABILITÉS
Les appareils électriques peuvent exposer à des
dangers aptes à causer des blessures graves,
voire la mort. Leur utilisation peut entraîner des
risques, y compris mais sans s’y limiter, de
blessures, d’incendies, de choc électrique et de
dommages à l’installation électrique. Le but de
ces instructions est de fournir les renseigne-
ments d’emploi voulus pour éviter ces dangers.
L’emploi d’appareils électriques requiert des
précautions fondamentales pour réduire les
risques d’incendies, de chocs électriques et de
blessures corporelles, dont les suivantes:
1. Avertissement – Lisez toutes les
instructions avant d’employer le radiateur.
2. Avertissement – Un radiateur qui marche
est chaud. Pour ne pas vous brûler, veillez
à ce que votre peau nue ne touche pas les
surfaces chaudes. Déplacez-le à l’aide des
poignées. Gardez les corps combustibles –
meubles, oreillers, literie, papiers, vêtements
et rideaux, par ex. – à au moins 0,9 m (3 pi)
de l’avant du radiateur et éloignez-les des
côtés et de l’arrière.
3. Avertissement – Redoublez de vigilance
lorsque le radiateur est utilisé par des
enfants ou en leur présence et près de
personnes handicapées, ainsi que lorsqu’il
fonctionne sans surveillance.
4. Avertissement – Débranchez toujours un
radiateur qui ne sert pas.
5. Avertissement – Ne l’utilisez pas si son
cordon ou sa fiche est abîmé, s’il a mal
fonctionné, a été échappé ou endom magé.
Jetez-le ou apportez-le à un centre agréé
pour le faire vérifier et/ou réparer.
6. Avertissement – Ne convient qu’à
l’utilisation résidentielle.
7. Avertissement – Ne l’utilisez pas en plein air.
8. Avertissement – Ce radiateur n’est pas
destiné aux salles de bains et de lavage ou
autres pièces intérieures. Ne le posez jamais
au-dessus d’une baignoire ou d’une cuve
d’eau dans laquelle il puisse tomber.
9. Avertissement – N’acheminez pas le cordon
sous tapis ou moquette. Ne le recouvrez pas
de carpettes, tapis de corridor, ou autres. Ne
le passez ni sous des meubles ni sous des
appareils. Éloignez-le du passage afin qu’il
ne puisse pas faire trébucher.
radIateurS à Infrarouge
ModèleS de la SérIe HZ-960
ModèleS de la SérIe HZ-970
ModèleS de la SérIe HZ-980
Kaz USA, Inc. utilise la marque de commerce Honeywell avec l’autorisation de Honeywell International Inc.
Honeywell International Inc. ne fait aucune assertion et n’offre aucune garantie en ce qui concerne ce produit.

18
INSTRUCTIONS DE SÉCURITÉ IMPORTANTES CONCERNANT LA FICHE DE L’APPAREIL
10. Avertissement – Appareil à brancher
uniquement sur courant de 120 volts. Le
cordon inclut la fiche illustrée à la fig. 1;
un adaptateur (illustré) est disponible
pour brancher les fiches tripolaires sur
prises bipolaires. Le tenon de terre vert de
l’adaptateur doit être connecté à une mise à
la masse permanente – une boîte électrique
correctement mise à la terre, par exemple.
N’utilisez pas un adaptateur quand une
prise triphasée (à la terre) est disponible.
Ne contournez pas les caractéristiques de
sécurité de la fiche et ne modifiez le cordon
d’alimentation en aucune façon.
11. Avertissement – Le fonctionnement de ce
radiateur prélève 12,5 ampères. Afin de ne
pas surcharger le circuit, ne le branchez pas
sur un circuit qui alimente d’autres appareils.
12. Avertissement – Il est normal que la
fiche soit un peu chaude au toucher; une
connexion prise de courant alternatif et fiche
mal assujettie peut surchauffer et déformer
la fiche. Demandez à un électricien de
remplacer les prises ayant du jeu ou usées.
13. Avertissement – Pour débrancher le
radiateur, éteignez-le puis tenez la fiche
entre le pouce et l’index pour la sortir de la
prise. Ne tirez jamais sur le cordon.
14. Avertissement – Veillez à ce qu’aucun
corps étranger ne pénètre dans les orifices
d’aération ou d’évacuation, sous peine de
provoquer choc électrique ou incendie et
d’abîmer l’appareil.
15. Avertissement – Pour éviter tout risque
d’incendie, ne bouchez les orifices
d’admission d’air ou d’évacuation en aucune
façon. Ne posez pas le radiateur sur une
surface molle, un lit par exemple, qui
pourrait boucher les orifices.
16. Avertissement – Un radiateur renferme des
pièces chaudes et produisant des étincelles.
Ne l’employez pas dans les lieux où sont
utilisés ou entreposés essence, peinture ou
liquides inflammables.
17. Avertissement – N’utilisez le radiateur que
tel que décrit dans ce guide. Tout autre
emploi que ne conseille pas le fabricant peut
être source d’incendie, de choc électrique ou
de blessures corporelles.
18. Avertissement – Branchez toujours le
radiateur directement sur la prise murale.
N’employez ni cordon prolongateur ni prise
mobile (barre multiprise).
19. Avertissement – N’altérez pas et ne tentez
pas de réparer ce radiateur. Toute altération
ou modification pourrait entraîner blessures
graves, mort ou incendie. Risque de choc
électrique. Ne l’ouvrez pas, il ne contient pas
de pièces que vous puissiez réparer.
20. Avertissement – N’ôtez pas les étiquettes de
mise en garde ou d’instructions de sécurité.
21. Attention – Le rendement du radiateur peut
varier et sa température être assez élevée
pour brûler la peau nue. Employer l’appareil
est déconseillé aux sujets dont la sensibilité
à la chaleur est limitée ou incapables de vite
réagir pour éviter les brûlures.
22. Attention – ÉTEIGNEZ le radiateur,
débranchez- le et laissez-le refroidir avant de
le nettoyer ou ranger et entre utilisations.
23. Attention – Posez le radiateur sur une
surface rigide, plane, d’aplomb, dégagée
et exempte d’obstructions, à au moins 3 pi
(0,9 m) des matières combustibles. NE le
placez PAS sur une surface instable telle
literie ou moquette épaisse. Veillez à ce qu’il
ne puisse faire trébucher ni les enfants ni les
animaux de compagnie.
24. Attention – Si l’installation électrique de
la maison comporte des fils d’aluminium,
faites vérifier la connexion à la prise par un
électricien agréé. Utiliser tout radiateur de
1500 watts avec câblage d’aluminium peut
compromettre la sécurité.
25. GARDEZ CES
INSTRUCTIONS
Spécifications du produit
Appareil présentant ces caractéristiques:
12,5 ampères (1500 watts) à 120 V CA, 60 Hz.
BRANCHE
DE TERRE
ADAPTATEUR
DE TERRE TENON
DE TERRE
VIS EN MÉTAL
PLAQUE DE
BOÎTE À LA
TERRE
Fig. 1

19
DÉCOUVREZ LA TECHNOLOGIE À INFRAROUGE
MISE EN PLACE
DÉMARRAGE
DÉPLACEMENT DU RADIATEUR
• L’énergie infrarouge provient d’un spectre de lumière invisible mais perçu par la chaleur.
• Ces radiateurs utilisent des lampes à quartz pour générer le spectre de lumière. Le radiateur Honeywell comporte six éléments
à quartz de longue durée qui chauent la chambre intérieure en métal. Une turbine aspire l’air par l’arrière du radiateur,
l’achemine sur les réecteurs chauds en cuivre puis renvoie la chaleur douce et réconfortante dans la pièce, par la grille avant.
• Ce genre de technologie fournit un chauage confortable, ecace et uniforme. La turbine améliore le processus de convection
et procure ainsi un confort revigorant et agréable dans les grands espaces.
• Le radiateur à infrarouge Honeywell ne requiert aucun assemblage. Sortez-le de la boîte puis mettez les matériaux d’emballage
de côté pour réemballer l’appareil à la n de la saison d’utilisation.
• Posez le radiateur sur une surface dégagée, plane, rigide, d’aplomb et exempte d’obstructions, à au moins 0,9 m (3 pi) des murs
ou des matières combustibles.
• NE le faites PAS fonctionner sur une surface instable – literie ou moquette épaisse, par exemple.
• VEILLEZ À CE QUE LE RADIATEUR NE RISQUE PAS DE FAIRE TRÉBUCHER LES ENFANTS OU LES ANIMAUX DE COMPAGNIE.
Enregistrez votre radiateur enligne et prolongez votre garantie de six mois.
Ouvrez une session au www.honeywellheatsavings.com/registration/ puis remplissez le formulaire pour enregistrer le produit.
• Ce radiateur est pourvu d’une grande poignée isolante et de roulettes destinées à simplier son déplacement.
• Éteignez toujours le radiateur avant de le déplacer.
• Laissez-le refroidir une dizaine de minutes.
• Débranchez alors le radiateur, levez-le par sa poignée ou bien faites-le rouler.
• REMARQUE: NE LAISSEZ JAMAIS LE RADIATEUR SANS SURVEILLANCE ALORS QU’IL FONCTIONNE
• Branchez le radiateur sur une prise de courant de 120 volts triphasée ou à la terre. NE FORCEZ PAS LA FICHE TRIPOLAIRE
DANS LA PRISE, elle n’enfonce que dans un sens.
• Le radiateur à infrarouge Honeywell est un appareil polyvalent, conçu pour être placé au milieu de la pièce ou près du mur (bien
qu’à au moins 0,9 m / 3 pi) – il ore ainsi la sécurité et l’ecacité de chauage maximales.
MODE D’EMPLOI
TÉLÉCOMMANDE
Le radiateur infrarouge Honeywell vient avec une télécommande permettant de le régler à distance. La télécommande est
alimentée par une pile bouton, incluse à l’intérieur.
• Pour activer la pile, il sut de tirer la patte de plastique.
• Entre utilisations, placez la télécommande dans la niche prévue à cet eet, sous la poignée du radiateur.

20
MODE D’EMPLOI (suite)
Série HZ-960 – Radiateur numérique à infrarouge
• Ce radiateur ore deux modes de fonctionnement – le
chauage constant ou le chauage par réglage du thermostat.
• Appuyez sur l’interrupteur ( ) pour mettre l’appareil en
marche. Le voyant d’alimentation s’allumera et le radiateur
commencera à chauer, tel qu’indiqué par le voyant clignotant
sous État, ceci jusqu’à ce que la chaleur soit susante et que
la turbine démarre. Le fonctionnement du radiateur débutera
au mode de chaleur haute constante ( ) et la température
actuelle de la pièce s’achera.
• Pressez la touche ( ) pour choisir un réglage constant:
- chaleur basse constante d’une puissance de 1000 watts
- chaleur haute constante d’une puissance de 1500 watts
REMARQUE: parce qu’il utilise moins de courant, le réglage bas se révèle aussi plus écoénergétique et peut constituer l’option de
choix pour les personnes soucieuses de réduire leur consommation d’énergie.
• Pour régler le thermostat, pressez les touches de réglage ( ) et choisissez la température désirée. Celle-ci clignotera à trois
reprises puis la température ambiante actuelle s’achera rouge xe.
• Pour passer rapidement d’un réglage à l’autre, appuyez longuement sur l’une ou l’autre des touches de température.
• Une fois la température désirée atteinte, le radiateur sera «à la température», ce qui sera indiqué par un voyant clignotant sous État.
REMARQUE: la turbine peut continuer à tourner pendant quelques instants pour refroidir les lampes à quartz.
• Pressez l’interrupteur ( ) pour arrêter le radiateur et le cycle de débranchement débutera, tel que l’indique le voyant clignotant
sous État. Le radiateur s’éteindra automatiquement (env. 60 secondes) après que la turbine ait refroidi les éléments intérieurs.
Série HZ-970 – Radiateur infrarouge EnergySmartMC
• Ce radiateur ore deux modes de fonctionnement – le
chauage constant ou le chauage contrôlé par le thermostat
EnergySmartMD .
• Appuyez sur l’interrupteur ( ) pour mettre l’appareil en
marche. Le voyant d’alimentation s’allumera et le radiateur
commencera à chauer, tel qu’indiqué par le voyant clignotant
sous État, ceci jusqu’à ce que la chaleur soit susante et que la
turbine démarre. Le fonctionnement du radiateur débutera au
mode de chaleur haute constante et L2 s’achera en tant que
température désirée.
• Appuyez sur les touches de réglage du thermostat
( ) pour régler un niveau de chaleur constant:
- choisissez L1 pour une chaleur basse constante ou
- choisissez L2 pour une chaleur haute constante
REMARQUE: parce qu’il utilise moins de courant, le réglage bas (L1) se révèle aussi plus écoénergétique et peut constituer l’option
de choix pour les personnes soucieuses de réduire leur consommation d’énergie.
• L’indicateur d’énergie utilisée ache en permanence l’énergie que consomme le radiateur lorsqu’il fonctionne:
- À «Haut», l’appel de courant pour réchauer la pièce est de 1500 watts
- À «Bas», l’appel de courant pour réchauer la pièce ou maintenir sa température ambiante est de 1000 watts
- À «Vent.», le radiateur utilise uniquement l’énergie nécessaire pour faire tourner la turbine et refroidir les éléments à quartz
- À «À la temp.», le radiateur n’utilise pas d’énergie parce que la température désirée a été atteinte
1
2
3
4
5
6
7
8
1. Voyants d’état
2. Voyant d’alimentation
3. Interrupteur
1
2
3
4
5
6
1. Voyants d’état
2. Température courante
3. Voyant d’alimentation
4. Interrupteur
5. Minuteur
6. Température désirée
7. Voyants d’énergie utilisée
8. Touches du thermostat
Fig. 2
Fig. 3
Commandes de l’interface utilisateur, modèle HZ-960
Commandes de l’interface utilisateur, modèle HZ-970
4. Température courante /
température désirée
5. Touches de réglage de la température
6. Réglages de chaleur constante
La page est en cours de chargement...
La page est en cours de chargement...
La page est en cours de chargement...
La page est en cours de chargement...
-
 1
1
-
 2
2
-
 3
3
-
 4
4
-
 5
5
-
 6
6
-
 7
7
-
 8
8
-
 9
9
-
 10
10
-
 11
11
-
 12
12
-
 13
13
-
 14
14
-
 15
15
-
 16
16
-
 17
17
-
 18
18
-
 19
19
-
 20
20
-
 21
21
-
 22
22
-
 23
23
-
 24
24


Honeywell HZ-960 Manuel utilisateur
- Catégorie
- Chauffe-eau
- Taper
- Manuel utilisateur
dans d''autres langues
- English: Honeywell HZ-960 User manual
- español: Honeywell HZ-960 Manual de usuario