Koala Kare KB311-SSWM Manuel utilisateur
- Taper
- Manuel utilisateur

KB311-SSWM
Surface-Mounted
Baby Changing Station
Cambiador Plegable
Table à Langer
Babywickelstation
Important. Retain for future reference. Read carefully.
Importante. Guárdelo para futuras consultas. Leer atentamente.
Important. À conserver pour information. À lire attentivement.
Wichtig. Zur späteren bezugnahme aufbewahren. Bitte sorgfältig durchlesen.
Koala Kare Products
Installation & Operations Instructions
The KB311 Baby Changing Stations have been designed to meet the following applicable provisions of the
2010 ADA Standards (ADAS) and the 2009/2017 American National Standards Institute A117.1 Standards
(ANSI 2009/2017) when properly installed and maintained. To comply with these accessibility requirements
the unit must be installed in a compliant location and height in accordance with the installation instructions.
You are responsible for the safe operation of this unit.


3
KB311-SSWM
Operations Instructions
Please Note
To assure proper installation, it is suggested that
a qualified person or carpenter install the Koala
Baby Changing Station. Koala Kare Products will
not be responsible if the station is not installed
properly. Koala Baby Changing Stations have
been tested to hold a substantial static load. The
unit must be attached to a permanent wall that is
capable of holding a substantial load. The maximum
recommended total weight for this baby changing
station is 50 lbs. Excessive weight may cause a
hazardous or unstable condition to exist.
Inspection Criteria
A properly maintained baby changing station:
• Opens and closes smoothly.
• Has a functioning strap and buckle. Strap is held
firmly in place when buckle is depressed over it.
• Oers parents liners through a fully stocked liner
dispenser. (Dispenser built into unit.)
• Provides a clean, convenient place for customers
to attend to their children.
Restraint System
Check strap by releasing the lever on the buckle and
pulling one end of the strap up through the bottom
of the buckle, depressing the lever when the strap is
tight. Give the strap a tug in the horizontal direction
away from the buckle, checking that the strap
remains in place beneath the buckle. To loosen the
strap, release the lever and pull the strap from the
bottom of the buckle.
ASTM F2285-04 (2016)
WARNING: Never leave child unattended.
WARNING: Avoid serious injury from falling or
sliding out. Always use restraint system.
WARNING: Designed for Infants Only. Age up
to 3.5 years and weighing less than 50 lb (22.7
kg). Keep one hand on the child at all times.
Parcels or accessory items, or both, placed on the
unit may cause the unit to become unstable.
Replacement Parts
For a list of replacement parts for this product,
(such as straps, shocks and labels) please visit
www.koalabear.com.
Replacement parts and additional liners can be
purchased from your local distributor or direct from
Koala at www.koalabear.com.
ADA Requirements
Additional information on how this product
complies with ADA requirements can be found
in the KB310 & KB311 Baby Changing Stations
Accessibility Compliance document on
www.koalabear.com.

4
KB311-SSWM
Installation Instructions
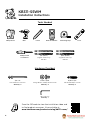
Tools Needed
1/8" (3mm)
(regular & masonry)
drill bits
Phillips Head
Screwdriver
7/32" (6mm)
(regular & masonry)
drill bits
1/4" x 3"
Pan Head Wood Screws
Quantity: 8
8-32" x 5/16"
Flange Button Phillips Head Screws
Quantity: 4
Allen Wrench
Quantity: 1
9/32" x 7/8"
Flat Head Phillips Screws
Quantity: 3
Hardware Provided
*Diagrams are not to scale.
Safety Gloves Wall Stud FinderDrill Measuring TapePencil Level
Scan the QR code to view the installation video and
to find product resources. Also available at:
www.koalabear.com/product-catalog/kb311-sswm/

5
KB311-SSWM
Installation Instructions
Step 1:
• Be sure to wear safety gloves to protect your hands
from the products exposed metal edge.
• Remove the handle and bag hook from the
packaging and set to one side.
Step 2:
• Remove the main unit from the flange by lifting it
out and set to one side, face down on a protected
flat surface. Fig. 1
• Lift the flange out of the skirt and set to one side.
Fig. 2
Step 3:
• Measure up the wall 64 3/8" (1635mm) and mark the
desired mounting location on wall stud center. Fig. 3
• Measure across 16" (406mm) and use a level to
mark for the second mounting location. The skirt
has two hangers set on 16" (406mm) centers for
easy installation.
• Predrill and screw in the provided mounting screws,
make sure to leave ~1/8" (3mm) of the thread
exposed.
• Position the hangers over the screws and hang the
skirt. Make sure to check it is level before securing
the mounting screws.
Step 4:
• Take the flange and position it inside the skirt. Make
sure the mounting holes are towards the floor.
Flange should be centered inside the skirt.
• Use the mounting holes to mark and predrill for
the mounting screws. Screw in the top two screws,
make sure you leave ~1/4" (6mm) of thread exposed
for hanging the main unit. Fig. 4
Fig. 2
64 3/8"
(1635mm)
Fig. 3
Fig. 4
1/8"
(3mm)
16"
(406mm)
1/4"
(6mm)
Fig. 1
*Diagrams are not to scale.

6
Step 5:
• Open the main unit by pulling up on the frame and
remove the plastic liner dispenser. Set it to one side.
Fig. 5
• Lift the unit into the flange locating the key holed
mounting holes over the mounting screws. Fig. 6
This may be easier with the assistance of a second
person.
Step 6:
• Secure the unit through the remaining mounting
holes with the provided mounting screws. Fig. 7
• Tighten the upper mounting screws.
Step 7:
• With the unit open take the liner dispenser and
position it over the exposed metal frame in the
center of the flange.
• Use the provided key to open the liner dispenser.
This will provide access to the four mounting holes.
• Use the provided hardware to secure the liner
dispenser to the metal frame. Fig. 8
• Lock the liner dispenser and close the unit.
KB311-SSWM
Installation Instructions
*Diagrams are not to scale.
Fig. 8
Fig. 5
Fig. 7
Fig. 6

7
Step 8:
• Take the provided handle and position it over the
handle mounting studs.
• Use provided Allen wrench to tighten the set screws
in the handle, securing it to the handle mounting
studs. Fig. 9
Step 9:
• Test the unit by opening and closing multiple times,
ensuring it opens and closes smoothly.
• Remove protective film from the surface of the unit.
Step 10:
• To install the bag hook, measure up 44" from
finished floor in the desired location and mark the
wall.
• Position the bag hook on the wall so that the top of
the mounting plate is level with the 44" mark.
• Position the bag hook over a wall stud for optimal
strength.
• Mark then predrill the mounting holes. Fig. 10
• Use the provided screws to secure the bag hook in
position, then take the escutcheon plate and screw
it over the mounting plate to cover the mounting
screws. Fig. 11
*Diagrams are not to scale.
Fig. 9
Fig. 10
KB311-SSWM
Installation Instructions
Fig. 11


Koala Kare Products
A Division of Bobrick
6982 South Quentin Street, Centennial, CO 80112-3945
Main: 303.539.8300 | Toll Free: 888.733.3456 | Fax: 303.539.8399
Website: koalabear.com | Email: customerservice@koalabear.com
©2020 Koala Kare Products, Form No. ###. December 2020
-
 1
1
-
 2
2
-
 3
3
-
 4
4
-
 5
5
-
 6
6
-
 7
7
-
 8
8
-
 9
9


Koala Kare KB311-SSWM Manuel utilisateur
- Taper
- Manuel utilisateur
dans d''autres langues
- English: Koala Kare KB311-SSWM User manual
Documents connexes
-
Koala Kare 311-33-KIT Mode d'emploi
-
Koala Kare KB310-SSWM Mode d'emploi
-
Koala Kare KB310-SSRE Manuel utilisateur
-
Koala Kare 311-32-KIT Mode d'emploi
-
-
-
Koala Kare 301-5-KIT Manuel utilisateur
-