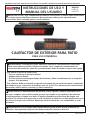
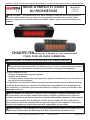
HeatStar HSRP37GL Outdoor Patio Heater Le manuel du propriétaire
- Taper
- Le manuel du propriétaire

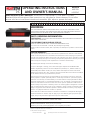
OPERATING INSTRUCTIONS
AND OWNER’S MANUAL
MODEL#
HSRP37GL,
HSRP37MT
WARNING: Read and follow all instructions carefully. Place instructions in a safe place for future
reference. Do not allow anyone who has not read these instructions to assemble, light, adjust or
operate the heater.
Installer: Leave this manual with the appliance. Consumer: Retain this manual for future reference.
WARNING: Improper installation, adjustment, alteration, service or maintenance can cause
property damage, injury, or death. Read and understand the installation, operating, and
maintenance instructions thoroughly before installing or servicing this equipment.
-WHAT TO DO IF YOU SMELL GAS
ǞShut off gas to the appliance.
ǞExtinguish any flame.
ǞIf odor continues, keep away from the appliance and immediately call your gas supplier or fire
department.
- This heater must be installed and serviced by trained gas installation and authorized personnel
only. Inspect the heater annually. Failure to comply could result in personal injury, asphyxiation,
death, fire, and/or property damage.
WARNING: If the information in these instructions are not followed exactly, a fire or explosion
may result causing property damage, personal injury or loss of life.
WARNING: Storage of gasoline and other flammable vapors and liquids in the vicinity of this
or any other appliance may result in fire or explosion. Do not store or use gasoline or other
flammable vapors and liquids in the vicinity of this or any other appliance. A propane cylinder
not connected for use shall not be stored in the vicinity of this or any other appliance. Maintain
all clearances to combustibles at all times.
OUTDOOR PATIO HEATER
FOR COMMERCIAL USE
WWW.HEATSTARBYENERCO.COM 1-(866)-447-2194 00084 REV C
WARNING: For Outdoor Use Only.

Outdoor Patio Heater 2
WARNING:
YOUR SAFETY IS IMPORTANT TO YOU AND TO OTHERS,
SO PLEASE READ THESE INSTRUCTIONS BEFORE YOU
OPERATE THIS HEATER.
WARNING:
FIRE OR EXPLOSION HAZARD
WARNING:
FIRE, BURN, INHALATION, AND EXPLOSION HAZARD.
KEEP SOLID COMBUSTIBLES, SUCH AS BUILDING
MATERIALS, PAPER, OR CARDBOARD, A SAFE DISTANCE
AWAY FROM THE HEATER. AS RECOMMENDED BY
THE INSTRUCTIONS NEVER USE THE HEATER IN SPACES
WHICH DO OR MAY CONTAIN VOLATILE OR AIRBORNE
COMBUSTIBLES, OR PRODUCTS SUCH AS GASOLINE,
SOLVENTS, PAINT THINNER, DUST PARTICLES OR
UNKNOWN CHEMICALS.
LANGUAGES
ENGLISH .......................................................... 1 - 22
SPANISH ....................................................... 23 - 44
FRENCH ........................................................ 45 - 68
CONTENTS
SAFETY ......................................................................... 2
INTRODUCTION ............................................................ 5
HEATER INSTALLATION ................................................. 7
GAS SUPPLY INSTALLATION INSTRUCTIONS .................. 8
ELECTRICAL REQUIREMENTS........................................ 10
HEATER OPERATING INSTRUCTIONS ............................ 10
MAINTENANCE INSTRUCTIONS ................................... 12
FUEL CONVERSION INSTRUCTIONS .............................. 14
TROUBLESHOOTING GUIDE...........................................15
ELECTRICAL DIAGRAM..................................................16
REPLACEMENT PARTS LIST ........................................... 18
WARRANTY ................................................................ 22
WARNING:THIS PRODUCT CAN EXPOSE
YOU TO CHEMICALS INCLUDING LEAD AND LEAD
COMPOUNDS, WHICH ARE KNOWN TO THE STATE
OF CALIFORNIA TO CAUSE CANCER AND BIRTH
DEFECTS OR OTHER REPRODUCTIVE HARM. FOR MORE
INFORMATION VISIT WWW.P65WARNINGS.CA.GOV
WARNING:
GENERAL INFORMATION
RETAIN THIS MANUAL FOR FUTURE REFERENCE.
FOR QUESTIONS, PROBLEMS, MISSING PARTS BEFORE
RETURNING TO RETAILER PLEASE CALL WITH MODEL NUMBER
AND SERIAL NUMBER OF HEATER:
1-866-447-2194
MONDAY-FRIDAY 8-5 EASTERN TIME
OR E-MAIL USING THE HEATSTAR WEBSITE:
WWW.HEATSTARBYENERCO.COM
is
WWW.HEATSTARBYENERCO.COM
WARNING: DO NOT STORE OR USE GASOLINE
OR OTHER FLAMMABLE VAPORS AND LIQUIDS IN THE
VICINITY OF THIS OR ANY OTHER APPLIANCE.
SAFETY

Outdoor Patio Heater 3
APPLICATIONS
not
COMMERCIAL/INDUSTRIAL
CLEARANCES TO COMBUSTIBLES
Combustible items:
Moving objects:
Cranes
Table 3
Hazards:
WARNING: For maximum safety the building must be
evaluated for hazards before installing the heater system.
NOTICE:
STANDARDS, CERTIFICATIONS, AND
GOVERNMENT REGULATIONS
Public Garages:
Aircraft Hangars:
High Altitude:
Gas Connection:
WARNING: An approved connector, suitable for the
environment of equipment usage, is required. Visible
or excessive swaying, flexing, and vibration of the gas
connections must be avoided to prevent failure.
Neither the gas pipe nor the connector shall be placed in the
flue discharge area or in direct contact with infrared rays. In
no case shall the gas supply support or bear weight of the
heater.

Outdoor Patio Heater 4
NOTICE:
Electrical:
Ventilation:
Z83.19)
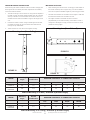
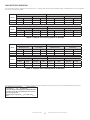
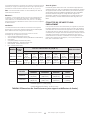
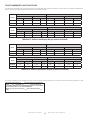
TABLE 1 BTU Ratings, Supply Pressures, and Orifice Sizes
TABLE 2 Heater Dimensions (without brackets and smoke deflector)
MODEL BTU/HR.
RATING
Gas Supply Pressure (W.C.) Orifice Drill
Size
MIN MAX MANIFOLD
HSRP37GL 37,000 NAT.
L.P.
NAT.
L.P.
NAT.
L.P.
NAT.
L.P.
HSRP37MT 37,000
MODEL SIZE
WIDTH LENGTH HEIGHT WEIGHT
HSRP37GL
HSRP37MT
Intertek (ETL)
Sprinkler Heads:
SAFETY LABELS AND THEIR LOCATIONS

Outdoor Patio Heater 5
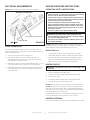
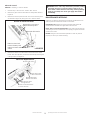
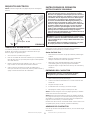
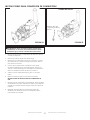
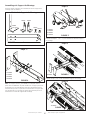
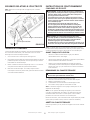
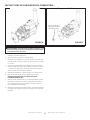
INTRODUCTION
MODEL HSRP37GL
FIGURE 1
MODEL HSRP37MT
FIGURE 2
WARNING: This heater is for outdoor or patio installation.
Not for used in residential dwellings.
WARNING: Improper installation, adjustment, alteration,
service, or maintenance can cause property damage, injury,
or death. Read and understand the installation, operating,
and maintenance instructions thoroughly before installing or
servicing this equipment.
WARNING: This heater must be installed and serviced by
trained gas installation and authorized personnel only.
Inspect the heater annually. Failure to comply could result in
personal injury, asphyxiation, death, fire, and/or property
damage.
WARNING: Do not exceed 14” W.C. (34.87 mbar) inlet
pressure to heater.
recent edition.
WARNING: A minimum clearance of 8’ above floor.
WARNING: Maintain clearances as shown on heater
nameplate.

Outdoor Patio Heater 6
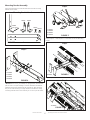
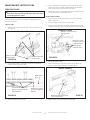
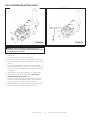
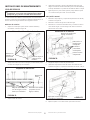
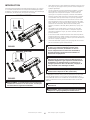
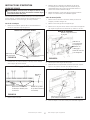
Mounting Bracket Assembly
00059
00087 00088
00089 00090
00060
2x
2x
4x 2x 16x
27x
Mounting Bracket Hardware
FIGURE 3
2x 00060
1x 00059
4x 00089
4x 00090
Step 1*
FIGURE 4
*NOTICE:
1x 00087
1x 00088
4x 00089
4x 00090
Step 2
FIGURE 5
Bracket.
4x 00089
Step 3
FIGURE 6
3x 00089
Step 4
FIGURE 7

Outdoor Patio Heater 7
WARNING: Keep any electrical supply cord away from any
heated surfaces.
WARNING: Certain materials or items, when stored under
the heater, will be subjected to radiant heat and could be
seriously damaged.
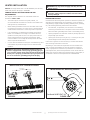
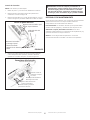
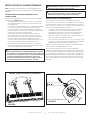
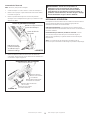
HEATER VENTILATION
4.72” (120mm) 4.72” (120mm)
13.39” (340mm)
4.33” (110mm)
Model HSRP37GL Installation Details
FIGURE 8
40º
For Model HSRP37MT: 30º
Model HSRP37GL Mounting Position
FIGURE 9
HEATER INSTALLATION
NOTICE:
GENERAL INSTALLATION INFORMATION AND
REQUIREMENTS
Table 3 and 4.
operation.
WARNING: ELECTRICAL GROUNDING INSTRUCTIONS: This
heater is equipped with a three-prong (grounding) plug for
your protection against shock hazard and should be plugged
directly into a properly grounded three-prong receptacle. Do
not cut or remove the grounding prong from this plug.

Outdoor Patio Heater 8
HEATER MOUNTING INSTRUCTIONS
1.
unit.
2.
3.
MOUNTING POSITIONS
Mount Bracket
FIGURE 12
AB
0
Mounting Arm (From Sidewall)
FIGURE 11
A
B0
Mounting Arm (From Ceiling)
FIGURE 10
MODEL Mounting
Angle
Bracket
Combination MINIMUM CLEARANCES TO COMBUSTIBLE SURFACES
TOP SIDES BACK* BELOW
HSRP37GL A-1
HSRP37GL
HSRP37MT B-3
TABLE 3 Mounting to a Wall (*Achieved by bracket length)
MODEL Mounting
Angle
Bracket
Combination MINIMUM CLEARANCES TO COMBUSTIBLE SURFACES
TOP SIDES BACK* BELOW
HSRP37GL B-2
HSRP37GL
HSRP37MT B-1
TABLE 4 Mounting to a Ceiling (*Achieved by bracket length)

Outdoor Patio Heater 9
GAS SUPPLY INSTALLATION
INSTRUCTIONS
CONNECTING HEATER TO GAS SUPPLY
WARNING: Depending on local codes and requirements and
the installer’s skill level, the sizing and installation of gas
lines required to safely and efficiently supply the heater may
require the assistance of a professional. If in doubt as to
these requirements, discuss the requirements of this manual
with the dealer from whom the heater was purchased and
your gas supplier.
Locate the hose out of pathways where people may trip
over it or out of areas where the hose may be subject to
accidental damage.
Gas Supply Requirements
WARNING: These patio heaters burn natural gas or liquefied
petroleum (propane) gas and they come equipped with
a regulator. The regulator is built into the gas valve. The
maximum inlet pressure to this regulator is 14 in. W.C.. If
gas line pressure exceeds 14 in. W.C., then an additional
regulator must be installed before the heater/regulator to
step down the pressure to a maximum of 14 in. W.C..
Piping Requirements
Piping Installation
WARNING: The gas hose must be positioned in such a
way that it does not trip people or create other accidental
damages.
Gas Connection 1/2”
Inlet pressure - unscrew
this screw to measure
pressure of the gas line.
Manifold pressure -
Unscrew this screw before
operation then measure
only when the burner is ON
Measure pressure regulation - Remove the cap with a slotted
screwdriver: turn clockwise to increase pressure; turn count-
er-clockwise to decrease pressure.
Unit Gas Connection
FIGURE 13
a.
WARNING: Failure to ensure that male threads on pipe to be
installed into gas valve meet the requirements may cause
gas valve damage, distortion and malfunction.
c.
d.
WARNING: When testing gas piping use only a soap and
water solution. Do not use a match or other flame for leak
testing. If during leakage check gas is smelled, turn off the
gas supply and ventilate building.
e.
connections.

Outdoor Patio Heater 10
TABLE 5: Natural Gas Heating Values at Altitude
TABLE 6: Propane Gas Heating Values at Altitude
Model
Altitude 0-2000 ft. (0-610m) Altitude 2000-3000 ft. (610-910mm)
Manifold Pressure Input Rating Manifold Pressure Input Rating
[“ W.C.] [kPa] [BTU/Hr] [W] [“ W.C.] [kPa] [BTU/Hr] [W]
HSRP37GL 6.4 1. 6 37,000 10,844 5.90 1.47 35,520 10,410
HSRP37MT 6.4 1. 6 37,000 10,844 5.90 1.47 35,520 10,410
Model
Altitude 0-2000 ft. (0-610m) Altitude 2000-3000 ft. (610-910mm)
Manifold Pressure Input Rating Manifold Pressure Input Rating
[“ W.C.] [kPa] [BTU/Hr] [W] [“ W.C.] [kPa] [BTU/Hr] [W]
HSRP37GL 7. 5 1.87 37,000 10,844 6.91 1.72 35,520 10,410
HSRP37MT 7. 5 1.87 37,000 10,844 6.91 1.72 35,520 10,410
Model
Altitude 3000-4000 ft. (910-1220m) Altitude 4000-4500 ft. (1220-1350mm)
Manifold Pressure Input Rating Manifold Pressure Input Rating
[“ W.C.] [kPa] [BTU/Hr] [W] [“ W.C.] [kPa] [BTU/Hr] [W]
HSRP37GL 5.42 1.35 34,040 9,976 5.18 1.30 33,300 9,760
HSRP37MT 5.42 1.35 34,040 9,976 5.18 1.30 33,300 9,760
Model
Altitude 3000-4000 ft. (910-1220m) Altitude 4000-4500 ft. (1220-1350mm)
Manifold Pressure Input Rating Manifold Pressure Input Rating
[“ W.C.] [kPa] [BTU/Hr] [W] [“ W.C.] [kPa] [BTU/Hr] [W]
HSRP37GL 6.35 1.58 34,040 9,976 6.08 1. 51 33,300 9,760
HSRP37MT 6.35 1.58 34,040 9,976 6.08 1. 51 33,300 9,760
This appliance was converted on ______ (day-month-year)
for operation at ____ ft.(___m) altitude by ____________
(name and address of the organization making this conver-
sion) which accepts the responsiblity that this conversion
has been properly made.
Manifold pressure adjustment____W.C. Input rating____
Btu/hr
HIGH ALTITUDE OPERATION

Outdoor Patio Heater 11
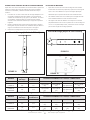
ELECTRICAL REQUIREMENTS
NOTICE:
Electrical Connection
FIGURE 14
ON RF
Switch RF/ON
Line Voltage 120 Vac 60 Hz
ROOM THERMOSTAT
1.
2.
3.
4.
HEATER OPERATING INSTRUCTIONS
OPERATING SAFETY INSTRUCTIONS
WARNING: When used without fresh air, heater may give off
carbon monoxide, an odorless poisonous gas. Open window
an inch or two for fresh air when using heater.
If heater shuts off, do not relight until you provide fresh air.
open door for 5 minutes. If heater keeps shutting off, have it
serviced. Keep burner and control clean.
Carbon monoxide poisoning may lead to death. Early
signs of carbon monoxide poisoning resemble the flu with
headache, dizziness and/or nausea. If you have these signs,
heater may not be working properly. get fresh air at once!
Have heater serviced.
Do not use match or other flame for leak testing.
CAUTION: If the infra-red color of the grid becomes dull
when the building furnace is operating, consult gas supplier
on correct gas supply piping sizes.
This heater is for outdoor or patio installation. Not for used
in residential dwellings.
NOTICE:
Before Each Use
HEATER STARTUP
WARNING: During heater startup ensure that building is well
ventilated.
1.
2.
3.
4.
5.
NOTICE:to
NOTICE:
HEATER SHUTDOWN

Outdoor Patio Heater 12
Start-Up Sequence
Start-Up Flame Failure Sequence
Flame Lost Sequence
FIGURE 15
FIGURE 16
FIGURE 17
Call for heat
Call for heat
Call for heat

Outdoor Patio Heater 13
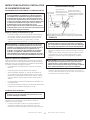
MAINTENANCE INSTRUCTIONS
SERVICING GUIDE
WARNING: Before doing all the operations below, it is
necessary to close the manual main shut-off gas valve and to
remove plug from the socket.
Ceramic Tiles
1.
See Figure 18.
Remove 4 screws
and side panel Remove top panel
and 4 screws
Side Cover Removal
FIGURE 18
2.
Remove the
glass
Remove the 4 small
screws (2 in figure, 2
behind)
Loosen the 6 screws (3 in
figure, 3 behind) without
removing them
Electrode Cleaning
FIGURE 19
3.
4.
5.
Venturi Tube/ Orifice
1.
2.
3.
Removal of Valve
Remove 3 screws
to replace valve or
perform internal
cleaning with
compressed air
Remove screw to remove
the connector
FIGURE 20
4.
5.
Burner Cleaning
FIGURE 21
Blow here with compressed
air to clean burner
6.

Outdoor Patio Heater 14
Electrode Control
NOTICE:
1.
2.
Figure 19.
3.
Access to Electrical Panel
FIGURE 22
Remove screws and
remove electric panel
taking care not to tear
cables
Electrode cable outlet
Remove these 2 screws to
remove electrical panel
4.
FIGURE 23
Electrode cable outlet
Remove cable on PIN
S1 from control board
Remove cable on PIN
HV from control board
Pass electrode cables
through this hole
Remove 2 screws and washers
to remove electrode
Electrode Replacement
WARNING: At the end of any maintenance procedure, testing
gas piping using only a soap and a water solution. Do not
use a match or other flame for leak testing. If during leakage
check gas is smelled, turn off the gas supply and ventilate
the building.
MAINTENANCE INTERVALS
Intermittent use:
Dusty, wet or corrosive environment:
NOTICE:

Outdoor Patio Heater 15
Orifice Change
FUEL CONVERSION INSTRUCTIONS
Change orifice to convert
from NG to propane
FIGURE 24 FIGURE 25
1.
to Figure 18.
2.
3.
4.
5.
6. GAS SUPPLY
INSTALLATION INSTRUCTIONS section.
7.
8.
WARNING: Before doing all the operations below, it is
necessary to close the manual main shut-off gas valve and to
remove plug from the socket.

Outdoor Patio Heater 16
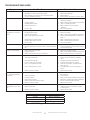
Symptom Possible Cause Corrective Action
1.
2.
3.
4.
1.
2.
3.
4.
1.
2. Low gas pressure.
3.
4.
5. Incorrect gas.
1.
2.
3.
4.
5.
1.
2.
3.
4.
5.
6.
7. Incorrect gas.
1.
2.
3.
4.
5.
6.
7.
Gas odor 1. Loose pipe connection.
2.
tap.
1.
2.
and out pressure tap.
1.
2. Low gas pressure.
3.
1.
2.
3.
1.
2.
3.
4. Loose or open wire connection.
5.
6.
7.
1.
2.
open.
3.
4.
5.
6.
restart.
7.
10 seconds
1.
2.
3. Low gas pressure.
4.
5.
6.
1.
2. Correct wiring.
3.
4.
5.
6.
1.
2.
3.
1.
2.
3.
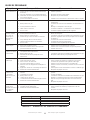
TROUBLESHOOTING GUIDE
# Of Flashes LED DIAGNOSTIC CODES
AT ON
2 FLASHES
3 FLASHES Ignition Lockout
4 FLASHES
TABLE 7 Diagnostic Control Board

Outdoor Patio Heater 17
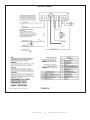
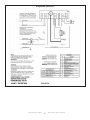
Electrical Diagram
FIGURE 26

Outdoor Patio Heater 18
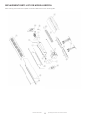
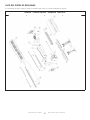
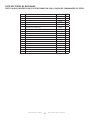
REPLACEMENT PARTS LIST FOR MODEL HSRP37GL

Outdoor Patio Heater 19
REF # Description Part# QTY
1 CERAMIC TILE ASSEMBLY 00054 1
2 GAS VALVE 00065 1
3 PCB-TRANSFORMER 00086 1
4 MOUNTING BRACKET (2 PCS) 00067 1
5 COMPLETE UPPER BRACKET 00068 1
6 SUPERIOR DEFLECTOR 00069 1
7 VALVE SIDE DIVIDER 00070 1
8 ELECTRODE BRACKET 00072 1
9 UPPER COVER 00073 2
10 SIDE COVER 00074 2
11 UPPER VALVE CLOSURE 00075 1
12 GAS VALVE CONNECTOR 00079 1
13 ELECTRODE 00080 1
14 INTERNAL DEFLECTOR 00081 1
15 GLASS 00082 1
16 GLASS STOPPER 00083 2
* CONVERSION KIT 00053 1
* INSTALLATION INSTRUCTION LABELS 00093 1
REPLACEMENT PARTS LIST FOR MODEL HSRP37GL
SEE BACK PAGE FOR PARTS ORDERING INFORMATION
* NOT SHOWN

Outdoor Patio Heater 20
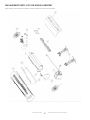
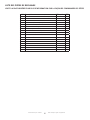
REPLACEMENT PARTS LIST FOR MODEL HSRP37MT
La page est en cours de chargement...
La page est en cours de chargement...
La page est en cours de chargement...
La page est en cours de chargement...
La page est en cours de chargement...
La page est en cours de chargement...
La page est en cours de chargement...
La page est en cours de chargement...
La page est en cours de chargement...
La page est en cours de chargement...
La page est en cours de chargement...
La page est en cours de chargement...
La page est en cours de chargement...
La page est en cours de chargement...
La page est en cours de chargement...
La page est en cours de chargement...
La page est en cours de chargement...
La page est en cours de chargement...
La page est en cours de chargement...
La page est en cours de chargement...
La page est en cours de chargement...
La page est en cours de chargement...
La page est en cours de chargement...
La page est en cours de chargement...
La page est en cours de chargement...
La page est en cours de chargement...
La page est en cours de chargement...
La page est en cours de chargement...
La page est en cours de chargement...
La page est en cours de chargement...
La page est en cours de chargement...
La page est en cours de chargement...
La page est en cours de chargement...
La page est en cours de chargement...
La page est en cours de chargement...
La page est en cours de chargement...
La page est en cours de chargement...
La page est en cours de chargement...
La page est en cours de chargement...
La page est en cours de chargement...
La page est en cours de chargement...
La page est en cours de chargement...
La page est en cours de chargement...
La page est en cours de chargement...
La page est en cours de chargement...
La page est en cours de chargement...
La page est en cours de chargement...
La page est en cours de chargement...
-
 1
1
-
 2
2
-
 3
3
-
 4
4
-
 5
5
-
 6
6
-
 7
7
-
 8
8
-
 9
9
-
 10
10
-
 11
11
-
 12
12
-
 13
13
-
 14
14
-
 15
15
-
 16
16
-
 17
17
-
 18
18
-
 19
19
-
 20
20
-
 21
21
-
 22
22
-
 23
23
-
 24
24
-
 25
25
-
 26
26
-
 27
27
-
 28
28
-
 29
29
-
 30
30
-
 31
31
-
 32
32
-
 33
33
-
 34
34
-
 35
35
-
 36
36
-
 37
37
-
 38
38
-
 39
39
-
 40
40
-
 41
41
-
 42
42
-
 43
43
-
 44
44
-
 45
45
-
 46
46
-
 47
47
-
 48
48
-
 49
49
-
 50
50
-
 51
51
-
 52
52
-
 53
53
-
 54
54
-
 55
55
-
 56
56
-
 57
57
-
 58
58
-
 59
59
-
 60
60
-
 61
61
-
 62
62
-
 63
63
-
 64
64
-
 65
65
-
 66
66
-
 67
67
-
 68
68


HeatStar HSRP37GL Outdoor Patio Heater Le manuel du propriétaire
- Taper
- Le manuel du propriétaire
dans d''autres langues
Documents connexes
-
HeatStar HS25NG Le manuel du propriétaire
-
HeatStar HSU80NG Le manuel du propriétaire
-
-
-
-
-
-